
International Research Journal of Engineering and Technology (IRJET) e-ISSN: 2395-0056
Volume: 12 Issue: 06 | Jun 2025 www.irjet.net p-ISSN: 2395-0072


International Research Journal of Engineering and Technology (IRJET) e-ISSN: 2395-0056
Volume: 12 Issue: 06 | Jun 2025 www.irjet.net p-ISSN: 2395-0072
Sandeep Chowdhry1
1 Engineering Consultancy & Training, Chandigarh, India ***
Abstract - Gray cast iron dampen vibrations and has high thermal conductivity, making it an excellent choice for housing or industrial applications such as machinery bases. However, the machining cost of the GCI workpiece can be more than the casting cost. This study aims to use the appropriate optimisation method to select values for feed rate, spindle speed and nose radius to minimise the machining time and reduce the surface roughness of the machinedGCI workpiece. The results show that the response surface method is an appropriate optimisation method. An increase in feed rate contributes more compared to an increase in the spindle speed, to the reduction in machining time. The increase in feed rate leads to a rise in surface roughness. At the same time, an increase in nose radius leads to a decrease in surface roughness. The results show that response surface method should be used for optimisation. Increase in feed rate contributes more compared to increase in the spindle speed to the reduction in machining time. The increase in feed rate leads to increase in the surface roughness. Whereas, increase in nose radiusleadsto decrease in surfaceroughness.
Key Words: milling, full factorial design, response surfacemethod,solidworkscam,graycastiron
Cast iron offers a competitive strength-to-cost ratio, good cast-ability,andhighmachinability;thus,itiswidely used in industry [1]. Gray cast iron (GCI) has a graphitic microstructure. The size and shape of the graphite flakes controlitsmechanicalproperties.Italsohasahighability todampenvibrations[2].Graycastironhasgoodstrength, wear resistance, vibration damping, excellent casting performance,andlowmanufacturingcosts[3];asaresult, it is currently the most used material for cast iron parts. Based on the Modern Casting Census reported at the end of 2018 [4], the most produced type of cast metal is GCI, which covers about 44.6% of the total world casting production. The world output of GCI parts reached 49.53 milliontonsin2019,accountingforapproximately46.9% of the world output of castings. These parts are used in manyfields[5],suchasthebedsofindustrialinstruments, bearinghousings,endcaps,andtheautomotiveindustry.
Surfaceroughnessisvitalinevaluatingmachiningquality. The surface roughness will determine a product's fatigue strength, tribological property, corrosion resistance, and aesthetic requirement. In industry, surface roughness is
periodically measured with a roughness tester. Once measuring data is out of standard, all the products betweenthelasttwotestingperiodsneedtobeinspected. Repairing failed products leads to additional costs. Therefore, online monitoring of surface roughness during production has attracted much attention. Surface roughnessmonitoringhasbecomea potential objective in a smart manufacturing or Industry 4.0 environment [6]. Cutting and machining costs for castings are frequently more than the casting cost. Therefore, a significant challengeinthecuttingandmachiningcastironmaterials is to minimise the manufacturing costs and increase production efficiency without affecting engineered parts’ quality or the high-strength properties [7]. It is evident from the literature that optimisation techniques are needed to ensure a practical selection of cutting parameters to achieve a balance between machining efficiencyandsurfacequality.However,whetherthereisa linear or non-linear relationship between the cutting parameters, such as feed rate, cutting speed, and machining time, is unclear. For instance, full factorial design(FFD)wasusedtostudytheeffectofmillingcutting parameters and lubrication on the machinability characteristics of mold steel [8]. In contrast, the response surface method (RSM) was used to differentiate the cutting conditions and analyse the process parameter influenceonsurfaceroughness[9].
Therefore,themainaimofthestudyis1)Toselectthe optimisation method by determining whether there is a linearornon-linearrelationshipbetweentheinputmilling cutting parameters, such as cutting speed and feed rate, and the response variable machining time; 2) To optimise thespindlespeedandfeedratetominimisethemachining time of GCI workpiece; 3) To optimise the feed rate and nose radius of the insert to minimise the surface roughness. This study aims to contribute to adopting an appropriate optimisation method to select the cutting parameter values to minimise the machining time and reduce the surface roughness of the machined GCI workpiece.
2.1 Material
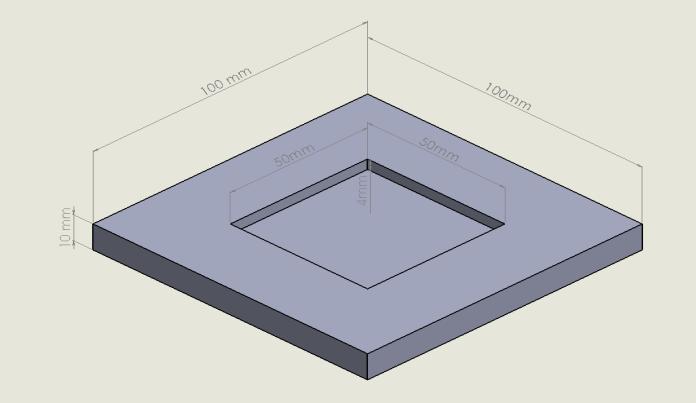
A specimen of GCI material with dimensions of 100 mm x 100 mm x 10 mm and a contour of 50 mm x 50 mm x 4 mm,asshowninFig.1,wasusedformillingmachining.

International Research Journal of Engineering and Technology (IRJET) e-ISSN: 2395-0056
Volume: 12 Issue: 06 | Jun 2025 www.irjet.net p-ISSN: 2395-0072
2.2 Equipment
The study used SolidWorks CAM, Microsoft Excel, and Minitab2023software.
The specimen part file was created using SolidWorks 2023software.
Table 1 shows the level settings of the milling operation parameters, such as cutting speed and feed rate. The machining time was selected as the response. Table 2 shows the level settings of the milling operation parameters,suchasthenoseradiusoftheinsertandfeed rate. The surface roughness is selected as the response. Therangeofmillingoperationparametersischosenasper theMitsubishiMillingToolGuide[10]andinconsultation withthemachineshopattheinstitution.
TABLE-I: LEVELSETTINGSOFSPINDLESPEEDANDFEEDRATEFOR MACHININGTIMEASRESPONSEVARIABLE
variables level settings
No.
TABLE-2: LEVELSETTINGSOFNOSERADIUSANDFEEDRATEFOR SURFACEROUGHNESSASRESPONSEVARIABLE
To determine whether there is a linear or non-linear relationship between the spindle speed, feed rate and machining time, a null hypothesis (H0) is that there is a linear relationship between the input and response variables. The alternative hypothesis (H1) is that there is no linear relationship between the input and output variables.Asaresult,FFDisused.
The study used Minitab 2023 software to create a randomised run order for the experiment involving two process parameters with low-level and high-level settings of the input variables spindle speed and feed rate, as showninTable1.TheFFDconsistsoffourfactorialpoints and two center points or six points (Run 1-6). The FFD is showninTable3.
The flat end milling cutter dimensions were modified according to the measurements in the catalogue [10] for tool number APXUR4000162SA12SA with two teeth and oneinchcutterdiameter.Themillingmachiningrunswere performed on the SolidWorks CAM 2023 software. The studyuseddefaultsettingsofthedepthofcut(50%ofthe total depth of the pocket) for roughing operation of SolidWorks CAM 2023 software. The spindle speed and feed rate per tooth of the first roughing flat end milling cutter were changed as per Table 3, and the machining timewasrecordedforeachexperiment.Thespindlespeed and feed rate of the second flat end milling cutter and third contouring flat end milling cutter were not changed foralltheexperimentruns.Onlythefirstroughingcutter’s input variables were changed, as the cutter removed the material up to 4mm depth in two cuts. So, it was easy to study the effect of input variables on the response variable. Changing the input parameters of all the cutters at the same time would make the process more complicated and time-consuming. The main interaction plot(Fig.2)showsthatthecenterpointdoesnotlieonthe line joining the start and end points. It indicates that the relationship between the input variables (spindle speed andfeedrate)andtheresponsevariable(machiningtime) is not linear. Hence, the study rejected H0 and concluded that FFD is not an appropriate optimisation method. The studyshouldusetheresponsesurfacemethodtooptimise thevariables.

International Research Journal of Engineering and Technology (IRJET) e-ISSN: 2395-0056
Volume: 12 Issue: 06 | Jun 2025 www.irjet.net p-ISSN: 2395-0072
Run
1
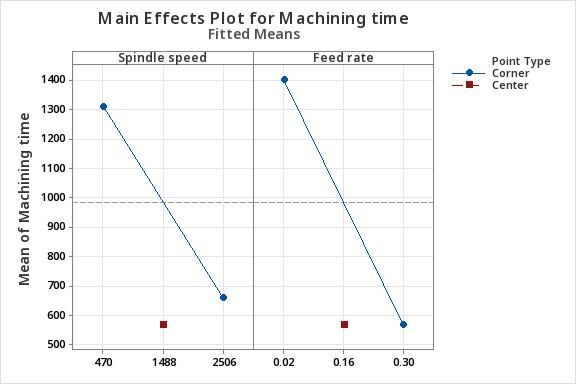
FIG-2: MAININTERACTIONPLOTOFSPINDLESPEED,FEEDRATEAND MACHININGTIME.
3.2 Response surface method (RSM)
Second, the study used Minitab 2023 software to create a randomised run order for the experiment involving two process parameters (spindle speed and feed rate) at two levels,asshowninTable1.TheCentralCompositeDesign (CCD) consists of 8 factorial points and five center points or13points(Run1-13).TheCCDisshowninTable4.The machiningtimeisselectedastheresponsevariable.
TABLE-4:CCDOFSPINDLESPEED,FEEDRATEWITHMACHINING
The milling machine simulations were performed using the SolidWorks CAM 2023, and the machining time was recordedincolumn four in Table4. Afterwards,thestudy used Minitab software to analyse the response surface design with a confidence level of 95% (α=0.05). The residual plots showed that the errors are random, independent, normally distributed and have constant varianceacrossallfactorlevels.
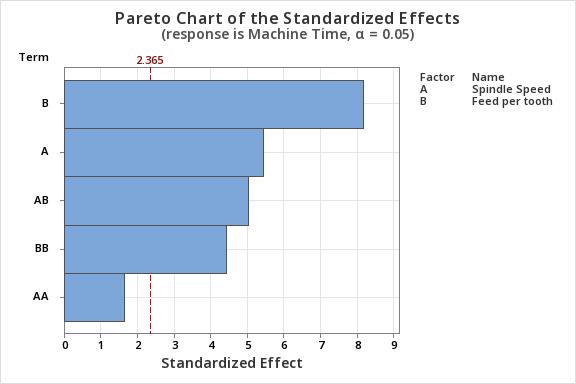
Fig-3:Paretochartshowingthesignificantparameters
TheParetochart(Fig.3)showsthatfeedpertooth,spindle speed, interaction of feed per tooth, spindle speed, and squareoffeedpertootharesignificantatα=0.05.
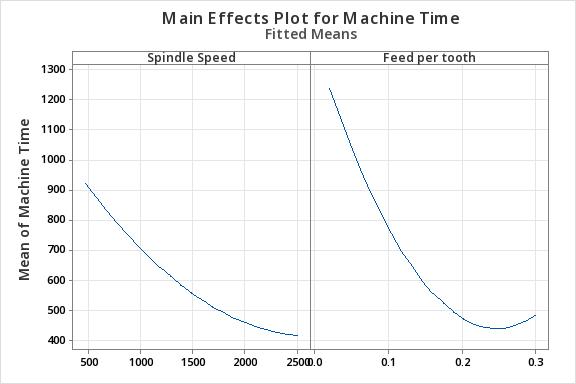
Fig-4:Maineffectplotsofspindlespeed,feedrateand machiningtime

International Research Journal of Engineering and Technology (IRJET) e-ISSN: 2395-0056
Volume: 12 Issue: 06 | Jun 2025 www.irjet.net p-ISSN: 2395-0072
The main effects plots (Fig. 4) show a non-linear relationship between spindle speed - machining time and feed per tooth – machining time. The higher slope of the feed per tooth w.r.t. machining time indicates that an increase in feed rate contributes more to the reduction in machining time compared to an increase in the spindle speed.
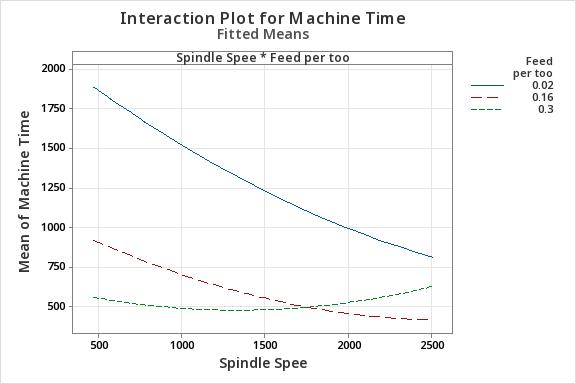
Fig-5:Interactionplotsofspindlespeed,feedrateand machiningtime.
Theinteractionplots(Fig.5)showthataslowfeedrateof 0.02 mm/tooth has a higher machining time over the entire spindle speed range. A feed rate of 0.3 mm/tooth has the lowest machining time at a slower speed. In comparison, a feed rate of 0.16 mm/tooth has the most down machining time at a higher speed. Hence, a higher feedratetendstoreducethemachiningtime.
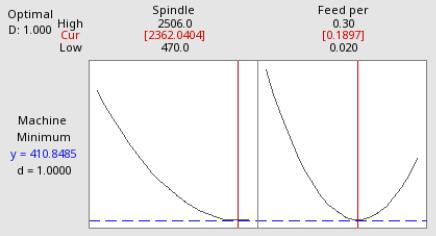
Fig-6:Optimisedvaluesofspindlespeedfeedrateto minimisethemachiningtime.
The optimum spindle speed value of 2362.04 rpm and feed rate of 0.1897 mm/tooth will give the lowest machiningtime,asshowninFig.6.
TABLE-5:ANALYSISOFVARIANCE(ANOVA)OFSPINDLESPEED
where,nisspindlespeed,fisfeedpertooth.ANOVATable 5showsthatspindlespeed, feedpertooth,squareoffeed per tooth and interaction of spindle speed and feed per tooth are significant at α = 0.05. The feed per tooth has a maximumcontributionof41.28%towardsminimisingthe machining time, followed by a spindle speed contribution of18.37%.
Third, for optimising feed rate and nose radius to minimise surface roughness, the RSM method is adopted due to a square term in the equation used to mathematicallycalculatethesurfaceroughnessvalue. The studyusedMinitab2023softwaretocreatea randomised run order for the experiment involving two process parameters(spindlespeedandfeedrate)attwolevels,as shown in Table 1. The Central Composite Design (CCD) consists of 8 factorial points and five center points or 13 points (Run 1-13). The CCD is shown in Table 6. The surfaceroughnessisselectedastheresponsevariable.The low-level and high-level settings of feed rate and nose radiusaresetasshowninTable2.Thelevelvaluesofthe input variables were selected using the catalogue [10] for theGCIworkpiece.

International Research Journal of Engineering and Technology (IRJET) e-ISSN: 2395-0056
Volume: 12 Issue: 06 | Jun 2025 www.irjet.net p-ISSN: 2395-0072
TABLE-6:CCDOFFEEDRATEANDNOSERADIUSWITHSURFACE ROUGHNESSASARESPONSE
Run
Order
8
9
The surface roughness values were calculated using the well-known mathematical model of surface roughness, calledthekinematicequation[11],shownbelowandused tocalculatethesurfaceroughnessvalue.
The Pareto chart (Fig. 7) shows that feed per tooth, nose radius, interaction of feed per tooth and nose radius, and squareofnoseradiusaresignificantatα=0.05.
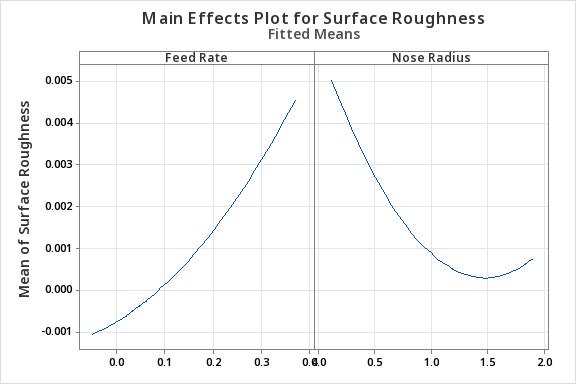
Fig-8:Maineffectplotsoffeedrate,noseradiusand surfaceroughness.
The main effects plots (Fig. 8) show a non-linear relationship between nose radius-surface roughness and feed per tooth–surface roughness. The increase in feed rate leads to a rise in the surface roughness. At the same time, an increase in nose radius leads to a decrease in surface roughness. In addition, an increase in nose radius above1.6mm(approx.)leadstoanincreaseinthesurface roughness.
Where f is the feed rate, and r represents the tool nose radius. The calculated surface roughness value was recordedincolumn four in Table6. Afterwards,thestudy used Minitab software to analyse the response surface design with a confidence level of 95% (α=0.05). The residual plots showed that the errors are random, independent, normally distributed and have constant varianceacrossallfactorlevels.
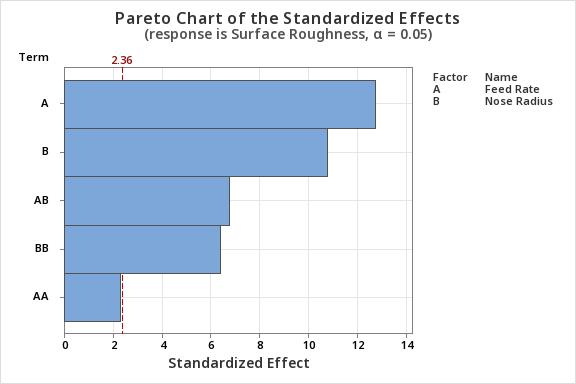
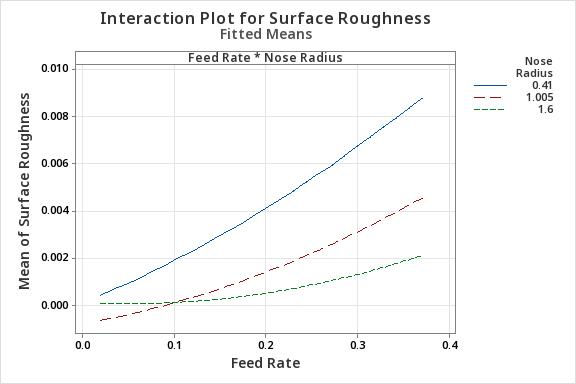
Fig-9:Interactionplotsoffeedrate,noseradiusand surfaceroughness.
The interaction plots (Fig. 9) show that a smaller nose radius has a higher surface roughness value than the surface roughness value for a large nose radius. The surface roughness value increases with anincreaseinfeedrateforsmallandlargenoseradii. However, with an increase in feed rate, the smaller nose radius has a more significant increase in the surfaceroughnessvaluethanthelargenoseradius.

International Research Journal of Engineering and Technology (IRJET) e-ISSN: 2395-0056
Volume: 12 Issue: 06 | Jun 2025 www.irjet.net p-ISSN: 2395-0072
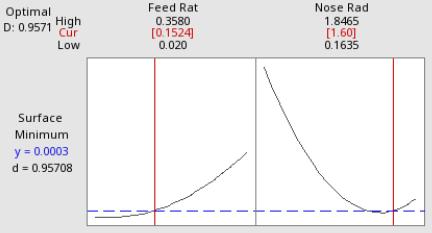
Fig-10:Optimisedvaluesoffeedrateandnoseradiusto minimisethesurfaceroughness.
As perthecatalogue [10],givenfeedpertoothvalue of0.1524mmforthedepthofcutlessthan5mm,the optimisednoseradiusvalueis1.6mm(Fig.10).The insert with a 0.063 inch nose radius is available in thecatalogue[10].
TABLE-7:ANALYSISOFVARIANCE(ANOVA)OFFEEDRATE,NOSE RADIUSWITHSURFACEROUGHNESSASRESPONSE
Source ANOVA
where, f is feed per tooth and r is nose radius. ANOVA Table 7 shows that feed per tooth, nose radius, square of nose radius and interaction of nose radius and feed per tooth are significant at α = 0.05. The feed per tooth has a maximumcontributionof41.07%towardsminimisingthe surface roughness value, followed by a nose radius contributionof28.57%.
First, the FFD experiment result shows that the main interaction plot (Fig. 2) shows that the center point does not lie on the line joining the start and end points. It indicatesthattherelationshipbetweentheinputvariables (spindle speed and feed rate) and the response variable (machining time) is not linear. The study concluded that
RSM is a more appropriate optimisation method to optimise the variables compared to FFD. Whereas, in the researchstudy[2],theFFDwasusedtostudytheeffectof cutting speed, feed rate and nose radius on the resultant cutting force, cutting temperature and surface roughness. Therefore, it is essential to determine whether there is a linear or non-linear relationship between the variables before opting for an optimisation method. Second, the main effects plots (Fig. 4) show a non-linear relationship between spindle speed - machining time and feed per tooth – machining time. The higher slope of the feed per tooth w.r.t. machining time indicates that an increase in feed rate contributes 41.28% to the reduction in machining time compared to an increase in the spindle speed with a contribution of 18.37% (Table 5). These findings agree that an increase in feed rate and cutting speed leads to an increase in the material removal rate [12]. Therefore, it reduces the machining time of GCI workpiece. Third, the main effects plots (Fig. 8) show a non-linear relationship between nose radius-surface roughness and feed per tooth–surface roughness. The findings that an increase in feed rate leads to an increase insurfaceroughnessaresimilartotheRSMresearch[13]. TheresultsofthisstudyalsoagreewiththeRSMresearch study [13] that an increase in feed rate has the maximum contribution to the increase in surface roughness. In addition, this study’s findings agree with [2] that increasing nose radius leads to decreased surface roughness.However,thisstudyconcludedthattheinverse relationship between the nose radius and the surface roughness is non-linear, as shown in Fig.8. Also, an increaseinnoseradiusabove1.6mm(approx.)leadstoan increaseinthesurfaceroughnessasshowninFig.10.
The study concluded that 1) There is a non-linear relationship between the input variables (spindle speed andfeedrate)andtheresponsevariable(machiningtime). As a result, FFD is not an appropriate optimisation method. Therefore, RSM should be used to optimise the variables. 2) The higher slope of the feed per tooth w.r.t. machining time indicates that an increase in feed rate contributes more (41.28%) to the reduction in machining time compared to an increase in the spindle speed, which contributes 18.37%. 3) The optimum value of spindle speed of 2362.04 rpm and feed rate of 0.1897 mm/tooth willgivethelowestmachiningtime,asshowninFig.6. 4) There is a non-linear relationship between nose radiussurfaceroughnessandfeedpertooth–surfaceroughness. The increase in feed rate leads to an increase in the surface roughness. At the same time, an increase in nose radius leads to a decrease in surface roughness. In addition, an increase in nose radius above 1.6 mm (approx.)leadstoanincreaseinthesurfaceroughness.5) A smaller nose radius has a higher surface roughness value than a large nose radius. The surface roughness

International Research Journal of Engineering and Technology (IRJET) e-ISSN: 2395-0056
Volume: 12 Issue: 06 | Jun 2025 www.irjet.net p-ISSN: 2395-0072
valueincreaseswithanincreaseinfeedrateforsmalland large nose radii. However, with an increase in feed rate, the smaller nose radius has a more significant increase in thesurfaceroughnessvaluethanthelargenoseradius.6) Asperthecatalogue[18],giventhevalueoffeedpertooth of 0.1524 mm for the depth of cut less than 5 mm, the optimised nose radius value is 1.6 mm (0.063 inches). 7) Thefeedpertoothhasamaximumcontributionof41.07% towardsminimisingthesurfaceroughnessvalue,followed by a nose radius contribution of 28.57% (Table 7). Therefore,optimisingthefeedratewhenmachiningGCIis essential because an increase in feed rate reduces the machining time and increases the surface roughness. Similarly, a machining process should select a larger nose radius as it reduces the surface roughness. The limitation of this study is that only virtual milling machining simulations have been done on SolidWorks CAM 2023 software to gather the data. Further researchers may study the effect of cutting speed, feed rate, depth of cut andvibrationsalongtheXYZaxisonthesurfaceroughness oftheGCIworkpiece.
IwouldliketoextendmysinceregratitudetoLilyRaynorBlundell, Head of Faculty – Engineering, Automotive and Motorsport at Wiltshire College & University Centre, Chippenham, England, for her invaluable support and permission to conduct this research. Her foresight in recognizing the potential of this study to enhance the learning experience for students enrolled in the T-Level Design and Development for Engineering and Manufacturing course was instrumental in its initiation. This research aims to contribute directly to the improvementofpedagogicalpracticeswithintheprogram, ultimatelybenefitingthenextgenerationofmanufacturing engineers.
[1] J. Herwan, S. Kano, O. Ryabov, H. Sawada, N. Kasashima, and T. Misaka . Predicting Surface RoughnessofDryCutGreyCastIronBasedonCutting Parameters and Vibration Signals from Different SensorPositionsinCNCTurning,Int. J.ofAutomation Technology,vol.14(2),pp.217-228,2020.
[2] M. M. E. Rayes, A.T. Abbas, A. A. A. Abduljabbar, A. E. Ragab, F.Benyahia and A. Elkaseer, “Investigation and Statistical Analysis for Optimising Surface Roughness, Cutting Forces, Temperature, and Productivity in Turning Grey Cast Iron,” Metals, vol. 13, pp. 1-19, 2023.
[3] F. Wang, “Production of gray cast iron parts,” Mod. Cast.,Ironvol.39(1),pp.22–26, 2019.
[4] Modern Casting Staff, “Census of World Casting Production,”ModernCasting,p.24,December2018.
[5] Y. Yuan, G. He, K. Fan, X. Liu, M. Zhu, “Low-period fatigue behavior of gray cast iron for engines,” J. Mater.Res.,vol.27(05)469–476,2013.
[6] J. Herwan, S. Kano, R. Oleg et al., “Cyber-physical system architecture for machining production line,” Proc. of 2018 IEEE Industrial Cyber-Physical Systems (ICPS), Saint Petersburg, Russia, pp. 387- 391, doi: 10.1109/ICPHYS.2018.8387689,2018.
[7] Y. Lin, J. Ma, D. Lai, J. Zhang, W. Li, S. Li, S. He, “Multiresponse optimisation of process parameters in nitrogen-containing gray cast iron milling process based on application of non-dominated ranking geneticalgorithm,”Heliyon,vol.8,pp.1-15, 2022.
[8] T.S. Ogedengbe, O.A. Yezeed, A. Yussouf, “Effect of annealing on machinability of grey cast iron,” J. Eng Technol.,vol.10,2019.
[9] M.S. Ranganath,H. Vipin, “Optimisation of process parameters in turning operation using response surface methodology: a review,” International Journal of Emerging Technology and Advanced Engineering, vol.4(10),pp.351–360,2014.
[10] Mitsubishi Milling tool guide https://www.mitsubishicarbide.com/us/technical_inf ormation/tec_rotating_tools/face_mills
[11] M. P. Groover, “Fundamentals of modern manufacturing:materials,processes,andsystems(3rd Ed.),”JohnWiley&Sons,2007.
[12] Y.P.Ballal, A.R.Mane ,Y.V.Patil, S.G.BAGI, “Optimisation of Surface roughness and Material removalrateinturningGraycastironBrakeDrumBy using Taguchi Method,” International Journal for Research in Science & Advanced Technologies, Vol. 6 (2),pp.261-266,2013.
[13] M. Thangamuthu, D.K. Madheswaran, “The Process Parameter Optimisation for Gray Cast Iron in Turning Process Using Response Surface Methodology,” International Journal of Mechanical and Production Engineering Research and Development (IJMPERD), Vol. 9 (2), pp. 997-1006, 2019.