
International Research Journal of Engineering and Technology (IRJET) e-ISSN:2395-0056
Volume: 12 Issue: 06 | Jun 2025 www.irjet.net p-ISSN:2395-0072


International Research Journal of Engineering and Technology (IRJET) e-ISSN:2395-0056
Volume: 12 Issue: 06 | Jun 2025 www.irjet.net p-ISSN:2395-0072
Niraj Kumar1 , Ashish Kumar Srivastava2
1M.Tech. (ME) Scholar, Department of Mechanical Engineering, Goel Institute of Technology and Management Lucknow, Uttar Pradesh, India
2Assistant Professor, Department of Mechanical Engineering, Goel Institute of Technology and Management Lucknow, Uttar Pradesh, India ***
Abstract: Friction Stir Welding (FSW) is an innovative solid-state joining technique, especially effective for aluminum alloys such as AA6061, widely used in aerospace, automotive, and structural applications. This study focuses on the optimization of key FSW process parameters tool rotational speed, welding speed, and axialforce toachievedefect-freeweldsandenhancethe mechanical and microstructural characteristics of the welded joints. The primary objective is to maximize the mechanical performance of AA6061 welds by identifying the optimal combination of parameters that minimizes defectsandimprovesstrength.
Aseriesof experimentsweredesignedusingthe Taguchi method to systematically analyze the influence of each process variable. The welded joints were evaluated for tensile strength, hardness, and impact strength to understand the correlation between process parameters and mechanical performance. Furthermore, detailed microstructural analysis was performed using optical microscopy and scanning electron microscopy (SEM) to assess grain refinement, material flow, and defect formationindifferentweldzones.
Keywords- Friction Stir Welding (FSW), AA6061 Aluminum Alloy, Process Parameter Optimization, Mechanical Properties, Microstructural Analysis, Taguchi Methodetc.
According to J. F. Lancaster (1999), welding is a joining method that creates a permanent bond between two materials through coalescence, which is brought on by a confluence of metallurgical conditions, temperature, and pressure. Certain welding procedures are carried out by heating them to the welding temperature, either with or withouttheuseofpressure. Fillermetalisalsoutilisedin certain welding processes to promote coalescence. Although welding is typically thought of in relation to metalcomponents,itcanalsobeusedtojoinplastics. A variety of manufacturing techniques can be used to create an engineering component. The operations of casting, machining, forming, and welding can be used to
create materials with a variety of mechanical, chemical, and physical characteristics. The material's characteristics, geometric complexity, quantity, and economics all play a role in the manufacturing process choices.
Castingandformingarereferredtoaszeroprocessesfor component manufacturing. With these methods, no materialisaddedorwithdrawn;justtheshapeoftheraw material is altered. Since material is removed to create componentswiththepropershapeandsize,machiningis referred to as a negative process. The sole constructive method for adding material to create components is welding. According to Misra et al. (2005), welding has several advantages over other procedures, including being permanent, having a higher strength than base metal, and being more cost-effective. Even though welding is thought to be a relatively modern joining technique as it is currently used, it was once utilised to create tools, weapons, and other ancient equipment (Iordachescuetal.2005).
During the material joining process,industrial robotsare employed to automatically control the processes. The welding torch is automatically controlled by a robot that is programmed to follow a predetermined course in the specifiedorientation. Arobotwasmadeupof numerous links and linkages that were connected by power drives. All other welding methods are being replaced by industrial robots because of their precision, speed, and inventiveness.
Friction stir welding (FSW) was created in 1991 by the Welding Institute (Thomas et al. 1991). The method is based on traditional frictional welding. This method works well for flat components and is also appropriate for hollow sections and pipelines. According to Ma et al. (2017),ithasbecomeanovelsolid-stateweldingmethod for metal matrix composites as well as aluminium, magnesium, and titanium alloys. These days, plastic and high-strength steel are joined using this method as well (Jafarzadegan et al. 2013). Automobiles, aeroplanes,

International Research Journal of Engineering and Technology (IRJET) e-ISSN:2395-0056
Volume: 12 Issue: 06 | Jun 2025 www.irjet.net p-ISSN:2395-0072
ships, and high-speed railroads all use this technology (Heinz and Skrotzki 2002). A non-consumable, rotating cylindrical pin tool with a profiled probe that rotates quickly and is subsequently inserted into the adjoining edges of the joining material is used in the continuous, mechanical,solid-statejoiningprocessknownasFSW. In order to prevent the abutting joint faces from being driven apart, the pieces must be secured onto a backing plate. Heatisproducedasaresultoffrictionbetweenthe tool and the substance that will be connected. It softens the material without melting it and makes it possible to move the wear-resistant tool along the joint line. The probe's length is marginally shorter than the necessary weld depth, and the tool shoulder should be in close proximitytotheworkpiece.

1.2. Determination criteria for aluminium alloys
Therearetwotypesofaluminiumproducts:wroughtand cast. They are further subdivided according to temper designation and chemical makeup. The European CommitteeforStandardisation(CEN)statesthatfourand five digits are used, respectively, to identify wrought and castalloys.
Thenecessity,benefits,andusesofweldingwerecovered inthepreviouschapterFSWofaluminiumalloys. Friction stir welding parameters, their impacts on mechanical characteristics, macrostructure, and microstructure, the impact of FSW on the weld joint's reactions, research gaps, and the study's goal are all covered in this chapter. Copper and aluminium are examples of non-ferrous elements that are frequently utilised in engineering applications. Because they are lightweight, these materials are widely employed in building, railroads, ships, cars, and aeroplanes. Because of their increased porosity, higher thermal conductivity, and lack of fusion, these materials are challenging to weld using traditional techniques.
The micro structure of the welded joint is determined in largepartbyFSWprocessparameters,includingmaterial attributes, machine variables, and tool variables. The FSWparametersalsodeterminethematerialflowpattern
and temperature distribution, which determine the FSW joints'strength. Eachparameter'scontributionresultsin a joint with enhanced mechanical qualities and soundproofing. This section discusses each parameter's contribution.
Very little is known about the intricacy of material flow during FSW. The quality of joints during FSW is influenced by numerous factors. The FSW process parameters that regulate weld quality are displayed in Fig.2.1(Ratheeetal.2017). ThesoundjointofFSWmay result from the optimisation of ibid factors. Tool geometry (tool pin profile, shoulder dimension, and relative dimensions of shoulder and pin), material type, and welding parameters (traverse speed, tool rotation direction, welding speed, plunge depth, and tool tilt angle) are all elements that affect FSW. Each of the aforementioned factors influences the welded joints' properties.
Along the joint line, a non-consumable rotating tool is Metalclosetothetoolpincanmigratefromthefrontend to the back end thanks to the tool's traverse action. A solid-statejoiningofthebasemetalistheoutcomeofthis movement. The material moving around the tool pin is a complicated phenomena since the tool was constructed with a variety of geometric considerations in mind. Fine equiaxedrecrystallisedgrainswereproducedduringFSW as a result of the base metal's plastic deformation. This offersthebasemetalgoodmechanicalqualities.
2.2. Tool rotation speed's impact on FSW's micro and macro structure
According to Humphreys and Hotherly (1995), a higher tool rotation rate results in a higher thermal cycle peak temperature. Additionally, it was found that the recrystallised grain size is decreased by the increased deformation during friction stir welding, in accordance with the recrystallisation concept. Grain coarse recrystallisation results from an increase in the FSW thermal cycle's peak temperature. As a result, grain growth is evident. The impact of process factors on the microstructureofFSWofaluminiumalloyswasexamined byLietal.(1999).
According to Song et al. (2002), temperature variations across the friction stir welded AA6061 aluminium alloy weld zone resulted in the presence of more precipitates and coarsened grains. The microstructure of the FSW jointisimpactedbythelocalthermalhistory.
As a result, the primary cause of the variance in recrystallised grain size is the tool rotation rate. According to Rhodes et al. (2003), the recrystallisation grain size of aluminium alloys' FSW increases as the tool rotation rate increases. Reduced recrystallisation grain

International Research Journal of Engineering and Technology (IRJET) e-ISSN:2395-0056
Volume: 12 Issue: 06 | Jun 2025 www.irjet.net p-ISSN:2395-0072
sizehasbeenfoundtooccurwhenthetoolrotationrateis decreased[Satoetal.2002;Kwanetal.2003].
The potential for friction stir welding to supplant traditional welding techniques is larger. Friction stir welding has been the subject of numerous studies, and numerous challenges have been surmounted. They have made significant progress in refining the procedure. Their study's findings offered optimism for maximising theuseofFSW. TheFSWtechniquehastheadvantageof turning aluminium alloy into a suitable high-speed transportationoption. FSWisbeingusedmoreandmore in the automotive and other industrial industries. It was discoveredthatthereisadearthofthoroughresearchon thick Al-6061alloys inthisfield. Itscorrosion resistance andweldabilityareexcellent. Al-6061isutilisedinthe
2.4.
After reviewing the existing literature, the research gap was determined. The study's goal was to address the issuethatwasdevelopedbasedontheresearchgap. The study'saimsareasfollows.
To maximise the process parameters for a frictionstirweldedconnectionfreeofdefects.
To investigate how process variables affect the friction stir welded joints' mechanical characteristicsandmicrostructure.
Examine how process parameters affect impact strength.
To investigate the welded junctions' microstructures
The parameters of the friction stir welding process were thoroughly covered in the previous chapter. Additionally covered was the impact of process factors on microstructure and mechanical characteristics. Fixture, work-piece and tool material selection, friction stir
welding machines, variable process parameters, experiment design, and FSW experimental setup will be themaintopicsofthischapter.Eachisexplainedinfullin thesectionsthatfollow:
The fixture was constructed from 400x200x60 mm mild steel plate.The fixture is370x190 x56 mm. Basemetal thatrangesinthicknessfrom6mmto16mmcanbeused with this fixture. This fixture was made using a drill machine, power hacksaw, and vertical milling machine. With the aid of a power hacksaw, a 400x200x60 mm pieceofmildsteelwascut.Averticalmillingmachinewas used to create the slot that would hold the base metal. The base metal was held in place by laterally drilling usingadrillmachine.Additionally,thefixturewasdrilled toattachtotheFSWmachine'sbed.
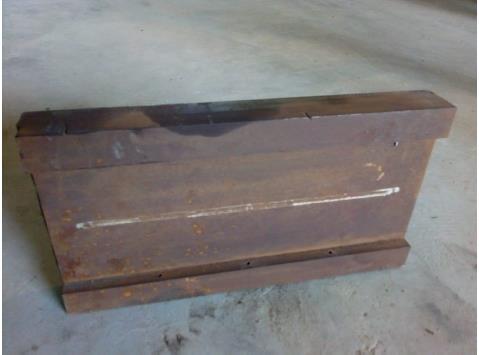
The aluminium alloy AA6061-T6 serves as the foundational metal for this study. The base metal of the 10 mm thick plate has been sliced into a 350 x 75 mm strip.
Table3.1:AA6061-T6Alalloy'schemicalmakeupandmechanicalcharacteristics Chemicalmakeup(weightpercentage)

International Research Journal of Engineering and Technology (IRJET) e-ISSN:2395-0056
Volume: 12 Issue: 06 | Jun 2025 www.irjet.net p-ISSN:2395-0072
Cutting: A75x370mmpieceofbasemetalwitha10mm thicknesswascutout.
Machining: To guarantee precise plate-to-plate contact, the base metal plates were cut using a vertical milling machine.
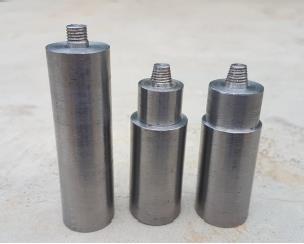
In friction stir welding, the tool is essential. The primary purposeofthetoolistoheatthebasemetal,combinethe materialstocreatetheFSWjoint,andsuppressthemetal underneath the FSW tool's shoulder. heat produced as a result of metal plastic deformation, tool pin friction, and shoulder friction (Matori et al., 2014). The base metal softens as a result of the heat generated, and the tool's movements provide adequate mixing. The FSW tool is made up of a shoulder, pin, and probe. Tool design, manufacturing precision, appropriate material selection, andheattreatmentallaffecttoolperformance.
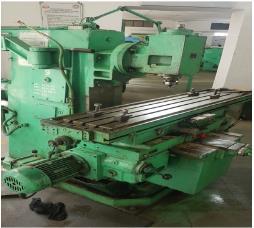
The experiments were performed on vertical milling machine (Batliboi made). The specifications of machine arelistedbelow:
Spindlemotorpower:10HP
SpindleSpeed:2000rpm
CuttingSpeed:220mm/min
Travel(X,Y,Z):1350x315x500(mm).
3.5. Variable process parameters
The FSWed joint's microstructure and mechanical characteristicsareinfluencedby the processparameters. Whilecertainprocessfactorsareflexible,othersarefixed. Table 3.3 displays the specifics of the fixed process parameters.
Table3.3:FixedProcessparameters
SrNo. Processparameter Value
1 Tooltiltangle 3°
2 Axialforce 10kgf
3 Pingeometry Cylindricalthreaded

International Research Journal of
Volume: 12 Issue: 06 | Jun 2025 www.irjet.net
Table3.4:VariableProcessparameters
Optimisation is the process of adjusting the process parameters to maximise the output responses. It is anticipated that the process parameters' values will not be affected by external noise or the environment. The Taguchi method is a cost-effective optimisation methodology that produces high-quality products. Numerous experiments must be carried out in the traditionalmanner.Thenumberofexperimentsthatmust becarriedoutrisesasthenumberofprocessparameters does. The Taguchi approach minimises the number of experimentsbyusinganorthogonalarray.Thisalsosaves timeandmoney whendoingexperiments.Thedeparture offeaturesfromthedesiredvalueisdeterminedusingthe loss function. It is transformed into the S/N ratio, or signal to noise. High S/N ratios indicate the process's optimallevel. parametersacquired.Todeterminethesignificanceofthe process parameters, an analysis of variance (ANOVA) statistical method is employed. The significance level of each process parameter is provided by the F test. Ultimately, a confirmation test is carried out to establish theidealvalueoftheprocessparameters.
3.6.1
The FSW method has been optimised for improved mechanical qualities using the Taguchi optimisation approach. Three elements with three levels have been takenintoconsiderationforthisstudy,andL27hasbeen employedforthesame.
L27Orthogonalarray(Table3.5)
Frictionstirwelding(FSW)wassuccessfullyusedtoweld aluminium6061alloys with an8mmthickness.FSW was performed on a modified vertical milling machine using base metals (BMs) that had been produced with the specified specifications outlined. The BMs were clamped in the butt position in an in-house fixture. Following a successful welding operation, both quantitative and qualitativetestswereconductedtoevaluatethewelding's efficacy. Mechanical characterisation and microstructural evolutionwereperformed.Scanningelectronmicroscopy (SEM) and metallurgical optical microscopy (OM) were used to analyse fractography and microstructural development, respectively. UTM and Charpy tests were used for mechanical characterisation in the form of ultimate tensile strength (UTS) and impact strength testing, respectively. Both quantitative and qualitative methods were used to analyse the results. Results were measured quantitatively, then statistically analysed and explainedwiththeuseofqualitativeanalysis,specifically microstructuralchange.
To determine the variable and fixed process parameters, numerous trials and experiments were first conducted.

International Research Journal of Engineering and Technology (IRJET) e-ISSN:2395-0056
Volume: 12 Issue: 06 | Jun 2025 www.irjet.net p-ISSN:2395-0072
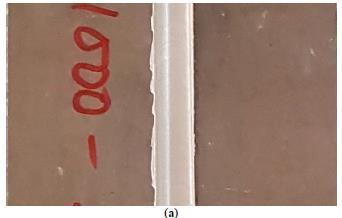
To determine a process window for variable parameters, additional trial runs were conducted once the fix parameters and their values were determined. The process window for the three variable parameters the tool's rotating speed (RST), welding speed (WST), and shoulder diameter (SDT) was determined based on the factthateveryexperimentconductedduringthiswindow was flawless. Experimental work was conducted using Taguchi'sL27orthogonalarray(OA),whichwasbasedon the number of process parameters and their level. To guarantee accuracy and subsequent statistical analysis, two replicates of each run were employed, and the average value of these replicates was taken into account when analysing the data. Every welded sample was discovered to be sound and devoid of flaws such as excessive flash, voids, or cracks. Fig. 4.1 describes the uppersurfaceofsomeoftheweldedsamples.
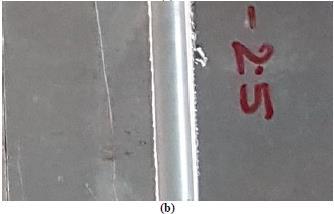
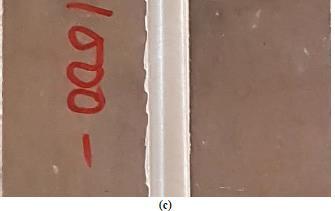
To assess the joints' UTS, tensile tests were conducted using ASTM E8M standards on a computerised tensiometer. The pictures of the tensile specimen before andaftertestingareshowninFig.4.2.
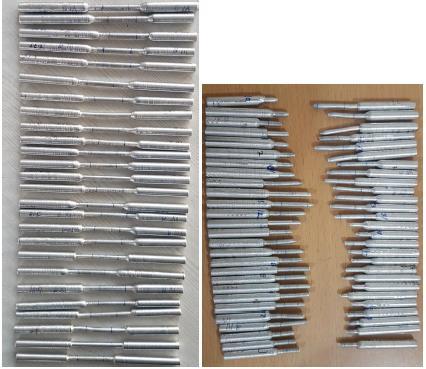
Tensilesamplesin Figure4.2:(a)priortotesting;(b)followingtesting
To determine the ideal set of process parameters for the best tensile strength of manufactured welds, a signal to noise(S/N)ratioanalysiswasconducted.TheS/Nratioof UTSisshowninTable4.1.

International Research Journal of Engineering and Technology (IRJET) e-ISSN:2395-0056
Volume: 12 Issue: 06 | Jun 2025 www.irjet.net p-ISSN:2395-0072
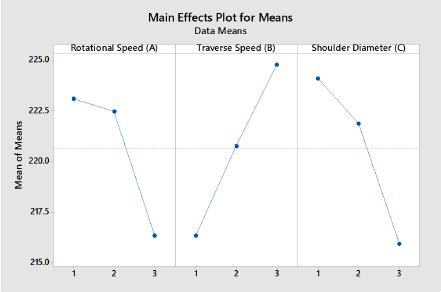
It is evident that TST has the greatest impact on UTS, followed by SDT and RST, depending on the rank of the FSW process parameters. Then, as seen in Fig. 4.3, main effectplotsofmeanswerecreated. ThebestFSWprocess parameters for reaching maximum UTS are A1B3C1, i.e., RSTatlevel1,RSTatlevel3,andSDTatlevel1,according totheresponseforS/NratioofUTS(Table4.1)andmajor effectplotsofS/NandmeansforUTS(Fig4.4and4.5)..
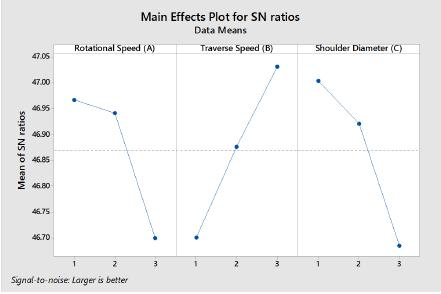
4.2. Regression analysis and ANOVA findings for UTS
To estimate the percentage contribution of FSW process parameters, an ANOVA was conducted; the results are shown in Table 4.2. The P-value shows that the process parametersarestatisticallysignificant.
Table4.2:ANOVAfindingsandtheproportionofFSWcharacteristicsthatcontributed
The P-value indicates that, at a significance level of 0.05, every process parameter is statistically significant. Each parameter's contribution proportion is shown by the Fvalue.
4.3. Elongation and hardness percentages
In order to quantify ductility and toughness in terms of % elongation and impact strength, respectively, the tensile and impact tests (Charpy) were conducted. After the
tensile specimen broke, the percentage elongation was measured,andtheCharpyimpacttestwasusedtoevaluate the yielded a maximum percentage elongation of 8.82 percent, whichissignificantlylessthanBM. Thisis mostly because the welds' SZ and TMAZ experience substantial plastic deformation and recrystallisation, which reduces ductility and increases tensile strength. The decrease in ductility is caused by the development of intermetallic compounds impact strength. The impact strength and percentageelongationmeasurementsareshownin.

International Research Journal of Engineering and Technology (IRJET) e-ISSN:2395-0056
Volume: 12 Issue: 06 | Jun 2025 www.irjet.net p-ISSN:2395-0072
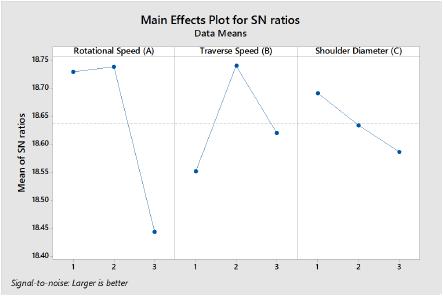
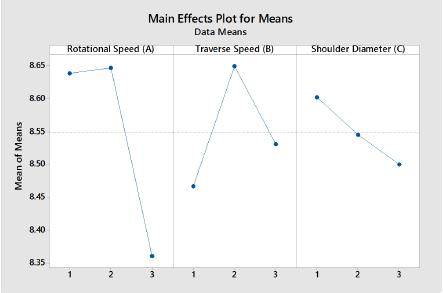
It is evident that RST has the greatest impact on percentage elongation, followed by TST and SDT, depending on the rank of the FSW process parameters. Then,asseeninFigs.4.5and4.6,respectively,main effect plots of the S/N ratio and means were created. The best processparametersofFSWforreachingmaximum percentage elongation are A2B2C1, i.e. RST at level 2, TST atlevel2,andSDTatlevel1,accordingtotheresponse forS/Nratioofpercentageelongation(Table4.3)andmain effect plots of S/N and means for percentage elongation (Fig4.5and4.6).
4.4. Examination of microstructure
Usinganopticalmicroscope(OM),microstructuralpictures were obtained from etched samples obtained from the traverse section of the welds. The pictures were taken at many places, including as the midpoint of the plate thickness's advancing side (AS), retreating side (RS), and stirzone(SZ).
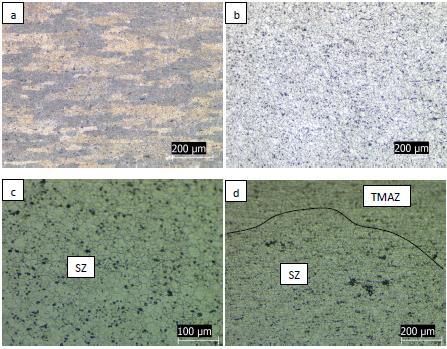
Fig 4.7. Microstructural images of: (a) BM; (b), (c) and (d) samplenumber12atdifferentmagnifications. Figure 4.8 shows the macrographic image of sample number12,whichshowsthevariousweldareazones.
Microstructural pictures of BM and run number 12 are seeninFig.4.7.ThemicrostructuralimageoftheBMofthe AA6061alloy,which displays an extended grainstructure, is shown in Fig. 4.7 (a). Microstructural pictures SZ of run/experiment number 12 (which showed the highest UTS) at various magnifications are shown in Fig. 4.7 (b) and (c). The SZ of sample number 12 (AS) is displayed in Fig. 4.7(c), where a fine-grained structure with randomly distributed precipitates (seen as black particles) is easily discernible. Two distinct SZ and TMAZ zones are depicted in the microstructural picture of the RS of sample number 12inFig.4.7(d).
5.1
Thefollowingbroadconclusionsarereachedbasedonthe findings of multiple experimental investigations conductedforthisthesisproject:
1. FSW has good joint efficiency and may be used to successfullyweldthickAA6061alloys.
2. Three FSW process parameters the tool's shoulder diameter (SDT), traverse speed (TST), and rotational speed(RST) werechosenasvariableparameters.
3.Theimpactofthreevariableparametersonthewelded joints'impactstrength,percentageelongation(%El),and ultimatetensilestrength(UTS)wasinvestigated.
4. The L27 Orthogonal Array (Taguchi's method) was usedtodesigntheexperiments.
5. The best set of process parameters was found to producetheintendedresults.
6. Analysis was done on the contributions of specific process factors and how they interacted. UTS is significantlyimpactedby theprocessparameters(within the defined range) and how they interact. A1B3C1 was

International Research Journal of Engineering and Technology (IRJET) e-ISSN:2395-0056
Volume: 12 Issue: 06 | Jun 2025 www.irjet.net p-ISSN:2395-0072
determined to be the best set of process parameters for maximisingUTS.
7.Withacontributionof25.94%,TSTwasdeterminedto be the most important process parameter influencing UTS, followed by SDT (25.86%) and RST (20.30%). Interactionsbetweenthechosenparameterswereshown tohaveaconsiderableimpact,withTST*SDTcontributing 14.10 percent, RST*TST contributing 6.51%, and RST*SDTcontributing3.10percent.
8. The percentage El is significantly impacted by the process parameters that were picked (within the intended range) and how they interact. A2B2C1 was determined to be the best set of process parameters for thehigheston%El.
9. It was found that the dynamic recrystallisation mechanism causes grain refinement at the SZ and TMAZ ofweldsduringmicrostructuralevolution.
The automotive and aerospace industries will greatly benefit from the experimental work's outcome. Making FSWed joints with other alloys that are challenging to weld is also encouraged by this study. A few recommendations are made because this work's future scopeisasfollows:
The current investigation could be expanded to includedissimilaralloyslike2xxx/5xxx.
Aresearchbasedonmodellingand simulationcan be used to identify the material and thermal flow aspects.
Plates of different series with greater thickness, like7xxx,maybeinvestigated.
Genetic algorithms and artificial neural networks canalsobeemployedtoforecastthebestresponse variables.
It is possible to look into mechanical characteristics like corrosion behaviour and residualstress.
[1] R. Wilson, A. Murphy, M.A. Price, C. Glazebrook ”A preliminary structural design procedure for laser beam weldedairframestiffenedpanels,ThinWallStruct,vol.55 ,pp.37-50,March2012.
[2] J. F. Lancaster, Metallurgy of Welding, WoodheadCambridge-2009.
[3] Mishra, R.S.; Ma, Z.Y. Friction stir welding and processing. Materials Science and Engineering: R: Reports,vol.50(1–2),1–78,Dec2005.
[4] Mihaela Iordachescu, Elena Scutelnicu and Danut Iordachescu, “Fundamentals of the process and tools design: Friction stir processing of materials”, Welding EquipmentandTechnology,vol.17,63–72July2006.
[5] Mishra, R.S.; M.M.W. Friction Stir Welding and Processing2007:ASMInternational.
[4] Chen, X.G.; da Silva, M.; Gougeon, P.; St-Georges, L. Microstructure and mechanical properties of friction stir welded AA6063–B4C metal matrix composites. Materials ScienceandEngineering:A,vol.518(1–2),174–184,July 2009.
[5] Reynolds, A.P.; Tang, W. Alloy, tool geometry, and process parameter effects on friction stir weld energies and resultant FSW joint properties. Friction stir welding and processing, ed. M.W.M. K.K. Jata, R.S. Mishra, S.L. SemiatinandD.P.Field2001:TMS.
[6] Prado, R.A.; Murr, L.E.; Shindo, D.J.; Soto, K.F. Tool wearinthefriction-stirweldingofaluminumalloy6061þ 20% Al2O3: A preliminary study. Scripta Materialia, vol. 45(1),75–80,June2001.
[7] Eftekharinia, H.; Amadeh, A.A.; Khodabandeh, A.; Paidar, M. Microstructure and wear behavior of AA6061/SiCsurfacecompositefabricatedvia frictionstir processing with different pins and passes. Rare Metals, vol.1–7.doi:10.1007/s12598-016-0691-x,June2016.
[8]Azizieh,M.;Kokabi,A.H.;Abachi,P.Effectofrotational speed and probe profile on microstructure and hardness ofAZ31/Al2O3nanocompositesfabricatedbyfrictionstir processing. Materials & Design , vol. 32 (4), 2034–2041 July2011.
[9]Azizieh,M.;Kokabi,A.H.;Abachi,P.Effectofrotational speed and probe profile on microstructure and hardness ofAZ31/Al2O3nanocompositesfabricatedbyfrictionstir processing. Materials & Design , vol., 32 (4), 2034–2043, Jan2012.
[10] Morisada, Y.; Fujii, H.; Nagaoka, T.; Fukusumi, M. Effect of friction stir processing with SiC particles on microstructure and hardness of AZ31. Materials Science andEngineering:A,vol.433(1–2),50–54Nov2006.
[11] Rathee, S.; Maheshwari, S.; Siddiquee, A.N.; Srivastava, M. Analysis of microstructural changes in enhancementofsurfacepropertiesinsheetformingofAl alloys via friction stir processing. MaterialsToday: Proceedings2020,inpress.
[12] Węglowski, M.S.; Dymek, S. Relationship between friction stir processing parameters and torque, temperature and the penetration depth of the tool. ArchivesofCivil andMechanical Engineering, vol.13 (2), 186–191,June2013.
[13] Mahmoud, E.R.I.; Takahashi, M.; Shibayanagi, T.; Ikeuchi, K. Effect of friction stir processing tool probe on fabrication of SiC particle reinforced composite on aluminium surface. Science and Technology of Welding andJoining,vol.14(5),413–425,July2009.