Chrome River Emburse Enterprise APP Instructions

Page 1


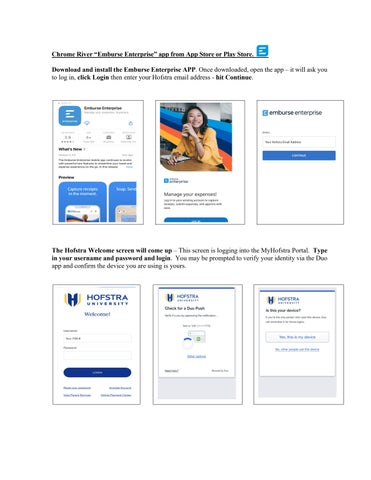
Chrome River “Emburse Enterprise” app from App Store or Play Store.

Download and install the Emburse Enterprise APP. Once downloaded, open the app – it will ask you to log in, click Login then enter your Hofstra email address - hit Continue

The Hofstra Welcome screen will come up – This screen is logging into the MyHofstra Portal. Type in your username and password and login. You may be prompted to verify your identity via the Duo app and confirm the device you are using is yours.

After confirming your identity/device, you may be prompted on the next screen to add another security layer by setting up face id. You can choose to set up or select “No thanks.”

Please note: if face id is disabled, you will be prompted to sign in manually when your session ends.

Now you’re ready to begin uploading your receipts to Chrome River to create and submit your expense reports!

Using Emburse Enterprise will help speed up processing and avoid missing receipts, which can further delay processing your reimbursement.

Note: you must provide the APP access to your camera before snapping pictures of your receipts.

Uploading and Managing Receipts using the Emburse Enterprise APP

• Uploading receipts using the Emburse Enterprise APP

o Open the APP, your camera will be ready to take a picture of your receipt. Click on the camera icon, take a picture of the receipt and then click Upload. Once uploaded, you will be given the opportunity to add more information and/or upload the receipt.

o All receipts captured through Emburse Enterprise will be available to you in the Receipt Gallery, which can be accessed through the eWallet. Click eWallet to view the Receipt Gallery.

o You will need to review and confirm data below is captured accurately:

 Amount of the receipt

 Exchange currency (i.e. USD, EUR, YEN, GBP etc.)

 Default Tile category is appropriate. Please note: Chrome River OCR technology may misread the receipt and select the MISC tile. You should update the tile to the appropriate tile by clicking the tiny arrow on the MISC tile and selecting new tile.

• Manual upload from documents scanned and saved to your computer are still available.

Turn static files into dynamic content formats.

Create a flipbook
Issuu converts static files into: digital portfolios, online yearbooks, online catalogs, digital photo albums and more. Sign up and create your flipbook.