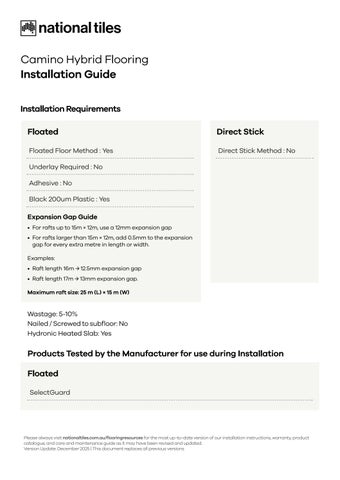
• For rafts up to 15m × 12m, use a 12mm expansion gap
• For rafts larger than 15m × 12m, add 0.5mm to the expansion gap for every extra metre in length or width.
Examples:
• Raft length 16m → 12.5mm expansion gap
• Raft length 17m → 13mm expansion gap.
Maximum raft size: 25 m (L) × 15 m (W)
Wastage: 5-10%
Nailed / Screwed to subfloor: No
Hydronic Heated Slab: Yes
Direct Stick Method : No
Products Tested by the Manufacturer for use during Installation
Floated
SelectGuard
Please always visit nationaltiles.com.au/flooringresources for the most up-to-date version of our installation instructions, warranty, product catalogue, and care and maintenance guide as it may have been revised and updated.
Version Update: December 2025 | This document replaces all previous versions
General Information
It is understood that:
It is the owner’s/installer’s responsibility to read and understand the full installation instructions before beginning the installation. important
The installer assumes full responsibility for the final inspection of product quality. Each board must be inspected prior to installation. It is the installer’s responsibility to ensure that the correct flooring has been supplied and aligns with the scope of works. Carefully examine the flooring for colour, finish and overall quality before installation. Use reasonable selectivity and set aside or cut off any pieces with obvious defects, regardless of the cause. All inspections should be carried out under finished lighting conditions, particularly in areas exposed to natural light.
Planks showing visible manufacturing defects should never be installed. If the flooring is not acceptable, contact your retailer before proceeding with the installation. If deemed defective by the manufacturer, these boards will be replaced prior to installation.
Once installed, all boards are deemed to be accepted. Claims arising from the installation of such planks will not be honoured.
Hybrid flooring must be installed in a regulated and liveable environment to prevent possible damage not covered by the warranty. A ‘regulated environment’ is one that maintains a consistent temperature range. For this reason, hybrid flooring should not be installed more than two weeks prior to occupation of the home. The floor is designed to perform within an environmentally controlled structure.
Warranty exclusions include, but are not limited to:
• any damage incurred through direct exposure to excessive heat and/or sunlight
• scratches, stains or indentations
• poor cleaning or maintenance regimes
• damage resulting directly or indirectly from moisture ingress or heat, including the incorrect use of steam mops and wet and dry vacuum cleaners. These must never be used on your hybrid flooring.
Please contact National Tiles immediately if you have any questions regarding these guidelines.
Acclimatisation and Site Inspection
Hybrid flooring requires a minimum of 24 hours of acclimatisation on site, in the area where it is to be installed, at a room temperature between 10–28ºC, and in unopened packs. Ensure all packs are stacked flat, no more than four packs high, and stored with at least 300mm of separation between stacks.
Ensure the room temperature is maintained between 0ºC and 35ºC after installation.
Avoid exposure to direct sunlight; sliding doors and/or windows should be covered with blinds or curtains. The surface temperature of the floor should never exceed 55ºC at any time.
Flooring should not be delivered until the building has been closed in and all cement work, plastering, painting and other materials are completely dry. Concrete and plaster should be fully cured and at least 60 days old. Check basements and underfloor crawl spaces to ensure they are dry and well ventilated to prevent moisture-related damage.
Handle with care. Do not stand packs on their ends.
When Hybrid flooring is ordered, allow approximately 5-10% for wastage and off-cuts, depending on the size or layout of the room or installation area.
Installation tools, accessories and materials
• Safety glasses
• Dust mask
• Measuring tape and square
• Ruler
• Sharp ‘Stanley’ type knife
• Pencil
• Pull Bar
• Hammer
• Tapping Block
• ‘Table type’ power saw with dust collector, or a circular saw with carbide-tipped blade, or a power jigsaw, multitool, drop saw, and undercut saw.
• Small hand tools associated with woodworking.
• Expansion wedges (suitable sized spacer blocks of plastic or wood)
• Suitable moisture barrier, and residue remover
• Trims
• Scotia
• Stair nosing
• Suitable floor protection
Method
Expansion Moulding
When installing flooring through tight or narrow areas, such as doorways, hallways, pantries or transitional spaces, additional expansion joints and mouldings must be used to accommodate natural floor movement. Expansion mouldings are also required when the installation area exceeds 15m in length and 12m in width, or when the flooring extends across multiple rooms. These joints help manage natural expansion and contraction and are essential for separating each room or defined area to prevent damage or buckling over time.
Remove base mouldings. If necessary, the planks in the first row may be cut to a narrower width to ensure that the planks in the final row are at least 50mm wide.
note
Failure to install the required expansion joints will void the product warranty. If the appearance of expansion joints is not acceptable to the customer, we recommend choosing an alternative flooring product that better suits their preferences.
Wet Areas
Hybrid flooring is not suitable for installation in wet areas. A wet area is defined as an area within a building that is supplied with water from a water supply system, which includes bathrooms, showers, laundries and sanitary compartments, and excludes kitchens, bar areas, kitchenettes, or domestic food and beverage preparation areas.
Please avoid the following:
• Free-standing bathtubs must not be installed on Hybrid flooring.
• The use of silicone or caulking compounds is not permitted at any time.
• Do not install cabinets, kitchen islands or any heavy items (over 200 kg) on top of floating floors. An expansion gap must be maintained where the flooring meets cabinetry (refer to the Installation Requirements inside the front cover). This requirement also applies to any obstructions or fixed items such as columns, pipes and similar structures. Door jambs must be undercut to allow for expansion; do not force the floorboards under tight door jambs.
Preparation - Subfloors
Before installing the flooring, ensure the subfloor is cleaned, swept or vacuumed so it is free of dirt and debris.
Hybrid flooring cannot be installed over any existing flooring that has an attached cushion or is a floating floor, such as carpet or carpet underlay. However, it may be installed over well-bonded vinyl or ceramic tiles, provided the surface is sufficiently level. Tile grout joints or other gaps greater than 2mm in depth and 4mm in width must be levelled.
Please ensure the subfloor or surface over which the flooring is being installed is level. Using a 1mm straightedge, the subfloor should not vary by more than 3mm over 1 lineal metre in any direction. Remember, uneven floors may lead to movement, noise and ultimately failure of the product joins, so it is essential to assess the levelness and correct it as needed. Timber subfloors can be sanded level, and concrete subfloors or existing floor coverings can usually be levelled using a cement-based self-levelling compound. Existing floor coverings may require a latex-based levelling compound.
Concrete slabs must be fully cured and dry. The relative humidity of a concrete slab must not exceed 85% at any time, in accordance with the current National Construction Code (NCC).
Wooden and wood-based materials (plywood, OSB, particle board) must be dry, with a moisture reading no greater than 14% (this should be verified with a moisture metre). All wooden subfloors must have a minimum thickness of 19mm.
Ensure that the boards of the subfloor are properly fastened to the supporting beams and that there are no squeaking or depressed areas. Patch as required and fill any low spots with a floor-levelling compound. Raised areas must be sanded down. The subfloor must be smooth, flat, structurally sound and free of deflection.
Hybrid Flooring Installation Instructions for Floating Floor Method
Proceed with a visual inspection of the boards before installation. Once installed, the boards are considered accepted by both the installer and the homeowner.
Hybrid flooring must be installed using the floating method only and cannot be glued, screwed, nailed or fixed to the subfloor in any way.
Any additional underlay used with this product will void the manufacturer’s warranty. If additional underlay is required, formal approval must be obtained from the manufacturer prior to installation.
Step and brick stagger patterns are not permitted. The installer must randomly stagger end joints to achieve the best visual appearance and structural integrity. These types of set-outs are not covered under warranty, as they can lead to bouncing, structural instability and joint failure.
The use of silicone or caulking compounds is not permitted at any stage of the installation.
For any installation area greater than 15m in length and/or 12m in width, 200um black plastic must be used as a layer between the subfloor and the floating hybrid floorboards. The use of black plastic allows the hybrid floorboards to move more freely as the raft expands and contracts with environmental changes.
Avoid using solvents of any kind to clean the floor. Solvents include (but are not limited to) methylated spirits, turpentine, bleach, ammonia, eucalyptus, citrus, vinegar and any non-pH-neutral cleaners. These may damage the surface, which is not covered under warranty.
Cleaning with a steam mop is not permitted under any circumstances.
1. Getting Started
Check all planks before you begin to ensure they are free from damage or quality defects. Any defective planks should be set aside for cuts or submitted for a product warranty claim. Warranty claims relating to the installation of defective planks will not be honoured. For best results, it is recommended that material be mixed from four (4) to six (6) boxes during installation.
After cleaning the subfloor, you may begin the installation.
During installation, open several cartons at a time to ensure colour variations are blended evenly throughout the floor.
The boards should be installed lengthways towards the main incoming light source and, where possible, along the length of the room. In narrow hallways, install the flooring parallel to the hallway.
To avoid straddling a door jamb with a plank, measure back to the starting wall to ensure a plank joint falls within the door jamb area. It is recommended that no final row ends with a strip less than 50mm wide on any wall. Adjust the width of both the first and last rows so they are equal.
Undercut all door jambs so the flooring can slide underneath easily, preventing the boards from being pinned. Using a scrap piece of flooring and underlay as a guide, undercut the jambs with a jamb saw or a standard handsaw. Always maintain an expansion gap between the flooring and all walls or fixed objects.
When cutting hybrid flooring, it is recommended to cut with the decorative side facing up using a utility knife and the ‘score and snap’ method. Alternatively, a jigsaw may be used to cut the long side of the plank, with the decorative side facing down.
2. Installing the first row
Start installing the planks in the left-hand corner, with the tongue side facing the wall. Begin the first row with a full plank. Saw off the tongue on both the long and short sides (2A), then place the plank with the sawn-off edges against the wall.
Ensure both sides of the plank are positioned 10–12mm from the wall, using spacers to maintain the expansion gap (2B). Position the short side of the next plank at an angle of 20–30º to the plank already installed (2C). Gently move the plank up and down while applying forward pressure (2D). The planks will automatically click into place (2E).
Repeat the same process for the next three to four planks, then begin installing the second row. Ensure the long sides of the planks form a straight, continuous line.
3. Installing the second row
Use a cut piece of plank at least 400mm long to begin the second row.
Always ensure the end joints are randomly staggered by at least 40 mm. Step and brick stagger patterns are not permitted; the boards must be randomly staggered for proper structural integrity and appearance (3A).
Place the long side of the plank into the first row at an angle of 20–30º; it will automatically click into place. Engage the short-side tongue of the new plank into the groove of the first plank in the second row at a 20–30º angle (3B). Then push the long-side tongue of the new plank at the same angle into the groove of the planks in the first row.
Gently move the plank up and down while applying forward pressure. The planks will click into place automatically (3C). Repeat these steps for the next three to four planks, then begin the third row.
You can tap the long side of the plank into the groove using a professional tapping block. The planks should not be joined with a single tap. To avoid damaging the boards, tap them together gradually and avoid applying excessive force.
4. Installing the third row
Start the third row in the same way as the second row. It is practical to adjust the expansion gap between the long sides of the flooring and the wall once three rows have been installed. Ensure a 10–12mm expansion gap is maintained using spacers (4A).
It is critical to keep the first three rows straight and square, as their alignment will affect the remainder of the installation.
Always ensure that the end joints are randomly staggered by at least 400mm (4B)
Do not tap the short sides of the plank at any time (4C).
5. Completing the first three rows
Move back to the first row and continue the installation. Place the final plank of the row face down. Ensure the distance to the wall is 10–12mm (5A). Mark where the plank needs to be cut. Place the plank decorative side up on the work surface and cut it to size using a utility knife and the ‘score and snap’ method.
6. Continuing the rest of the installation
Repeat the same process row by row. Ensure that the locking mechanism on all planks is fully engaged. If any gapping is observed or the planks are not lying flat, disengage the long side by lifting it up, then carefully tilt and lift the short side.
Avoid using force on end joints as it will damage the locking mechanism.
In areas where it is too difficult to use a tapping block (e.g. against a wall), you may tap the planks together using a pull bar and hammer.
After two to three rows have been installed, adjust the distance to the front wall by placing spacers of 10–12mm. Continue the row by locking in the long sides of the planks until the end joints are fully engaged.
7. Laying the last row
Measure and cut the plank, ensuring it is at least 50mm wide. Leave a 10–12mm expansion gap between the plank and the wall (7A).
8. Holes for pipes
Measure the diameter of the pipe and drill a hole that is 20–24mm larger to allow for expansion. Saw off the cut-out piece, then lay the plank in place on the floor (8A–8C).
9. Under door frames
Once the planks have been cut, ensure the expansion joint under the door is at least 10–12mm. If the planks cannot be lifted, gently use a tapping block (9A) or a pull bar and hammer (9B) to tap the planks together while keeping them flat on the floor until they click into place.
10. Door moulding and skirting
Lay a plank (with the decorative side facing down) next to the door moulding to mark where it needs to be cut, using a jamb saw or a regular handsaw (10A). Cut the plank, then slide it under the moulding (10B).
11. Lifting or removing planks
It is possible to remove or replace planks that have been installed as floating flooring in living areas and commercial spaces without causing damage. First, release the entire row along the long side by angling it upward to disengage it from the locking mechanism. The planks can then be separated by carefully sliding them apart on the end (short) side.
12. Finishing
Take particular care when carrying out this process to avoid damaging the locking system. Remove all spacers and ensure a 10–12mm (or greater) expansion gap is maintained around the entire perimeter. Install the scotias, skirting boards and other mouldings against the wall, never to the floor. This allows the flooring to expand and contract as required. Ensure the room temperature does not exceed 30 °C at any time. Protect the flooring from furniture and chair legs by using suitable felt pads or plastic mats.
The use of silicone or any caulking compound is not permitted at anytime. important
Installation Instructions - Over Heated Slab
Hybrid flooring, due to its excellent stability, can be installed over a hydronic heated slab only. It must be installed in accordance with the guidelines below to ensure your flooring warranty remains valid; other types of floor-heating systems are not covered by our warranty.
The floor must be installed by a professional installer, and the manufacturer’s guidelines must always be followed to avoid compromising your warranty. A 200um plastic moisture barrier must be laid before installing the hybrid flooring. The heating system must also be installed and operated in accordance with the heating manufacturer’s guidelines. Refer to our hybrid flooring installation instructions or contact us for further information.
1. The in-slab under floor heating needs to be started and run at desired temperature for at least 14 days prior to installation.
The slab surface temperature must not exceed 26 °C at any time.
2. After 14 days, turn off the slab heating and allow 4 days for the subfloor to cool down and return to room temperature before installation.
Do not store any floorboards in the dwelling during Step 1 and Step 2.
3. Ensure the room temperature is at least 16ºC during installation, and that the temperature of the heated slab surface does not exceed 26ºC at any time.
4. Leave 10mm expansion gap as per normal installation guidelines.
5. After the floor installation is complete, the hybrid flooring requires gradual acclimatisation in conjunction with the heating system. Increase the heating system temperature in 2-degree increments each day until the desired temperature is reached (not exceeding 26 °C). When turning the heating off, reduce the temperature in 2-degree increments each day until it is fully switched off.
6. Using an in-floor temperature sensor is highly recommended to prevent overheating.