LOW VOLTAGE DESIGN + INSTALLATION GUIDE
What do you want to light?
Pick favorite trees, interesting plants, fountains, statues or other attractive architectural elements. These items will be the focus of your lighting plan. Think about how you use the property. Are there areas you would like to illuminate for work, recreation or entertaining?
Think about areas in which added light would enhance safety, such as steps or a wall around the side of your home.
HELPFUL PLANNING TIP
USE OUR LANDSCAPE LIGHTING TECHNIQUES
TO DETERMINE THE BEST METHODS FOR HIGHLIGHTING YOUR HOME'S EXTERIOR.
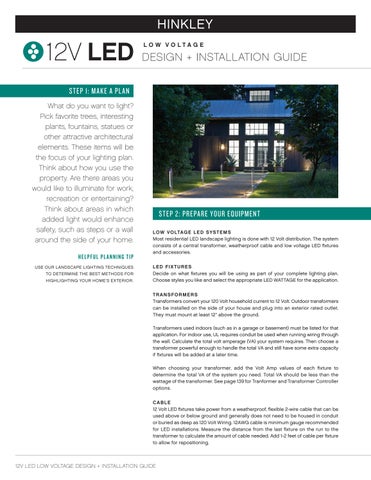
STEP 2: PREPARE YOUR EQUIPMENT
LOW VOLTAGE LED SYSTEMS
Most residential LED landscape lighting is done with 12 Volt distribution. The system consists of a central transformer, weatherproof cable and low voltage LED fixtures and accessories.
LED FIXTURES
Decide on what fixtures you will be using as part of your complete lighting plan. Choose styles you like and select the appropriate LED WATTAGE for the application.
TRANSFORMERS
Transformers convert your 120 Volt household current to 12 Volt. Outdoor transformers can be installed on the side of your house and plug into an exterior rated outlet. They must mount at least 12" above the ground.
Transformers used indoors (such as in a garage or basement) must be listed for that application. For indoor use, UL requires conduit be used when running wiring through the wall. Calculate the total volt amperage (VA) your system requires. Then choose a transformer powerful enough to handle the total VA and still have some extra capacity if fixtures will be added at a later time.
When choosing your transformer, add the Volt Amp values of each fixture to determine the total VA of the system you need. Total VA should be less than the wattage of the transformer. See page 139 for Tranformer and Transformer Controller options.
CABLE
12 Volt LED fixtures take power from a weatherproof, flexible 2-wire cable that can be used above or below ground and generally does not need to be housed in conduit or buried as deep as 120 Volt Wiring. 12AWG cable is minimum gauge recommended for LED installations. Measure the distance from the last fixture on the run to the transformer to calculate the amount of cable needed. Add 1-2 feet of cable per fixture to allow for repositioning.
STEP 3: WIRING YOUR SYSTEM
CABLE FIXTURE AND LAYOUT
If your lighting plan requires more than one transformer, you will need to divide the fixtures into groups or zones. To do so, consider the many areas of your property and how they are used. You may want all of the front yard lighting on one transformer, patio and deck lighting on another transformer, etc. The location of your electrical outlets will also help you to determine how to group the fixtures.
SPLIT LOAD INSTALLATION
STRAIGHT RUN INSTALLATION
The pictured diagrams will help you wire your system. The black box represents the transformer.
STRAIGHT RUN INSTALLATION
Fixtures run in sequence directly from the transformer.
SPLIT LOAD INSTALLATION
With a Split Load installation, fixtures run in two or more directions from the transformer. Locate the transformer in the center of the run and connect wires to the transformer as you would when using straight run installation.
"T" INSTALLATION
A “T” installation allows more equal distribution of power to the center of the run, or to the run some distance away. For lengthy runs, use 8 or 10 AWG cable to split. Use 12 AWG cable to cross the “T” between fixtures.
"T" INSTALLATION
6 fixtures x 2.1 W each = 12.6 W total
(ACTUAL ENERGY CONSUMED)
6 fixtures x 3.2 VA each = 19.2 VA total
(MINIMUM TRANSFORMER REQUIRED)
MINIMAL VOLTAGE DROP WITH LED
LED fixtures use less amperage than incandescent, therefore more fixtures can be used in a single cable run as compared to incandescent. Each fixture has a built-in durable driver circuit that accepts a wider input voltage range (10VAC15VAC) thus eliminating the common voltage-drop problems experienced with incandescent systems. Most fixtures can be wired in straight run installations eliminating the need to create zones or split loads. The driver in each fixture will regulate the input voltage and properly power the LED.
VA (VOLT-AMPS) & W (WATTAGE)
All LED fixtures are measured in wattage (the actual electric consumed by the LED) and volt-amps VA (the power supply required to operate the LED). LED drivers convert the 12V alternating current (AC) to direct current (DC) to power the LED chip(s). This additional power to change the current is measured as voltamps (VA) for each fixture. The VA indicates the power supply or transformer requirement you will need to operate the LEDs. To properly size your transformer, add up the VA for all fixtures on the system. To calculate your energy cost, add up the measured wattage rating of each LED.
12V LED
STEP 3: WIRING YOUR SYSTEM (CONTINUED)
If your lighting plan requires more than one transformer, you will need to divide the fixtures into groups or zones. To do so, consider the many areas of your property and how they are used. You may want all of the front yard lighting on one transformer, patio and deck lighting on another transformer, etc. The location of your electrical outlets will also help you to determine how to group the fixtures.
You can calculate voltage drop in volts using the formula below. It also shows the relationship of wattage/VA, run length and two-conductor cable size (given by the cable constant). Adjust lamp wattage/VA, number of fixtures per run, or the length of the run to maintain the right relationship.
Example: (3) 50w fixtures on a 75 ft. run using 12 gauge wire.


FIXTURE CONNECTION
Hinkley low voltage fixtures come standard with a connection kit, (2) wire nuts and silicone caulk. Fixtures should be attached by splicing them into main supply cable. Wire nuts should be filled with silicone. Twist the wires, then screw on the wire nut. Wrap with electrical tape. Bury any extra wire at the base of fixture to allow for relocation or adjustment.
MOUNTING
Hinkley low-voltage fixtures come standard with a ground spike (see accessories, page 132) and can be easily relocated every several years to adjust for the natural growth of trees and plantings.
STEP 4: COMPLETE INSTALLATION
VOLTAGE DROP
Excessive voltage drop occurs when too much wattage is placed on a cable that is too long or too small for the load. Voltage drop causes lamps furthest from the transformer to be dimmer than those near the transformer.
To help minimize voltage drop among each group of fixtures, use the following information to assist you:
Total Watts = sum of the incandescent wattage on a single run of wire.
Volt Amps = sum of the LED VA on a single run of wire.
Cable Length = length of cable run (feet) from the transformer to the last fixture on that run.
Cable Constant = thickness of copper wire. The thicker the wire, the lower the conductive resistance, resulting in a lower drop in voltage.
THE
CONSTANT IS BASED ON WIRE SIZE.
REMEMBER THAT LARGER WIRES HAVE LOWER AWG SIZES.
Then, subtract the voltage drop from transformer output to operate in desired range:
Controls enhance landscape lighting, just as they do interior lighting. Photocells, timers, special lenses and the new landscape controller can help control your lighting plan.


Lighting fixtures will generate heat. To avoid excessive heat be sure to keep all lamps clear of dirt and debris. Input voltage at the lamp on low voltage fixtures should never exceed 12 volts.


PHOTOCELLS
Photocells turn the lighting on when the sun goes down. You can combine a photocell (on) and a timer (off) to avoid wasting energy after the household has retired for the night.
TIMERS
Timers provide automatic on/off control, according to how you program them and can be used in conjunction with photocells.
LENSES
Hinkley lenses are available for use with well and spot lights to create directional beams of light, diffuse lamp beam spread, enhance color and to reduce overall glare. See page 132.
SMART LANDSCAPE CONTROL + DIMMER
The Hinkley Smart Landscape Controller easily fits into any Hinkley Pro Series Transformer and remains fully enclosed and protected against the elements. Create customized lighting patterns by controlling different zones on your property.