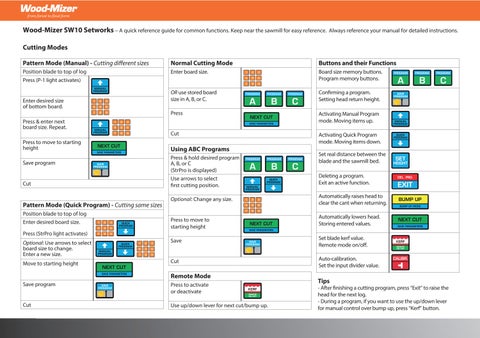
Wood-Mizer SW10 Setworks – A quick reference guide for common functions. Keep near the sawmill for easy reference. Always reference your manual for detailed instructions. Cutting Modes Pattern Mode (Manual) - Cutting different sizes
Normal Cutting Mode
Buttons and their Functions
Position blade to top of log Press (P-1 light activates)
Enter board size.
Board size memory buttons. Program memory buttons.
OR use stored board size in A, B, or C.
Confirming a program. Setting head return height.
Press
Activating Manual Program mode. Moving items up.
Cut
Activating Quick Program mode. Moving items down.
Enter desired size of bottom board. Press & enter next board size. Repeat. Press to move to starting height Save program Cut
Pattern Mode (Quick Program) - Cutting same sizes Position blade to top of log Enter desired board size.
Using ABC Programs Press & hold desired program A, B, or C (StrPro is displayed) Use arrows to select first cutting position. Optional: Change any size. Press to move to starting height
Press (StrPro light activates)
Set real distance between the blade and the sawmill bed. Deleting a program. Exit an active function. Automatically raises head to clear the cant when returning. Automatically lowers head. Storing entered values.
Optional: Use arrows to select board size to change. Enter a new size.
Save
Set blade kerf value. Remote mode on/off.
Move to starting height
Cut
Auto-calibration. Set the input divider value.
Remote Mode Save program
Press to activate or deactivate
Cut
Use up/down lever for next cut/bump up.
Tips
- After finishing a cutting program, press “Exit” to raise the head for the next log. - During a program, if you want to use the up/down lever for manual control over bump up, press “Kerf” button.