WHY REFACING KITCHEN CABINETS MIGHT MAKE SENSE FOR YOU PAGE 6
WHY MODERN HOME SECURITY IS A NECESSITY PAGE 12
HOW SOLAR CAN HELP OFFSET HIGHER ENERGY COSTS PAGE 4
Dubuqueflooring.com
The publisher makes no representations concerning any product or service advertised in this publication. Tri-State Home TRENDS and JuliensJournal.com serve only as a medium for sellers to reach potential buyers and do not guarantee the accuracy of any advertisement. TriState Home TRENDS makes every effort to eliminate typographical errors and assumes no responsibility for misspelling names. All editorial items submitted are subject to editing and alteration at the sole discretion of the publisher. Design and format of the magazine and website are protected by the copyright laws of the United States of America. Reproduction of this publication in whole or in part is prohibited without specific written permission of the publisher.
HOW SOLAR POWER CAN HELP OFFSET
HIGHER ENERGY COST
Electricity prices across the Midwest have increased considerably during the last few years. If you’ve been on the fence about switching to solar, it might be time to make the move. From increasing wholesale prices to shifting energy demands, several trends are converging to make solar a financially sound choice. Listed below are some of the reasons to consider making the move to solar power for your home or business.
New Data Centers Will Increase Demand
New data centers, some projected to use as much energy as entire cities, are adding even more pressure on the grid. According to Wisconsin, Rep. David Steffen, a new Microsoft data center in Mount Pleasant would use the same amount of energy as the city of Madison, and the Port Washington data center would use the same amount of power as the entire city of Los Angeles.
Along with data centers, manufacturing is expanding across the U.S. due to tariffs and new incentives in the One Big Beautiful Bill. AP News observed that Johnson & Johnson is investing $55 billion in the U.S. over the next 4 years, which will include 4 new manufacturing plants. The Telegraph highlighted that Wieland Rolled Products is investing $500
million to increase production and retain 800 jobs in Illinois.
While great for the U.S. economy, these, along with other major manufacturing investments, are creating a need for utilities to update aging infrastructure to meet the growing demand. Utility Dive emphasized that investor-owned U.S. electric utilities will invest more than $1.1 trillion in the 2025–2029 period as the sector rushes to meet growing power demand.
New facilities and upgrades are coming online quickly, so as the energy demand increases, the current supply versus the demand for available energy will cause the market to soar. Utilities will need to meet the demand of their customer base and will be forced to buy energy at much higher rates.
Without major changes, analysts predict that the average American household energy bill could increase between 25% and 70% in the next decade.
Energy Stats Worth Noting for Consumers
Due to energy policy changes and increasing demand, electricity and gas
prices in Iowa, Wisconsin and Illinois have increased.
Iowans are forecast to pay $350 more per year for energy by 2035, according to The Des Moines Register.
Wholesale electricity prices are projected to rise 48% by 2035 in Iowa, reported in Energy Innovation Policy & Technology.
Residential Manufacturer
Iowans are forecast to pay $350 more per year for energy by 2035, according to The Des Moines Register.
Data from the Illinois Citizens Utility Board shows that capacity auction prices, which determine a major part of your electric bill, surged to 830% year-over-year for 2025-2026 and recently set another record high of $329.17 per MW-day for 2026-2027.
Illinois electric customers are already feeling the impact, with ComEd and Ameren raising rates 53% and 47%, respectively, as stated in PR Newswire.
In Wisconsin, electric utilities are seeking double-digit increases over the next two years, and WisPolitics says the state now has the secondhighest electricity rates in the Midwest.
Solar Incentives are Ending
In July of 2025, President Trump signed the One Big Beautiful Bill Act into law. Among its many provisions, the bill makes substantial changes to federal solar tax incentives* — and introduces hard deadlines that every homeowner and business should be aware of:
✔ The 30% Residential Federal Tax Credit* ended on December 31, 2025.
✔ The current 30% Commercial/ Agricultural Federal Tax Credit* (Section 48E) will end on Decem-
ber 31, 2027. A project will qualify for the 30% Federal Tax Credit if the project construction commences before July 4, 2026.*
✔ If construction does not commence before July 4, 2026, the project must be placed in service before December 31, 2027.
✔ The bill restores 100% bonus depreciation on commercial solar projects — a major win for businesses looking to offset upfront costs.
Why Solar Could be the Solution
Going solar is no longer just an ecoconscious decision, it could be a financially strategic one. With utility prices climbing and federal tax credits* winding down, solar offers:
✔ Financial freedom from potential utility rate hikes.
✔ Immediate and consistent savings.
✔ Greater energy independence.
✔ Significant tax advantages — but only for a limited time.
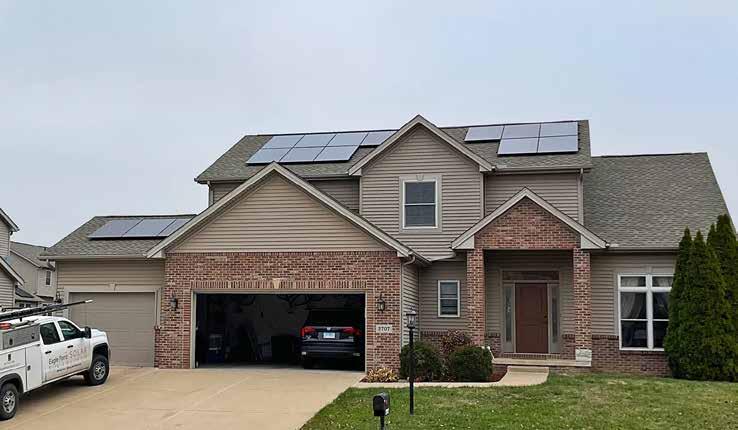
Solar owners have the advantage of producing clean, affordable electricity from their personal solar array, and they can use that power immediately as it’s produced. This reduces the need to purchase power from the grid and helps to offset the amount of power purchased each day or month from the utility company.
This generally creates savings for the consumer, as the monthly payments for solar power are typically far less than they pay for grid electricity, according to Solar.com.
Additionally, the per kilowatt rate of a solar array is a fixed cost with a defined payback period. The per kilowatt rate from a utility company can increase and is out of the consumer’s control.
*Consult with your tax professional to learn more about how you can take advantage of tax credits and incen-
tives. Not all clients are eligible for the Federal Investment Tax Credit (FITC).
Eagle Point Solar provides renewable solar energy solutions throughout Iowa, Illinois and Wisconsin. Eagle
Point Solar also offers sales, design & engineering, permitting, utility interconnection, construction and maintenance. Learn more at EaglePointSolar. com.
Photos courtesy of Eagle Point Solar.
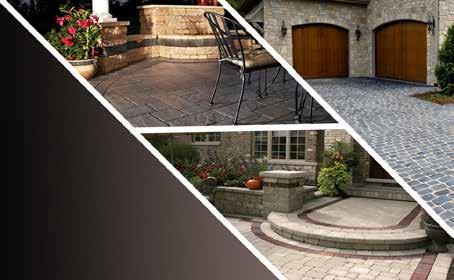
Top Block & Brick for Landscaping
For big outdoor projects or small, we can accommodate your needs.
Top Block & Brick, Inc. manufactures a variety of retaining wall products, concrete pavers, natural stone, edging, decorative rock and much more.
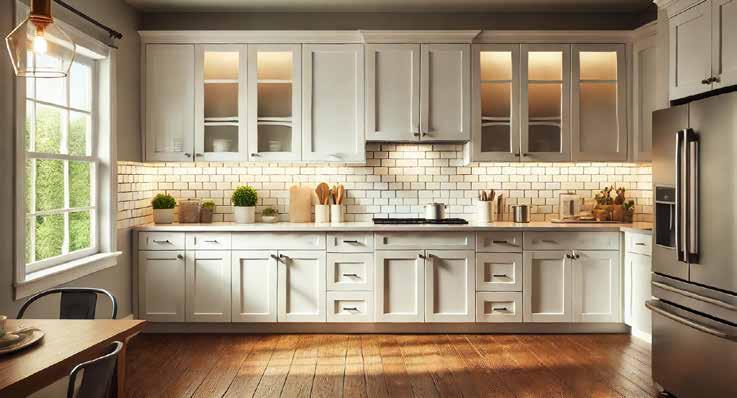
Why Refacing KITCHEN CABINETS Might Make Sense for You
Refacing kitchen cabinets can be an appealing alternative to a full kitchen remodel, especially for homeowners looking to update the look and feel of their kitchen without the high costs or extended timelines associated with a complete renovation. Here’s a closer look at the pros and cons of refacing kitchen cabinets, helping homeowners make an informed decision about whether this option is right for their space.
What is Cabinet Refacing?
Cabinet refacing, sometimes known as cabinet resurfacing, involves updating the external appearance of existing kitchen cabinets rather than replacing the cabinets entirely. In a typical refacing project, new veneer or laminate is applied to the cabinet frames, and new doors and drawer fronts are installed. Often, new hardware, like knobs, handles, and hinges, are added to complete the fresh look. Refacing can transform outdated or worn cabinets into something that looks new, modern, and aligned with the latest design trends.
Benefits of Refacing Kitchen Cabinets
Cost Savings
Refacing is usually much less expensive than a complete cabinet replacement, often costing between 30% and 50% of what a full replacement would cost. For homeowners who want a fresh look without a hefty investment, refacing can be a cost-effective solution.
Time Efficiency
Cabinet refacing typically takes a few days to a week, depending on the scope of the project, compared to several weeks or even months for a full kitchen remodel. This shorter timeline means less disruption to daily life, allowing homeowners to get back to using their kitchen sooner.
Eco-Friendly Option
Since refacing involves reusing the cabinet framework, it prevents old cabinets from ending up in a landfill and reduces the need for new materi-
als. For environmentally conscious homeowners, refacing is a sustainable option that aligns with reducing waste and conserving resources.
Minimal Disruption and Clean-Up
Unlike a complete kitchen renovation, which can create a significant mess and require extensive cleanup, refacing is less invasive. It typically generates less dust and debris, as there’s no need for demolition of the existing cabinets.
Aesthetic Flexibility
Refacing offers a wide range of design choices in terms of materials, finishes, colors, and styles. This flexibility allows homeowners to match or complement other elements of their kitchen, like countertops, backsplashes, and flooring, without having to design a whole new cabinet structure.
Potential Value Addition
If done well, refacing can increase a home’s resale value by giving the kitchen an updated look. A modern, fresh kitchen can be a key selling point for potential buyers, as many see the kitchen as one of the most important rooms in a home.
Drawbacks of Refacing Kitchen Cabinets
Limited Structural Changes
Refacing is a cosmetic solution; it doesn’t allow for changes to the layout or structure of the kitchen. For homeowners hoping to change the configuration of cabinets to improve storage or functionality, refacing may not be the right choice.
May Not Address Wear and Tear Issues
While refacing makes the cabinets look new on the outside, it doesn’t address any internal structural issues. If cabinets have significant wear, warping, water damage, or poorquality materials, the core issues will persist beneath the new veneer. In
such cases, a full replacement may be more worthwhile in the long run.
Limited Customization Options
Although refacing offers various styles and finishes, it doesn’t provide the full customization that new cabinetry allows. Homeowners may find their choices limited, especially if they want to integrate specific features like built-in organizers or specialized drawers that would require structural changes.
Possible Mismatch with Newer Elements
Refacing may not seamlessly match newer kitchen elements like countertops or flooring if the materials or finishes don’t blend well with the existing setup. Homeowners who have already upgraded other parts of the kitchen may find that refaced cabinets don’t fully align with the new aesthetics.
Quality of Materials and Professionalism Impact Results
The success of a cabinet refacing project largely depends on the quality of materials and the skill of the installer. Poor-quality veneers or laminates can peel over time, leading to a short-lived upgrade. Likewise, an inexperienced installer may leave visible seams or uneven edges, making the cabinets look less polished.
Potential for Overcapitalization
While refacing can increase home value, there’s a risk of overcapitalizing, especially if the cost of refacing
is high and the overall kitchen layout or other finishes are outdated. If the kitchen requires extensive updates beyond the cabinetry, it might make more sense to invest in a full remodel.
Is Refacing Right for Your Kitchen?
Refacing is generally a good option if:
✔ The existing cabinets are structurally sound.
✔ The current kitchen layout works well.
✔ You want a fresh look at a lower cost and with less disruption.
✔ You’re aiming for an eco-friendly home improvement option. However, if the cabinets are old, worn, or unsuitable for the desired layout, a complete remodel may be a more appropriate investment.
Conclusion
Cabinet refacing offers a budgetfriendly and efficient way to refresh the kitchen, enhancing its appeal and functionality without the complexity of a complete remodel. While there are certain limitations, the benefits often outweigh the drawbacks for many homeowners. By considering your kitchen’s specific needs, your budget, and your long-term plans for the space, you can decide whether refacing is the best way to achieve your kitchen renovation goals.
Excellence in Electrical Construction Since 1931
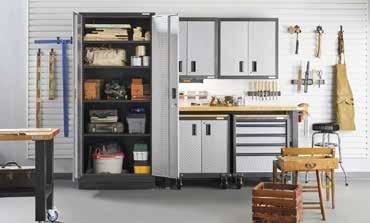
4 EASY WAYS TO GIVE YOUR GARAGE WORKSHOP A SPRING REFRESH
Spring is on its way, which means you’re probably planning to start some spring projects. If you’re a DIY hobbyist, it’s time to give your workspace a spring cleaning.
During the winter, your garage workshop accumulates extra items, dust and debris that can make it impossible to do your best work. So, take advantage of the warmer weather and give your workshop a spring refresh with these four simple tips.
1. Clear Out the Garage
Dedicate the first warm weekend in spring to emptying your garage. That means removing everything that isn’t attached to the walls. This may require a lot of muscle and energy, but it will create a solid foundation for your garage spring cleaning.
Once you have everything out, inventory and sort your items. Sort them into piles like gardening tools, power tools, lawn care appliances, etc. Review each pile and identify what you want to keep, toss or donate.
If you’re having trouble figuring out what to keep, think about how often
you use an item. If you use them regularly or annually, put these tools aside so you can find space for them. Anything you don’t use or that’s broken should be donated or tossed.
2. Dust and Clean Surfaces, Items and Floors
Now that you have everything out of the garage, take time to dust surfaces and items and clean the floors. Start high and work downward so the dust you remove from the shelves doesn’t land on a freshly cleaned countertop. Use a damp cloth to wipe down surfaces and equipment and follow up with a vacuum to get into corners. Next, tackle the floors with a broom and mop. Sweep away dirt, debris and trash that may have accumulated during the winter. Once that’s done, lightly wet the floor with the hose and mop the excess water.
3. Organize Your Tools and Equipment
Take in your cleaned garage, and designate areas to store your various tools and equipment by category. This can help you think about creative storage
solutions and optimal organization, so you have more room for your woodworking projects.
Think about installing overhead, ceiling-mounted storage racks for camping gear, decorations and other bulky items. Consider adding or replacing cabinets for more storage and organization.
A great storage solution for organizing your tools and equipment is a storage cabinet that features one fixed and two or three adjustable full-width shelves that can hold significant weight, so you have plenty of room to store even your heaviest tools.
Another organizational feature to consider is a garage storage wall. Systems like this help you create the perfect organizational space to get gear off the floor, maximize space and make it easier for you to quickly find any item yaou need. Make sure that the kit is customizable, so you can choose from a variety of hooks, baskets and bins that fit your storage needs.
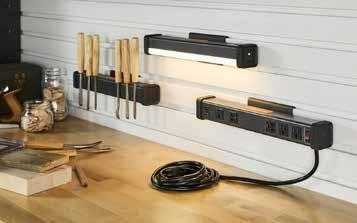
4. Optimize Lighting and Power Sources
Whether you’re working on big or small projects, it’s critical to have proper lighting and multiple power sources so you can work with your power tools safely and efficiently. Consider adding wall accessories like a light bar or power strips.
Choose a light bar with adjustable lighting options so you can see every detail of your project. Light bars are great for providing under-cabinet lighting and lighting inside cabinets as well.
Don’t forget to keep multiple power strips on hand so you have the freedom to plug in several tools anywhere you need them. The ideal power strip will have a long, tangle-resistant cord and surge protection. Modern power strips may even offer USB-A and USBC utility outlets.
Does it seem like you never have enough working surfaces for your projects? You can easily increase workspace by getting tools off your counters. Install a wall-mounted magnet bar or two (or three!) that are strong enough to hold up all the tools you use regularly.
If you clear your counters and still don’t have enough room for your projects, think about purchasing a mobile workstation. Look for a workstation that is heavy-duty and has swivel casters that provide easy mobility. Make sure that the casters can also be locked to hold the workstation steady for added safety and for projects requiring precision.
Tackle your spring projects with ease and confidence. These four tips will help you create a clean and well-organized garage that you’ll look forward to working in.
3 QUESTIONS TO ASK BEFORE STARTING A STAINING PROJECT
Itwon’tbelongbeforespringhassprung, bringingidealweatherfortacklingoutdoorhomeimprovementprojects.Oneof thetopwaystoelevatethelookofoutdoor wooden surfaces is with a fresh coat of stain.Herearemust-askquestionsforyour professionalcontractorbeforegettingstarted:
1. How Long Will the Project Take?
Once temperatures start rising and days start getting longer, there is no better place to be than outside. Before you start your staining project, work on a realistic timeline for completion. There are several factors that will determine how long a project will take to finish including:
Size of Area
Larger surfaces, such as decks or fences, will take more time to stain than smaller areas like furniture or trim.
Type of Stain
Different stains (oil-based, waterbased, gel stains) have varying application and drying times. With a premium oil-based stain and sealer only
one coat needs to be applied to achieve a beautiful, flawless finish.
Preparation
Surfaces that require cleaning, sanding, or stripping old finishes can add time to the project.
Weather Conditions
Weather can impact drying times. High humidity or low temperatures can extend the time needed for the stain to dry.
Application Method
The method of application (brush, roller, or spray) can affect the time required.
2. What Stain Products Will Work Best for my Project?
Choosing the best stain product for your project depends on several factors, including the type of surface you are staining and the desired finish.
Consider:
Type of Surface
Outdoor fences, decks and furniture made of wood are ideal for staining.
Desired Finish
To maintain a natural appearance, opt for a clear or semi-transparent stain that provides color while allowing the natural wood grain to show. If you want a deeper, richer finish, select a premium stain and sealer that is semi-transparent and offers even penetration.
Environmental Conditions
For outdoor projects, choose stains that are specifically formulated for exterior use, as they offer UV-blocking protection and moisture resistance.
3.
How do I Select a Stain Color?
With seemingly endless options, selecting a stain color can be overwhelming, especially if you are not sure what final look you want to create for your outdoor space. Consider these factors:
Wood Type and Age
Wood has different characteristics based on type and age. For example, pine typically takes on a lighter, softer hue while oak gives a more vibrant and deep finish. For new, clean wood,
show off the natural grain with a transparent or semi-transparent stain. Aged wood is a good candidate for deeper coverage and protection. And regardless of the type or age of wood, it’s recommended to test a small area before you fully commit.
Location of Project
Whether your backdrop consists of a lot of open space, or is submerged in earthy, lush greenery, consider your project’s location when choosing a stain color. Select a color that complements your existing exterior elements to create a seamless atmosphere of comfort and beauty.
Lighter stains generate an illusion of openness and more space while dark, earthy tones can produce contrast when paired with bright, lush greens and florals.
Background information for this article was provided by Flood Wood Finishes. Visit Flood.com.
Why HOME SECURITY is a Necessity
For decades, the image of “home security” was a simple deadbolt and perhaps a flickering porch light. If you were particularly cautious, you might have owned a dog with a loud bark. But as our world becomes increasingly interconnected and technology more integrated into our daily lives, the definition of a “secure home” has shifted. Today, a home security system is no longer an optional upgrade for the wealthy; it is a fundamental component of responsible homeownership.
Protecting your property is about more than just thwarting a potential break-in. It is about creating a sanctuary where your family feels safe, your assets are monitored, and your mind is at ease. Here is why investing in a modern security system is one of the smartest moves a homeowner can make.
The Evolution of Deterrence
The most immediate benefit of a security system is deterrence. Most burglaries are crimes of opportunity. Research consistently shows that thieves look for the path of least resistance. When a predator sees a visible camera, a smart doorbell, or a security firm’s decal in the window, the “risk versus reward” calculation changes instantly.
Modern systems have moved beyond passive alarms that simply make noise after an entry has occurred. Proactive security—such as motionactivated floodlights and AI-powered cameras that can distinguish between a stray cat and a human crouching in the bushes—stops many incidents before they even begin. In the digital age, visibility is your first line of defense.
24/7 Peace of Mind (Even When You’re Away)
Perhaps the greatest gift a security system offers is the removal of “whatif” anxiety. Whether you are at the office, running errands, or vacationing on the other side of the world, a smart security system keeps you tethered to your home.
Through smartphone integration, you can:
✔ View live feeds: Check in on your pets or ensure your kids got home from school safely.
✔ Receive instant alerts: Get notified the moment a package is delivered or if a sensor detects an unusual vibration on a rear window.
✔ Remote Management: Forget to lock the front door? You can secure it with a tap on your phone.
This connectivity transforms a house into a “smart” fortress, providing a level of oversight that was unimaginable twenty years ago.
More Than Just AntiTheft: Environmental Protection
Many homeowners mistakenly believe security systems are only for catching “bad guys.” However, some of the greatest threats to a home are internal and environmental. Comprehensive modern systems often include:
✔ Smoke and Fire Detection: Integrated smoke detectors can alert the monitoring station and the fire department faster than a standalone alarm, which is crucial if you are asleep or away.
✔ Carbon Monoxide Monitoring: This “silent killer” is undetectable by human senses. A monitored sensor can literally save lives.
✔ Flood and Leak Sensors: Water damage is one of the most common (and expensive) homeowners’ insurance claims. Sensors placed near water heaters or in basements can alert you to a burst pipe before your ground floor becomes a swimming pool. While there is an upfront cost to installing a high-quality system, it often
pays for itself over time. Most major insurance providers offer significant discounts on homeowners’ insurance premiums, sometimes up to 15% or 20%—for houses equipped with professionally monitored security.
Furthermore, in a competitive real estate market, a pre-installed, high-tech security system is a major selling point. Prospective buyers view it as a value-added feature that saves them the hassle of installation, potentially increasing your home’s resale value.
Creating a “Safety Culture”
Ultimately, a security system fosters a culture of awareness within the household. It encourages family members to be mindful of locked doors, closed garage entries, and general surroundings. It provides a safety net that allows you to sleep more soundly, knowing that an extra set of “eyes” is watching over your most precious investments.
In an era where we protect our smartphones with biometrics and our bank accounts with two-factor authentication, it only makes sense to apply that same level of rigor to the physical space where we live, breathe, and raise our families.
Finding Your Fit
Every home is different. A sprawling suburban estate might require a network of outdoor perimeter cameras and gate sensors, while a downtown condo might only need a smart doorbell and a few window sensors. The beauty of today’s market is scalability. You can start small with a DIY kit and expand your network as your needs or your family grow.
Investing in home security isn’t about living in fear; it’s about living with the confidence that you have done everything possible to protect what matters most.
A Guide to LOW-MAINTENANCE Gardening
For many homeowners, the “American Dream” often comes with a side of weekend-consuming yard work. We envision ourselves sipping lemonade on the porch, but the reality is more frequently spent wrestling with a temperamental lawnmower, pulling stubborn dandelions, or untangling a heavy garden hose.
As our professional and personal lives become increasingly demanding, the traditional, high-maintenance landscape is becoming a relic of the past. The modern homeowner doesn’t want to be a slave to their soil; they want a sanctuary that looks beautiful with minimal intervention. Welcome to the era of lazy-luxe landscaping—a philosophy that prioritizes smart design and hardy biology over constant toil.
Rethinking the “Green Carpet”
The biggest time-sink in any yard is the traditional turf lawn. It requires weekly mowing, seasonal aeration, expensive fertilizers, and massive amounts of water just to stay green. To reclaim your weekends, the first step is lawn reduction.
Consider replacing portions of your grass with “living rugs” or hardscaping. Groundcovers like creeping thyme, sedum, or clover are excellent alternatives. They rarely need mowing, stay low to the ground, and often produce delightful scents or flowers. If you aren’t ready to give up the green entirely, investigate “No-Mow” fescue blends—grasses designed to grow slowly and flop over into a beautiful, meadow-like aesthetic that only needs cutting twice a year.
The Power of Native Plants
If you want a garden that thrives on neglect, look to the locals. Native plants are species that have evolved over thousands of years to thrive in your specific climate and soil conditions. Unlike exotic ornamentals, they don’t need “coddling.”
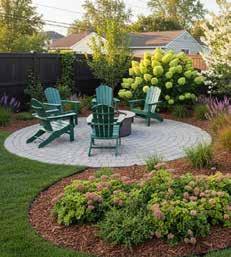
A landscape area that includes native plants hydrangea, purple coneflower, and ornamental grass.
✔ Pest Resistance: Native plants have built-in defenses against local bugs.
✔ Drought Tolerance: Once established, their deep root systems can handle a dry spell much better than non-native species.
✔ Ecosystem Support: They provide essential food and habitat for local pollinators like bees and butterflies, turning your yard into a self-sustaining ecosystem.
When choosing plants, think about perennials (which come back every year) rather than annuals (which die after one season). A well-placed hydrangea, purple coneflower, or a cluster of ornamental grasses like Little Bluestem will provide structural beauty year after year with nothing more than a quick trim in the spring.
Mulch: The Busy Gardener’s Best Friend
If there is a “magic bullet” in low-maintenance landscaping, it is mulch. A thick layer (2–3 inches) of organic mulch, such as shredded bark or wood chips, performs three vital tasks:
1. Weed Suppression: It blocks the sunlight that weed seeds need to germinate.
2. Moisture Retention: It prevents water from evaporating, meaning you have to pick up the hose far less often.
3. Soil Improvement: As it breaks down, it feeds your plants naturally.
For even less maintenance, consider stone or gravel mulch in specific areas. While stone doesn’t nourish the soil, it never needs to be replenished and provides a clean, modern look that defines garden beds beautifully.
Hardscaping and Strategic Zoning
One of the most effective ways to reduce yard work is to simply have less
Embracing “Planned Imperfection”
Perhaps the most important shift in low-maintenance landscaping isn’t horticultural—it’s psychological. We have been conditioned to believe that a perfect yard is one that looks manicured and sterile. However, there is immense beauty in a “wilder” aesthetic.
“yard” to work on. Hardscaping—the use of non-living elements like patios, decks, stone paths, and fire pits—creates “outdoor rooms” that require zero watering and zero pruning.
By expanding your patio or adding a gravel seating area under a shade tree, you create functional space for entertaining while simultaneously deleting a section of the garden that would have required maintenance.
Automation: Let Technology Do the Heavy Lifting
Even a low-maintenance yard needs some water, especially during the first year of planting. This is where modern technology can help.
✔ Drip Irrigation: Unlike traditional sprinklers that spray water into the air (where much of it evaporates), drip systems deliver water directly to the roots of the plants.
✔ Smart Controllers: Modern irrigation systems connect to your Wi-Fi and use local weather data to adjust watering schedules automatically. If it rained last night, the system knows not to turn on this morning.
✔ Robotic Mowers: If you insist on keeping a lawn, a robotic mower can handle the daily upkeep, much like a Roomba does for your living room floors.
By choosing ornamental grasses that sway in the wind and letting seed heads remain on flowers through the winter, you provide visual interest during the cold months and food for birds. This “New Perennial” movement celebrates the natural lifecycle of plants, meaning you don’t have to rush out to deadhead every spent bloom.
Getting Started: The 3-Step Transition
You don’t have to tear up your entire yard this weekend to see results. Start small:
4. Identify the “Struggle Zones”: Is there a patch of grass that always dies or a corner that’s a pain to mow? Start there. Turn it into a mulched bed with three hardy shrubs.
5. Edge Your Beds: A clean, deep edge between your lawn and your garden beds makes the whole yard look professional and “finished,” even if the plants inside are a bit wild.
6. Plant for the Future: Every time a high-maintenance plant dies, replace it with a native, droughttolerant perennial.
By making these incremental changes, you’ll slowly transform your outdoor space from a source of stress into a source of serenity. After all, your yard should be a place where you spend your time living—not just working.
Including hardscaping and landscape areas in your yard reduces maintenance work.
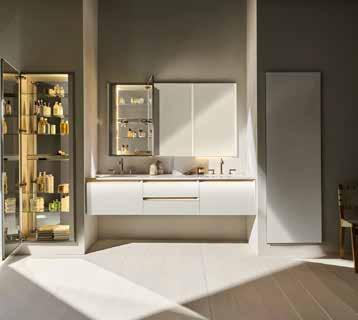
Luxury How Modular Designs Help Create a Bathroom
Bathrooms are more than just a necessity of modern living. It’s true that they’re practical spaces, but practicality doesn’t mean you have to sacrifice luxury.
Creating a bathroom that combines functionality and luxury isn’t difficult if you use the right design principles.
George Wahlgren, Director of Product Development of Robern - a manufacturer of bespoke bathroom furnishings and fixtures - has answered a few questions to shed some light on how incorporating modular designs and products into your bathroom can enhance the space.
What are the Benefits of Modular Design for Bathrooms?
Modular design can enhance the look and feel of any bathroom, especially when creating personalized spaces. There are many advantages to using modular designs in building or renovating a bathroom. For example, modular bathroom features can help seamlessly integrate various design components - such as different textures, finishes, materials and colors - while maintaining a cohesive and polished look.
Modular designs also offer the flexibility to maximize space in a bathroom, creating a sense of openness and elegance, giving people a chance to enjoy the benefits of functionality and personal expression. That includes customizable lighting and integrated technology.
What Luxury Bathroom Trends or Features Are Popular Now?
This year, we’re going to see bathrooms go beyond the basics and become more dynamic, multifunctional retreats. Whether they incorporate saunas, dressing rooms, beauty stations or home fitness areas, these versatile spaces will focus on offering a holistic experience.
Along the same lines, wellness and relaxation will take center stage in bathroom design. The idea of the bathroom as a sanctuary is stronger than ever, with spa-like atmospheres creating an escape from the stresses of daily life.
A major part of the spa-ification of bathrooms relies on providing an immersive sensory experience. You’ll see more bathrooms with dimmable lighting systems, allowing users to adjust the color and intensity of light based on their mood or activity.
As part of the sensory experience, designers lean toward a mix of natural materials and finishes, offering clients textural variation. Whether that’s achieved through contrasting textures or carefully curated patterns, bathroom designs will trend toward richness and luxury.
A Guide to Different Types of BABY GATES and
Installation Tips for Homeowners
When it comes to babyproofing your home, baby gates are an essential safety feature. They help keep curious little ones away from potentially dangerous areas like stairs, kitchens, or fireplaces. However, not all baby gates are created equal, and choosing the right type can make all the difference in ensuring your child’s safety. Here’s a breakdown of the different types of baby gates available and some practical installation tips to help you get started.
Types of Baby Gates
Pressure-Mounted Gates
✔ Best For: Flat surfaces like doorways and between rooms.
✔ Features: These gates rely on tension to stay in place, making them easy to install without drilling holes. They are portable and suitable for temporary setups.
✔ Considerations: They are not recommended for use at the top of stairs, as they can be dislodged with enough pressure.
Hardware-Mounted Gates
✔ Best For: Areas with high safety risks, such as the top of stairs.
✔ Features: These gates are screwed into walls or banisters, offering a secure and sturdy option. They typically include features like swing-stop mechanisms to prevent them from opening over staircases.
✔ Considerations: Installation is more permanent, requiring tools and leaving holes in walls or wood.
Retractable Gates
✔ Best For: Tight spaces or areas where the gate needs to be out of the way when not in use.
✔ Features: Made from a soft mesh or durable fabric, these gates roll up into a compact unit when not extended. They’re versatile and sleek, blending well with modern decor.
✔ Considerations: They may not be as sturdy as hardware-mounted gates, especially for energetic toddlers.
Freestanding Gates
✔ Best For: Creating temporary play zones or blocking off wide, open areas without walls.
✔ Features: These gates do not require any mounting and are often designed as configurable panels that can be arranged into various shapes.
✔ Considerations: They are less secure than mounted gates, so supervision is still necessary.
Walk-Through Gates
✔ Best For: High-traffic areas where adults need easy access.
✔ Features: These gates have a swinging door mechanism, allowing you to pass through without dismantling the gate.
✔ Considerations: Ensure the latch mechanism is secure to prevent toddlers from opening it.
Extra-Wide or Custom-Fit Gates
✔ Best For: Wide openings, irregularly shaped spaces, or unconventional layouts.
✔ Features: These gates often come with extensions or configurable panels to fit unique spaces.
✔ Considerations: Be sure to measure accurately before purchasing to avoid improper fitting.
Installation Tips
Measure Twice, Install Once Always measure the width of the opening and the height needed before purchasing a gate. Ensure the gate is tall enough to prevent your child from climbing over.
Follow Manufacturer Instructions
Each type of gate has specific installation requirements. Carefully follow the instructions to ensure maximum safety.
How to Fix That Hole in the Wall Like a Pro
We’ve all been there. Maybe it was a rowdy game of indoor fetch, a door handle flung open too wide, or the lingering scars of a gallery wall that didn’t quite work out. Whatever the cause, a hole in the drywall feels like a glaring neon sign pointing to a home in disrepair.
Secure Anchors for HardwareMounted Gates
If you are installing the gate on drywall, use appropriate anchors to prevent the gate from loosening over time. For banisters, consider using mounting kits to avoid drilling directly into wood.
Check Stability Regularly
Over time, gates can loosen due to pressure or wear. Periodically check the tension and tightness of your baby gate to ensure it remains secure.
Avoid Tripping Hazards
If the gate has a bottom bar, ensure it is clearly visible to avoid tripping ac cidents. Alternatively, choose a gate without a bottom threshold for hightraffic areas.
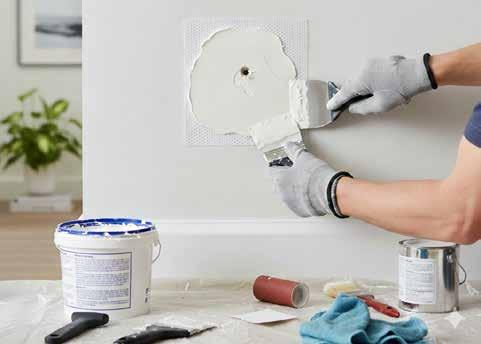
The good news? You don’t need to call a contractor or lose your security deposit. Patching a small hole is one of the most satisfying DIY projects because the barrier to entry is low, and the results—when done correctly—are invisible. Here is your stepby-step guide to taking your walls from “holey” to “holy cow, that looks great.”
Step 1: Gather Your Tools
Before you touch the wall, you need the right tools. For a small hole (anything from a nail pop to the size of a golf ball), you will need:
✔ A putty knife (a 2-inch or 3-inch flexible blade is ideal).
✔ Fine-grit sandpaper (120 to 220 grit).
✔ Self-adhesive mesh patch (only if the hole is larger than an inch).
Keep Tools Handy
A level, screwdriver, and measuring tape will be essential during installation. For complex setups, consider an electric drill.
Conclusion
Baby gates are a critical part of keeping your home safe for your child, but the right type and proper installation are key to their effectiveness. Whether you need a simple pressure-mounted gate for temporary use or a robust hardware-mounted gate for staircases, the market offers options to suit every homeowner’s needs. By choosing the right gate and installing it securely, you can create a safer environment for your little explorer.
✔ A damp cloth.
✔ Matching wall paint and a small brush or foam roller.
Step 2: Preparation is Everything
The biggest mistake beginners make is trying to patch over “shag.” If there are jagged bits of drywall paper or crumbling plaster sticking out, your patch will never be smooth.
1. Clear the Debris: Use your putty knife or a utility knife to scrape away any loose debris. If the edges of the hole are protruding outward, gently push them in or trim them so the surface is flush or slightly recessed.
2. Dust It Off: Use a damp cloth to wipe away dust around the area. Spackle won’t stick to a dusty surface; it will just roll off like a dry ball of dough.
Step 3: The Patching Process
For Nail Holes and Scratches:
These are the “easy wins.” Take a small dab of spackle on the tip of your putty knife. Press it into the hole, then swipe across the surface in a single, smooth motion.
Pro Tip: Don’t overwork it. Every time you swipe, you risk pulling the material back out of the hole. Leave it slightly “proud” (bulging just a tiny bit), as spackle tends to shrink as it dries.
For Larger Holes (The Doorknob Incident)
If the hole is large enough that the spackle would just fall through into the wall cavity, you need reinforcement.
✔ Apply the Mesh: Cut a piece of self-adhesive mesh patch so it overlaps the hole by about an inch on all sides. Press it firmly against the wall.
✔ The First Coat: Apply a layer of joint compound over the mesh. Start from the center and spread outward. You want to “feather” the
edges, meaning the compound should get thinner as you move away from the hole until it blends into the wall.
✔ The Second Coat: Once the first coat is dry (usually 2–4 hours), it might look a bit uneven. This is normal. Apply a second, wider coat to further smooth out the transition.
Step 4: The Art of the Sand
Patience is a virtue, especially here. Ensure the patch is completely dry, it should be stark white and hard to the touch.
Take your fine-grit sandpaper and lightly sand the area in a circular motion. Your goal isn’t to sand the patch off, but to remove any ridges or “lap marks” left by the putty knife. Run your fingers over the area with your eyes closed. If you can feel a bump, your guests will see a bump. Sand until the transition between the patch and the original wall is indistinguishable to the touch.
Step 5: The Finishing Touch
Now for the part where the magic happens: painting. You might be tempted
to just slap some paint on, but if you want it to be invisible, follow these two rules:
3. Prime if Necessary: If you used a large amount of compound, it is very porous and will “suck up” the moisture in the paint, leaving a dull spot (this is called “flashing”). A quick dab of primer—or even a tiny bit of paint mixed with a drop of water—can act as a sealer.
4. Stipple, Don’t Stroke: Don’t use long brush strokes. Instead, “stipple” or dab the paint onto the patch and blend it outward. This mimics the slight texture of the surrounding wall.
Less is More
The most common DIY disaster is applying a giant mountain of spackle for a tiny hole. It results in hours of sanding and a dusty mess. Remember: you can always add a second layer, but removing a rock-hard glob of dried compound is a headache.
TIPS ON HOW TO BEST LOAD YOUR DISHWASHER
One question has persisted in households everywhere: Is there a right way to load a dishwasher? The answer is yes. To ensure that your dishes come out clean when your washer is done doing its job
The experts at KitchenAid brand share tips to help your dishes come out clean - and you may be surprised how easy your cleanup time can be.
Let Go of Rinsing
You may have been trained to prerinse dishes, but if you bought your dishwasher in the past 10 years, you may be able to give up this step. Prerinsing can be a waste of time and re-
sources, as most modern dishwashers have built-in sensors that measure the soil level of each load. If dishes don’t have soil on them, your dishwasher may cut the cycle short, leaving dishes less than pristine. Simply scrape off excess food and debris before loading.
Make Sure Everything is Dishwasher Safe
You don’t want to clutter your dishwasher with items that don’t belong, or worse yet, risk damaging anything that should be hand washed. Watch for items like:
✔ Cast iron and non-stick pans: Hot water and detergent can destroy their coatings.
✔ Silver or enamel: Heat and detergent can ruin these finishes.
✔ Fine China: Some dishwashers have cycles specifically designed for fine china, but since they can break or chip easily, you may want to wash with extra care by hand.
Load for Maximum Spray
Load items so they’re angled downward, toward the center of the rack. This method helps enable the maximum amount of spray jets to reach surfaces to clean them properly. Avoid close nesting or overlapping items, as that can block spray from reaching dishes.
Optimize Loading with a Third Rack
When you’re in the market for a new dishwasher, a third rack dishwasher will free up more space with a convenient third rack for items like silverware, measuring cups and spatulas.
Especially for large households or if you enjoy frequent cooking and entertaining.
Think Rack by Rack
Start at the top by loading smaller, lighter items like mugs, stemware and small plates and bowls in your second and/or third rack. Large utensils, spatulas and ladles should be laid flat on an upper rack, as putting them in the utensil holder could block the lowerlevel spray arm. Smaller utensils can also be loaded on the upper rack - just make sure they’re placed so they won’t fall through open spaces in thea rack. Plastic containers should be loaded on an upper rack away from the heating element to prevent warping or melting. Only wash plastic items that are marked “dishwasher safe.”
The lower rack is designed for large items like dinner plates and dishwasher-safe cookware. Alternating large and small items helps spray arms reach all surfaces. Place soiled pans, bowls and casserole dishes on their sides, especially for older dishwashers that might only have a spray arm in the bottom that could be blocked by face-down dishes. Oversized items like cutting boards or pans are best laid down on their sides or placed around the perimeter so the spray arm isn’t impeded.
Finally, load the utensil holder with cutlery handles down, except for knives. They should be inserted blades down to protect fingers during emptying.
Pro Tip
Unload dishwasher in reverse order, starting with cutlery and the bottom rack - this avoids having any water that’s pooled in dishes in upper racks from splashing on items below while you’re unloading.
No more arguing about how to load the dishwasher, now that you know the best method for keeping your dishes clean.
The BENEFITS and DRAWBACKS of Granite Countertops in the Kitchen
Granite countertops are a popular choice in kitchens, known for their luxurious appearance and durability. As one of the most sought-after natural stones, granite offers a range of benefits, but it also comes with certain drawbacks. If you’re considering granite for your kitchen, here’s a breakdown of the pros and cons to help you make an informed decision.
Benefits of Granite Countertops
Aesthetic Appeal
Granite countertops are prized for their natural beauty and unique appearance. Each slab of granite is one-of-akind, with different color variations, veining, and patterns. This individuality adds a touch of elegance and sophistication to any kitchen, and with a wide range of colors available (from subtle neutrals to bold hues), it can complement various design styles.
Durability and Strength
One of granite’s standout features is its strength. Granite is highly resistant to scratches, making it ideal for busy kitchens where sharp knives and other utensils are in constant use. It’s also heat-resistant, allowing you to place hot pots and pans directly on the surface without causing damage.
Long Lifespan
With proper care, granite countertops can last for decades. Once installed and sealed correctly, granite can withstand the rigors of a kitchen environment, maintaining its look and functionality for years. This longevity makes it a worthwhile investment for homeowners looking for a long-term solution.
Resistant to Stains and Bacteria (When Sealed)
Granite is naturally porous, but when sealed properly, it becomes resistant to staining and moisture. A high-quality
sealant will also create a hygienic surface, preventing the absorption of liquids and the growth of bacteria. This is particularly important in kitchens where food preparation happens regularly.
Adds Value to Your Home
Granite countertops are often seen as a premium feature that can increase the resale value of your home. They are attractive to potential buyers due to their beauty, durability, and reputation as a high-end material. If you plan to sell your home in the future, granite countertops could make your kitchen more appealing to buyers.
Drawbacks of Granite Countertops
High Cost
One of the major downsides of granite is its cost. Granite countertops are typically more expensive than other countertop materials like laminate or tile. The price of granite varies depending on the color, rarity, and thickness of the slab, but it can be prohibitive for homeowners on a tight budget. Additionally, installation costs for granite are higher due to the need for skilled labor.
Requires Regular Maintenance
While granite is durable, it does require some maintenance to keep it in top condition. Granite countertops need to be sealed upon installation and re-sealed periodically (typically every 1-2 years) to maintain their resistance to stains and bacteria. Without proper sealing, granite can absorb liquids, leading to stains and potential damage over time.
Porous Nature (When Not Sealed Properly)
If granite is not sealed correctly, it can absorb liquids like oils, wine, or juice, leading to stubborn stains. Unsealed granite is also susceptible to harboring bacteria, which can make the counter-
unhygienic. The porous nature of the stone makes sealing a crucial step, and homeowners must be diligent in keeping up with this maintenance task.
Heavy Weight
Granite is an extremely heavy material, which can pose challenges during installation. The weight of the slabs often requires reinforced cabinetry to support the load. This can increase the overall cost of the project, as additional structural work may be needed to ensure your kitchen can handle the weight of the granite.
Prone to Chipping and Cracking
Although granite is strong, it’s not completely impervious to damage. A heavy object, such as a cast-iron skillet, dropped on the countertop can cause chips or cracks. Repairing these damages can be difficult and costly. Corners and edges are particularly vulnerable to chipping, so careful use is required to prevent accidents.
Limited Color Options Compared to Man-Made Materials
While granite offers a wide variety of colors and patterns, it doesn’t provide as much consistency or flexibility in design as some man-made materials like quartz. Since granite is a natural stone, you’re limited to the colors and patterns that nature has created, which might not always match your design pref fectly.
Is Granite Right for Your Kitchen?
Granite countertops are a stunning and durable choice for any kitchen, offering a timeless aesthetic and impressive strength. However, they come with certain drawbacks, particularly in terms of cost, weight, and maintenance requirements. If you’re willing to invest in regular upkeep and the initial expense, granite can provide a beautiful and lasting surface for your kitchen. However, for homeowners looking for a more budget-friendly or low-maintenance option, alternative materials like quartz or laminate may be worth considering.
Ultimately, choosing granite comes down to your personal preferences, lifestyle, and budget. With proper care, granite countertops can elevate the look of your kitchen and provide a surface that stands the test of time.