
HISTORY
WOOD JOINERY - WOODWORK
PERIOD
Ancient India (c. 3000–500 BCE)
KEY DEVELOPMENTS
Initial Steps- Use of lashings and pegs in furniture, storage chests, and watercraft.
Wooden Chariots-Advanced joinery like mortise and tenon for chariots and royal furniture.
Maurya & Gupta Periods (c. 300 BCE–500 CE)
Medieval Period (500–1500 CE)
Colonial Era (1500–1947 CE)
Post-Independence Era (1947–Present)
Development of Joinery- Advanced woodworking techniques and use of metal in furniture.
Wooden Architecture- Beams, columns, and carvings in temples, palaces, and sculptures.
Temple Architecture-Wooden elements with advanced joinery (mortise and tenon, dovetail, lap joints).
Delhi Sultanate & Mughal Periods- Refined joinery, intricate carving, and latticework with inlays.
European Influence- Fusion of Indian craftsmanship with European styles.
British Raj- Use of modern carpentry tools; mortise and tenon, finger joints, and dovetail techniques.
Indigenous Craftsmanship- Revival of traditional joinery in handcrafted furniture from regions like Rajasthan and Kashmir.
Handcrafted Furniture-Blend of ancient techniques with modern tools for luxury furniture and heritage restoration.
SOURCE OF ORIGIN-
WOOD JOINERY - WOODWORK
Many cultures separately invented wood joinery, but ancient Egypt, China, Japan, Greece, Rome, and India are important places where it flourished. The development of carpentry and woodworking was influenced by the distinctive methods and designs that each of these areas offered. These methods demonstrated the usefulness of joinery in creating and conserving history since they were not only practical but also intricately entwined with cultural, religious, and aesthetic values.
REGION & ERA
Ancient Egypt (c. 3000–1000 BCE)
Ancient China (c. 2000–500 BCE)
Japan (c. 7th Century CE–Present)
Ancient Greece & Rome (c. 700 BCE–500 CE)
Middle East (c. 700–1500 CE)
India (c. 3000 BCE–Present)
Europe (c. 1200 CE–Present)
WOOD JOINERY
Dovetail, mortise and tenon, pins
Complex mortise and tenon joints (no glue or nails)
Advanced interlocking joints (e.g., Shachi-sen, Kigoroshi)
Mortise and tenon, dovetail joints
Interlocking joints for geometric patterns
Dovetail, lap, mortise and tenon joints
Half-lap, tongue and groove, dovetail joints
CULTURAL SIGNIFICANCE
Accuracy and expertise used in furniture, boats, and tomb treasures.
Symbolized balance and harmony, seen in temples and furniture.
Reflected longevity, simplicity, and reverence in temples and shrines.
Demonstrated order and engineering perfection in public buildings and furnishings.
Expressed Islamic art's intricacy and harmony, aligned with aniconism.
Functional and symbolic decorative joinery in furniture, palaces, and temples.
Key in Gothic architecture and Renaissance furnishings, combining structural and aesthetic ideals.
PROCESS, TOOLS, AND TECHNIQUES
WOOD JOINERY - WOODWORK
joineries used in making of the product are-
Tenon and Mortise Joinery
Dowel Joinery
TENON AND MORTISE JOINERY
METHOD
Traditional Method
STEPS
Marking the Wood: Use marking gauges, squares, and pencils/knives for layout.
TOOLS USED
Marking gauge, square, pencil/knife
Cutting Mortise: Drill/chisel to remove material; smooth walls with chisels. Hand drill, brace, chisels
Trimming Tenon: Cut tenon cheeks and shoulders; refine fit with a chisel.
Assembly and Adjustment: Dry-fit, adjust with sanding/chiseling; glue and clamp.
Modern Method Mortise Cutting:
Handsaw, chisels
Sandpaper, clamps, glue
- Drill Press: Quickly bore mortises; square edges with a chisel. Drill press, chisel
- Mortising Machine: Combines drilling and chiseling for square mortises. Mortising machine
- CNC Router: Cuts precise mortises for complex designs or production.
- Table Saw: Uses dado blades or tenon jig for accuracy.
CNC router
Table saw, dado blades, tenon jig
- Router: Creates precise tenons with a straight bit. Router, straight bit
- Band Saw: Shapes tenons for custom applications. Band saw
DOWEL JOINERY
CATEGORY TRADITIONAL TECHNIQUES
Marking & Measuring
Drilling
Dowels
Alignment
Adhesive
Use a marking gauge, ruler, square, and marking knife for precise dowel placement and alignment.
Drill manually with a hand drill or brace and bit, using a simple doweling jig for alignment.
Hand-cut dowels using a dowel plate or knife, then sand for proper fit.
Dry-fit dowels to test alignment and depth.
Apply wood glue to dowels and holes, then clamp until set.
Hybrid Techniques -
MODERN TECHNIQUES
Utilize laser levels or digital calipers for high accuracy.
Use power drills with adjustable doweling jigs for fast, precise hole alignment, or automated doweling machines in commercial settings.
Use pre-made dowels with flutes or grooves for even glue distribution.
Use alignment pins or center points for precise positioning of mating holes.
Use advanced glues (e.g., polyurethane, epoxy) for stronger bonds.
Combine pocket-hole joinery with dowels for additional strength.
EVOLUTION
WOOD JOINERY
HISTORICAL EVOLUTION OF WOOD JOINERY
ERA
TECHNIQUES/ADVANCEMENTS
Ancient Techniques Mortise and tenon, dovetail, lap joints
Medieval & Renaissance
Improved saws and chisels enabled complex joints; Gothic architecture flourished
Industrial Revolution Mechanization (lathes, saws); introduction of mass-produced nails and screws
CHARACTERISTICS
Crafted with hand tools, used wooden pegs/dowels for strength
Joinery became both decorative and structural
20th Century
Use of adhesives (e.g., PVA glue); prefabrication and modular systems
INTEGRATION OF JOINERY IN MODERN DESIGN
ASPECT
Craft Revival
Digital Fabrication
Sustainability
Hybrid Approaches
Balanced efficiency with traditional durability
Simplified joints, reduced reliance on traditional skills, increased efficiency
DETAILS
Celebrates visible, hand-crafted joinery, influenced by Arts and Crafts and Scandinavian modernism.
CNC machining enables precise, intricate joints inspired by traditional Japanese systems.
Revives traditional methods for eco-friendly designs; CLT applies joinery to large-scale projects.
Combines visible craftsmanship with hidden connectors for strength and modular adaptability.
HISTORY
WOOD LATHE WORK
PERIOD
Ancient & Medieval Period
KEY DEVELOPMENTS
- Early wooden lathes used for crafting tools, sculptures, and wooden objects (e.g., in Uttar Pradesh, Gujarat, Rajasthan).
- Played a key role in temple architecture, producing intricate carvings, statues, and panels.
Mughal Period
Colonial Period
Post-Independence
Contemporary Period
Notable Regions
- Enhanced craftsmanship with intricate wood carving for palace furniture, ornate screens, and architectural elements.
- Persian and Central Asian influences.
- British introduced advanced lathes, steam-powered machinery, and industrial methods.
- Rise of furniture making in urban centers like Kolkata and Chennai.
- Revival of traditional wood turning after 1947 with government support.
- Decline of hand lathe work due to industrialization, but artisan craft continued.
- Combination of traditional methods with modern technology.
- Wood lathe work as an art form in regions like Rajasthan and the Himalayas.
- Karnataka: Known for wood carving and turning.
- Rajasthan: Intricate woodwork, furniture, and ornamental items.
- Kolkata: Long-standing tradition of wood lathe work, especially in furniture manufacturing.
SOURCE OF ORIGIN-
WOOD LATHE WORK
PERIOD/CULTURE
Ancient Egypt (circa 1300 BCE)
Ancient Greece and Rome
KEY DEVELOPMENTS IN WOOD LATHE WORK
Early forms of wood lathes powered by hand or foot, used for small wooden objects like spools and figurines.
Foot-powered lathes became more sophisticated, used for furniture, chariot parts, and decorative items.
Medieval Europe (5th-15th century)
Renaissance Italy
Industrial Revolution (18th-19th Century)
Traditional Woodworking Cultures
Japan
Scandinavia (Sweden, Norway)
Foot-powered lathes used for everyday items (furniture, utensils, architectural details), especially in England and Italy.
Skilled artisans in Florence created intricate wood and metalwork, contributing to decorative arts.
Invention of power-driven lathes (steam/electricity), revolutionizing mass production in woodworking industries.
Native American Cultures
Modern Wood Lathe Work
Cultural & Artistic Significance
Unique lathe with fixed headstock and movable tailstock; craftsmanship linked to simplicity and functionality.
Long history of woodturning, with cultural significance in self-sufficiency and craftsmanship, creating spoons, bowls, and small tools.
Simple hand-powered lathes used for creating bowls, canoes, and utensils, integral to daily life and spiritual practices.
Woodturning as both a professional skill and hobby; continues through guilds and schools.
Represents craftsmanship, precision, and artistic expression, transforming raw wood into functional or decorative pieces.
PROCESS, TOOLS, AND TECHNIQUES
WOOD LATHE WORK
ASPECT
Power Source
Tools
Control
Speed
Precision
Craftsmanship
Learning Curve
TRADITIONAL METHODS
Manual (foot-powered or hand-powered)
Hand tools like chisels, gouges, and scrapers
Operator controls speed and precision manually
MODERN METHODS
Electric or motorized (with variable speed)
High-speed steel, carbide tools, digital calipers, CNC tools
Speed and precision are often controlled electronically
Slow and labor-intensive Fast and efficient
Dependent on skill and experience
Highly focused on individual craftsmanship
Steep learning curve, requires skill
High precision, especially with CNC
Often focuses on mass production and efficiency
Easier to learn with automated systems, but still requires training for advanced techniques
IMPORTANT DISTINCTIONS BETWEEN CONVENTIONAL AND CONTEMPORARY APPROACHES
SPEED
Woodturning is a more efficient operation thanks to modern lathes, which run considerably faster.
PRECISION
Modern techniques, particularly with CNC technology, enable extremely accurate work that can be precisely duplicated, whereas traditional methods rely on the artist's expertise.
TOOLS AND ACCESSORIES
While modern lathes come with a variety of accessories that enhance the quality of the job and speed of production, traditional lathes employed simple tools.
CRAFT VS. MASS PRODUCTION
While modern lathes, particularly CNC machines, enable mass production and improved output consistency, traditional woodturning was typically used for custom or handcrafted objects.
EVOLUTION
WOOD LATHE WORK
PERIOD
Ancient Civilizations
Medieval Period
KEY DEVELOPMENTS
Egypt: Simple two-person lathe with rope to turn workpiece and chisel for carving.
14th Century: Treadle-powered lathe introduced for better control, used for ornate carvings and furniture.
Industrial Revolution
Rise of Specialization
20th Century
Integration with Modern Tools
Modern Design
Fusion with Digital Tools
Product Design & Architecture
18th-19th Century: Steam-powered lathes replace manual labor, enabling mass production of turned wooden items (e.g., spindles, wheels).
Specialized lathes for tasks like bowl and spindle turning developed, improving precision and design variety.
Electric & CNC Lathes: Introduction of electric motors, automated systems, and CNC lathes for precise, repeatable designs.
CAD software and CNC technology allowed for detailed planning, visualization, and complex design work.
Advanced Materials: Integration with engineered woods, composites, and even metalworking. Eco-friendly practices and material fusion (e.g., resin, glass).
3D scanning & 3D printing: Hybrid designs combining digital and handmade elements in woodturning.
Modern wood lathes are key in creating intricate, customized designs for furniture, products, and architectural details.
HISTORY
CHARPAI WEAVING
CATEGORY
Early Origins
Traditional Weaving
Craftsmanship
Cultural Significance
Symbol of Rural Life
Social & Ritual Use
Decline
Revival Efforts
Cultural Heritage
DETAILS
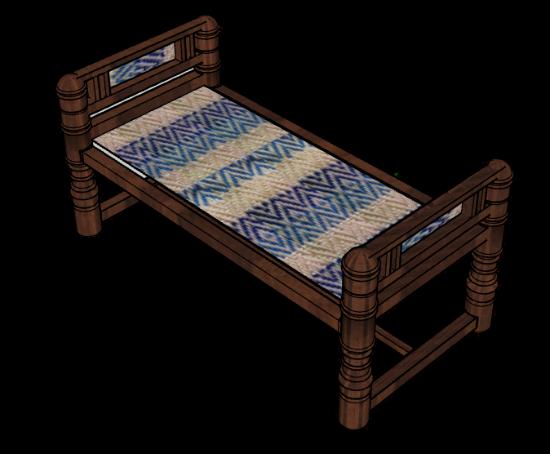
Evolved in ancient India, linked to the need for portable, comfortable sleeping surfaces.
Wooden frame with crisscrossed ropes (cotton, jute, wool). Variations exist in patterns/materials.
Skillful weaving passed down through generations, with regional differences.
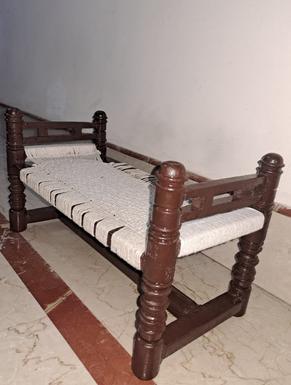
Used for sleeping, sitting, socializing, and as a symbol of rural life.
Seen in courtyards or open spaces, representing hospitality and community.
Used in ceremonies (weddings, rituals), and for transporting the deceased.
Decline in urban areas due to modern furniture; less demand in industrialized settings.
Increasing interest in eco-friendly, sustainable designs; incorporation into modern interiors.
Recognized as part of India’s intangible cultural heritage, with efforts to preserve techniques.
SOURCE OF ORIGIN-
CHARPAI WEAVING
DETAILS
Region and Culture
Materials
Cultural Significance
Modern Adaptation
Weaving Technique
Predominantly in rural India and Pakistan (Punjab, Rajasthan, Uttar Pradesh, Sindh, Khyber Pakhtunkhwa). A symbol of community and hospitality.
Frame: Wood (acacia or neem). Weaving: Cotton, jute, or wool ropes.
- Used in rural homes for sleeping, sitting, and socializing. - Weaving is a family tradition, often passed down through generations. - A symbol of warmth and hospitality.
Charpais still used in rural areas, especially outdoors in cooler months. Some modern versions use metal frames or synthetic ropes.
Ropes are interwoven in a tight, net-like pattern, promoting airflow. Patterns and tightness vary by region, with distinct local designs.
PROCESS, TOOLS, AND TECHNIQUES
CHARPAI WEAVING
Aspect Traditional Methods
Materials
Weaving Process
Wood: Neem, teak, bamboo. Threads/Ropes: Cotton, jute, hemp, silk.
Frame: Four wooden poles, rectangular/square shape.
Weaving Types: Horizontal & Vertical.
Modern Methods and Tools
Synthetic: Nylon, polypropylene. Frames: Metal, plastic straps.
Power looms automate weaving for uniformity.
Tools
Traditional Techniques
Design Influence
Awl/Chisels: Create holes for threads. Scissors/Knives: Cut threads. Needles/Shuttles: Assist in weaving.
Hand-weaving with tight tension and knotting to secure threads.
Regional designs with motifs (e.g., floral, animals) in areas like Rajasthan.
Machines: Power looms, threading machines for efficiency.
Hybrid techniques blend handweaving with modern design or color patterns.
Modern ergonomics, cushioned beds for comfort.
EVOLUTION
CHARPAI WEAVING
HISTORICAL ORIGINS AND TRADITIONAL WEAVING:
CATEGORY DETAILS
Materials & Craftsmanship
Design & Functionality
EVOLUTION OVER TIME
Made from natural fibers like jute, cotton, and wool; durable and breathable.
Intricate, regional geometric patterns; lightweight, portable, and ideal for hot climates.
ASPECT TRADITIONAL CHARPAI URBAN CHARPAI
Setting Predominantly rural
Materials (Weaving)
Materials (Frame)
Durability
More common in urban areas, adapted for modern use
Natural fibers like jute and cotton Synthetic fibers like nylon and polypropylene
Wood or bamboo
Less weather-resistant and more maintenance
Design Simple, traditional design
Metal or plastic for better stability and durability
More durable, weather-resistant, and low-maintenance
Sleeker, contemporary design with modern materials
INTEGRATION INTO MODERN DESIGN
CATEGORY DESCRIPTION
Furniture and Interiors
Textiles and Home Decor
Charpai weaving is used in contemporary furniture like chairs, sofas, and daybeds, incorporating minimalist and geometric designs while maintaining comfort and ventilation.
Charpai weaving influences modern textiles, inspiring rugs, wall hangings, cushions, and upholstery, with a focus on texture and intricate patterns.
Sustainability
Artisanal Craft in Fashion
Charpai weaving is embraced for its eco-friendly, sustainable production using natural fibers and hand-weaving, emphasizing slow-made and locally sourced materials.
Charpai weaving appears in fashion accessories like handbags, belts, and jewelry, supporting the movement toward artisanal and handcrafted goods.
3. Craftsperson
WOOD LATHE WORK
Background and History
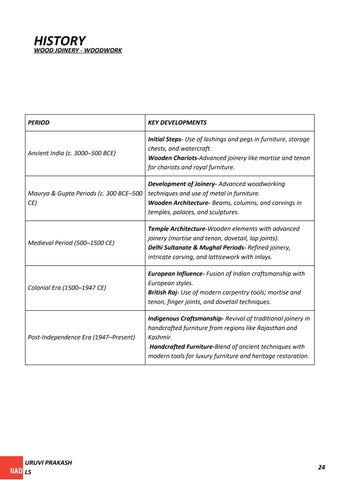
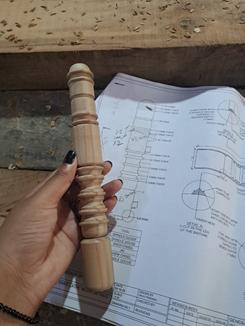
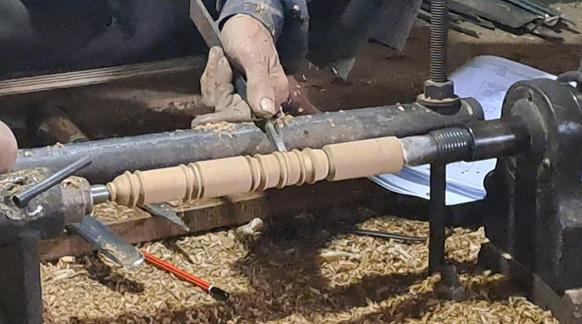
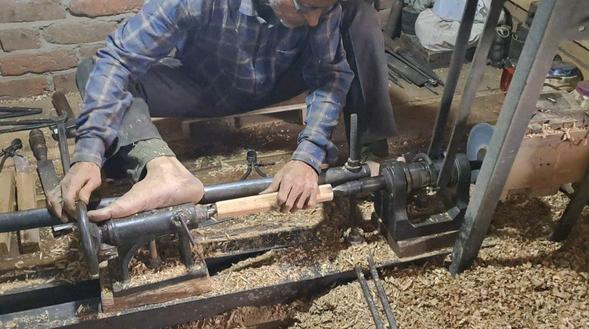
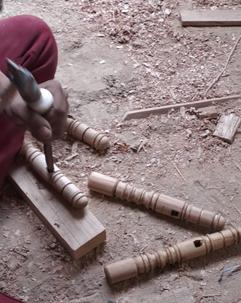
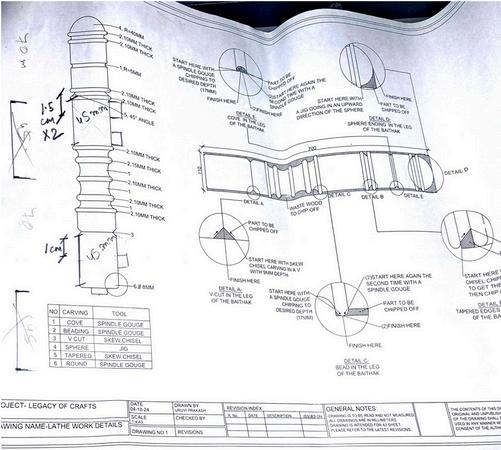
PRAMAN was the craftsman who created the baithak's exquisite and elaborate legs. His workshop is located in East Delhi's Dallupura furniture market. Since he was a young lad, he has worked as a craftsman specializing in lathes. He has carried on this family-inherited craft and career to this day. He's nearly sixty years old.
WOOD JOINERY
Background and History
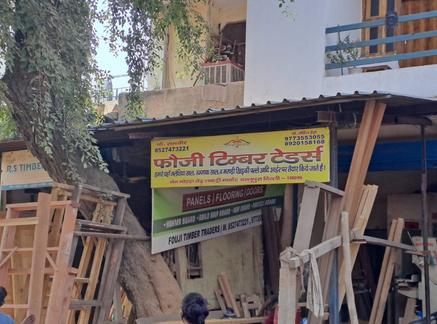
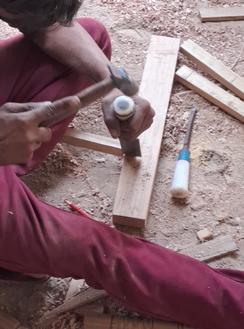
The other craftsman I collaborated with to make my prototype was GUDDU. His place of employment was located in East Delhi's Dallupura Furniture Market. Window and door frames were typically ordered in bulk from this shop.
The result was at the level I had anticipated because they lacked much experience in creating furniture with this particular intricacy.

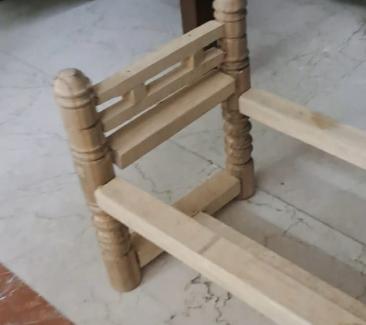
5. PRODUCT
PRODUCT OVERVIEW-
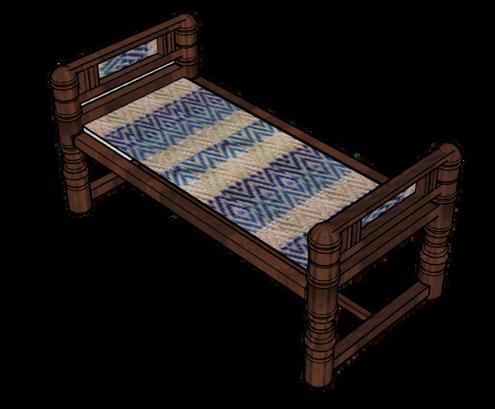
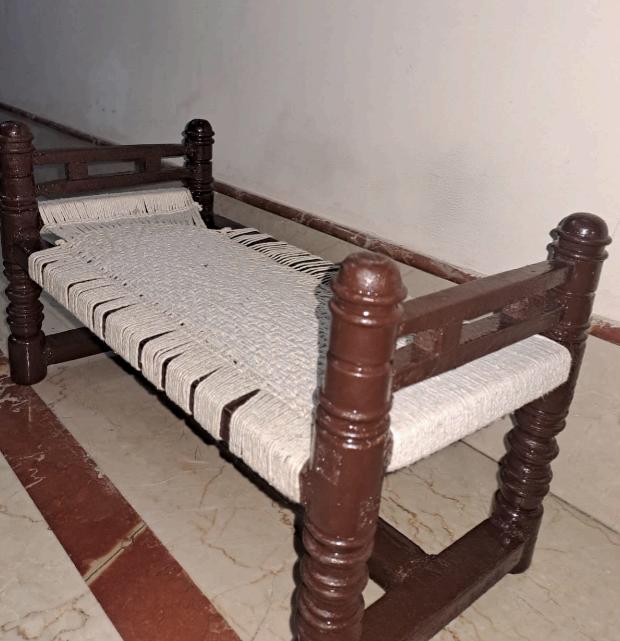
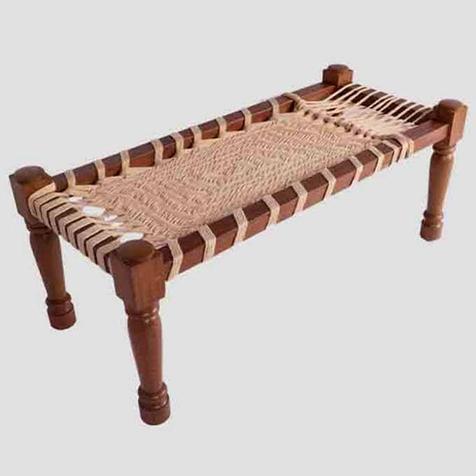
This item is a piece of furniture that is positioned in the center of the living room and the space that serves as the foyer or entry. BAITHAK is a product that was inspired by a khatiya. This product falls under the home décor (furniture) category.
Many features of this product are similar to those of a khatiya, such as the charpai weaving and wood joineries. The entire idea behind the furniture is to bridge the generational divide by reviving the lost traditional craft in the contemporary world.
DESIGN AND DEVELOPMENT
1 2 3 4 5 6 7 8
PLANNING-
Determine the material substitute and the scale at which the prototype is to be produced.
FINDING THE CRAFTSPERSON
A craftsperson was required because the product included crafts that were impossible to complete on one's own.
COSTING
Obtaining the prototype's initial cost
GETTING THE PIECES PROTOTYPE
Gathering the various components of the prototype in order to integrate them
IDENTIFYING THE ISSUES TO ADDRESS
Resolving issues that arose even after the prototype was created
SOLVING THE ISSUE
use the resources at the college to solve the issues independently
VARNISHING AND WEAVING
Deciding the varnish to get the sheesham wood colour and the rope substitute for the weave
FINAL TOUCHES
Preparing the prototype for the display
DESIGN AND DEVELOPMENT
PLANNING-
1
Determine the material substitute and the scale at which the prototype is to be produced.
In order to display the product's joineries and other features on a smaller size, a specific scale had to be chosen before the prototype could be made.
Following extensive faculty discussions, it was determined that the prototype's 1:5 scale would be too tiny and make it challenging to display the product's finer characteristics. It was determined to work on the 1:3 scale.
Each membrane had to be shrunk in size in order to allow the craftsman to make the furniture components from 1:1 scale to 1:3 scale.
2
FINDING THE CRAFTSPERSON
A craftsperson was required because the product included crafts that were impossible to complete on one's own.
Two artisans were required to begin the prototype because it involved wood joinery and wood lathe work. Because it is extremely rare, these artisans had to have sufficient skill to create the prototype on a smaller scale.
These artisans were discovered in the Dallupura Furniture Market, East Delhi. There were plenty of carpentry possibilities in this market. After reviewing the provided plans and determining the final pricing, the carpenter agreed to create the prototype. Despite agreeing to complete the joinery work, this carpenter lacked the equipment necessary to perform lathe work on the prototype's legs.
When we found him in the market, the other craftsman who worked on the lathe was quite skilled and finished the design that was given to him in the form of drawings.
COSTING
Obtaining the prototype's initial cost
S.NO MATERIAL
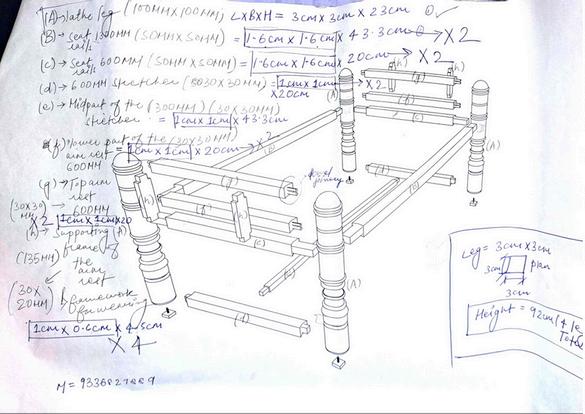
1. Teak Wood (Batten) 23cmX3.3cmX3.3cm
1.6cmX1.6cmX43.3cm
1.6cmX1.6cmX20cm
1cmX1cmX20cm
2. Pine Wood (Batten)
1cmX1cmX43.3cm
1cmX1cmX20cm 1cmX1cmX20cm 1cmX0.6cmX4.5cm
6. Labour Charges - -
NOTEsince the woodwork was done at a carpenter’s shop no wood battens were wasted and exact amount that were required was provided
3. Fevicol
4. Cotton Rope
5. Synthetic Brown Varnish
4
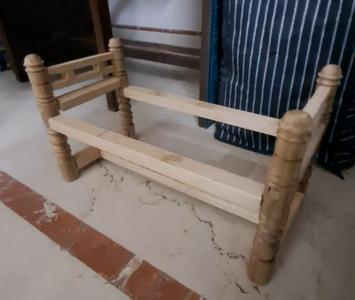
GETTING THE PIECES PROTOTYPE
Gathering the various components of the prototype in order to integrate them
The prototype's design required careful integration to guarantee both structural and aesthetic harmony because it blended conventional joineries made without power tools with lathe-turned legs. Although the lathe produced symmetrical, smooth legs, fitting them into hand-crafted joineries such as mortise-and-tenon joints was difficult due to curved profiles and minor dimensional irregularities. Prior to iterative fitting and securing with conventional techniques like wooden pegs, these problems were fixed by making accurate manual modifications with chisels, files, and planes. This method effectively combined heritage craftsmanship with contemporary shaping processes, producing a long-lasting, aesthetically pleasing design that maintained the genuineness of traditional carpentry.
The prototype's joineries were first badly done, leading to loose connections that weakened the piece's structural soundness and visual appeal and gave it an amateurish, unstable appearance. This problem resulted from inaccurate measurements and a lack of focus on the tightness needed for conventional woodworking joints. The faculty acknowledged the shortcomings and offered helpful advice, recommending ways to enhance the fit, including rethinking the joinery measurements, using wooden shims for reinforcement, and using more conventional procedures like pegging to tighten the connections. By adjusting the joineries, the prototype's stability was restored and its general appearance was improved, guaranteeing a more polished and expert result.

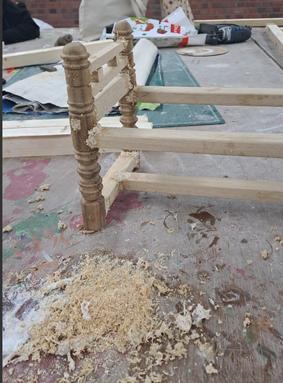
IDENTIFYING THE ISSUES TO ADDRESS
Resolving issues that arose even after the prototype was created
UNSECURED JOINERIES:
The prototype's stability and structural integrity were jeopardized by loose connections between parts.
Fits that were poorly done resulted in misalignment and a crude look.
ABSENCE OF SMOOTH FINISHES:
Visible spaces between the linked pieces gave the appearance of being haphazard and amateurish.
Uneven surfaces and misaligned edges were caused by inadequate assembly precision.
SURFACE ROUGHNESS WITHOUT SANDING:
Rough textures and obvious tool marks were seen on the unfinished surfaces.
The prototype's overall quality and usability were negatively impacted by the lack of smoothness caused by improper sanding.
SOLVING THE ISSUE
use the resources at the college to solve the issues independently
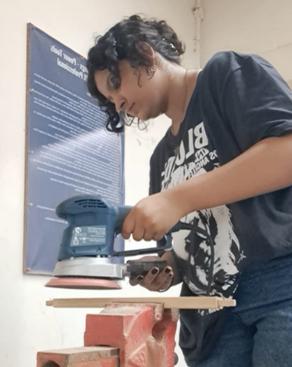
With the help of the college's resources and direction, the prototype's problems were successfully fixed. Each membrane was smoothed using sanding equipment to remove tool marks and produce a polished finish in order to address the rough surfaces. To ensure a seamless appearance, a paste composed of wood dust and Fevicol was applied to the loose and gapped joineries. To achieve a uniform and elegant finish, the surfaces were sanded once more once the paste had set, blending the filled regions with the remainder of the structure. These remedial actions not only strengthened the prototype's overall structural integrity but also improved its overall aesthetic appeal.
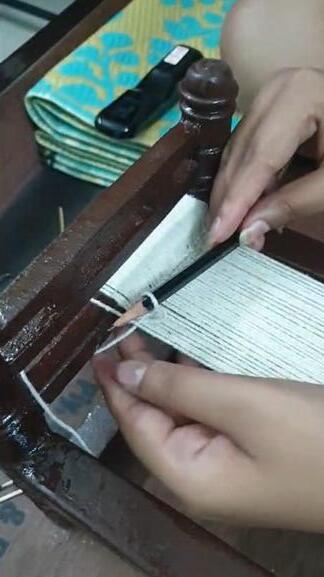
VARNISHING AND WEAVING
Deciding the varnish to get the sheesham wood colour and the rope substitute for the weave
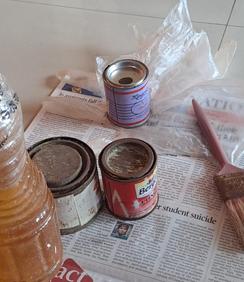
A synthetic-based varnish was used to polish the prototype in order to improve its strength and visual appeal. To provide a uniform and protective covering, the entire structure was coated twice. In order to obtain a consistent finish, special attention was paid to the gaps in the lathe work, which were carefully filled with tiny brush tips. Aside from the lathe-turned portions, the membranes' flat surfaces were also coated twice to give them a uniform gloss and wear resistance. In addition to enhancing the prototype's aesthetic appeal, this thorough varnishing procedure increased its resilience to external influences.
After the originally planned rope broke repeatedly throughout the weaving process, cotton rope was used as a substitute to complete the prototype. I did the weaving myself, using internet resources to learn the method and then modifying it to make a special design based on the broken diamond twill weave. In order to preserve symmetry and alignment in the design, the number of horizontal ropes across the prototype had to be meticulously calculated. In addition to being useful, the final weaving gave the prototype a unique visual component that demonstrated a harmony between conventional workmanship and imaginative improvisation.
FINAL TOUCHES
Preparing the prototype for the display
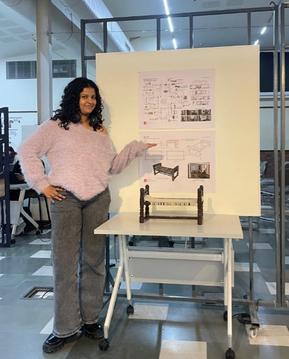
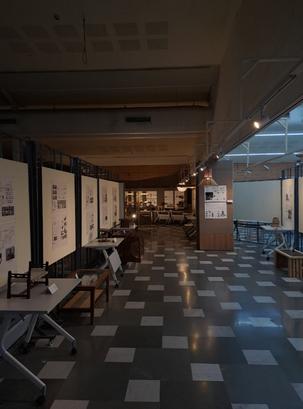
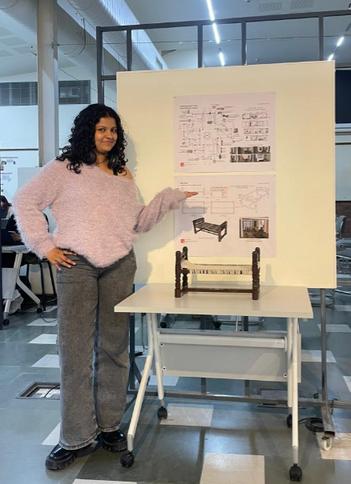
Completing the prototype's complicated weaving, making sure it was securely fastened and aesthetically pleasing, and creating printable presentation papers that included background information and specifics about the design process were the last touches. These documents demonstrated the skill, difficulties, and solutions encountered during the prototype's development. The finished prototype and presentation materials were on display at an exhibition, which was a great way to show the work to a larger audience. It was a satisfying experience because this platform not only made it possible to provide insightful criticism but also demonstrated the work and originality put into the product.
5. MARKETING POTENTIAL
THE PROTOTYPE’S COSTING
1. Teak Wood (Batten) 23cmX3.3cmX3.3cm
1.6cmX1.6cmX43.3cm
1.6cmX1.6cmX20cm
1cmX1cmX20cm
2. Pine Wood (Batten)
1cmX1cmX43.3cm
1cmX1cmX20cm
1cmX1cmX20cm 1cmX0.6cmX4.5cm
3. Fevicol
Cotton Rope
Synthetic Brown Varnish
6. Labour Charges - -
NOTEsince the woodwork was done at a carpenter’s shop no wood battens were wasted and exact amount that were required was provided
THE BAITHAK’S COSTING
1.
1300mmX50mmX50mm
600mmX50mmX50mm
600mmX30mmX30mm
1300mmX30mmX30mm
600mmX30mmX30mm
600mmX30mmX30mm
135mmX30mmX20mm
NOTEThe labour charges maybe according to the no.of days the furniture takes to be build
Sheesham Wood (Batten)
2. Sheesham Wood (Batten)
Synthetic Brown Varnish
7. CONCLUSION
PROBLEMS FACED IN THE DESIGN PROCESS
APPEARINGLY BASIC DESIGN
Although the original plan seemed simple, it was complicated to implement. Because of the concept's simplicity, it was difficult to foresee the minute nuances that would impact both its usability and appearance.
ABSENCE OF A BACKREST
The absence of a backrest in the design raised issues about comfort because it was uncomfortable to use for extended periods of time. The necessity of making ergonomic changes to furniture design was brought to light by this absence.
WEAVING FURNITURE ADJUSTMENTS
Although it seemed straightforward in theory, the weaving pattern needed to be modified for the furniture prototype. In contrast to the original design, it became clear during the process that the weave could not be extended from edge to edge, changing both its appearance and functionality.
THE ARMREST'S WEAVING
Time and material constraints prevented the armrest's weaving, which was originally intended for the prototype, from being completed. But after more thought, it was determined that this element might have caused useful problems, such the armrests becoming soiled from use, making it an unfeasible decision for the finished design.
PRODUCT ENHANCEMENT
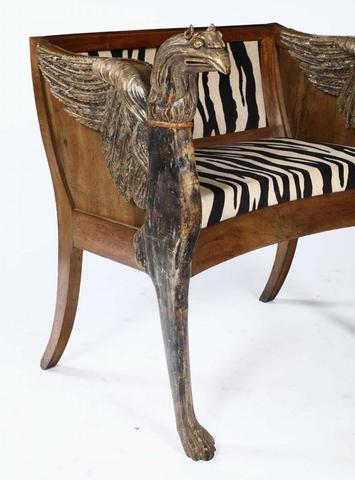
WOOD CARVING OF A BIRD ON AN EXTENDING LATHE WORK LEG
The expanded lathe-turned leg was topped with a bird carving, which improved the design's aesthetic appeal and added a distinctive, creative element. By drawing attention to the legs and adding a more individualized, ornamental touch, this carving helped elevate the furniture.
MODIFICATIONS TO THE SEAT FRAMEWORK'S WEAVE BORDERS
To make the seat framework look smoother and more unified, the weave's borders were redrawn. By making this adjustment, the weave would blend in with the furniture design more smoothly and provide a better balance between form and function, in addition to improving the overall appearance.
SEATING WIDTH REDUCTION (600 MM TO 500 MM)
To prevent the furniture from having a bed-like shape, the seating width was lowered from 600mm to 500mm. This change improved the piece's comfort and usefulness by making the seats more proportionate to the rest of the design. The furniture was able to continue serving its purpose without sacrificing comfort because to the reduced seat width.
PRODUCT ENHANCEMENT
WOOD CARVING OF A BIRD ON AN EXTENDING LATHE WORK LEG
SEATING WIDTH REDUCTION (600 MM TO 500 MM)
KEEPING ENOUGH OPEN HORIZONTAL WEAVES TO DEFINE A SEATING AREA
REMOVING THE ARMREST WEAVING LETTING THE LEG EXTEND LIKE THE PROTOTYPE
Following the improvements, the product is now more marketable and bridges the gap between modern design and traditional craftsmanship. While the clean, updated weave borders reflect a more contemporary look, the addition of the bird wood carving on the lathe-turned legs adds a unique touch that shows the beauty and expertise of traditional carpentry. The seating width has been decreased from 600mm to 500mm, which better suits contemporary tastes for furniture that is more portable and useful. Because of these deliberate changes, the product is adaptable and appealing to a wide spectrum of customers, combining traditional workmanship with the modern, useful elements that today's market demands. This piece may satisfy both heritage-conscious consumers and those looking for modern styles thanks to its harmony between history and modernity.
REFERENCING
https://www.finewoodworking.com/project-guides/joinery
https://www.thesprucecrafts.com/wood-joinery-types-3536631
https://www.thespruce.com/types-of-wood-joints-6822939
https://www.woodworkingtrade.com/sheesham-wood-complete-guide/ https://www.thebasicwoodworking.com/what-is-sheesham-wood-everything-you-need-to-know-about-it/
https://thewoodcarpenter.com/sheesham-wood/ https://www.seacorope.com/blog/guide-to-rope-materials/
https://www.rope.com/pages/rope-material-guide https://www.ravenox.com/blogs/news/the-complete-buyers-guide-to-rope-uses-for-cotton-ropesynthetic-ropes-and-more https://www.instructables.com/