
1. INTRODUCTION
This document serves as the official user guide to the Jira Service Management (JSM) tool, implemented to streamline the registration and management of complaints within the TESY After-Sales Department. The platform centralizes complaint handling, ensures accurate tracking of every request, and facilitates efficient communication between all parties involved.
Two request types are currently available on the platform:
• Replacement Request for registering claims that may result in a product replacement.
• Service Intervention for registering interventions which will be included in the monthly protocol for invoicing
Please read this guide thoroughly before submitting a request, and keep it available for reference throughout the process. Following the outlined procedures will help ensure accurate and timely processing of all submitted requests.
https://sprinttesy.atlassian.net/helpcenter/fsm/
2. REGISTRATION — CREATING YOUR ACCOUNT
Before you can submit any request, you need to create and activate your account on the platform. Follow the steps below.
2.1 STEP 1 - RECEIVE YOUR INVITATION
You will receive an email invitation to join the project. The email contains a link to set your password:
2.2 STEP 2 - SET YOUR PASSWORD
After clicking the “set password” link in the invitation email, you will be redirected to the account setup page shown below. Enter and confirm your password to activate your account.
2.3 STEP 3 - ACCESS THE PLATFORM
Once your account is active, you can access the platform at any time using the following link:
Official Portal https://sprinttesy.atlassian.net/helpcenter/fsm/
2.4.
STEP 4 - LOGGING IN
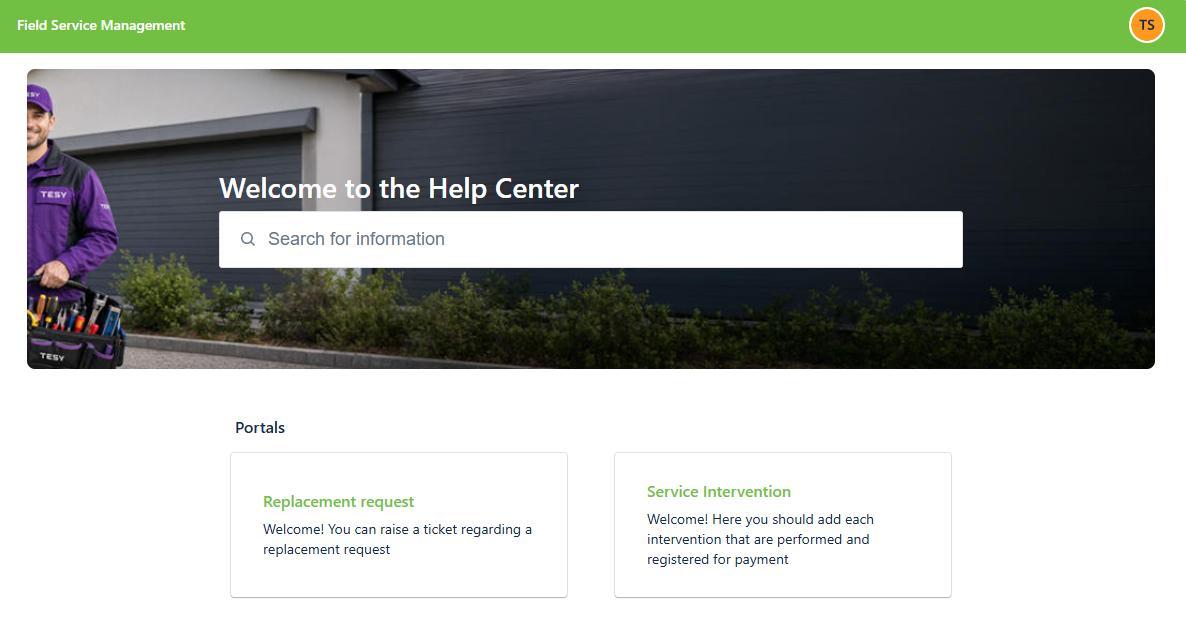
After logging in, the request portal home screen will appear, as shown below. From here you select the type of request you need to submit:
3. OVERVIEW OF REQUEST TYPES
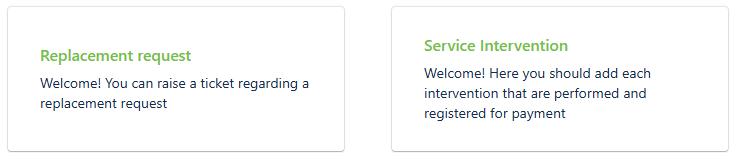
Currently, two types of requests can be submitted through the portal. Each is explained in full detail in its own chapter of this guide:
• Replacement Request (Chapter 4)
• Service Intervention (Chapter 5)
Selecting the correct request type from the home screen is important, as each type routes your case to the appropriate internal workflow and team.
CHOOSE REQUEST TYPE
SERVICE INTERVENTION
1. REGISTER SERVICE INTERVENTION (REPAIRS, REPLACEMENTS)
2. RECIVE APPROVAL/DISAPROVAL DECISION
3. GENERATE MONTHLY SERVICE RAPORT
4. ISSUE INVOICE FOR PAYMENT
REPLACMENT REQUEST
1. REGISTER REPLACEMENT REQUEST
2. RECIVE APPROVAL/DISAPPROVAL DECISION
3. ISSUE REPLACMENT PROTOCOL
4. REPLACEMENT REQUEST
Use this request type to register a claim that may result in the replacement of a product.
4.1 STEP 1 - OPEN THE REPLACEMENT REQUEST FORM
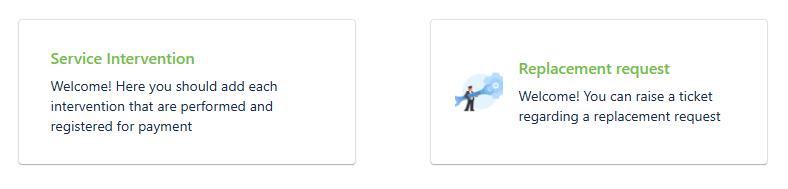
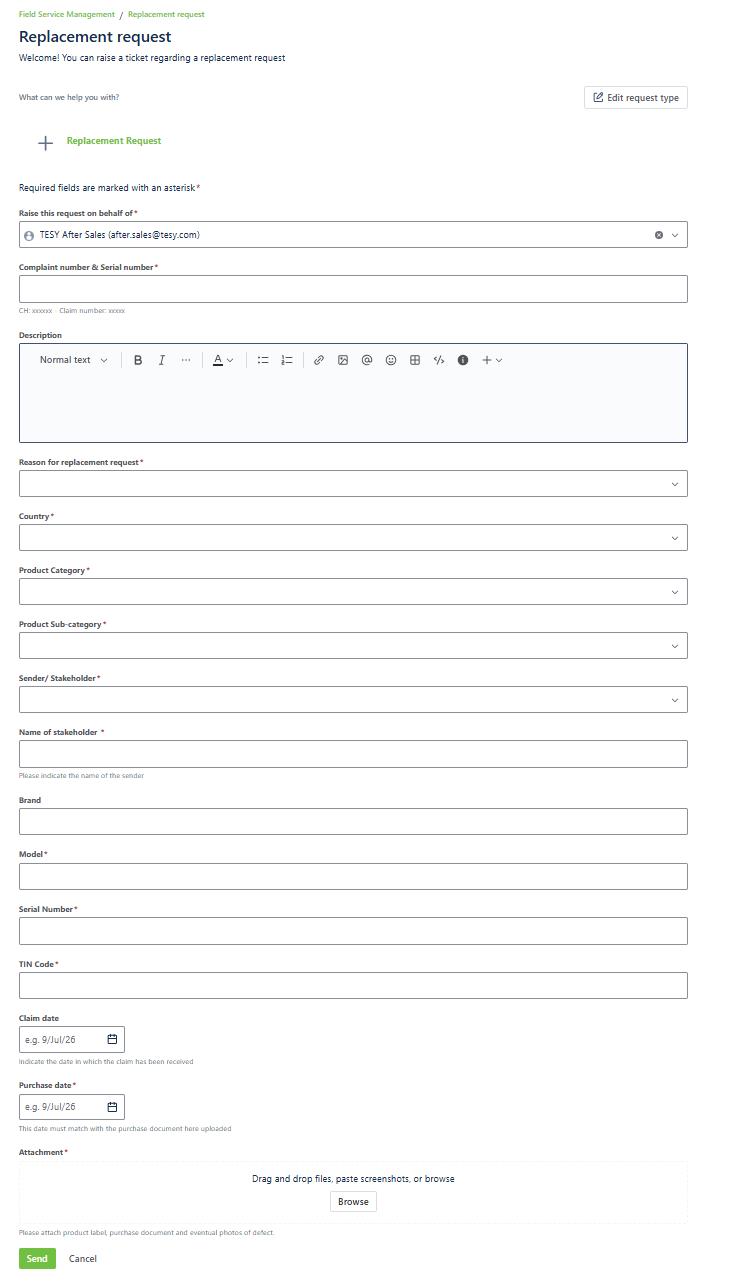
On Field Service Management home screen, select Replacement request and the form below will open:
4.2 STEP 2 - FILL IN THE REQUIRED FIELDS
Fill in all remaining required fields with the requested data. Where information is genuinely not available and the field is marked with an asterisk (*), enter N/A:
• Complaint number & Serial number - enter the serial number (SN) of the appliance and the complaint number from your own system. This is the only field you will later be able to search tickets by, so make sure it is entered accurately.
• Description - write a description of the claim, following the replacement guideline (where applicable), or the end user’s statement together with any information the After-Sales team will need in order to process the request.
• Reason for replacement request select the appropriate reason from the available options.
• Country – select the country
• Product Category – select the product category
• Product Sub-category – select the product sub-category
• Sender/ Stakeholder – select the sender/stakeholder
• Name of stakeholder – enter the name of stakeholder
• Brand – enter the brand
• Model – enter the model
• Serial Number - enter the serial number
• TIN Code – enter the TIN code
• Claim date – enter the claim date
• Purchase date – enter the purchase date
• Attachment – attach required photos like label with SN, purchase document, photo of issue, installation photo etc
4.3. STEP 3 - SUBMIT THE REQUEST

After filling out the form, click the button to submit your request to the After-Sales team:
Once submitted, the After-Sales team will receive your request and begin working on it.
You will receive an email update after every change made to your request.
4.4 POSSIBLE OUTCOMES OF A REPLACEMENT REQUEST
STATUS
Waiting for feedback
Approved
Rejected
Important — adding comments
WHAT IT MEANS?
The TESY After-Sales team needs additional information from you e.g. a missing statement, additional photos, or comments before the request can be processed further.
The replacement has been approved. You may now issue a replacement protocol and/or request a Credit Note (CN) from the Customer Service / Sales team.
The claim has been rejected. A replacement protocol or CN will not be issued. The reason is explained in the comments of the ticket.
Adding a comment to a ticket that is already Approved or Rejected will re-open the case. If you agree with the decision, do not add a comment the ticket will remain closed with its final status.
5. SERVICE INTERVENTION
Use this request type to register a claim that has already been closed and approved as a technical service visit for example an on-site inspection, installation check, or repair carried out by a service technician so that it can be included in the monthly report.
5.1. STEP 1 - OPEN THE SERVICE INTERVENTION FORM
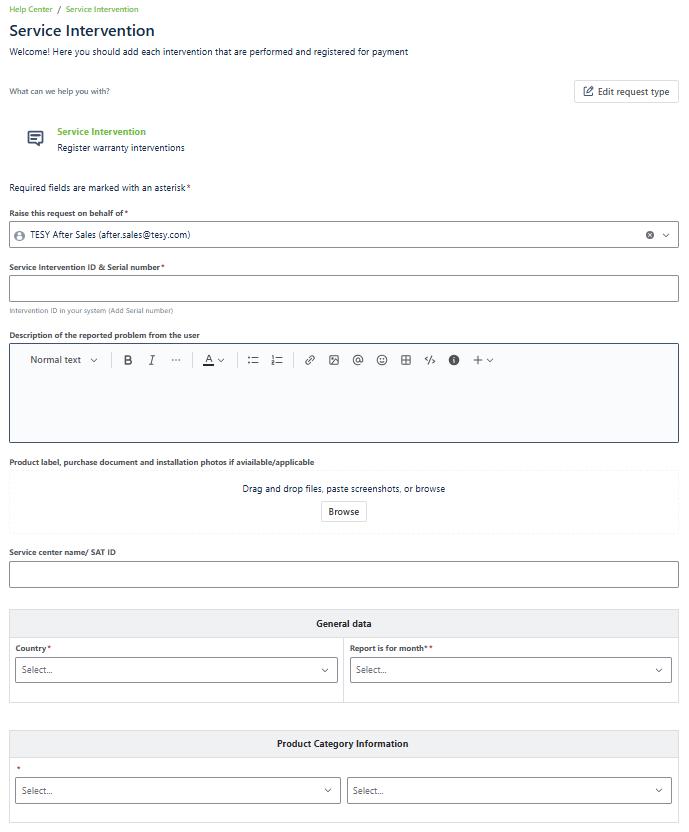
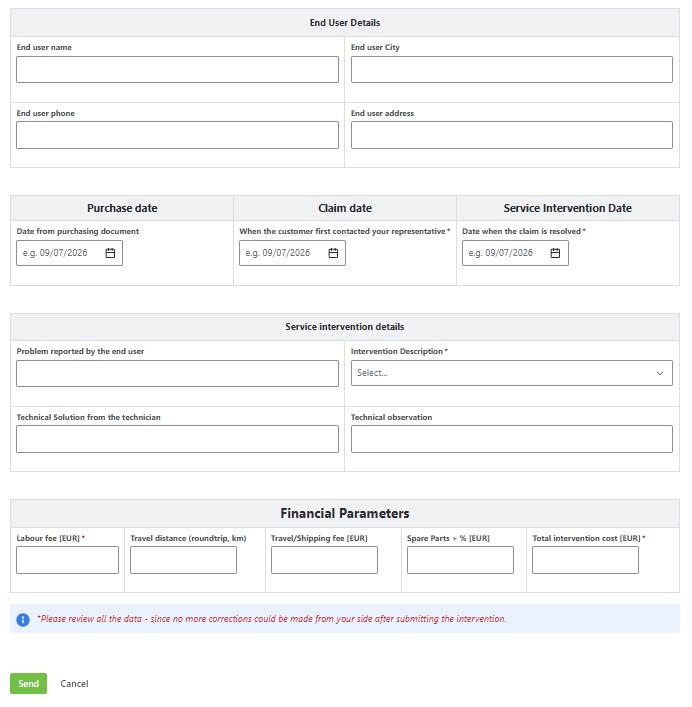
On Field Service Management home screen, select Service Intervention and the form below will open:
5.2 STEP 2 - FILL IN THE REQUIRED FIELDS
Fill in all remaining required fields with the requested data. Where information is genuinely not available and the field is marked with an asterisk (*), enter N/A:
• Service Intervention ID & Serial number - enter the serial number (SN) of the appliance and the complaint number from your own system. This is the only field you will later be able to search tickets by, so make sure it is entered accurately.
• Description of the reported problem from the user - write a description of the claim reported by the end user
• Product label, purchase document and installation photos if aviailable/applicable - attach required photos like label with SN, purchase document, photo of issue, installation photo etc.
• Service center name/SAT ID – enter the service center name/SAT ID
• Country – select the country
• Report is for month – select the month the report is for (January-December)
• Product Category – select the product category
• Product Sub-category – select the product sub-category
• Brand – enter the brand
• TIN code – enter the TIN code
• Model name – enter the model name
• Serial numer – enter the serial number
• End user name – enter the end user name
• End user city – enter the end user city
• End user phone – enter the end user phone
• End user address – enter the end user address
• Purchase date – enter the purchase date
• Claim date – enter the claim date
• Service intervention date – enter the service intervention date
• Problem reported by the end user – enter the description of the problem reported by the end user
• Intervention Description – enter the intervention description
• Technical Solution from the technician – enter the technical solution from the technician
• Technical observation – enter the technical observation
• Spare part code – enter the spare part code
• Spare part name – enter the spare part name
• Quantity – enter the quantity
• Price per one piece (EUR) – enter the price per one piece in EUR
• Labour fee (EUR) – enter the labour fee in EUR
• Travel distance (roundtrip, km) – enter the travel distance
• Travel/Shipping fee [EUR] – enter the travel/shipping fee in EUR
• Spare Parts + % [EUR] – enter the amount for spare parts with % in EUR
• Total intervention cost [EUR] – enter the total intervention cost in EUR
5.3. STEP 3 - SUBMIT AND TRACK THE REQUEST
After filling out the form, click the button to submit your request to the After-Sales team:
Once submitted, the After-Sales team will receive your request and begin working on it.
You will receive an email update after every change made to your request.
5.4. SERVICE INTERVENTION WORKFLOW
Once submitted, a service intervention case moves through the following statuses:
Submitted → Under Review → Approved → Invoiced
This represents the standard path from initial registration through to invoicing. At any point along this path, the After-Sales team may also move a case to Required Correction, if additional information or a correction is needed from you, or to Rejected, if the case does not qualify. Once a case reaches Approved, the only further status change is to Invoiced, as described in the table below.
MEANS?
Submitted
Under Review
Approved
The case has been registered and is awaiting review by the After-Sales team.
The After-Sales team is reviewing the case.
The service intervention has been approved. Invoiced
On a monthly or quarterly basis, the After-Sales team exports all Approved cases and determines the final amount to be invoiced. An Excel report with all the data to be invoiced will be sent by email, and the partner is expected to stamp and return it. Once
Required Correction
Rejected
invoicing is completed, approved cases move to Invoiced.
The After-Sales team needs additional information or a correction from you before the case can proceed.
The case has been rejected.
6. MANAGING AND TRACKING YOUR REQUESTS
6.1. VIEWING YOUR REQUESTS
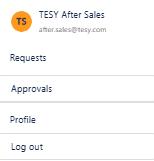
You can view all requests you have submitted by clicking the circle with your initials in the top right corner of the portal:

After clicking your initials, a menu will appear click the Requests button:
6.2 FILTERING YOUR REQUESTS
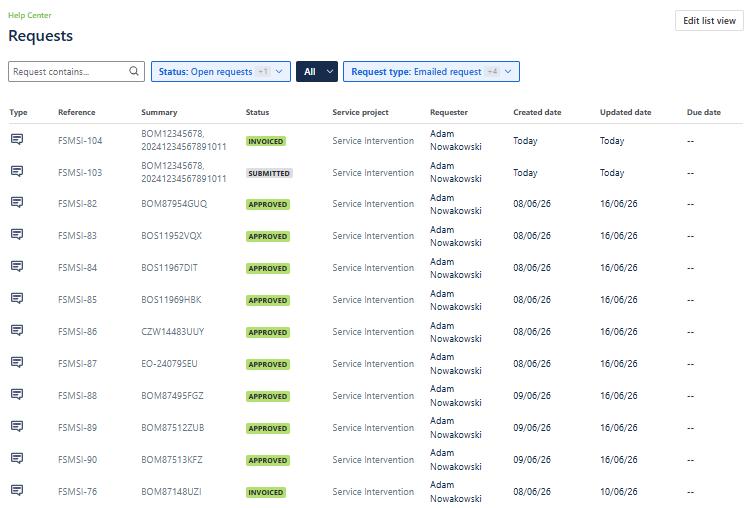
After clicking the button, the requests screen will appear, where you can filter by status:
• Open requests
• Requests in progress
• Closed requests
You can further filter the view by:
• All requests
• Requests created by me
• Requests I’m involved in
6.3. OPENING A REQUEST
Click on any request in the list to open it and see all its details.
6.4 RESPONDING TO A REQUEST
When you receive an email notification about a request and want to provide feedback immediately, always click the View request button to open the request in the system and add your comment directly there.
Important -
reply
If you reply directly to the notification email instead of using the “View request” button, your comment will NOT be received by anyone.
7. USER INTERFACE OVERVIEW
The table below summarizes the main areas of the Field Service Management portal and where to find them:
Request tiles
Profile icon (initials)
Requests list
Request detail view
Send button
Status label
Portal home screen
Top right corner
Requests → filter panel
Choose between Replacement Request and Service Intervention
Open your account menu and access “Requests”
View, filter, and search all your submitted requests
Click any request in the list See full details, status, and add comments
Bottom of any request form
Submit the completed form to the After-Sales team
Top of the request detail view Shows current status: Waiting for feedback / Approved / Rejected
8. ACCESSING THE PLATFORM ON YOUR PHONE
8.1.
1. Open your mobile browser.
2. Go to your organization’s Jira Service Management Help Center URL: https://sprinttesy.atlassian.net/helpcenter/fsm/
3. Log in with your customer credentials.
4. You can submit requests, check ticket statuses, and comment on issues directly from your phone’s browser.
8.2 USING THE JIRA CLOUD MOBILE APP
1. Download the Jira Cloud app from the Google Play Store or Apple App Store.
2. Log in with your Atlassian account.
As a customer, using the app you can:
• View and comment on your requests.
• Receive push notifications for ticket updates.
• Access the Help Center and your organization’s service portals.
8.3. SETTING UP NOTIFICATIONS ON YOUR PHONE
a) Email Notifications (Default)
• By default, you will receive email notifications for ticket updates, comments, and resolutions.
• You can open these emails on your phone and click the links to view or respond to requests.
b) Mobile Push Notifications
If you use the Jira Cloud mobile app, you can also receive push notifications for ticket updates. To enable them:
1. Open the Jira Cloud app.
2. Go to Profile Settings → Notification Settings.
3. Make sure that push notifications are enabled.
4. Allow notifications for the app in your phone’s system settings.