FROM DESIGN TO HARVEST: HOW TO GROW ORGANIC, SUSTAINABLE FOOD IN COLDER CLIMATES
Permaculture explained
How nature works when left alone
From plans to plants to harvest; what to do
EVA PETTERSSON
To all my children and grandchildren
Your f uture is my inspiration!
Introduction 11
Food production today 11
Today’s food supply 12
Towards a more natural society 12
How can you and I help? 12
Then the book begins 13
HOW NATURE WORKS WHEN LEFT ALONE 15
Photosynthesis – the key to life 17
A vital process 17
Yellowing of the leaves 17
Reverse photosynthesis 17
Coal and oil; a controversial topic 17
Freshwater is no longer a given thing 19
Growing water scarcity 19
How much water is out there? 19
The water’s pH 19
Artificial rain 20
Changing for the better 20
Without trees, we would have deserts 21
The water cycle of the tree 21
Trees affect the climate 22
Trees work together with the soil and mycorrhiza 22
Trees as air purifiers 22
The effect of wind on the trees 23
Using trees as climate protection 23
Versatile soil for a happy environment 25
How nutritious soil forms 25
Prerequisites for good soil 25
How plants get their nutrition 26
Mycorrhizal network 26
The soil’s essential nutrients 26
Essential substances for us people 27
The soil’s pH plays a major role 27
Location decides the climate 29
Our place on Earth 29
Orographic effects 30
PERMACULTURE EXPLAINED 33
How permaculture works 35
Permanent Agriculture 35
The ethical principles of permaculture 35
Is change hard? 35
The 12 design tools of permaculture 35
A contemporary “old-fashioned” village 45
A sustainable village 45
FROM PLAN TO PLANTS TO HARVEST: WHAT TO DO 47
Getting to know the place you live on 49
Climate change 49
Observing nature 49
To map and to plan 50
The best way to plan a landscape 55
Questions to start with 55
Ängsvägen – An example 55
Site structures 59
Ängsvägen’s structures 60
Sectors to consider 62
Gardening in different zones – practical tips 65
The zones of Ängsvägen 66
Practical know-how about elements, function, and contacts 72
Co-cultivating with trees for a sustainable garden 75
Functions of the tree 75
Buying and planting 76
Buying fruit trees 77
To save and conserve water 81
Control over the water 81
Saving water 81
Collecting rainwater 89
Collecting groundwater 91
Pumps 96
Ängsvägens water 97
To understand and grow the soil 99
Different soil types 99
The grain sizes of the different soils 99
Testing the soil to figure out the type 99
The art of watering 100
Mulching 101
Weeds are not the issue 102
A fertile soil 102
How climate affects the need for energy 105
The conditions of a place 105
Energy from water 105
The influence of the wind 105
The sun and our homes 105
Microclimates 107
Frost 108
Wind and windbreaks 110
Gardening for diversity and achieving an ideal harvest 121
The ideal place to grow your crops 121
Choosing plants 121
Create diversity 121
Improve the Earth 121
Grow vertically 121
Intercropping 121
Cluster gardening 125
Perennials for increased durability 127
Extend the season 127
Start harvesting early 127
Indigenous and local plants 127
Winter protection 127
Edges in practice 127
Cultivation Beds 130
Crop sequence 143
Succession 145
Propagating plants 145
With the forest as a role model 151
Intercropping with trees 151
Silvoarable 151
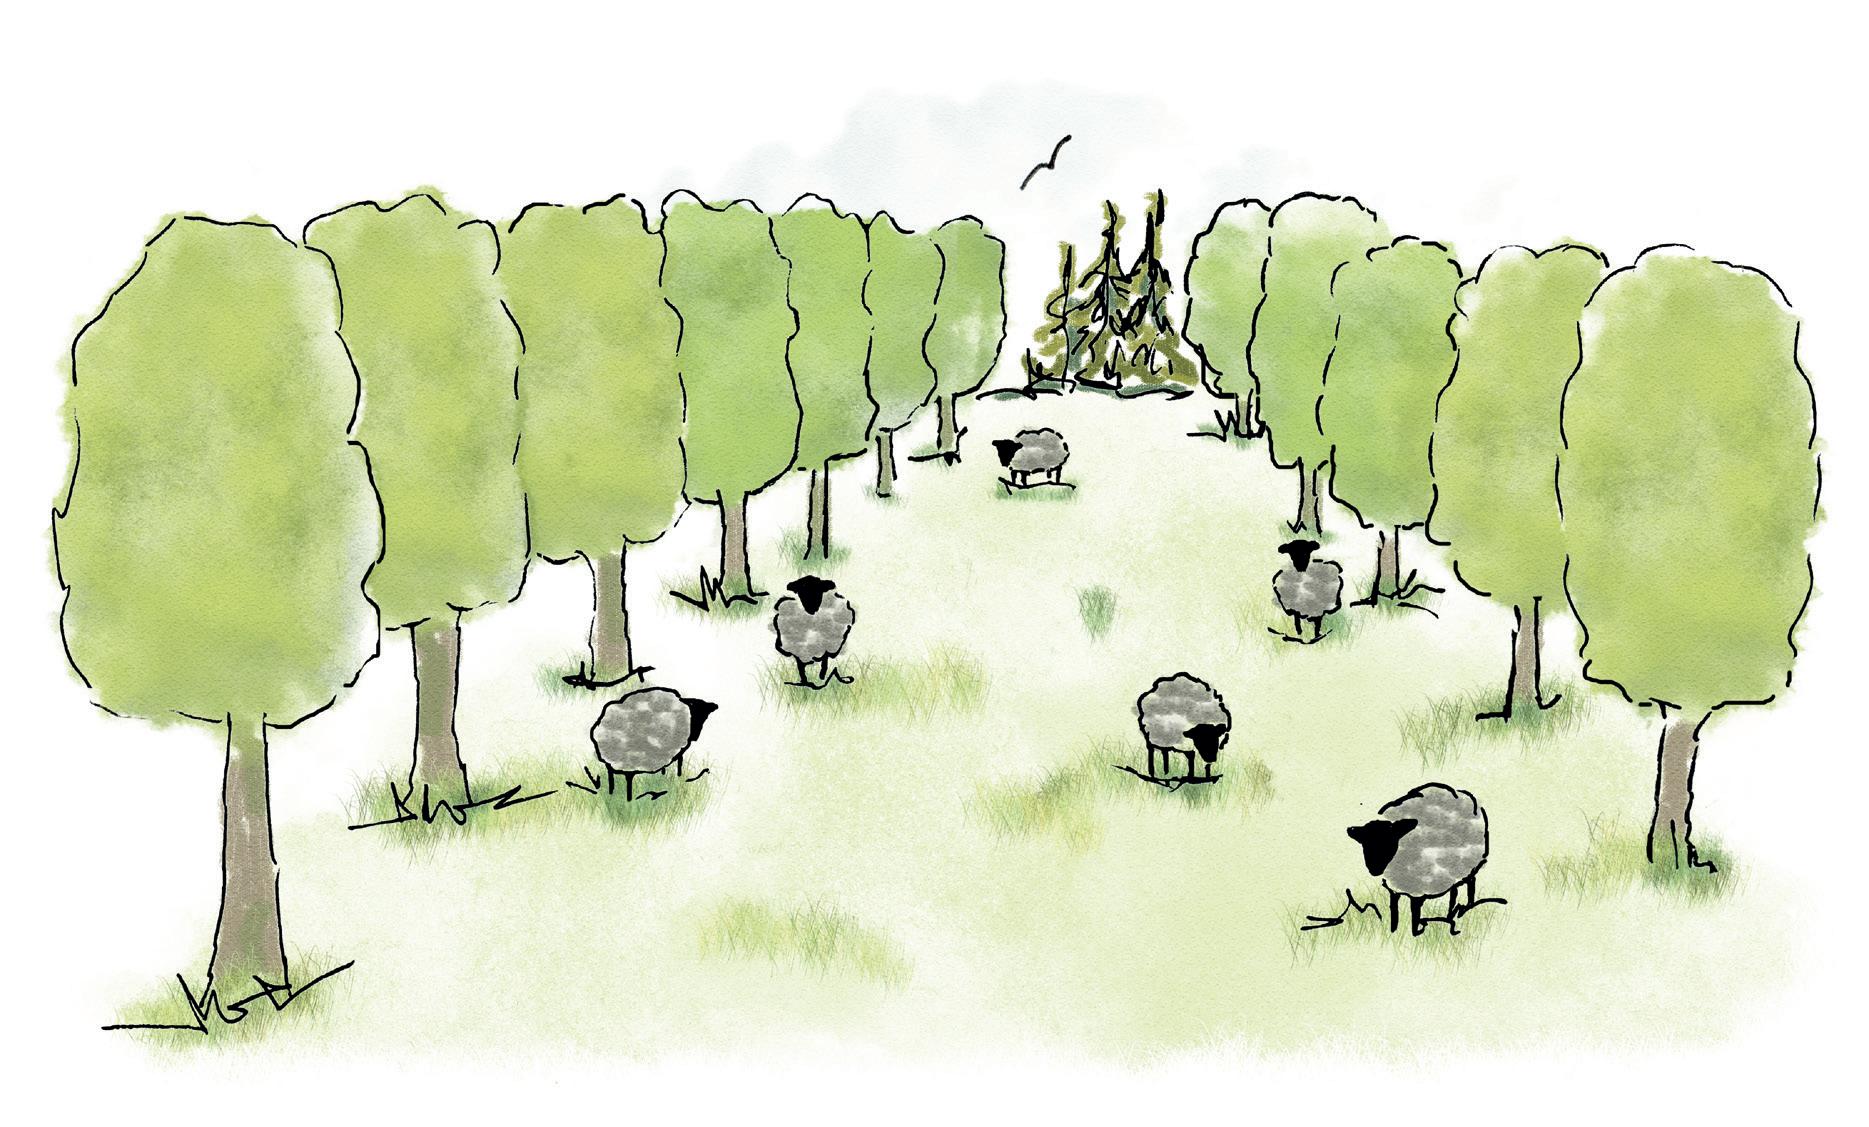
Silvopasture 151
Forest farming 151
Forest garden 152
Plants within a forest garden 152
Creating a forest garden 152
A U-shaped forest garden 152
Extending the growing season 155
Starting plants indoors 155
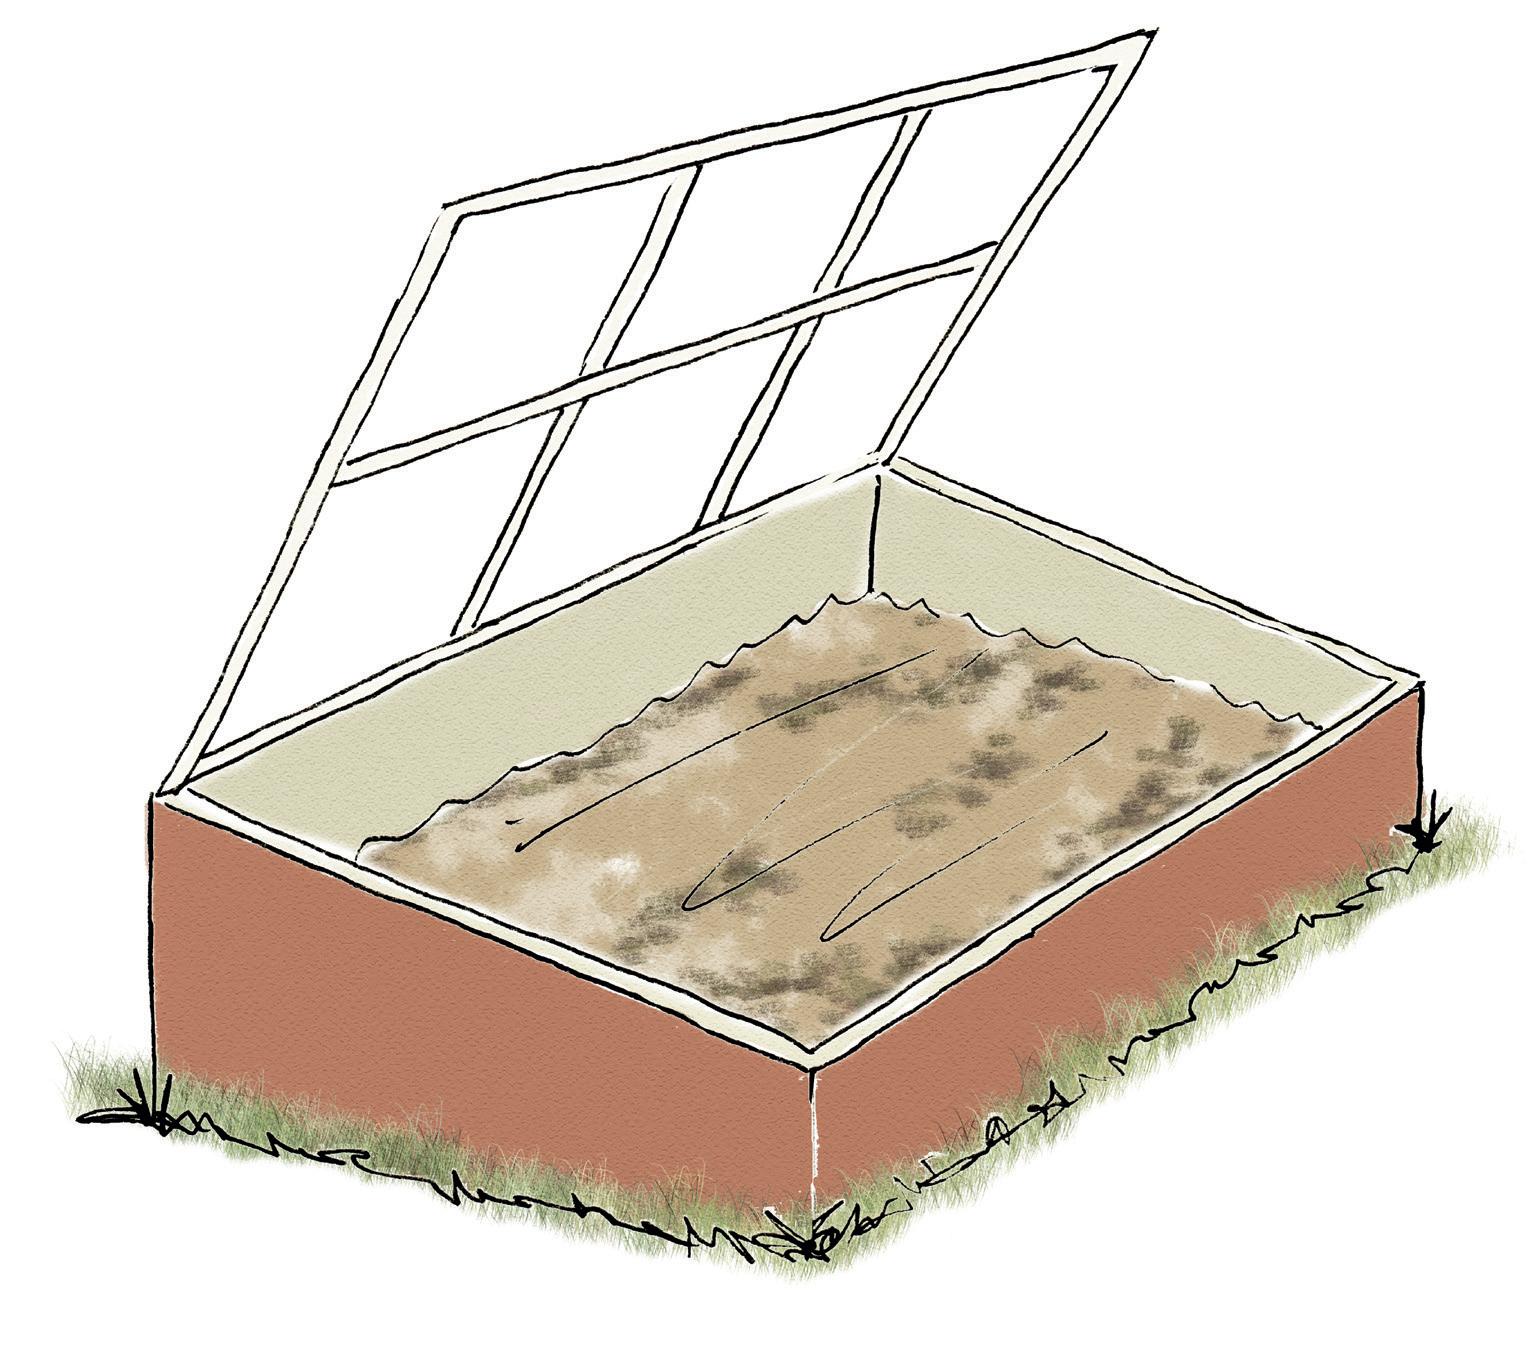
Cold frames and hotbeds 155
Greenhouses 157
Greenhouses combined with outbuildings 157
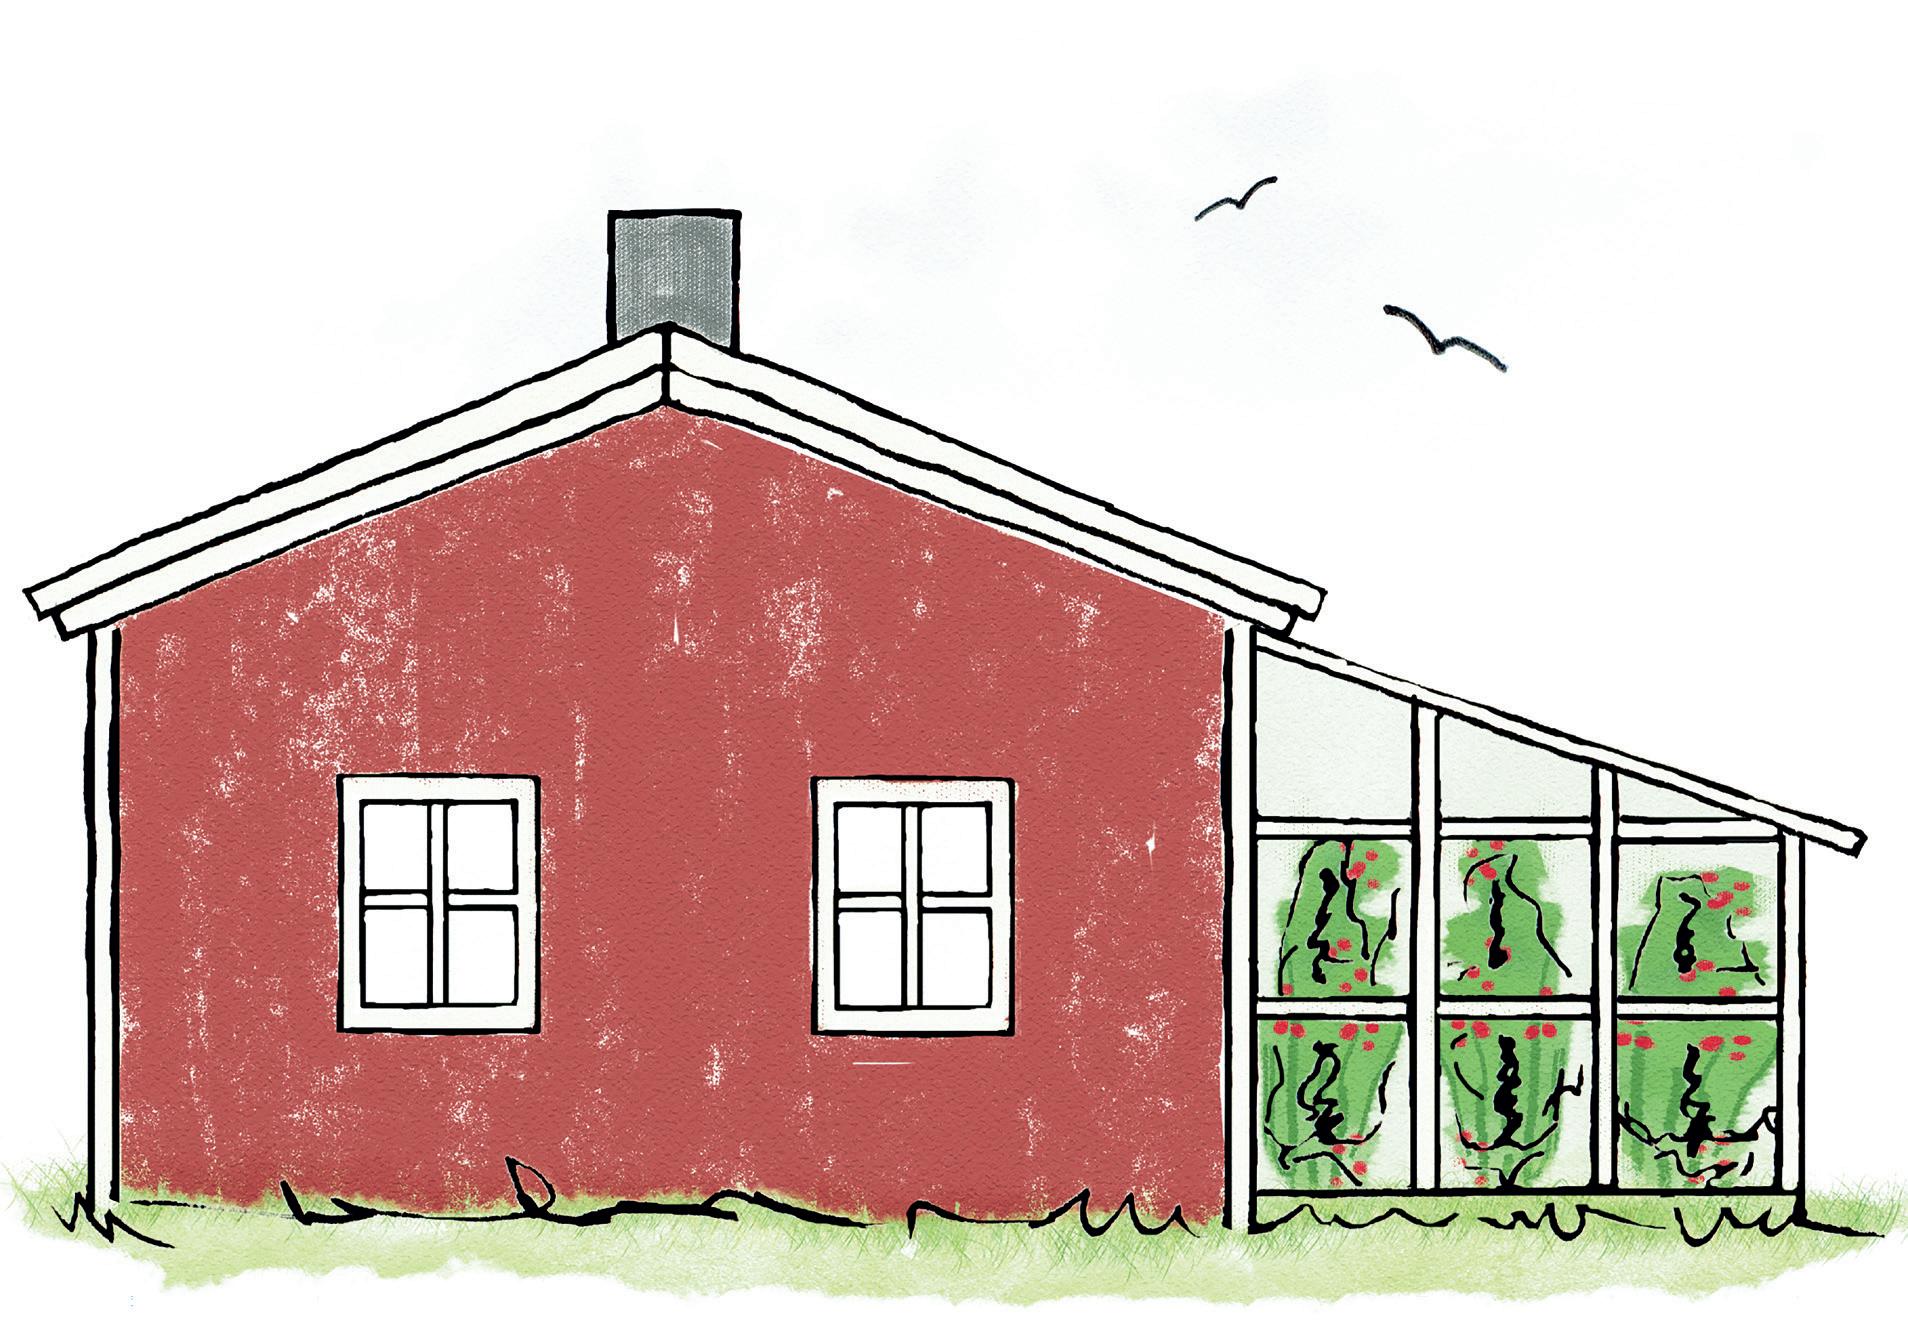
Greenhouses against a house wall 158
Greenhouse for hot water 158
Getting a greenhouse 159
Self-sustainability - How much you need 161
Household animals 163
Chickens 164
Geese 164
Ducks 165
Muscovy ducks 165
Rabbits 166
Bees 166
Goats 167
Sheep 167 Pigs 168
Cows 168
About the author 171
The farmer in Eva never gave up 171
Thanks from the author 171
Appendix 173
Parts of the appendix 173
Alphabetical list of contents 204
Ängsvägen - an exampel 208
Alphabetical list of illustrations 209
Ängsvägen - an exampel 210
Introduction
Today, most people live in cities and communities with less and less contact with nature. Just 150 years ago –reality looked very different. Back then, most people lived in the middle of nature and knew how it behaved. During that period in Sweden, seven out of ten people worked in agriculture. Today, only about two per cent do. We have in a very short time gone from an agricultural society to an industrial society to today’s service-based society. Fortunately, the knowledge of those days is still with us, in our oldest generation. This knowledge is something that we need to help preserve before it disappears completely.
It is with a tremendous and passionate commitment to nature, agriculture, and the food on our tables that I have written this book.
I will, therefore, give a brief overview of what today’s food production looks like, its pitfalls, and what is needed for us to move on to sustainable food production.
I do this because of my heartfelt desire for more people to understand how unnaturally things are grown today, and how important - and easy - it is to grow naturally.
Food production today
Today’s industrial farming, with fewer and fewer farms with ever-increasing monocultures, causes enormous problems - such as deforestation, soil erosion, and pollution. Fresh ground is continuously being broken to grow the amounts of corn, soy, grains, and oilseeds that the industry is demanding for food, animal feed, and fossil fuel. Here are some of the big problems in modern agriculture:
⇾ Very high energy consumption. It takes 10 calories of energy to produce 1 calorie food.
⇾ A third of our soils are already depleted. If today’s level of depletion continues, there may be as little as 60 years of nutrient-rich soil left.
⇾ A harsh hunt of new land, known as land grabbing, is taking place in various developing countriesespecially in Africa.
⇾ Unsustainable irrigation that causes the planet’s freshwater to deplete, or be polluted quickly.
⇾ The extensive use of chemicals, from fuel and fertilizers to various forms of pesticides - most of which comes from the oil industry.
⇾ Vegetables contain fewer nutrients as they get less nutrition themselves in the form of artificial fertilizers.
Large-scale animal production
Production of various animal products such as beef, pork, poultry, and fish is also heavily industrialized. Here are
the major problems:
⇾ Very high energy consumption.
⇾ The animals live in very unnatural conditions.
⇾ The animals have abnormal diets, such as soy and corn.
⇾ Feed and even to some extent water must be trans ported to the farms as the animals do not have access to any natural food.
⇾ Vast amounts of manure become a waste issue, rather than valuable fertilizer.
⇾ This meat contains fewer nutrients, including lower levels of omega 3.
Large-scale organic crops
Just because a farm has gone organic does not always mean that it is better or more sustainable than the conventional farm was.
Organic systems can be as unsustainable as the conventional ones if these are made up of large monocultures. In many greenhouses, crops are not grown in real soil - but in various substrates where all nutrition comes from the irrigation with different nutritional solutions
The only good thing about these large-scale organic crops is that the toxic chemicals are gone.
Modern biochemistry
There is a silent change happening with our nature and our food that is spearheaded by the biochemistry industry, where intensive research is underway to produce new effective products of various kinds. All to increase returns; especially financially.
This is done using everything from newer forms of gene modification (GMO) to the latest big thing, known as “synthetic biology”.
Genetically modified plants and animals
The most common form of gene modification today is the so-called molecular scissor CRISPR. Today, the researchers cut and paste DNA in everything from
bacteria, yeast, and green plants to zebrafish, fruit flies, mice, rats, and human cells.
Synthetic biology
The newest thing is something called synthetic biology. It is a form of genetic modification that is based on creating new artificial lifeforms, in which nature no longer decides what and in what form something should exist. Instead, the industry’s own assessments determine this.
Today’s food supply
Everything we’ve decided that we need is produced far away from us and transported to the cities - just as the shelves need restocking.
A severe effect of today’s food industry is that most people have lost all knowledge and understanding of how things are produced. There are frightening many of us who do not know how our food is produced - much less what it contains.
When both vegetables and animal products are produced at the lowest possible cost with maximum profit, no consideration is given to what the food ultimately contains. The problem is that plants and animals are what they eat! On top of this, more and more food products are eked out with everything from water to various chemical additives.
Domestic food supply is said to sit at just under 50%. This may not sound that alarming, but you need to remember that everything produced in Sweden is entirely dependent on imports of so-called input goods, such as fuel and fertilizers. The fuel sector has some domestic stocks, but in a crisis, these reserves won’t last more than a few days.
In practice, we have become entirely dependent on transports from all over the world working around the clock. This is an unsustainable system that risks collapse at the slightest disruption of the various transport routes.
Towards a more natural society
Today, most people know that much in society needs to change in order to have a sustainable future. Unfortunately, too little is done, and many people feel that it’s too negative, too difficult, and almost impossible for them to make a difference. But that is where reality differs!
Just one person can do a lot, and the best part is that once you start doing something - it starts to feel less negative. As an inspiration along the way, I would like to briefly tell you about the few indigenous people who still live with nature.
⇾ They see man as part of the earth.
⇾ They make no difference between animals and plants, but only see animals as a higher form.
⇾ Their cultivations are similar to forest gardens.
⇾ Their gardens are comparatively small, but provide the people with everything they need; food, some medicines, wood, fibres, and even a small surplus to exchange, give, or sell.
⇾ The size of a community is about one hectare, and fascinatingly enough, whether the village is in Africa, Asia, or South America - the size remains the same.
Organic and small-scale farming
Some time ago, the UN issued a report that points to the problem of today’s industrial agriculture.
In the report, they say that the world can cope with the challenges in terms of food supply, fewer chemicals, and less fossil fuel that we face. They mean that by converting to local, ecological, small-scale, and sustainable agriculture, we will be able to support an increased population. At the same time, nature and the environment will thrive.
In organic farming, no toxic chemicals are replaced by natural nutrients such as green manure and animal manure. The result is healthy and fertile soils that yield crops of non-toxic and nutrient-rich food.
The best form of organic farming is one where you grow with a crop rotation schedule and keep different kinds of animals. Such a system does not deplete the soil, but rather strengthens it.
Animals are not only needed for food, but they are also required first and foremost for the work they do in the fields. When they graze, they fertilize the soil with their manure and keep the soil surface porous with their cloven hoofs. This is important, because when the soil is porousthe rainwater is absorbed by the soil and does not flow off the ground as it does in those vast monocultures. This, in turn, reduces soil erosion.
In an organic system, the animals are also allowed to live more naturally and eat the food they were intended to eat. Which, in turn, means that they stay healthier and that less medication is needed. Good for the animals, but also for those of us who choose to eat their meat. Here too, the result is a non-toxic and nutrient-rich food.
How can you and I help?
The hardest part can be knowing where to start, but since money is what controls today’s food production, we can use this to our advantage! As consumers, we have a more significant influence than we think. When profit is the deciding factor, the products we buy the most
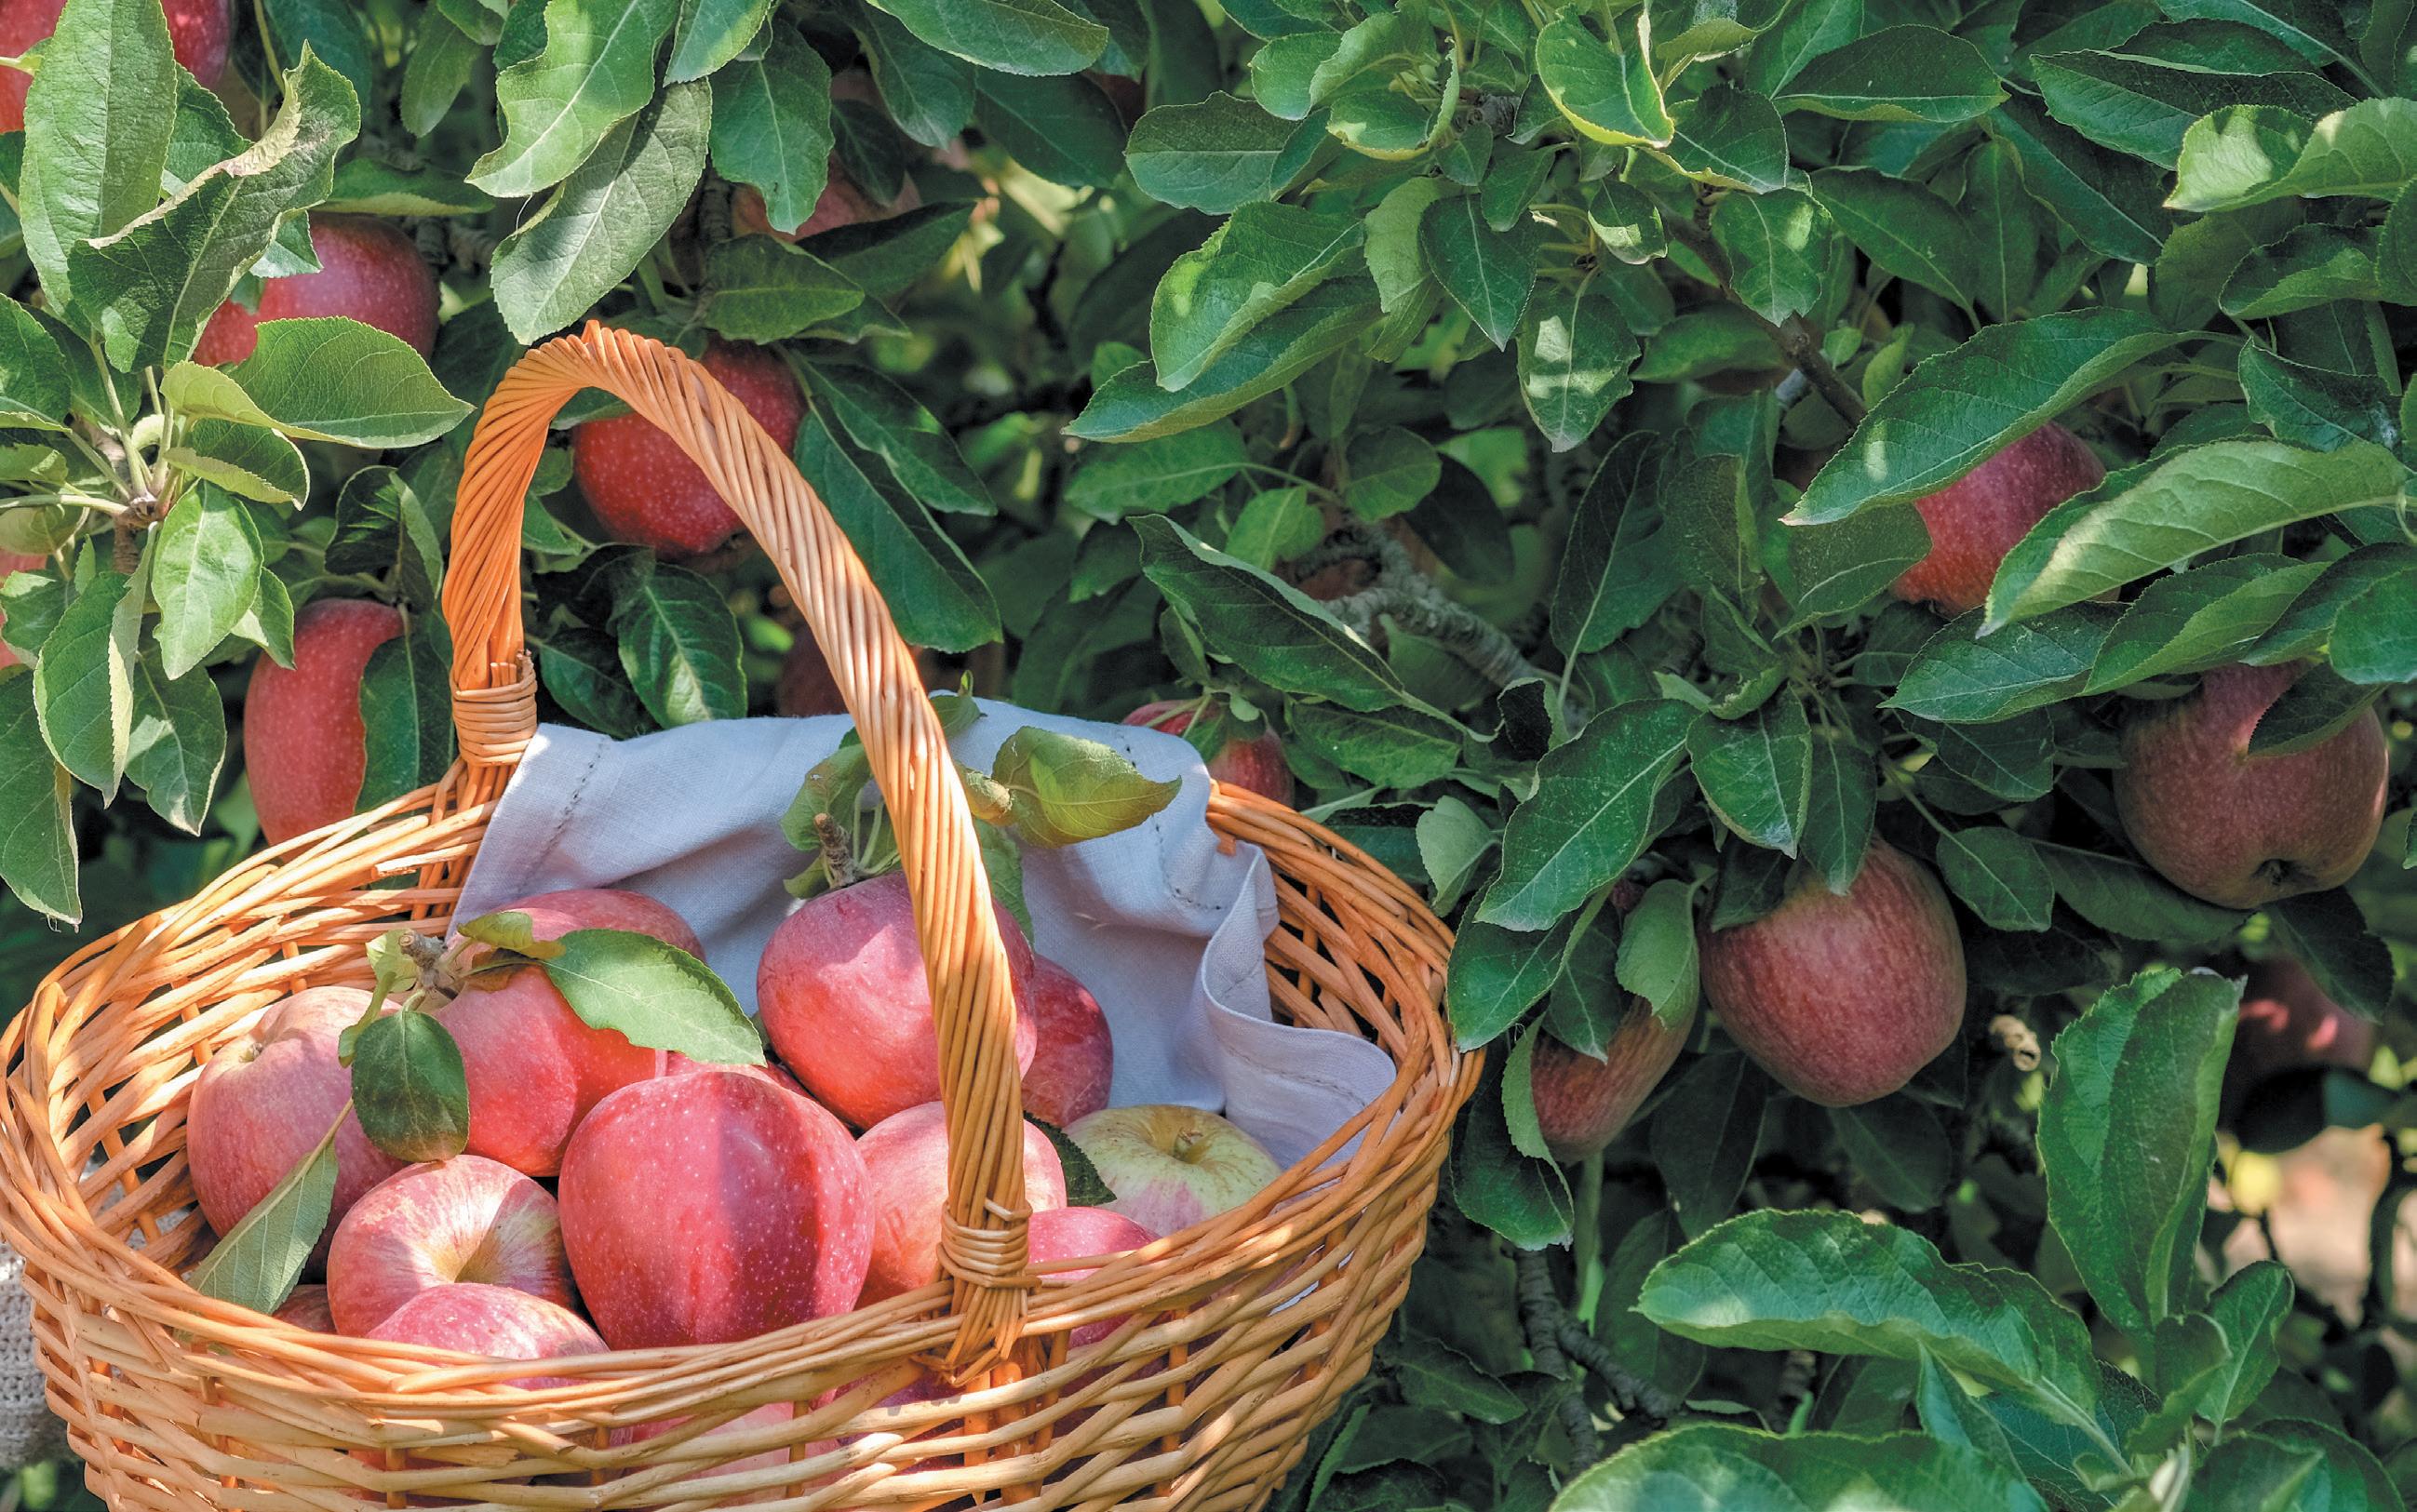
of are also the ones that are produced. By changing our buying habits, we can help break the industrial circle. Ultimately, we deceive ourselves with the beautiful exterior of nutrient-poor products. Organic apples might not always be as pretty, but they taste much better!
An excellent way to start is to find out what the food you are buying contains, and then choose the option with the purest ingredients and the least amount of additives. This is best done by consistently choosing food that is organic, local, and produced on a small-scale. This means that we cannot always get hold of all those things we are used to buying, but remember the old saying “Good things come to those who wait”? As it happens, it’s not wrong to wait for something tasty - when the season for it finally comes, it’ll taste all the sweeter!
As a consumer, it is time to put your foot down and choose the food that makes both us, the animals, and nature happiest!
Start growing your own
Starting to grow your own food is not only exciting and fun, but it also yields food that you know is healthy. In addition, it provides you with the satisfaction of contributing something positive to the change that needs to happen.
If you don’t know where to start, I would highly recommend permaculture. Around the world, the number of people who use permaculture with great success is steadily growing.
Initially, permaculture may feel a little alien, and some of the ways of thinking may be perceived as being contrary to what we are used to. Still, once you understand the foundation - a world of crystal-clear simplicity opens up. All you need to know already exists in nature.
We need to slow down a little and start to follow nature’s own rules and rhythms. After all, all things don’t - and shouldn’t - happen right away. Taking the time to observe, to think about what is available, and what is happening in your little piece of nature, provides not only knowledge - but also more opportunities to simply enjoy what you already have.
Then the book begins
The first part of this book is a review of how different biological systems work when nature is allowed to set the rules of the game.
The second part describes how permaculture works as a planning and cultivation tool.
The third part is the practical part, based on the first two parts of the book. Here you’ll find lots of practical examples and illustrations, all to make it easier for you to get started with your crops.
There is also an appendix that contains many useful charts to help you along the way.
Without trees, we would have deserts
Trees are absolutely magical. They are singularly one of the essential parts of our ecosystem, as trees make up about 80 per cent of the workforce when it comes to creating soil and atmosphere. Without them, our climate would be completely different. The harsh reality is that without trees, there would be nothing but desert.
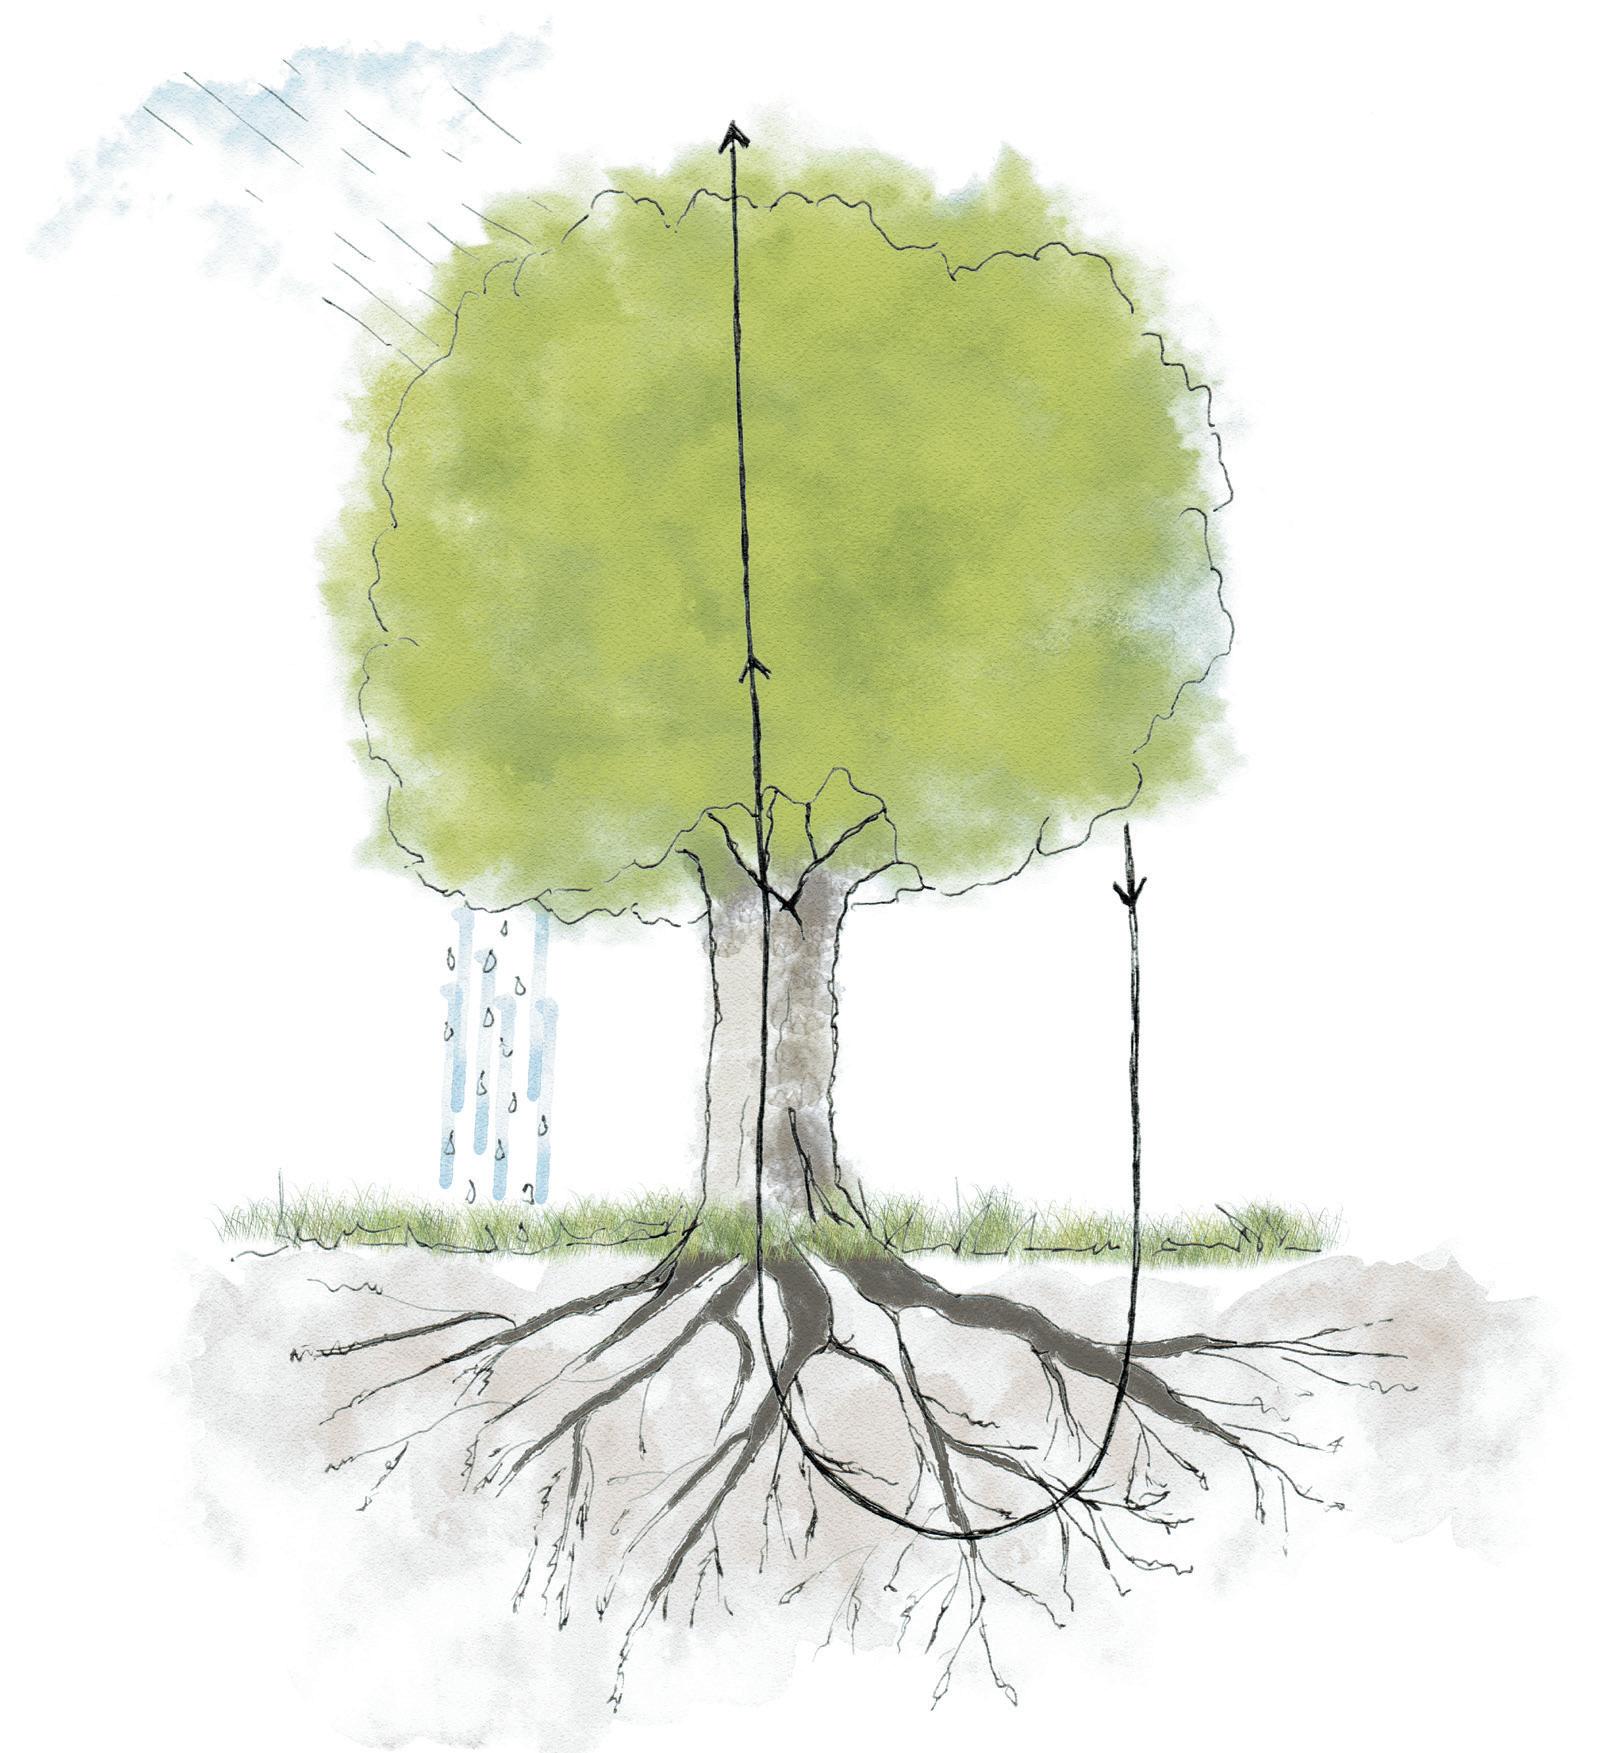
The water cycle of the tree
Th anks to a large leaf area, a fully grown tree collect massive amounts of water. A mature tree can have an incredible 16 hectares of working leaf area – if you count both the outer surface and all the vessels within the leaves.
Trees are also shaped in such a way that when it rains, the water runs along the outer branches towards the trunk, and down along it to the ground. Water will not drip from the crown until all the parts above ground have been saturated. When the droplets finally hit the ground,
it will be carrying nutrients from the surface of the tree along with insects and dust. This nutrient-rich water feeds the topsoil and the finer, shallower roots, while the water from the trunk feeds the deeper layers of soil and the more massive roots.
These thick, deeply buried roots pull different minerals from the ground – minerals which then gets transported up through the tree to the leaves. Once there, these nutrients are washed back down to the soil when it next rains. And so, the cycle goes. You could say that the tree feeds both itself and the ground surrounding it. There-
AN ADULT TREE CAN HAVE UP TO 160 000 SQM WORKING SURFACE
DROPLETS FROM THE CROWN CONTAINS UP TO 50 TIMES MORE NUTRIENTS THAT THE ACTUAL RAIN
85 % OF THE ROOTS AND 94 % OF THE WATER IS FOUND ABOVE A DEPTH OF 60 CM
APPROXIMATELY 15% OF THE ROOTS ARE LOCATED DEEPER DOWN
The water cycle of the tree
APPROXIMATELY 93 % OF THE TREE CROWN IS WATER
THE VISIBLE PART OF A TREE IS 46-60% OF ITS TOTAL SIZE
THE TRUNK AND BRANCHES CONTAIN APPROXIMATELY 86% WATER
SCARCELY 26% OF THE RAINWATER REACHES GROUNDWATER
WITHOUT TREES, WE WOULD HAVE DESERTS
fore, collecting rainwater under a tree gives you water that is significantly more nutrient-rich than just rain. Up to 50 times more nutritious than regular rain, to be precise!
The upper layer of soil and plant material underneath the tree – the so-called litter layer, or the O horizon – helps to retain the water on its way down through the ground. The first 60 cm of the soil below the tree includes 15 per cent of the tree’s biomass (the roots) and 96 per cent of its water. This delay gives enough time for the roots to be able to take full advantage of the water before it continues down into the ground. Once the ground is fully saturated, and the water has given life to everything in its path, the water continues down to the groundwater.
Different types of soils have different capabilities for retaining water. Roughly speaking, a soil with no trees can hold 2.5–7 cm of rain per every 30 cm of depth, while the ground underneath a tree can hold up to 10–30 cm in the same volume of soil. Soil which is rich in organic matter, also known as humus, can hold up to one-third of its weight in moisture. One could say that figuratively, there exists a whole lake of recycled water within the forest’s layers of soil.
Interestingly enough, trees supply more of the water present in streams compared to what the rain does. This means that the water in a brook is cleaner than rainwater – assuming that the environment around the brook isn’t polluted.
Trees affect the climate
A tree recycles roughly 74 per cent of rainwater. This occurs partly by water evaporating from the surface of the leaves, and partly by water from the ground; water that travels up through the tree, where it then evaporates. The rest – almost 26 per cent – of the water flows down into the ground to become groundwater.
From this evaporated water, or rather the water vapour, clouds are formed. However, before a cloud can produce rain or snow, the moisture must adhere to the surface of tiny, tiny little particles. Most of which are minerals, although airborne microbes also help out. In this, the trees play another vital role, as water vapour from trees contains large amounts of those same little water-creating particles.
Clouds formed over forests are a mixture of water vapour from the sea and water vapour from the trees, depending on how far it is to the sea, or to a lake. Along the coastline, the rain contains 100 per cent seawater, while further inland, as much as 50 per cent of the water in the rain comes from trees.
Unlike water vapour from seas and oceans, water vapour from forests contains significantly more organic par-
ticles and plant nutrients.
The farther you get from the sea, the trees ability to condense moisture plays an increasingly important role. A long way inland, where you are far away from any seawater, there would be no rain at all without trees.
Another effect on our climate is that trees affect temperature; because trees – and other plants – are in themselves several degrees warmer than the surrounding air. During the day, this leads to evaporation that in turn cools the tree down, which then makes its’ surroundings colder. The opposite happens at night, when the water condensates against the warmth of the tree, making its’ surroundings warmer than the air nearby.
This, in turn, means that when hot, dry air enters a forest, it is cooled and moisturized. Vice versa, when cold, humid air enters a forest, it is heated up and dehydrated for it to evaporate on its way up through the canopies. Trees are therefore excellent at regulating both temperature, and moisture.
Trees work together with the soil and mycorrhiza
During their lifetime, trees produce their weight in organic waste several times over, which means that the trees produce most of their soil themselves. This aids the nutrient interaction – also known as mycorrhiza – between the plants’ fibrous root system and certain sponges (Mycelium). These fibrous roots can, in the right conditions, extend an unbelievable 1000 metres away and 1500 metres down into the ground, which means that a tree can have a massive area to collect nutrients from. Concurrently, the fungi receive the starch they need from the trees.
Trees as air purifiers
Trees are our planets air purifiers that work just by living and thriving. They take care of the carbon dioxide and in return, gives us vital oxygen. In addition to carbon dioxide, trees also absorb other harmful gases such as carbon monoxide, chlorofluorocarbons, and nitrous oxide. Therefore, having large amounts of trees in our cities would be at least one way of reducing smog and other pollution problems.
With that in mind, it’s easier to understand why the massive deforestation that is taking place across the planet contributes to the acceleration of climate change. There are simply not enough trees to convert the surplus of carbon dioxide to oxygen. So, in parallel with a massive reduction of emissions, we should be planting substantial amounts of trees, – urgently –which in the long run may help to curb climate change
WITHOUT TREES, WE WOULD HAVE DESERTS
How permaculture works
As I wrote in the introduction of the book, permaculture can be a solution to many of our problems – all over the globe. In this chapter, I will briefly explain what it means, first and foremost from a horticultural perspective. The rest of the book will offer information both on the practical aspect and a more in-depth look at how to use permaculture alongside other tools.
Permanent Agriculture
The term permaculture comes from the words of Permanent Agriculture. It was coined in 1978 by Bill Mollison and David Holmgren, both from Australia.
Bill was a researcher and biologist, and as such, he was fascinated by the forest and how it worked when it was allowed to grow freely without human influence. At the same time, he was very committed to finding a solution to the catastrophe he believed the world was heading towards. Despite both involvement and participation in many protests, he felt that nothing he did yielded any visible results.
In the end, he realized that the change that was needed did not come from above, but from below. Therefore, he returned home and began to cultivate crops in ways inspired by the forests and by the indigenous people that remain in the world. From this, his book “Permaculture: A Designers’ Manual” was born. A complete manual for everything related to permaculture.
The ethical principles of permaculture
Permaculture is a planning tool that can help us find our way back to a sustainable system – both for us, and the planet as a whole. Permaculture is a holistic approach that can be summarized in the following three ethical principles.
Caring for the Earth
Caring for the Earth means that we recapture the understanding that we are part of the planet and that we live in synergy with all other life.
Caring for people
Caring for people is about finding our way back to a more close-knit community, where people have time for each other – that we can talk, listen, see, and be seen.
Fair distribution
Earth’s resources are finite, so we need to manage and fairly distribute these resources in a way so that we do not consume more than what is renewed.
Is change hard?
The answer is both yes and no. The difficulty lies in that the problems are global, and that makes the decision process extremely slow and convoluted. It is the economic doctrine of constant growth in particular which is the driving force behind most of the problems. Unfortunately, the likelihood of a quick change is minimal – because nobody, neither politicians nor financiers want to be the first to take a step towards change. Nobody dares to be the first to put the nail in the coffin on today’s shining economy.
How, then, do we stop the runaway train? Here, I believe the saying “if you want something done, do it yourself” comes in handy even if it can sound near impossible. But imagine – what if we can?
Permaculture is about taking the reins ourselves and changing our own way of life. We can do so much more than we think, and a good start is to change our perspective from “something must be done” to “what can I do?”.
Because we decide our own actions, as long as we stay within the limits of the law. No one can prevent us from starting – right now – to see things from another perspective. Everything does not need changing all at once; we can take it one step at a time. Because how do you move a mountain? Why; by moving one rock at a time of course. Therefore, let us start by growing more of our food ourselves. If we don’t have that option, we can at least choose sustainable, organic and locally grown produce. If we take a step back and rethink, while asking ourselves “Do I really need this?” we can reduce our consumption while saving both resources and money. As soon as we succeed in taking a step towards a more thoughtful existence, we need less money, which has the added bonus of needing to “work” less. This, in turn, makes the puzzle of life easier to solve.
The 12 design tools of permaculture
In addition to the ethical principles, permaculture has 12 design tools. Within these, many of the permaculture keywords words such as observation, planning, natural balance, resource conservation, renewal, and overall return are repeated throughout. Together, the design tools reflect the three ethical principles of permaculture.
⇾ Observe and interact
⇾ Catch and store energy
⇾ Obtain a yield
⇾ Apply self-regulation and accept feedback
⇾ Use and value renewable resources and services
⇾ Produce no waste
Collecting all the parts
INORGANIC MATTER SOCIAL CONDITIONS AND LAWS
⇾ Design from patterns to details
⇾ Integrate rather than segregate
⇾ Use small and slow solutions
⇾ Use and value diversity
⇾ Use edges and value the marginal
⇾ Creatively use and respond to change
Check STRUCTURES
PARTNERS INSURANCE CREDIT OPTIONS
TECHNICAL SOLUTIONS
ORGANIC MATTER
Choose PEOPLE ENERGY
SPECIES/ VARIETIES
MATERIALS
ECONOMY
PLANTING
BUILDINGS LAND-USE PLANNING WATER
Decide
Design for optimum FLOW USES OF RESOURCES
RETURN
To understand and grow the soil
Learning how your soil works can take some time, but you can learn a lot by merely observing the ground itself and what naturally grows there. Those “pesky” things we usually call weeds are in reality an encyclopedia, where many types of weeds act as a signaling system that tells you how the soil is feeling. When the ground is imbalanced, these “weeds” attack the problem in that particular area. In fact, there can be up to 2000 dormant seeds on one square meter of land. Seeds that are there, just waiting for “right” conditions to arise, so that they can start to grow.
Different soil types
Different soil types retain varying amounts of nutrients and water.
Sandy
Sandy soil is easy to work and is relatively airy thanks to its large grain size. That is why various root vegetables grow large and straight in sandy soil. The disadvantage is that this type of soil is poor at retaining both water and nutrients. Sandy soil heats up faster in the spring but also gets colder in the autumn.
To increase the humus content in the soil so that it is better at retaining nutrients and water, you add – for example – grass clippings, manure, and compost. Even mulching benefits water retention.
Fine Sand
A soil made up of very fine sand has properties similar to the sandy soil, with the difference that this type of soil is better at retaining water. Fine sandy soil can be improved in the same way as sandy soils.
Coarse Silt
Coarse silty soil differs a great deal from the fine sandy soil. The structure is grainy and is even better at retaining water. The disadvantage of the grainy structure is that it easily breaks down; for example in the event of heavy rain, and then forms such a hard surface that the seeds that grow cannot penetrate the surface.
Coarse silty soil is improved in the same way as clay soil.
Silt
Silty soil is a soil that is good at retaining nutrients and water. However, sometimes this soil can be so waterretaining that it causes issues. The soil becomes wet, compact, and above all – cold, which means that this silty soil takes longer to heat up in the spring. Compact and wet soil is also easily affected by a lack of oxygen, which causes the plants to suffocate. Silty soil is improved in the
same way as clay soil.
Clay
The clay soil is the finest of the various soils. It is a very nutritious soil, but with the disadvantage that it is wet and cold. In addition, the clay soil is especially sensitive to soil compaction.
Improving clay soil, coarse silty soil, and silty soil is done by adding large amounts of organic material, by mulching, and by growing green manure plants in order to loosen up the soil and get its’ micro life started. Do not add sand to clay soil. This can make the clay soil coalesce even more and become as hard as concrete.
Loam
Loam is a mixture of sand, silt, and clay in different amounts, so, therefore, you need to try and determine which of the above soils it most closely resembles. Adding organic material always works.
The grain sizes of the different soils
Soil type Grain size
Gravel, medium 20–6 mm
Gravel, fine 6–2 mm
Sand, coarse 2–0,6 mm
Sand, medium 0,6–0,2 mm
Sand, fine 0,2–0,06 mm
Silt, coarse 0,06–0,02 mm
Silt, medium 0,02–0,006 mm
Silt, fine 0,006–0,002 mm
Clay 0,002 mm
Testing the soil to figure out the type Feel test
Moisten the soil and rub it between your fingers. Sandy soils (e.g. sandy loam or sandy clay) feels gritty, silty soils (e.g. silty loam or silty clay) feels smooth, and clayey soils (e.g. clay loam) feels sticky.
Ball test
Roll a ball of approximately 25 g moistened soil in your hand.
Coarse textures (sand or sandy loam) won’t ball at all, or the ball breaks at the slightest pressure.
Sandy loams and silt loams stay together but change their shape easily when pressing them.
Fine-textured (clayey or clayey loam) soils stay together very well.
Ribbon test
Using that ball you just made, press it out between your thumb and the side of your index finger in an upward motion so that a ribbon forms.
Sandy soils won’t ribbon at all.
Loam, silt, silty clay loam, or clay loam soil ribbons less than 2.5 cm before breaking off
Sandy clay loam, silty clay loam, or clay loam ribbons 2.5–5 cm before breaking off
Sandy clay, silty clay, or clay soil ribbons more than 5 cm before brea king off
Sound test
If you take some dry soil and rub it between your fingers and it crackles; the soil is mostly sand. If it instead makes a creaky sound, the soil is made up of finer particles.
Test pit
One way to test the soil’s ability to retain water is to dig a test pit that is 50 centimetres wide and 30 centimetres deep – and then fill it with water. If the water remains for several hours or even worse; several days, the drainage is too weak, and the soil is too good at retaining water. If you want to plant something there, the soil must be improved. It is easiest to do this by mixing in more organic material such as compost, grass clippings, and so on. If, on the other hand, the water disappears within 30 minutes, the drainage and the water-retaining ability of the soil is good. If the water disappears within 10–15 minutes, the soil is porous, which is also addressed by organic m atter.
Dig test
When digging in good soil, it should be possible to push the spade down into the ground solely with the force of your foot, and the soil you dig up should fall apart. In a soil that is too compact, it is harder to push down the spade, and the soil comes up in clods. To make the soil more porous, organic matter is added, preferably in combination with the cultivation of deep-rooted green manure plants.
Water test
The easiest way to test how much clay soil contains is to put some soil in a jar of water and then shake it rigorously. After a while, the different soil types will settle depending on their size. Sand in the bottom, then sludge, then clay and at the top, organic material.
I am convinced that by now, no one has missed the fantastic properties of organ ic material, right?
The art of watering
Back again to the subject of water. Depending on the type of soil you have, you should water it in different ways.
A sandy soil that is poor at retaining water should be watered frequently and a little at a time, in dry weather. When it comes to a soil that is mostly clay, you water rarely but a lot at a time – because large amounts of water are needed to penetrate the dense clay.
Regardless of the soil type, it is good to add humus as it balances the soil’s water retention. Sandy soil with a high humus content does not need to be watered as often, while a clay soil with a high humus content needs to be watered more often.
An average water requirement is about 30l/week, but your kitchen plants need more. Some need as much as 200l/week. The comparison should be that 1 mm corresponds to 1l/m2. Therefore, you need at least 30mm/ week, and up to 200mm/week for some plants. That is why the art of watering is so important.
I have mentioned this before, but it bears repeating. You should not water between 9 am and 4 pm (solar time) when it is hot out. Watering during the hottest hours in the belief that you are cooling the plants down, in reality only gives the plants a shockingly cold shower.
Watering in the morning is best – although watering in the evenings usually works as well; at least if you do not have a problem with snails or plants that are easily attacked by mould. In the greenhouse, watering in the evenings should be avoided as far as possible to prevent mould.
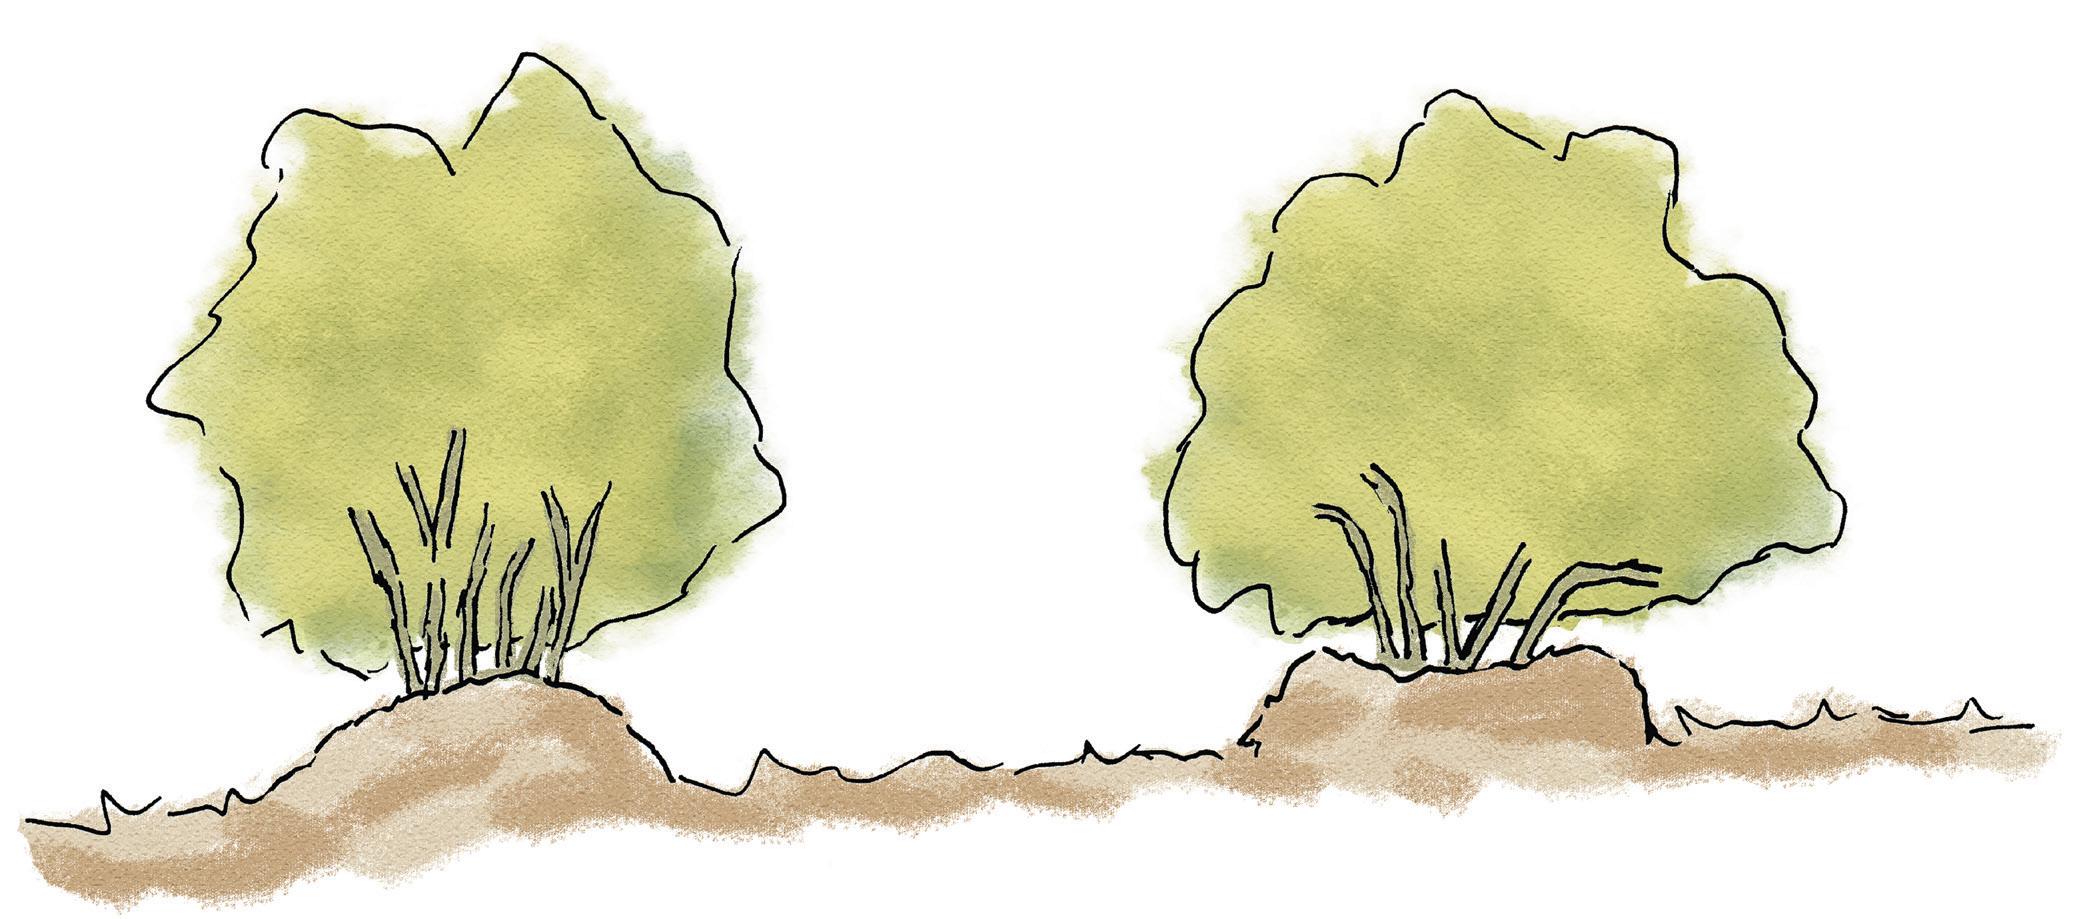
A n old and well-proven trick for optimizing watering for perennials requires, first and foremost, them to be planted slightly higher than ground height; on a small hill. Thanks to this planting method, one can optimize the plant’s access to water by making a small pit in the hill during spring, in order for the plant to absorb the water properly. When you reach July, you water as little as possible. In August, you round off the soil so that the hole is gone and you have a proper hill again. This means that the water flows off more quickly and that the plant settles better during autumn, and thus will cope better in the wi nter.
UNDERSTAND AND GROW THE SOIL
It should also be remembered that established perennials have more extensive and deeper root systems, which means that they need to be watered less than oneand two-year-old plants. Newly planted perennials, on the other hand, need to be watered more often and with large amounts each time in order for the root system to develop and spread down into the ground. Mulching helps to keep water consumption down, which landscape fabrics also do.
At high winds, the evaporation rate increases and you get a definite increase in water consumption if using irrigation, because the light water droplets drift away in the wind. An effective way to keep water consumption down is to use a drip irrigation system.
Another factor that affects water consumption, which one might not think of, is when the soil has become dry and hard before watering. Such a soil surface has a much harder time absorbing the water, and you lose a significant amount that trickles off somewhere else, at the same time as soil erosion increases.
Mulching
Covering the bare soil around your planted crops has many advantages and few disadvantages. When the plants grow to such an extent that they are large enough not to risk drowning in the cover material, it is time to weed and start covering the crops. What to cover with depends a little on what you have access to.
Comfrey is considered the very best, but if you are to grow it yourself, you need to be aware that comfrey is a so-called invasive plant, wh ich means that it quickly
takes over the area you plant it in. The least invasive variety is said to be the Russian comfrey plant, (Symphytum uplandica = Symphytum x uplandicum). Alternatively, one can plant some form of green manure plant between the rows, which are then cut down and used as cover material. More about green manure later on.
Advantages
⇾ Prevents soil erosion during high winds and heavy rains.
⇾ Improves the soil structure by decomposition, which in turn increases the soil’s humus content.
⇾ Stimulates the soil’s microorganisms, especially the mycorrhizae.
⇾ Increased mycorrhizae improve the growth and uptake of many micronutrients while protecting the plants from high levels of harmful substances in the soil and increasing the plant’s resistance to diseases.
⇾ Reduces evaporation and helps the soil retain moisture both longer and in a larger volume. A thatch of as little as 3.5 cm reduces evaporation by about 35 per cent, compared to bare soil.
⇾ Stabilizes the soil temperature in the topsoil layers, which means that the smaller fine roots have a higher chance of survival. With bare soil, even established plants can suffer from stress because the fine roots do not like to be exposed to large fluctuations between hot and cold.
Donut shaped mound
⇾ Prevents silting of the soil surface during heavy rains. Suffocates the weeds.
⇾ Legumes (including vetch, fodder peas, and clover) in particular increase the number of nutrients in the soil.
⇾ Requires less weeding, nutrition, and watering.
⇾ Greater yields.
Disadvantages
⇾ Increased snail problems in areas with larger snail populations.
⇾ Can be counteracted by growing in raised beds with some form of snail barrier around.
Various cover materials
Cover material should primarily be organic to gain full benefit from the mulching.
Grass clippings provide quick nourishment and are suitable for nutritious plants such as leaf plants, cabbage, tomato, cucumber, and leeks.
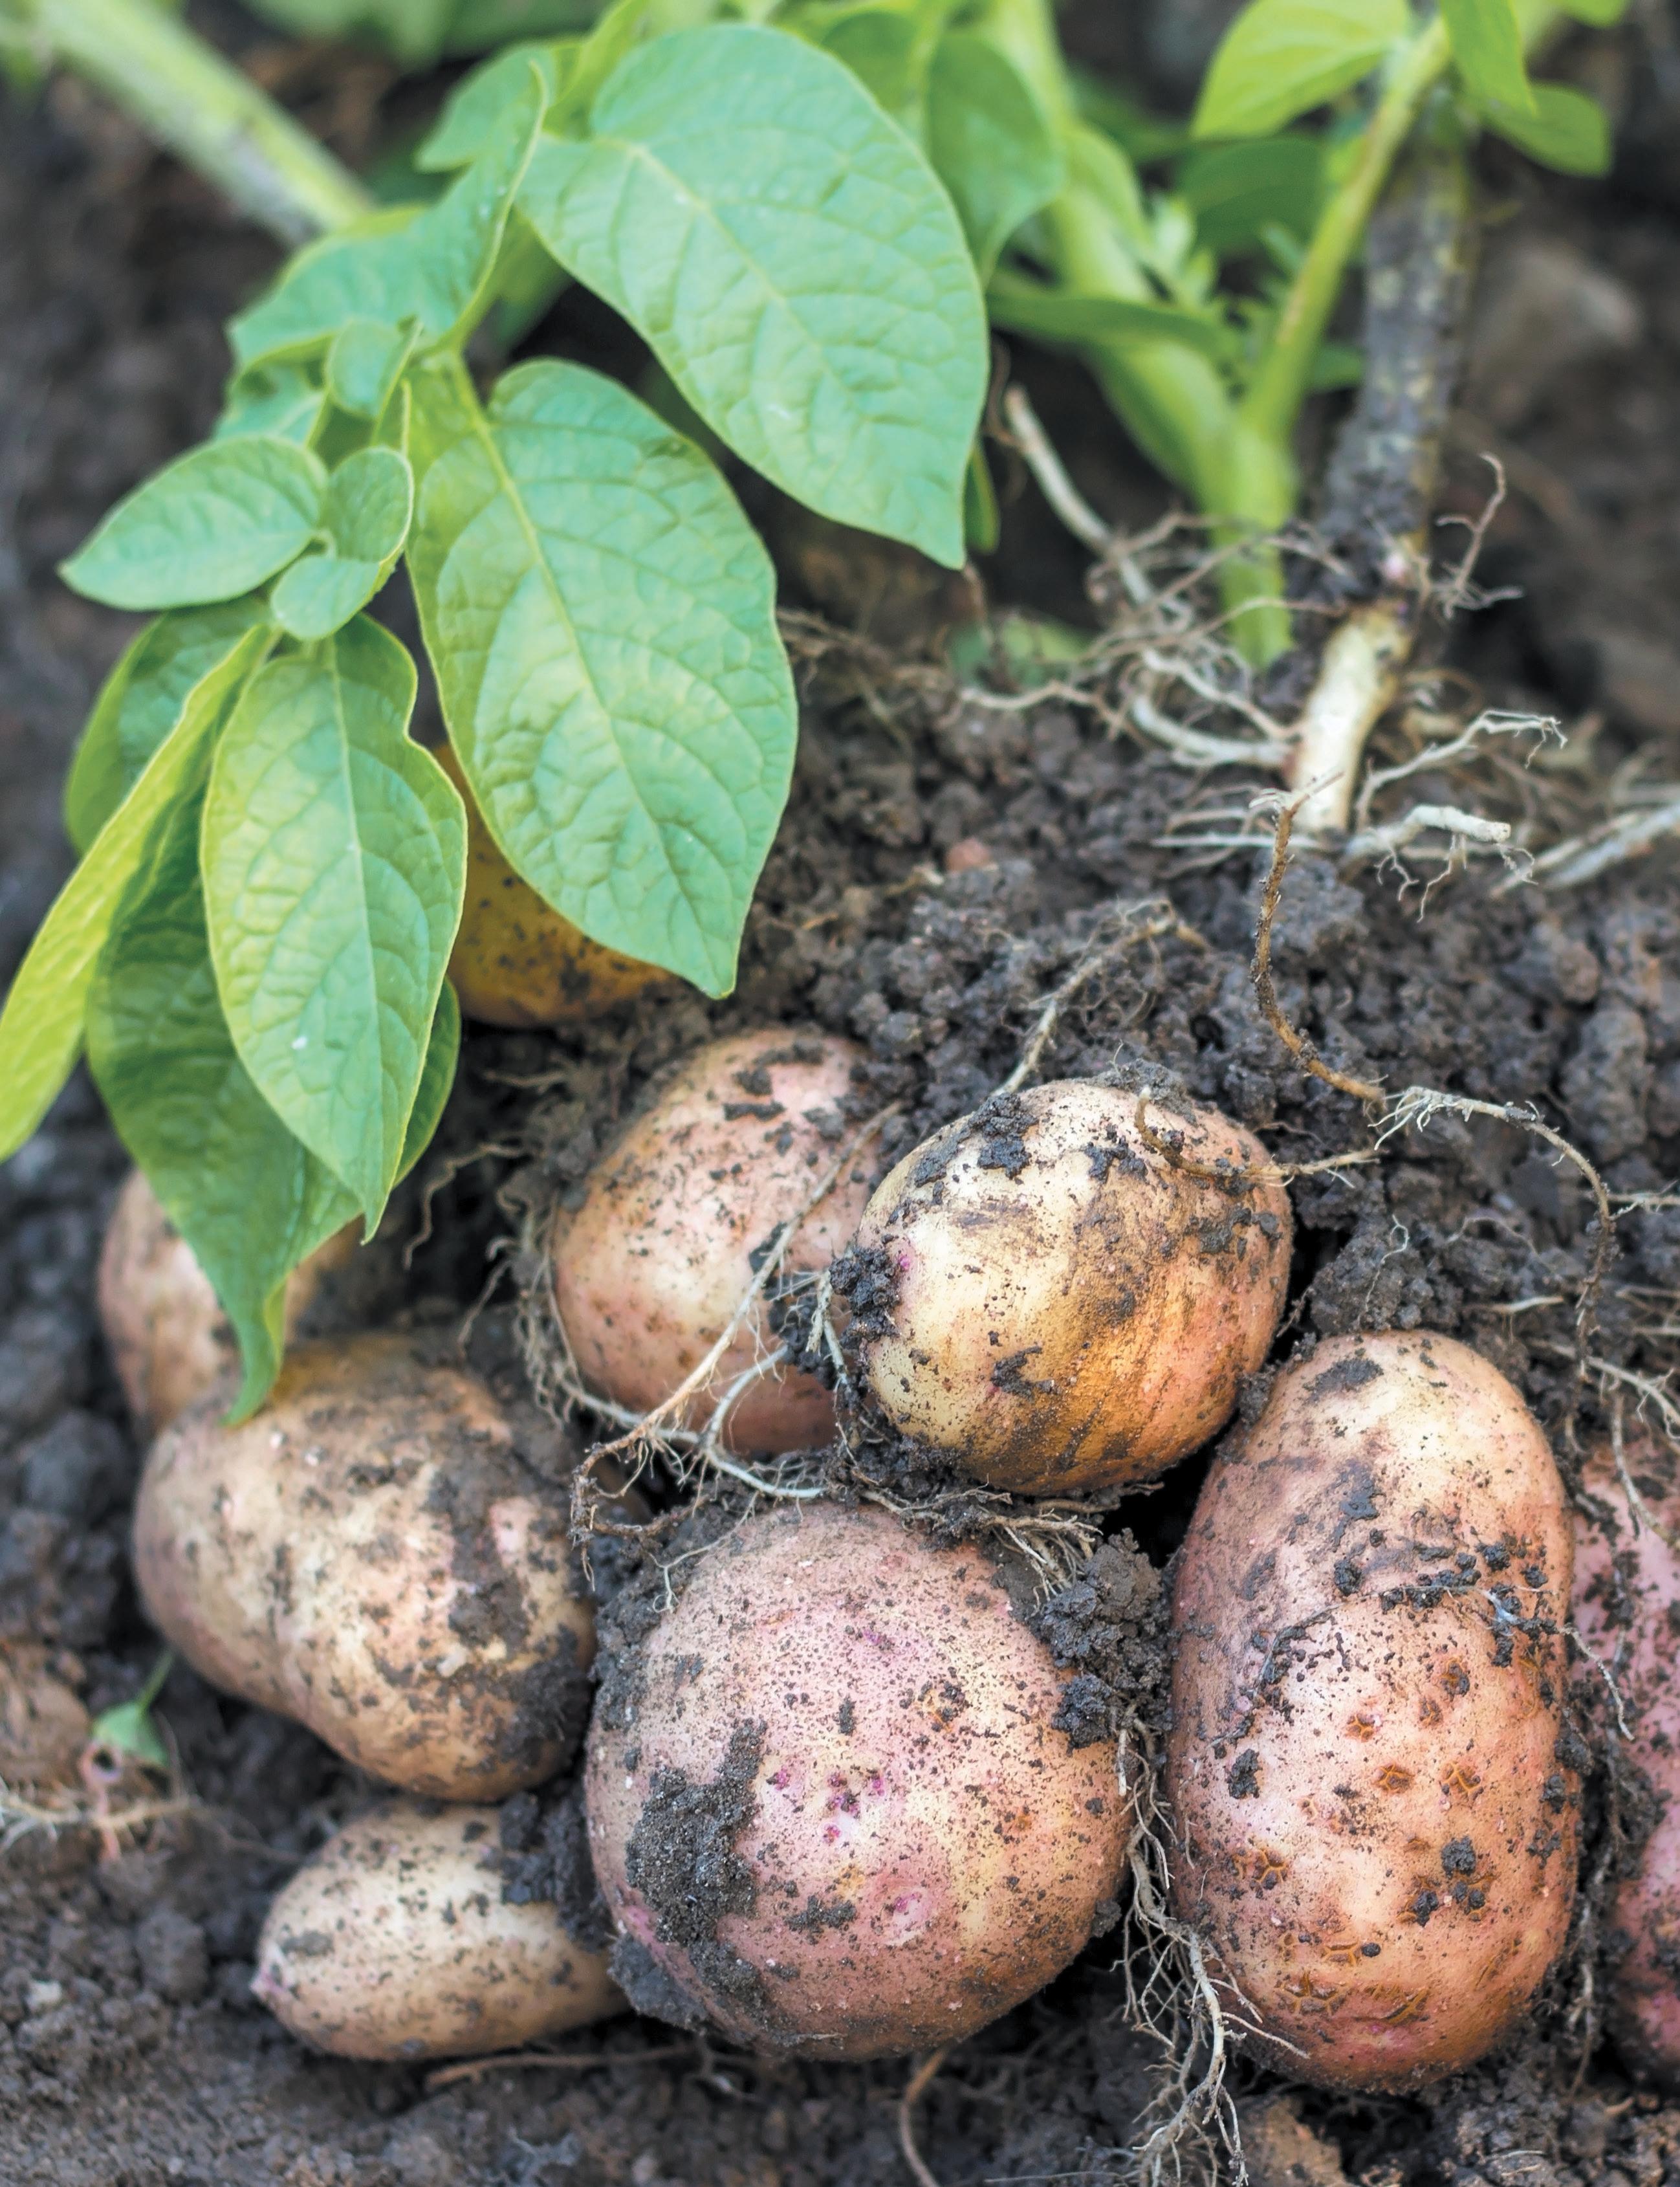
Straw, hay, and leaves are broken down more slowly. They are well suited for plants that require fewer nutrients such as potatoes, root vegetables, onions, peas, and beans. These also suitable for mulching around berry bushes and fruit trees, because it helps keep the plants healthy and increase the harvest.
Contrary to previous data, bark mulch and sawdust are now considered to have a positive effect on the general nutritional content of the soil. Yes, even woodchips from conifers work in some cases as cover material. The condition for this type of woodchips to work positively is that it does not melt into the soil. It must, therefore, decompose above ground so as not to acidi-
Different soil types and their weeds
Land type
Tightly packed, no air
Ploughed many times, very airy
Burned
Wrongly used for a long time, i.e. overused
fy the soil. Some data also show that soil covered with chips from coniferous trees can raise its’ pH. The nitrogen deficiency that arises in the soil surface just below the chips makes it harder for the seed to grow properly, which on the one hand gives fewer weeds, but on the other hand, does not work when sowing directly on the open.
Remove or wait to add your cover material – mulch – until the seed has sprouted and the plants have established themselves. If you have a heavy soil such as clay soil, you need to remove the mulching in the spring so that the soil warms up faster.
Weeds are not the issue
The solution to your “weed problems” is not to remove the weeds, not without correcting the underlying issue. Instead, you have to consider why that particular plant grows there. Compare it to you taking a pill because you have a headache – it is hardly because the body lacks acetylsalicylic acid, the cause is something completely different. The same goes for nature.
Depending on the way the soil has been handled, nature responds with some particular seeds growing to repair the damage.
In the appendix of the book, I have compiled a list of plant indicators which I hope you will enjoy.
A fertile soil
Fertile soil is the basis of everything. First, there must be enough nutrients for the soil to maintain its fertility; then there must exist a surplus that can be used to grow with. This means that the soil will gradually be depleted if you remove more nutrients than you return to it. An easy way to keep some nutrition in when harvesting is to let the plant parts that you do not want, remain on the ground to decompose.
Plant type
Deep-rooted plants (taproots) helps to loosen the soil, such as thistles
Small bush-like plants with a hair-like network of roots
Leafy grass and ferns are utilizing the potash (potassium carbonate) formed in the ground after a fire. If you continue to burn the ground, these will spread. Instead, if you instead cut them down and mulch them, the area will decrease its production of grass and ferns.
Herbaceous plants with flowers that form pods, and whose roots have small tubers of nitrogen-fixing bacteria.
Gardening for diversity and achieving an ideal harvest
How, and what we grow can be varied almost infinitely, as long as we understand what works best for our growing conditions and own goals.
The ideal place to grow your crops
The very best place for cultivation here in the Nordic region is on a southern slope; due to this being the angle where you get the most out of the sun. Most other conditions can be solved when the place is right.
The location should have protection both to the north and to the west. The soil needs to have rich humus content, be nutritious, and be able to retain a fair amount of water.
The cultivation beds should first of all lie slightly twisted to the southwest, as long as this does not mean that they end up sitting vertically in relation to the slope. Should this be the case, it is better to lay the beds horizontally along the slope, and adapt how you plant in the beds so that the crops face the southwest.
An old piece of Swedish wisdom says;
“The north wind brings frost and hail, the chilly westerly winds delay the development of the plants, and may even kill them”.
– From Trädgårdsmästaren, in 1917
Choosing plants
Among the most enjoyable things to do is reading seed and plant catalogues – but sometimes it is important to master oneself, and plan for what you actually need. Here are three important factors to consider:
⇾ The shape of the plant, how it grows and how old it becomes
⇾ The plant’s climate zone, how it tolerates sun, shade, what it needs from the soil, pH tolerance, and other specific requirements that a plant may have
⇾ Use of the plant; such as food for humans and animals, to attract pollinators, to prevent damage, medical use, soil improvement, soil erosion protection, wind protection or simply just because it is beautiful
Create diversity
Diversity is invaluable in many aspects. When it comes to cultivation, it is easy to focus only on what benefits yourself. Still, to create a good ecosystem, other plants are
needed. Here are another three key points that one needs to incorporate to create a greater diversity:
⇾ Host plants for insects feeding on pests (predators)
⇾ Sacrificial plants are plants that are sacrificed to various pests to protect the plant that you want to prioritize
⇾ Plants that attract different useful insects and pollinators
Improve the Earth
The most important thing when cultivating is actually “feeding” the soil. If you have poor soil, it is natural to improve the soil to grow plants. Still, if you do not return the nutrition that disappears when you grow and harvest, the soil will gradually deteriorate and eventually die. Just like all other living things, the soil also needs food.
Grow vertically
Many plants prefer to grow up along nets, trellises, poles, fences, and trees. You can even use hanging flowerpots of varying kinds. Plants that grow vertically have the great advantage of only taking up a minimal surface area to its size. These plants also protect the soil around them. This can be used advantageously in your garden by, for example, planting a vertical plant next to another low growing plant that needs some extra protection. The more powerful climbing plants can also be used to create a shaded trellis at the patio, or on a hot south wall to cool the house.
Intercropping
Intercropping, or co-cultivation, has become increasingly common, which is a huge advantage for everyone involved; the soil, plants, insects, and ourselves. Intercropping is a subject where there is a lot to learn, but the foundation is that you match up plants that support each other in different ways. It can be plants that do not compete for the same nutrients or space (both above and below the ground) or a sun-loving plant that gives shade to a sun-sensitive variety. Another form of co-cultivation is to combine perennials with annuals. Because the perennials are usually the ones that get going first in spring, the
growing season is extended, and the yield from the same area is thus increased. At the same time, the plant waste from the one-year-old plants nourishes the perennials if this waste is allowed to remain and decay.
Many plant combinations provide mutual support for proper growth. A classic example is the one from Native Americans, called “the three sisters”. It is a co-cultivation of maize, beans, and squash where all three are better off when planted together. The maize plants become climbing support for the beans, which turn into a windbreak
for the squash that grows along the ground. The squash, in turn, helps the others by keeping the weeds away. In addition, the beans also provide extra nutrition to the soil.
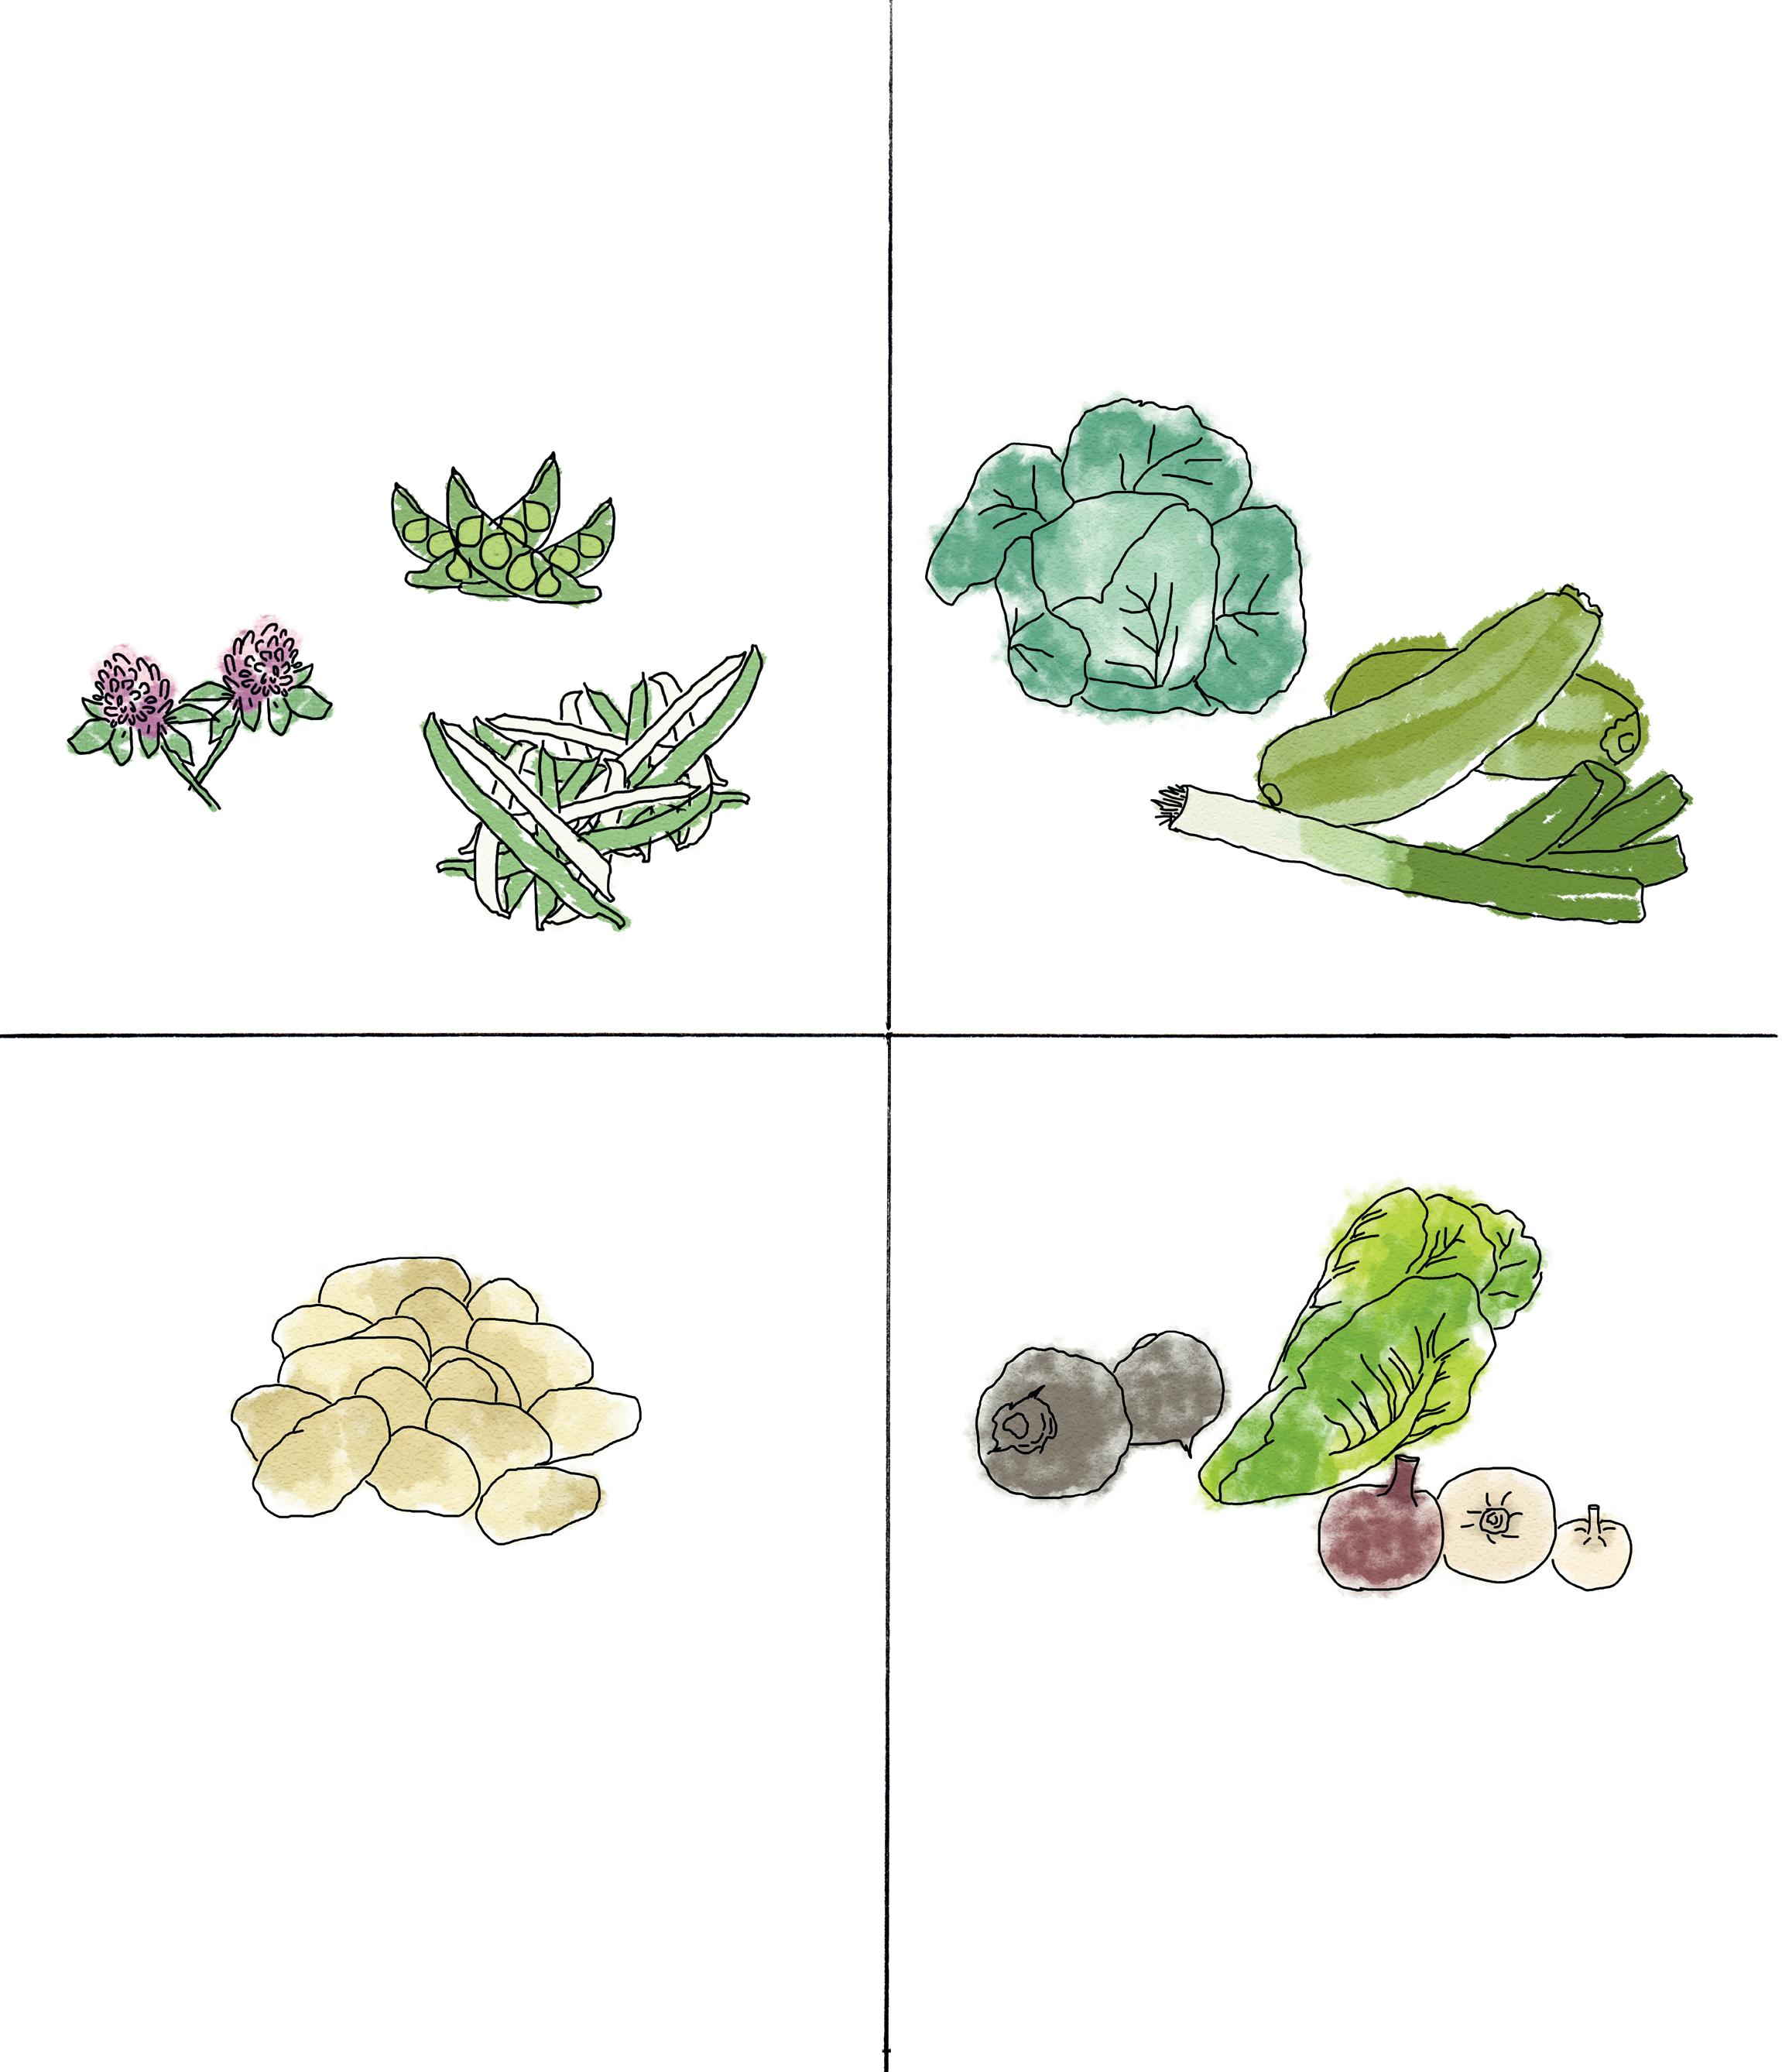
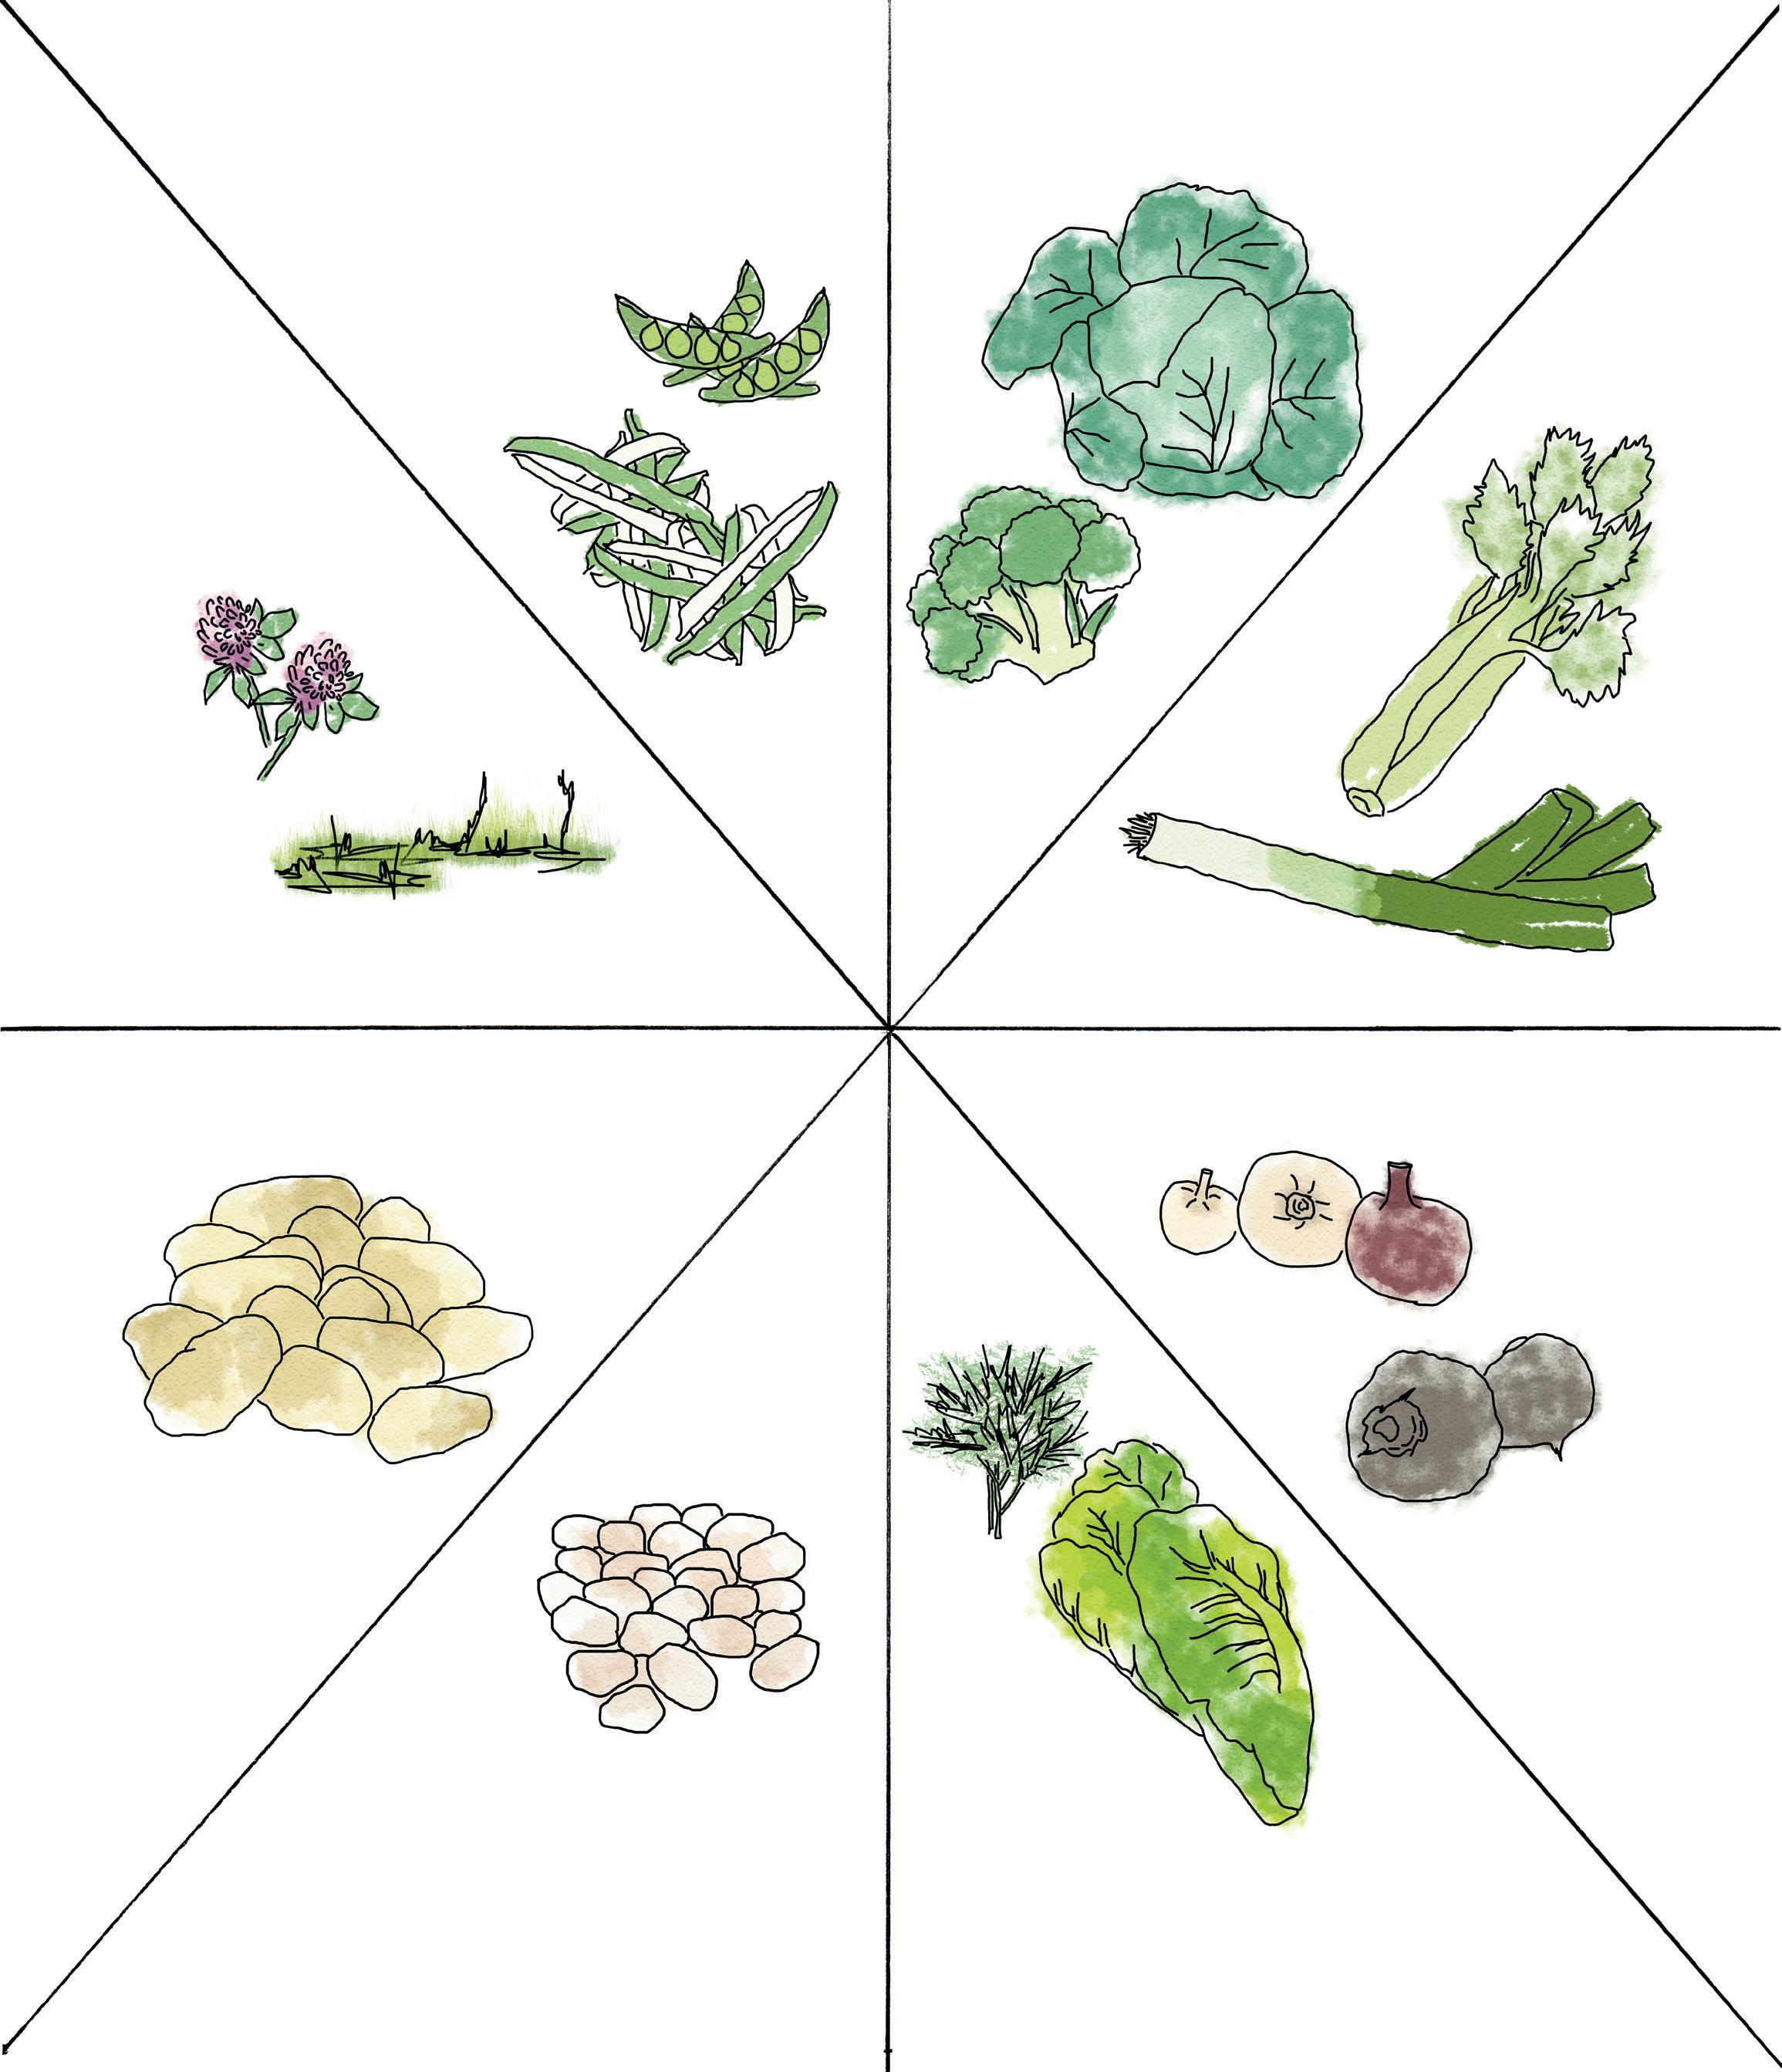
Intercropping examples
Here are a few of the many different co-cultivation combinations available. The appendix contains a more detailed list of which plants get along with others and so on, which can be useful to have at hand when planning your crops.
Peas provide nitrogen to the soil and are the tallest. Therefore, they should be at the back. Carrot and onion protect each other against different pests. Tagetes protects against the leek moth and is tasty in salads while adding a sense of beauty to your garden. It is preferably placed between the onion and the carrot; both of which are narrow in their growth pattern.
Jerusalem artichoke protects tomatoes from cold winds. Tagetes protects against nematodes and again, is good in salads. The tagetes are preferably planted in front of the tomatoes. Borage can help achieve an earlier tomato harvest. It is, however, essential to keep it in check, due to it being so invasive. If you still want to try it, it should be planted in the outer edges of the tomato area or in pots.
Chervil protects lettuce against aphids, but keep in mind that chervil is an enthusiastic seeder and can cause some troubles the following year. Since leeks and beets grow slower than lettuce, they do not compete for the place and light that the lettuce needs to grow well. Once the lettuce is harvested, both leeks and beets have room to grow large.
Carrots
ONION TAGETES
LEEK
PEA
Tomatoes TAGETES
BORAGE
JERUSALEM ARTICHOKE
Lettuce
Wormwood protects against pests due to its strong fragrance. Both wormwood and chives also protect against Puccinia ribis, “Currant rust”. Fragaria vesca (wild strawberry) and Arctic bramble are good ground covers while at the same time providing tasty berries.
Beans provide nitrogen to pumpkins. Onions and spinach have shallower roots and therefore do not compete with the pumpkins deeper roots. Black salsify is grown between onions and spinach because it benefits both plants. Finally, lacy phacelia for green manure. Think of the heights and place the beans at the back and the spinach at the front.
Roses, together with all of these herbs, create stunningly beautiful beds. The chives protect the roses against black spots and enhance the scent of the roses. Hyssop and thyme protect against aphids.
Roses
LEMON BALM
CHIVE
MALLOW
MINT HYSSOP
THYME
Pumpkins
ONION
BLUE TANSY BLACK SALSIFY
BEAN SPINACH
Currants
ARCTIC BRAMBLE CHIVE WORMWOOD WILD STRAWBERRY
Natural group of plants
Cluster gardening
In most gardens, apple trees stand alone on the lawn. Nothing grows beneath them, and the surface beneath them is a bother, where the grass needs to be cut and fallen apples removed. But it does not have to be like this!
Many plants thrive in the walking shade along the outer part of the tree crown. Why there are even plants that make the apple tree healthier and provide a better harvest. With a broad diversity in plants, the variety of animals will also increase. Another important detail is that when the rain passes through the tree, it brings with it lots of different nutrients on its journey down to the ground. This rain can contain as much as 50 times more nutrients than regular rain. This, of course, benefits the tree and everything that grows underneath it.
Growing in this way is usually called cluster gardening. It is an effective form of intercropping based on the creation of interaction between plants, animals, and other elements in nature. Often, the clusters are grouped around a central element. On larger surfaces, several clusters can be connected.
Let us take the apple tree as an example of a central element where the following parts interact around to create a well-functioning intercropping.
⇾ Comfrey as green fertilizer
⇾ Gagea lutea as ground cover before the apple tree has its leaves and other perennials have sprouted
⇾ Plants that deter pests
⇾ Plants that attract animals that feed on pests
⇾ Plants that attract pollinators
⇾ Legumes that bind extra nitrogen to the soil
⇾ Nitrogen-fixing trees – alder, for example
⇾ Rosehips as protection for visiting birds
⇾ Trees and shrubs that can protect against wind, sun, and frost
⇾ Even animals fit well in such a cluster, either for shorter or longer periods
⇾ Chickens for a shorter period to shift, scratch, and fertilize the soil
⇾ Ducks who eat snails and slugs
⇾ Guard dog to keep wild pests away
Getting all these parts in a regular garden can be difficult. Still, selected parts will get you a long way, and the ground underneath the apple tree finally has a use.
Imitate wild nature
To increase your understanding of the benefits of intercropping in clusters, one can look at the wild nature. There are plants at all levels; tall trees, low trees, shrubs, creeping, and winding plants. But only things that thrive in that particular place. To the untrained eye, this can look messy, but if you look closer, you can see that nature fills in all the “voids” that occur in the environment. No bare ground or “empty holes” in the air are left to chance. All plants fulfil their function when nature itself decides. This can be advantageously mimicked in our gardens by thinking this way.
As tall trees, large and medium-sized fruit trees are suitable. Low trees can be different forms of smaller fruit and nut trees. At the shrub level, there is a lot to choose from with varying bushes of berry: next level down, different herbs and perennial vegetables. And finally, on the ground level, it is advisable to use some form of creeping ground cover. If wanted, you can add plants where the roots are the vital part, and preferably some climbing plant along any tree trunk or trellis. Incorporate all this, and it begins to resemble wild nature.
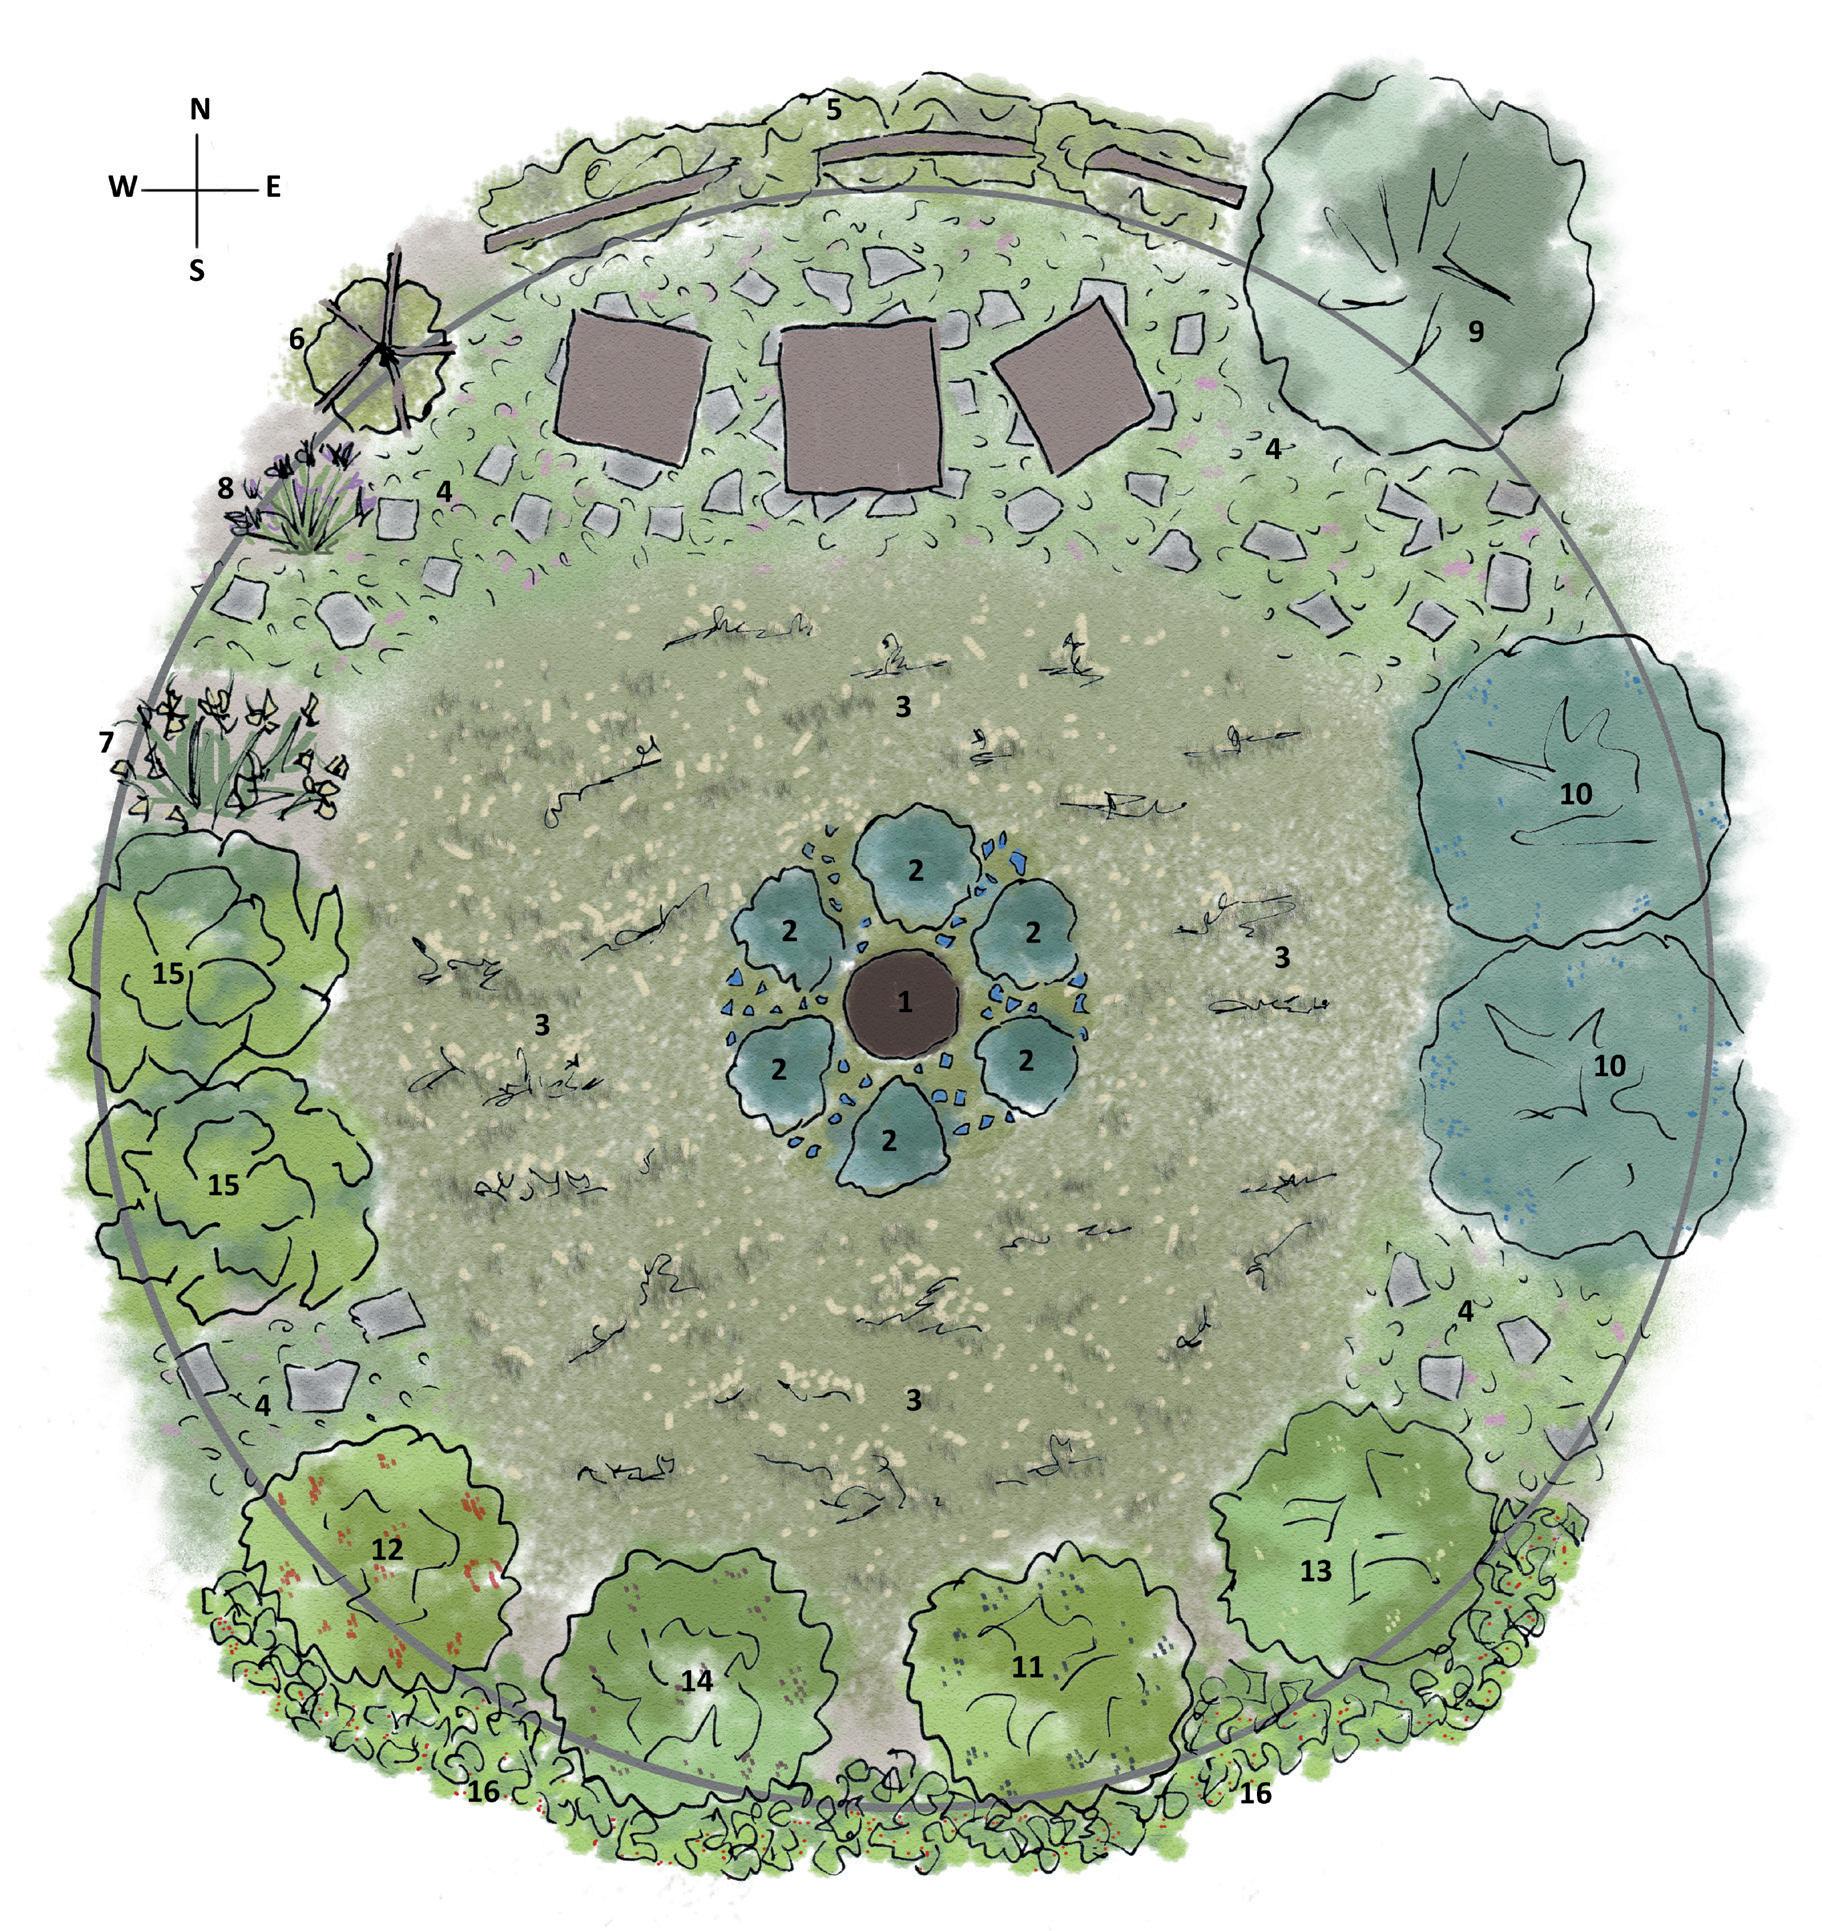
In the garden
Back to that little house garden. Here I have chosen to illustrate a more straightforward intercropping cluster that can fit in many gardens.
Under the apple tree, there is now instead of just grass lots of edible plants. Near the tree trunk grows hosta, whose crispy sprouts in spring are good to eat. Further on in the season, they will bloom beautifully. Here you can also plant gagea lutea or scilla, which bloom before the apple tree has set its leaves. You can, of course, choose other early, bulbous spring flowers – you can also spread them out in the white clover area outside. This area fills several functions. Partly, it provides easier access for picking apples and other plants. Secondly, white clover clippings are excellent fertilizer that you can advantageously spread out around the plants. If you have dandelions, please let them stay for the benefit of the apple tree.
In the entrances between the bushes and on the sitting area there are stepping stones and in between, Thymus pseudolanuginosus.
In the east, there are two different kinds of honey-
Stepping stones in the walkways and for the sitting area
2 chairs and a table
Trellis for blackberries and Hablitzia
The gray circle marks the approximate size of the tree crown.
berries, in the south, currant and gooseberry bushes w ith Fragaria vesca (wild strawberries) in front. Rhubarb grows in the west and next to it an area of tree onions. Onions of all varieties can help keep some pests away.
Behind the sitting area on the north is a trellis with blackberries that not only provides tasty berries but also acts as a windshield. To the right of the blackberries stands a silverberry bush; as a windshield, to help to give an increased harvest, and because it smells so good. To the left of the blackberries stands a small trellis with Hablitzia. Next to the Hablitzia grows the herb hyssop which is especially loved by bumblebees.
Perennials for increased durability
Perennial vegetables are still used far too little, but a change is on the way. The advantages of perennials are that they start earlier in spring and they are usually more climate-friendly thanks to their more extensive root systems. Perennials thus provide a more sustainable cultivation system compared to if you only grow annual plants. To make the system especially sustainable, it is usually best to have several different varieties; Some that can withstand a cold and wet summer, some that can withstand a hot and dry summer, and as a base; some that thrive best during an ordi nary sum mer.
Extend the season
Since a plant only grows during the part of the year that the temperature stays above five degrees, we up here in the Nordic region benefit massively from helping nature a bit on the way to stretch the growing season. You can do this by working with microclimate in different ways, growing in a greenhouse or perhaps even in a winter garden if you have the opportunity. Other methods are to grow in both cold and hotbeds, to grow in raised beds, to mulch, and to cover with cover fabrics or similar materials—all to cheat both the last and the first frost. With a little inventiveness, you can extend the season with a justifiable number of weeks.
Start harvesting early
Many of our plants can be harvested earlier than traditionally. A good way is to plant too tight or cull too little. Then, you can harvest baby versions of most of our common root vegetables. Many of the plants’ leaves are also excellent in a salad, such as spinach and beetroot.
Indigenous and local plants
By choosing native, and preferably local varieties, one makes it easier for themselves – because the local plants have developed over many years, (centuries even!) and
they are thus adapted to the environment and the climate of that particular place. This applies not only to all plants but also to all animals. When it comes to so-called domestic animals such as chickens, ducks, sheep, etc., several country breeds originate from different local parts of the country. Helping to preserve these is very important.
Winter protection
By putting some effort into helping the herbaceous plants prepare for their winter dormancy, the durability of the crops is increased. Four good ways are:
⇾ Cover the soil with leaves, straw, spruce twigs, or perhaps even with an old carpet. This way, the soil is isolated, and the risk of frost damage is reduced. Meanwhile, the microbial life reaps the benefits, since their work season is extended in the autumn
⇾ Work on keeping the soil well-drained. Sandy soil is in itself well-drained and deals with the drainage on its own
⇾ If you have clay soil, it is best to grow in raised beds where you add large quantities of organic material
⇾ Last but not least, one can work on creating a microclimate around the plants
Edges in practice
Nature becomes the most vivid where different environments meet, and we call these border areas edges.
The fact that the majority of people live in edges –especially in-between land and water of different forms –is not a coincidence, but rather a natural consequence of the fact that the highest biodiversity is found here – and thus the greatest access to food.
An example of an edge that is easy to observe is the forest edge. When trying to enter a natural forest, the edge effect is clearly marked out—densely populated with everything from small bushes to large trees, with a lot of birds and insects. Once you have entered the forest, it opens up, and it gets quieter – because the diversity here has decreased.
Animals are also looking for different edges due to the diversity in them. One example is deer, who likes to stay around the forest edge or along the edges of the fields. Even fishermen prefer to go along edges of different kinds – like the edge of the reeds, or in the shade of a jetty – instead of fishing in the middle of open water.
Edges of different shapes
The edge effect can be utilized in many of the garden’s various areas, and its multiple forms.
Ponds
In nature, as mentioned, the edge between land and water is the most fertile. A pond in the area provides the opportunity to recreate this rich environment. But making a round pond is not the most efficient, nor a square for that part; creating a pond with the longest shoreline possible is. You do this best by letting the shoreline be irregular and wavy to create the maximum space for different plants and animals. If you then add a small island, the water depth varies. If you then add a rough tree branch or an old log, you have created perfect conditions for a place full of life.
Beds
The same idea applies when planning different garden beds. A straight line gives the smallest edge effect, so a wavy line is much better. A few examples of effective forms are the keyhole shape and the spiral shape.
Planting
Again, same when you sow and plant. There are fewer plants in a straight line than in a wavy one. In addition, a wavy planting pattern means that each plant has a bigger border against its surrounding environment with, for example, more sun.
Vertical gardening
Vertical gardening also increases the edge effect on trellises and against walls and fences; yet another edge is created – the height. The height means that more insects can be found there, that a windbreak is created, and that it can provide shade and protection for what grows on the ground.
Windbreaks and demarcations
Again, the wavy lines provide the best benefit. Just look at the natural forest edge, there are no straight lines – because when nature takes care of itself, the line swells back and forth. Straight lines in nature are human inventions.
Examples of edges
The edges along animal fences are valuable areas that you can both benefit from and reinforce. Because animals like to stay close to the fence, a lot of manure is collected there. Not only does it fertilize the soil there, but a lot of the nutrition also flows into the adjacent water, such as a ditch. If you can take advantage of this nutritious water and lead it on to your crops, much is gained. Another way to gain a greater benefit from an animal fence is to plant trees along the fence – for both food and shade for the animals.
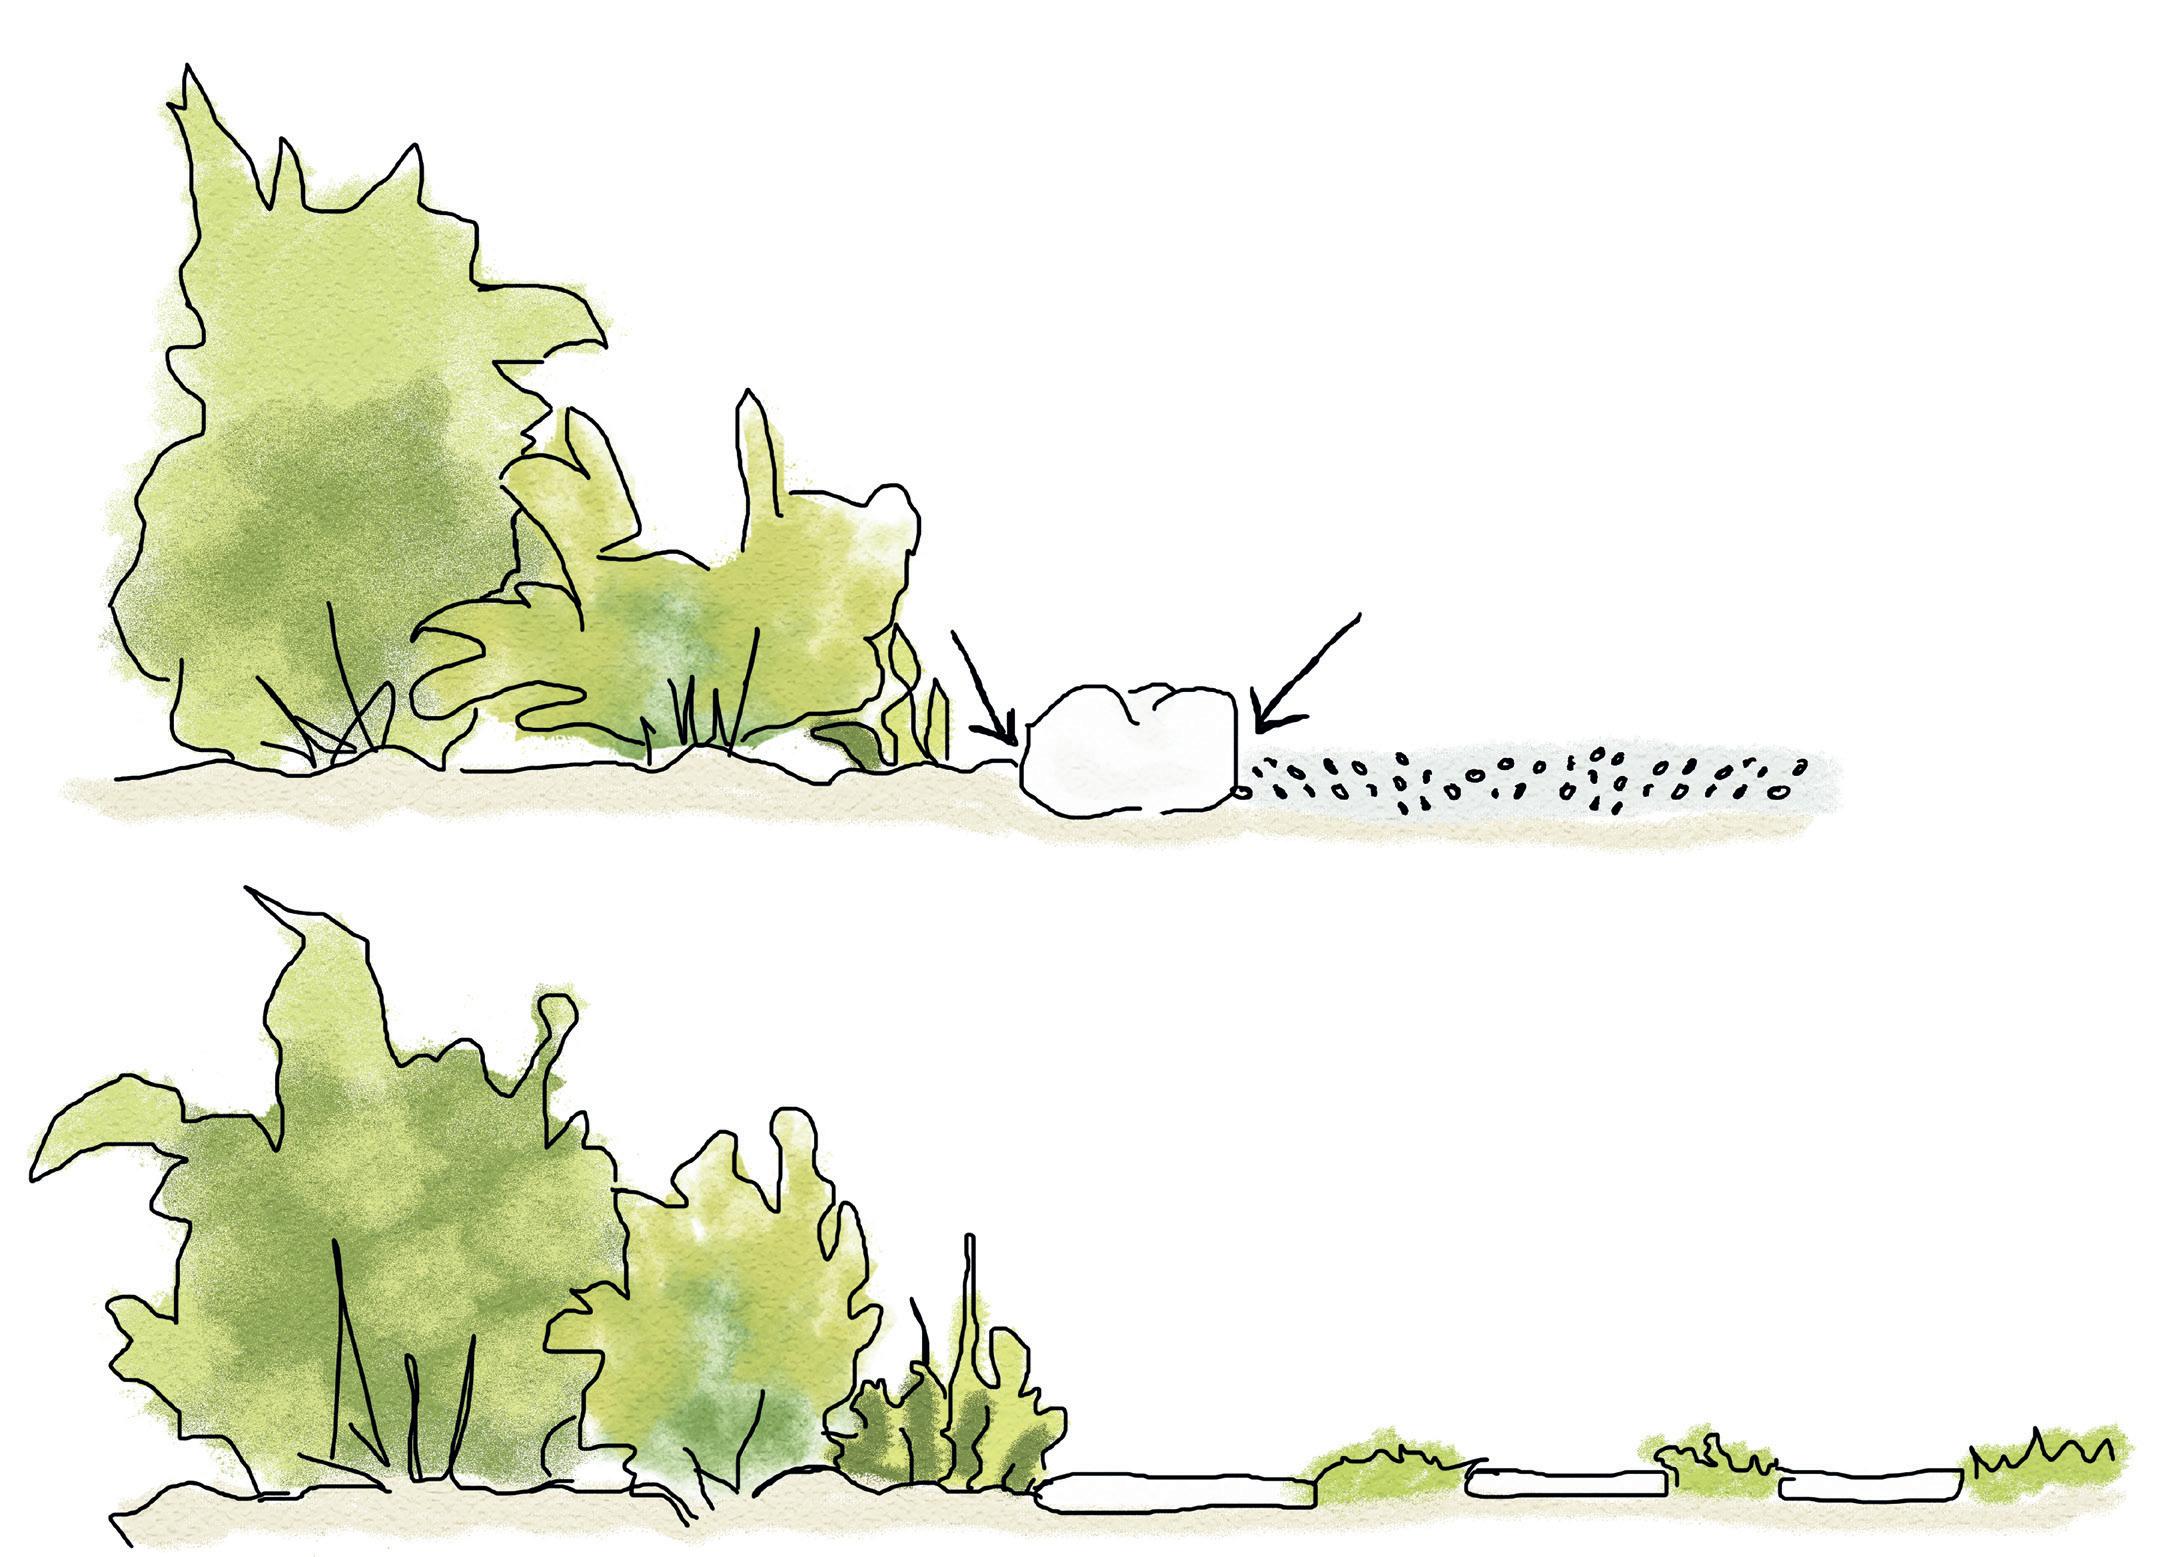
Another example that can give more trouble than joy
is to put stones around flower beds and crops. Because around these pretty stones, weeds will soon sprout, and then you will most likely go about muttering over the issue. The stones were only put there to keep the grass away in the first place. The reason? The edge effect explains everything. The stones work as a water collection system in miniature, as well as having some help from the wind to blow in nutrients between the stones. The result is a perfect microclimate where plants thrive. And then we wonder why it got to be so bothersome!
The problem can be solved by growing something on the inside next to the stones, which then reaps the benefits from the stones’ ability to collect nutrients and water. The outside is a little trickier, at least if you want a walkway there. If that is the case, it should be raised so that it is at the same height as the stones, with nary a space between the different surfaces. This is not easy to arrange. It is easier to omit the rocks and, instead of a path between stones, perhaps make it out of stepping stones with, for example, Thymus pseudolanuginosus between the stones. Beautiful to look at; smells good when you walk, and you don’t have to clear weeds.
Another example is how leaves, snow, and even debris gather against a fence. This can be a negative if you do not think about it when planning, and it can be woven into the planning to counteract snowdrifts where you do not want them.
If you do not know how to plan different surfaces and edges, the trick is that you start by planning for what SHOULD be along the different edges. Plan how the boundaries should be managed and what should be grown for the best possible results, then the rest will resolve itself. Even though it may sound strange, the surfaces (the spaces in between) will come along with the bargain.
Once you have learned to see the edges, you will find that they are astoundingly many. Here are a few examples of an infinite variety of variants:
⇾ Field/Forest
⇾ Lake/beach
⇾ Farmland/wild nature
⇾ Wall/house drainage
⇾ Wall/cultivation area
⇾ Walkway/lawn
⇾ Fence/lawn
⇾ Driveway/lawn
⇾ Culture bed / logs
⇾ Logs/lawn
⇾ Culture bed/stone wall
⇾ Stonewall/lawn
⇾ Culture bed/fence
⇾ Pond/cultivation area
⇾ Growth area/lawn
⇾ Pond/lawn
⇾ Culture area/boulders
⇾ Sun/shade
⇾ Acid soil/neutral soil
⇾ Roses/chives
⇾ Carrots/leek
⇾ Cabbage/celery
⇾ Lettuce/chervil
⇾ Strawberries/beans
⇾ Squash/nasturtium
⇾ Raspberry/spinach
Edge zones between pathways and garden beds
GARDENING
EDGE ZONE
EDGE ZONE
Cultivation Beds
A cultivation bed can be at ground height or more or less raised. It can be drawers and pots on a small balcony, and it can be many large beds on a field. The raised cultivation beds have many advantages both from plant and work point of view compared to those that lie directly on the ground. The height means that they have a warmer climate, and if they are also arched, they create a larger cultivation area. A fascinating figure is that a wellplanned balcony of 20 square meters can provide as much as 70 kilos of food in one year.
Plan cultivation beds
First and foremost, it is the size of the place that determines how much you can grow. Once you start planning, you should do so based on what is needed. Growing for the sake of growing is rarely a good idea. Instead, it can be counterproductive when you can’t manage it. Better to start on a smaller scale and experience the joy and even the craving for more crops the following year. A smart tip is to start with something that you like to eat.
At this point in the planning comes the next step. How large beds do I need, where should they be, and should they be raised? Plants to be harvested every day or quite often should be located closest to the house – that is, in zone 1 – while plants harvested only once or a few times a week may be located further away from the house. Remember to place the beds to get the most sun. The very best is if you can direct the vegetation more to the southwest than straight to the south – because then you also get the evening sun’s last warming rays on your crops. If it is not possible to have the beds in that direction, at least try to make sure that the plant rows go in that direction, and that the lowest plants are closest to the sun.
Some places on the beds are more vulnerable than others. The most sensitive points are the corners where the aisles or other surrounding environment dominate. To create stability and secure the corners, it is good to plant perennials there. The next sensitive area is the short sides of the beds, where it is also good to plant several lower perennials, such as herbs. If you have no built-up sides around the raised beds, the lower edges of these beds are also vulnerable. Here too, it is suitable to grow herbs or preferably strawberries.
The next step is to go through and plan which plants to grow. Use the technique to grow with crop rotation and find out which plants thrive best together. Also, keep in mind that the highest plants should be placed in the middle of the bed and the lowest along the edges – everything to be able to harvest easily and c omfortably.
Material selection in the beds
Remember to avoid using materials that result in different chemicals ending up in the beds. Here are some examples of what to avoid:
⇾ Treated wood
⇾ Straw where the grain has been sprayed with various pesticides. This can destroy the whole cultivation area for many years to come
⇾ Fertilizer from stables using a lot of antibiotics and pesticides
Raised beds
Raised beds are the most straightforward shortcut to a better growing climate. Building raised cultivation beds is also a quick way to get better drainage. In order to gain a plant zone, it is usually sufficient to apply more soil so that the cultivation area is 15–20 cm higher than the surrounding area. The effect is especially noticeable in the spring when the soil in the raised bed is heated faster. With a little luck, you can start your gardening several weeks earlier than what you ordinarily would –but remember that the sooner you start, the higher the risk of frost. Garden fabric is an excellent solution to the problem, and you can readily have it on 24/7 for the first few weeks while the plants are establishing themselves.
The height of the bed can be achieved in several different ways, where the lowest bed, as previously stated, only has a lot more soil in relation to the walkways. The next variant is that you make a base with straw, manure, old leaves, et cetera, that you then put the soil on top. The next variant is where you start with branches and twigs for a base. Finally, you have the variant where the base consists of logs and thick branches. In order to avoid soil compaction in the finished beds, you must never walk on them. Later, I will take you through the construction of the higher beds.
Of course, the garden beds don’t need to be tall, but it tends to make gardening easier. One significant advantage of raised beds is that they are considerably more productive because they are initially made up of lots of compostable material. By continuing to feed them with the more nutritious matter, they retain their fertility.
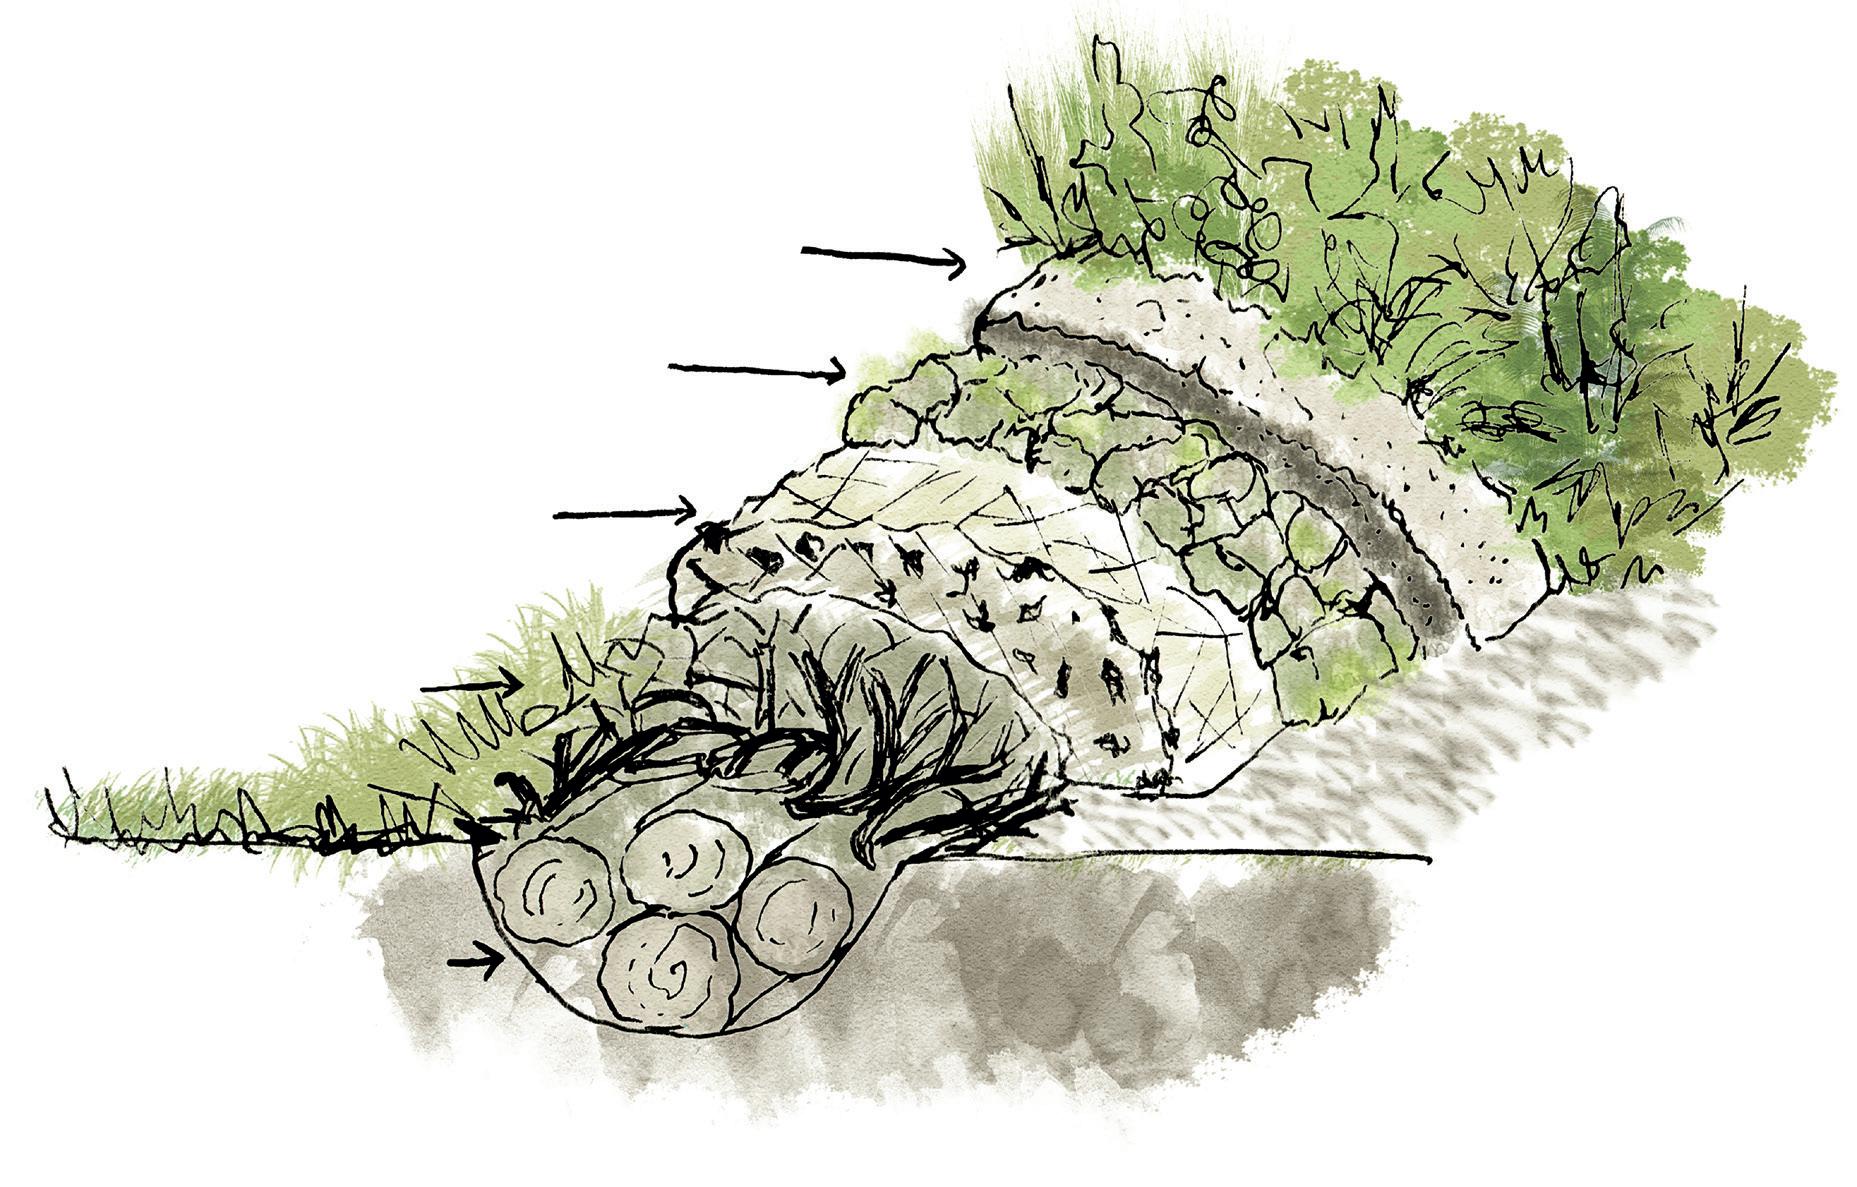
Raised bed with hügelkultur
Hügelkultur is a German word, meaning hill/mound culture. It is a unique form of tall beds that are becoming more common, especially in permaculture. The idea is not new; it is an old technique that has been used for centuries in both Eastern Europe and Germany. Interestingly, the hügelkultur technique must go through cold winters to function, which is very suitable here up in the north.
The benefits of the hügelkultur
The benefits of growing in hügelkultur beds are many:
⇾ No digging needed
⇾ Less work and better working posture
⇾ Much of the kitchen and garden waste is used
⇾ The waste is composted directly on site
⇾ You do not have to buy expensive soil or spend a long time creating a good compost soil
⇾ The bed maintains an even moisture level and reduces the need for irrigation
⇾ The bed creates a nutritious and viable soil
⇾ Combined with mulching, almost no weeding is needed
In literature, there are many “recipes” on how to create the perfect bedding. Still, the basic technique is simple: Build the beds of various organic compostable materials, place the coarsest in the bottom, and fine soil on top. Then, simply let nature have its course.
The difference between hügelbeds and other forms of beds
There are some important differences between the hügelbed and other forms of beds – differences that explain the benefits of hügelkultur.
Wood base
Hügelbeds are built from a base of logs, branches, and twigs from woody shrubs. The more wood and the coarser the wooden material is, the more self-sufficient the beds become over time. You can even use old stumps and ro ots.
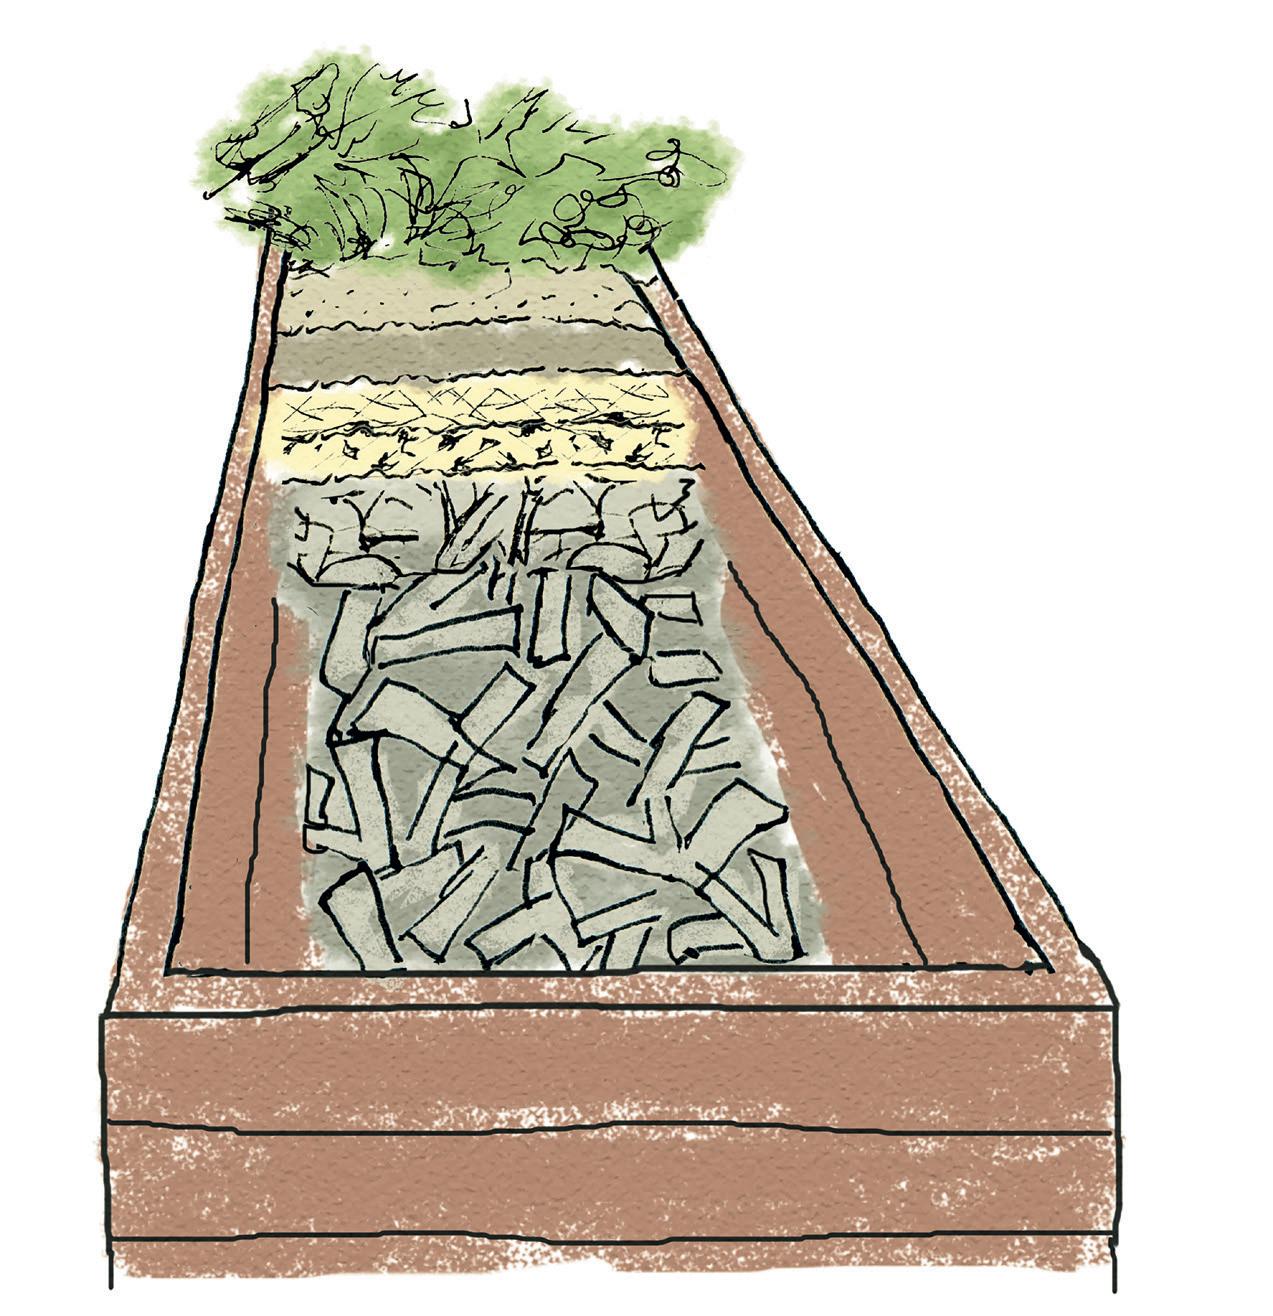
Framed Hügelkultur on flat ground
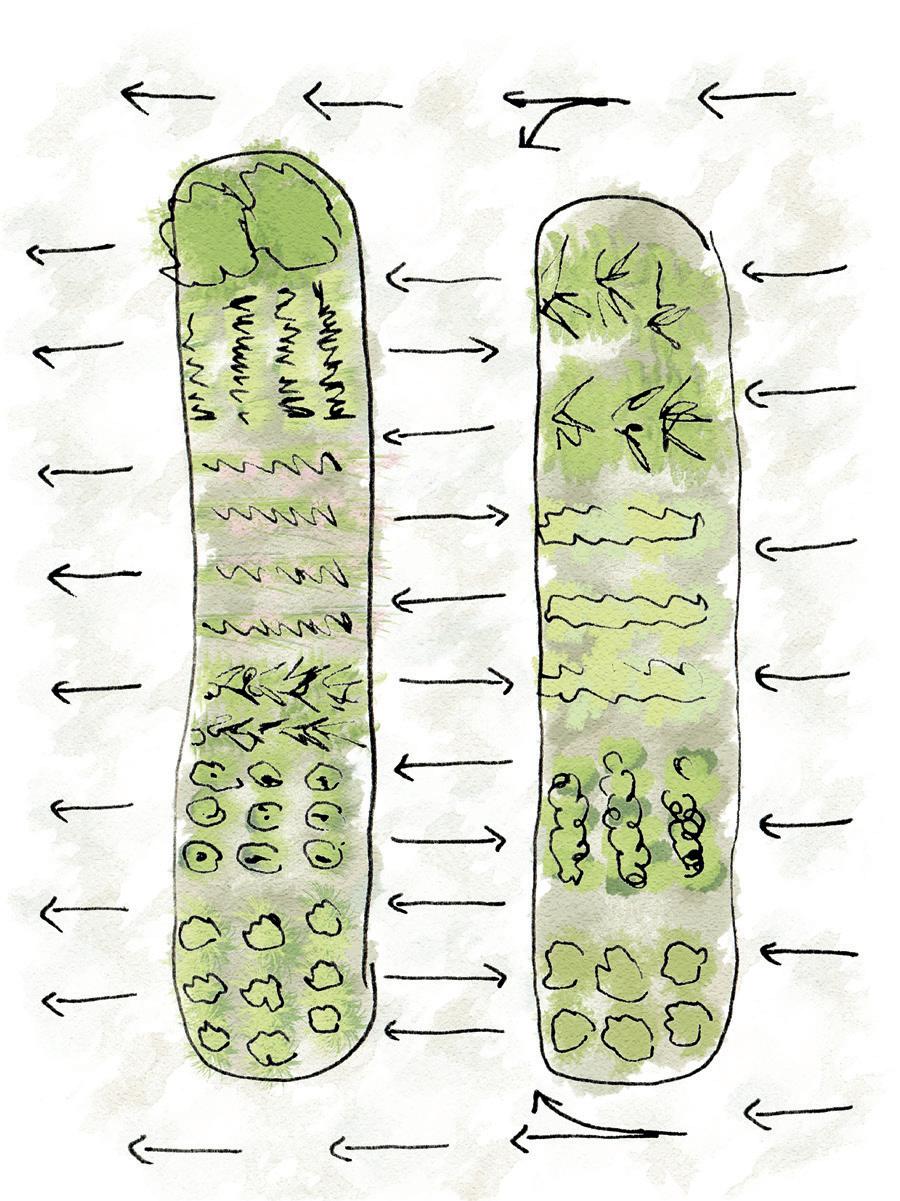
The size
Hügelbeds can be huge, and some beds are over two meters tall with whole trees as the base material. These large beds not only provide a large cultivation area, but they also function as windbreaks. At the same time, in principle, no irrigation is needed.
But even if the large bed has its advantages, 60–90 cm is a more suitable height in a regular garden.
The slope of the sides
Most other bedding methods create relatively flat beds, but the hügelbed expert Sepp Holzer disagrees that this is ideal. Instead, he advocates a 45-degree slope so that the beds will not be too compressed since an over-pressed bed will result in lower oxygen supply to soil and plants. But even a flat hügelbed can work well if you take care to add more organic material continually.
Nutritionally superior
Because wood rots slowly, this subsequent degradation provides nutrients to soil and plants for a considerably longer time than the beds made without wood.
A large bed can provide a constant supply of nutrients for 15–20 years (or even longer if only using deciduous trees). The composting of wood also generates extra heat which prolongs the growing season, especially in the first few years.
Retains moisture
When wood decays, large amounts of fungal mycelium are formed. Not only does this provide better nutritional conditions; it also creates countless small air pockets that help keep a stable moisture content in the beds. Provided that one-year-old plants are not cultivated with shallow roots, the smaller beds can survive for several weeks without irrigation, while the largest can cope with whole summers without extra irrigation even in dry climates.
Planning your hügelbed
Since a hügelbed lasts for many years, it is essential to plan appropriately before deciding where it should be and how it should look.
Just like in almost all forms of cultivation, it is essential to get the most significant benefit from the sun. The right direction, that is, southwest, is especially important when it comes to hügelbeds as the height and the inclined sides may create a permanent shaded side if you put the bed in the wrong direction. If you have problems with wind, it may be worth considering the wind direction when plan-
ning to see if the bed can also function as a windbreak.
Even the slope of the ground and the natural water flow are essential factors that one has to take into account. Because while a strategically placed bed can help to suck up excess water, too much water can cause problems and begin to undermine the bed. Should there be problems with excessively high water pressure or muddy soil, it can be solved by adding a layer of large stones as drainage underneath the wooden layer.
What the bed looks like is only determined by the imagination. It does not have to be straight or square, but it should preferably be rounded, have wavy edges, be horseshoe-shaped, or why not a little winding.
Depending on the size of the project, one may have to start collecting material the year before to get enough together. Logs, branches, twigs, and roots are the ideal base for a hügelbed.
Untreated wood is good to use as well as wood chips, but keep in mind that the more finely divided the wood is from the beginning, the shorter the life of the bed. Also, it quickly becomes too compact.
If you do not have direct access to wood, you have to be creative and ask the neighbours – or even the municipality you live in.
The function of the wood and various types of it
It is the decaying wood that is the magic behind this technique. Of course, you can start with fresh wood, as long as you take into account that the yield will not be the best during your first year.
The harder the wood, the slower the decay – and the longer the bed will remain productive. Coniferous trees are okay to use, but only to a lesser extent because they provide a more acidic soil. At the same time, they rot a little too quickly. If, on the other hand, you want to grow plants that want acid soil, wood from coniferous plants is instead preferable.
The best tree varieties are apple, aspen, birch, poplar, maple, oak, willow (make sure it is dead; otherwise, it will start to grow).
However, some types of wood should be avoided, and these are cedar, Robinia (false acacia), black cherry, black walnut, and treated wood. They emit substances that are unfavourable to the cultivated plants in various ways.
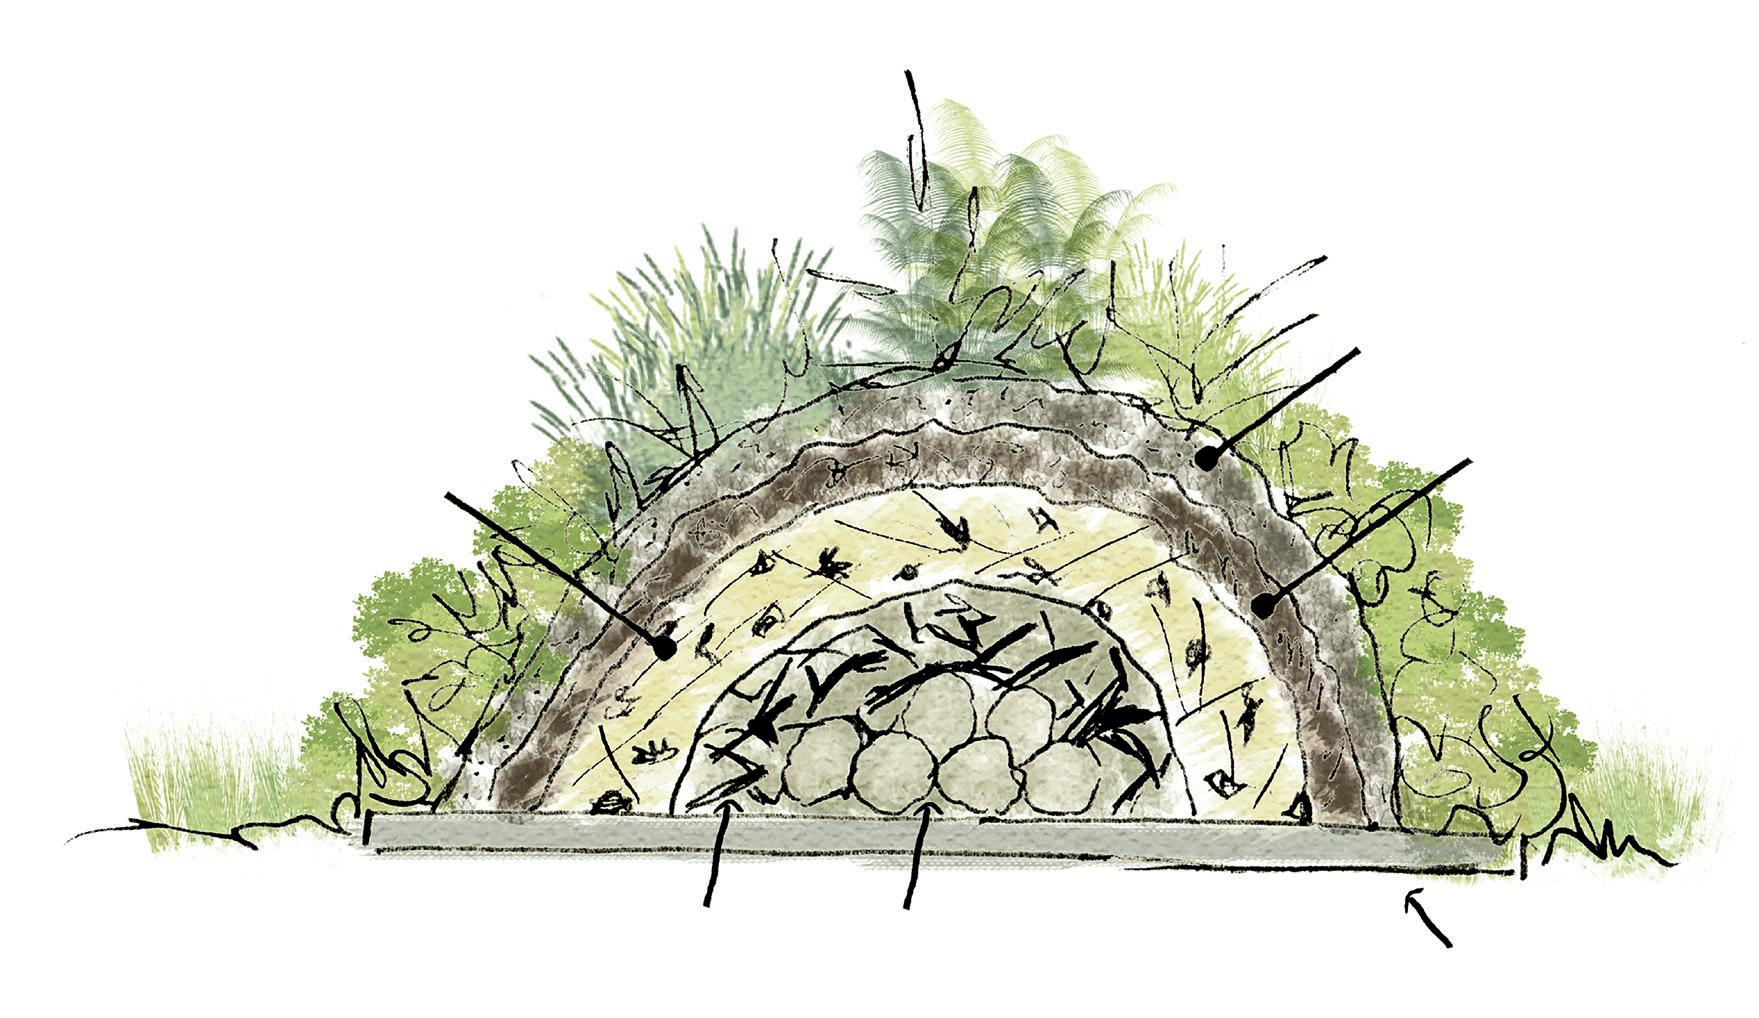
B uilding a
hügelbed
Once you have decided the place, how the bed should look, and gathered all the material, it is time to start building.
Depending on how the ground looks where you plan to build, you can start in two different ways:
SOIL/COMPOST
HAULM/MANURE/LEAVES
BRANCHES/STICKS
TREE LOGS
Intersection of an Hügelkultur
COARSE COMPOST
SOIL/COMPOST
SOD
HAULM/MANURE/LEAVES
BRANCHES/STICKS TREE LOGS
CARDBOARD/NEWSPAPER
Perspective of an Hügelkultur
GARDENING FOR DIVERSITY AND ACHIEVINGAN IDEAL HARVEST
⇾ Either dig a 30–50 cm deep trench and lay the turf rolls and soil to the side for use at a later stage
⇾ Or if there are aggressive weeds or if the soil is otherwise inappropriate, you build the bed directly on top of the ground with a thick layer of cardboard as the first layer
⇾ If you have planned a flat bed with a frame around, it is now time to make the frame.
⇾ It is essential to soak each layer before the next one is added
⇾ Place out all the wood. Start with the larger and coarser pieces in the bottom and in the middle. If you have a truly muddy soil, it is better to use short logs that you set up vertically in the dug ditch
⇾ Then spread out the smaller and thinner ones on top of the coarser. Try placing and pushing together all the wood so that it is steady before you put on the next layer
⇾ The next layer consists of finer twigs. If you are spry, you can now step up onto the bed; otherwise, you can push it together to the best of your ability by hand. This is done so there will not be big air pockets in the bottom, as these pockets mean that the bed deflates a lot during the first few years
⇾ The next layer may consist of a little everything; tufts of grass (with the turf down), straw, old hay, silage, leaves, kitchen compost, or semi-finished compost. Most organic materials work well.
⇾ Depending on what you have, it is also advisable to mix well-aged horse or chicken manure preferably with straw or bedding. When you start laying the material, you need to make sure that it also reaches down among the branches and twigs, without pushing it down. How thick the layer should be you decide yourself, but estimate at least 60 cm because it compacts very quickly
⇾ Finally, you put on a layer of finished compost or soil with anything from 30 cm to just a few centimetres. How much is determined by what you intend to grow the first year
You get the best results if you build the bed in the fall so that it can mature a little before it is time to sow. But of course, it is possible to start cultivating pretty much right away, if you keep track of the temperature so that the composting process does not make it too hot in the beginning.
If the beds are on a slight slope, it is good to make it easier for the beds to suck up surrounding groundwater by digging the aisles about 10 cm deeper than the surroundings. Then you cover the aisles with, for example, mulch.
Water pressure around garden beds on a slope
Hügelkultur on a slope
The four year crop rotation plan
POTATOES
ROOT VEGETABLES ONIONS LETTUCE
PEAS BEANS CLOVER
BRASSICAS SQUASH LEEKS
The benefits of crop rotation
⇾ Reduced soil fatigue
⇾ Healthier soils
⇾ Reduced number of diseases
⇾ Fewer pest infestations
⇾ Optimal nutritional conditions
⇾ Different amounts of years in a crop rotation
4-year crop rotation
Year / Bed 1 – Plants that provide nutrition
Year 1, you grow legumes and other green manure plants that feed the soil themselves, which means t hey do not nee d any extra nutrients. If the soil is impoverished, you can give a moderate dose of liquid manure or treatment of grass clippings in the spring. In late summer, when harvesting the peas and beans, the remains of the plants are worked into the soil.
If you grow pure green manure plants where you do not take a harvest, it is advisable to cute these down a couple of times during the season. Some of the cut off mass will also be an excellent cover material for the other crops.
⇾ Beans
⇾ Peas
⇾ Green crop plants such as clover, vetches, and lacy phacelia
Year / Bed 2 – Nutritionally demanding plants
Here you will feed the soil properly with fertilizer, covered with grass clippings, and water with nettle water, all done to ensure that the nutritionally demanding plants thrive. This group includes pumpkin plants, some onion plants, and cabbage.
⇾ Brassicas
⇾ Turnips
⇾ Celery
⇾ Tomatoes
⇾ Cucumber
⇾ Squash
⇾ Melon
⇾ Maize
⇾ Leek
⇾ Garlic
Year / Bed 3 – Moderate requirements for nutrition
Here you can add a little fertilizer in the form of mulching, but absolutely no new fertilizer – because these plants are not particularly demanding. Root vegetables grow for so long, and they utilize the mycorrhiza. Therefore, they manage with less nutrition. This includes root vegetables, lettuce, parsley, dill, and onions. Both root vegetables and onions will have a worsened durability and taste if there is too much nutrition in the soil.
⇾ Carrots
⇾ Parsnip
⇾ Beets
⇾ Radishes
⇾ Spinach
⇾ Chard
⇾ Onions
⇾ Lettuce
⇾ Dill
⇾ Parsley
Year / Bed 4 – Small nutritional requirements
The soil does not need to be fertilized, but feel free to a little cover material and plant, for example, broad beans between the rows.
⇾ Potatoes
5-year crop rotation
Year / Bed 5 – Green manure plants
As an alternative to the 4-year crop rotation, one year can be added per bed, while you only cultivate pure green manure plants the fifth year. The following year /bed (no. 1) changes only by removing the green manure plants.
8-year crop rotation
The easiest way to create an 8-year crop rotation is to divide the respective bed into two parts and expand the compositions as shown here. When you begin to find your footing, you can also rotate the plants within each bed. In this way, it takes many years before the same plant returns to the same growing area.
LATE POTATO VARIETIES
EARLY POTATO VARIETIES
BRASSICAS
HERB CELERY SCALLIONS LEEKS GARLIC
The eight year crop rotation plan
ROOT VEGETABLES ONIONS CHARD
RYEGRASS CLOVER
PEAS BEANS
LETTUCE PARSLEY DILL
With the forest as a role model
Throughout history, man has interacted with nature, and of course, with the forest. Today, we have begun rediscovering several of the old methods of natural interplay. Ways that utilize cultivation areas more efficiently while becoming more ecologically sustainable.
Intercropping with trees
The methods are based on the fact that trees are in several ways intercropped with other crops and on pastures. Here, trees are used for several different purposes, such as giving crops, nourishing other plants and soil, for animal feed, wood, timber, as protection against pests, and as wind and sun protection. Thanks to the trees’ many functions, these forms of intercropping create greater biodiversity and a more sustainable ecosystem at that place. In this chapter, I will describe some different methods that are in use around the world.
Silvoarable
The method “Silvoarable” means that trees are planted as windbreaks between different cultivation zones. Many varieties of trees are used - trees for timber and wood, for harvesting fruit and nuts, for pollarding fodder, or
a nitrogen-fixing purpose. The tree va rieties are chosen depending on what you want to achieve. The trees can be planted either in rows or in clusters.
Silvopasture
Silvopasture is a method that builds on trees being planted in rows or clusters, around or on forage lands and pastures. Tree varieties and features are the same as with Silvoara ble.
Forest farming
Forest farming is a method that means integrating the crops into the already existing forest landscape. Common crops grown here include mushrooms, nuts, root vegetables, fruits, berries, plants for bees, herbs, medicinal plants, and edible flowers - as well as trees that can produce edible crops. This way, you create both a food forest
Silvopasture
Extending the growing season
Here in the north where the growing season is short, it is precious for us to be able to extend the growing season. The contrivances we take are many - with everything from starting seeds indoors so that the plant gets a sufficiently long growing period to carry a harvest, to building greenhouses where we can grow things no matter the season.
Starting plants indoors
Starting plants in your house gives hope for a new spring and summer. In order to grow and harvest some plants here in the north, it is necessary to start them indoors first. Some other plants enjoy it as well since it gives them a better chance to survive once they get put outside. However, it is quite space-consuming to do this on a larger scale, and you need to have a genuinely bright place for them. If you do not have enough light, it is possible to solve this with different lighting setups. If you are en-
ti rely unable to start them at your place, you may be able to house your plants with someone with better conditions.
Cold frames and hotbeds
A cold frame is a small, low greenhouse. With a simple cold frame consisting of a solid frame and a transparent lid, you can extend the growing season by about a month during both spring and autumn.
The longer side of the cold frame should be turned
Cold frame
slightly to the southwest, and the rear wall should be higher than the front to get the most out of the sun. The tilted lid also makes snow and rain slide off easier. Materials for the frame can be concrete or wood, and the lid any material that lets the sunlight through accurately. It is common to use old windows. To make the climate in the cold frame even better, you can insulate it with soil, leaves, or straw around the outer walls.
If you want to extend the season further, you can instead make a hotbed. To increase the heat in the bed, one begins by laying out a thick layer of fresh horse manure mixed with lots of straw, The thicker you make it, the warmer it will be. The next step is to pack in the manure firmly - easily done by walking on it - and water it with hot water, preferably with added urine to speed up the heating process. You can then set the frame in place, and put the lid on. You then barricade the frame with straw
all around it. Soon the heat will start to rise and then begin to fall again. When the temperature has come down to about 30 degrees Celsius, it is time to add the topsoil and start growing things!
Keep in mind that it may get sweltering underneath the glass when the sun’s rays start to warm. Therefore, you need to keep a close eye on the temperature. Photosynthesis gradually decreases when it gets to be above 25 degrees Celsius, which also reduces growth and production. The further along in spring you come, the more often the cover needs to be lifted during the warmest hours. Another way is to cast shade on the beds with, for example, reed mats or old rugs.
With the help of both cold frames and hotbeds, you can get fresh leafy vegetables much earlier in the year. A hotbed can provide its’ first harvest as soon as in February.
A greenhouse set against the wall of a house
Self-sustainability - How much you need
Self-sustainability is becoming increasingly popular, and many are thinking about what you need and in what amount to become fully self-sufficient. This is not an easy question to answer since many factors come into play. This chapter, therefore, provides a more general picture of what is needed.
Finding information on how much you need to grow to become self-sufficient when it comes to vegetables made me a right detective since most of the information available is about how to grow - not how much you need to grow.
To at least give a clue as to how much you might use, I have compiled information where the numbers mainly come from a thesis from 2010. The calculations are based on a mixed diet of both vegetables and meat, where all
food is eaten at home. Specific crop loss and that the crops are located up here in the north (specifically, in the middle region of Sweden) have also been taken into account. In total, this would mean that you need the following for a family of two adults and two children:
334 kg potatoes (including rice and pasta)
130 kg of root vegetables ⇾ 195 kg more nutritious vegetables
Annual consumption of vegetables
comsumption of vegetables
The land needed for this is, according to the thesis, just over 500 sqm of cultivated land.
How much land you actually need, and how much you need to grow is determined by the family’s dietary choices, how much they eat at home, and what farming conditions exist on the site.
In the thesis, there was also an attempt to calculate the time required - that it should suffice with 25 minutes a day elapsed over six months to grow all this. However, I don’t believe this is reasonable since there were a few too many assumptions combined with a lack of figures on how long manual cultivation takes. My own experience tells me that it is probably going to be 2-3 hours a day throughout the growing season. Of course, the time required depends on what is grown and with what methods. The time requirement will always look different; some days with no work at all, and some days with many hours of work.
In addition to all the greens, you need a lot of fruits and berries. Of course, how many shrubs and trees you need also depends on how often you eat at home and what opportunities you have to take care of and store fruits and
berries over the winter.
The estimate below is, therefore, also a clue as to what might be needed. The number of plants is based on that the family can store the harvest, and that most meals are eaten at home.
Which fruits and berries you can grow will depend on in which zone you live.
⇾ 4 apple trees
⇾ 2 pear trees
⇾ 2 plum trees
⇾ 3 cherry trees
⇾ 20 raspberry plants
⇾ 6 currant bushes
⇾ 6 gooseberry bushes
⇾ 70 strawberry plants
In addition, you may want to both add or replace some of these plants with, for example, blackberries, blueberries, sea buckthorn and peaches.
About the author
Raised on a farm on the island of Gotland, Sweden, where her family grew potatoes, strawberries, and other vegetables by hand - led to Eva being very tired of farming when she moved away from home at 18.
The farmer in Eva never gave up
Eva then proclaimed that she would never live in the countryside again! But at 25, her attitude had already softened. The lack of fresh produce right outside the door made itself known. So in the muddy lawn of her terraced house, Eva planted the first potato. And at 30, Eva left the city and has since lived in the countryside in different places, with varying amounts of gardening space. Just past 40, Eva got her first greenhouse. And not a small one either - a whooping 40 square meters. It was joy, pure joy; now she could grow more produce, with an extended growing season.
Her interest in food and the quality of it awakened as Eva and her family started a restaurant in 1998. The guests would be offered the best ingredients available, some home-grown, others from local farmers. What could not be obtained locally would at least be Swedish in origin. Eva remembers that they wrote in their menu that “We serve food from Gotland, and in the worst-case - Swedish”.
Some tourists probably thought it was a bit cooky, but not the Gotlanders. Another memory from that time is the numerous discussions had with the meat wholesaler, who for a long time insisted on delivering Danish pork when the Swedish was out of stock. Each time Eva pushed back; she only wanted Swedish meat, so the Danish meat had to go back. Nobody understood what she was on about. It is only now in recent years that more and more people are beginning to understand what Eva meant back then.
A few years ago, Eva came into contact with something called “permaculture” and became curious. The more she read about, the more interested she became. So much so that Eva studied to become a Certified Permaculture Designer. Once she started the course, her view of nature and cultivation changed forever. To think how much easier everything is when people take a step back and learn from nature - and not only when it comes to gardening!
In the beginning, not many people knew what Eva was talking about when she began to talk about permaculture in a garden setting. Still, over time, more and more curious questions started to pop up.
Several of her friends asked if she knew of any courses for someone who wanted to learn how to use a permacultural approach in their gardens. She did not, and it turned out that there were none anywhere close-by.
So Eva thought, how hard can it be... and promised her friends to arrange a course.
Then reality hit - when you want to teach, you need course material! Once she started writing, Eva soon realized how much knowledge she wanted to convey. Knowledge which, if you only know about it, makes growing so much easier. The result of all that writing eventually became the book you hold in your hands.
Thanks from the author
I want to thank my family and friends who have supported and believed in me throughout the process of writing this book. In particular, a big thank you to Madelene Dahlberg for doing the layout, cover, and the translation from Swedish to English.
“For those who want to see their garden from new perspectives. Common sense on steroids.”
- Petter Bergström
Homesteader
& editor for the magazine Åter
Welcome to a world where everything grows and thrives! Here no one needs to do the weeding or watering, and neither chemicals nor human-made fertilizers are needed. Because when nature itself gets to decide, everything is perfect.
We need to return to the basics: How nature’s ecosystems work and how we can use them to start growing more locally, on a small scale, and without toxins.
In this book, you’ll get insight into how everything works and how you imitate nature’s methods to succeed with your organic gardening endeavours!
This way, we start a positive spiral towards a healthier life - both for us and nature. Growing stuff the natural way does not have to be time-consuming, cumbersome, or even expensive!
“This is a book that everyone who eats should read. Above all, it is an almost comprehensive handbook for those who grow for self-sufficiency or small-scale business. Everything is presented in a very easy to understand and educational way. I get insight, inspiration and gardening joy.”
- Jonas Wangsten President of Förbundet Sveriges Småbrukare
“Homo Sapiens are a unique species that can build personal fantasy worlds and live their lives inside them, without being significantly disturbed by the annoying reality outside.
But here comes a book about daring to stop, and train our ability to observe reality, as it is before we more carefully give shape to our little world. Because what if it is possible to fit the whole reality on the inside?
It is no coincidence that the ways we cultivate our garden are so often compared to how we live our lives.
In the long run, the choice is between being one with nature or not at all.”
- Jonas Wangsten Originator of Fjällbete & leader of Savory Institutes nordic hub
“Permaculture is the best method for success with their crops; man has always cared for his crops with nature’s growth and diversity as a model. The methodology works just as well for large-scale agriculture as for the small allotment, the ecological principle nurtures your soil and gives you rich harvests. Permaculture is the right path for the future that benefits both vegetation and animals.”
- Hannu Sarenström
“In Sustainable Gardening Made Easy, Eva Pettersson gives us lots of patterns, tools and perspectives for how we can combine nature’s processes with our human needs and desires. The book inspires and at the same time has lots of facts and can therefore be useful during the long journey of discovery that it is to develop a garden or farm.”
- Gunnar Rundgren Author & agricultural consultant