

Prep: 1hour 15minutes Cook: 25 minutes
Total: 1hour 40 minutes Serves: 16
2 cups all purpose flour (fluffed and spooned into measuring cup)
1/8 teaspoon salt
12 tablespoons unsalted butter (slightly softened)
2 tablespoons cold water

1. Preheat the oven to 375° F/190°C, and position a rack in the lower third of your oven.
2. In a bowl, combine the flour and salt. The butter should be just soft enough that it gives when you press it, but not so soft that it collapses. Basically, you want it to be soft enough to break up with your fingers, but it shouldn’t immediately form a paste with the flour.
3. Cut the butter into small cubes, and add it to the flour and salt. Working quickly, break it up roughly with your fingers until it resembles coarse crumbs with some peasized chunks of butter still in the mixture.
4. Add 2 tablespoons of cold water, and bring the dough together with your hands. Add a little more water if necessary, no more than 3 teaspoons. At this point, the dough will be scraggly and dry. You need to rest the dough in the refrigerator to allow the flour in the dough to continue to absorb moisture. Wrap the dough tightly in plastic, and refrigerate for 20 minutes.
5. On a lightly floured surface, roll the dough into a roughly 6×15 inch rectangle. Work quickly to avoid overworking it. Fold the top third of the dough down to the center, then the bottom third up and over that. Give the dough a quarter turn and roll out again to a 6×15 inch rectangle. Fold the same way as before, cover, and chill for 1 hour.
½ cup granulated sugar
1 cup hot water
1/2 cup evaporated milk (at room temperature)
3 large eggs (at room temperature)
1 teaspoon vanilla extract
6. While the dough is resting, make the filling. Dissolve the sugar into 1 cup of hot water, and allow the mixture to cool to room temperature. Whisk evaporated milk, eggs, and vanilla together, and then thoroughly whisk in the sugar water.
7. Strain through a fine meshed strainer into a large measuring cup or pitcher (something with a pour spout). You should have about 2 to 2 1/4 cups of custard.
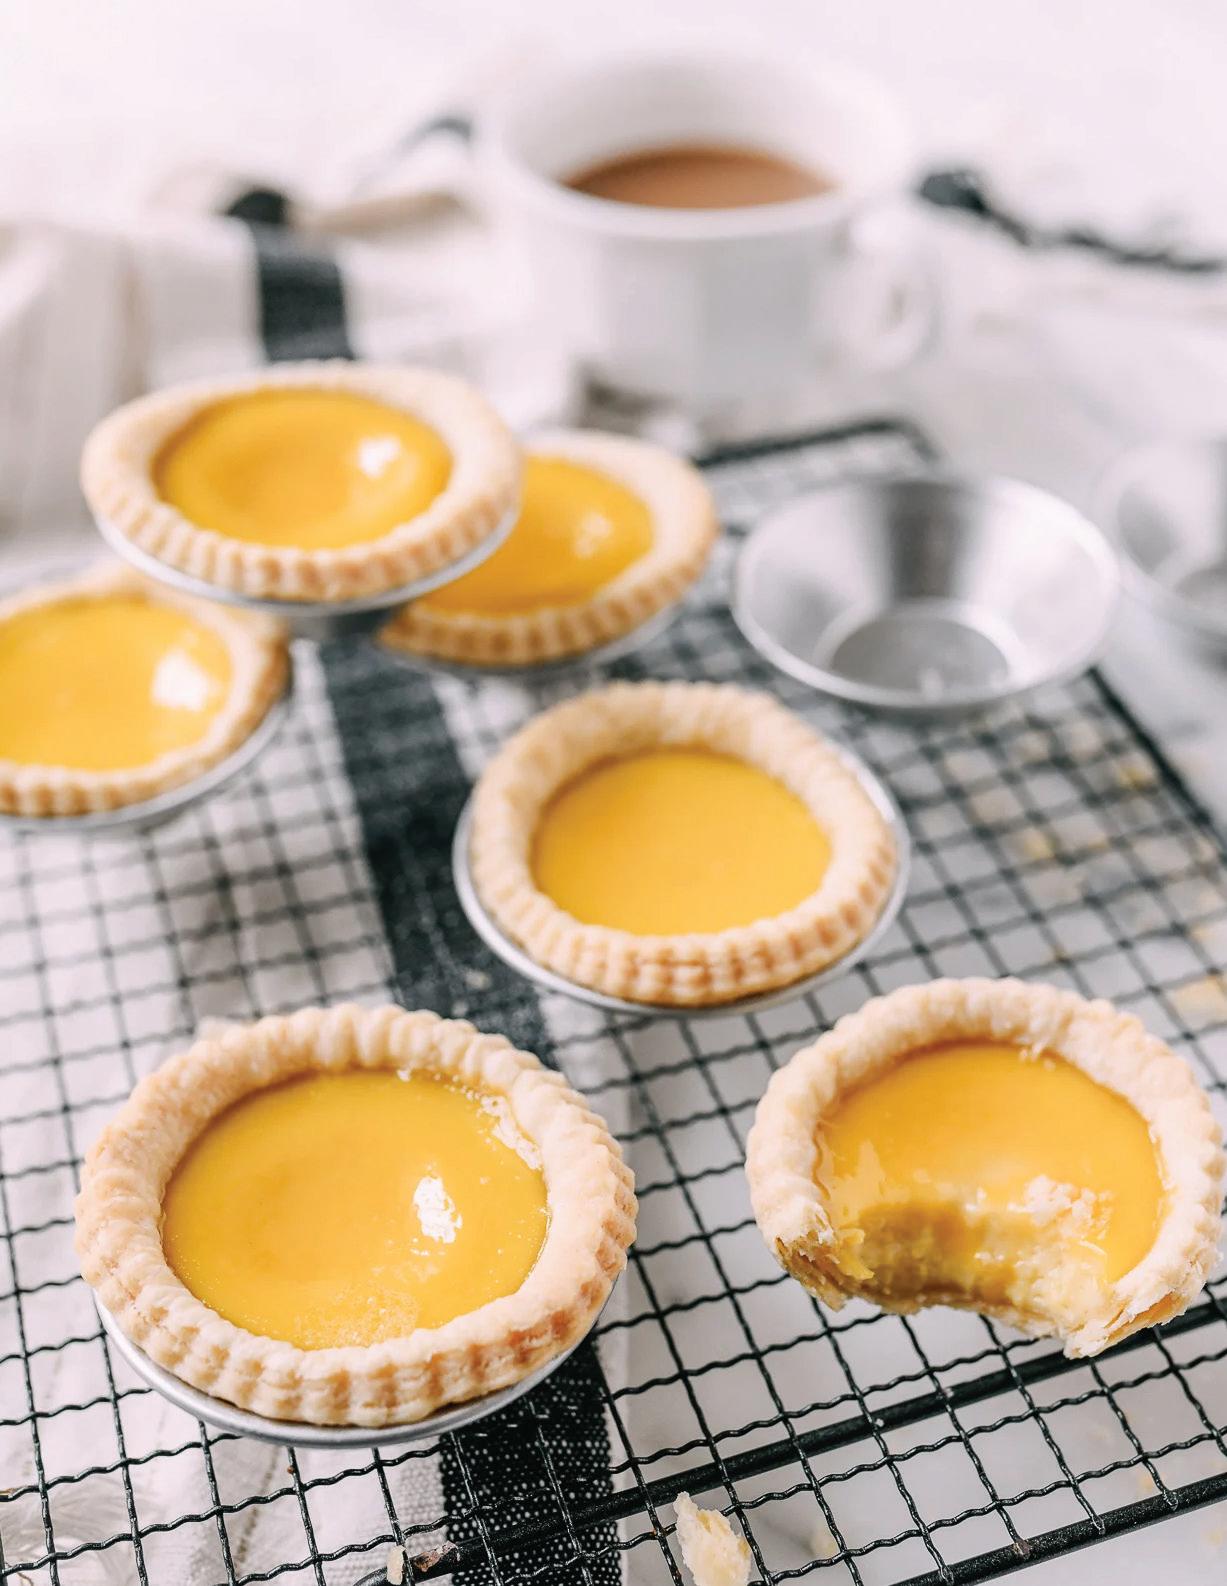
8. Roll out the dough 0.2 inch/5mm thick, and cut into 4-inch circles to fit either mini tart tins or a shallow nonstick standard muffin pan, leaving a lip going over the top of the cup (the tart shells will shrink as they bake, so you want ample clearance). Take the excess dough, re-roll it, and cut more circles until you have around 16 of them.
9. Evenly fill the tart shells about three quarters full. If you have an ample lip of dough at the top, you can fill it just until you reach the part where the dough curves outward.
10. Once filled, immediately (but very slowly and carefully) transfer the pan to the oven. Immediately reduce the heat to 350°F/180°C, and bake for 26-29 minutes, until filling is just set (if a toothpick can stand up in it, it’s done).
11. Allow the tarts to cool for at least 10 minutes before enjoying.


Prep Time: 15minutes Cook Time: 1hour
Total Time: 1hour 45minutes Servings: 100 pieces
4 cups granulated sugar
4 ¼ cups water divided
3 tablespoons lemon juice
1 ¼ cups cornstarch
1 teaspoon cream of tartar
2 tablespoons rosewater (optional)
1. Set two large 4-6 quart stock pots on the stovetop. Attach a candy thermometer onto one pot. Then set out a 9X9 inch baking dish. Line it neatly with foil, then spray it generously with nonstick cooking spray. Set aside.
2. Pour 4 cups of sugar and 1 ½ cups of water in the pot with the thermometer. Set on high heat and bring to a boil
3. Continue to boil until the sugar syrup reaches 240 degrees F. Meanwhile, pour the remaining 2 ¾ cups water in the second pot. Whisk in the lemon juice, cornstarch and cream of tartar, making sure there are NO clumps.
4. Turn the heat on high and continue whisking until the mixture forms a thick white paste that resembles petroleum jelly. Again, whisk well to insure there are NO clumps. It’s highly important that you whisk the mixture well, at every step. These little bits of clumps will turn hard like little rocks in each piece of candy.
5. Once the sugar syrup reaches the desired temperature, slowly and carefully pour the hot syrup into the cornstarch paste, a little at a time, making sure there are NO clumps. (This is safest with two sets of hands.)
6. Then turn the heat back to medium and simmer for approximately 45 minutes, stirring occasionally, until the mixture looks like thick golden-orange jelly.
1 ½ teaspoon raspberry extract
1 ½ teaspoon orange extract
½ teaspoon salt
¼ cup chopped pistachios (optional)
1 cup powdered sugar
4-6 drops red food coloring (optional)
7. Turn off the heat, stir in the rosewater, raspberry extract, orange extract, and salt. Add food coloring if desired. Then pour half of the mixture into the prepared baking dish
8. Quickly sprinkle with chopped pistachios, then pour the remaining candy mixture over the top before it cools and becomes too thick to pour. (Two sets of hands in nice here as well.
9. If you don’t care that the pistachios are directly in the center of the candy, you can simply mix them into the candy mixture and pour it in the pan all at once.)
10. Place the dish in the refrigerator and chill for 30-60 minutes, until firm. Turn the Turkish delight out of the dish and peel off the foil. Use a sharp knife (or kitchen shears) to cut the candy into approximately 100 tiny squares.
11. Add powdered sugar to the empty baking dish. As you cut the candy pieces, give them a good shake in the powdered sugar to coat them on all sides. Once finished, move them to an airtight container and keep at room temperature for up to 4 weeks.
12. The candy should be somewhat hard after chilling, but will soften as it sits at room temperature.

Prep time: 1 hour 30 mins Cook time: 40 mins
Total time: 2 hours 10 mins
3/4 teaspoons baking powder
1/4 teaspoon salt
3 large eggs, separated
1/2 cup granulated sugar, divided
2 tbsp. + 2 tsp. whole milk
1/2 teaspoon vanilla extract
1. Preheat the oven to 350°F. Grease an 8”x8” (or similar) pan with non-stick cooking spray.
2. In a medium bowl combine flour, baking powder, and salt. Separate the egg yolks and whites into two other mixing bowls.
3. Add 1/4 cup + 2 tbsp. of sugar to the bowl with the egg yolks and mix on high speed until the yolks are pale yellow Add 2 tbsp. + 2 tsp. of whole milk and vanilla and stir to combine. Pour the egg yolk mixture over the flour mixture and stir gently just until combined (don’t over-mix).
4. Use electric beaters to beat the egg whites at high speed. As they begin to whip into stiff peaks, gradually mix in the remaining 2 tbsp. of sugar. Fold the stiffly beaten egg whites into the batter gently, scraping the bottom and sides of the bowl, until combined.
5. Stiff peaks forms will not recede back or melt back into itself. It should hold a tall, stiff peak, and if you turn the beater upside down the peak that has formed on the end of it should hold its shape as well.
6. Pour batter into the prepared pan and smooth it into an even layer. Bake for 25 to 35 minutes, or until a toothpick inserted in the center of the cake comes out clean.
Servings: 18 slices
3/4 cup evaporated milk
3/4 cup + 2 tbsp. sweetened condensed milk
2 tbsp. whole milk
11/4 cup heavy whipping cream
11/2 tbsp. powdered sugar
1/4 tsp. vanilla extract
Ground cinnamon, for topping
7. Once cake has cooled (do not invert it, leave it in the cake pan), prepare topping by whisking together condensed milk, evaporated milk, heavy cream, and vanilla extract. Use a large fork or a wooden skewer to poke holes all over the cake (poke down to the bottom of the cake pan).
8. Pour milk mixture slowly and evenly over cake. Cover and transfer cake to refrigerator and allow to chill for at least several hours or overnight.
9. Slowly pour the milk mixture over the top of the cake, making sure to pour near the edges and all around.
10. Refrigerate the cake for at least 1 hour or overnight, to allow it to soak up the milk.
11. Combine heavy cream, powdered sugar, and vanilla extract in a large bowl and use an electric mixer to beat until thickened and you achieve stiff peaks and a Cool Whip consistency.
12. Spread whipped cream over tres leches cake and sprinkle with ground cinnamon, if desired. I personally recommend it for that fall taste.

Prep Time: 20minutes Cook Time: 1hour 10minutes
Total Time: 1hour 30minutes Servings: 8
226 g (1 cups) Cream cheese full fat Philadelphia
55 g (¼ cups) Unsalted butter
120 g (½ cups) Whole milk
40 g (⅓ cups) All purpose flour low protein content flour e.g. pastry flour is ideal
1. Line a 20 cm (8-inch) round cake pan with parchment paper, and preheat the oven to 150°C (300°F) with a water bath inside. Ensure the water bath reaches about halfway up the sides of the cake tin.
2. If using a loose-base pan, wrap it thoroughly with aluminum foil to keep water from getting into the cheesecake. In case your sugar granulates on the larger side, pulse it in a blender to make superfine sugar, then measure the amount needed. Separate the eggs into yolks and whites.
3. Place the cream cheese, butter, and milk in a saucepan over low heat, stirring until completely smooth, then remove from heat. Sift the cornstarch, salt, and flour. Add them to the cream cheese mixture, until the batter is smooth and free of lumps.
4. Then, add the egg yolks to the cream cheese mixture one at a time, mixing thoroughly after each addition. Using a stand mixer or hand mixer, start whipping the egg whites on low speed. Gradually add the sugar one tablespoon at a time, continue until the mixture forms soft peaks.
5. Gently fold the whipped meringue into the cream cheese batter with a rubber spatula, ensuring the mixture stays light and fluffy.
15 g (2 tablespoons) Corn starch
Pinch of salt
5 medium Eggs yolk and white separetely
75 g (⅔ cups) Granulated sugar superfine sugar is ideal
6. Then, pour the batter into the prepared cake pan, and place it in the water bath to bake. Start by baking for 30 minutes, then continue at the same temperature for another 20 minutes with the oven door slightly open.
7. Finish with an additional 20 minutes at with the oven door closed, using a digital oven thermometer if available to confirm accuracy.
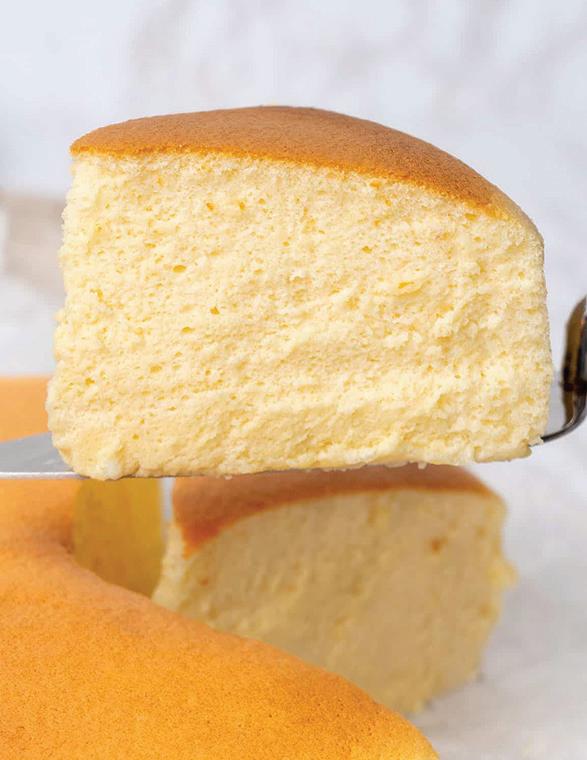
8. Keep an eye on the cheesecake as it bakes; aim for a gentle rise to avoid cracking on the surface. Look for a golden-brown top—fully colored but not burnt—and adjust the temperature if needed to achieve this.
9. This is where you might need to experiment with your oven and run 1-2 tests. In practise, take the cheesecake out of the oven when it has a golden-brown top, a slight jiggle in the center, and feels soft and springy to the touch.
10. If you are confident that the cheesecake is well baked, remove it from the oven, flip it onto a plate, then flip it back onto another plate to keep its shape.
11. Serve immediately while warm and jiggly, and store any leftovers in the refrigerator for up to 2–3 days. Note that the cheesecake’s airy texture is best enjoyed fresh.