

Product: TRACK LOADER
Model: 939C TRACK LOADER 6DS
Configuration: 939C Track Loader Hydrostatic Drive 6DS00001-UP (MACHINE) POWERED BY 3046 Engine
Disassembly and Assembly 3046 ENGINE SUPPLEMENT FOR 933C & 939C SERIES III TRACK-TYPE
Air Conditioning Accumulator
SMCS - 7322-010
Remove & Install Air Conditioning Accumulator
Start By:
a. remove hood
Effective July 1, 1992 regulations prohibit the venting of any refrigerant into the atmosphere. Refer to Caterpillar publication SENR5664 and NEDG5065 for the proper procedure, equipment and tools to reclaim refrigerant from any Caterpillar machine.
Alwayswear goggles whenworking on air conditioning systems. The system is under pressure at all times, engine running or not. Escaping refrigerant R-134A can cause freezing of human flesh.
Do not smoke while working on air conditioning. Inhaling Refrigerant R-134Athrough any smoking material, although not toxic or flammable, can cause violent illness. Also heat must never be applied to a charged system. See Air Conditioning And Heating Service Manual Form No. SENR5664-01, for more informationon removal and installation of lines and refrigerant from the system.
1. Using the proper procedure recover the refrigerant from the system.
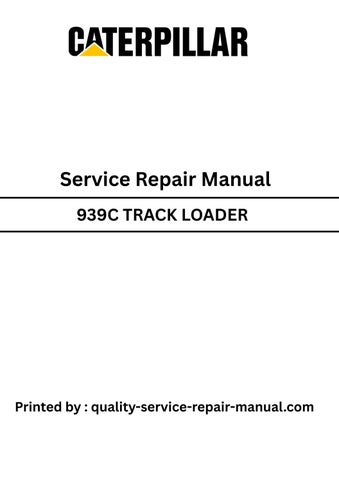
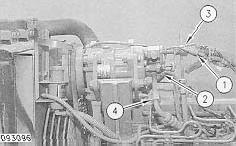
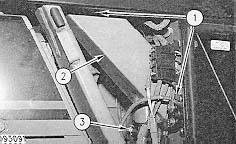
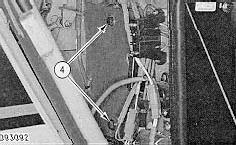
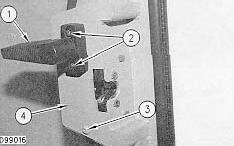
2. Disconnect tube assembly (1) and hose assembly (4) from accumulator (2).
3. Remove two bolts, and washers (3) and remove the air conditioning accumulator (2).
NOTE: For the installation of the air conditioning accumulator, reverse the removal steps. Check all O-rings for damage and replace where necessary.
NOTE: Some modelsmay be equipped with quick disconnect couplings. If this is the case, it will not be necessary to evacuate and recover the refrigerant.
NOTE: If the machine is not equipped with quick disconnect couplings, plug and cap the air conditioning lines leading to and from the accumulator. This will prevent moisture from entering the system.
NOTE: For charging the air conditioning system refer to Form No. SENR5664.
End By: a. install hood
Product: TRACK LOADER
Model: 939C TRACK LOADER 6DS
Configuration: 939C Track Loader Hydrostatic Drive 6DS00001-UP (MACHINE) POWERED BY 3046 Engine
Disassembly and Assembly
3046 ENGINE SUPPLEMENT FOR 933C & 939C SERIES III TRACK-TYPE
Media Number -SENR1263-00 Publication Date -01/10/1997 Date Updated -08/05/2002
Air Conditioning Belt
SMCS - 1357-010; 7316-010
Remove & Install Air Conditioning Belt
Start By:
a. remove left engine panel assembly
b. remove right engine panel assembly
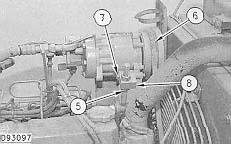
1. Loosen nut (1) to release tension from belt (4). Remove bolt (2), washer and nut holding adjusting block (5) to the air conditioning compressor (3).
2. Remove bolt (6) nut and washers. Remove belt (4) from air conditioning compressor (3) and position the air conditioning compressor (3) out of the way.
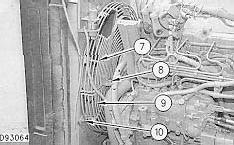
3. Remove two bolts (8) connecting the upper fan guard (7) and the lower fan guard (9). Remove eight bolts (10) and washersand remove both guards.
4. Remove belt (4) by moving the belt around the fan blade and off of the engine.
NOTE: Install the belt in reverse order. Adjust nut (1) to obtain the proper tension. Consult the Operation & Maintenance Manual for proper belt tightening specifications.
End By:
a. install left engine panel assembly
b. install right engine panel assembly
Remove & Install Air Conditioning Fans And Motors
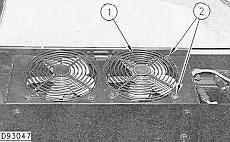
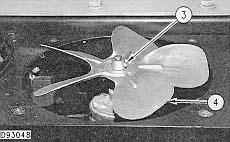
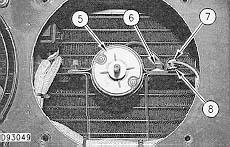
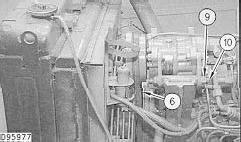
3. Disconnect wiring connector (7).
4. Remove two nuts(6) and washers. Remove one clip (8), and remove motor (5).
5. Use the same procedure to remove the other fan and motor.
NOTE: Install in reverse order.
Copyright 1993 - 2020 Caterpillar Inc. All Rights Reserved.
Network For SIS Licensees.
This is the sample of the manual
Click on the download link for complete Manual
Product: TRACK LOADER
Model: 939C TRACK LOADER 6DS
Configuration: 939C Track Loader Hydrostatic Drive 6DS00001-UP (MACHINE) POWERED BY 3046 Engine
Disassembly and Assembly
Air Conditioning Compressor
SMCS - 1802-010
Remove & Install Air Conditioning Compressor
Start By:
a. remove hood
Effective July 1, 1992 regulations prohibit the venting of any refrigerant into the atmosphere. Refer to Caterpillar publication SENR5664 and NEDG5065 for the proper procedure, equipment and tools to reclaim refrigerant from any Caterpillar machine.
Alwayswear goggles whenworking on air conditioning systems. The system is under pressure at all times, engine running or not. Escaping refrigerant R-134A can cause freezing of human flesh.
Do not smoke while working on air conditioning. Inhaling Refrigerant R-134Athrough any smoking material, although not toxic or flammable, can cause violent illness. Also heat must never be applied to a charged system. See Air Conditioning And Heating Service Manual Form No. SENR5664, for more information on removal andinstallation of linesand refrigerant from the system.
1. Using proper recovery procedures, recover the refrigerant from the system.
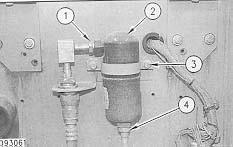
2. Place identification marks on all wiring harnesses and hose assemblies. Disconnect two wiring harnesses (1) and (2) at the quick disconnects.
3. Disconnect two hose assemblies(3) and (4) from the back side of the air conditioning compressor.
4. Loosen nut (5) to release tension from vee belt (6). Remove bolt (7), washer and nut holding adjuster block (8) to the compressor.
5. Remove nut and washer (9) from threaded rod (10). Remove threaded rod (10) out of bracket and compressor from the machine.
NOTE: For the installation of the compressor, reverse the removal procedure. Prior to installation, check all O-rings for wear or damage and replace if necessary.
NOTE: Check Operation And Maintenance Manual for the proper belt tension to apply on the compressor belt.
NOTE: Some modelsmay be equipped with quick disconnect couplings. If this is the case, it will not be necessary to evacuate and recover the refrigerant.
NOTE: If the machine is not equipped with quick disconnect couplings, plug and cap the air conditioning lines leading to and from the compressor. This will prevent moisture from entering the system.
NOTE: For charging the air conditioning system refer to Form No. SENR5664.
End By: a. install hood
Product: TRACK LOADER
Model: 939C TRACK LOADER 6DS
Configuration: 939C Track Loader Hydrostatic Drive 6DS00001-UP (MACHINE) POWERED BY 3046 Engine
Disassembly and Assembly 3046 ENGINE SUPPLEMENT FOR 933C & 939C SERIES III TRACK-TYPE
Air Conditioning Condenser
SMCS - 1805-010
Remove & Install Air Conditioning Condenser
Effective July 1, 1992 regulations prohibit the venting of any refrigerant into the atmosphere. Refer to Caterpillar publication SENR5664 and NEDG5065 for the proper procedure, equipment and tools to reclaim refrigerant from any Caterpillar machine.
Alwayswear goggles whenworking on air conditioning systems. The system is under pressure at all times, engine running or not. Escaping refrigerant R-134A can cause freezing of human flesh.
Do not smoke while working on air conditioning. Inhaling Refrigerant R-134Athrough any smoking material, although not toxic or flammable, can cause violent illness. Also heat must never be applied to a charged system. See Air Conditioning And Heating Service Manual Form No. SENR5664, for more information on removal andinstallation of linesand refrigerant from the system.
1. Using the proper procedure recover the refrigerant from the system.

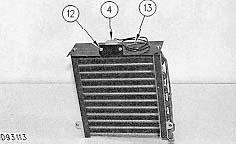
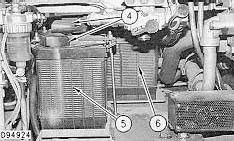
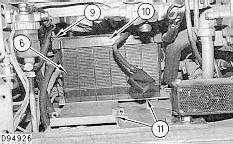
2. Disconnect tubes (1) from condenser (2).
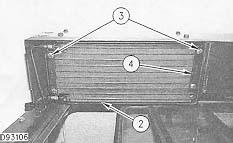
3. Remove four bolts (3), two strips (4), and four spacers(not shown).
NOTE: Make note of the position of each of the spacers for exact placement during installation.
4. Remove condenser (2) from housing.
NOTE: Use care when removing and installing the air conditioning condenser. The core of the condenser is made of soft metal and can be damaged or punctured very easily.
NOTE: For installation of the air conditioning condenser, reverse the removal steps. Check all O-rings for damage and replace where necessary.
NOTE: Some modelsmay be equipped with quick disconnect couplings. If this is the case, it will not be necessary to evacuate and recover the refrigerant.
NOTE: If the machine is not equipped with quick disconnect couplings, plug and cap the air conditioning lines leading to and from the condenser. This will present moisture from entering the system.
NOTE: For charging the air conditioning system refer to Form No. SENR5664.
Product: TRACK LOADER
Model: 939C TRACK LOADER 6DS
Configuration: 939C Track Loader Hydrostatic Drive 6DS00001-UP (MACHINE) POWERED BY 3046 Engine
Disassembly and Assembly 3046 ENGINE SUPPLEMENT FOR 933C & 939C SERIES III TRACK-TYPE
Air Conditioning Evaporator Coil
SMCS - 7343-010
Remove & Install Air Conditioning Evaporator Coil
Effective July 1, 1992 regulations prohibit the venting of any refrigerant into the atmosphere. Refer to Caterpillar publication SENR5664 and NEDG5065 for the proper procedure, equipment and tools to reclaim refrigerant from any Caterpillar machine.
Alwayswear goggles whenworking on air conditioning systems. The system is under pressure at all times, engine running or not. Escaping refrigerant R-134A can cause freezing of human flesh.
Do not smoke while working on air conditioning. Inhaling Refrigerant R-134Athrough any smoking material, although not toxic or flammable, can cause violent illness. Also heat must never be applied to a charged system. See Air Conditioning And Heating Service Manual Form No. SENR5664, for more information on removal andinstallation of linesand refrigerant from the system.
1. Using the proper procedure recover the refrigerant from the system.
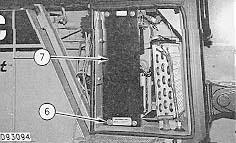
6. Remove access panel (8) and filter (9).
7. Remove bolt (10) and bolt (11).
8. Remove air conditioning evaporator coil (2) through access panel (1).
9. Remove screws (12). Remove switch (4) by removing the thermostat probe (13).

10. Remove bolts (14) and plate (15).
NOTE: Use care when removing and installing the air conditioning evaporator. The core of the evaporator is made of soft metal and can be damaged or punctured very easily.
NOTE: For installation of the air conditioning evaporator, reverse the removal steps. Check all O-rings for damage and replace where necessary.
NOTE: Some modelsmay be equipped with quick disconnect couplings. If this is the case, it will not be necessary to evacuate and recover the refrigerant.
NOTE: If the machine is not equipped with quick disconnect couplings, plug and cap the air conditioning lines leading to and from the evaporator. This will prevent moisture from entering the system.
NOTE: For charging the air conditioning system refer to Form No. SENR5664.
Product: TRACK LOADER
Model: 939C TRACK LOADER 6DS
Configuration: 939C Track Loader Hydrostatic Drive 6DS00001-UP (MACHINE) POWERED BY 3046 Engine
Disassembly and Assembly 3046 ENGINE SUPPLEMENT FOR 933C & 939C SERIES III TRACK-TYPE
Media Number -SENR1263-00
Alternator Belt
SMCS - 1357-010
Publication Date -01/10/1997
Remove & Install Alternator Belt
Start By:
a. remove air conditioning Belt

Date Updated -08/05/2002
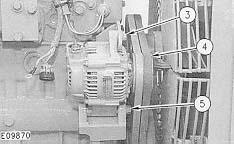
1. Loosen bolts (1) and (2). Move alternator (4) towards the engine and remove two Vee belts (3).
NOTE: Install the belt in reverse order. If replacement is necessary, only replace alternator beltsin sets of two. Adjust alternator (4) to obtain the proper tension. Consult the Operation & Maintenance Manual for proper belt tightening specifications.
End By:
a. install air conditioning belt
Copyright 1993 - 2020 Caterpillar Inc. All Rights Reserved. Private Network For SIS Licensees. Mon Nov 30 22:36:53 UTC+0530 2020
Product: TRACK LOADER
Model: 939C TRACK LOADER 6DS
Configuration: 939C Track Loader Hydrostatic Drive 6DS00001-UP (MACHINE) POWERED BY 3046 Engine
Disassembly and Assembly 3046 ENGINE SUPPLEMENT FOR 933C & 939C SERIES III TRACK-TYPE
Alternator
SMCS - 1405-010
Remove & Install Alternator
Start By:
a. remove right engine panel assembly
Disconnect the batteries prior to the performance of any work on the alternator.
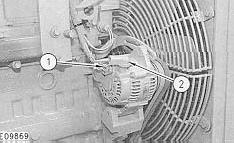
1. Disconnect wire connector (1) and disconnect wires from terminal (2).
Updated -08/05/2002
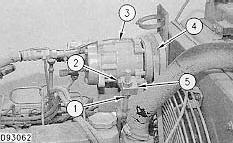
2. Loosen bolt (3) and alternator mount bolt (5) and remove belts (4) from the pulley.
3. Remove bolt (3) and alternator mount bolt (5) and remove alternator.
NOTE: Install alternator in the reverse order. See Operation & Maintenance Manual for belt tightening specifications. Replace belts in sets of two on the alternator.
4. Tighten the nut at terminal (2) to a torque of 110 ±17 N·m (81 ± 13 lb ft).
End By:
a. install right engine panel assembly Copyright 1993 - 2020 Caterpillar Inc. All Rights Reserved.
Product: TRACK LOADER
Model: 939C TRACK LOADER 6DS
Configuration: 939C Track Loader Hydrostatic Drive 6DS00001-UP (MACHINE) POWERED BY 3046 Engine
Disassembly and Assembly
3046 ENGINE SUPPLEMENT FOR 933C & 939C SERIES III TRACK-TYPE
Media Number -SENR1263-00
Batteries
SMCS - 1401-010
Publication Date -01/10/1997 Date Updated -08/05/2002
Remove & Install Batteries
Start By:
a. remove ripper (if equipped)
1. Turn battery disconnect switch to the "OFF" position.
2. Remove rear access panel (1) and open access door (2).
3. Remove two hydraulic oil filters(3).
NOTE: At installation, replace all lost hydraulic oil.
4. Disconnect battery cables (4) from batteries (5) and (6).
NOTE: To prevent injury or battery damage alwaysremove negative cables from the ground side of the battery, first.

5. Loosen and remove two hold down clamps (7).
6. Slide battery (5) with bracket (8) still in place, out of the battery compartment.
NOTE: The position of the positive and negative terminals for proper installation.
7. Loosen and remove two hold down clamps (9). Remove bracket (10) from front of battery (6).
8. Slide battery (6) out of the battery compartment in a similar manner as the first battery.
NOTE: The position of the positive and negative terminals for proper installation.
NOTE: Install in reverse order.
End By:
a. install ripper (if equipped)
Product: TRACK LOADER
Model: 939C TRACK LOADER 6DS
Configuration: 939C Track Loader Hydrostatic Drive 6DS00001-UP (MACHINE) POWERED BY 3046 Engine
Disassembly and Assembly 3046 ENGINE SUPPLEMENT FOR 933C & 939C SERIES III TRACK-TYPE
Media Number -SENR1263-00 Publication Date -01/10/1997 Date Updated -08/05/2002
Blower Fans & Motor
SMCS - 7316-010
Remove & Install Blower Fans and Motor
Start By:
a. remove heater core
2. Remove four bolts (1) and remove duct (2).
3.

4. Disconnect wire connector (5).
5. Remove four bolts (6) and washers and remove blower fans and motor assembly (7).
NOTE: Install in reverse order.
End By:
a. install heater core
Product: TRACK LOADER
Model: 939C TRACK LOADER 6DS
Configuration: 939C Track Loader Hydrostatic Drive 6DS00001-UP (MACHINE) POWERED BY 3046 Engine
Disassembly and Assembly 3046 ENGINE SUPPLEMENT FOR 933C & 939C SERIES III TRACK-TYPE
Media Number -SENR1263-00 Publication Date -01/10/1997 Date Updated -08/05/2002
Cab Door Cylinder (latch)
SMCS - 5138-010
Remove & Install Cab Door Cylinder (Latch)
1. Remove two screws (2) and handle (1). Remove screw(3) and remove plate (4).

2. Remove four screws (5) and remove latch (6).
NOTE: Install in reverse order.
Product: TRACK LOADER
Model: 939C TRACK LOADER 6DS
Configuration: 939C Track Loader Hydrostatic Drive 6DS00001-UP (MACHINE) POWERED BY 3046 Engine
Disassembly and Assembly 3046 ENGINE SUPPLEMENT FOR 933C & 939C SERIES III TRACK-TYPE Media
SMCS - 7301-010
Remove & Install Cab

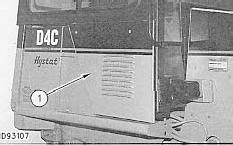
NOTE: The machine displayed in thisstory is D4C Hystat. The cab of a D4C and a 933C are identical.
Fluid Spillage Containment
Care must be taken to ensure that fluids are contained during performance of inspection, maintenance, testing, adjusting and repair of the machine. Be prepared to collect the fluid with suitable containers before opening any compartment or disassembling any component containing fluids. Refer to "Tools And Shop ProductsGuide", NENG2500 for toolsand supplies suitable to collect and contain fluids in Caterpillar machines. Dispose fluids according to local regulations and mandates.
NOTE: The cab displayed in thisstory isof a D4C. The 933C/939C cab removal and installation is identical
NOTE: Prior to the disconnection or removal of any wires, wiring harnesses, hoses or cables, insure that all are clearly marked and identified.
Effective July 1, 1992 regulations prohibit the venting of any refrigerant into the atmosphere. Refer to Caterpillar publication SENR5664 and NEDG5065 for the proper procedure, equipment and tools to reclaim refrigerant from any Caterpillar machine.
Alwayswear goggles whenworking on air conditioning systems. The system is under pressure at all times, engine running or not. Escaping refrigerant R-134A can cause freezing of human flesh.
Do not smoke while working on air conditioning. Inhaling Refrigerant R-134Athrough any smoking material, although not toxic or flammable, can cause violent illness. Also heat must never be applied to a charged system. See Air Conditioning And Heating Service Manual Form No. SENR5664, for more information on removal andinstallation of linesand refrigerant from the system.
1. Using proper recovery procedures, purge the refrigerant from the system. Drain radiator coolant into a suitable container for storage or disposal. Radiator capacity is 20 liters (7 U.S. Gal).
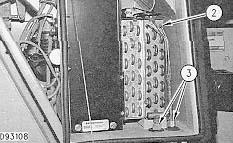
2. Remove eight bolts and washers (1) that secure cover assembly (2) to the machine. Open access panel (3).
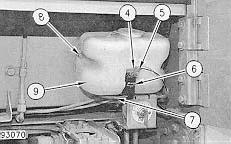
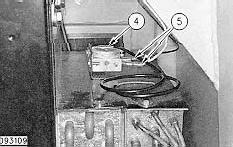
3. Mark, identify and disconnect wires(4) and (5) from windshield washer pump (6).
4. Remove hose (7) from the bottom of windshield washer pump (6). Drain the fluid into a suitable container for storage or disposal.
5. Remove two bolts (8) and remove windshield washer bottle (9) from machine.
This is the sample of the manual
Click on the download link for complete Manual
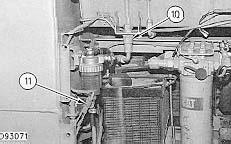
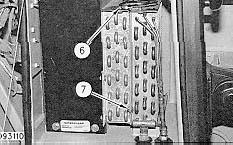
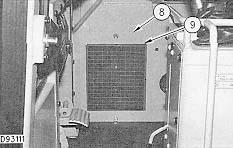
6. Disconnect air conditioning hose assembly (10) and set aside.
7. Disconnect wire connector (11) at quick disconnect.
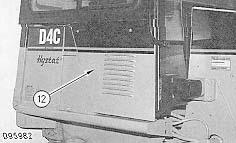
8. Open access panel (12).
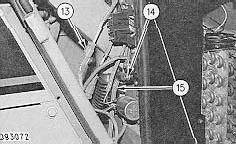
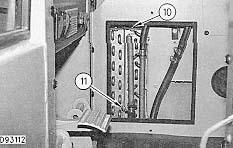
9. Disconnect wire connector (1) at quick disconnect and remove screw (14) to disconnect wire (15).
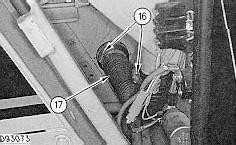
10. Loosen two clamps (16) and remove hose (17).