

Product: MINI HYD EXCAVATOR
Model: 305.5D MINI HYD EXCAVATOR FLZ
Configuration: 305.5D Mini Excavator FLZ00001-UP (MACHINE) POWERED BY S4Q2T Engine
Disassembly and Assembly
303.5D, 304D, 305.5D and 305D Mini Hydraulic Excavators Engine Supplement
Media Number -UENR0101-01
Publication Date -01/06/2013
Alternator - Remove and Install
SMCS - 1405-010
Removal Procedure
1
Date Updated -12/06/2013
i03906472
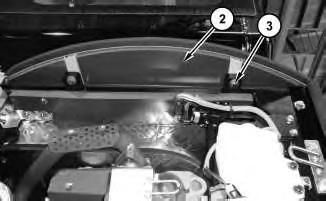
Illustration 2
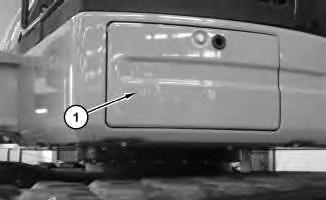
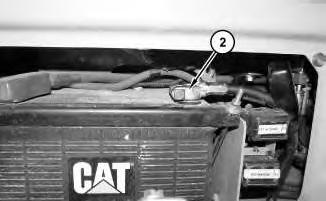
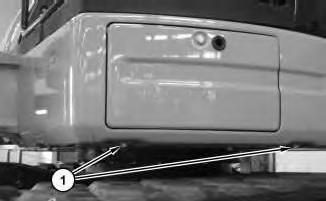
1. Open door (1) . Disconnect negative cable assembly (2) .
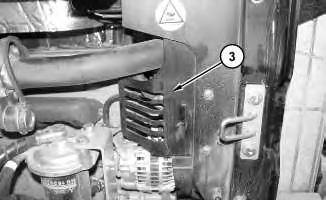
Illustration 3
2. Remove guard (3) .

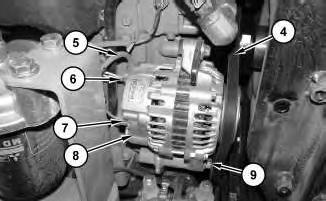
Illustration 4
3. Remove belt (4) . Refer to Operation and Maintenance Manual, "BeltInspect/Adjust/Replace".
4. Disconnect harnessassemblies(5) , (6) , and (7) . Remove bolts (9) and remove alternator (8) .
Installation Procedure
1. Install alternator (8) and bolts (9) . Connect harness assemblies (5) , (6) , and (7) .
2. Install belt (4) . Refer to Operation and Maintenance Manual, "BeltInspect/Adjust/Replace".
Install guard (3) .


8
Copyright 1993 - 2020 Caterpillar Inc. All Rights Reserved. Private Network For SIS Licensees. Thu Feb 6 10:07:08 UTC+0530 2020
Product: MINI HYD EXCAVATOR
Model: 305.5D MINI HYD EXCAVATOR FLZ
Configuration: 305.5D Mini Excavator FLZ00001-UP (MACHINE) POWERED BY S4Q2T Engine
Disassembly and Assembly
303.5D, 304D, 305.5D and 305D Mini Hydraulic Excavators Engine Supplement
Media Number -UENR0101-01
Publication Date -01/06/2013
Battery - Remove and Install
SMCS - 1401-010
Removal Procedure
1
Date Updated -12/06/2013
i03906473
2
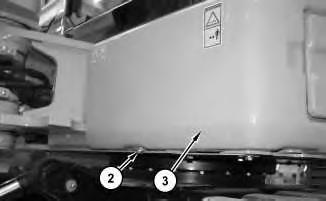
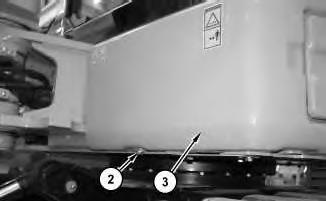
2. Remove bolt (2). Remove guard (3).
3
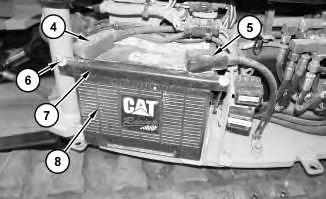
3. Disconnect negative cable assembly (5). Disconnect positive cable assembly (4). Remove nuts(6). Remove bracket (7) and battery (8).
Note: Do not attempt to remove battery (8) through the front access panel.
Installation Procedure

Illustration 4
g01221256
1. Install battery (8). Install bracket (7). Install nuts (6). Connect positive cable assembly (4). Connect negative cable assembly (5).
This is the sample of the manual
Click on the download link for complete Manual
Copyright 1993 - 2020 Caterpillar Inc. All Rights Reserved. Private Network For SIS Licensees. Thu Feb 6 10:06:52 UTC+0530 2020
Product: MINI HYD EXCAVATOR
Model: 305.5D MINI HYD EXCAVATOR FLZ
Configuration: 305.5D Mini Excavator FLZ00001-UP (MACHINE) POWERED BY S4Q2T Engine
Disassembly and Assembly
303.5D, 304D, 305.5D and 305D Mini Hydraulic Excavators Engine Supplement
Media Number -UENR0101-01
Publication Date -01/06/2013
Electric Starting Motor - Remove and Install
SMCS - 1453-010
Removal Procedure
1
Date Updated -12/06/2013
i03906480
Illustration 2
1. Open door (1) . Disconnect negative battery cable assembly (2) .
2. Open the engine hood.

3
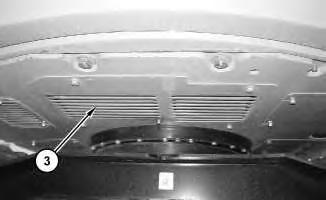
3. Remove guard (3) .
4
5
BottomView
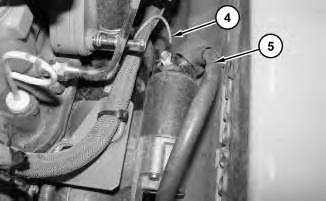
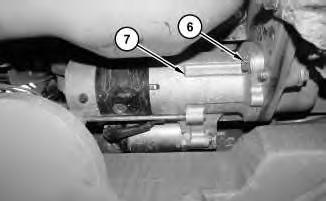
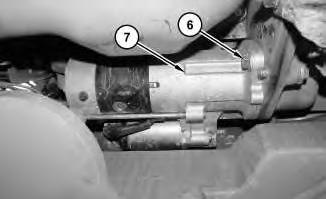
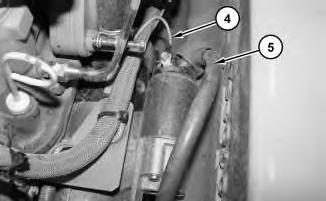
4. Disconnect harnessassemblies(4) and (5) . Remove bolts (6) and remove electric starting motor (7) .
Installation Procedure
6
BottomView
7
1. Install electric starting motor (7) . Install bolts (6) . Connect harness assemblies (4) and (5) .
8
2. Install guard (3) .
3. Close the engine hood.

9
Copyright 1993 - 2020 Caterpillar Inc. All Rights Reserved. Private Network For SIS Licensees.
Thu Feb 6 10:07:25 UTC+0530 2020
Product: MINI HYD EXCAVATOR
Model: 305.5D MINI HYD EXCAVATOR FLZ
Configuration: 305.5D Mini Excavator FLZ00001-UP (MACHINE) POWERED BY S4Q2T Engine
Disassembly and Assembly
303.5D, 304D, 305.5D and 305D Mini Hydraulic Excavators Engine Supplement Media Number -UENR0101-01
Engine - Install
SMCS - 1000-012
Installation Procedure Table 1
Required Tools
i04012789
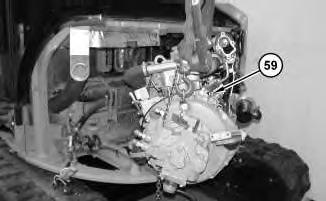
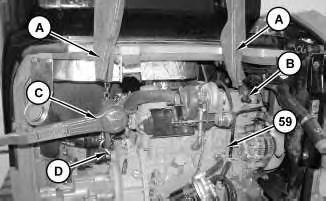
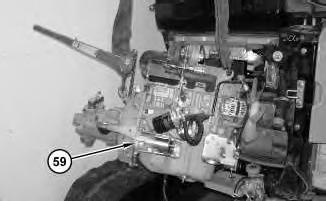
1. Attach Tooling (A), Tooling (B), Tooling (C), Tooling (D), and a suitable lifting device to engine (59). The weight of the engine for the 303.5D and the 304Disapproximately 249 kg (549 lb). The weight of the engine for the 305D and the 305.5D is approximately 340 kg (750 lb).
2. Install engine (59) .
4
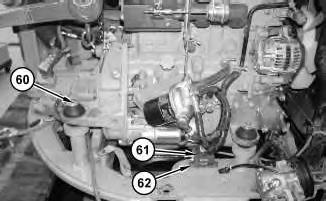
3. Install bolts (60). Install back up alarm (61) and bolts(62) .
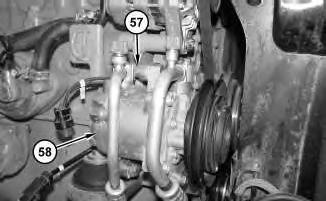
Illustration 5
4. Move refrigerant compressor (58) into position and install bolts (57) .
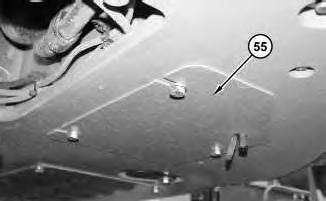
5. Install the belt for the refrigerant compressor. Refer to Operation and Maintenance Manual, "Belt - Inspect/Adjust/Replace".
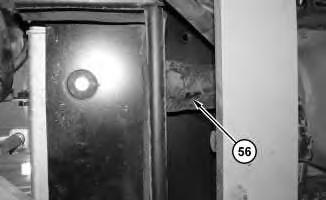
Illustration 6
6. Install lower radiator hose (56) .
7
8
9
10
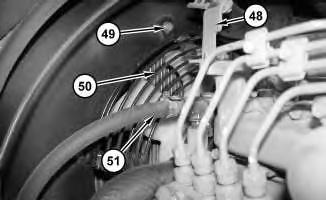
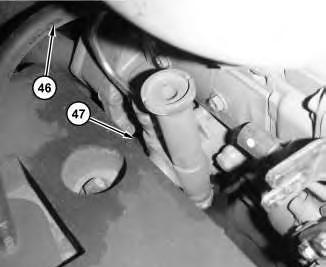
10. Connect hoses (46) and (47) .
11
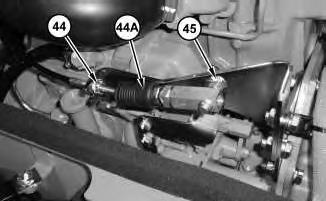
11. Move throttle cable (44A) into position. Tighten nut (44). Install bolt (45) .

12
12. Install cover (42) and bolts (43) .
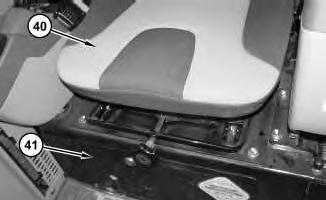
Illustration 13
g01223934
13. Install seat (40). Refer to, "Seat - Remove and Install". Close door (41) .
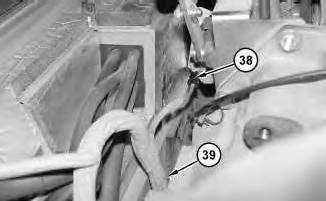
Illustration 14
g01223933
14. Connect harness assembly (38). Connect clamp (39).

Illustration 15
g02149494
15. Connect harness assembly (33). Connect cable straps (34), (35), (36), and (37) .
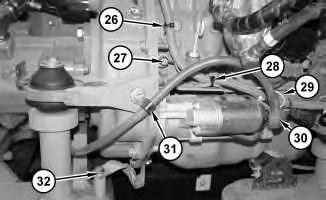
Illustration 16
g01223927
16. Install clip (31). Install cable straps (26) and (28). Connect ground strap (32). Connect harnessassemblies (27), (29), and (30) .
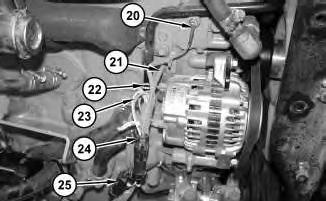
Illustration 17
g01223907
17. Connect harness assemblies (20), (21), (22), (23), (24), and (25) .
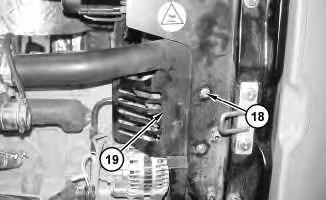
18
18. Install guard (19) and bolts(18) .

19

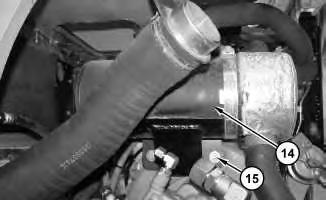
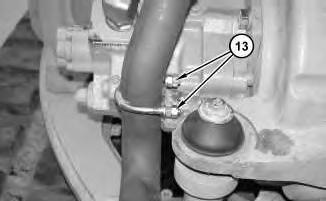
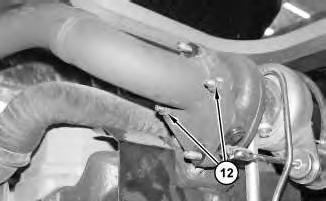

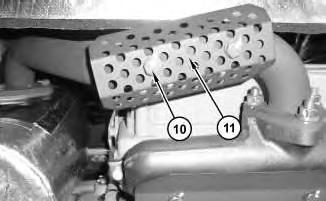
Illustration 24
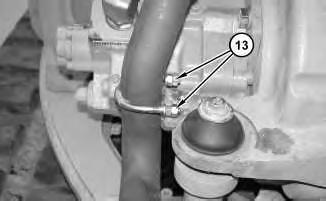
24. Install guard (11) and nuts (10) .
25
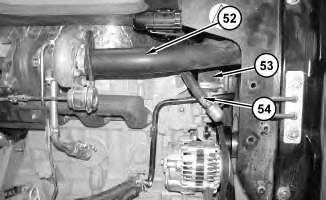
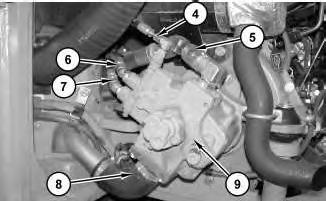
25. Connect hose assemblies(4), (5), (6), and (7) and install hose (8) to main hydraulic pump (9) .
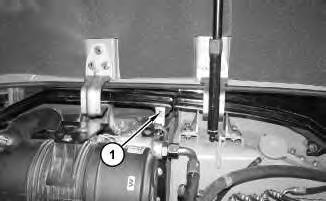
26. Open the side hood and install cover (2). Install bolts (3). Install bolt (1) .
27. Close the side hood.
28. Fill the cooling system. Refer to Operation and Maintenance Manual, "Cooling System Coolant (ELC) - Change".
29. Fill the hydraulic oil system. Refer to Operation and Maintenance Manual, "Hydraulic System Oil - Change".
End By: Install the counterweight. Refer to , "Counterweight - Remove and Install".
1993 - 2020 Caterpillar Inc.
Product: MINI HYD EXCAVATOR
Model: 305.5D MINI HYD EXCAVATOR FLZ
Configuration: 305.5D Mini Excavator FLZ00001-UP (MACHINE) POWERED BY S4Q2T Engine
Disassembly and Assembly
303.5D, 304D, 305.5D and 305D Mini Hydraulic Excavators Engine Supplement Media Number -UENR0101-01
Engine - Remove
SMCS - 1000-011
Removal Procedure
Table 1
Required Tools
Start By:
A. Remove the counterweight. Refer to, "Counterweight - Remove and Install".
1. Drain the hydraulic oil into a suitable container for storage or disposal. Refer to Operation and Maintenance Manual, "Hydraulic System Oil - Change".
2. Drain the engine coolant into a suitable container for storage or disposal. Refer to Operation and Maintenance Manual, "Cooling System Coolant (ELC) - Change".
3. Open the side hood.
1

2
3
5. Disconnect hose assemblies (4), (5), (6), and (7) and remove hose (8) from main hydraulic pump (9) .
This is the sample of the manual
Click on the download link for complete Manual
4
5