
SLICE Studio Project

Page 1


1.0 | Transformable Space

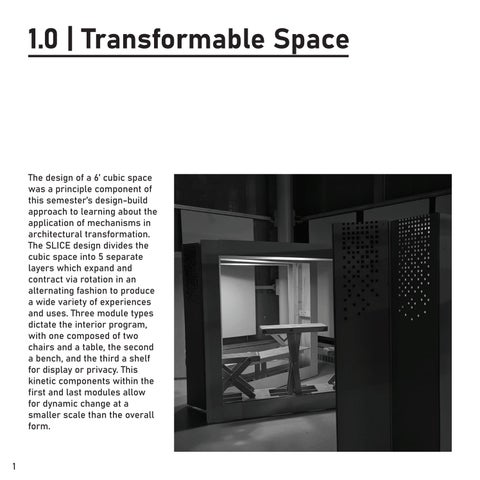
The design of a 6’ cubic space was a principle component of this semester’s design-build approach to learning about the application of mechanisms in architectural transformation. The SLICE design divides the cubic space into 5 separate layers which expand and contract via rotation in an alternating fashion to produce a wide variety of experiences and uses. Three module types dictate the interior program, with one composed of two chairs and a table, the second a bench, and the third a shelf for display or privacy. This kinetic components within the first and last modules allow for dynamic change at a smaller scale than the overall form.

1.4 | Design Application

The final design uses rotational movement to transform expand the base volume with a hinge system. The interior chairs and shelving units apply rotional mechanisms as well, while the table compresses with a grooved sliding system.

5 module_rotate 2_configurations: 10

Drawing

1.5 | Design Concept

Our design does not necessarily change the program of the space as much as the experience within the program types, with shifts in privacy, enclosure, and amount of people the spaces can hold, from a single person to a group. Within experience specifically there is a wide range of interactive potential, from visual and physical privacy to varied levels of enclosure and social adjacencies.

EXPERIENCE

width of modules

4 modules: 18” - 100%

5 modules: 14.4” - 80%

6 modules: 12” - 66.7%

1.7 | Construction Process | Week 6

The time taken to cut out and assemble each frame was progressively faster as we learned our way around the equipment in the woodshop and developed a workflow.

The miter cut joint in all its simple glory
clamps and corner blocks were used to align
All corners were joined at the same time
The first of 10 frames that would be assembled

2.4 | Surface Application in Design

The variation in pixel density both aligns with programmatic logic and hides structure to give a clean finish. The translucent corrugated panel on the interior allows light to pass through while still providng a finish for the interior cladding.

1.7 | Construction Process | Week 12

Before shop vac
Arturo with quarter scale shelf model

| Construction Process | Week 12

Seats being glued and connected
Testing the bench module
Jose painting cladding system
Assembling the remaining frames
Assembled table module with 3d printed lock

1.7 | Construction Process | Week 13

Applying porous cladding to structure

Table leg lock mechanism with 3d printed

1.8 | Gallery Display

The opportunity for students and faculty to see the project and experience the space created was a rewarding moment. The moments of social connection and helpful feedback allowed us to reflect on the process and design while also enjoying the end result. Moving the modules to the gallery was the more difficult element of this segment in the journey, revealing potential revisions that would make transportation easier.

Turn static files into dynamic content formats.

Create a flipbook
SLICE Studio Project by Quincy - Issuu