wire rope clips
safe. simple. on-site ready. Certified safety – Complies with ASME B30.26 and EN 13411-5 Type B (formerly US Fed. Spec. FF-C-450D) Full traceability – Each batch marked with an identification code, linked to the pewag online certification tool Maximum corrosion protection – Entire clip hot-dip galvanized, with powder-coated U-bolt for enhanced durability
Product features: • • •
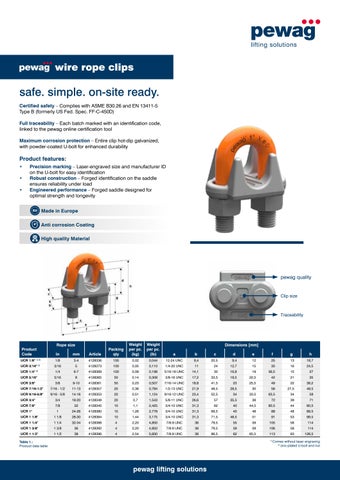
Precision marking – Laser-engraved size and manufacturer ID on the U-bolt for easy identification Robust construction – Forged identification on the saddle ensures reliability under load Engineered performance – Forged saddle designed for optimal strength and longevity Made in Europe Anti corrosion Coating High quality Material
pewag quality
Clip size
Traceability
Article
Packing qty
Weight per pc. (kg)
Weight per pc. (lb)
a
b
c
d
e
f
g
h
4128336
100
0,02
0,044
12-24 UNC
9,4
20,5
9,4
12
25
13
18,7
30
16
24,5
36,5
15
27
Rope size
Dimensions [mm]
Product Code
In
mm
UCR 1/8" 1) 2)
1/8
3-4
UCR 3/16" 2)
3/16
5
4128373
100
0,05
0,110
1/4-20 UNC
11
24
12,7
15
UCR 1/4" 2)
1/4
6-7
4128369
100
0,09
0,198
5/16-18 UNC
14,1
30
16,8
19
UCR 5/16"
5/16
8
4128365
50
0,14
0,309
3/8-16 UNC
17,2
33,5
18,5
22,5
42
21
35
UCR 3/8"
3/8
9-10
4128361
50
0,23
0,507
7/16-14 UNC
18,8
41,5
23
25,5
49
22
38,2
UCR 7/16-1/2"
7/16 - 1/2
11-13
4128357
20
0,36
0,794
1/2-13 UNC
21,9
48,5
28,5
30
58
27,5
48,5
UCR 9/16-5/8"
9/16 - 5/8
14-16
4128353
20
0,51
1,124
9/16-12 UNC
23,4
52,5
34
33,5
63,5
34
58
UCR 3/4"
3/4
18-20
4128349
20
0,7
1,543
5/8-11 UNC
26,6
57
35,5
38
72
39
71
UCR 7/8"
7/8
22
4128345
10
1,1
2,425
3/4-10 UNC
31,3
62
40
44,5
80,5
44
80,5
UCR 1"
1
24-26
4128380
10
1,26
2,778
3/4-10 UNC
31,3
66,5
45
48
88
48
89,5
UCR 1 1/8"
1 1/8
28-30
4128384
10
1,44
3,175
3/4-10 UNC
31,3
71,5
48,5
51
91
53
99,5
UCR 1 1/4"
1 1/4
32-34
4128388
4
2,20
4,850
7/8-9 UNC
36
79,5
55
59
105
58
114
UCR 1 3/8"
1 3/8
36
4128392
4
2,20
4,850
7/8-9 UNC
36
79,5
59
59
106
58
114
UCR 1 1/2"
1 1/2
38
4128396
4
2,54
5,600
7/8-9 UNC
36
86,5
62
65,5
113
63
126,5
1)
Table 1.: Product data table
pewag lifting solutions
Comes without laser engraving 2) zinc-plated U-bolt and nut