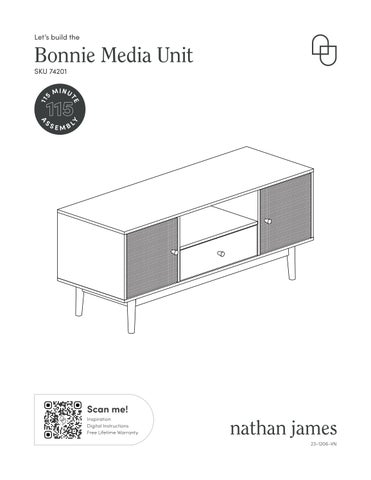
Let’s build the
Bonnie Media Unit SKU 74201 5
MINU
SEMBL
Y
11
A
S
TE
115
Scan me! Inspiration Digital Instructions Free Lifetime Warranty 23-1206-VN
Ok, let’s get rolling
What’s included
This should be easy, just follow our instructions and you will be back to Netflix in no time.
Estimated time for assembly
115:00 What you need
Description
Qty
1
Top Panel
1
2
Bottom Unit
1
3
Left Side Panel
1
4
Right Side Panel
1
5
Left Division Panel
1
6
Right Division Panel
1
7
Shelf
1
8
Side Back Panel
2
•
Some of your favourite bubbly or your preferred relaxant
•
Use the packaging carton as a working surface to prevent product damage during assembly
9
Middle Back Panel
1
10
Doors
2
Phillips head screwdriver
11
Legs
4
12
Drawer Front Panel
1
13
Drawer Left Side Panel
1
14
Drawer Right Side Panel
1
15
Drawer Back Panel
1
16
Drawer Bottom Panel
1
•
Do not use a drill
Weight Limitation
90 11 lbs table top
lbs drawer
33
lbs cabinet
Toll-free at 1-866-619-1004 Help@nathanjames.com Nathanjames.com/help
Scan me! Inspiration Digital Instructions Free Lifetime Warranty
2
The goods
IMPORTANT 1. Do not tighten bolts / screws completely until all bolts / screws are lined up and inserted into holes. 2. Do not over tighten screws and bolts to avoid stripping. 3. Please use hand tools to assemble this product. Do not use power tools. 3
What’s included Description
Qty
A
Cam Bolt
16
B
Cam Lock
16
C
M6*30mm Wood Dowel
20
D
M4*12mm Screw
24
E
M3.5*10mm Screw
12
F
M4*35mm Screw
8
G
Door Stop
2
H
Hinge
4
I
M6*50mm Bolt
8
J
Flat Washer
8
K
Knob
3
L
M4*25mm Bolt
2
M
Drawer Runner
1
N
M4*16mm Bolt
1
O
M4*30mm Screw
4
P
M3*12mm Screw
4
Q
Allen Key
1
R
Spring Washer
8
Scan me! Inspiration Digital Instructions Free Lifetime Warranty
4
The goods A
B
F
G
K
N
C
H
L
O
D
I
E
J
M
P
Q
IMPORTANT 1. Do not tighten bolts / screws completely until all bolts / screws are lined up and inserted into holes. 2. Do not over tighten screws and bolts to avoid stripping. 3. Please use hand tools to assemble this product. Do not use power tools.
5
R
Step 1 Alright, time to get started! But first things first, grab a snack. A hungry furniture assembler is never a good thing. Place the Top Panel (1) on the floor and screw the Cam Bolts (A) into their corresponding holes. Next, attach the Door Stops (G) to the left and right side using the M3.5*10mm Screws (P).
Insider tip: Anywhere you see this icon, it means we recommend using a screwdriver.
A
P P G
A
A
A
P
A
G
A
A
A
1
P P
P
G
6
Step 2 Don’t worry, this step is a lot simpler than it looks. Now we’re going to attach the Drawer Runners (M) to the Left Division Panel (5) and Right Division Panel (6) using the M3.5*10mm Screws (E). Pay careful attention to the labels CL and CR, written on each of the Drawer Runners (M). The Runner labeled CL should be attached to the Left Division Panel (5) and the Runner labeled CR should be attached to the Right Division Panel (6). After you’ve attached the Drawer Runners (M), secure the Cam Locks (A) into their corresponding holes. Helpful tip: The “C” in CL and CR stands for Cabinet, so you’ll attach the CL and CR to the cabinet. You’ll be using the DL and DR Drawer Runners in a later step.
CR
CL
E
Front
E
E 6 CR
(CR) 5
E
M
Back
E
Back
E CL
Front
A
A
(CL)
M
A
E E
5
E
E
A E
6
E
CR
M
(CR)
CL
E
E
E
M
(CL)
E
7
E
E
Step 3 Now it’s time to start putting together some of these panels! Also, did you eat your snack already? We’re not judging, we ate ours in step 2. Insert the 6*30mm Wood Dowels (C) into their corresponding holes in the sides of the Shelf (7). Then, attach the Left Division Panel (5) and Right Division Panel (6) to the Shelf (7) by aligning the Wood Dowels (C) with the corresponding holes in the division panels. Secure these together using the Cam Locks (B) by inserting them into the corresponding holes in the Shelf (7) and tighten.
6
C B C 7
B C B C 5 B
8
How to use cam locks
Did you know? Cam locks are used to join two panels together, usually the edge of one to the flat side of another.
First, your cam bolt (or cam pin) will need to be properly inserted into the flat side of the board. Important Note: Only tighten the cam bolt until it is secure. Do not over-tighten.
Next, you will fit the proper hole on the edge of the associated joining panel over the cam bolt. Important Note: When installed properly, the head of the cam bolt will be visible through the larger hole on the side of the joining panel.
Next, you will notice the cam lock has a “C” shaped back. Commonly, an arrow on the front of the cam lock points in the same direction as the open section on back. Using these as your cue, insert the cam lock into the large hole so the opening of the “C” fits over the head of the cam bolt.
Using a screwdriver, you will turn the cam lock until it stops, usually between 130º or 180º. You will feel the panels pulling closer until they are secured. Important Note: Only turn the cam lock until the panels are fully engaged & feel secure. Turning too far may lead to hardware failure.
Still having issues?
If a cam lock seems to be spinning in place or is not “catching” or pulling the p anels together as expected first remove the cam lock & try again while making sure that everything is properly positoned & oriented .
,
If you are still having issues get ting things work ing as expected, first remove the cam lock then unscrew the cam bolt slightly (less than 1 complete turn) to see if that helps with the alignment of the cam lock & bolt .
9
Step 4 Get excited, now is when this baby really starts coming together! Place the Top Panel (1) on the ground with the Door Stops (G) facing up. Insert 8 of the 6*30mm Wood Dowels (C) into the corresponding holes in the Top Panel (1). Attach the Right Side Panel (4), the middle section you assembled in Step 3, and the Left Side Panel (3) to the Top Panel (1) by aligning the holes with the Wood Dowels (C) you just inserted and the Cam Bolts (A) you secured in Step 1. Refer to the illustration below for correct alignment. Once these are aligned, secure in place using the Cam Locks (B).
3 5
B
6
B
4
C
C B
C
C
B
C 1
C
C G
10
G
C
Step 5 This one should be a piece of cake! Slide the Side Back Panels (8) and Middle Back Panel (9) into the slots in the cabinet you assembled in Step 4.
8 9 8
11
Step 6 You’re almost halfway done! We’re so proud of you. Now it’s time to attach the Bottom Unit (2) to the rest of the cabinet you’ve assembled by first inserting 6*30mm Wood Dowels (C) into the corresponding holes in the side of the cabinet. Once aligned, secure in place using the M4*35m Screws (F).
F F
F F F F
F F
2 C
C C C
C
C
C 3
C
5
6 4
12
Step 7 Time to add the legs! Secure the Legs (11) to the Bottom Unit (2) using the 6*50mm Bolts (I). First place the a Flat Washer (J), then a Spring Washer (R), then the 6*50mm Bolt (I). Tighten using the provided Allen Key (Q). Repeat this process for all 4 legs, using 2 bolts per leg.
11 J J
R
11
R
I I
Q Q 11
2 Q 11
13
Step 8 Hinge time! Attach the Hinges (H) to the Doors (10) using the M4*12mm Screws (D).
14
Step 9 You’re so close to the finish line we can taste it! Or maybe that’s the snack we ate earlier…either way, it’s time to attach those doors! Attach the Doors (10) to the Left Side Panel (3) and Right Side Panel (4) by securing the Hinges (H) using the M4*12mm Screws (D). Repeat this for all hinges on both doors (you’ll use a total of 4 screws per hinge). Once complete, attach the Knobs (K) to the Doors (10) using the 4*25mm Bolts (L).
15
Is your cabinet door looking crooked or unevenly spaced? Then you’ve come to the right place. Follow the illustrations below to get your cabinet door aligned and ready for action.
If your door is too low or too high…
Loosen the height screws, then move the door up or down to make it level.
If the space between your doors is off…
Loosen the side-to-side screws, then screw counter-clockwise to make the gap wider or clockwise to close any gaps.
If you need to adjust the depth of the doors…
Adjust the in-and-out screws until the door is aligned with the side of the cabinet.
16
Step 10 Now it’s time to assemble the drawer. Attach the Drawer Left Side Panel (13) and Drawer Right Side Panel (14) to the Drawer Back Panel (15) using the M4*30mm Screws (O).
O
Once secure, slide the Drawer Bottom Panel (16) into place.
O 14
15
O
13
O 15 13
14
16
Step 11 Next, screw the Cam Bolts (A) into the corresponding holes in the Drawer Front Panel (12). Align those Cam Bolts (A) with the corresponding holes in the Drawer Left Side Panel (13) and Drawer Right Side Panel (14). Secure in place using the Cam Locks (B). A A
B 12
A
B
14
A 13 B B
17
12
Step 12 Remember those Drawer Runners we mentioned in Step 2? Time to put those to use! Attach the Drawer Runners (M) to the sides of the drawer using the M3.5*10mm Screws (E). The Runner labeled DL should be attached to the left side, while the Runner labeled DR should be attached to the right side. M E
(DL) E
E
DL
E
E
E E
E
E
M (DR) DR
DR
15
14 E
DL
E
E
DR
Step 13 You’ve made it to the final step! We made this step super easy, because you deserve it. Attach the Knob (K) to the drawer you’ve just assembled using the M4*16mm Bolt (N). Slide the drawer into place, and voila! You’ve got yourself a new media unit!
18
No heartburn, when we handle the return Give us a call 1-866-619-1004 or shoot us a message at help@nathanjames.com we will issue you a free replacement with zero hassle.
Our way
Their way
Give us a call
Re-package item
Replacement
Schedule pick up
You
Track package Replacement You
We really don’t want you to go through the hassle of re-packaging your item and sending it back, because let’s be honest…nobody has time for that.
19
Safety first, fun later We want your Bonnie Media Unit to last as long as possible, so we recommend that you tighten the screws 2 weeks after assembly and for added safety check the tightness of all screws every 2 months. For proper care and treatment please check our website at NathanJames.com/products
Safe use of this product starts with you.
Do not modify the structure of this product in any way.
Use this Bonnie Media Unit responsibly with the primary concern for your safety. Follow assembly instructions carefully and inspect product upon receipt and each use.
Our products have been tested to meet specific safety measures as they were originally intended to be sold. Any modifications will present the risk of creating significant safety issues which NJ will not be responsible for.
Nathan James and its parent companies cannot be held legally responsible for any injuries or death resulted from failure to follow instructions or improper use of this product.
Proper use
DO NOT
use for commercial purposes
DO NOT
frolic on media unit
DO NOT
use media unit as foot stool
DO NOT
leave spilled liquid on media unit
DO NOT
use media unit if damaged
DO NOT
make temporary repairs
DO NOT
use outdoors
20
We are only in business if you’re happy For starters, thanks for being you. Toll-free at 1-866-619-1004 Help@nathanjames.com NathanJames.com/help
We do our best to ensure your furniture arrives without any problems, but occasionally mistakes happen—as humans we are imperfect beings. In the event that a part is damaged or missing, we will be more than happy to provide you with replacement part(s) for free.
Warranty This product comes with a lifetime warranty from the date of purchase. Please use your phone to scan the QR code to register your product or visit https://goo.gl/i9dk3q
Did we do alright? Please spread the love! If you are happy with your product, tell your friends and family about us or even better leave us a review online. Spreading the word gives us the opportunity to make more people happy and keep our prices low for your next purchase.
Brooklyn Burdon Founder, Nathan James
21