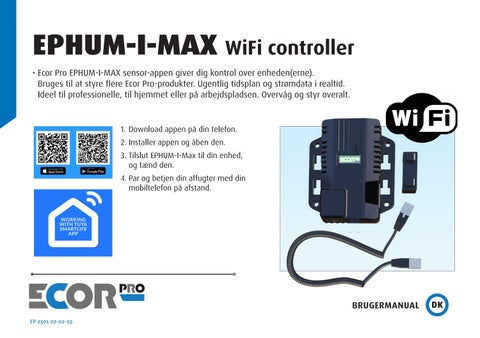
EPHUM-I-MAX WiFi controller
•The Ecor Pro EPHUM-I-MAX sensor App puts you in control of the device(s).
Ecor Pro EPHUM-I-MAX sensor-appen giver dig kontrol over enheden(erne).
Used to control multiple Ecor Pro products. Weekly schedule and real time power data performance.
Bruges til at styre flere Ecor Pro-produkter. Ugentlig tidsplan og strømdata i realtid.
Ideal for the professional user for Homes or the Workplace.
Ideel til professionelle, til hjemmet eller på arbejdspladsen. Overvåg og styr overalt.
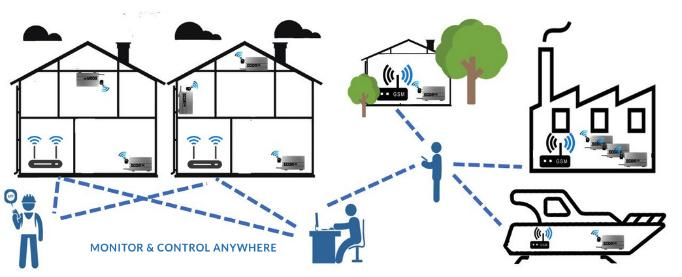
Monitor and control anywhere.

1) Download App on your telephone
1. Download appen på din telefon.
2) Open App and install the App
2. Installer appen og åben den.
3) Connect EPHUM-I-Max to your device and switch on
3. Tilslut EPHUM-I-Max til din enhed, og tænd den.
4) Pair and control your Dehumidifier with your Mobile Phone on distance.
4. Par og betjen din affugter med din mobiltelefon på afstand.
GEBRAUCHSANWEISUNG

EPHUM-I-MAX - Tilslutning
EPHUM-I-MAX - How to connect
EPHUM-I-MAX Wifi
hygrostat og temperaturmonitor (til EPDXXX RESTO, MAX og LGR modeller)
EPHUM-I-MAX Wifi Humidistat and Temperature Monitor (for EPXXX RESTO and EPXXX MAX Models)
Lavspændings-hygrostat (12 V) til EPDXXX RESTO, MAX og
LGR enheder. Giver fuld fjernstyring af enheden via WiFiforbindelse. Anvender standard-WiFi, så der pålægges ingen dataafgifter, forudsat at der er LAN- eller dongleinternetforbindelse til rådighed. Virker kun på 2,4 GHz sammen med Apple- eller Android-smartphone via den gratis EPHUM-I-MAX-app (se de følgende sider).
Low voltage (12V) humidistat for EPXXX RESTO & MAX units. Allows full remote control of the appliance via WiFi link. Uses standard wifi so no data charge provided than lan or dongle internet connection is available to connect to. Works on 2.4 GHz only together with Apple or Android smartphone with free EPHUM-I-MAX App (See next pages).
Lille knap i hvid cirkel.
Small button in white circle.
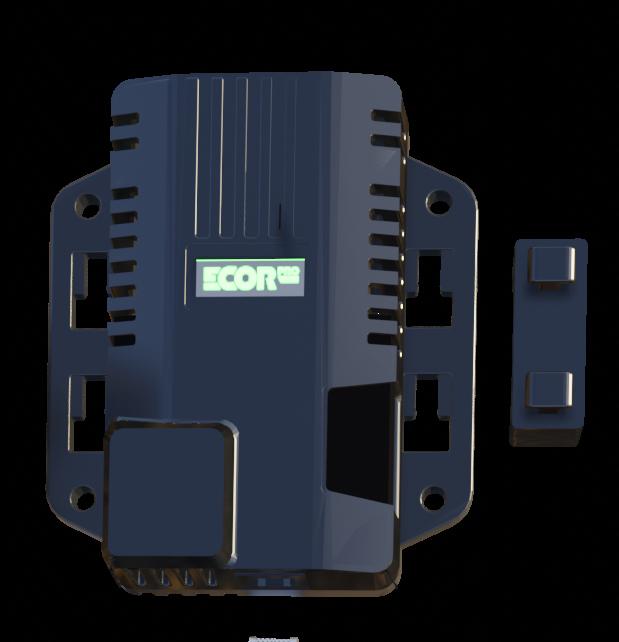
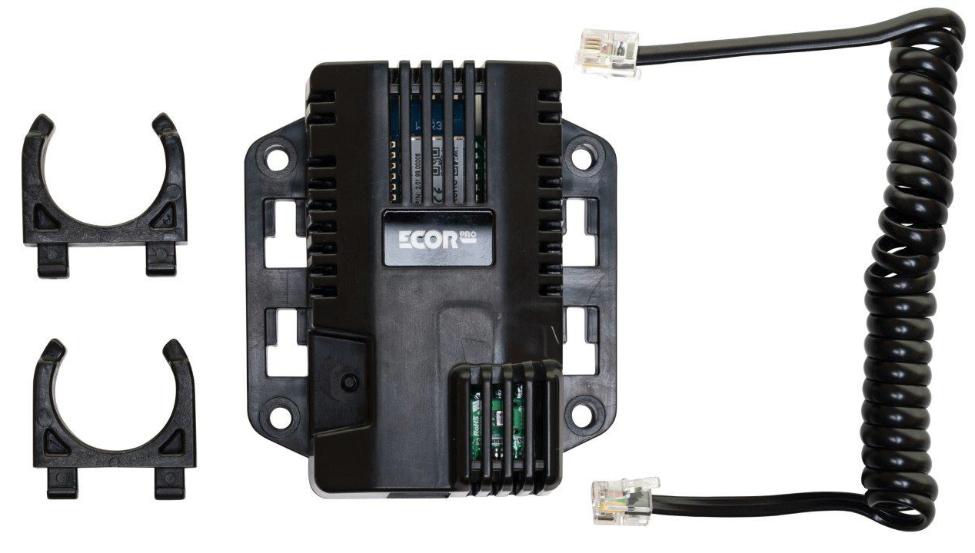
Wall mounted or clips can be slotted in to be able to connect to the front grill or on handle bars where fitted.
Kan vægmonteres, eller clips kan indsættes, så den fastgøres til frontgitteret eller håndtagene.
Bemærk: Den største forskel mellem 2,4 GHz og 5 GHz afgør i praksis, hvilken frekvens du bør bruge hvornår. Med 2,4 GHz får du bedre rækkevidde og en lidt lavere internethastighed.
Derfor er det en god idé at bruge 2,4 GHz til din telefon.
Note: The biggest difference between 2.4 GHz and 5 GHz also immediately determines which frequency you use when. With 2.4 GHz you have better range and slightly slower internet. That's why it's smart to use 2.4 GHz for your phone. The EPHUM-I-MAX only works on 2.4 GHZ.
EPHUM-I-MAX fungerer kun på 2,4 GHz.
One Mobile Phone can control hundreds of Ecor Pro appliances using the EPHUM-I-MAX in world locations.
Én mobiltelefon kan styre hundredvis af Ecor Pro-enheder ved hjælp af EPHUM-I-MAX på lokationer verden over.
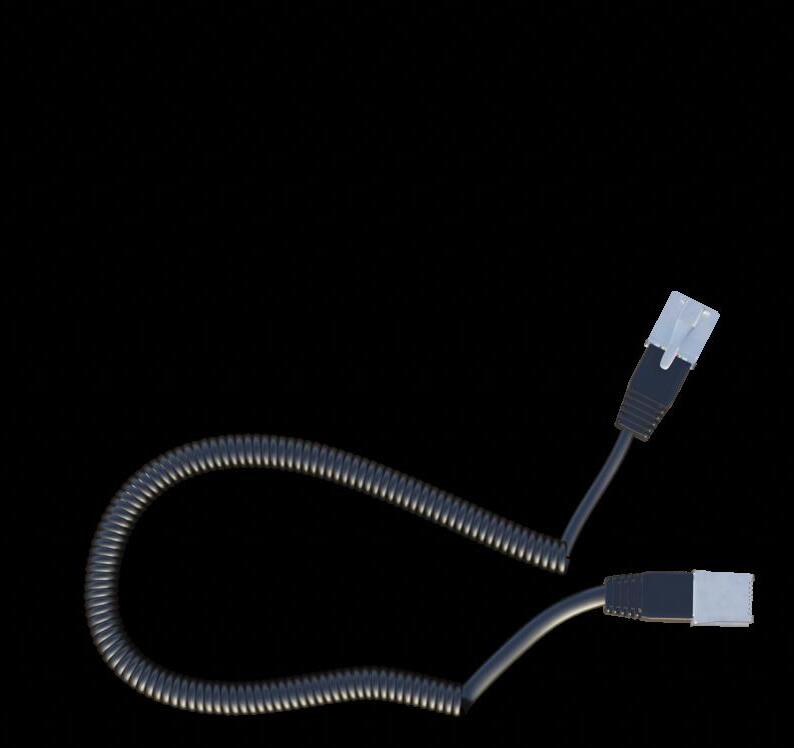
Spiralkablet leveres med to RJ11-stik.
Kablet kan forlænges op til 7 meter.
The curley cable comes with two RJ11 connectors. Cable can be extended up to 20’/7m.
Installed in Seconds:
Installeres på få sekunder:
Sæt det ene RJ11-stik i EPHUM-I-MAX og det andet i din affugter.
Sæt kontakten på affugteren til ekstern styring (hvid prik nedad på knappen nær stikket). Tænd affugteren, og EPHUM-I-MAX er nu tilsluttet. Displayet lyser op. Se manualen til din affugter for indstillinger og optimal drift.
Put one RJ11 connector in the EPHUM-I-MAX and the other one in your dehumidifier. Set the switch on the dehumidifier to extern control (white dot down on the button near the connector). Switch the dehumidifier on and EPHUM-I-MAX is now connected. The display lights up. See the manual of your dehumidifier for the settings and best operation.
Bemærk, at der er indbygget en tolerancefaktor på 5% i alle affugtere. Ved en relativ luftfugtighed tæt på 100% vil hygrostaten reelt ikke tænde affugteren. Ved en meget lav indstilling vil hygrostaten i praksis lade affugteren køre kontinuerligt. Fugtprocenten relaterer sig til luftens relative fugtighed, også kaldet RH%.
Please note there is a 5% tolerance factor built into every dehumidifier. At near 100% RH the humidistat will effectively not turn the humidistat on. At a very low setting the humidistat will effectively turn the dehumidifier on continuously. The humidity percentage relates to the relative humidity level of the air sometimes referred to a RH%.
PUT
Sæt EPHUM-I-MAX i parringstilstand (se de næste sider). Tilslut EPHUM-I-MAX til enheden, og tænd for strømmen. Hvis der ikke findes en WiFi-forbindelse, vil EPHUM-I-MAX blinke rødt. For at tilslutte til en ny mobiltelefon skal du holde den lille knap i fingerfordybningen nede i 10 sekunder og derefter slippe den. Efter yderligere 10 sekunder vil EPHUM-I-MAX blinke hvidt.
SENSOR IN WHITE
FLASH
Den er nu i parringstilstand og kan findes via mobiltelefonens Smart Life-app.
PAIRING MODE (See next pages). Connect EPHUM-I-MAX to unit and switch on the power. If no connection to wifi found the EPHUM-I-MAX will flash red. To connect to a new Mobile Phone hold down the small button in the finger recess for 10 seconds and release. A further 10 seconds later the EPHUM-I-MAX will flash white. It is then in paring mode and can be discovered via the Mobile Phone Smart Life App.
DOWNLOAD AND INSTALL APP
DOWNLOAD AND INSTALL APP
1) Download TUYA Smart Life App on your mobile telephone
1) Download TUYA Smart Life App on your mobile telephone
1. Download TUYA Smart Life-appen på din mobiltelefon.
2. Åbn appen, accepter vilkårene og log ind, indtast dine oplysninger, og giv tilladelse til at bruge din placering.
2) Open App, agree and sign in, add your details, agree to use your location.
ADD YOUR ROUTER PASSWORD
ADD YOUR ROUTER PASSWORD
TILFØJ DIN ROUTERS ADGANGSKODE
2) Open App, agree and sign in, add your details, agree to use your location.
3. Tilslut EPHUM-I-MAX til enheden, og tænd for strømmen.
Hvis der ikke findes en WiFi-forbindelse, vil
3) Connect EPHUM-I-MAX to unit and switch on the power. If no connection to wifi found the EPHUM-I-MAX will flash red.
EPHUM-I-MAX blinke rødt.
3) Connect EPHUM-I-MAX to unit and switch on the power. If no connection to wifi found the EPHUM-I-MAX will flash red.
For at tilslutte til en ny mobiltelefon skal du holde den lille knap i fingerfordybningen nede i 10 sekunder og derefter slippe den.
To connect to a new Mobile Phone hold down the small button in the finger recess for 10 seconds and release.
To connect to a new Mobile Phone hold down the small button in the finger recess for 10 seconds and release.
Efter yderligere 10 sekunder vil EPHUM-I-MAX blinke hvidt.
SÆT SENSOR I HVID BLINKENDE PARRINGSTILSTAND.
A further 10 seconds later the EPHUM-I-MAX will flash white. PUT SENSOR IN WHITE FLASH PAIRING MODE. It is then in paring mode and can be discovered via the Mobile Phone Smart Life App.
A further 10 seconds later the EPHUM-I-MAX will flash white. PUT SENSOR IN WHITE FLASH PAIRING MODE. It is then in paring mode and can be discovered via the Mobile Phone Smart Life App.
Den er nu i parringstilstand og kan findes via mobiltelefonens Smart Life-app.
Det anbefales at placere mobiltelefonen tæt på EPHUM-I-MAX under parringen. Søgningen kan tage op til 30 sekunder, men når du er tæt på, kan det tage mindre end 5 sekunder.
TILFØJ
DINE WIFI-OPLYSNINGER
Suggest placing Mobile Phone close to the EPHUM-I-MAX for pairing. Discovery may take up to 30 seconds but being close by can take less than 5 seconds.
Suggest placing Mobile Phone close to the EPHUM-I-MAX for pairing. Discovery may take up to 30 seconds but being close by can take less than 5 seconds.
ADD YOUR WIFI INFORMATION.
Din WiFi-forbindelse skal være på 2,4 GHz. Kontakt din internetudbyder for at få vejledning i, hvordan du opretter en 2,4 GHz-forbindelse, da de fleste routere anvender både 5,0 og 2,4 GHz. Bemærk, at dette er den primære årsag til, at EPHUM-I-MAX kan have problemer med at blive parret med Smart Life-appen på dette trin.
ADD YOUR WIFI INFORMATION. Your Wifi connection must be 2.4GHz connection speed. Check with your router provider how to make a 2.4GHz connection as most routers will be both 5.0 & 2.4GHz. Please note this will be the main reason the EPHUM-I-MAX fails to pair with the Smart Life App at this stage.
Your Wifi connection must be 2.4GHz connection speed. Check with your router provider how to make a 2.4GHz connection as most routers will be both 5.0 & 2.4GHz. Please note this will be the main reason the EPHUM-I-MAX fails to pair with the Smart Life App at this stage.
This allows the EPHUM-I-MAX to gain access to the router that it will be using for connection to the wifi. The connection takes some time around 1 minute once device is located.
This allows the EPHUM-I-MAX to gain access to the router that it will be using for connection to the wifi. The connection takes some time around 1 minute once device is located.
Dette giver EPHUM-I-MAX adgang til den router, der skal bruges til WiFi-forbindelsen. Forbindelsen tager lidt tid – cirka 1 minut, når enheden er fundet.
ÆNDR NAVN
CHANGE ITS NAME
CHANGE ITS NAME
Hvis du har mere end én enhed, kan du navngive dem efter hjemmelokation, opgavereference eller adressen, hvor enheden bruges, ved at klikke på blyantsymbolet.
If you have more than one device you can name them to home location, job reference or address the device is in using by clicking on the pencil.
If you have more than one device you can name them to home location, job reference or address the device is in using by clicking on the pencil.
NAVNET ER NU ÆNDRET – ÅBN
CHANGED NAME NOW OPEN
CHANGED NAME NOW OPEN
Det tager omkring 15 sekunder at åbne appen.
It will take around 15 seconds to open the App. That is because it loads the latest version of the Ecor Pro App and checks connections.
Det skyldes, at den indlæser den nyeste version af Ecor Pro-appen og kontrollerer forbindelserne.
APPEN ER NU KLAR TIL BRUG
It will take around 15 seconds to open the App. That is because it loads the latest version of the Ecor Pro App and checks connections.
APP NOW READY TO USE
APP NOW READY TO USE
Du og din mobiltelefon kan nu befinde jer hvor som helst i verden med en dataforbindelse, og appen vil styre den enhed, der er tilknyttet EPHUM-I-MAX.
You and your Mobile Phone can now be anywhere in the world with a data signal and the App will control the device linked to EPHUM-I-MAX. One Mobile Phone can control hundreds of Ecor Pro appliances using the EPHUM-I-MAX in world locations.
You and your Mobile Phone can now be anywhere in the world with a data signal and the App will control the device linked to EPHUM-I-MAX. One Mobile Phone can control hundreds of Ecor Pro appliances using the EPHUM-I-MAX in world locations.
Én mobiltelefon kan styre hundredvis af Ecor Pro-enheder ved hjælp af EPHUM-I-MAX på lokationer verden over.
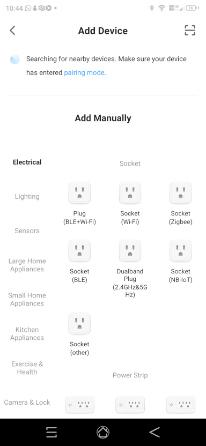
Hold den lille knap i fingerfordybningen nede i 10 sekunder, og slip den derefter.
Hold down the small button in the finger recess for 10 seconds and release.
Hold down the small button in the finger recess for 10 seconds and release.
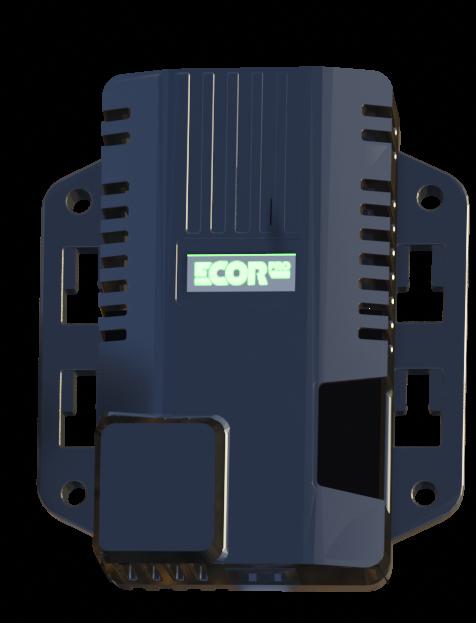
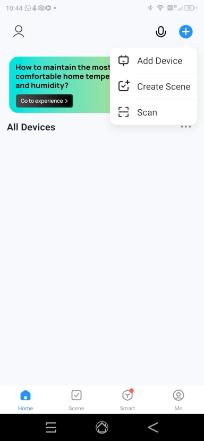
Rather than a manual selection of the device, easiest is to select first option Add Device.
I stedet for manuelt at vælge enheden er det nemmest at vælge den første mulighed, Add Device.
Rather than a manual selection of the device, easiest is to select first option Add Device.
SAFETY The EPHUM-I-MAX works on 12V, so safe to use.
OPENING SCREEN
EPHUM-I-MAX arbejder på 12 V og er
sikker at anvende.
Hvis du klikker på logoet, bliver du ført til Ecor Pro’s hjemmeside.
Clicking on the logo will take you to the Ecor Pro website
By clicking on the pencil the device name can be changed
Ved at klikke på blyantsymbolet kan enhedens navn ændres.
Dine telefonoplysninger vises på første linje.
Your phone details on first line
Device name, can be changed by pencil
Enhedsnavnet kan ændres via blyantsymbolet.
Drop indicates humidity control selected.
Set the humidity level you wish to achieve down to be pressing the green dot next to %.
Dråbeikonet viser, at fugtstyring er valgt. Indstil den ønskede luftfugtighed ved at trykke på den grønne prik ved siden af %.
Slide to the desired level and then press confirm. See next pages.
Slide til det ønskede niveau, og tryk derefter på Bekræft.
Se de næste sider.
Viser enhedens status, når den styres efter relativ luftfugtighed (RH%).
Showing status of unit on being controlled by relative humidity level (RH%).
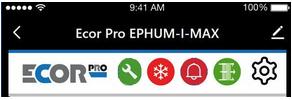
On/Off. Mode of operation whether controlled by temperature, manual or humidity indicated here.
Tænd/Sluk. Driftstilstanden – om den styres efter temperatur, manuelt eller efter fugtighed – vises her.
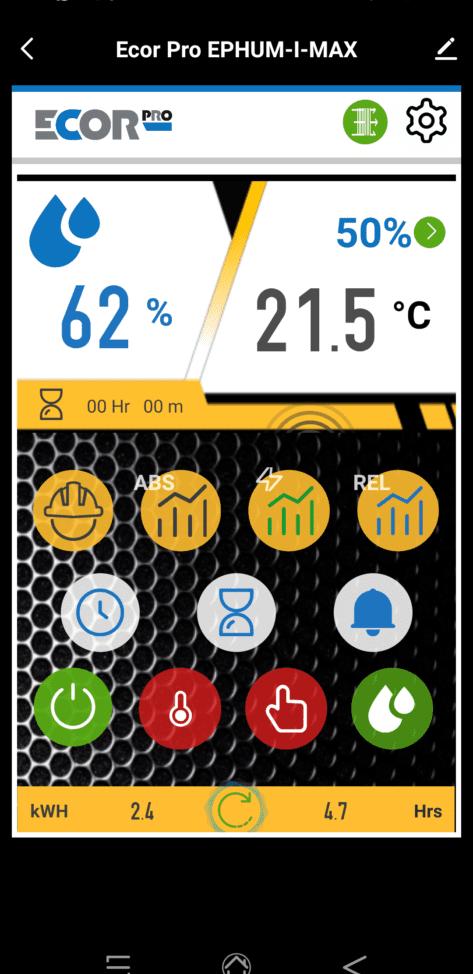
The cog symbol will take you to the settings page
Tandhjulssymbolet fører dig til indstillingssiden.
Grafik over forbindelsen til enheden via WiFi.
Graphic of the connection to the unit via wifi.
EN RØD STATUSLINJE VISES, NÅR DEN INTERNE TEMPERATUR OVERSTIGER 40°C. DETTE INDIKERER EN FEJL SOM FØLGE
AF BLOKERET LUFTSTRØM, ELLER AT PROCESLUFTEN ER FOR VARM.
A RED STATUS BAR WILL APPEAR WHEN INTERNAL TEMPERATURE EXCEEDS 40°C/ 104°F. THIS WILL INDICATE A FAULT OF BLOCKED AIR FLOW OR PROCESS AIR IS TOO HOT. THE DEHUMIDIFIER WILL WILL CONTINUE TO RUN IN FAN ONLY UNTIL THE INTERNAL TEMPERATURE DECREASES.
AFFUGTEREN VIL FORTSÆTTE MED AT KØRE KUN MED VENTILATOR, INDTIL DEN INTERNE TEMPERATUR FALDER.
STARTSKÆRM (1)
OPENING SCREEN (1)
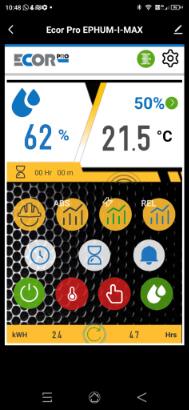

Clicking on the logo will take you to the Ecor Pro website
+
Hvis du klikker på logoet, bliver du ført til Ecor Pro’s hjemmeside.
Main - TOP
Hovedmenu - TOP

Link til Ecor Pro-siden for fejlfinding.
Link to the Ecor Pro Page for trouble shooting faults. Only appears when an internal device fault causes overheating
Vises kun, når en intern enhedsfejl medfører overophedning.
First row. Your standard phone status bar. Not part of the App.
Første række: Din telefons standard statuslinje. Ikke en del af appen.
Device name. By clicking on the pencil the device name can be changed. Unlimited number of devices can be controlled with one phone or linked to computer with specialized serial interface.
Enhedsnavn. Ved at klikke på blyantsymbolet kan enhedens navn ændres. Et ubegrænset antal enheder kan styres fra én telefon eller tilkobles en computer via en specialiseret seriel grænseflade.


Frostadvarsel / temperaturadvarsel, hvis den er aktiveret (grøn) på indstillingssiden.
Frost warning / Temperature warning if set green on Settings page.
- Snowflake Red/White if freezing or below.
- Snefnug rød/hvid ved frost eller derunder.
- Amber if below 5°C/41°F
- Heat Symbol Amber above 35°/95°F
- Amber (gul/orange) ved temperaturer under 5°C.
- Red if above 40°C/95°F
- Hidden otherwise
- Varmesymbol amber over 35°C.
THESE ARE EXTERNAL
- Rød over 40°C.
SENSOR READINGS
- Skjult ellers.
DETTE ER AFLÆSNINGER FRA DEN EKSTERNE SENSOR.
Alarm for humidity or temperature warning set on the Settings page. Either temperature or humidity is too High (Hi) or too Low (Lo)
Alarm for fugtighed eller temperatur, indstillet på indstillingssiden.
Enten er temperaturen eller luftfugtigheden for høj (Hi) eller for lav (Lo).
Filterindikator. Nedtælling over 90 dage. Kan nulstilles når som helst efter filterrengøring.
Filter indicator.. Countdown over 90 days. Can be reset after filter cleaning anytime.
Green/White - filter < 30 days
Grøn/hvid - filter < 30 dage.
Green/Grey - filter 30 - 60 days
Grøn/grå - filter 30 - 60 dage.
Red/White - filter needs cleaning > 90 days
Rød/hvid - filter skal rengøres > 90 dage.
TIMER FUNCTION ONLY. NOT BASED ON AIR FLOW. DATA HELD INSIDE UNIT
KUN TIMERFUNKTION. IKKE BASERET PÅ LUFTGENNEMSTRØMNING. DATA GEMMES I ENHEDEN.
The cog symbol will take you to the settings page
Tandhjulssymbolet fører dig til indstillingssiden.
STARTSKÆRM (2)
OPENING SCREEN (2)
OPENING SCREEN (2)
Main - UPPER
Hovedmenu - ØVERST
Main - UPPER

Dråbeikonet viser, at fugtstyring er valgt. Indstil den ønskede luftfugtighed ved at trykke på den grønne prik ved siden af %. Slide til det ønskede niveau, og tryk derefter på confirm.
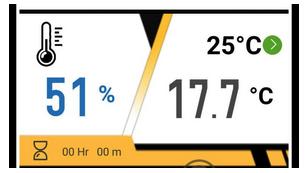
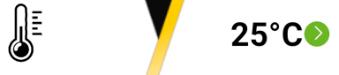
Drop indicates humidity control selected. Set the humidity level you wish to achieve down to be pressing the green dot next to %. Slide to the desired level and then press confirm.
Drop indicates humidity control selected. Set the humidity level you wish to achieve down to be pressing the green dot next to %. Slide to the desired level and then press confirm.
Drop indicates humidity control selected. Set the humidity level you wish to achieve down to be pressing the green dot next to %. Slide to the desired level and then press confirm.
Drop indicates humidity control selected. Set the humidity level you wish to achieve down to be pressing the green dot next to %. Slide to the desired level and then press confirm.

Showing status of unit on being controlled by relative humidity level (RH%)
Viser enhedens status, når den styres efter relativ luftfugtighed (RH%).
Showing status of unit on being controlled by relative humidity level (RH%)
Showing status of unit on being controlled by relative humidity level (RH%)
Showing status of unit on being controlled by relative humidity level (RH%)
Thermometer indicates temperature control selected. Set the temperature to the level you want to control up to °F/°C (Setting Page selected) . Note a dehumidifier will not necessarily produce heat. Used for Ecor Pro heating appliances and selective humidity control. Select level you wish to achieve up to by pressing the green dot next to level. Higher temperature than that selected will turn unit off.
Thermometer indicates temperature control selected. Set the temperature to the level you want to control up to °F/°C (Setting Page selected) . Note a dehumidifier will not necessarily produce heat. Used for Ecor Pro heating appliances and selective humidity control. Select level you wish to achieve up to by pressing the green dot next to level. Higher temperature than that selected will turn unit off.
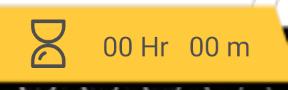
Up to 24 Hour count down indicator in hour & minutes. Whole hours can be selected from.
Up to 24 Hour count down indicator in hour & minutes. Whole hours can be selected from.
Termometerikonet viser, at temperaturstyring er valgt. Indstil temperaturen til det niveau, du ønsker at regulere i °F/°C (valgt på indstillingssiden). Bemærk, at en affugter ikke nødvendigvis producerer varme. Funktionen bruges til Ecor Pro-varmeenheder og til selektiv fugtstyring. Vælg det ønskede niveau ved at trykke på den grønne prik ved siden af værdien. En højere temperatur end den valgte vil slukke enheden.
Thermometer indicates temperature control selected. Set the temperature to the level you want to control up to °F/°C (Setting Page selected) . Note a dehumidifier will not necessarily produce heat. Used for Ecor Pro heating appliances and selective humidity control. Select level you wish to achieve up to by pressing the green dot next to level. Higher temperature than that selected will turn unit off.
Thermometer indicates temperature control selected. Set the temperature to the level you want to control up to °F/°C (Setting Page selected) . Note a dehumidifier will not necessarily produce heat. Used for Ecor Pro heating appliances and selective humidity control. Select level you wish to achieve up to by pressing the green dot next to level. Higher temperature than that selected will turn unit off.

Slide to the desired level and then press Confirm. Status unit on controlled by temperature level.
Slide to the desired level and then press Confirm. Status unit on controlled by temperature level.
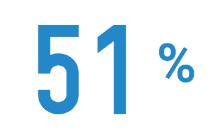
Relative Humidity % reading of external sensor. To get a true accuracy put the sensor in the air flow using the clips provided attaching to the outside inlet grill.
Relative Humidity % reading of external sensor. To get a true accuracy put the sensor in the air flow using the clips provided attaching to the outside inlet grill.
Nedtællingsindikator på op til 24 timer vist i timer og minutter. Hele timer kan vælges.
Up to 24 Hour count down indicator in hour & minutes. Whole hours can be selected from.
Up to 24 Hour count down indicator in hour & minutes. Whole hours can be selected from.

Relative Humidity % reading of external sensor. To get a true accuracy put the sensor in the air flow using the clips provided attaching to the outside inlet grill.
Relative Humidity % reading of external sensor. To get a true accuracy put the sensor in the air flow using the clips provided attaching to the outside inlet grill.
Relativ luftfugtighed (%) aflæst fra den eksterne sensor. For at opnå den mest nøjagtige måling skal sensoren placeres i luftstrømmen ved hjælp af de medfølgende clips, som fastgøres til det udvendige indsugningsgitter.
EXTERNAL SENSOR READINGS
EKSTERNE
EXTERNAL SENSOR READINGS
Clicking on countdown button lets you select up to 24 hours of operation before shut down. Unit must be in an ON sate prior
EXTERNAL SENSOR READINGS
EXTERNAL SENSOR READINGS
SENSORAFLÆSNINGER
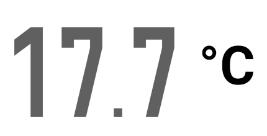
Temperature reading of sensor. To get a true accuracy put the sensor in the air flow using the clips provided. Temperature can be in °F/°C by selecting on the settings page.
Ved at klikke på nedtællingsknappen kan du vælge op til 24 timers drift, før enheden slukker. Enheden skal være i tændt tilstand på forhånd.
Clicking on countdown button lets you select up to 24 hours of operation before shut down. Unit must be in an ON sate prior
Clicking on countdown button lets you select up to 24 hours of operation before shut down. Unit must be in an ON sate prior
Clicking on countdown button lets you select up to 24 hours of operation before shut down. Unit must be in an ON sate prior
Temperature reading of sensor. To get a true accuracy put the sensor in the air flow using the clips provided. Temperature can be in °F/°C by selecting on the settings page.
Slide to the desired level and then press Confirm. Status unit on controlled by temperature level.
Slide til det ønskede niveau, og tryk derefter på confirm. Viser enhedens status, når den styres efter temperaturniveauet.
Slide to the desired level and then press Confirm. Status unit on controlled by temperature level.
Temperature reading of sensor. To get a true accuracy put the sensor in the air flow using the clips provided. Temperature can be in °F/°C by selecting on the settings page.
Temperaturaflæsning fra sensoren. For at opnå den mest nøjagtige måling skal sensoren placeres i luftstrømmen ved hjælp af de medfølgende clips. Temperaturen kan vises i °F/°C ved at vælge dette på indstillingssiden.
Temperature reading of sensor. To get a true accuracy put the sensor in the air flow using the clips provided. Temperature can be in °F/°C by selecting on the settings page.
EXTERNAL SENSOR READINGS
EXTERNAL SENSOR READINGS
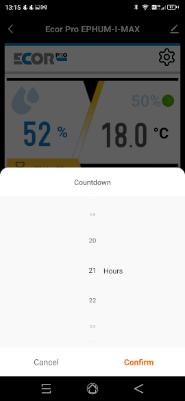
Cancel by selecting zero hours and confirm.
Cancel by selecting zero hours and confirm.
EXTERNAL SENSOR READINGS
EXTERNAL SENSOR READINGS
EKSTERNE SENSORAFLÆSNINGER
Cancel by selecting zero hours and confirm.
Annullér ved at vælge nul timer og tryk confirm.
Cancel by selecting zero hours and confirm.
STARTSKÆRM (3)
OPENING SCREEN (3)
Main - LOWER
Hovedmenu - NEDERST
Første række
First row
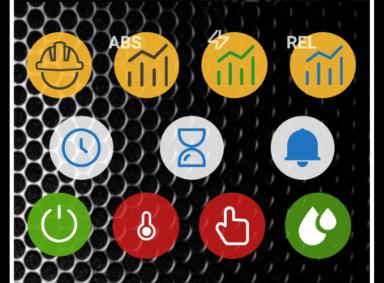

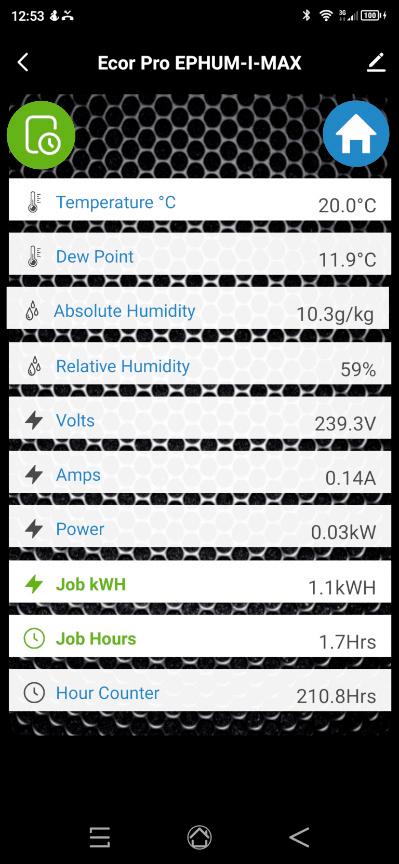
All data page.

On/Off. Mode of operation whether controlled by temperature, manual or humidity indicated here.
Tænd/Sluk. Driftstilstanden – om den styres efter temperatur, manuelt eller efter fugtighed – vises her.


Graph Data is held on the viewing device such as Mobile Phone connected rather than the unit itself.
Grafdata gemmes på den enhed, der bruges til visning, såsom den tilsluttede mobiltelefon, og ikke i selve enheden.
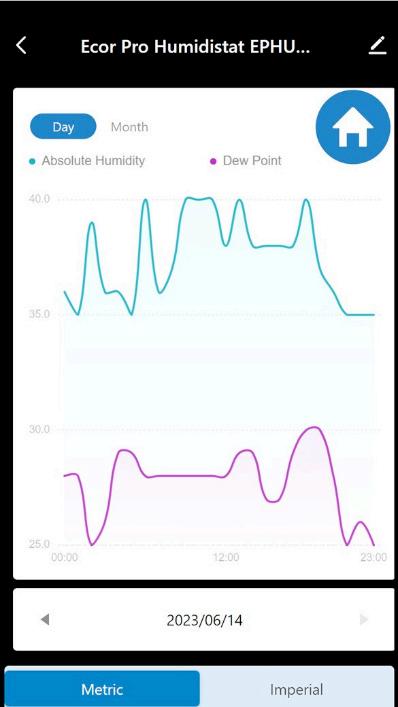
Absolute humidity and dew point graphs over time. In Grains/Pound (if Imperial selected or Grams/Kilogram if Metric Selected.
Grafer over absolut luftfugtighed og dugpunkt over tid. Vises i grains/pound (Imperial er valgt) eller g/kg (hvis metrisk er valgt).
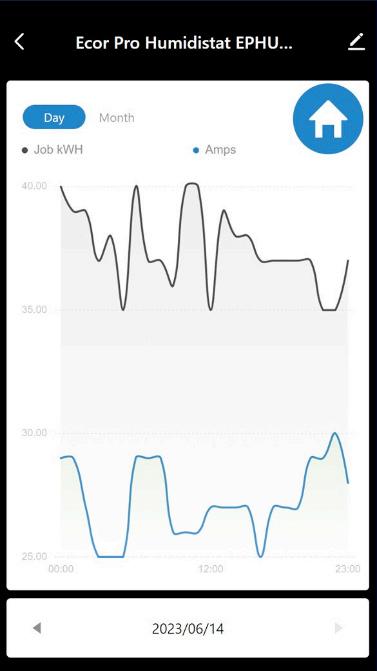
Job kWH and Amps used graphs
Grafer over job-kWh og anvendt strøm (ampere).
Relative Humidity and Temperature in °F or °C graphs.
Grafer over relativ luftfugtighed og temperatur i °F eller °C.
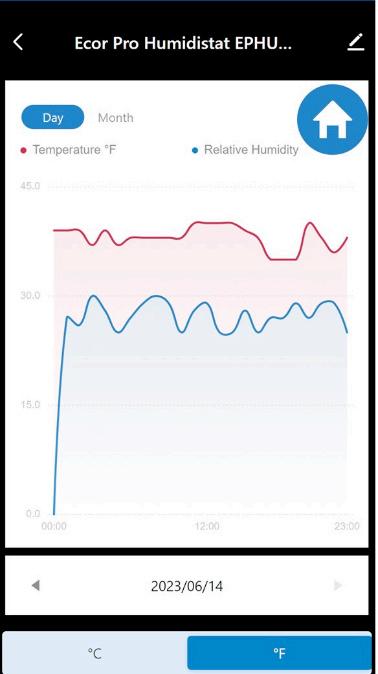
Click on the graph lines to get a close up of the data at that point
Klik på graflinjerne for at få vist en detaljeret aflæsning af data på det pågældende punkt.
Side med alle data.
OPENING SCREEN (3)
Main - LOWER
Hovedmenu - NEDERST
Second, third and bottom row
Anden, tredje og nederste række
Tænd/Sluk.
On/Off. Mode of operation whether controlled by temperature, manual or humidity indicated here.
Driftstilstanden – om den styres efter temperatur, manuelt eller efter fugtighed – vises her.


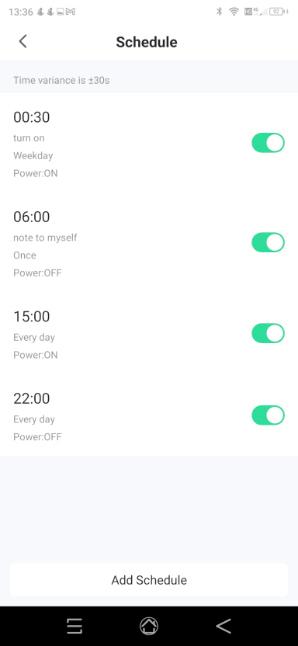
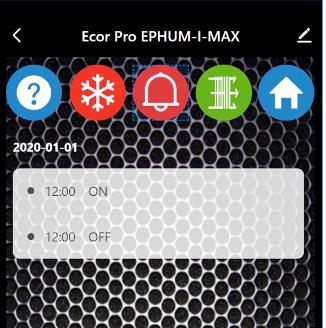
Create multiple timer events to switch on / off the appliance which overwrite other settings.
Opret flere timer hændelser for at tænde/slukke enheden, som tilsidesætter andre indstillinger.
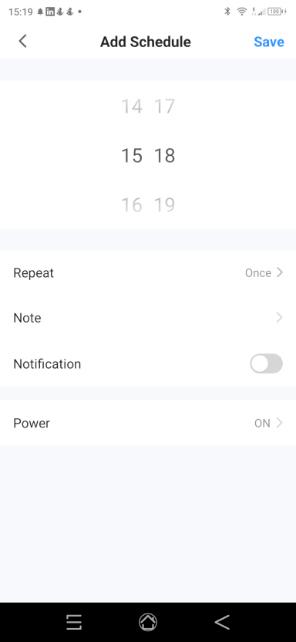
Up to 24 Hour count down indicator in hour & minutes. Whole hours can be selected from.
Nedtællingsindikator på op til 24 timer vist i timer og minutter. Hele timer kan vælges.
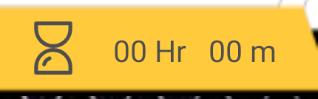
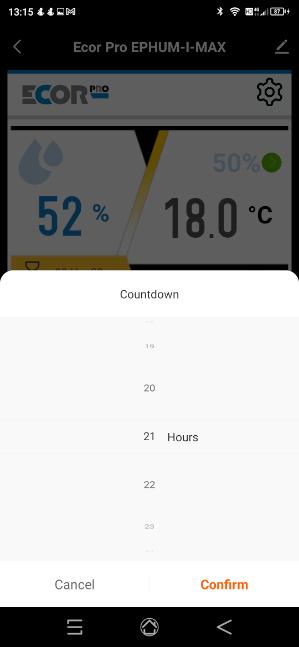
Clicking on countdown button lets you select up to 24 hours of operation before shut down if already ON.
Ved at klikke på nedtællingsknappen kan du vælge op til 24 timers drift, før enheden slukker, hvis den allerede er tændt.
Cancel by selecting zero hours and Confirm.
Annullér ved at vælge nul timer og trykke på confirm.
Link to Settings and Alarm page.
Link til indstillingsog alarmsiden.
Main -BOTTOM
Hovedmenu - BUND
Last row
Sidste række
Temperature, Manual or Humidity operation modes.
Driftstilstande: temperatur, manuel eller fugtighed.
Unit and app linked but not in operation.
Enheden og appen er forbundet, men ikke i drift.
Contineuos fan selected on App or selected on unit.
Kontinuerlig ventilatordrift valgt i appen eller indstillet på enheden.
Investigate unit air flow and temperature. Do not ignore!
Undersøg enhedens luftstrøm og temperatur. Må ikke ignoreres!
INTERNAL OVERHEAT
INTERN OVEROPHEDNING
EN RØD STATUSLINJE VISES, NÅR DEN INTERNE TEMPERATUR
OVERSTIGER 40°C.
DETTE INDIKERER EN FEJL SOM FØLGE
AF BLOKERET LUFTSTRØM, ELLER AT PROCESLUFTEN ER FOR VARM.
AFFUGTEREN VIL FORTSÆTTE MED KUN AT KØRE MED VENTILATOR, INDTIL DEN INTERNE TEMPERATUR FALDER.
A RED STATUS BAR WILL APPEAR WHEN INTERNAL TEMPERATURE EXCEEDS 40°C/104°F. THIS WILL INDICATE A FAULT OF BLOCKED AIR FLOW OR PROCESS AIR IS TOO HOT. THE DEHUMIDIFIER WILL WILL CONTINUE TO RUN IN FAN ONLY UNTIL THE INTERNAL TEMPERATURE DECREASES.
INDSTILLINGSSIDE (1)
PAGE (1)
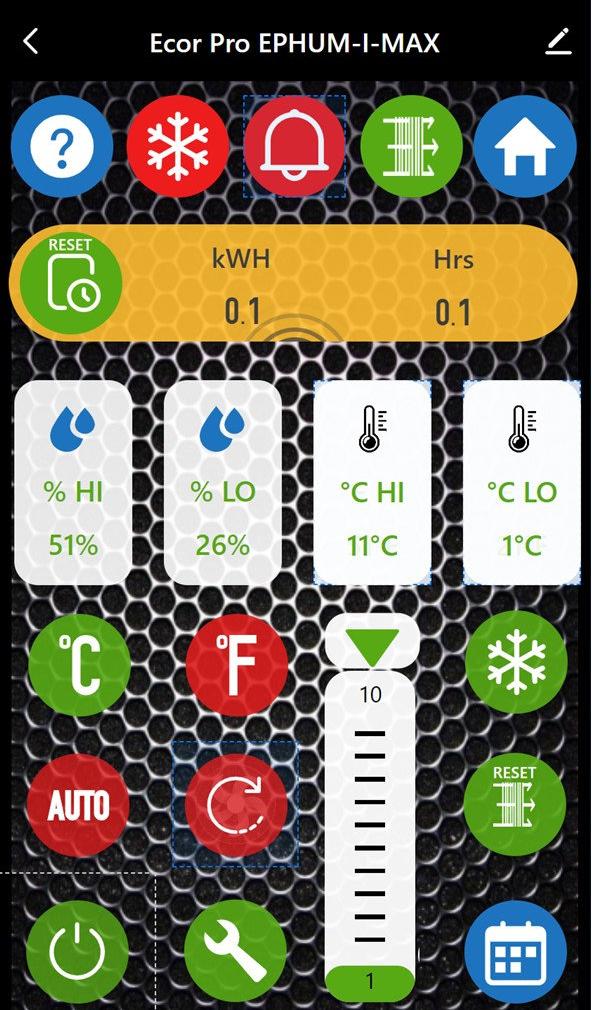
MOVING GRAPHIC MEANS ON AND COMMUNICATION WITH UNIT.
BEVÆGELIG GRAFIK BETYDER, AT ENHEDEN ER TÆNDT OG KOMMUNIKERER MED ENHEDEN.
Settings - UPPER
Indstillinger - ØVERST

Link til Tuya-administrationssiden.
Link to the Tuya management page. You can pass control of the device to another, rename, remove it or turn off/on notifications.
Her kan du overdrage styringen af enheden til en anden, omdøbe den, fjerne den eller slå notifikationer til/fra.




Frost warning / Temperature warning if set green on Settings page.
Frostadvarsel / temperaturadvarsel, hvis den er aktiveret (grøn) på indstillingssiden.
Snefnug rød/hvid ved frost eller derunder.
Snowflake Red/White if freezing or below.
Amber (gul/orange) ved temperatur under 5°C.
Amber if below 5°C/ 41°F
Varmesymbol amber, hvis over 35°C.
Heat Symbol Amber above 35°/95°F
Rød, hvis over 40°C.
Skjult ellers.
Red if above 40°C/ 95°F
EKSTERNE
SENSORAFLÆSNINGER
Hidden otherwise
EXTERNAL SENSOR READINGS
Alarm for fugtighed eller temperatur, indstillet på indstillingssiden.
Alarm for humidity or temperature warning set on the Settings page.
Filterindikator.
Filter indicator.. Countdown over 90 days. Can be reset after filter cleaning anytime.
Nedtælling over 90 dage. Kan nulstilles når som helst efter filterrengøring.
Green/White - filter < 30 days
Grøn/Hvid - filter < 30 dage
Green/Grey - filter 30 - 60 days
Grøn/Grå - filter 30 - 60 dage
Rød/Hvid - filter skal rengøres > 90 dage
Red/White - filter needs cleaning > 90 days
The Home symbol will take you to the main page
Hjem-symbolet fører dig til hovedsiden.
Settings - MIDDLE
Indstillinger - MIDT
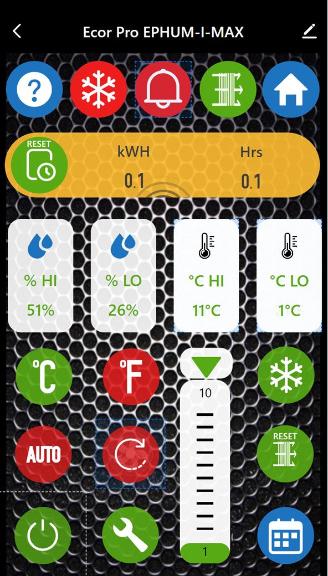
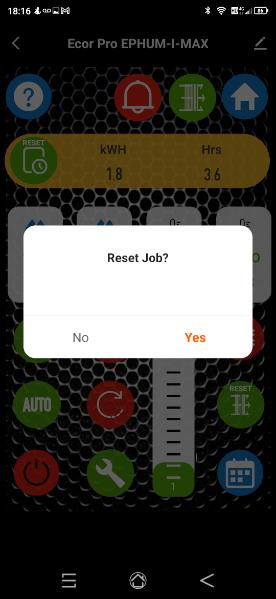
Reset Job hours and Job kWh (kilo Watt hours)
Nulstil jobtimer og job-kWh (kilowatt-timer).

Resides values to zero on all
Nulstiller værdierne til nul på alle skærme.
screens
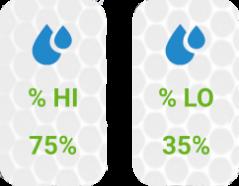
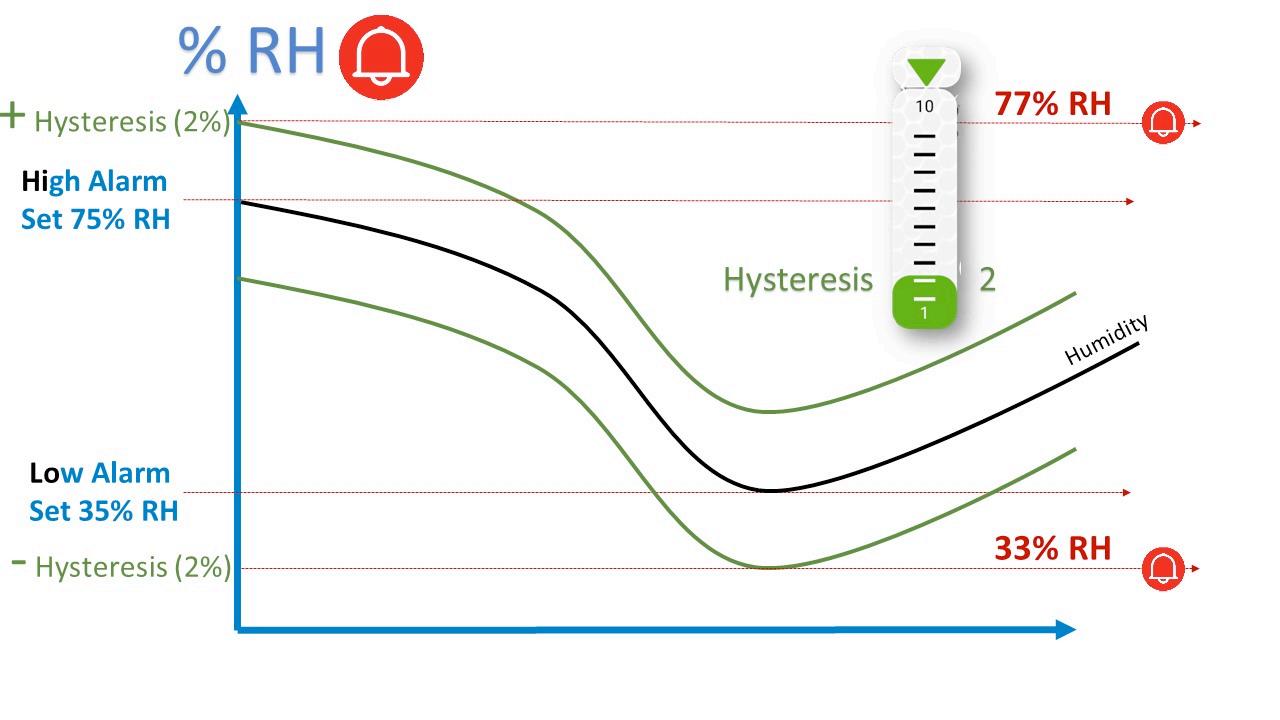
Input alarm values to warn or high (Hi) Relative Humidity (RH) levels or of low humidity levels (Lo).
Indtast alarmværdier for at advare om høje (Hi) relative fugtighedsniveauer (RH) eller lave fugtighedsniveauer (Lo).
This is not related to Absolute Humidity levels & the degree level of Hysteresis
Dette er ikke relateret til absolutte fugtighedsniveauer og gradniveauet for hysterese.

Indtast alarmværdier for at advare om høje (Hi) luftfugtighedsniveauer eller lave luftfugtighedsniveauer (Lo).
Input alarm values to warn or high (Hi) humidity levels or of low humidity levels (Lo)
Værdierne ændres, hvis der arbejdes i °F eller °C, og hystereseniveauet vil påvirke dette.
Values change if working in °F or °C and the level of Hysteresis will affect.

+ Hysterese (2%)
Høj Alarm
Indstil 75% RH
Lav Alarm
Indstil 35% RH
- Hysterese (2%)
Hysteresis level selector. Note alarms will turn off when one degree less than the set value is hysteresis is set to Zero.
Valg af hysterese-niveau. Bemærk, at alarmer slukker, når værdien er én grad under den indstillede værdi, hvis hysterese er sat til nul.
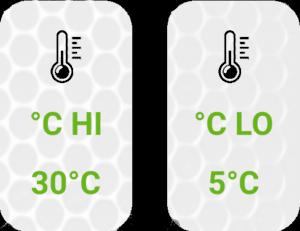
Same principle applies when working with Temperature control. Values change if working in °F or °C and the level of Hysteresis will affect alarm notifications. Hysteresis is especially useful if Hi & Lo alarms are close to prevent unnecessary notifications.
Det samme princip gælder ved temperaturstyring. Værdierne ændrer sig afhængigt af, om der arbejdes i °F eller °C, og hysterese-niveauet vil påvirke alarmmeddelelser. Hysterese er især nyttig, hvis Hi- og Lo-alarmer ligger tæt, for at undgå unødvendige notifikationer.
Hysterese
INDSTILLINGSSIDE (3)
SETTINGS PAGE (3)
On/Off. A moving graphic will be seen under the ON/ OFF button if the Continuous Fan option has been selected on the unit itself.
Tænd/Sluk. En bevægelig grafik vises under Tænd/Slukknappen, hvis funktionen Kontinuerlig ventilator er valgt på selve enheden.
Indstillinger - NEDERST
Settings - LOWER
Skift mellem °C og °F
ændrer ikke kun temperaturenhederne, men også dugpunktet.
Canging units between °C & °F will not only mean temperature units change including Dew Point.
Enhederne for absolut luftfugtighed ændres også fra gram pr. kilogram luft (°C, metrisk) til grains pr. pund luft (°F, imperial).
Also Absolute Humidity units will change from Grams per Kilogram of air (°C metric) to Grains per Pound of air (°F imperial).
På grafsiderne kan du stadig skifte mellem imperial og metrisk visning.
On Graph pages you can swap still between imperial and metric displays



Hysteresis slider. set between zero and 10. How it influences the workings of the units is deal with above.
Hysterese-skyderen kan indstilles
mellem 0 og 10. Hvordan den påvirker enhedens funktion, er beskrevet ovenfor.

Link to take you to Ecor Pro fault finding page on www.ecor-pro.com
Link, der fører dig til Ecor Pro’s fejlfindingside på www.ecor-pro.com
Historisk log over, hvornår enheden er blevet tændt og slukket.
Historical log of when the appliance has been turned on and off.
Turn frost alert (and high temperature alert) off and on.
Slå frostalarm (og højtemperaturalarm) til eller fra.
Beskrives i vejledningen til hovedskærmen. Giver advarsler på alle skærme (undtagen grafsider), hvis temperaturen nærmer sig frysepunktet eller høje temperaturer op til 40°C. Dette er for at forhindre frostskader (hvor relevant) og sikre sikker drift af enheden.
Describe in Main Screen guide. Gives warnings on all screens (except graph screens) if temperatures approach freezing or high temperatures to 40°C / 100°F. This is to prevent frost damage (if applicable) and safe running of the unit
Auto or continuous fan. When first loading the app select a auto or contineuos as initial status neither are selected. Even if unit is turned off (Red) and continuous can is selected on the appliance or app the fan will keep running but there will be no heating or dehumidification.
Automatisk eller kontinuerlig ventilator. Når appen åbnes første gang, vælges enten auto eller contineuos (kontinuerlig) som startstatus – ingen af dem er valgt som standard.
Selv hvis enheden er slukket (rød), og kontinuerlig ventilator er valgt på enheden eller i appen, vil ventilatoren fortsætte med at køre, men der vil ikke være nogen opvarmning eller affugtning.
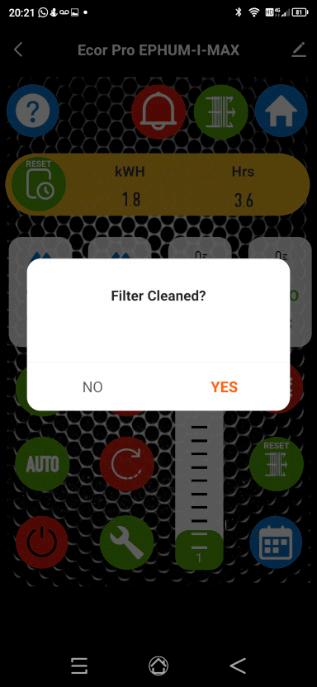
Whenever you clean the filter, the counter is reset here
Hver gang du rengør filteret, nulstilles tælleren her.
Wijzigingen voorbehouden..
to modifications • Änderungen vorbehalten • Sous réserve de
Info@nac-europe.com www.nac-europe.com
Tel. +45 7442 6292
Ellegårdvej 18 - DK-6400 Sønderborg
NAC Europe
Aflever dette produkt på din lokale genbrugsstation for korrekt bortskaffelse.
Elektrisk affald må ikke bortskaffes sammen med almindeligt husholdningsaffald.
Waste electrical equipment must not be disposed of in normal household waste. Take this product to your local recycling centre for proper disposal.
End of the period of use
Når enheden skal kasseres efter endt brug