What you’ll n
Christmas craft:
eed
Gingerbread Pop Stick House
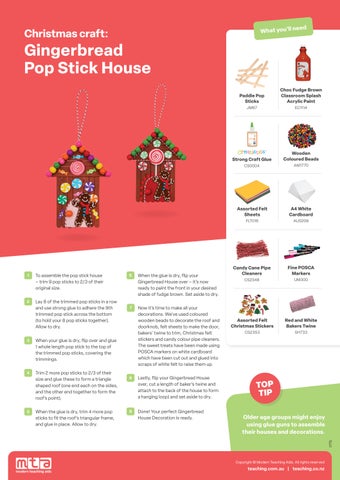
To assemble the pop stick house
6
W hen the glue is dry, flip your Gingerbread House over – it’s now ready to paint the front in your desired shade of fudge brown. Set aside to dry.
7
N ow it’s time to make all your decorations. We’ve used coloured wooden beads to decorate the roof and doorknob, felt sheets to make the door, bakers’ twine to trim, Christmas felt stickers and candy colour pipe cleaners. The sweet treats have been made using POSCA markers on white cardboard which have been cut out and glued into scraps of white felt to raise them up.
– trim 9 pop sticks to 2/3 of their original size. 2
L ay 8 of the trimmed pop sticks in a row and use strong glue to adhere the 9th trimmed pop stick across the bottom (to hold your 8 pop sticks together). Allow to dry.
3
W hen your glue is dry, flip over and glue 1 whole length pop stick to the top of the trimmed pop sticks, covering the trimmings.
4
T rim 2 more pop sticks to 2/3 of their size and glue these to form a triangle shaped roof (one end each on the sides, and the other end together to form the roof’s point).
5
W hen the glue is dry, trim 4 more pop sticks to fit the roof’s triangular frame, and glue in place. Allow to dry.
8
L astly, flip your Gingerbread House over, cut a length of baker’s twine and attach to the back of the house to form a hanging loop) and set aside to dry.
9
D one! Your perfect Gingerbread House Decoration is ready.
Choc Fudge Brown Classroom Splash Acrylic Paint
JM67
EC1114
Strong Craft Glue
Wooden Coloured Beads
CS0004
AM1770
Assorted Felt Sheets
A4 White Cardboard
FLT016
AUS208
Candy Cane Pipe Cleaners
Fine POSCA Markers
CS2348
UM300
Assorted Felt Christmas Stickers
Red and White Bakers Twine
CS2353
SH733
TOP TIP Older age groups might enjoy using glue guns to assemble their houses and decorations. 1773
1
Paddle Pop Sticks
Copyright All rights rights reserved reserved Copyright© ©Modern Modern Teaching Teaching Aids. Aids. All
teaching.com.au | teaching.co.nz