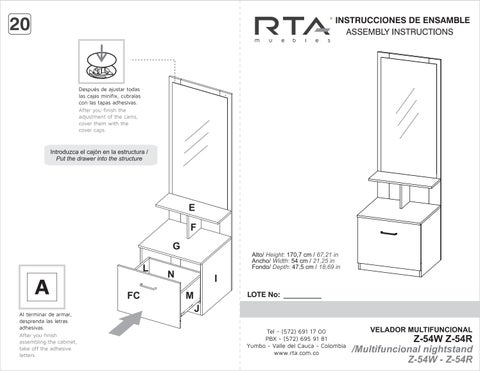
Después de ajustar todas las cajas minifix, cúbralas con las tapas adhesivas.
After you finish the adjustment of the cams, cover them with the cover caps.
Introduzca el cajón en la estructura / Put the drawer into the structure
Alto/ 170,7 cm / Height: 67,21 in
Ancho/ 54 cm / Width: 21,25 in
Fondo/ 47,5 cm / Depth: 18,69 in
AAl terminar de armar, desprenda las letras adhesivas.
After you finish assembling the cabinet, take off the adhesive letters.
Tel - (572) 691 17 00
PBX - (572) 695 91 81
Yumbo - Valle del Cauca - Colombia www.rta.com.co
RECOMENDACIONES
IMPORTANTES
No pintar el mueble.
El mueble debe ser usado únicamente en interiores, no exponer al sol directo
Limpiar los herrajes metálicos con un paño seco
NO sobrecargar el mueble (ver las cargas sugeridas).
No golpear ni martillar el mueble (solo cuando se indique).
Limpiar con un paño ligeramente húmedo, usar jabones suaves.
No arrastre el mueble, levántelo entre dos personas.
Evite el contacto directo con el agua, el fuego o la exposición a fuentes de calor
IMPORTANT
RECOMMENDATIONS
Do not paint the cabinet.
The cabinet MUST be used exclusively indoors, do not expose to direct sun.
Clean metallic hardware with a dry cloth.
Do NOT overload the cabinet (see suggested loads).
Do not hit or hammer the cabinet (just when indicated).
Clean with a slightly damp cloth, use gentle soaps.
Do not drag, lift and move between two people
Avoid direct contact with water, fire or exposureto heat sources.
ADVERTENCIA
Nunca permita que los niños escalen o manipulen el mueble, la caída de este puede provocar lesiones graves o la muerte
WARNING
Never allow children to climb or manipulate the cabinet, furniture tip over can cause serious injuries or death.
TENGA EN CUENTA/PLEASE NOTICE:
Por la seguridad del usuario se recomienda anclár el mueble a la pared / For the user safety, it is recomended to anchor the furniture to the wall
WALL
* Herramientas NO incluidas/ Tools not included
Utilizar una broca de 5/16" para hacer las perforaciones en el muro/ Use a 5/16" drill bit to drill the wall.
VOLTEAR EL MUEBLE CUIDADOSAMENTE / CAREFULLY FLIP THE FURNITURE
De un adecuado armado del mueble depende su buen funcionamiento. Armed with a suitable furniture depends on its smooth functioning. RECOMENDACIONES DE ENSAMBLE /ASSEMBLYRECOMENDATIONS
MINIFIX / CONNECTOR - DOWELS
/ Rotate 180°
1 2 3
Es un herraje de unión, la cabeza esférica del perno se ubica en el centrodelacajaembutidaenformadecopadesdecualquieránguloy luego se sujeta firmemente. Este permite un arme y desarme repetidamenteyunauniónfirmequenoseafloja. Itisahardwareunion,sphericalheadofthepinislocatedinthecenterofthe boxembossedintheformofglassfromanyangleandthensubjectfirmly Thisallowsforarminganddisarmingrepeatedlyandastrongunionthatis notloosened.
TARUGOS O TAQUETES / FLUTED DOWELPIN
Tarugo / Fluted dowel pin
1
caja minifix / dowels hole
x
2
Es un pedazo de madera corto ygrueso, aprox. de 5cm a10cm, quesirvepara amarrarel mueble ydarleresistencia. It is a piece of wood short andthick,aprox.5cmto10cm,whichserves totiethe cabinet and give it strength.
Se recomienda armar el mueble entre 2 personas o más. It is recommended to assemble the product between 2 people or more.
Se recomienda armar el mueble sobre la caja o una superficie lisa para no rayarlo. It is recommended to assemble the product on the box or on a flat surface to not scratch it.
Voltear el mueble cuidadosamente para ensamblar los fondos. Carefully turn over the cabinet to assemble the back panels.
VOLTEAR TURN OVER /READY TO ASSEMBLE FURNITURE, BUILDING HOMES
1"
MUEBLES MODULARES, CONSTRUYENDO HOGARES
HERRAJES PARAARMADO ASSEMBLY HARDWARE
x33 x33
x33
x35
2"
Minifix/ Minifix Cams
Perno minifix/ Spreading Bolt
Tarugo/ Fluted Dowel Pin
Tapa Adhesiva
Minifix)/ Cover Caps
x2 x4
Tornillo + Chazo / Screw + Wall Dowel
Deslizador/ Plastic Glide x6 x1
Riel Extensión total / Drawer slides
x9
x1
Tornillo de Ensamble 2"/ 2" Drywall Screw
Tornillo de Ensamble 1"/ 1" Drywall Screw
Manija zamak / Handle Incluye tornillos Screws included Incluye tornillos Screws included
x1
Espejo + 2 Tramos de Cinta Doble faz/ Mirror + 2 Double sided tape stretches
IMPORTANTE
TENER PRECAUCIÓN AL ABRIR LA BOLSA DE HERRAJES PARA NO EXTRAVIAR NINGUNO. COMPRUEBE QUE ELCONTENIDO DE LAS PIEZAS SEAELCORRECTO. EN CASO QUE FALTE ALGUNAPIEZAO ESTE DEFECTUOSADEVUELVALAS PIEZASALALMACÉN CON SU FACTURAPARA EFECTUAR ELCAMBIO DE LAS PIEZASY/O LOS HERRAJES LO MÁS PRONTO POSIBLE./ PLEASE BE CAUTIOUS WHEN OPENING THE HARDWARE BAG TO NOT LOSE ANY. CHECK THE CONTENTS OF THE PARTS ARE CORRECT. IF ANY PART IS MISSING OR DEFECTIVE PLEASE RETURN THE PARTS TO THE STORE WITH THE PRODUCT INVOICE ATTACHED TO MAKE EFECTIVE THE REPLACEMENT OF THE DEFECTIVE PIECES OR WARDWARE AS SOON AS POSSIBLE.