Introduzca el cajón en la estructura / Put the drawer into the structure
Alto/ 170,7 cm / Height: 67,21 in Ancho/ 54 cm / Width: 21,25 in Fondo/ 47,5 cm / Depth: 18,69 in
By: TEL (572) 691 17 00 PBX (572) 695 91 81 CALI - COLOMBIA www.rta.com.co
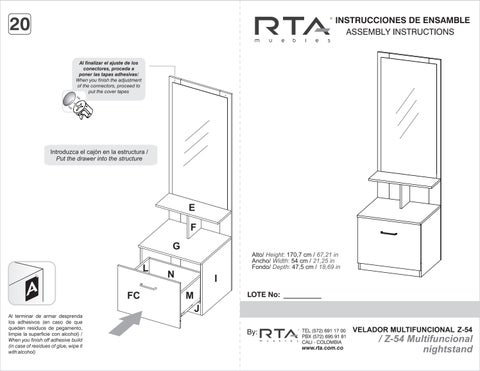
Introduzca el cajón en la estructura / Put the drawer into the structure
Alto/ 170,7 cm / Height: 67,21 in Ancho/ 54 cm / Width: 21,25 in Fondo/ 47,5 cm / Depth: 18,69 in
By: TEL (572) 691 17 00 PBX (572) 695 91 81 CALI - COLOMBIA www.rta.com.co
NO pinte el mueble / Do not paint the furniture.
NO lavar las manijas o tiraderas con jabones o elementos abrasivos / Do not wash handles or dumps with soap or abrasives.
NO golpear ni martillar el mueble (hágalo sólo donde se indique) / Do not hit or hammer the furniture (just do it where is indicated).
SIEMPRE levante el mueble entre dos personas, NO lo arrastre / Do not drag thefurniture Lift it between two people.
NO mojar o ubicar a la intemperie / Do not expose to rain or direct sun.
NO sobrecargue el mueble. no exceda el peso de 30 kilos para gabinetes de cocina / Do not overload the cabinet. Weight max. 66lbs for kitchen cabinets.
NO permita que los niños manipulen el mueble, puede voltearse y lastimarlos / Do not allow children to handle the cabinets or drawers, they could get hurt.
Limpie con paño seco , / Clean with a dry cloth.
1.Abrir la caja del mueble y buscar la bolsa con los herrajes / Open the box and look for the hardware bag.
P2.Abrir el paquete y comprobar que el contenido de las piezas es correcto / Open the package and verify that the content of the pieces is correct.
3. Separe los herrajes para facilitar su identificación durante el armado / Separate hardware for easy identification during assembly.
4.Arme el mueble en un lugar limpio y en una superficie plana / RTAfurniture must be assembled in a clean place and on a flat surface.
TENGA EN CUENTA/PLEASE NOTICE:
Por la seguridad del usuario se recomienda anclár el mueble a la pared / For the user safety, it is recomended to anchor the furniture to the wall
WALL
* Herramientas NO incluidas/ Tools not included
Utilizar una broca de 5/16" para hacer las perforaciones en el muro/ Use a 5/16" drill bit to drill the wall.
VOLTEAR EL MUEBLE CUIDADOSAMENTE / CAREFULLY FLIP THE FURNITURE
El buen funcionamiento del mueble depende de un adecuado ensamblaje An excellent furniture´s performance relies on a solid and a suitable assembly.
1 2 3 A B
Sistemadeunióncompuestoporunperno(A)yunacajaminifix(B).
(1)Seinsertalacajaminifixdentrodelaperforaciónubicadaenlacaradelapieza,laflechadebeapuntarsiemprea ladireccióndelaperforaciónpordondeentraráelperno.
(2)Sedebeinsertarelpernoporsuparteplásticaenlasperforacionesqueseindiquen,luegoseinsertalapunta metálicaenlaperforaciónparaquesucabezaquedealinteriordelacajaminifix.
(3)Girarlacajaminifix180°paraapretarlasdospiezas.
It´safittingsystemmadeofaspreadingbolt(A)andaminifixcam(B).
(1)Inserttheminifixcamintheholeplacedinthefaceofthepanelwiththearrowpontingtowardstheholewheretheboltwill fit.
(2)Inserttheboltwithitsplasticbaseintheshownholes,theninsertthemetallicboltheadintheholessoitfitsinsidethe minifixcam.
(3)Tightthepanelsbyturningtheminifixcam180°.
180° x 2 1 caja minifix / dowels hole
Esunpedazodemaderacortoygrueso,deaproximadamente3a10cmdelargo,quesirveparaamarrarelmuebley darleresistencia.
It´s ashortandthickpieceofwood,1,18to3,9inchesaproximately,whichisusedtotiethecabinetandgiveitresistence.
Se recomienda armar el mueble entre 2 personas o más. It is recommended to assemble the product between 2 people or more.
Se recomienda armar el mueble sobre la caja o una superficie lisa para no rayarlo. It is recommended to assemble the product on the box or on a flat surface to not scratch it.
Voltear el mueble cuidadosamente para ensamblar los fondos. Carefully turn over the cabinet to assemble the back panels.
VOLTEAR TURN OVER /READY TO ASSEMBLE FURNITURE, BUILDING HOMES
1"
x33 x33
Minifix/ Minifix Cams
Perno minifix/ Spreading Bolt
x33
Tarugo/ Fluted Dowel Pin
x35 Tapa Adhesiva Minifix)/ Cover Caps
x8
x6 x1 x1 L M N 2"
Tornillo + Chazo / Screw + Wall Dowel
Tornillo Manija/ Screw Handle x2 x2 x1 x9
Deslizador/ Plastic Glide
Tornillo de Ensamble 1"/ 1" Drywall Screw
Tornillo Lámina/ Sheet Screw x4
Tornillo de Ensamble 2"/ 2" Drywall Screw
Riel Extensión total / Drawer slides Manija zamak / Handle
Espejo + 2 Tramos de Cinta Doble faz/ Mirror + 2 Double sided tape stretches
IMPORTANTE
TENER PRECAUCIÓN AL ABRIR LA BOLSA DE HERRAJES PARA NO EXTRAVIAR NINGUNO. COMPRUEBE QUE EL CONTENIDO DE LAS PIEZAS SEA EL CORRECTO. EN CASO QUE FALTE ALGUNA PIEZA O ESTE DEFECTUOSA DEVUELVA LAS PIEZAS AL ALMACÉN CON SU FACTURA PARA EFECTUAR EL CAMBIO DE LAS PIEZAS Y/O LOS HERRAJES LO MÁS PRONTO POSIBLE./ PLEASE BE CAUTIOUS WHEN OPENING THE HARDWARE BAG TO NOT LOSE ANY CHECK THE CONTENTS OF THE PARTS ARE CORRECT IF ANY PART IS MISSING OR DEFECTIVE PLEASE RETURN THE PARTS TO THE STORE WITH THE PRODUCT INVOICE ATTACHED TO MAKE EFECTIVE THE REPLACEMENT OF THE DEFECTIVEPIECESORWARDWAREASSOONASPOSSIBLE.
D E F G H I J A B C D E F G H I J FC N M L K X2 O ESPEJO/ MIRROR
Para pegar el espejo, retire el papel protector de los tramos de cinta y luego presione el espejo contra las piezas A-B el espejo reposa en la pieza E./ To paste the mirror, peel off the cover paper from the pieces of tape and then push the mirror against the pieces A-B, the mirror rests on the E piece.
A B
ANTES DE EMPEZAR A ARMAR EL MUEBLE LEA DETENIDAMENTE LAS INSTRUCCIONES. SE RECOMIENDA ARMAR EL MUEBLE SOBRE LA CAJA O SOBRE UNA SUPERFICIE LISA Y CUBIERTA, PARA NO RAYARLO / BEFORE STARTING TO ASSEMBLE THE FURNITURE, CAREFULLY READ THE INSTRUCTIONS. IT IS RECOMMENDED TO ASSEMBLE THE FURNITURE ON THE BOX OR ON A FLAT AND COVERED SURFACE IN ORDER TO NOT SCRATCH THE PRODUCT
VOLTEAR TURN OVER
A C D J H B D
I G F E K K K J H I G
PARAPONER RIELEN LATERALDELCAJÓN:
Revisar que el tope metálico del riel quede en la PARTE DELANTERA/ The metallic stop should be placed on the front.
PARAPONER RIELEN LATERALDELMUEBLE:
Revisar que el tope plástico del riel quede en la PARTETRASERA/ The plastic stop should be placed on the rear
VOLTEAR/ TURN OVER
VOLTEAR/ TURN OVER