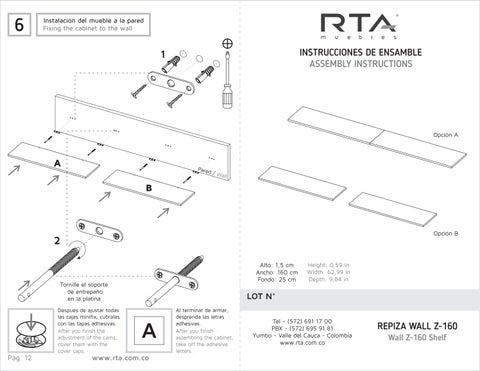
Instalación del mueble a la pared
Fixing the cabinet to the wall
Tornille el soporte de entrepaño en la platina
Después de ajustar todas las cajas minifix, cúbralas con las tapas adhesivas.
After you finish the adjustment of the cams, cover them with the cover caps.
Al terminar de armar, desprenda las letras adhesivas.
After you finish assembling the cabinet, take off the adhesive letters.
INSTRUCCIONES DE ENSAMBLE ASSEMBLY INSTRUCTIONS
Alto: 1,5 cm
Ancho: 160 cm
Fondo: 25 cm
LOT N°
Height: 0,59 in
Width: 62,99 in
Depth: 9,84 in
Tel - (572) 691 17 00
PBX - (572) 695 91 81
Yumbo - Valle del Cauca - Colombia www.rta.com.co
RECOMENDACIONES
IMPORTANTES
No pintar el mueble.
El mueble debe ser usado únicamente en interiores, no exponer al sol directo
Limpiar los herrajes metálicos con un paño seco
NO sobrecargar el mueble (ver las cargas sugeridas).
No golpear ni martillar el mueble (solo cuando se indique).
Limpiar con un paño ligeramente húmedo, usar jabones suaves.
No arrastre el mueble, levántelo entre dos personas.
Evite el contacto directo con el agua, el fuego o la exposición a fuentes de calor
IMPORTANT RECOMMENDATIONS
Do not paint the cabinet.
The cabinet MUST be used exclusively indoors, do not expose to direct sun.
Clean metallic hardware with a dry cloth.
Do NOT overload the cabinet (see suggested loads).
Do not hit or hammer the cabinet (just when indicated).
Clean with a slightly damp cloth, use gentle soaps.
Do not drag, lift and move between two people
Avoid direct contact with water, fire or exposureto heat sources.
ADVERTENCIA
Nunca permita que los niños escalen o manipulen el mueble, la caída de este puede provocar lesiones graves o la muerte
WARNING !
Never allow children to climb or manipulate the cabinet, furniture tip over can cause serious injuries or death.
Instalación del mueble. Opción B
Fixing the cabinet. Option B
Instalación del mueble a la pared
Fixing the cabinet to the wall
Broca de 5/16". 1 Rotate to tighten. Gire para apretar x8
5/16 Drill bit.
Esta distancia puede variar según lo desee This distance may change as desired
*Centímetros / Inches
Esta altura puede variar según lo desee. This height may change as desired
Instalación del mueble a la pared
Fixing the cabinet to the wall