Alto/ 53,5 cm / Height: 21.06 in Ancho/ 141 cm / Width: 55.51 in Fondo/ 45,3 cm / Depth: 17.83 in
Deslice los cajones dentro del mueble / Slide the drawers inside the cabinet
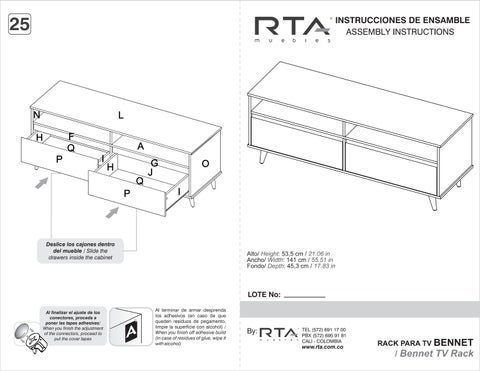
Alto/ 53,5 cm / Height: 21.06 in Ancho/ 141 cm / Width: 55.51 in Fondo/ 45,3 cm / Depth: 17.83 in
NO pinte el mueble / Do not paint the furniture.
NO lavar las manijas o tiraderas con jabones o elementos abrasivos / Do not wash handles or dumps with soap or abrasives.
NO golpear ni martillar el mueble (hágalo sólo donde se indique) / Do not hit or hammer the furniture (just do it where is indicated).
SIEMPRE levante el mueble entre dos personas, NO lo arrastre / Do not drag thefurniture Lift it between two people.
NO mojar o ubicar a la intemperie / Do not expose to rain or direct sun.
NO sobrecargue el mueble. no exceda el peso de 30 kilos para gabinetes de cocina / Do not overload the cabinet. Weight max. 66lbs for kitchen cabinets.
NO permita que los niños manipulen el mueble, puede voltearse y lastimarlos / Do not allow children to handle the cabinets or drawers, they could get hurt.
REPETIR ESTOS PASOS PARA EL OTRO CAJON / REPEAT THIS STEPS FOR THE OTHER DRAWER
Limpie con paño seco , / Clean with a dry cloth.
1.Abrir la caja del mueble y buscar la bolsa con los herrajes / Open the box and look for the hardware bag.
P2.Abrir el paquete y comprobar que el contenido de las piezas es correcto / Open the package and verify that the content of the pieces is correct.
3. Separe los herrajes para facilitar su identificación durante el armado / Separate hardware for easy identification during assembly.
4.Arme el mueble en un lugar limpio y en una superficie plana / RTAfurniture must be assembled in a clean place and on a flat surface.
VOLTEAR EL MUEBLE CUIDADOSAMENTE PARA ENSAMBLAR EL FONDO / CAREFULLY FLIP THE FURNITURE
R L O A C
4° Perforación
6° Perforación
Instale los otros Rieles en la parte Inferior
Install the other slides on the bottom
El buen funcionamiento del mueble depende de un adecuado ensamblaje An excellent furniture´s performance relies on a solid and a suitable assembly. RECOMENDACIONES DE ENSAMBLE / ASSEMBLYRECOMENDATIONS
Sistemadeunióncompuestoporunperno(A)yunacajaminifix(B).
(1)Seinsertalacajaminifixdentrodelaperforaciónubicadaenlacaradelapieza,laflechadebeapuntarsiemprea ladireccióndelaperforaciónpordondeentraráelperno.
(2)Sedebeinsertarelpernoporsuparteplásticaenlasperforacionesqueseindiquen,luegoseinsertalapunta metálicaenlaperforaciónparaquesucabezaquedealinteriordelacajaminifix.
(3)Girarlacajaminifix180°paraapretarlasdospiezas.
It´safittingsystemmadeofaspreadingbolt(A)andaminifixcam(B).
(1)Inserttheminifixcamintheholeplacedinthefaceofthepanelwiththearrowpontingtowardstheholewheretheboltwill fit.
(2)Inserttheboltwithitsplasticbaseintheshownholes,theninsertthemetallicboltheadintheholessoitfitsinsidethe minifixcam.
(3)Tightthepanelsbyturningtheminifixcam180°.
x 2 1 caja minifix / dowels hole
Esunpedazodemaderacortoygrueso,deaproximadamente5a10cmdelargo,quesirveparaamarrarelmuebley darleresistencia.
It´s ashortandthickpieceofwood,1,9to3,9inchesaproximately,whichisusedtotiethecabinetandgiveitresistence.
VOLTEAR TURN OVER
Se recomienda armar el mueble sobre la caja o una superficie lisa para no rayarlo. It is recommended to assemble the product on the box or on a flat surface to not scratch it.
Voltear el mueble cuidadosamente para ensamblar los fondos. Carefully turn over the cabinet to assemble the back panels.
PESO MAX. SUGERIDO EN MUEBLE (Kg) / MAX SUGGESTED LOAD (Kg)
NOTA: La resistencia a las cargas puede variar dependiendo si es una carga distribuida o una carga puntual, las grácas corresponden a cargas puntuales, NO exceder los pesos sugeridos / NOTE: The load capacity depends if it is a point load or if it is an uniform distributed load, do not exceed the suggested loads.
Girar 180° / Rotate 180°
Minifix/ Minifix cam
Tapa Minifix adhesiva / Cover caps
Perno Minifix/ Spreading Bolt
Tarugo -Taquete/ Fluted dowel pin
Pata madera/ Wooden leg x8
Tornillo ensamble 2"/ Drywall Screw
Riel sencillo 35cm/ Drawer slides
Tornillo lámina/ Sheet screw
Puntilla/ Panel pin
Tornillo ensamble 3/4"/ Drywall Screw
TENER PRECAUCIÓN AL ABRIR LA BOLSA DE HERRAJES PARA NO EXTRAVIAR NINGUNO. COMPRUEBE QUE EL CONTENIDO DE LAS PIEZAS SEA EL CORRECTO. EN CASO QUE FALTE ALGUNA PIEZA O ESTE DEFECTUOSA NO DEVUELVA EL MUEBLE AL ALMACÉN, LE AGRADECEMOS LLAMAR DE INMEDIATO A LA EMPRESA TEl: 57(4) 3252280 FAX: 57(4) 3140701 MEDELLÍN - COLOMBIA, TEL: 57(2) 6959181 CALI - COLOMBIA O ESCRIBIR AL CORREO ELECTRÓNICO comercial@rta.com.co INCLUYENDO ELNUMERO DE LAREFERENCIAY ELNOMBRE DELMUEBLEYASÍ PODER RESOLVER SU PROBLEMALO MAS PRONTO POSIBLE. IMPORTANTE
ANTES DE EMPEZAR A ARMAR EL MUEBLE LEA DETENIDAMENTE LAS INSTRUCCIONES. SE RECOMIENDA ARMAR EL MUEBLE SOBRE LA CAJA O SOBRE UNA SUPERFICIE LISA Y CUBIERTA, PARA NO RAYARLO / BEFORE STARTING TO ASSEMBLE THE CABINET, CAREFULLY READ THE INSTRUCTIONS. IT IS RECOMMENDED TO ASSEMBLE THE FURNITURE ON THE BOX OR ON A FLAT AND COVERED SURFACE IN ORDER TO NOT SCRATCH THE PRODUCT
Girar 180° / Rotate 180°
IMPORTANTE: Ensamblar los otros dos rieles en el paso 21/ Assemble the other two drawer slides on step 21 B C D E F G H H I I J J K K L M N O P P Q Q R A
VOLTEAR TURN OVER
VOLTEAR TURN OVER M 3/4"
IMPORTANTE: Ensamblar el segundo riel en el paso 21/ Assemble the second drawer slide on step 21