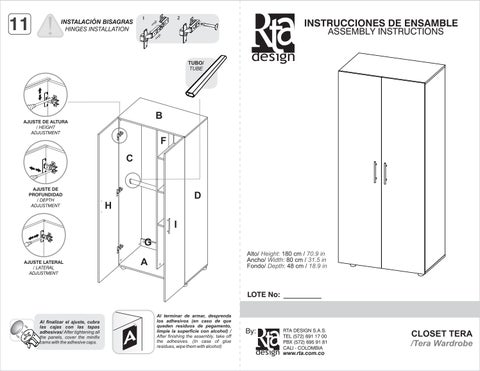
AJUSTE DE ALTURA / HEIGHT ADJUSTMENT
AJUSTE DE PROFUNDIDAD / DEPTH ADJUSTMENT
AJUSTE LATERAL / LATERAL ADJUSTMENT
INSTALACIÓN BISAGRAS HINGES INSTALLATION TUBO/ TUBE H I C D B A G F
Alto/ 180 cm / Height: 70.9 in
Ancho/ 80 cm / Width: 31.5 in
Fondo/ 48 cm / Depth: 18.9 in
Al finalizar el ajuste, cubra las cajas con las tapas adhesivas/ After tightening all the panels, cover the minifix camswiththeadhesivecaps.
LOTE No:
Al terminar de armar, desprenda los adhesivos (en caso de que queden residuos de pegamento, limpie la superficie con alcohol) / After finishing the assembly, take off the adhesives. (In case of glue residues,wipethemwithalcohol)
By: RTA DESIGN S.A.S. TEL (572) 691 17 00 PBX (572) 695 91 81 CALI - COLOMBIA www.rta.com.co
RECOMENDACIONES IMPORTANTES
KEY RECOMMENDATIONS
NO pinte el mueble / Do not paint the furniture.
NO lavar las manijas o tiraderas con jabones o elementos abrasivos / Do not wash handles or dumps with soap or abrasives.
NO golpear ni martillar el mueble (hágalo sólo donde se indique) / Do not hit or hammer the furniture (just do it where is indicated).
SIEMPRE levante el mueble entre dos personas, NO lo arrastre / Do not drag thefurniture Lift it between two people.
NO mojar o ubicar a la intemperie / Do not expose to rain or direct sun.
NO sobrecargue el mueble. no exceda el peso de 30 kilos para gabinetes de cocina / Do not overload the cabinet. Weight max. 66lbs for kitchen cabinets.
NO permita que los niños manipulen el mueble, puede voltearse y lastimarlos / Do not allow children to handle the cabinets or drawers, they could get hurt.
Limpie con paño seco , / Clean with a dry cloth.
HERRAJES BÁSICOS PARA MUEBLES RTA BASIC HARDWARE FOR
1.Abrir la caja del mueble y buscar la bolsa con los herrajes / Open the box and look for the hardware bag.
2.Abrir el paquete y comprobar que el contenido de las piezas es correcto / Open the package and verify that the content of the pieces is correct.
RTA FURNITURE
3. Separe los herrajes para facilitar su identificación durante el armado / Separate hardware for easy identification during assembly.
4.Arme el mueble en un lugar limpio y en una superficie plana /Assemble the furniture in a clean place and on a flat surface.
MUEBLES MODULARES, CONSTRUYENDO HOGARES /READY TO ASSEMBLE FURNITURE, BUILDING HOMES
VOLTEAR/ TURN OVER
Kit de anclaje a la pared / Wall - Anchoring Kit 10
B D H I B D 1 2
Girar 180° /
IMPORTANTE
Tenga en cuenta: Voltear el mueble cuidadosamente para ensamblar los fondos.
El buen funcionamiento del mueble depende de un adecuado ensamblaje An excellent furniture´s performance relies on a solid and a suitable assembly.
MINIFIX / CONNECTOR - DOWELS
Sistemadeunióncompuestoporunperno(A)yunacajaminifix(B).
(1)Seinsertalacajaminifixdentrodelaperforaciónubicadaenlacaradelapieza,laflechadebeapuntarsiemprea ladireccióndelaperforaciónpordondeentraráelperno.
(2)Sedebeinsertarelpernoporsuparteplásticaenlasperforacionesqueseindiquen,luegoseinsertalapunta metálicaenlaperforaciónparaquesucabezaquedealinteriordelacajaminifix.
(3)Girarlacajaminifix180°paraapretarlasdospiezas.
It´safittingsystemmadeofaspreadingbolt(A)andaminifixcam(B).
(1)Inserttheminifixcamintheholeplacedinthefaceofthepanelwiththearrowpontingtowardstheholewheretheboltwill fit.
(2)Inserttheboltwithitsplasticbaseintheshownholes,theninsertthemetallicboltheadintheholessoitfitsinsidethe minifixcam.
(3)Tightthepanelsbyturningtheminifixcam180°.
TARUGOS O TAQUETES / FLUTED DOWELPIN
caja minifix / dowels hole
Esunpedazodemaderacortoygrueso,deaproximadamente5a10cmdelargo,quesirveparaamarrarelmueble ydarleresistencia.
It´s ashortandthickpieceofwood,1,9to3,9inchesaproximately,whichisusedtotiethecabinetandgiveitresistence.