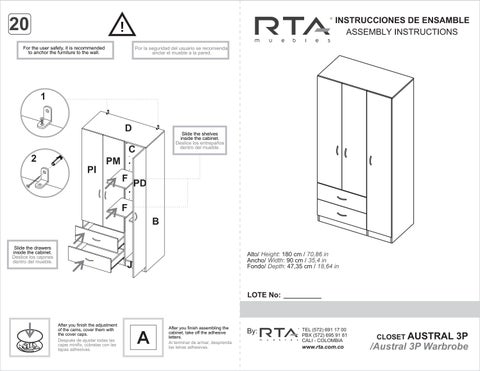
For the user safety, it is recommended to anchor the furniture to the wall.
Por la seguridad del usuario se recomienda anclar el mueble a la pared.
Slide the drawers inside the cabinet.
Deslice los cajones dentro del mueble.
shelves
After you finish the adjustment of the cams, cover them with the cover caps.
Después de ajustar todas las cajas minifix, cúbralas con las tapas adhesivas.
After you finish assembling the cabinet, take off the adhesive letters.
Al terminar de armar, desprenda las letras adhesivas.
Alto/ Height: 180 cm / 70,86 in
Ancho/ Width: 90 cm / 35,4 in
Fondo/ Depth: 47,35 cm / 18,64 in
LOTE No:
By: TEL(572) 691 17 00 PBX (572) 695 91 81 CALI - COLOMBIA www.rta.com.co
Slide the
inside the cabinet.
Deslice los entrepaños dentro del mueble.
Door Installation
RECOMENDACIONES IMPORTANTES
KEY RECOMMENDATIONS
NO pinte el mueble / Do not paint the furniture.
NO lavar las manijas o tiraderas con jabones o elementos abrasivos / Do not wash handles or dumps with soap or abrasives.
NO mojar o ubicar a la intemperie / Do not expose to rain or direct sun.
NO sobrecargue el mueble. no exceda el peso de 30 kilos para gabinetes de cocina / Do not overload the cabinet. Weight max. 66lbs for kitchen cabinets. O O O O O O
NO golpear ni martillar el mueble (hágalo sólo donde se indique) / Do not hit or hammer the furniture (just do it where is indicated).
NO permita que los niños manipulen el mueble, puede voltearse y lastimarlos / Do not allow children to handle the cabinets or drawers, they could get hurt.
SIEMPRE levante el mueble entre dos personas, NO lo arrastre / Do not drag thefurniture Lift it between two people.
Limpie con paño seco , / Clean with a dry cloth.
HERRAJES BÁSICOS PARA MUEBLES RTA
BASIC HARDWARE FOR RTA FURNITURE
1.Abrir la caja del mueble y buscar la bolsa con los herrajes / Open the box and look for the hardware bag.
2.Abrir el paquete y comprobar que el contenido de las piezas es correcto / Open the package and verify that the content of the pieces is correct.
3. Separe los herrajes para facilitar su identificación durante el armado / Separate hardware for easy identification during assembly.
4.Arme el mueble en un lugar limpio y en una superficie plana / RTAfurniture must be assembled in a clean place and on a flat surface.
adjustment Ajuste de altura
adjustment Ajuste de profundidad
Hinge adjustment Ajuste de las bisagras
adjustment Ajuste lateral
Closet Rod
Tubo ovalado
El buen funcionamiento del mueble depende de un adecuado ensamblaje An excellent furniture´s performance relies on a solid and a suitable assembly. RECOMENDACIONES DE ENSAMBLE / ASSEMBLYRECOMENDATIONS
MINIFIX / CONNECTOR - DOWELS
(3)Tightthepanelsbyturningtheminifixcam180°. 18 K L M N O Slide. Deslice.
Turn minifix cams to the right to tighten.
Gire las cajas minifix hacia la derecha para apretar las piezas. x2
x2 K L M O FC
1 2 3 A B
Sistemadeunióncompuestoporunperno(A)yunacajaminifix(B).
(1)Seinsertalacajaminifixdentrodelaperforaciónubicadaenlacaradelapieza,laflechadebeapuntarsiemprea ladireccióndelaperforaciónpordondeentraráelperno.
(2)Sedebeinsertarelpernoporsuparteplásticaenlasperforacionesqueseindiquen,luegoseinsertalapunta metálicaenlaperforaciónparaquesucabezaquedealinteriordelacajaminifix.
(3)Girarlacajaminifix180°paraapretarlasdospiezas.
It´safittingsystemmadeofaspreadingbolt(A)andaminifixcam(B).
(1)Inserttheminifixcamintheholeplacedinthefaceofthepanelwiththearrowpontingtowardstheholewheretheboltwill fit.
(2)Inserttheboltwithitsplasticbaseintheshownholes,theninsertthemetallicboltheadintheholessoitfitsinsidethe minifixcam.
TARUGOS O TAQUETES / FLUTED DOWELPIN
caja minifix / dowels hole
Esunpedazodemaderacortoygrueso,deaproximadamente5a10cmdelargo,quesirveparaamarrarelmuebley darleresistencia.T
It´s ashortandthickpieceofwood,1,9to3,9inchesaproximately,whichisusedtotiethecabinetandgiveitresistence. 180°
VOLTEAR TURN OVER
Se recomienda armar el mueble sobre la caja o una superficie lisa para no rayarlo. It is recommended to assemble the product on the box or on a flat surface to not scratch it.
Voltear el mueble cuidadosamente para ensamblar los fondos. Carefully turn over the cabinet to assemble the back panels.
PESO MAX. SUGERIDO EN MUEBLE (Kg) / MAX SUGGESTED LOAD (Kg)
NOTA: La resistencia a las cargas puede variar dependiendo si es una carga distribuida o una carga puntual, las gráficas corresponden a cargas puntuales, NO exceder los pesos sugeridos / NOTE:The load capacity depends if it is a point load or if it is an uniform distributed load, do not exceed the suggested loads.
Do NOTtighten the cams in this step. NO apriete las cajas minifix en este paso.
Turn minifix cams to the right to tighten. Gire las cajas minifix hacia la derecha para apretar las piezas.
x24
HERRAJES PARAARMADO
ASSEMBLY HARDWARE
x24
x16
x8
Minifix/ Minifix Cams
Perno Minifix/ Spreading Bolt
x5
Tapa Adhesiva
Color 1/ Cover Caps
x10
Be careful turning over the cabinet. Tenga cuidado al voltear el mueble.
Bisagra Semi-parche/ Half Overlay Hinge
Manija Arco/ Handle
Tornillo Manija /Handle Screw
Tapa Adhesiva
x10
x50
Deslizador 15mm/ Nail On Glide
Puntilla/ Nail
Soporte Tubo Ovalado/ Closet Rod Support
x6
Color 2/ Cover Caps x1
Bisagra Parche/ Full Overlay Hinge
Tubo Ovalado/ Closet Rod x2
TENER PRECAUCIÓN AL ABRIR LA BOLSA DE HERRAJES PARA NO EXTRAVIAR NINGUNO. COMPRUEBE QUE EL CONTENIDO DE LAS PIEZAS SEA EL CORRECTO. EN CASO QUE FALTE ALGUNA PIEZA O ESTE DEFECTUOSA DEVUELVA LAS PIEZAS AL ALMACÉN CON SU FACTURA PARA EFECTUAR EL CAMBIO DE LAS PIEZAS Y/O LOS HERRAJES LO MÁS PRONTO POSIBLE./ PLEASE BE CAUTIOUS WHEN OPENING THE HARDWARE BAG TO NOT LOSE ANY CHECK THE CONTENTS OF THE PARTS ARE CORRECT. IF ANY PART IS MISSING OR IMPERFECT PLEASE RETURN THE PARTS TO THE STORE WITH THE PRODUCT INVOICE ATTACHED TO MAKE EFECTIVE THE REPLACEMENT OF THE IMPERFECTPIECESORHARDWAREASSOONASPOSSIBLE.
HERRAJES PARAARMADO
ASSEMBLY HARDWARE
x2
Tornillo de Ensamble 2"/ Drywall Screw
x38
Riel Sencillo/ Drawer Slides
Perfil en H/ H Guide
x8
Soporte Entrepaño Móvil/ Shelf Support x1
x56
Tarugo/ Fluted Dowel Pin
Tornillo Lámina/ Sheet Metal Screw
KITANTIVUELCO
Tornillo Lámina/ Sheet Metal Screw x2
Cantonera/ Corner Brace x2
Chazo Mariposa + Tornillo Ensamble / Wall Anchor + Drywall Screw x2
TENER PRECAUCIÓN AL ABRIR LA BOLSA DE HERRAJES PARA NO EXTRAVIAR NINGUNO. COMPRUEBE QUE EL CONTENIDO DE LAS PIEZAS SEA EL CORRECTO. EN CASO QUE FALTE ALGUNA PIEZA O ESTE DEFECTUOSA DEVUELVA LAS PIEZAS AL ALMACÉN CON SU FACTURA PARA EFECTUAR EL CAMBIO DE LAS PIEZAS Y/O LOS HERRAJES LO MÁS PRONTO POSIBLE./ PLEASE BE CAUTIOUS WHEN OPENING THE HARDWARE BAG TO NOT LOSE ANY CHECK THE CONTENTS OF THE PARTS ARE CORRECT. IF ANY PART IS MISSING OR IMPERFECT PLEASE RETURN THE PARTS TO THE STORE WITH THE PRODUCT INVOICE ATTACHED TO MAKE EFECTIVE THE REPLACEMENT OF THE IMPERFECTPIECESORHARDWAREASSOONASPOSSIBLE.
Turn minifix cams to the right to tighten. Gire las cajas minifix hacia la derecha para apretar las piezas. J 12 A B C E G H J J I I
B C G H J
x2 x2
Do NOTtighten the cams in this step. NO apriete las cajas minifix en este paso.
x4
Do NOTtighten the cams in this step. NO apriete las cajas minifix en este paso.
x3
Full Overlay Hinge
Bisagra Parche
Do NOTtighten the cams in this step. NO apriete las cajas minifix en este paso. x3 x2
Overlay Hinge Bisagra Parche
x3
x2 x3
Half Overlay Hinge
Bisagra Semi Parche
x2 Arrow !
Do NOTtighten the cams in this step. NO apriete las cajas minifix en este paso.
x4 x3 x2