Stylus Wacom AES 2.0 Pen with App launch button G3
Connections
Network and connectivity
Keyboard
Software
Sensors
Battery capacities
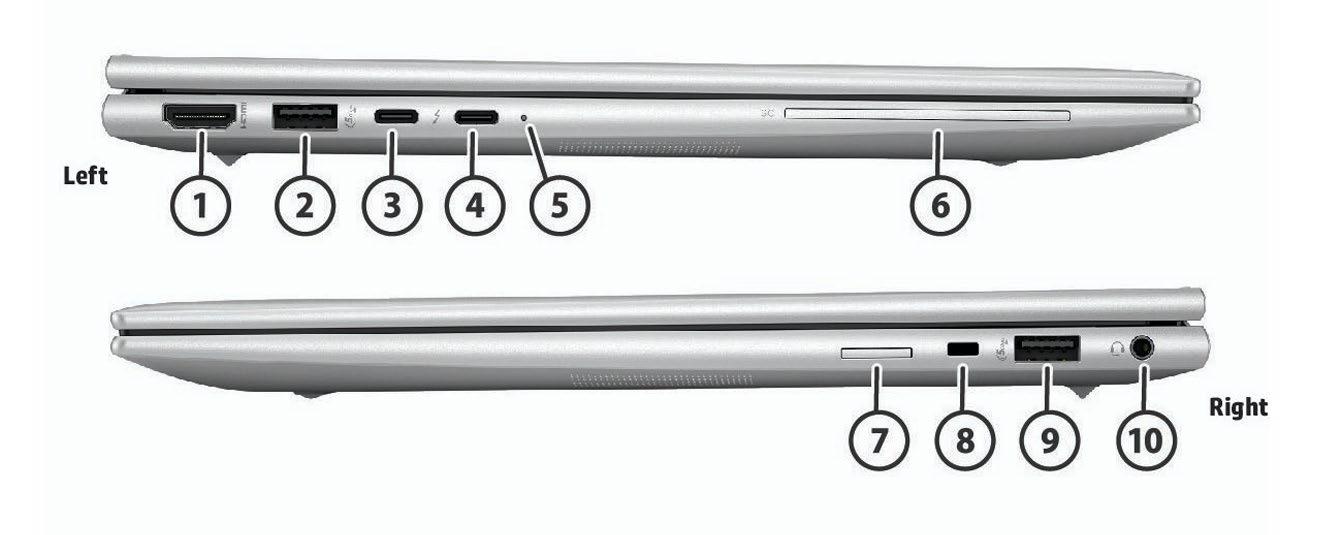
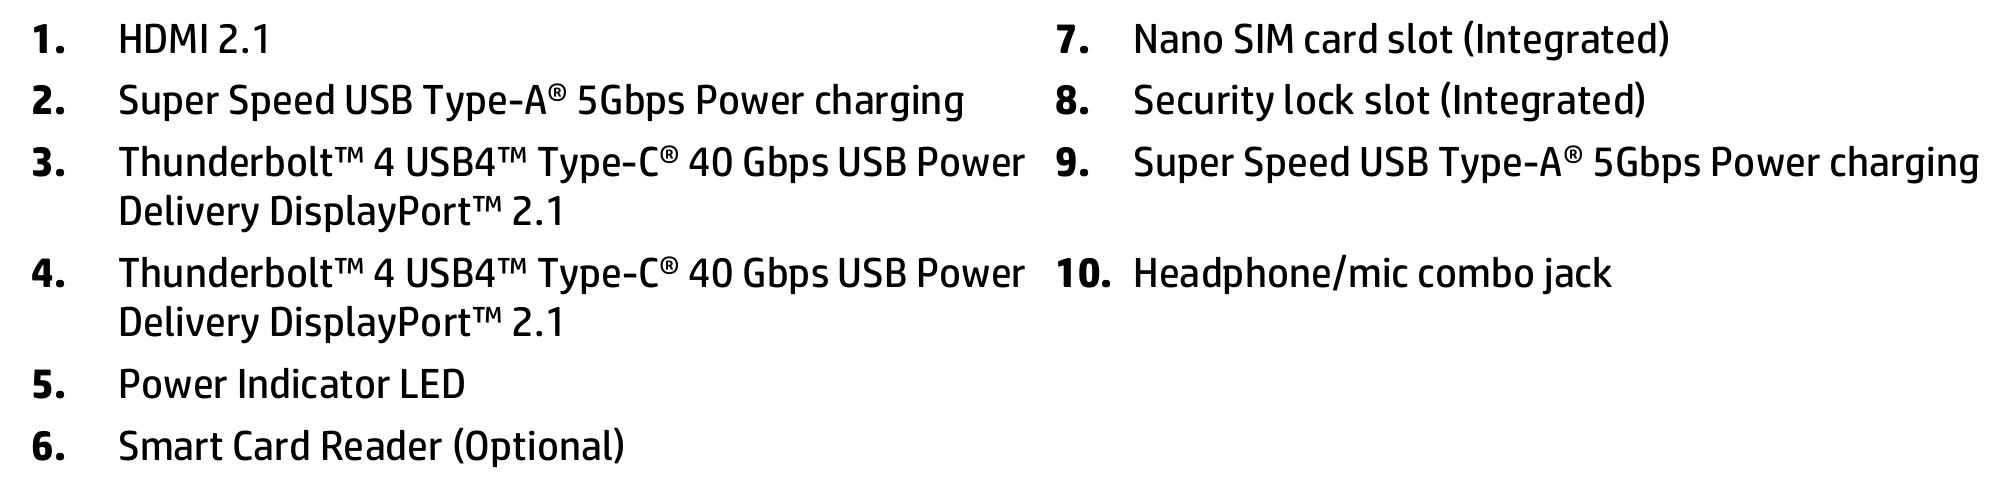
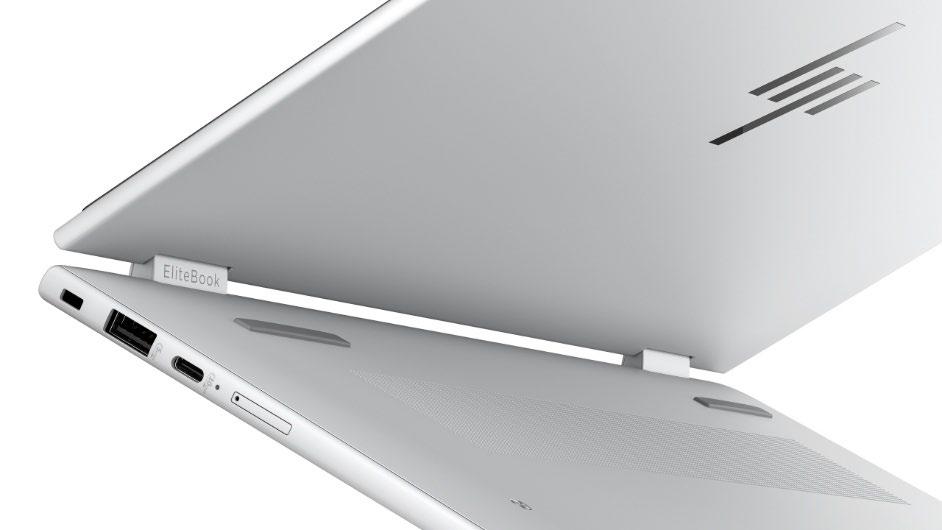
Left side: 2 x USB-C (Thunderbolt 4)
1 x USB-A power charging & 1 x HDMI 2.1, 1 x Card Reader
Right side: 1 x Security Lock Slot, 1 x USB-C, 1 x USB-A slot, 1 x headphone/mic jack, 1 x Nano SIM slot
Intel AX211 Wifi 6E 160 MHz
Bluetooth 5.3 WW WLAN
HP Premium spill-resistant backlit keyboard
Microsoft Precision Clickpad
Multi-touch Gesture support
HP Services Scan & HP Support Assistant
Ambient light, Adaptive Colour, Hall Effect, Thermal, Fingerprint
HP Long Life 3-cell
56Wh Li-ion Polymer Battery
HP Fast Charge to 50% in 30 minutes
Meet
Ports
Power and charging
When the computer has a charged battery and is not plugged into external power, the computer runs on battery power. When the computer is off and unplugged from external power, the battery slowly discharges. The computer displays a message when the battery reaches a low or critical battery level. The HP Fast Charge feature allows you to quickly charge your computer battery. Charging time might vary by ±10%. When the remaining battery charge is between 0 and 50%, the battery charges to 50% of full capacity in no more than 30 to 45 minutes, depending on your computer model. Be sure to conserve battery power and maximize battery life.
1. Lower the brightness of the display.
2. Turn off wireless devices when you are not using them.
3. Disconnect unused external devices that are not plugged into an external power source, such as an external hard drive connected to a USB port.
4. Stop, disable, or remove any external media cards that you are not using. Before you leave your work, initiate Sleep or shut down the computer.
Keep your laptop up to date
Microsoft releases important updates to improve Windows software security and reliability, and system and hardware updates (also known as firmware updates) to help improve the stability and performance of your hardware.
Storage and OneDrive
HP Elitebook 830 x 360 G11 is available with up to 16 GB of RAM and 512GB SSD storage. You can extend your storage options by using OneDrive, USB drives, and microSD cards.
OneDrive is 1 TB online storage that comes with your Microsoft Office365 account linked to your school account. Save your documents, photos, and other files to the OneDrive folder on your laptop and they'll be synced to OneDrive in the cloud
If you add, change, or delete a file or folder in your OneDrive folder, the file or folder is added, changed, or deleted on the OneDrive website and vice versa. You can work with your synced files directly in File Explorer and access your files even when you’re offline.
Whenever you’re online, any changes that you or others make will sync automatically. The copy in the cloud is available to you from any web-connected device. If you want to, you can share some of the folders in your OneDrive with others or send someone a link to just one page.
Please note: Users are advised to save all their work onto OneDrive to prevent data loss if their device needs to be replaced. It is the students’ responsibility to back up any other personal files externally
Care and cleaning
To keep your HP Elitebook 830 x 360 G11 laptop looking and working great, follow these simple steps:
Touchscreen care
Scratches, oil, dust, chemicals, and ultraviolet light can affect the performance of your touchscreen. Here are some things you can do to help protect the screen:
- Clean it frequently. Use a soft, lint-free cloth to wipe the screen gently. You can dampen the cloth with water or an eyeglass cleaner, but don’t apply liquids directly to your screen. Don’t use window cleaner or other chemical cleaners on your device.
- Keep it covered. Close the Cover while you’re in transit or not using your laptop.
- Keep it out of the sun. Do not leave your computer in direct sunlight for a long time. Ultraviolet light and excessive heat can damage the display.
Keyboard care
The laptop requires minimal care to function well. To clean the keyboard, wipe it with a lint-free cloth dampened in mild soap and water. Don’t apply liquids directly to the keyboard.
Power cord care
Charger cords, like any other metal wire or cable, can be weakened or damaged if repeatedly twisted or bent in the same spot. Here are some things you can do to keep your power cord from being damaged:
- Avoid twisting or pinching your power cord.
- Don’t wrap your power cord too tightly, especially around the power brick. Wrap it using loose coils rather than tight angles.
- Inspect your power cord regularly, especially where it joins the power brick.
- Avoid pulling on the power cord when unplugging your laptop. Gently removing the connector from the charging port can help prevent damage to your power cord.
Support and warranty
Before emailing the ICT Service Desk with your problem, you can check out the Troubleshooting Guide in this document. If you can’t solve your issue, contact us on 9727 9989 or at servicecentre@oxley.vic.edu.au We are open Mon – Fri including school holidays between 8am and 4:30pm.
Warranty Replacement
Devices under the Student Device Program are subject to a 3-year warranty with 3 accident claims. If any issues arise, the device should be brought to the ICT Service Desk and the warranty can be assessed and processed accordingly. For more information, please refer to the Student Device Policy
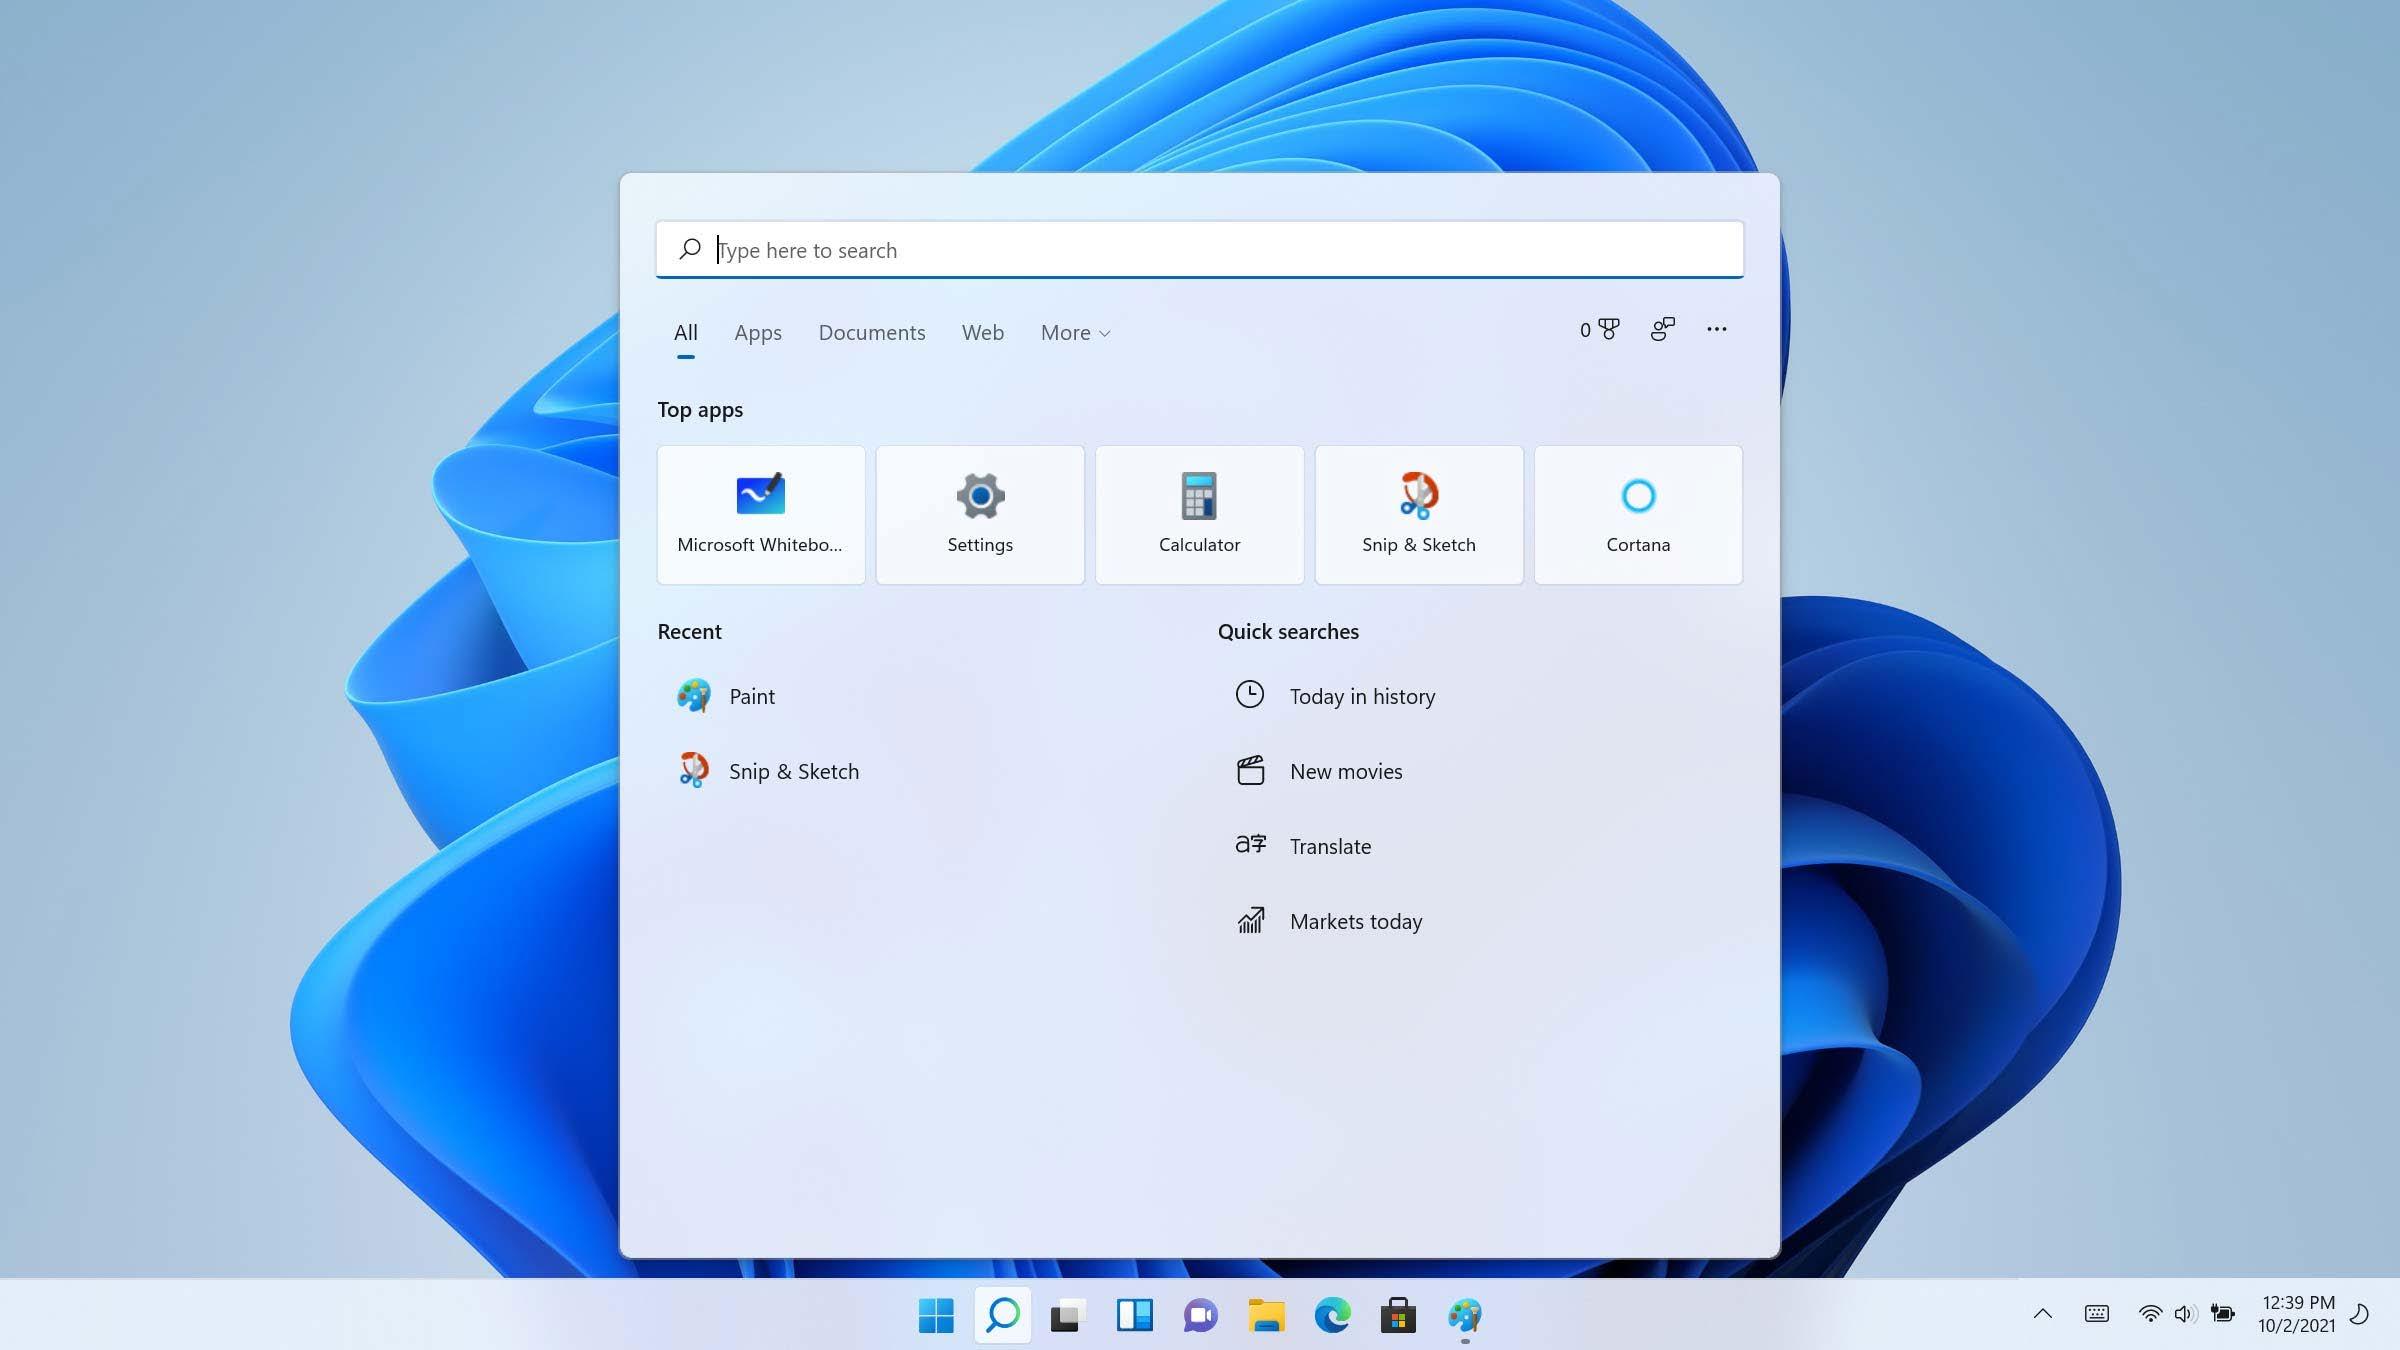
Windows 11: Start menu & Taskbar
You will notice that the Start Menu and Task Bar location has changed, but this can be altered if needed:
1. Right click your taskbar
2. Select Task Bar Settings
3. Select Taskbar Behaviours
4. Under Taskbar Alignment, choose from the drop-down menu to adjust the location
Auto tablet mode
This means your device will automatically change to the appropriate mode (no need to select it). The new three finger swipe action means you can call up Task View to minimize or recall running apps. (only available while the device is in tablet mode).
Snap layouts
This function enables you to use several apps at the same time, spread evenly across your screen by pressing ‘Windows key + Z’. Choose between a variety of window layouts by selecting them with your mouse.
Virtual desktops
Now you can have multiple desktops available to switch between whenever you like.
1. Hover your mouse over the virtual desktop icon (appears as a grey and white square)
2. Select New Desktop
3. Switch between virtual desktops by holding Windows + Ctrl + left or right arrow key.
De-cluttering your mailbox
When you get warnings about your mailbox being almost full, please follow the procedures detailed here to reduce the size of your mailbox:
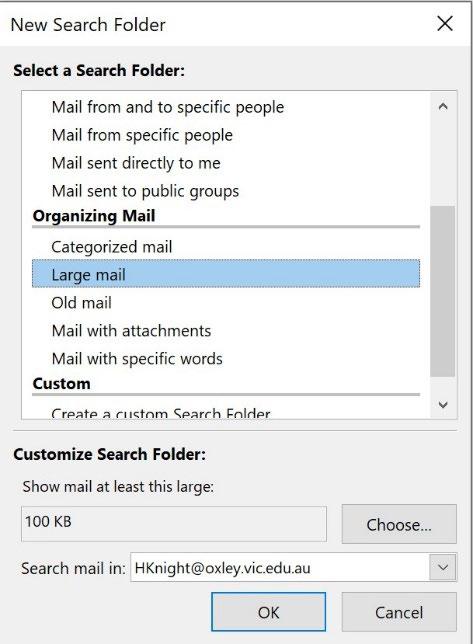
1. Check your largest emails and delete as many as possible
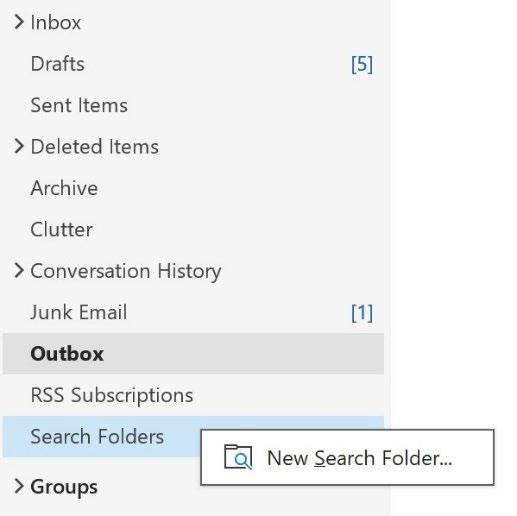
• In left folders column expand the Search Folders and
• Choose the New Search folder
You will then be able to see the list of your largest emails. By deleting any of these that are not needed, you will be gaining the most space.
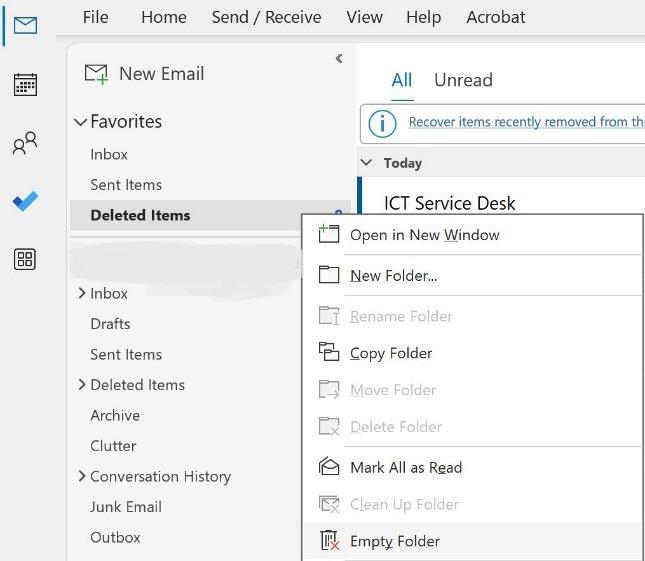
2. Make sure your deleted emails folder has been emptied
• Right click on the Deleted Items folder in left column
• Choose Empty Folder
3. Save email attachments you wish to keep in your network drives and delete the emails
• Open the email with attachments you want to keep
• Right click on the email attachment
• Choose Save As to save the attachment to one of your network drives
• Once you have saved the attachments, delete the email
• Empty your deleted items folder
Troubleshooting Guide
My device won’t turn on
Is device battery charged? If not, please ensure that device battery is charged before arriving at school. If the laptop refuses to turn on even though its power source appear fine, try forcing a restart by:
1. press and hold the power button for 30 seconds, then release it
2. then press the power button as you normally would to turn the tablet back on
3. If your tablet is completely frozen and won’t restart, you can force a shut down by press the power button for 30 seconds, and then pressing both the power button and the volume-up button at the same time for 15 seconds. Release the buttons, then wait 10 seconds then press the power button to boot up again
Device is showing a blue screen
Be careful! If your device is just rebooting and downloading some updates, then it needs to keep doing its job and you should leave the tablet uninterrupted (the screen may be black, bluish, or dark during this time). The exception is if you see a long-term blue screen that eventually leads to an error message or a similar problem. If forcing a restart does not resolve the issue, bring the device to The Cloud ICT services at Oxley Christian College Your best bet, after waiting about a half-hour for the problem to clear, is to force a restart
Device is performing very slowly
A number of different issues can cause your device to slow to a crawl. We suggest that you start by looking through all your open desktop applications and closing down a few of them. If your speed immediately improves, you had too many programs running for your RAM to deal with.
Wifi not connected
If the problem seems to be with the device itself:
1. Go to Start Menu
2. Choose Settings
3. Select Network & Internet
Here you will see an option for Airplane mode. Make sure it is turned off Go to Wi-Fi and make sure your wireless capabilities are turned on.
Device audio not working
Find the volume controls and mute key on your Type Cover: Press them to make sure your sound isn’t just quiet or on mute. Some applications may have their own volume controls too, so if it’s only one application that’s not playing any sound, look for volume control options within the application itself.
Sometimes sound drivers need to be updated. To update:
1. Go to the Start Menu Select Settings and choose Update & Security
2. Select the Windows Update option
3. Choose Check for Updates here
4. If updates are found, choose to Install
5. Restart your device, when prompted
Remember to give your laptop plenty of time to restart, because updating can take a significant number of minutes – your device may be busy for the next half hour or so.
Touch screen not responding
1. Firstly, try the basics like wiping down your touch screen to clean off any oil.
2. If you can still use your keyboard, restart your device via the Start menu.
3. If your entire computer is frozen, this is a different sort of problem. On your laptop, force a manual restart. If you cannot even do this, force a manual shutdown. See "Device won't turn on" section for how to do this
4. If your touch screen is flashing of flickering and a restart doesn’t resolve this, bring your device to The Cloud ICT Services at Oxley Christian College.
Touch screen won’t rotate
If you’ve been spinning your device in circles trying to get the screen to rotate, head over to the Action Center (use Windows Logo Key + A) and take a look at your Screen Rotation Lock button to make sure it is turned on. If you can’t find the Rotation Lock button at all, don’t panic – sometimes the button does disappear. A solution that seems to work here is removing your Type Cover keyboard and attaching it again. The keyboard can interfere with screen rotation and sometimes lead to problems.
Webcam showing black
To open the camera shutter on your laptop, follow these steps:
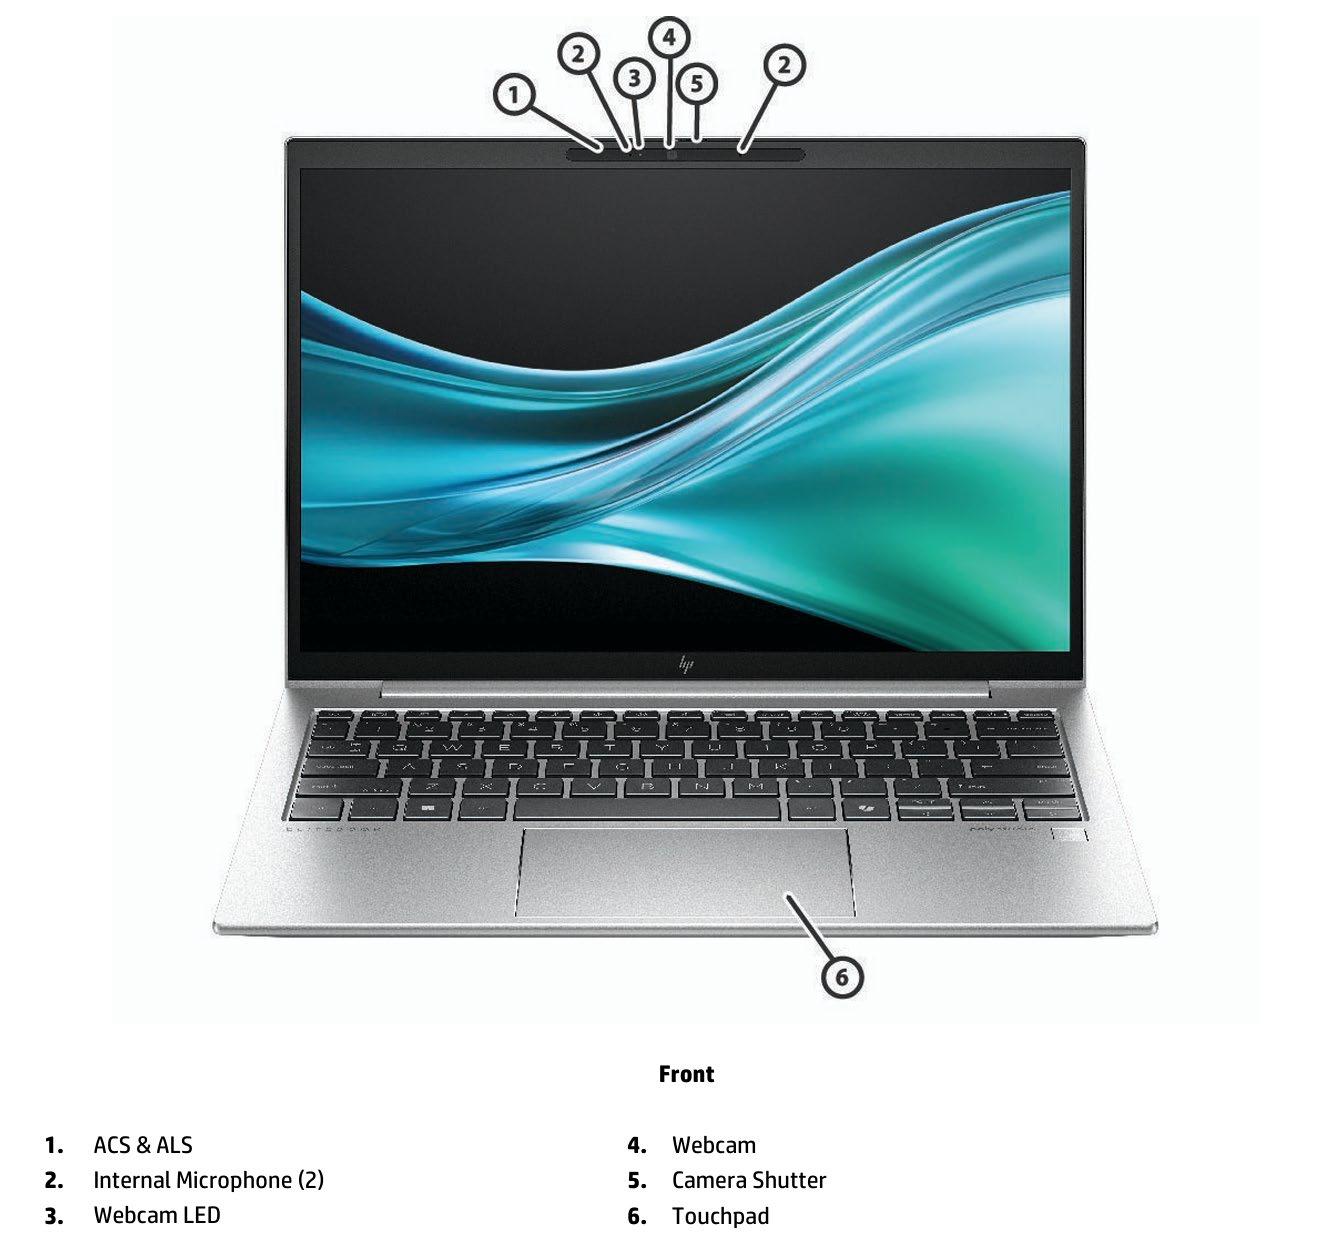
1. Locate the Privacy Shutter at the top of your screen
2. Identify the physical slider that you can move left or right to open or close the shutter
3. Slide to Open – Gently slide the shutter to the open position until the camera lens is fully exposed
4. Check the Camera app on Windows to confirm that the webcam is functioning properly
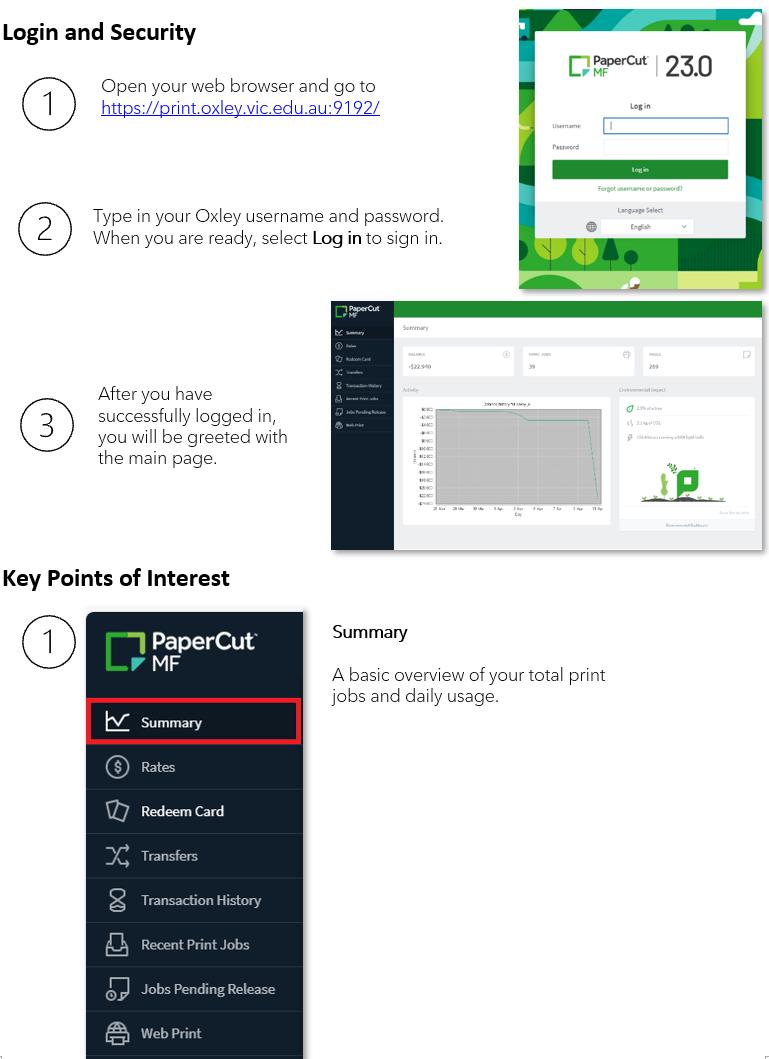
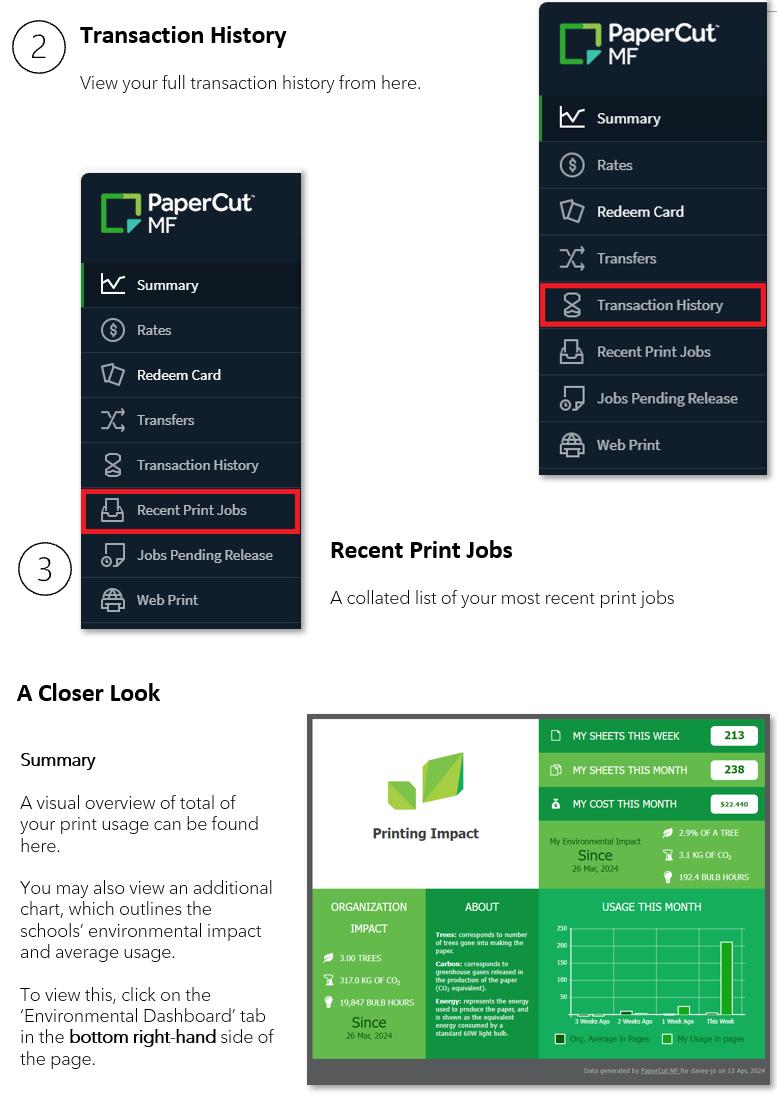
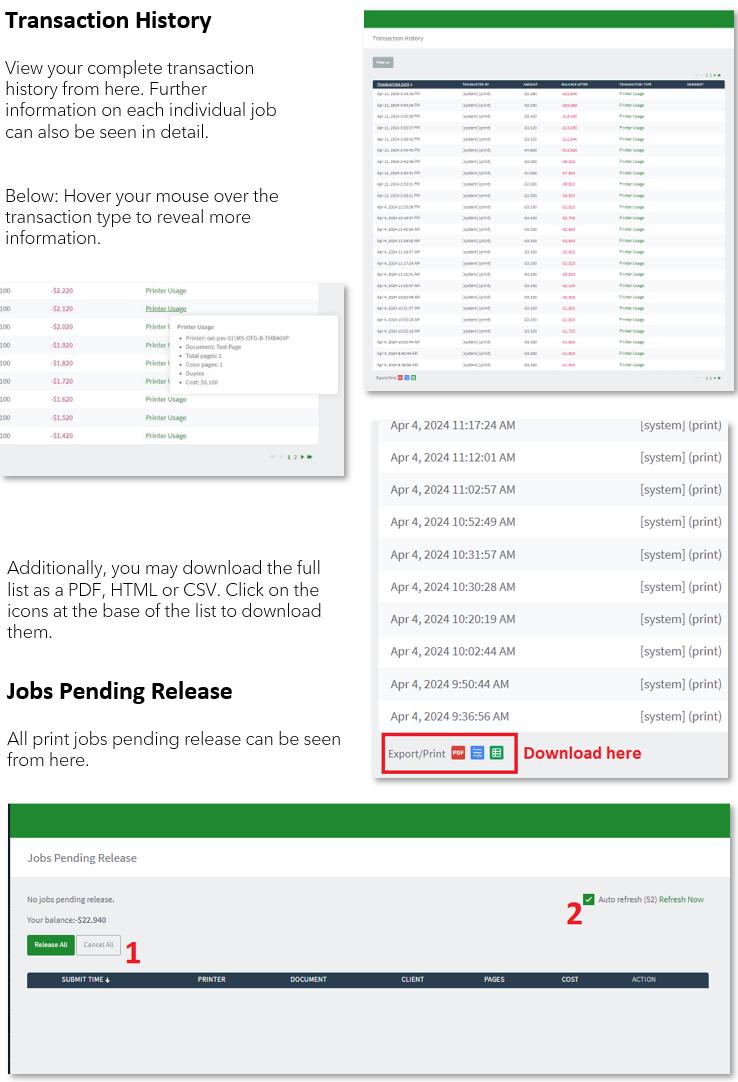
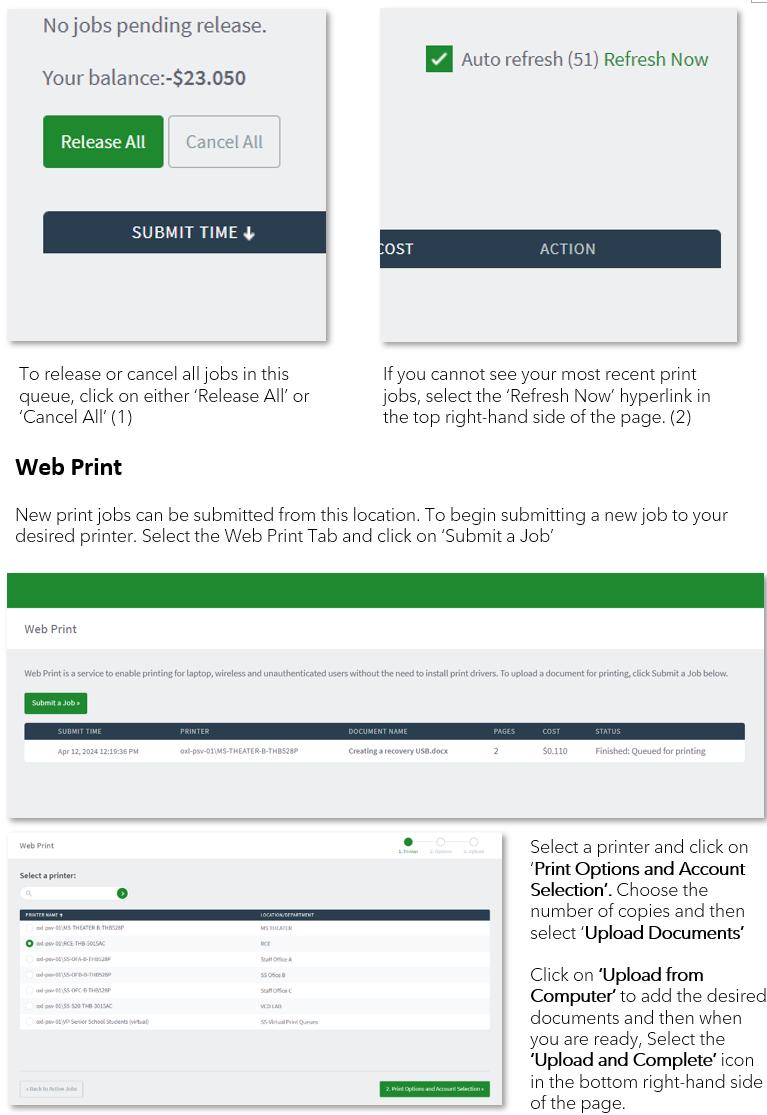
How to use Toshiba Web Print
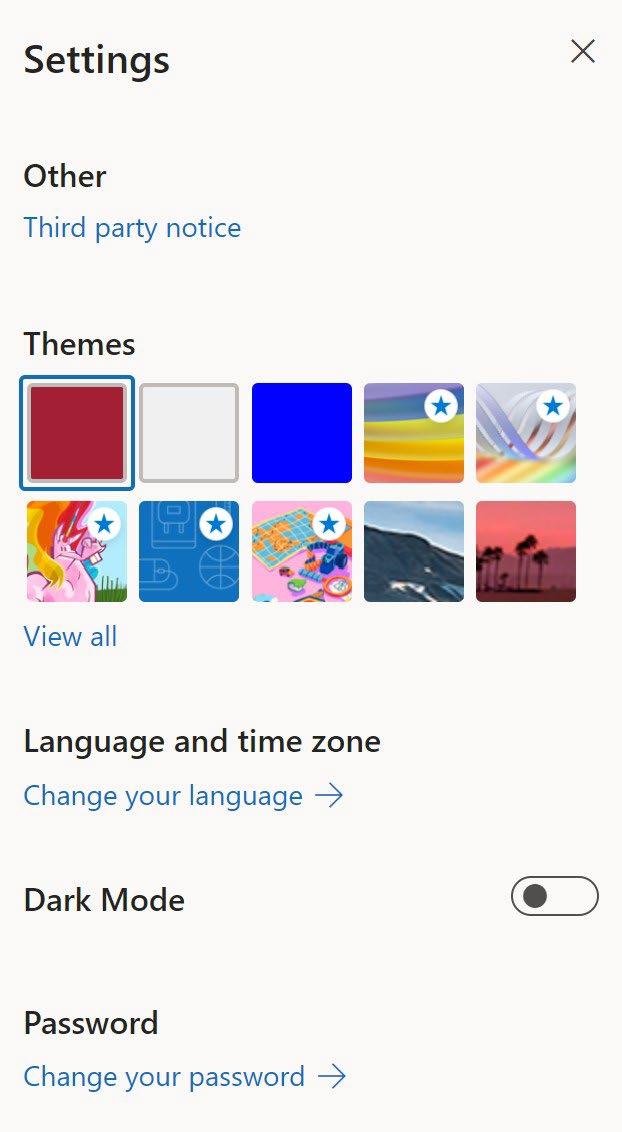
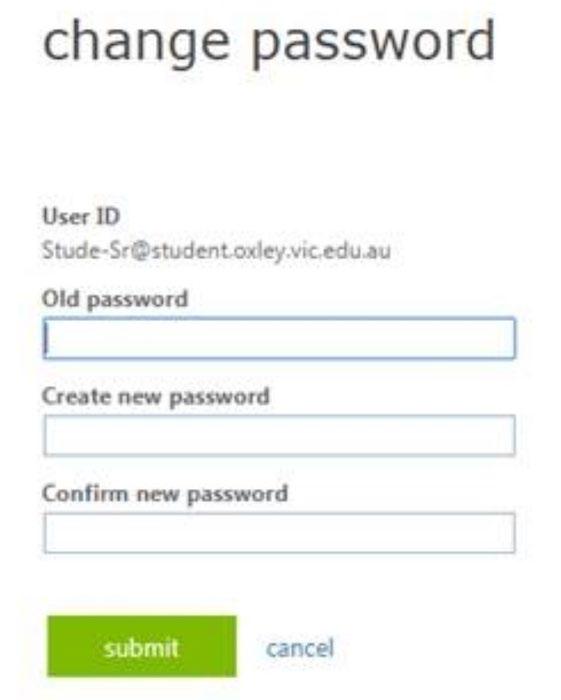
How to reset your Oxley password
Option
2
Option
1
1. Go to www.office.com, https://portal.office365.com
2. Sign in with your school account.
3. Go to Settings > Password > Change your password
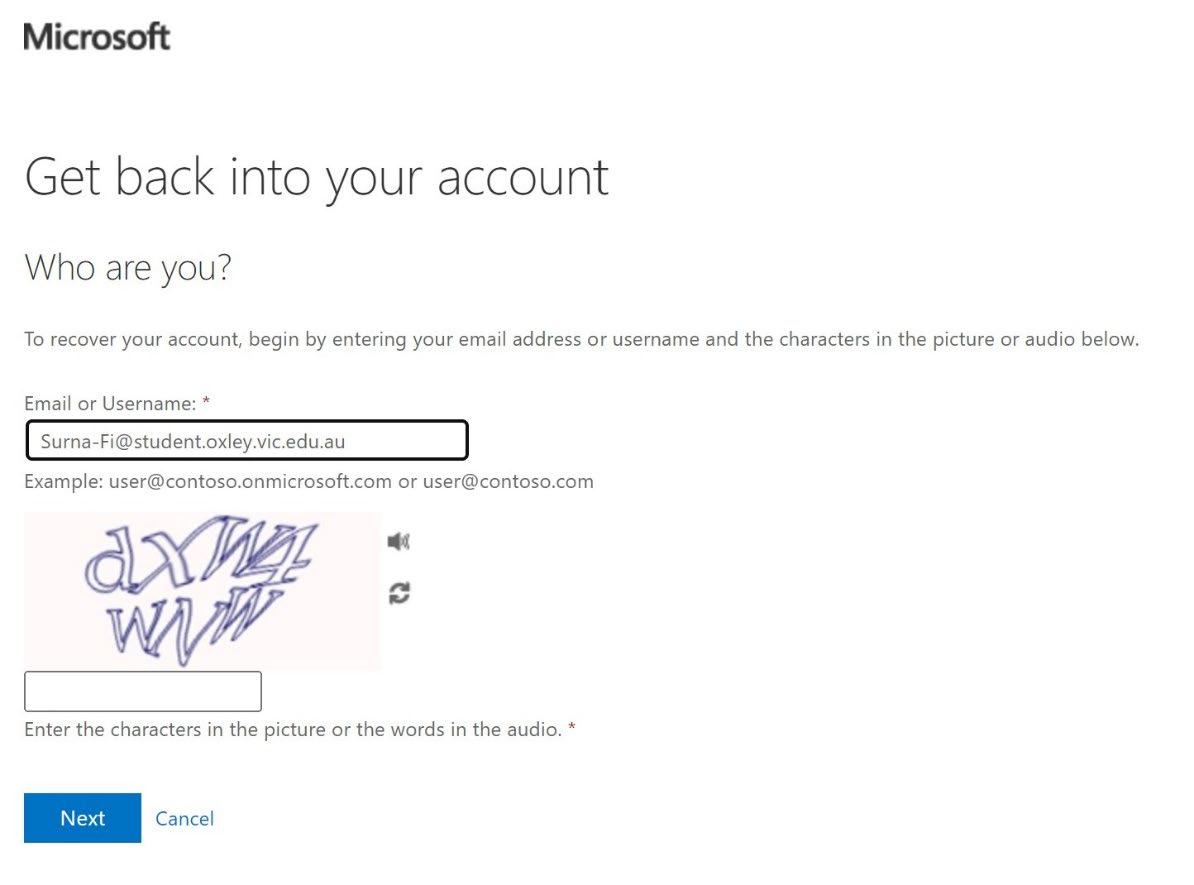
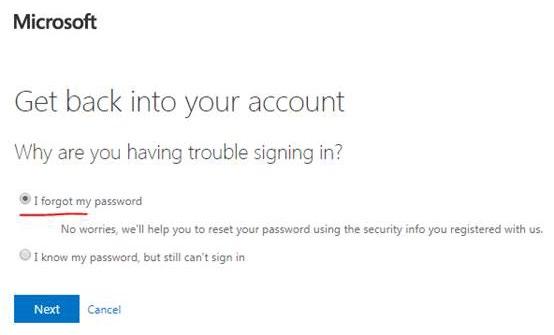
Go to the self-service password reset page https://passwordreset.microsoftonline.com
1. Enter your username in the text box.
2. Enter the security code in the field.
3. Enter your new password.
Setting up Multi-Factor Authentication (MFA)
As part of Oxley Christian College's ongoing commitment to protecting student accounts and personal information, Cleve MFA has been implemented for all students since 2025. This additional security measure helps safeguard student accounts from unauthorised access and provides an extra layer of security when accessing College systems and online learning resources.
How Clever MFA Works
During the MFA onboarding process:
• At the beginning of the school year, the ICT Department will issue each student with an ID card that includes their unique QR code. Students should keep their ID card secure, as the QR code is used as part of the MFA authentication process.
• Students will create their own secure six-digit PIN during the setup process.
• Once configured, Students can verify their identity during the authentication process by using either their unique QR code or their six-digit PIN.
When prompted for MFA, students will:
1. Sign in using their College username and password.
2. Scan their assigned QR code or
3. Enter their six-digit PIN to complete the authentication process.
Important Information
• The QR code is unique to each student and should be kept secure.
• Students should never share their QR code or six-digit PIN with anyone, including friends.
• Parents are encouraged to remind students to keep their PIN confidential.
• If a student forgets their PIN or loses access to their QR code, they should contact the ICT Service Desk for assistance.
Benefits of Clever MFA
• Protects student accounts from unauthorised access.
• Reduces the risk of phishing and password-related security incidents.
• Provides secure access to College applications and learning resources.
• Supports the College's commitment to maintaining a safe and secure digital learning environment.
The ICT Department will assist students with the onboarding process and provide guidance to ensure everyone can successfully activate Clever MFA (see video MFA | ClickView).