The entire John Cannon Homes team is committed to your continued satisfaction with your home buying decision. This Guide is a tool for your use throughout your home building experience It outlines and details each step and acts as a quick reference guide Please review this information as soon as possible.
About Us
For over three decades, John Cannon Homes has set the standard in luxury custom home building and design; creating distinctive homes for people who appreciate the fine art of living well.
Exquisite craftsmanship, uncompromising quality, the finest materials, and unparalleled personal service are the hallmarks of our success. Creating homes of timeless beauty and lasting value has earned John Cannon Homes the recognition of local and national awards year after year. However, our greatest reward is the trust of hundreds of homeowners like you.
Avery Davis
John Cannon Homes has an impressive collection of industry awards including over 500 Parade of Homes honors Additionally, we have been voted Sarasota's Best Builder/Finalist by the readers of the Sarasota Herald-Tribune for 34 consecutive years. The Tampa Bay Business Journal has recognized John Cannon Homes as one of the 50 Fastest Growing Companies in the Tampa Bay area and the Professional Builder Magazine has ranked John Cannon Homes 15th in the "Nation's Best Companies to Work For" in the residential construction industry. These awards from both local residents and business publications highlight just a few of our accomplishments as a leader in the residential construction industry.
John Cannon Homes is an integral part of distinguished communities throughout the West Coast of Florida including Sarasota, Manatee, Charlotte, Hillsborough, Pasco, Pinellas, and DeSoto Counties
From initial design to finishing touches, the John Cannon Homes Team is committed to making your home-building experience rewarding, and enjoyable, and turning your dreams into reality
John K. Cannon, President/CEO
John Cannon Homes, Inc.
Our Mission Statement
To create homes of timeless beauty with superior craftsmanship and enduring quality for our respected customers, while providing the highest level of personalized service and support from all of our team members.
Your home is the center of your life, a place to build memories, raise a family, entertain friends, and build a legacy. The John Cannon Homes team is dedicated to achieving your dreams for your new home and to make your building experience rewarding.
Holding true to our core values by maintaining a dynamic business environment with an unwavering commitment to future growth, John Cannon Homes will provide an environment allowing for the personal growth and fulfillment of our team members while continuing to be good stewards in our community
The purchase of your new home is a unique and emotional experience. We are committed to making the process pleasant and rewarding. Your Design/Build Specialist will be your John Cannon Homes representative during the development of your custom home design and the execution of your Construction Agreement.
Your Design/Build Specialist will spend the time needed to answer your questions and guide you through the custom design process Please schedule appointments in advance to ensure you receive the individual and undivided attention you deserve.
Pre-Construction Process
Your Design Liaison
Once your Construction Agreement has been fully executed, you will be contacted by your Design Liaison Your personal Design Liaison will guide you through the plan design, and interior and exterior finish selection process Your Design Liaison will also schedule appointments with trade partners and will attend those appointments with you Additionally, your personal Design Liaison will communicate with you regularly to advise you of the status of your home plans and selections.
The Plan Process
The first step for the Design and Drafting department is to produce design development plans for your home that represent all options selected in your Construction Agreement. You will be asked to review these plans and return them within the timeframe discussed. Any changes requested, before or after you receive these plans, will be documented on a Customer Accommodation form signed by you and an authorized representative of John Cannon Homes and will become part of your Construction Agreement
Once you have approved the design development plans for your home, we will proceed with further development of your construction drawings. The size, complexity, and location of your home along with the number and intricacy of changes requested will determine how quickly our Drafting department can produce the final construction drawings. Once your construction drawings are finalized and approved by you, we ask that you refrain from making any additional structural changes to avoid delays in the permitting process and the construction of your new home
Building Code Requirements
Every home that John Cannon Homes builds is unique Your home is no exception During the various pre-construction phases, the changes, alterations, and requirements that you desire are incorporated into the overall design of your home It is an exciting time when many different design features are drawn together to create your custom home. Part of this process involves adherence to the local/state building codes and neighborhood architectural review committees. For these reasons, the requested changes may not be possible However, we will make every effort to accommodate your requests
Customer Accommodations/Requests
John Cannon Homes will make every attempt to honor any and all requests for changes, modifications and customizations to your plans prior to construction Once the construction drawings have been produced, structural change requests will cause a delay in the start of construction which may require a price adjustment All changes and modifications must be in writing on a Customer Accommodation or Customer Request form, signed by both parties, and fully funded in order for it to be an official request and become part of your Construction Documents. Any change request maybe withdrawn by John Cannon Homes if not accepted by the client within 7 business days.
Architectural Review Committee/Homeowner’s Association Approval
During the pre-construction plan process, we will submit your construction drawings and exterior selections to the appropriate governing Architectural Review Committee (ARC) and/or Homeowners' Association (HOA) Both you, as the owner, and John Cannon Homes, as the contractor, must conform to the guidelines dictated by these committees There may be additional cosmetic items required by the ARC/HOA to enhance the architectural features of the home that are not included in your Construction Agreement but are required by the governance of the community. Please refer to the architectural guidelines provided by the developer at the time of your lot purchase. Many of these requirements are subjective and although we make every effort to include all requirements, we are not able to predict how an ARC/HOA will review and interpret specific submittals
Selection Meetings
There are several meetings that will occur in a short period of time following your plan approval. These appointments will be scheduled when final plans have been approved and signed.
The first appointment will be in our Design Center to select your interior and exterior finishes and colors You can expect five sessions of approximately three hours each to make all of your selections. Every effort is made to offer a diversified selection in all categories and to accommodate any specialty product requests. Please keep in mind, some custom options and products carry an extended lead-time and could pose a delay in construction. Our Design Liaisons are qualified and knowledgeable design consultants who will assist you in every way possible during color and product selections based on specification levels to ensure that you achieve the finish and personal touch you desire
Your Design Liaison will schedule appointments with our trade partners such as the pool contractor, landscaper, landscape lighting, cabinet and appliances, home systems integrator, security and structured wiring. It is important that all of these selections be finalized prior to the start of construction to prevent errors, delays and additional costs.
Option Selection Deadlines
Home builders are faced with the dilemma of balancing flexibility for the buyer with the need to maximize quality control and the number of selections offered At John Cannon Homes we achieve a good balance with the following policies governing the quality and type of options available.
We will apply all options and selections that are part of the original Construction Agreement or approved on a Customer Accommodation and/or Customer Request form that is signed, accepted by both parties, and fully funded
In order to maintain quality, safety, and control, only trade partners specifically under contract with John Cannon Homes are allowed to participate in the construction of your new home. For reasons of safety, quality control and liability, buyers are not permitted to perform any work themselves or subcontract outside suppliers for any reason during construction and prior to closing
Please note that due to the complexities and infeasibility sometimes encountered in the implementation of requested changes, John Cannon Homes reserves the right to deny a request for alteration or deviation from original selection. We will notify you as soon as possible if a requested change cannot be completed.
Changes requested after the start of construction require additional time and typically cost more than changes made prior to the start of construction. Any alteration, change or deviation from options or specifications will be executed upon receipt and acceptance by all parties of an executed Customer Accommodation or Customer Request with receipt of payment in full. Any change request proposal may be withdrawn by the contractor if not accepted by the client within 7 days. All agreements for deviations are contingent upon feasibility, and material and labor availability.
Written Agreements
For your protection and to avoid any confusion, it is absolutely necessary that any agreement between you and any John Cannon Homes representative that departs from the standard John Cannon Homes agreement, is documented on a Customer Accommodation or Customer Request form and signed by all authorized parties. These agreements would include any changes in the terms of the Construction Agreement, Customer Accommodation or Customer Request forms in order for the item to be received by the client or installed into the home
Substitutions by John Cannon Homes
On occasion, it is necessary to substitute a material from the original specifications due to the availability or current performance of a selected material or alter a process when such changes will avoid construction delays, improve quality, eliminate future service problems, lower maintenance costs and/or generally enhance the livability of your home. Also, a slight modification to the design of your home that may not appear on the sales plan or blueprints may be necessary We make every effort to keep the sales literature up to date, but occasionally changes to code or specifications occur too rapidly to incorporate into published sales information. We will make every effort to keep you apprised of such modifications.
Financing
There are many reputable lenders in our area that offer a wide range of financial products for the construction of your new home and the purchase of your homesite Your Design/Build Specialist can provide you with a list of names and phone numbers from our approved list of lenders.
It is imperative that you notify your Design Liaison as soon as possible with the name, contact person and telephone number of the lender that you have selected Your construction financing should be completed and closed prior to the time we apply for your building permit If you are also purchasing your homesite from John Cannon Homes, please refer to your Lot Purchase Agreement for the specified lot closing date. Your Lot Purchase Agreement contains the terms for any delay in the purchase of your homesite. Any delays in the start of construction due to the absence of financing will be cause for an appropriate price increase.
Our office provides the following documents to your lender when requested:
Copy of Construction Agreement
CopyofLotPurchaseAgreement(ifapplicable)
Construction plans
Copies of any applicable Customer Accommodation or Customer Request forms
Prior to the start of construction, our Financial Administrator will review your Builder's Risk Insurance, lender's information, construction draws, balance statement of CA/CR'S, utilities and closing documents
Insurance Requirements
Per the terms of your Construction Agreement and loan documents (if applicable), it is very important that you provide an insurance certificate showing proof of Builder's Risk Insurance prior to the start of construction. This insurance is required regardless of your payment method If you are financing the construction of your home, please refer to your loan documents for the insurance coverage required by your lender and their mortgagee clause that must be included in your policy Please do not have your policy take effect until shortly prior to the actual start of construction on your home. Please note that if your home is in a flood zone, you will be required to provide proof of flood insurance to both your lender and John Cannon Homes.
The Construction Process
Your Project Manager
John Cannon Homes employs a highly qualified staff of Project Managers. From the start of construction to the closing of your new home, your Project Manager will be with you each step of the way He or she will be your main point of contact from the moment your building permit is issued until you move into your new home Your Project Manager will handle the day-to-day operation of your home building project. Each Trade Partner that provides labor or material on your home will be monitored on a daily basis by your Project Manager to ensure that quality and accuracy are paramount during all phases of construction. Please remember, your Project Manager is constructing your home based on written documentation including your Construction Agreement, Customer Accommodation and Customer Request forms John Cannon Homes does not permit our Project Managers to interpret or make judgments or decisions regarding your intent or wishes. Our Project Managers will diligently follow the written agreements to build your home. Any requests outside this documentation must be in writing on a Customer Accommodation or Customer Request form.
Site Meetings
Pre-Start Orientation (PSO)
Prior to the start of construction, you will meet with our Financial Administrator, your Project Manager and Design Liaison to discuss the construction process. Our Financial Administrator will review your Builder's Risk Insurance, Lender's information, construction draws, balance statement of CA/CR'S, utilities and closing documents During this meeting, you may walk your home site with your Project Manager to review features specific to your location Additionally, you will review your Construction Agreement, all Customer Accommodation and Customer Request forms and address any questions, comments or concerns about the construction of your new home John Cannon Homes wants to be sure that the information and instruction provided to our Trade Partners is accurate and complete The Pre-Start Orientation(PSO) meeting will take place once the permit for your home is issued and should last approximately two hours. The PSO is the final opportunity to confirm that the instructions are correct prior to the start of construction After your PSO is complete, you will be asked to sign a document that confirms the covered information When construction of your home starts, your project is scheduled using a Universal Job Schedule and a Long-Range Projection Forecast. These are both starting points concerning the overall construction process. Due to the diverse style of homes we build, the schedule is customized to meet the requirements of your particular home During your Pre-Start Orientation, your Project Manager will explain the process step-by-step. Please refer to the Pre-Start Orientation form located at the end of this reference guide for a full list of items to be reviewed at this meeting.
Electrical Walk-Through
Once the mechanical trade partners are completing their rough scope of work and prior to the completion of the rough-in electrical phase, you will be asked to join your Project Manager for an electric walk-through. The purpose of this is to finalize the locations for electrical items and make final adjustments to the number and placement of light switches and outlets This can be done as part of the Pre-Drywall Orientation or as a separate meeting Please discuss your wishes with your Project Manager
Pre-Drywall Orientation (PDO)
You will meet your Project Manager at your new homesite after your home is framed and mechanical phases are complete, but prior to drywall installation The purpose of this meeting is to confirm that your option selections have been correctly installed and to view the structure of your home one last time prior to drywall installation. This appointment takes approximately one to four (1-4) hours, and your Project Manager will contact you to arrange this meeting Your presence at this meeting is strongly encouraged Please refer to the PreDrywall Orientation form located at the end of this reference guide for a full list of items to be reviewed at this meeting.
Pre-Closing Orientation (PCO)
Your Pre-Closing Orientation (PCO) is one of the most important meetings during the construction process It will be scheduled as soon as the production schedule has progressed enough to determine when your home will be ready for occupancy. Your Project Manager will establish this date. You will be notified of the exact date and time approximately 14 days prior to the meeting date The PCO takes place 3-7 business days prior to your actual closing Please make yourself available for a minimum of 4 hours to conduct this orientation in order to familiarize yourself with the operation of your new home. All purchasers named in the Construction Agreement must attend the Pre-Closing Orientation. This is your opportunity to learn the features and functionality of your new home, where all of the systems controls are located, and to review any questions prior to moving in Your Project Manager will be covering a lot of information in a short time, and it is important that we have your complete attention.
Therefore, we respectfully request that you do not invite friends, relatives, or others to attend the PCO. You may also want to consider childcare for small children. At the conclusion of the PCO, you will be asked to sign a Pre-Closing Orientation form to show that you accept your new home Please refer to the Pre-Closing Orientation form located at the end of this reference guide for a full list of items to be reviewed at this meeting
If there are any items that need adjusting, they will be documented at this time Our policy is to address all items needing attention prior to your closing, but in some cases it may take longer Our policy is to have any outstanding items completed within 10 days of closing. On some occasions, back ordered or unavailable items may give cause to extend this 10-day goal. When adjustments are made completing these items, you will be contacted again to meet the Project Manager at your new home to verify that all concerns have been addressed. Due to the potential for damage during move-in, the following items must be documented at the PCO with your Project Manager
Appliances scratched, dented or marked
Cabinets and/or countertops scratched, gouged, or damaged
Casing and baseboard scratched or gouged
Floor tile chipped or scratched
Interior or exterior doors scratched or gouged
Drywall damaged or gouged
Light fixtures scratched or marred
Mirrors scratched or marred
Paint marred
Plumbing fixtures scratched, tarnished or marred
Screens torn or missing window screens
Sinks, tubs, enclosures scratched, chipped or gouged
Windows scratched, chipped or cracked
Public sidewalks cracked or damaged
Pool finish marred
Pavers and driveway cracked or damaged
Target Completion Date
Within your construction agreement, we estimate an approximate timeline that refers to the completion of your new home. This estimate is based on the best possible scenario for your selections and for the construction process In other words, we have anticipated that all activities will flow smoothly without interruption and/or delays The target completion date cannot be guaranteed and should be considered an estimate based on best practices but may be subject to change due to a variety of different circumstances. Your closing date can be established once we receive your certificate of occupancy.
Visiting the Construction Site
In addition to the three required site meetings, you and your Project Manager can schedule re-occurring site meetings When building a custom home, there are endless amounts of options and suggestions that need to be brought to your attention. The complexity of your home and level of finish will determine the number of site visits that are necessary. John Cannon Homes asks that when you visit your site, you schedule an appointment with your Project Manager prior to arrival. Construction sites are dangerous places and, for the safety of everyone involved, it is important that this policy is strictly followed
Changes to Contract
After the start of construction, all requests for changes to your home and your finishes are to be discussed with your Project Manager Your Project Manager will write up your request and submit it to our Purchasing Department for pricing. A Customer Request form will be generated and returned to you for appropriate execution and payment. A Customer Request form cannot be processed without a signature and payment. If you have additional questions on this process, please refer to your Construction Agreement or speak directly to your Project Manager
Construction Site Etiquette
Whether it is your first or fifth home building experience, this is a very exciting time. Many new buyers want to visit the homesite often to watch the building progress firsthand without the accompaniment of their Project Manager Although we do not encourage this practice, John Cannon Homes feels obligated to state some guidelines to govern this activity.
Safety is very important to John Cannon Homes OSHA now requires employees and home buyers to use personal protective equipment while on the construction site (i.e. hardhats, construction boots) due to the dangers that may exist during construction. John Cannon Homes is dedicated to safety and requires that you conduct your visits under the supervision of a John Cannon Homes representative.
Please be aware that the home you are purchasing does not become your property until the house is closed and all funds have been received
In order to maintain the quality and integrity of your new home, any changes, alterations or additions to your home must be contracted through John Cannon Homes, until the home becomes your property. Please do not ask trade partners to contract work directly with you
All communication with trade partners must be made through your Project Manager John Cannon Homes is in control of the building process, and trade partners at this time.
If you wish to pass on information to a trade partner, please speak to your Project Manager.
The Construction Process in Photos
We are aware that you, as the homeowner, are vitally interested in the progress of your new home. On the next several pages, you will find the major stages of construction with photos and explanations of each stage. This is designed to provide a quick start to finish overview and "road map" for the hundreds of steps required during the construction of your new home
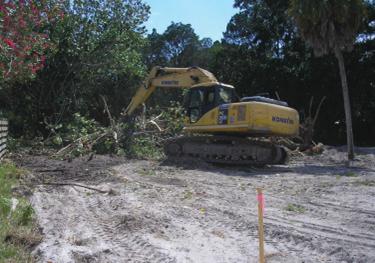
The first stage of building a new home is to clear the homesite and apply for your building permit In many jurisdictions, you cannot clear the home site until a permit has been issued. During this stage unwanted vegetation will be removed and clean fill will be brought in (if needed) to raise the lot to the height needed to begin construction
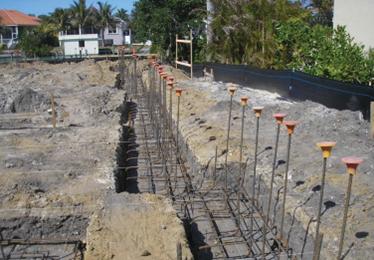
Foundation is set with "batter boards" as shown String lines are pulled between them and used as guides for digging the footings.
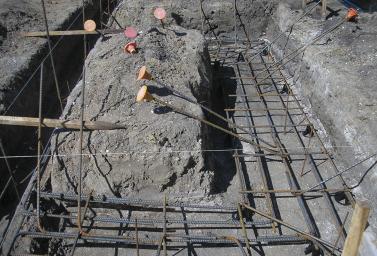
The footings have been dug and reinforcing steel placed. The amount, size and placement of reinforcing steel is mathematically calculated by the structural engineer and made part of the structural design of the home.
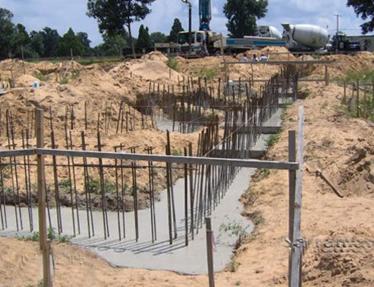
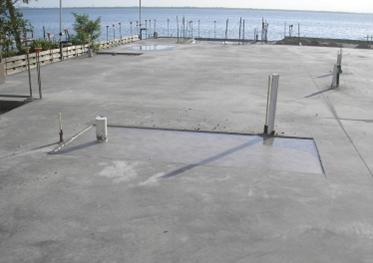
Here is the precise view with the concrete placed and the dowels positioned The location where the dowels emerge from the concrete are in a straight line This job is now ready for the block stem wall to be laid The stem wall will vary in number of courses depending on flood maps and the specifications of the Construction Agreement.
This photo shows the footing and steel. If you look closely, you can see footing chairs. The steel "sits" on these so that when the concrete is placed, the steel is totally encased in concrete. The vertical dowels that will become the ecoskeleton are in place. When concrete is poured, they will be moved to exact locations as dictated by the structural engineer
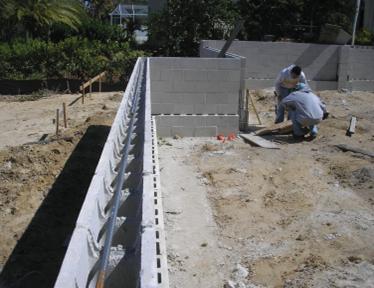
Here the stem wall has been set The top course is made up of "chair" block This is due to their profile If you look at one from the end you see the chair This stem wall will be filled with clean fill to the level of the "seat" of the chair This leaves 4"to the top of the block for the concrete slab.
This is a view of the same wall from the outside showing the stem wall laid on the footing Notice the "cleanouts" or square holes in the bottom course at each dowel. These openings are designed to actually facilitate viewing of steel placement and overlap. At each dowel is a vertical concrete pour from future ceiling height to the slab
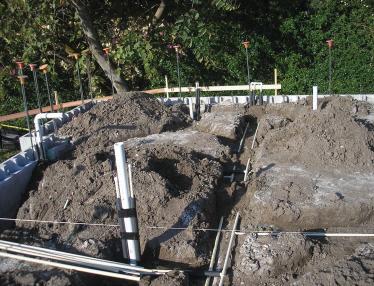
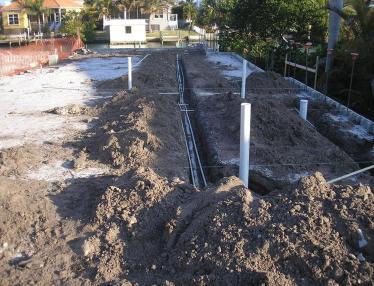
The underground plumbing is completed and ready for inspection. The tall PVC pipes are the vents for the waste lines.
Once the stem wall is backfilled, underground plumbing is installed This includes water and waste lines to be stubbed up at all service locations. Both water and waste lines are tested and inspected for leaks.
After passing the underground plumbing inspection, the trenches are backfilled with dirt. Once compacted, the slab area is covered with a vapor barrier to prevent water from condensing on the concrete slab.
At this time, the slab prep is complete and waiting to be inspected. Anywhere the level of the slab changes (i.e., at porches, shower, and garage), wooden forms are used If there is an island with electrical in the kitchen, the electrician will come before the slab pour and install conduit from a future wall to the island area. This enables them to merely pull a wire through the conduit when the home is wired
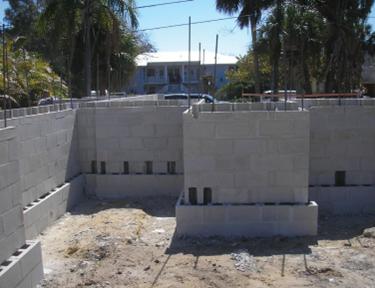
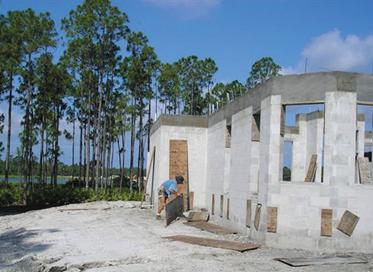
The block masons have set the block and are now ready to place vertical steel
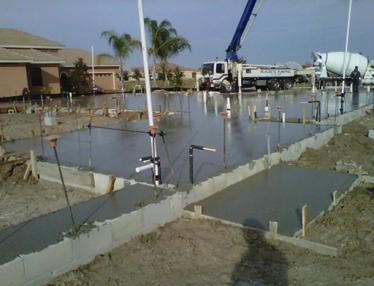
The steel dowels and plumbing pipes are all that is visible after the slab is poured. A lot of hard work has been covered up with much more to come Control joints are cut approximately every 20 feet to control the expansion and contraction minimizing cracks. However, some cracking outside these joints is normal and can be expected.
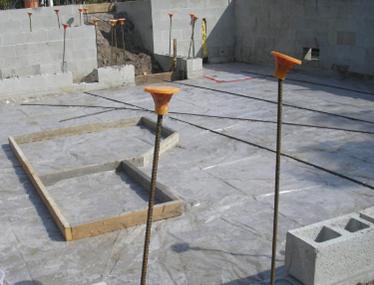
"Rebar" (steel) is bent into an "L'' shape The long leg of the "L'' is put down through the block directly above the dowel so both pieces overlap and can be attached using tie-wire. Concrete is pumped down to the slab from the beam where each dowel is located so that all steel is encased in concrete
The hole at the bottom of each poured cell must be covered once the inspector checks the steel lap and connection at the lintel inspection These clean outs will be boarded up to prevent the concrete that is pumped from escaping the cell.
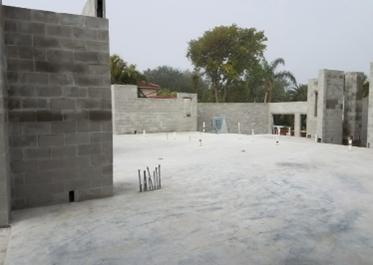
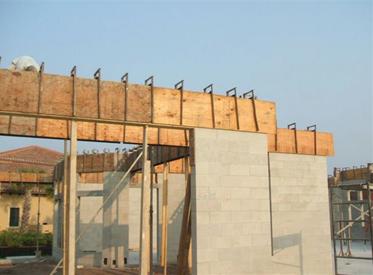
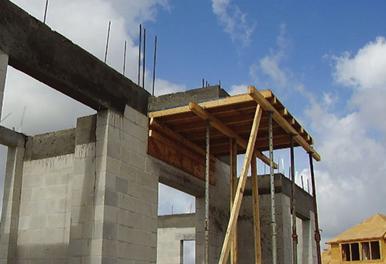
Once the beam is poured, framing begins It starts with interior bearing walls and posts. From there, interior beams and walls will be constructed. This is a lengthy process and will take several weeks.
On this home, the tie beam has been poured with truss straps and anchor bolts placed in concrete. Both the bolts and the straps have turned ends After the concrete cures, these hold-downs will connect to the trusses and to the block walls. The turned ends on the straps and bolts have been designed and engineered to resist the forces of high winds. These are also referred to as Hurricane Straps
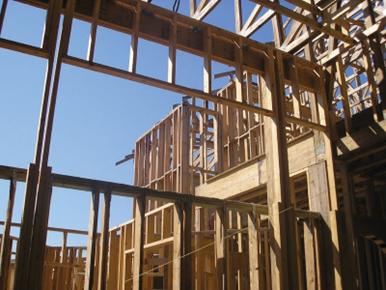
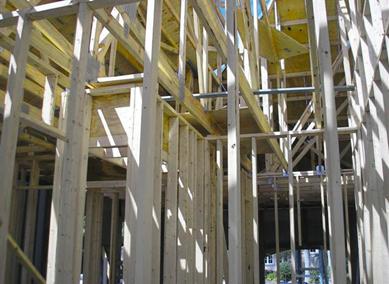
This picture shows a different stage of framing
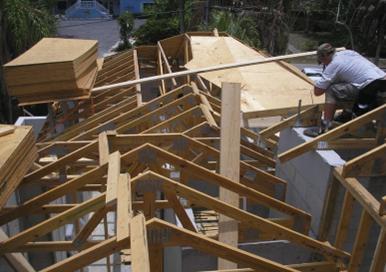
Plywood roof sheathing is applied to the trusses. The engineer has determined the way the plywood is nailed to the trusses and all municipalities check the nailing in some manner When completed, the roof will then be covered with self-sealing adhesive membrane.
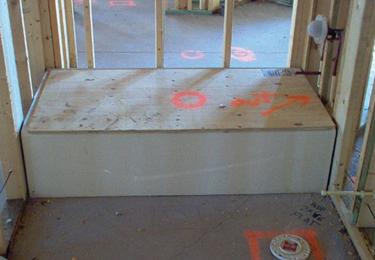
The Tub Set: The framing is complete
The plumber sets the tubs and connects the water supply and waste lines to them, extends vents through the roof, and builds supply and waste lines to extend through the walls The electrician runs wires for every outlet, switch, appliance and light and installs the breaker panel, meter base and main disconnect.
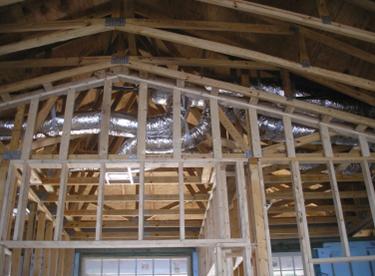
The self-sealing adhesive membrane is installed on the roof, the windows have been installed and the framers have finished the interior framing in the home It is now time for mechanical trades to prepare their pre-drywall phases.
HVAC- The heating ventilation/air conditioning system rough will be completed in conjunction with supplies and returns. The ducts are installed along with the outlets so drywall can be hung around them The rough plumbing, HVAC and, electrical and gas (if applicable) must be inspected before the framing inspection can be made. When the house passes the framing inspection, insulation is installed and inspected.
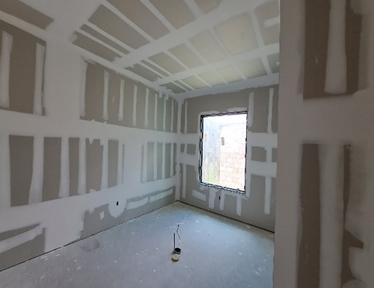
Before we can hang drywall, we must pass the insulation inspection. You can see in this photo that we've passed those inspections! The drywall has been hung and the seams and screws have been taped and mudded We'll sand and skim the drywall until smooth and then follows the texture.
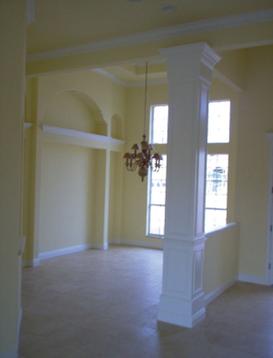
It's beginning to look like a home The tile is down, the cabinets are being installed, electricians have started their trim outs, and the painters are prepping and painting the trim.
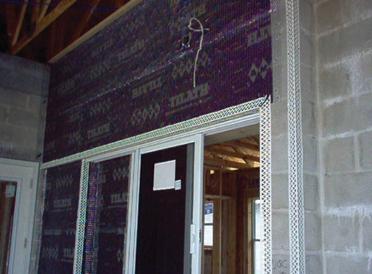
After the framing inspection is made, the stucco crew will apply the lath to the wood surfaces on the exterior of the home Once the lath is inspected, the stucco application will begin
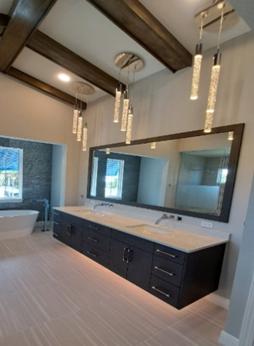
Trimouts: The final stages of mechanical work, from A/C grills to light switches, will all be completed. Plumbing fixtures and cabinet doors are installed.
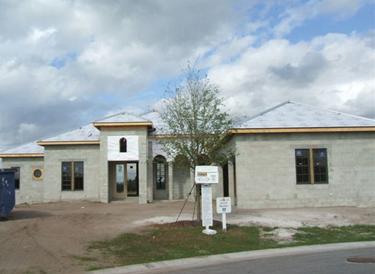
This is an example of a home that is nearing completion From this stage, closing should take place within 30 to 60 days Note that the exterior of the home has been painted, driveway and sidewalk installed, and the yard has been graded. Irrigation will be added, and landscaping and sod installed. Cleaning and final inspection will be completed to determine any outstanding items
Closing Process
The sod has now been installed, the carpet and tile are in, and the final building inspection has been passed The A/C has been tested, your home has been cleaned and is ready for your Pre-Closing Orientation.
This section covers the items involved in the closing process once your home is completed Please read through it carefully to understand the various steps required to make your move a seamless and pleasant experience
Each new homeowner relies on their Project Manager to help with the closing process. The Project Manager's primary goal is to make sure that you are comfortable with the progress of your home up to the date of your closing He/she assists in determining the estimated completion date, schedules your Pre-Closing Orientation and personally walks you through the closing process The Project Manager works closely with our office staff to ensure that your mortgage company or title agency is provided with the documentation needed to complete your closing. Your Project Manager conducts your closing at your new home. At this time, each item needing attention will be addressed and initialized by both parties signifying satisfactory completion. Any remaining items that may need touch-up or adjustment will be documented on our PCO form Every attempt will be made to correct any outstanding issues within 10 business days.
Customer Responsibilities
Utilities: Please make sure that you have arranged for all utility service connections in your name prior to closing to avoid any delays in service when you move into your new home
Insurance: Permanent homeowner's insurance is required prior to your closing. This policy must include your lender, if any, as the "Loss Payee". A certificate showing proof of this insurance must be sent to your lender prior to the closing date.
Closing Process
Pre-Closing Orientation
After we receive your certificate of occupancy, your Project Manager will schedule a meeting at your new home for Pre-Closing Orientation approximately 3-7 days prior to closing At this time, you will complete a room-by-room orientation of all systems and features included in your home as well as the exterior components Any necessary touch ups or adjustments will be noted on the Orientation Checklist with a copy for your reference. Your Project Manager will schedule the work necessary to complete items listed on the Orientation Checklist.
Closing Day
On closing day, you will meet your Project Manager at your new home at a mutually convenient time He/she will review the status of all items listed on the Orientation Checklist Initialing next to each item will signify that the item has been completed to your satisfaction You will then sign all of your closing papers including:
Closing Statement
Notice of Consumer Rights under the Construction Industry Recovery Fund
Warranty Documents
Affidavit of Acceptance
Utility Payment Agreement
Any documents required by your lender
If your loan requires a mortgage modification, you may have additional documents to sign at your title company. Once all of the closing documents are signed and payment in full is made to John Cannon Homes, you will receive the keys to your new home and can begin to move in
Summary
As a way of summarizing much of the above information on closing and for the mutual protection of you, the Buyer, and John Cannon Homes, Inc., we have established the following policy governing the actual occupancy of your new home:
All purchasers named in the contract must participate in the Pre-Closing Orientation and acknowledge their comments on the form provided All forms required by your lender must be fully executed
All John Cannon Homes closing documents must be signed by all purchasers. All funds due to John Cannon Homes, Inc. must be paid in full, prior to receipt of keys.
In Closing
We hope that this reference guide will serve as a useful tool during the design and building process of your new home The team at John Cannon Homes looks forward to working with you!
PRE-START ORIENTATION
HOMEOWNERS:
PROJECT MANAGER:
AREA MANAGER:
VERIFY:
Color Sheet is executed and Drawings are current- no further drawings will be issued unless County comments require it, or HO makes structural changes Allowances are reconciled
Setbacks: Site plan- post light, mailbox, septic, propane
Front Door: Material, size, color, shop drawing signed
Subcontractors will not take direction from Homeowner
Circle one: TEXT PHONE CALL EMAIL
Homeowner 2 Communication Preference: Circle one: TEXT PHONE CALL EMAIL
Homeowner 2 Email Address:
Homeowner 2 Cell Phone Number:
Weekly jobsite meeting requested?
Day: Time:
□ We have completed a PSO Call with Sheila / Accounts Receivable
Purchasers acknowledge that they are the legal owners of the construction homesite / lot and that all topics herein have been reviewed to their satisfaction Purchasers hereby authorize John Cannon Homes, Inc to start construction From your first meeting with our Sales Team to the completion of construction of your home, you will have many conversations with JCH personnel.
By signing below, you acknowledge and agree that all changes, clarifications, additions or deletions to your home must be in writing and accepted by both parties on a John Cannon Homes Contract Accommodation or Customer Request Verbal discussions, emails, texts, phone calls or other communication method requests cannot be honored unless there is a corresponding JCH CA or CR, per our Construction Agreement.
PRE-CLOSING ORIENTATION
PROJECT ANAGER: Date
HOMEOWNERS
:
EXTERIOR
1.) Grass and landscaping are alive. The builder does not warrant. Explain watering requirements. (1 inch per week minimum, and fertilization requirements 5 times per year balanced fertilizer) Water lawn every day for first 30.
2) Locate irrigation control panel and valves in yard Explain timer and rain sensor No warranty on heads, only system
3.) Locate the main water shutoff valve at street and house. Explain back flow and hose bid back flow and aeration
4.) Locate the water meter and explain the spinning triangle.
5) Locate sewer clean out
6) Review septic tank location and drain field Do not plant in drain field, human waste only no food
7.) Show well system and explain or set up a meeting with well contractor to explain. Note: builder does not warrant quality of water nor water pressure
8.) Locate and explain all exterior GFI’s and reset switch.
9) Locate property corners and explain drainage swales and 72-hour drainage plan Do not plant in swales
10.) Windows should be inspected and re-caulked yearly as homeowner maintenance.
11) Concrete surfaces will crack including stucco, pool decks, garage floors, sidewalks, driveways and slabs. These are normal and not covered under warranty.
12) Exterior caulking should be maintained once per year minimum
13) Landscape bed and yard erosion is not warranted
14.) Locate electric meter and main disconnect and explain use.
15) All utility accounts in builder name will be discontinued as of the closing date and will need to be set up in the owner’s name.
16) Locate phone and CATV service at point of entry into home
17) Locate and explain AC condensation line
18.) Locate and explain condenser and main shutoff. Do not block air flow with plants and do not allow pest to build nests in coil
19.) Swimming pool:
Set up appointment for pool school
Screen panels in cage are not warranted for tears after closing We recommend professional pool service.
20) Metal above drip edge on tile roof has weep holes and should be kept free from debris
GARAGE
1.) Garage door opener and red manual release. Beam at bottom of track.
2.) Breaker box location, labeled and use explained
3) Hot water heater
Heating element locations and thermostat
Gas or electric
Care and use manual in book
Heat recovery unit and lines if applicable
4.) Do not plug freezer or fridge into GFI.
5) HVAC unit explained breaker, drain pan etc
6.) Locate irrigation timer box.
7) Attic ladder: weight restrictions, do not store heavy items in attic trusses are not bottom cord bearing, we do not install plywood in attic, insulation is only over living area
8.) Garage floor paint slippery when wet.
ENTRY
1) Check doorbell for operation
2) Explain door lock de-mastering from construction lock
3.) Locate the light switch.
4) Explain front door deadbolt adjustment and door may expand and contract
GREATROOM / BONUS ROOM
1) Locate and demonstrate all switches and outlets
2.) Locate any telephone, TV, structured wiring outlets
3) Operate windows and locks, check screens
4.) Point out any other items, speaker wires etc.
5) Carpet in larger rooms may stretch in larger in damp weather
6) Discuss operation of fireplace and gas
7.) Wood trim is semi-gloss washable paint, soap and water only
8) Walls are flat latex paint and must be touched up, cannot be washed
9.) We provide paint touch up kit
10) Explain operation and locate AC registers and returns, show how and where to change filter
11) Explain operation and adjustment of sliders, track lubrication, and lock mechanism
HALLS
1.) Location and operation of all thermostats
3-degree variation is normal
Air temp at thermostat location may vary from areas farthest away from thermostat
If system shuts down check breakers first
Heating system has a delay when shutting on or off
2.) Show all smoke detector locations and explain battery backup, should be checked once yearly
MASTER BATH
1.) Instruct on use of shower and drain
2) Show all water shutoff valves under sinks
3.) Show tub access and explain if applicable
4) Clogged plumbing not warrantable
5) Explain emergency privacy lock keys
6.) Located GFIs
7) Explain plumbing traps below sinks
8.) Locate commode water shutoff valve
9) Locate all switches and fan
10.) Vanity top care, Corian will scratch, cultured marble will scratch (do not use abrasive cleaners)
11.) Fill and operate jetted tub if applicable (fill tub before customer arrives)