International Research Journal of Engineering and Technology (IRJET)
e-ISSN: 2395-0056
Volume: 09 Issue: 05 | May 2022
p-ISSN: 2395-0072
www.irjet.net
IOT BASED SMART ENERGY METER USING ARDUINO UNO D. Sharanya1, Akhil Nashaboina2, Kanakaraju Manda3, Sai Kiran Kommu4, Nishanth Reddy Veeramreddy5 1 Assistant
Professor at ACE Engineering College, Dept of Electrical and Electronics Engineering, Telangana, India of ACE Engineering College, Dept of Electrical and Electronics Engineering, Telangana, India ---------------------------------------------------------------------***--------------------------------------------------------------------2,3,4,5 Student
Abstract - The main aim of this paper is to monitor the
amount of electricity consumed by a consumer. Generally, the energy consumption can be monitored by an electric device called Energy Meter. Every month one person comes from electricity board to our home and generates the electricity bill. So, by this manual work there are some errors like we don’t know the bill generated by him belongs to us or not, we cannot see our usage. By using this system over IoT the cost and regular usage of power consumption can be informed to the user to overcome the high bill usage. The user can also track and control the loads in our home with the help of Transmission Control Protocol (TCP) application and Arduino board through a Wi-Fi module and LDR Sensor.
Key Words: Energy meter, IoT, TCP Application, Wi-Fi Module, LDR Sensor.
When the connection is established the two loads which is Bulb-1 and Bulb-2 will be switched ON. So, when the loads are ON the system starts its work. According to the energy meter specification 3200 blinks is equal to 1 unit. For easy understanding we converted the 3200 blinks to 1 blink it means if the calibration LED blinks one time, we should come to conclusion that the system consumed 1 unit. When the calibration LED is blinked it will be sensed by the LDR Sensor and sends the information to the Arduino UNO and through Arduino UNO it will be displayed on the LCD provided. At the same time the readings will be displayed in the TCP application. Additional to this we can turn ON and OFF the loads. Here we took the ASCII code to control the loads.
1. INTRODUCTION Now a days many consumers doesn’t able to know whether the bill generated by the person who came from electricity board belongs to them or not. And at the same time the consumers were confused about the high bill usage so for this we came with a project in that the consumer can able to closely track their usage and spend. In this project consumption of energy i.e., units consumed by that meter will be displayed on the 16X2 LCD provided and at the same time any internet enabled devices through Transmission Control Protocol (TCP) application. So, whenever there is vary in count that is units in the energy meter get change, these values are displayed on LCD. Due to manual electricity billing, there exists some errors to overcome those errors we came with a proposed system that working of energy meter over IoT. This system mainly consists of Energy meter, Arduino UNO, Wi-Fi module, LDR Sensor, a display unit and two loads provided.
To turn OFF the Bulb-1 we need to give *22#, To turn OFF the Bulb-2 we need to give *44#, similarly if we want to turn ON the loads we should give *11# to turn ON the Bulb-1 and *33# to turn ON the Bulb-2.
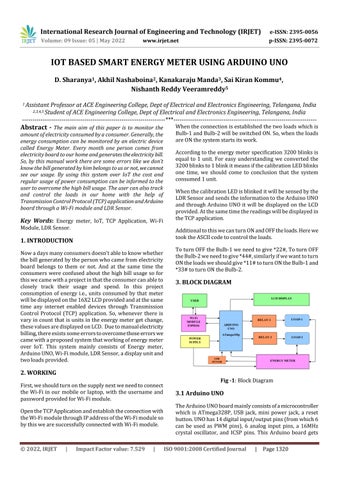
3. BLOCK DIAGRAM
2. WORKING Fig -1: Block Diagram
First, we should turn on the supply next we need to connect the Wi-Fi in our mobile or laptop, with the username and password provided for Wi-Fi module.
3.1 Arduino UNO
Open the TCP Application and establish the connection with the Wi-Fi module through IP address of the Wi-Fi module so by this we are successfully connected with Wi-Fi module.
The Arduino UNO board mainly consists of a microcontroller which is ATmega328P, USB jack, mini power jack, a reset button. UNO has 14 digital input/output pins (from which 6 can be used as PWM pins), 6 analog input pins, a 16MHz crystal oscillator, and ICSP pins. This Arduino board gets
© 2022, IRJET
|
Impact Factor value: 7.529
|
ISO 9001:2008 Certified Journal
|
Page 1320