Installationsanleitung Instructions d’installation Installation instructions
ANFANG DÉBUT START
2
WAND MUR WALL
41 mm
Arbeitslinie Ligne de travail Working line
Mittelpunkt Point central Center point ENDE FIN END
3
WAND MUR WALL
41 mm
Arbeitslinie Ligne de travail Working line
1
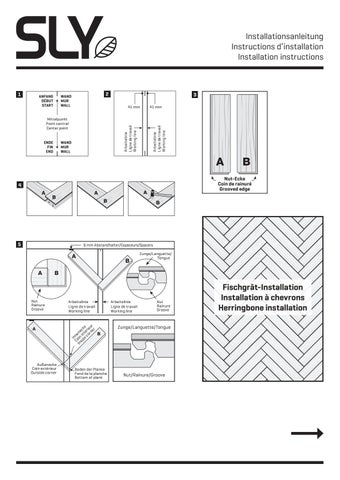
Nut-Ecke Coin de rainuré Grooved edge
4
5
6 mm Abstandhalter/Espaceurs/Spacers Zunge/Languette/ Tongue
Nut Rainure Groove
Arbeitslinie Ligne de travail Working line
r k e ie u r ec t ér r ne n n e in c o In oin d e C si In
Außenecke Coin extérieur Outside corner
Boden der Planke Fond de la planche Bottom of plank
Arbeitslinie Ligne de travail Working line
Nut Rainure Groove
Zunge/Languette/Tongue
Nut/Rainure/Groove
Fischgrät-Installation Installation à chevrons Herringbone installation
6
7
Nicht vollständig aufsetzen/ Ne pas fixer complètement/ Don’t tap down fully
2
6 mm Abstandhalter/Espaceurs/ Spacers
1 Fang von hier an an Commencez à taper ici Start tapping from here
Nicht vollständig aufsetzen/ Ne pas fixer complètement/Don’t tap down fully
1. Kante anheben/ Lever le bord/Lift edge 2. Unterschieben/ Glisser de sous/Slide under
ANFANG WAND DÉBUT MUR START WALL
ANFANG WAND DÉBUT MUR START WALL
ENDE WAND FIN MUR END WALL ENDE WAND FIN MUR END WALL
8
ANFANG WAND DÉBUT MUR START WALL
Distanz messen Mesurer la distance Measure distance
9
ENDE WAND FIN MUR END WALL Starten/Commencer/Starting
© 2019, HWZ International AG, Switzerland.
HWZ International AG Untere Gründlistrasse 23 6055 Alpnach Dorf Switzerland +41 58 470 66 00 hwzi.ch