DOWNLOAD LINK
For some reason if link does not work download this pdf and then click
Illustration 1 g02524476
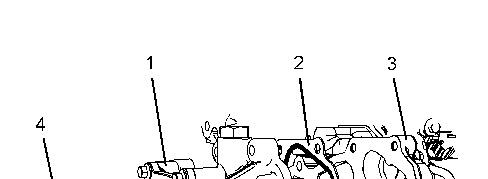
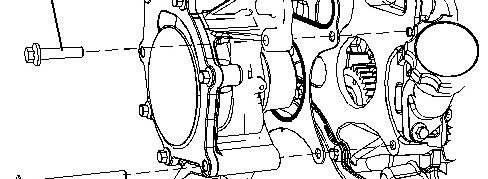
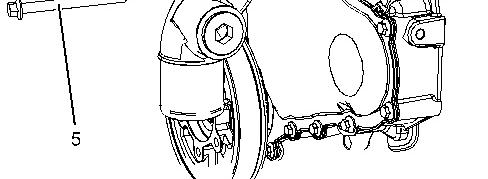
3. Remove bolts (4) and bolts (5).
4. Remove water pump (1) from housing (3).
Note: If necessary, tap the water pump with a soft faced hammer in order to loosen the water pump.
5. Remove gasket (2).
Installation Procedure
1. Install water pump (1) in the reserve order of the removal.
Copyright 1993 - 2025 Caterpillar Inc. All Rights Reserved. Sat Jan 18 16:39:43 UTC+0530 2025
Product: TRACK-TYPE TRACTOR
Model: D3K2 LGP TRACK-TYPE TRACTOR KL2
Configuration: D3K2 XL & D3K2 LGP Small Track Type Tractor KL200001-UP (MACHINE) POWERED BY C4.4 Engine
Disassembly and Assembly
D3K2, D4K2 and D5K2 Track-Type Tractors Engine Supplement
Media Number -UENR4087-00 Publication Date -01/05/2015 Date Updated -03/12/2015
Water Temperature Regulator - Remove and Install
SMCS - 1355-010
Removal Procedure
i06171088
1. Drain the coolant. Refer to Operation and Maintenance Manual, Cooling System Coolant (ELC) - Change for the correct draining and filling procedures.
Illustration 1
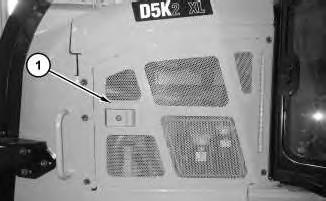
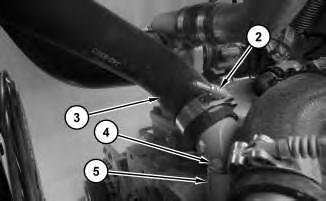
2. Open left side engine enclosure (1). Loosen clamp (2) and remove hose (3). Remove bolts (4). Remove water temperature regulator (5).
Installation Procedure
NOTICE
Keep all parts clean from contaminants.
Contaminants may cause rapid wear and shortened component life.
1. Install water temperature regulator (5) in the reverse order of removal.
Copyright 1993 - 2025 Caterpillar Inc. All Rights Reserved. Private Network For SIS Licensees. Sat Jan 18 16:39:27 UTC+0530 2025
Product: TRACK-TYPE TRACTOR
Model: D3K2 LGP TRACK-TYPE TRACTOR KL2
Configuration: D3K2 XL & D3K2 LGP Small Track Type Tractor KL200001-UP (MACHINE) POWERED BY C4.4 Engine
Disassembly and Assembly
D3K2, D4K2 and D5K2 Track-Type Tractors Engine Supplement
Media Number -UENR4087-00 Publication Date -01/05/2015 Date Updated -03/12/2015
Crankshaft Vibration Damper and Pulley - Remove and
Install
SMCS - 1205-010
Removal Procedure
Start By:
a. Remove the alternator belt.
Illustration 1
i06177915
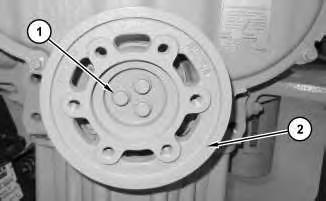
1. Use a suitable tool in order to prevent the crankshaft from rotating. Remove bolts (1).
2. Remove crankshaft pulley (2) from the crankshaft.
Installation Procedure
1. Install crankshaft pulley (2) in the reverse order of removal.
Product: TRACK-TYPE TRACTOR
Model: D3K2 LGP TRACK-TYPE TRACTOR KL2
Configuration: D3K2 XL & D3K2 LGP Small
Disassembly and Assembly
D3K2, D4K2 and D5K2 Track-Type Tractors Engine Supplement
Media Number -UENR4087-00 Publication Date -01/05/2015 Date Updated -03/12/2015
Crankshaft Front Seal - Remove and Install
Start By:
a. Remove the crankshaft pulley.
NOTICE
Keep all parts clean from contaminants.
Contaminants may cause rapid wear and shortened component life.
i06177038
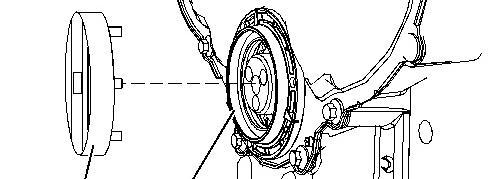
Illustration 1 g02445196
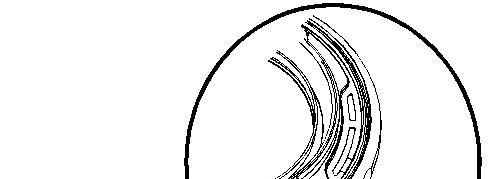
1. Align Tooling (A) onto crankshaft front seal (2).
2. Turn Tooling (A) in a counterclockwise direction and remove crankshaft front seal (2) from front cover (1).
Installation Procedure
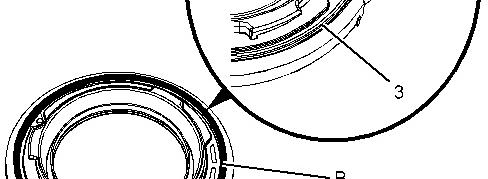
1. Install crankshaft front seal (2) in reverse order of removal.
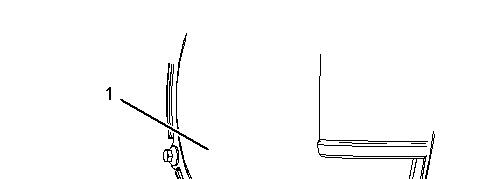
Illustration 2 g02445217
a. Apply a continuous bead of Tooling (B), approximately 3 mm (0.118 inch) in diameter, to the top of the static seal beads (3).
b. Use Tooling (A) in order to turn crankshaft front seal (2) in clockwise direction.
c. If rotating the crankshaft seal (2) requires torque greater than 50 N·m (37 lb ft) in order to install crankshaft front seal (2). Remove crankshaft front seal (2). Inspect the crankshaft front seal and the front cover for faults or damage.
Copyright 1993 - 2025 Caterpillar Inc.
Rights Reserved.
Network For SIS Licensees. Sat Jan 18 16:38:54 UTC+0530 2025
Product: TRACK-TYPE TRACTOR
Model: D3K2 LGP TRACK-TYPE TRACTOR KL2
Configuration: D3K2 XL & D3K2 LGP Small Track Type Tractor KL200001-UP (MACHINE) POWERED BY C4.4 Engine
Disassembly and Assembly
D3K2, D4K2 and D5K2 Track-Type Tractors Engine Supplement
Media Number -UENR4087-00 Publication Date -01/05/2015 Date Updated -03/12/2015
Valve Mechanism Cover - Remove and Install
SMCS - 1107-010
Removal Procedure
Start By:
i06173391
a. If the Clean Emission Module (CEM) is mounted on the valve mechanism cover. Removal of the CEM will be necessary in order to access the valve mechanism cover.
NOTICE
Keep all parts clean from contaminants.
Contaminants may cause rapid wear and shortened component life.
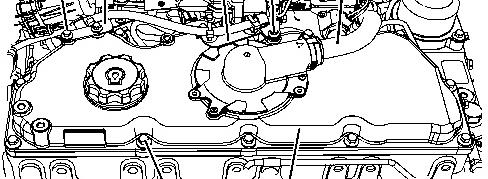
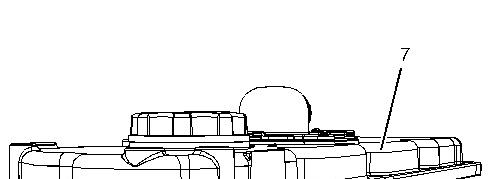
Illustration 1 g02522396
1. Remove bolts (1) and bolts (4) from bracket (2) and bracket (3). Position brackets and harness assembly away from valve mechanism cover (7).
2. Disconnect the plastic tube assembly (5) from the valve mechanism cover for the crankcase breather. Refer to Disassembly and Assembly, "Crankcase Breather - Remove" for the correct procedure.
3. Remove bolts (6) from valve mechanism cover (7).
4. Remove valve mechanism cover (7) from the cylinder head.
Note: Remove the valve mechanism cover vertically in order to avoid damage to the electronic unit injectors.
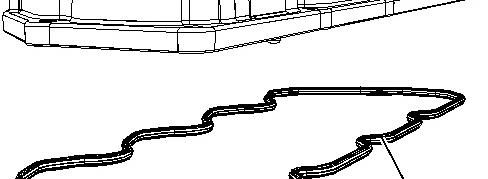
Illustration 2 g02522397
5. Remove gasket (8) from valve mechanism cover (7).
Installation Procedure
1. Install valve mechanism cover (7) in the reverse order of removal.
a. Thoroughly clean all gasket surfaces of valve mechanism cover (7). Clean the gasket surfaces of the cylinder head. Inspect gasket (8) for damage. If necessary, install a new gasket.
b. Install the valve mechanism cover vertically in order to avoid damage to the electronic unit injectors.
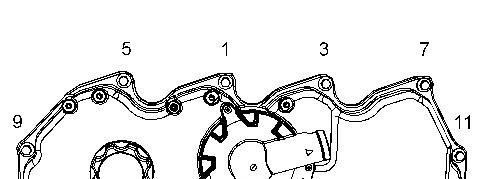
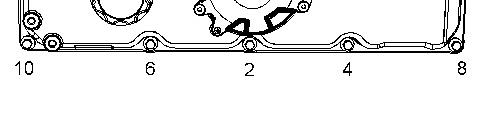
Illustration 3 g02522516
c. Tighten the bolts in the numerical sequence that is shown in Illustration 3. Tighten the bolts to a torque of 22 N·m (195 lb in)
Copyright 1993 - 2025 Caterpillar Inc. All Rights Reserved. Private Network For SIS Licensees. Sat Jan 18 16:38:39 UTC+0530 2025
Product: TRACK-TYPE TRACTOR
Model: D3K2 LGP TRACK-TYPE TRACTOR KL2
Configuration: D3K2 XL & D3K2 LGP Small Track Type Tractor KL200001-UP (MACHINE) POWERED BY C4.4 Engine
Disassembly and Assembly
D3K2, D4K2 and D5K2 Track-Type Tractors Engine Supplement
Media Number -UENR4087-00 Publication Date -01/05/2015 Date Updated -03/12/2015
Turbocharger - Remove and Install
SMCS - 1052-010
Removal Procedure
Table 1
Required Tools
Tool Part Number Part Description Qty A 51008 LOCTITE Anti-Seize 1
Start By:
a. Remove the right side engine enclosure.
NOTICE
Care must be taken to ensure that fluids are contained during performance of inspection, maintenance, testing, adjusting and repair of the product. Be prepared to collect the fluid with suitable containers before opening any compartment or disassembling any component containing fluids.
Dispose of all fluids according to local regulations and mandates.
i06163318
Note: Cleanliness is an important factor. Before you begin the removal procedure, clean the exterior of the components thoroughly to prevent dirt from entering the internal mechanism. Keep components covered and protected at all times.
Illustration 1
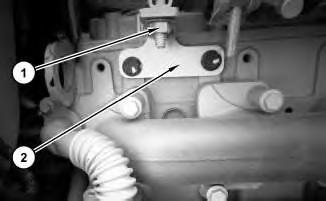
1. Remove bolt (1) from turbocharger mounting bracket (2).
Illustration 2
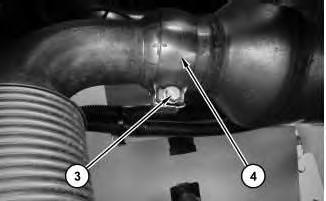
2. Loosen bolt (3) and remove clamp (4).
Illustration 3
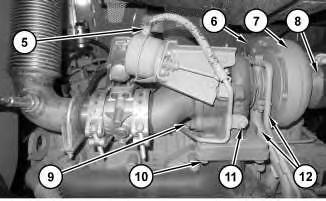
3. Disconnect hose assembly (5) and remove bolt (11). Disconnect hose assembly (6) and hose assembly (8). Disconnect tube assemblies (12). Remove nuts (9) and nuts (10). Remove turbocharger (7).
g03833926
g03833932
g03833973
Installation Procedure
NOTICE
Keep all parts clean from contaminants.
Contaminants may cause rapid wear and shortened component life.
Note: Check the O-ring seals, the gaskets, and the seals for wear or for damage. Replace the components, if necessary.
1. Install turbocharger (7) in the reverse order of removal.
a. Clean the mating surfaces of the exhaust manifold and the turbocharger. Clean the mating surfaces of the tube assemblies.
b. Clean the mating surfaces of the exhaust manifold and turbocharger (7). Clean the mating surfaces of the tube assemblies.
c. Apply Tooling (A) to nuts (9) and nuts (10). Tighten nuts (9) and nuts (10) to a torque of 44 N·m (32 lb ft).
d. Install tube assemblies (12). Tighten bolts to a torque of 20 N·m (177 lb in).
Sat Jan 18 16:38:17 UTC+0530 2025
Product: TRACK-TYPE TRACTOR
Model: D3K2 LGP TRACK-TYPE TRACTOR KL2
Configuration: D3K2 XL & D3K2 LGP Small Track Type Tractor KL200001-UP (MACHINE) POWERED BY C4.4 Engine
Disassembly and Assembly
D3K2, D4K2 and D5K2 Track-Type Tractors Engine Supplement
Media Number -UENR4087-00 Publication Date -01/05/2015 Date Updated -03/12/2015
Oil Cooler (Engine) - Remove and Install
SMCS - 1378-010
Removal Procedure
Start By:
a. Remove engine side guard.
b. Remove electronic control module.
Illustration 1
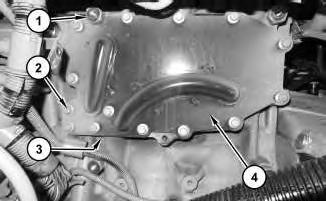
1. Remove spacer (1). Remove bolts (2). Remove oil cooler (4) and gasket (3).
Installation Procedure
1. Install oil cooler (4) in the reverse order of removal. Sat Jan 18 16:38:00 UTC+0530 2025
i06056985
Product: TRACK-TYPE TRACTOR
Model: D3K2 LGP TRACK-TYPE TRACTOR KL2
Configuration: D3K2 XL & D3K2 LGP Small Track Type Tractor KL200001-UP (MACHINE) POWERED BY C4.4 Engine
Disassembly and Assembly
D3K2, D4K2 and D5K2 Track-Type Tractors Engine Supplement
Media Number -UENR4087-00 Publication Date -01/05/2015 Date Updated -03/12/2015
Clean Emissions Module - Remove and Install
SMCS - 1050-010; 7279-010
Removal Procedure
Start By: a. Remove hood.
Illustration 1
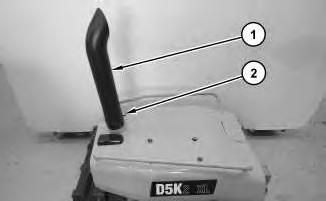
g03792864 1. Loosen clamp (2). Remove exhaust pipe (1).
i06054705
2
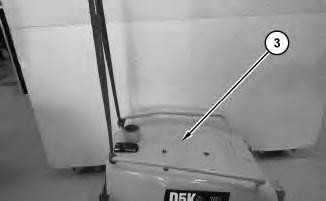
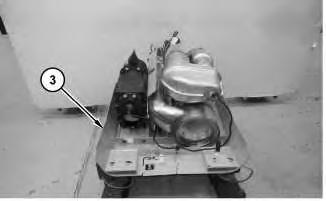
2. Use a suitable lifting device to lift hood (3). The weight of hood (3) is approximately 61 kg (135 lb).
Illustration 3
3. Reposition hood (3) on suitable cribbing.
4
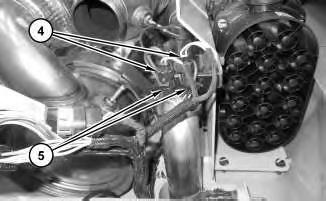
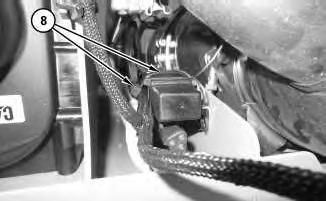
4. Disconnect harness assemblies (4). Remove cable straps (5).
Illustration
g03792895
g03792900
Illustration
g03792916
5
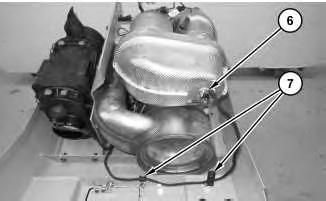
5. Disconnect harness assembly (6). Remove cable straps (7).
Illustration 6
6. Remove cable straps (8).
Illustration 7
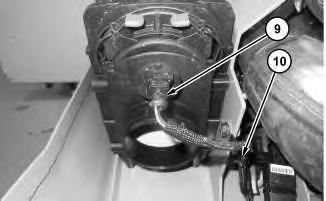
7. Disconnect harness assembly (9). Remove cable strap (10).
Illustration
g03792927
g03792934
g03793537
8
Illustration
g03793544
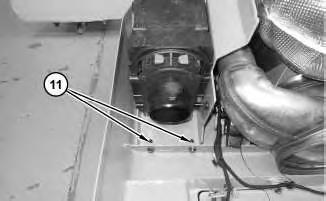
8. Remove bolts (11).
Illustration 9
g03793549
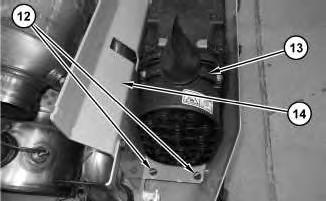
9. Remove bolts (12). Remove air cleaner (13) and plate (14).
Illustration 10
g03793579
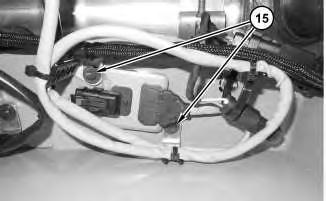
10. Remove bolts (15).
Illustration 11
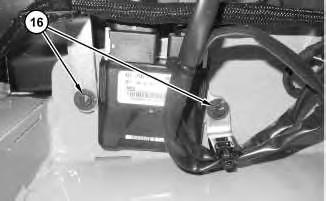
11. Remove bolts (16).
Illustration 12
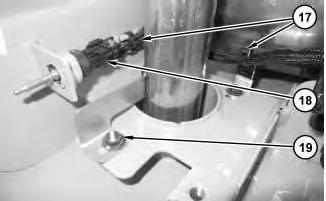
12. Remove cable straps (17). Disconnect harness assembly (18). Remove bolt (19).
13
g03793602
g03793620
Illustration
g03793637
14
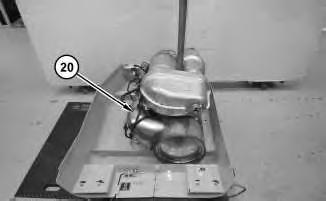
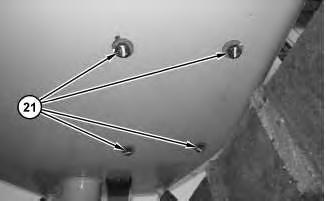
13. Attach a suitable lifting device to clean emissions module (20). The weight of clean emissions module (20) is approximately 45 kg (100 lb). Remove four bolts (21). Remove clean emissions module (20).
Installation Procedure
1. Install clean emissions module (20) in the reverse order of removal.
Copyright 1993 - 2025 Caterpillar Inc. All Rights Reserved. Private Network For SIS Licensees. Sat Jan 18 16:37:37 UTC+0530 2025
This is the sample of the manual click on the download link for complete manual