


Product: ARTICULATED TRUCK
Model: D300D ARTICULATED TRUCK 5MG
Configuration: D300D ARTICULATED TRUCK 5MG00001-UP (MACHINE)
Disassembly and Assembly
3304B and 3306B Engines for Caterpillar Built Machines
Air Compressor - Remove and Install
SMCS - 1803-010
Removal Procedure
Do not disconnect the air lines until the air pressure in the system isat zero. If hose is disconnected under pressure it can cause personal injury.
i00943434
NOTICE
Keep all parts clean from contaminants.
Contaminants may cause rapid wear and shortened component life.
NOTICE
Care must be taken to ensure that fluidsare contained during performance of inspection, maintenance, testing, adjusting and repair of the machine. Be prepared to collect the fluidwith suitable containers
before opening any compartment or disassembling any component containing fluids.
Refer to Special Publication, NENG2500, "Caterpillar Tools and Shop Products Guide", for tools and supplies suitable to collect and contain fluids in Caterpillar machines.
Dispose of all fluids according to local regulationsand mandates.
1. Remove the air pressure from the air tank and drain the coolant from the cooling system.
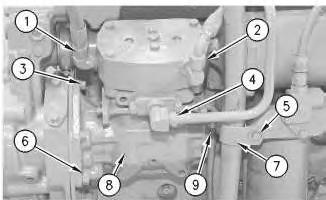
Illustration 1
2. Disconnect hose (1), (2) and (9) from the air compressor. Remove tube (4) from the air compressor.
3. Remove bolt (5) and the washer. Remove clamp (7) from the breather tube. Move the breather tube aside.
4. Remove three bolts (3) and the washersthat hold the air compressor to the timing gear housing.
5. Remove two bolts (6) and remove air compressor (8) and the gasket from the engine.
Installation Procedure
NOTICE
Keep all parts clean from contaminants.
Contaminants may cause rapid wear and shortened component life.
Note: Check the condition of the gaskets and O-ring seals. If gaskets or O-ring sealsare damaged, use newparts for replacement.
2
1. Use three bolts(3) and the washers to install air compressor (8). Apply 4C-4030 Thread Lock Compound to the threads of two bolts (6). Torque bolts (6) to 160 ± 30 N·m (118 ± 22 lb ft).
2. Install clamp (7) for the breather tube with bolt (5) and the washer.
3. Install tube (4) and connect hoses(9), (2) and (1) to air compressor (8) .
Sun Jan 5 21:35:50 UTC+0530
Product: ARTICULATED TRUCK
Model: D300D ARTICULATED TRUCK 5MG
Configuration: D300D ARTICULATED TRUCK 5MG00001-UP (MACHINE)
Disassembly and Assembly
3304B and 3306B Engines for Caterpillar Built Machines Media Number -SENR5598-09
Automatic Timing Advance - Assemble
SMCS - 1272-016
Assembly Procedure
NOTICE
Keep all parts clean from contaminants.
Contaminants may cause rapid wear and shortened component life.
i00935599
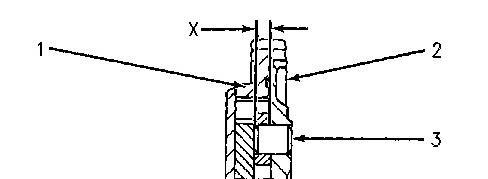


Illustration 1 g00476382
1. If dowels(3) were removed from the gear hub, installation dimension (X) is9.00 ± 0.50 mm (.354 ± .020 inch).
2. Install seals (4) and (5) .
3. Put gear (1) in position on hub assembly (2) .
This is the sample of the manual if you need complete manual click on the Download button
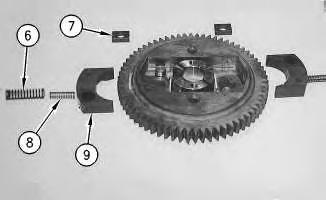
Illustration 2 g00476383
4. Install slide (7), weight (9) and springs (6) and (8) on each side of the assembly.

Illustration 3 g00476385
5. Install plate (11) with two screws (10) .
End By: Install the automatic timing advance unit. Refer to Disassembly and Assembly, "Automatic Timing Advance - Install".
Copyright 1993 - 2020 Caterpillar Inc. All Rights Reserved. Private Network For SIS Licensees.
Sun Jan 5 21:12:58 UTC+0530 2020
Product: ARTICULATED TRUCK
Model: D300D ARTICULATED TRUCK 5MG
Configuration: D300D ARTICULATED TRUCK 5MG00001-UP (MACHINE)
Disassembly and Assembly
3304B and 3306B Engines for Caterpillar Built Machines Media Number -SENR5598-09
Automatic Timing Advance - Disassemble
SMCS - 1272-015
Disassembly Procedure
Start By:
A. Remove the automatic timing advance unit. Refer to Disassembly and Assembly, "Automatic Timing Advance - Remove".
NOTICE
Keep all parts clean from contaminants.
Contaminants may cause rapid wear and shortened component life.

Illustration 1
1. Remove two screws (1) and plate (2) .
NOTICE
The weights are heldinposition with two springs for each weight that is under compression. Carefully remove the weights and the springsin order to help prevent possible injury.

Illustration 2
g00476293
2. Remove springs (3) and (5), weight (6) and slide (4) from each side of the assembly.


Illustration 3 g00476294
3. If necessary, remove gear (7). Remove seals (8) and (9) . Copyright 1993 - 2020 Caterpillar Inc. All Rights Reserved. Private Network For SIS Licensees.
Sun Jan 5 21:12:43 UTC+0530 2020
This is the sample of the manual if you need complete manual click on the Download button