910G COMPACT WHEEL LOADER


Product: COMPACT WHEEL LOADER
Model: 910G COMPACT WHEEL LOADER AKR
Configuration: 910G Wheel Loader AKR00001-UP (MACHINE) POWERED BY 3064 Engine
Disassembly and Assembly
HDB Series and M1 Series Heavy Duty Brushless Alternators Media Number -SENR4130-01
i01585833
Alternator - Assemble - HDB Series Alternator
SMCS - 1405-016
Assembly Procedure
Note: Before assembly, clean all parts in cleaning fluid. Allow the parts to air dry. DO NOT dry the parts with wiping cloths or with rags. Cloths and rags contain lint. Inspect all parts. Replace worn parts and replace damaged parts.

Illustration 1
g00825148
1. Install ball bearing (28) into the front frame. The installation of this component requires force.
2
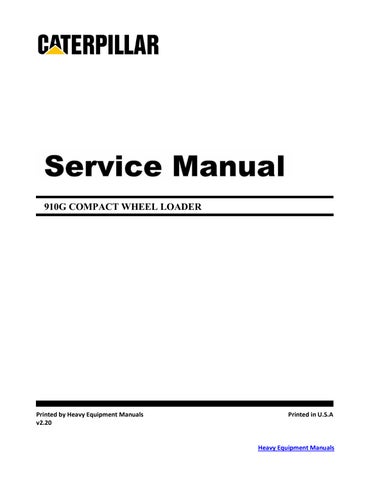
2. Install retainer (27). Install three bolts (26) .
3
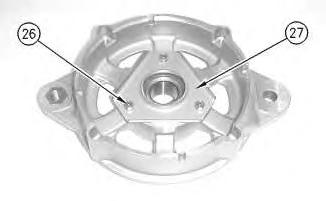
3. Install spacer (25) onto the rotor.
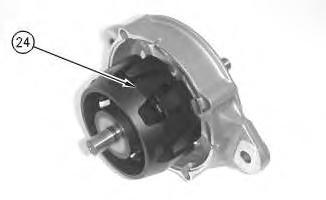
Illustration 4 g00825155
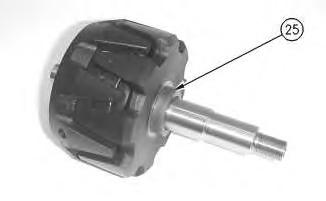
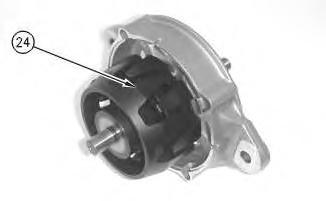
4. Install rotor (24) onto the front frame. The installation of this component requires force.
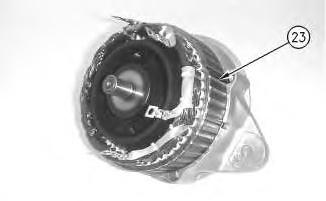
Illustration 5
g00825156
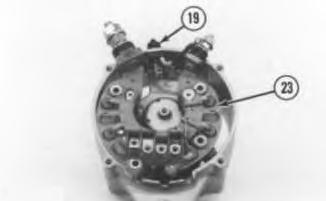
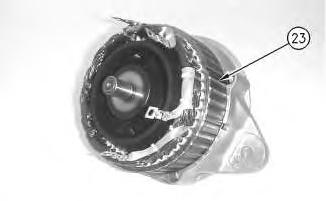
5. Install stator (23) onto the front frame. Align the mark on the stator to the mark on the front frame.
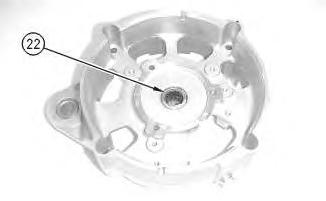
Illustration 6
g00825158
6. Install roller bearing (22) into the rear frame. The installation of this component requires force. Apply grease to the roller bearing, if necessary.
This is the sample of the manual click on the download link for complete manual
DOWNLOAD LINK
For some reason if link does not work download this pdf and then click
7
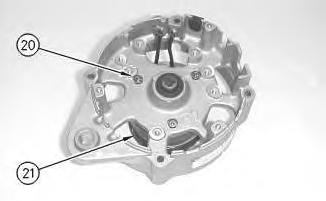
7. Install field coil (21) onto the rear frame. The leads must fit through the rear frame. Install three bolts (20) .

Illustration 8
g00825170
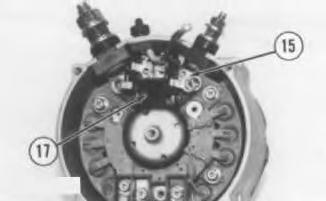
8. Attach rear frame (18) to front frame (19). Align the mark on the rear frame to the mark on the front frame. The stator leads must pass through the appropriate openings. Install four bolts (17) .
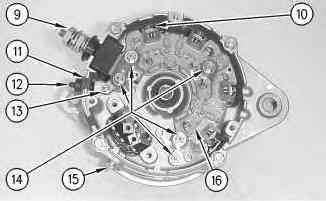
Illustration 9
9. Install rectifier (16). Install five bolts (14). Connect the stator leads to the rectifier and install four bolts (10). Tighten "B+" terminal (9) to the following torque: 18.2 ± 2.4 N·m (13.4 ± 1.8 lb ft)
10. Install "R" terminal (12). Install grommet (11). Install bolt (13) .
11. Install "B-" terminal (15). Tighten the "B-" bolt to the following torque: 4.4 ± 1 N·m (39 ± 9 lb in)
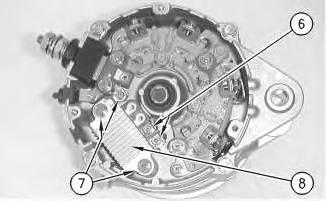
Illustration 10
g00825175
12. Install regulator (8). Install the three bolts (7). Connect the field winding leads to the regulator. Install two bolts (6) .
Note: The regulator terminal that is closest to the "B+" terminal goes on top of the rectifier terminal. The regulator terminal that is farthest from the "B+" terminal goes underneath the rectifier terminal.
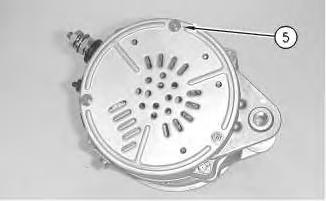
Illustration 11
13. Install the rear cover. Install three bolts (5) .
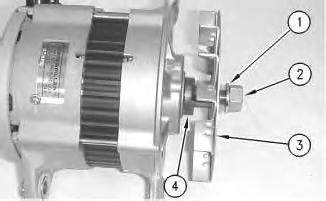
Illustration 12
14. Install spacer (4), fan (3), washer (1), and pulley nut (2) to the rotor shaft. Tighten the pulley nut to the following torque: 127 ± 10 N·m (94 ± 7 lb ft)
15. Restore the residual magnetism in the alternator. Refer to Testing and Adjusting, "Residual Magnetism - Restore".
End By: Install the alternator on the machine. Refer to Disassembly and Assembly, "AlternatorInstall" for the machine that is being serviced.
Copyright 1993 - 2021 Caterpillar Inc. All Rights Reserved. Private Network For SIS Licensees.
Tue Apr 6 10:48:57 UTC+0530 2021
Product: COMPACT WHEEL LOADER
Model: 910G COMPACT WHEEL LOADER AKR
Configuration: 910G Wheel Loader AKR00001-UP (MACHINE) POWERED BY 3064 Engine
Disassembly and Assembly
HDB Series and M1 Series Heavy Duty Brushless Alternators
Media Number -SENR4130-01
Alternator - Assemble - M1 Series Alternator (35 Amp)
SMCS - 1405-016
Assembly Procedure
-23/01/2002
i01569730
Note: Before assembly, clean all parts in cleaning fluid. Allow the parts to air dry. DO NOT dry the parts with wiping cloths or with rags. Cloths and rags contain lint. Inspect all parts. Replace worn parts and replace damaged parts.
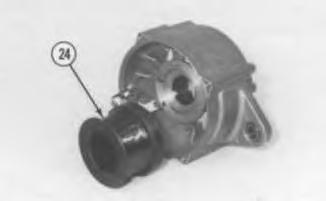
Illustration 1 g00825771
1. Put field winding (24) into the rear frame. Install three bolts.
2
2. Install "R" terminal (19). Put rectifier (23) into the rear frame. Install the four bolts. Tighten the "B+" terminal nut to the following torque: 29 ± 8 N·m (21 ± 6 lb ft) Tighten the "B-" terminal nut to the following torque: 4.4 ± 1 N·m (39 ± 9 lb in)
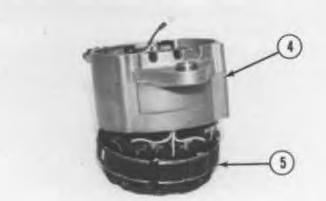
Illustration 3
3. Put rear frame (4) on stator (5). Align the marks on the stator and on the rear frame. Connect the stator leads to the rectifier.
4
4. Install regulator (15) and capacitor (17). Install the two bolts.
5. Connect the field winding leads and connect the wire (14) to the regulator and to the capacitor. Connect the other end of the wire (14) and connect wire (16) to the rectifier.
6. Install the rear cover.

Illustration 5
7. Install two ball bearings (6) on the rotor. Install plate assembly (10), the rear spacer, the rear felt washer, plate (7), ball bearing (8), washer (11), front felt washer (12), and spacer (9) .
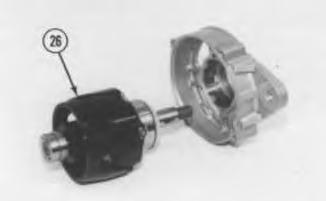
Illustration 6
8. Put rotor (26) into the front frame. Install the four bolts.
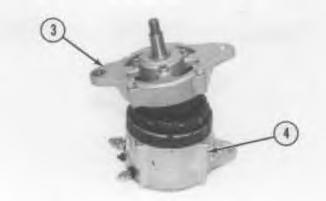
Illustration 7
9. The rotor remains connected to the front frame. The stator remains connected to the rear frame. Put front frame (3) into the rear frame (4). Align the marks on the front frame and on the rear frame. Install the four bolts.
10. Install the fan, the key, the pulley, the washer, and the pulley nut. Tighten the pulley nut to the following torque: 102 ± 7 N·m (75 ± 5 lb ft)
11. Restore the residual magnetism in the alternator. Refer to Testing and Adjusting, "Residual Magnetism - Restore".
End By: Install the alternator on the machine. Refer to Disassembly and Assembly, "AlternatorInstall" for the machine that is being serviced. Copyright 1993 - 2021 Caterpillar Inc.
Product: COMPACT WHEEL LOADER
Model: 910G COMPACT WHEEL LOADER AKR
Configuration: 910G Wheel Loader AKR00001-UP (MACHINE) POWERED BY 3064 Engine
Disassembly and Assembly
HDB Series and M1 Series Heavy Duty Brushless Alternators
i01586342
Alternator - Disassemble - HDB Series Alternator
SMCS - 1405-015
Disassembly Procedure
Start By:
A. Remove the alternator from the machine. Refer to Disassembly and Assembly, "AlternatorRemove" for the machine that is being serviced.
Note: Before disassembly, clean the exterior of the alternator in order to prevent dirt from entering the unit.
Illustration 1 g00825178
1. Remove pulley nut (2), washer (1), fan (3), and spacer (4) from the rotor shaft.
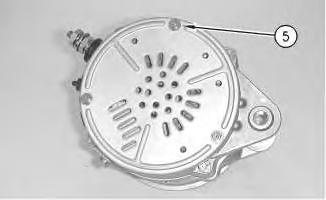
Illustration 2
g00825176
2. Remove three bolts (5). Remove the rear cover.
Illustration 3
g00825175
3. Remove two bolts (6). Disconnect the field winding leads from the regulator. Label the wires. Remove three bolts (7). Remove regulator (8) .
4
4. Remove "B-" terminal (15) .
5. Remove bolt (13). Remove grommet (11). Remove "R" terminal (12) .
6. Loosen "B+" terminal (9). Remove four bolts (10) and disconnect the stator leads from the rectifier. Label the wires. Remove five bolts (14). Remove rectifier (16) .
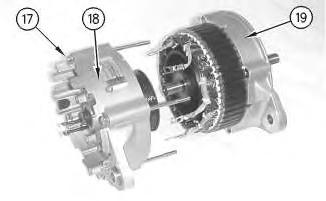
Illustration 5
7. For proper alignment during assembly, mark the front frame, the stator, and the rear frame. Mark the locations of the stator leads in the rear frame. Remove four bolts (17). Separate rear frame (18) from front frame (19) .
6
8. Mark the location of the field winding leads in the rear frame. Remove three bolts (20). Remove field coil (21) from the rear frame.
Illustration 7
9. Remove roller bearing (22) from the rear frame. The removal of this component requires force.
8
10. The stator and the front frame remain marked. Remove stator (23) from the front frame.
9
11. Remove rotor (24) from the front frame. The removal of this component requires force.

Illustration 10
12. Remove spacer (25) from the rotor.
g00825154
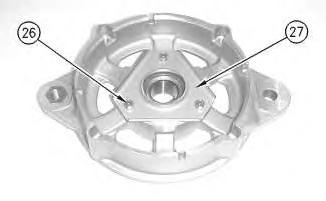
Illustration 11
g00825149
13. Remove three bolts (26). Remove retainer (27) .
Illustration 12
g00825148
14. Remove ball bearing (28) from the front frame. The removal of this component requires force.
Copyright 1993 - 2021 Caterpillar Inc. All Rights Reserved. Private Network For SIS Licensees. Tue Apr 6 10:48:10 UTC+0530 2021
Product: COMPACT WHEEL LOADER
Model: 910G COMPACT WHEEL LOADER AKR
Configuration: 910G Wheel Loader AKR00001-UP (MACHINE) POWERED BY 3064 Engine
Disassembly and Assembly
HDB Series and M1 Series Heavy Duty Brushless Alternators Media Number -SENR4130-01
Alternator - Disassemble - M1 Series Alternator (35 Amp)
SMCS - 1405-015
Disassembly Procedure
Start By:
i01568975
A. Remove the alternator from the machine. Refer to Disassembly and Assembly, "AlternatorRemove" for the machine that is being serviced.
Note: Before disassembly, clean the exterior of the alternator in order to prevent dirt from entering the unit.
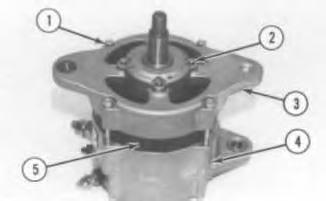
Illustration 1 g00825749
1. Remove the pulley nut, the washer, the pulley, the key, and the fan.
2. For proper alignment during assembly, mark the front frame, the stator, and the rear frame.
3. Remove four bolts (1). Remove front frame (3) from rear frame (4). The rotor remains connected to the front frame. Stator (5) remains connected to the rear frame.
4. Remove four bolts (2). Remove the rotor from the front frame.
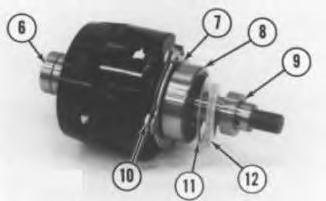
Illustration 2
g00825750
5. Remove spacer (9), front felt washer (12), washer (11), ball bearing (8), plate (7), the rear felt washer, the rear spacer, and plate assembly (10). Remove two ball bearings (6) .

Illustration 3
6. Remove the rear cover.
g00825751
7. For proper assembly, mark all wires. Disconnect wire (16). Disconnect wire (14) and remove wire (14). Disconnect field winding lead (13) .
8. Remove the two bolts. Remove capacitor (17). Remove regulator (15) .
9. Disconnect stator leads (18). Lift rear frame (4) from the stator.
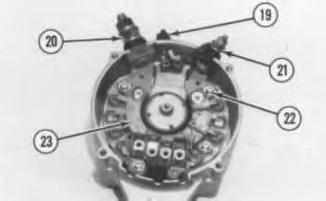
Illustration 4
10. Loosen "B+" terminal nut (20) and loosen "B-" terminal nut. Remove four bolts (22). Remove rectifier (23). Remove "R" terminal (19) .
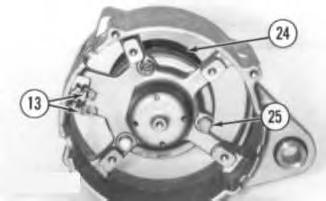
Illustration 5
11. For proper assembly, mark the locations of field winding leads (13) in the rear frame. Remove three bolts (25). Remove field winding (24) from the rear frame.
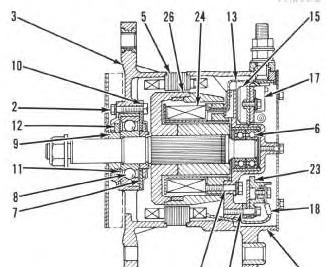
Illustration 6
Alternator Components
(2) Bolts
(3) Front frame
(4) Rear frame
(5) Stator
(6) Ball bearings
(7) Plate
(8) Ball bearing
(9) Spacer
(10) Plate assembly
(11) Washer
(12) Felt washer
(13) Field winding leads
(15) Regulator
(17) Capacitor
(18) Stator leads
(22) Bolts
(23) Rectifier
(24) Field winding
Rotor Copyright 1993 - 2021 Caterpillar Inc. All Rights Reserved.
Network For SIS Licensees. Tue Apr 6 10:47:52 UTC+0530 2021
Product: COMPACT WHEEL LOADER
Model: 910G COMPACT WHEEL LOADER AKR
Configuration: 910G Wheel Loader AKR00001-UP (MACHINE) POWERED BY 3064 Engine
Disassembly and Assembly
3064 and 3066 Engines for Caterpillar Built Machines
Media Number -SENR5553-10
Updated -15/05/2012
Air Inlet Heater - Remove and Install
SMCS - 1090-010
Removal Procedure
NOTICE
Keep all parts clean from contaminants.
Contaminants may cause rapid wear and shortened component life.
1
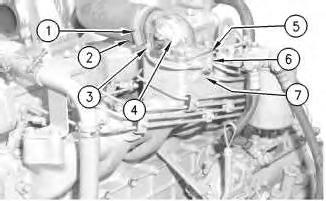
1. Loosen hose clamp (1) that secures air inlet hose (2) to air inlet elbow (4) .
2. Disconnect air inlet hose (2) from air inlet elbow (4) .
3. Remove four bolts (3) and washers that secure the following items to the air inlet manifold: air inlet elbow (4), gasket (5), air inlet heater (6) and gasket (7) .
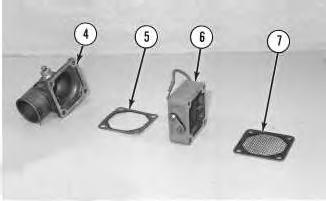
Illustration 2
4. Remove the following items from the air inlet manifold: air inlet elbow (4), gasket (5), air inlet heater (6) and gasket (7) .
Note: Check the condition of the gaskets that are used between the elbow and the air inlet heater. Check the gaskets between the air inlet heater and the air inlet manifold. If the gaskets are damaged in any way, replace the gaskets.
Installation Procedure
NOTICE
Keep all parts clean from contaminants.
Contaminants may cause rapid wear and shortened component life.
This is the sample of the manual click on the download link for complete manual
DOWNLOAD LINK
For some reason if link does not work download this pdf and then click