


Product: ARTICULATED TRUCK
Model: 725C2 ARTICULATED TRUCK 2T3
Configuration: 725C2 Articulated Truck 2T300001-UP (MACHINE) POWERED BY C9.3 Engine
Disassembly and Assembly
730C2 and 725C2 Articulated Truck Power Train
Media Number -M0069866-04
Publication Date -01/10/2014
Date Updated -17/08/2020
Accessory Drive (Transmission) - Remove and Install
SMCS - 1207-010
Removal Procedure Table 1
Required Tools
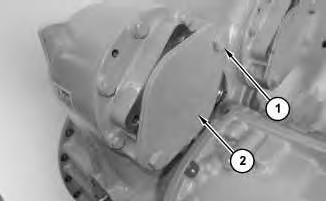
Illustration 1 g03140318
1. Remove bolts (1). Remove cover (2) and the O-ring seal.
i04954722
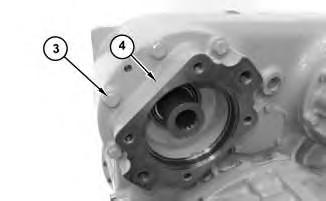
Illustration 2
g03140345
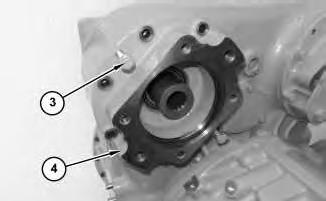
Illustration 3
g03140420
2. Remove bolts (3) from adapter (4). Use bolts (3) to remove adapter (4).
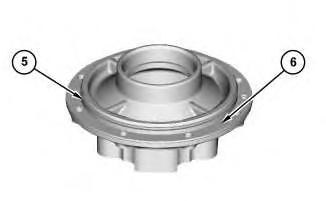
Illustration 4
3. Remove O-ring seal (5) and shims (6).
g03141316
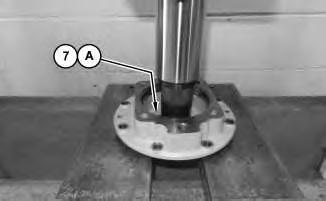
Illustration 5
4. Use Tooling (A) and a suitable press to remove bearing cup (7).
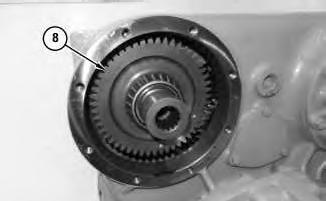
Illustration 6
5. Remove gear assembly (8).
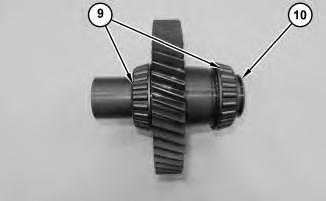
Illustration 7
6. Remove bearing cones (9) and seal (10).
8
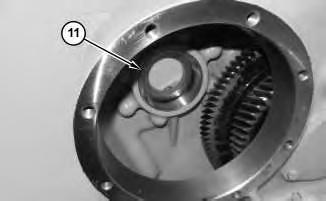
7. Remove bearing cup (11).
Installation Procedure
Illustration 9
1. Install bearing cup (11).
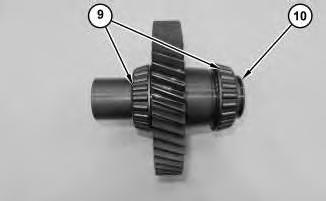
Illustration 10
2. Raise the temperature of bearing cones (9) to install. Install seal (10).
Illustration 11
3. Install gear assembly (8).
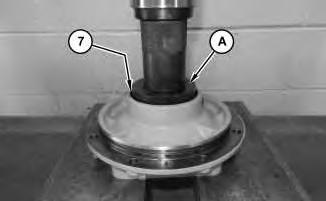
Illustration 12
4. Use Tooling (A) and suitable press to install bearing cup (7).
Illustration 13
5. Install required shims (6) to obtain 0.1 mm (0.00394 inch) to 0.2 mm (0.00787 inch) end play. Install O-ring seal (5) and lubricate with lubricant being sealed.
14
6. Position adapter (4) and install bolts (3).
Illustration 15
g03140318
7. Position cover (2) and the O-ring seal. Install bolts (1).
Copyright 1993 - 2023 Caterpillar Inc. All Rights Reserved. Private Network For SIS Licensees. Mon Dec 18 20:27:23 UTC+0530 2023
Product: ARTICULATED TRUCK
Model: 725C2 ARTICULATED TRUCK 2T3
Configuration: 725C2 Articulated Truck 2T300001-UP (MACHINE) POWERED BY C9.3 Engine
Disassembly and Assembly
730C2 and 725C2 Articulated Truck Power Train
Media Number -M0069866-04
Axle Oil Cooler Pump and Motor - Remove and InstallCenter Axle Oil Cooler Pump and Motor
SMCS - 1365-010; 1365; 5061-010; 5061; 506G-010; 506G; 5073-010; 5073
Removal Procedure
Table 1 Required Tools Tool
A 236-1192 Lift Cylinder Brace As 3
Start By:
a. Release the system pressure.
Personal injury can result from oil under high pressure.
DO NOT allow high pressure oil to contact skin.
Wear appropriate protective equipment while working with high pressure oil systems.
Care must be taken to ensure that fluids are contained during performance of inspection, maintenance, testing, adjusting, and repair of the product. Be prepared to collect the fluid with suitable containers before opening any compartment or disassembling any component containing fluids.
Refer to Special Publication, NENG2500, "Dealer Service Tool Catalog" for tools and supplies suitable to collect and contain fluids on Cat® products.
Dispose of all fluids according to local regulations and mandates.

1
g06135334
1. Raise the truck body. Secure the truck body in the raised position with Tooling (A). Use two people to position Tooling (A). The weight of Tooling (A) is approximately 37 kg (80 lb).
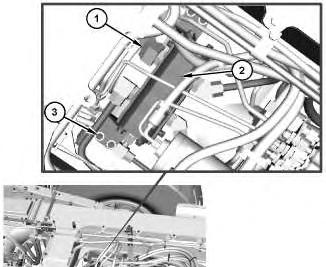
Illustration 2
g06135335
2. Disconnect hose assemblies (1).
3. Remove bolts (3) and axle oil cooler pup and motor (2).
Installation Procedure
1. Install axle oil cooler pup and motor (2) in the reverse order of the removal.
Copyright 1993 - 2023 Caterpillar Inc. All Rights Reserved. Private Network For SIS Licensees.
Mon Dec 18 20:47:05 UTC+0530 2023