



Product: MARINE AUXILIARY
Model: 3608 MARINE AUXILIARY 1ZD
Configuration: 3608 Marine Auxiliary Engine Military 1ZD00001-UP
Operation and Maintenance Manual
3608 Engine
Foreword
Literature Information
This manual contains safety, operation instructions, lubrication and maintenance information. This manual should be stored in or near the engine area in a literature holder or literature storage area Read, study and keep it with the literature and engine information.
English is the primary language for all Cat publications. The English used facilitates translation and consistency in electronic media delivery.
Some photographs or illustrations in this manual show details or attachments that may be different from your engine. Guards and covers may have been removed for illustrative purposes. Continuing improvement and advancement of product design may have caused changes to your engine which are not included in this manual. Whenever a question arises regarding your engine, or this manual, please consult with your Cat dealer for the latest available information.
Safety
This safety section lists basic safety precautions. In addition, this section identifies hazardous, warning situations. Read and understand the basic precautions listed in the safety section before operating or performing lubrication, maintenance and repair on this product.
Operation
Operating techniques outlined in this manual are basic. They assist with developing the skills and techniques required to operate the engine more efficiently and economically. Skill and techniques develop as the operator gains knowledge of the engine and its capabilities.
The operation section is a reference for operators. Photographs and illustrations guide the operator through procedures of inspecting, starting, operating and stopping the engine. This section also includes a discussion of electronic diagnostic information.
Maintenance
The maintenance section is a guide to engine care. The illustrated, step-by-step instructions are grouped by fuel consumption, service hours and/or calendar time maintenance intervals. Items in the maintenance schedule are referenced to detailed instructions that follow.
Use fuel consumption or service hours to determine intervals. Calendar intervals shown (daily, annually, etc.) may be used instead of service meter intervals if they provide more convenient schedules and approximate the indicated service meter reading.
Recommended service should be performed at the appropriate intervals as indicated in the Maintenance Interval Schedule. The actual operating environment of the engine also governs the Maintenance Interval Schedule. Therefore, under extremely severe, dusty, wet or freezing cold operating conditions, more frequent lubrication and maintenance than is specified in the Maintenance Interval Schedule may be necessary.
The maintenance schedule items are organized for a preventive maintenance management program. If the preventive maintenance program is followed, a periodic tune-up is not required. The implementation of a preventive maintenance management program should minimize operating costs through cost avoidances resulting from reductions in unscheduled downtime and failures.
Maintenance Intervals
Perform maintenance on items at multiples of the original requirement. Each level and/or individual items in each level should be shifted ahead or back depending upon your specific maintenance practices, operation and application. We recommend that the maintenance schedules be reproduced and displayed near the engine as a convenient reminder. We also recommend that a maintenance record be maintained as part of the engine's permanent record.
See the section in the Operation and Maintenance Manual, "Maintenance Records" for information regarding documents that are generally accepted as proof of maintenance or repair. Your authorized Cat dealer can assist you in adjusting your maintenance schedule to meet the needs of your operating environment.
Overhaul
Major engine overhaul details are not covered in the Operation and Maintenance Manual except for the interval and the maintenance items in that interval. Major repairs are best left to trained personnel or an authorized Cat dealer. Your Cat dealer offers a variety of options regarding overhaul programs. If you experience a major engine failure, there are also numerous after failure overhaul options available from your Cat dealer. Consult with your dealer for information regarding these options.
California Proposition 65 Warning
Diesel engine exhaust and some of its constituents are known to the State of California to cause cancer, birth defects, and other reproductive harm.
Battery posts, terminals and related accessories contain lead and lead compounds. Wash hands after handling. Fri May 24 11:50:08 UTC+0530 2024
This is the sample of the manual click on the download link for complete manual
DOWNLOAD LINK
For some reason if link does not work download this pdf and then click
Product: MARINE AUXILIARY
Model: 3608 MARINE AUXILIARY 1ZD
Configuration: 3608 Marine Auxiliary Engine Military 1ZD00001-UP
Operation and Maintenance Manual
3608 Engine
i01222871
Aftercooler Condensation - Drain
SMCS - 1063
The aftercooler is similar to a radiator. Coolant passes through the tubes in the aftercooler core. Inlet air that is warmed by the turbocharger compressor is directed through the aftercooler core. The air is cooled in the aftercooler.
Condensation can form in the passages of the aftercooler system. A drain plug is provided for draining the moisture.
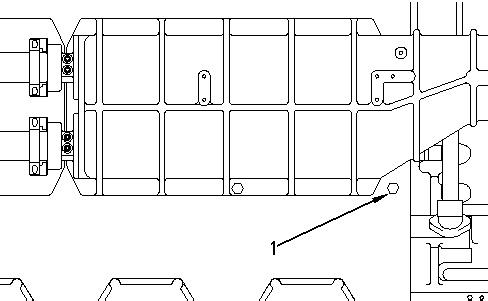
Illustration 1 g00748120
The drain plug is located on the left side near the rear of the engine.
(1) Plug
1. Remove plug (1) .
2. Drain the moisture into a suitable container.
3. Install the plug.
Copyright 1993 - 2024 Caterpillar Inc. All Rights Reserved. Private Network For SIS Licensees.
Fri May 24 11:59:28 UTC+0530 2024
Product: MARINE AUXILIARY
Model: 3608 MARINE AUXILIARY 1ZD
Configuration: 3608 Marine Auxiliary Engine Military 1ZD00001-UP
Operation and Maintenance Manual
3608 Engine
Aftercooler Core - Clean/Test
SMCS - 1064-081; 1064-070
Before cleaning the aftercooler core, determine if the aftercooler requires cleaning. Use the 1522067 Differential Pressure Gauge to measure the differential pressure of the air side of the aftercooler. When the air side differential pressure reaches 7 kPa (1.0 psi) at full rated power, clean the aftercooler core.
Cleaning the Aftercooler
See the Service Manual, "Disassembly and Assembly" module for instructions on removal, disassembly, assembly, and installation.
Note: The following procedure may be used for cleaning both the aftercooler core and the oil cooler core.
1. Remove the core. Disassemble the core.
2. Turn the core upside-down in order to remove debris.
NOTICE
Do not use a high pressure spray for cleaning the fins of the core. A high pressure spray can damage the surface of the fins and reduce the flow of air through the core.
NOTICE
Do not use a high concentration of caustic cleaner to clean the core. A high concentration of caustic cleaner can attack the internal metals of
the core and cause leakage. Only use the recommended concentration of cleaner.
3. Back flush the core with cleaner.
Caterpillar recommends the use of Hydrosolv liquid cleaner. Consult your Cat dealer for the part numbers and quantities that are available.
Use a 2 to 5 percent concentration of the cleaner at temperatures up to 93 °C (200 °F).
4. Steam-clean the core in order to remove any residue. Flush the fins of the aftercooler core. Remove any other trapped debris.
5. Wash the core with hot, soapy water. Rinse the core thoroughly with clean water.
Personal injury can result from air pressure.
Personal injury can result without following proper procedure. When using pressure air, wear a protective face shield and protective clothing.
Maximum air pressure at the nozzle must be less than 205 kPa (30 psi) for cleaning purposes.
6. Dry the core with compressed air. Direct the air in the reverse direction of the normal flow.
7. Inspect the core in order to ensure cleanliness. Pressure-test the core. Many shops that service radiators are equipped to perform pressure tests. If necessary, repair the core.
8. Install the core.
For more information on cleaning the core, consult your Cat dealer. Copyright 1993 - 2024 Caterpillar Inc.
Fri May 24 11:59:44 UTC+0530 2024
For SIS
Product: MARINE AUXILIARY
Model: 3608 MARINE AUXILIARY 1ZD
Configuration: 3608 Marine Auxiliary Engine Military 1ZD00001-UP
Operation and Maintenance Manual
3608 Engine
Air Prelube Pump Lubricator Bowl - Clean
SMCS - 1319; 5507
Personal injury can result from removing hoses or fittings in a pressure system.
Failure to relieve pressure can cause personal injury.
Do not disconnect or remove hoses or fittings until all pressure in the system has been relieved.
NOTICE
Never allow the lubricator bowl to become empty. The prelube pump will be damaged by a lack of lubrication. Ensure that sufficient oil is in the lubricator bowl.
1. Shut off the air supply to the prelube system. Release the pressurized air from the system.
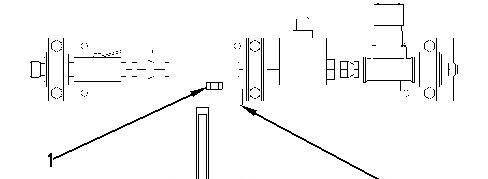
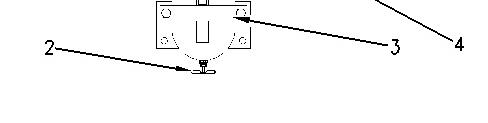
Illustration 1 g00716526
Prelube pump lubricator
(1) Filler plug
(2) Drain valve
(3) Clamp
(4) Retaining ring
2. Slowly remove filler plug (1) from the head of the lubricator in order to release the pressure from the lubricator bowl.
NOTICE
Care must be taken to ensure that fluids are contained during performance of inspection, maintenance, testing, adjusting and repair of the product. Be prepared to collect the fluid with suitable containers before opening any compartment or disassembling any component containing fluids.
Refer to Special Publication, NENG2500, "Caterpillar Tools and Shop Products Guide" for tools and supplies suitable to collect and contain fluids on Caterpillar products.
Dispose of all fluids according to local regulations and mandates.
3. Place a suitable container under the lubricator bowl and open drain valve (2) in order to drain any remaining oil from the bowl.
4. Loosen clamp (3). To remove the lubricator bowl, unscrew retaining ring (4).
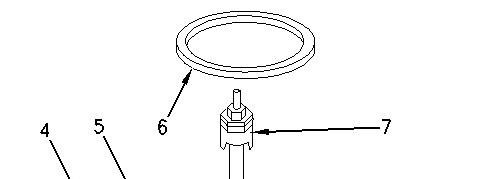


Illustration 2 g00716538
(4) Retaining ring
(5) Lubricator bowl
(6) Gasket
(7) Wick assembly
5. Remove retaining ring (4), lubricator bowl (5), and gasket (6), and wick assembly (7).
6. Clean the wick assembly and the bowl with nonflammable solvent.
Note: The height of the wick inside the lubricator bowl determines the amount of oil that is delivered by the lubricator. The height of the wick for the lubricator is set to the half position at the factory. The height of the wick must be adjusted when a reduction in the delivery of the oil mist is noticeable.
7. Use the following steps to adjust the rate of the oil mist, if necessary.
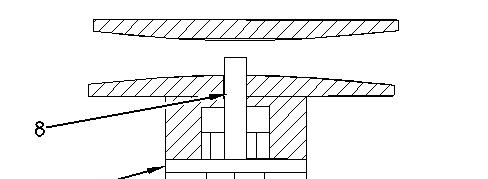
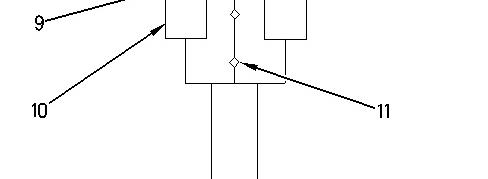

Illustration 3 g00716721
Wick assembly (7) in the venturi of the head of the lubricator (8) Wick (9) Locknut (10) Adjusting nut (11) Notch
a. Loosen locknut (9).
b. Adjust the height of wick (8) by turning adjusting nut (10).
To increase the oil mist, raise the wick. To decrease the oil mist, lower the wick.
Notch (11) is located on the adjusting nut. The height of the wick is visually indicated by the relative position of the notch to the bottom of locknut (9).
8. Install wick assembly (7) into lubricator bowl (5).
9. Inspect gasket (6) for good condition. If the gasket is damaged, obtain a new gasket for assembly. Install the gasket, lubricator bowl (7), and retaining ring (4). Tighten the retaining ring by hand.
10. Make sure that drain valve (2) is closed. Fill the lubricator bowl through the hole for filler plug (1) in the head of the lubricator.
11. Inspect the O-ring seal for filler plug (1). If the seal is damaged, obtain a new seal for assembly. Install the seal and the filler plug.
Copyright 1993 - 2024 Caterpillar Inc.
Rights Reserved.
Network For SIS Licensees. Fri May 24 11:59:57 UTC+0530 2024
Product: MARINE AUXILIARY
Model: 3608 MARINE AUXILIARY 1ZD
Configuration: 3608 Marine Auxiliary Engine Military 1ZD00001-UP
Operation and Maintenance Manual
3608 Engine
i01358364
Air Prelube Pump Lubricator Oil Level - Check
SMCS - 1319; 5507
NOTICE
Never allow the lubricator bowl to become empty. The prelube pump will be damaged by a lack of lubrication. Ensure that sufficient oil is in the lubricator bowl.
Note: The height of the wick inside the lubricator bowl determines the amount of oil that is delivered by the lubricator. The height of the wick must be adjusted when a reduction in the delivery of the oil mist is noticeable. If the lubricator bowl requires more frequent filling, the height of the wick probably needs to be adjusted. For the procedure, see this Operation and Maintenance Manual, "Air Prelube Pump Lubricator Bowl - Clean".
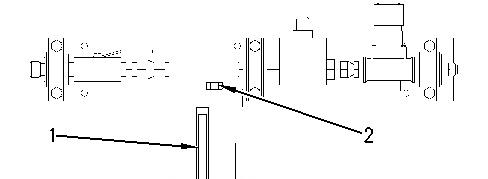

Illustration 1 g00716875
(1) Sight gauge (2) Filler plug
1. Observe the oil level in sight gauge (1). If the oil level is less than 1/2, add oil to the lubricator bowl.
Personal injury can result from removing hoses or fittings in a pressure system.
Failure to relieve pressure can cause personal injury.
Do not disconnect or remove hoses or fittings until all pressure in the system has been relieved.
2. Ensure that the air supply to the lubricator is OFF. Slowly remove filler plug (2) in order to release pressure from the lubricator bowl.
3. Remove filler plug (2). Pour oil into the hole for the filler plug in the head of the lubricator. Fill the bowl to the top.
Use "10W" oil for temperatures that are greater than 0°C (32°F). Use air tool oil for temperatures that are below 0°C (32°F).
4. Inspect the O-ring seal for the filler plug. If the seal is damaged, obtain a new seal for assembly. Install the seal and filler plug (2).
Product: MARINE AUXILIARY
Model: 3608 MARINE AUXILIARY 1ZD
Configuration: 3608 Marine Auxiliary Engine Military 1ZD00001-UP
Operation and Maintenance Manual
3608 Engine
i01223032
Air Shutoff - Test
SMCS - 1078-081
The air shutoff must operate properly in case an emergency shutdown is needed. Test the operation of the air shutoff. It is not necessary for the engine to be operating in order to test the shutoff.
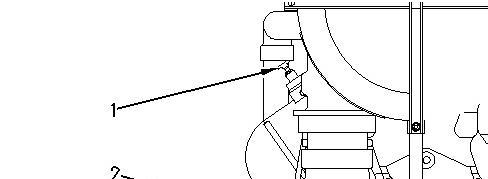
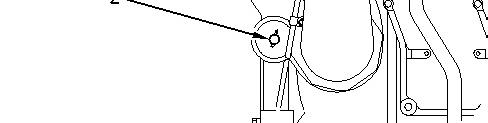
Illustration 1 g00748151
(1) Knob (2) Reset lever
1. To activate the air shutoff, pull knob (1) .
A plate that is inside of the apparatus will cover the air inlet. This prevents air from entering the inlet manifold.
Reset lever (2) should move to the "CLOSED" position. If this fails to occur, investigate the problem. See the Service Manual, "Disassembly and Assembly" topic.
DO NOT attempt to operate the engine if the air shutoff will not activate.
Note: The air shutoff must be reset before the engine can be started.
2. To reset the air shutoff, move reset lever (2) to the "OPEN" position.
1993 - 2024 Caterpillar Inc.
Product: MARINE AUXILIARY
Model: 3608 MARINE AUXILIARY 1ZD
Configuration: 3608 Marine Auxiliary Engine Military 1ZD00001-UP
Operation and Maintenance Manual
3608 Engine
i01357301
Air Starting Motor Lines Screen - Clean
SMCS - 1451-070-LI
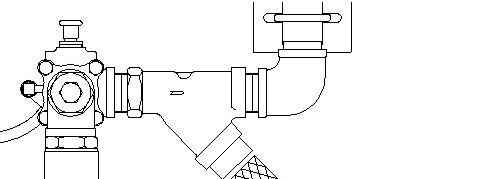
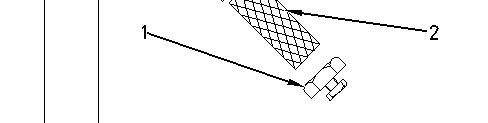
Illustration 1 g00716268
(1) Plug (2) Screen
1. Ensure that the air supply to the air lines is OFF. Purge the pressurized air from the system.
2. Remove plug (1) .
3. Carefully remove screen (2). Clean the screen with nonflammable solvent. Inspect the screen for damage. If the screen is damaged, replace the damaged screen with a new screen.
4. Install clean, dry screen (2). Clean plug (1). Install the plug.
Copyright 1993 - 2024 Caterpillar Inc. All Rights Reserved. Private Network For SIS Licensees.
Fri May 24 12:00:59 UTC+0530 2024
Product: MARINE AUXILIARY
Model: 3608 MARINE AUXILIARY 1ZD
Configuration: 3608 Marine Auxiliary Engine Military 1ZD00001-UP
Operation and Maintenance Manual
3608 Engine
Air Starting Motor Lubricator Bowl - Clean
SMCS - 1451-070
If the engine is equipped with an air starting motor, use the following procedure:
Personal injury can result from removing hoses or fittings in a pressure system.
Failure to relieve pressure can cause personal injury.
Do not disconnect or remove hoses or fittings until all pressure in the system has been relieved.
1. Ensure that the air supply to the lubricator is OFF.
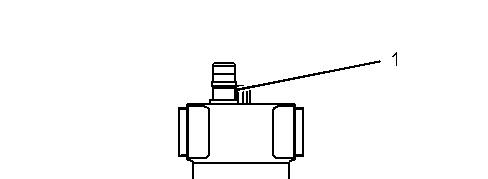
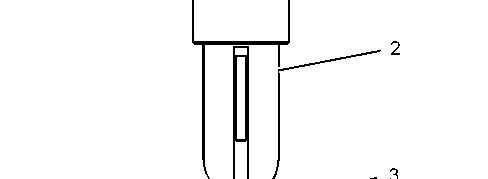

Illustration 1 g03789898
(1) Filler plug
(2) Bowl
(3) Drain valve
2. Slowly loosen filler plug (1) in order to release the pressure from the lubricator.
NOTICE
Care must be taken to ensure that fluids are contained during performance of inspection, maintenance, testing, adjusting, and repair of the product. Be prepared to collect the fluid with suitable containers before opening any compartment or disassembling any component containing fluids.
Refer to Special Publication, NENG2500, "Dealer Service Tool Catalog" for tools and supplies suitable to collect and contain fluids on Cat products.
Dispose of all fluids according to local regulations and mandates.
3. Place a suitable container under bowl (2) and open drain valve (3) in order to drain the oil from the bowl.
4. Remove bowl (2) . Clean the bowl with warm water.
5. Dry the bowl. Inspect the bowl for cracks. If the bowl is cracked, replace the damaged bowl with a new bowl. Inspect the gasket. If the gasket is damaged, replace the gasket.
6. Install the bowl.
7. Make sure that drain valve (3) is closed.
8. For instructions on filling the lubricator, see this Operation and Maintenance Manual, "Air Starting Motor Lubricator Oil Level - Check" topic. Copyright 1993 - 2024 Caterpillar Inc.
Rights Reserved.
Network For SIS Licensees. Fri May 24 12:01:11 UTC+0530 2024
Product: MARINE AUXILIARY
Model: 3608 MARINE AUXILIARY 1ZD
Configuration: 3608 Marine Auxiliary Engine Military 1ZD00001-UP
Operation and Maintenance Manual
3608 Engine
Air Starting Motor Lubricator Oil Level - Check
SMCS - 1451-535
NOTICE
Never allow the lubricator bowl to become empty. The air starting motor will be damaged by a lack of lubrication. Ensure that sufficient oil is in the lubricator bowl.
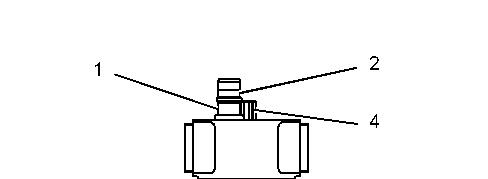
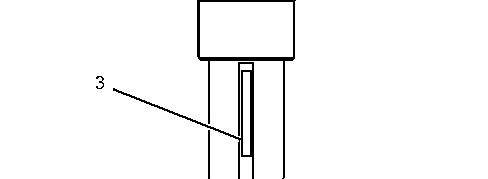

Illustration 1 g03789862
1. Observe the oil level in sight gauge (3) . If the oil level is less than 1/2, add oil to the lubricator bowl.
Personal injury can result from removing hoses or fittings in a pressure system.
Failure to relieve pressure can cause personal injury.
Do not disconnect or remove hoses or fittings until all pressure in the system has been relieved.
2. Ensure that the air supply to the lubricator is OFF. Slowly loosen filler plug (4) in order to release pressure from the lubricator bowl.
3. Remove filler plug (4) . Pour oil into the lubricator bowl. Use nondetergent SAE 10W oil for temperatures that are greater than 0 °C (32 °F). Use air tool oil for temperatures that are below 0 °C (32 °F).
4. Install filler plug (4) .
This is the sample of the manual click on the download link for complete manual
DOWNLOAD LINK
For some reason if link does not work download this pdf and then click