

Product: EXCAVATOR
Model: 336D2 L EXCAVATOR GJA
Configuration: 336D2 L Excavators GJA00001-UP (MACHINE) POWERED BY C9 Engine
Disassembly and Assembly
336D2/336D2 GC Excavator Engine Supplement Media Number -M0065624-02
Air Cleaner - Remove and Install
SMCS - 1051-010; 1054-010
Removal Procedure
Note: Cleanliness is an important factor. Before the disassembly procedure, the exterior of the component must be cleaned. Cleaning will help to prevent dirt from entering the internal mechanism.

2
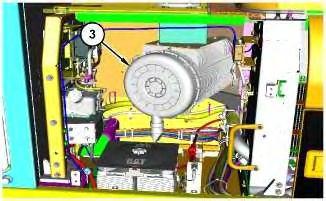
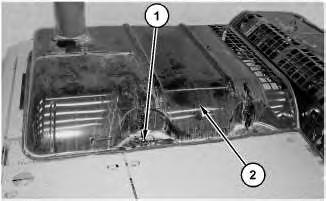
Remove cover (3).
3
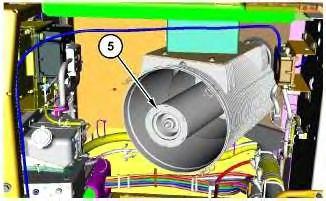
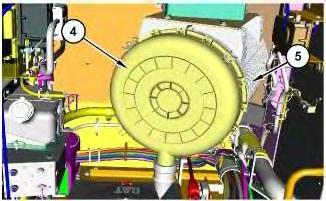
Illustration 4
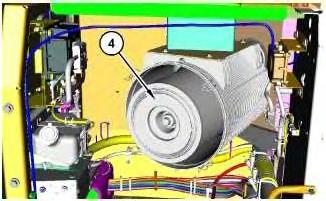
3. Remove primary filter element (4) and secondary filter element (5).
5
g03828112
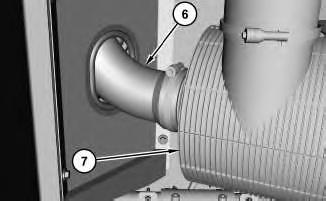
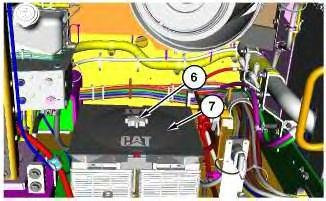
4. Disconnect hose (6) from the rear side of air cleaner assembly (7).
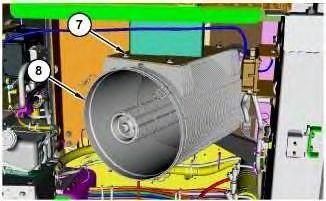
Illustration 6
g06039898
5. Remove bolts (7) and air cleaner assembly (8).
Installation Procedure
1. Install air cleaner assembly (8) in the reverse order of removal.
Copyright 1993 - 2020 Caterpillar Inc. All Rights Reserved. Private Network For SIS Licensees. Mon Mar 30 12:12:48 UTC+0530 2020
Product: EXCAVATOR
Model: 336D2 L EXCAVATOR GJA
Configuration: 336D2 L Excavators GJA00001-UP (MACHINE) POWERED BY C9 Engine
Disassembly and Assembly
336D2/336D2 GC Excavator Engine Supplement
Media Number -M0065624-02
Publication Date -01/09/2015
Air Inlet Elbow - Remove and Install
SMCS - 1087-010-E4; 1087-010
Removal Procedure
Date Updated -10/08/2018
i06589578
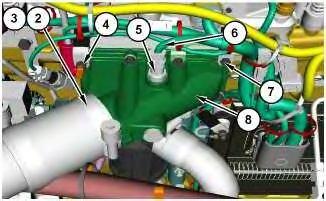
2. Loosen Clamp (2) and disconnect air inlet hose (3).
3. Remove nut (4), bolt (7), and disconnect harness assembly (6).
4. Remove air inlet temperature sensor (5).
5. Remove remaining bolts (7) and air inlet elbow (8).
Installation Procedure
1. Install air inlet elbow (8) in the reverse order of removal. Copyright 1993 - 2020 Caterpillar Inc. All Rights Reserved. Private Network For SIS Licensees.
Product: EXCAVATOR
Model: 336D2 L EXCAVATOR GJA
Configuration: 336D2 L Excavators GJA00001-UP (MACHINE) POWERED BY C9 Engine
Disassembly and Assembly
336D2/336D2 GC Excavator Engine Supplement
Media Number -M0065624-02
Alternator - Remove and Install
SMCS - 1405-010
Removal Procedure
-10/08/2018
Note: Cleanliness is an important factor. Before the disassembly procedure, the exterior of the component should be thoroughly cleaned. This will help to prevent dirt from entering the internal mechanism.
Note: Put identification marks on all lines, on all hoses, on all wires, and on all tubes for installation purposes. Plug all lines, hoses, and tubes. This helps to prevent fluid loss and this helps to keep contaminants from entering the system.
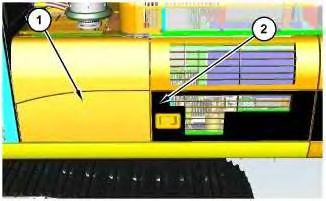
Illustration 1
1. Open doors (2) and (1).
g06036659
2
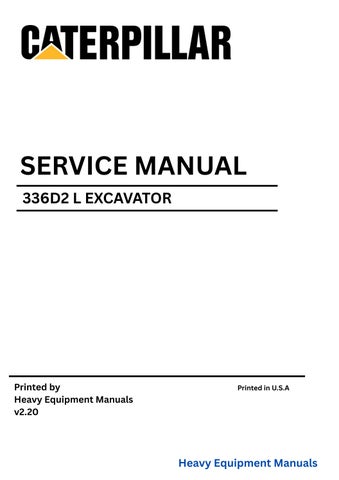
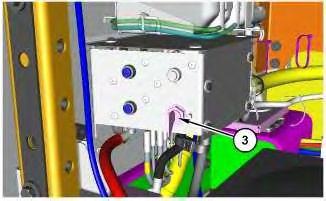
2. Turn battery disconnect switch (3) to the OFF position.

Illustration 3
3. Open engine hood (4).
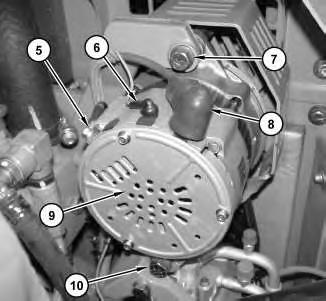
Illustration 4
4. Remove the belt from alternator (9). Refer to Operation and Maintenance Manual, "BeltsInspect / Adjust / Replace".
5. Disconnect harness assemblies (5), (6), and (8).
6. Remove bolt (7), bolt (10), and alternator (9).
Installation Procedure
Note: Cleanliness is an important factor. Before assembly, all parts should be thoroughly cleaned in cleaning fluid. Allow the parts to air dry. Wiping cloths or rags should not be used to dry parts. Lint may be deposited on the parts which may cause later trouble. Inspect all parts. If any parts are worn or damaged, use new parts for replacement.
1. Install alternator (9), bolt (7), and bolt (10).
2. Connect harness assemblies (5), (6), and (8).
3. Install the belt to alternator (9). Refer to Operation and Maintenance Manual, "BeltsInspect / Adjust / Replace".
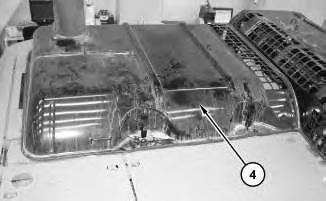
Illustration 6
4. Close engine hood (4).
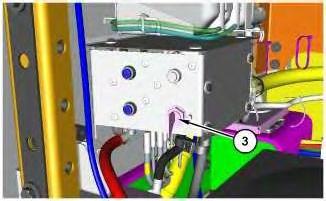
Illustration 7
5. Turn battery disconnect switch (3) to the ON position.
Illustration 8
6. Close doors (1) and (2). Copyright 1993 - 2020 Caterpillar Inc.
Product: EXCAVATOR
Model: 336D2 L EXCAVATOR GJA
Configuration: 336D2 L Excavators GJA00001-UP (MACHINE) POWERED BY C9 Engine
Disassembly and Assembly
336D2/336D2 GC Excavator Engine Supplement
Media Number -M0065624-02
Battery - Remove and Install
SMCS - 1401-010
Removal Procedure
Updated -10/08/2018
Note: Put identification marks on all lines, on all hoses, on all wires, and on all tubes for installation purposes. Plug all lines, hoses, and tubes to prevent fluid loss and keep contaminants from entering the system.
2
2. Turn battery disconnect switch (3) to the OFF position.
3
3. Remove cover (4) from air cleaner (5).
4
4. Remove knob (6) and cover (7).
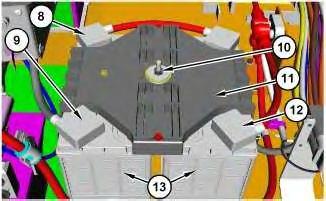
5
5. Disconnect cable assemblies (8), (9), and (12).
6. Remove nut (10) and cover (11).
7. Remove batteries (13).
Installation Procedure
Illustration 6
1. Install batteries (13).
2. Install cover (11) and nut (10).
g06036681
3. Connect cable assemblies (8), (9), and (12).
7
4. Install cover (7) and knob (6).
8
5. Install cover (4) on air cleaner (5).
9
6. Turn battery disconnect switch (3) to the ON position.
Copyright 1993 - 2020 Caterpillar Inc. All Rights Reserved.
Private Network For SIS Licensees. Mon Mar 30 12:09:33 UTC+0530 2020
Product: EXCAVATOR
Model: 336D2 L EXCAVATOR GJA
Configuration: 336D2 L Excavators GJA00001-UP (MACHINE) POWERED BY C9 Engine
Disassembly and Assembly
336D2/336D2 GC Excavator Engine Supplement
Media Number -M0065624-02 Publication Date -01/09/2015 Date Updated -10/08/2018
Belt Tensioner - Remove and Install - Alternator, Refrigerant Compressor, Water Pump
SMCS - 1358-010
Removal Procedure
1
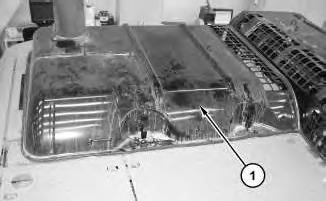
1. Remove bolts (1) and guard assembly (2).
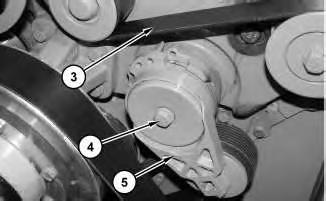
2. Remove belt (3). Refer to Operation and Maintenance Manual, "BeltInspect/Adjust/Replace" to remove and install the belt.
3. Remove bolt (4) and belt tensioner (5).
Installation Procedure
1. Install belt tensioner (5) in the reverse order of removal. Copyright 1993 - 2020 Caterpillar Inc. All Rights Reserved.
Network For SIS Licensees. Mon Mar 30 12:13:43 UTC+0530 2020
Product: EXCAVATOR
Model: 336D2 L EXCAVATOR GJA
Configuration: 336D2 L Excavators GJA00001-UP (MACHINE) POWERED BY C9 Engine
Disassembly and Assembly
336D2/336D2 GC Excavator Engine Supplement
Media Number -M0065624-02
Cooling System Package (Radiator, Hydraulic Oil Cooler, and Aftercooler) - Assemble
SMCS - 1063-016; 1353-016; 1374-016
Assembly Procedure Table 1
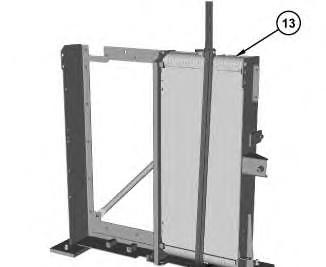
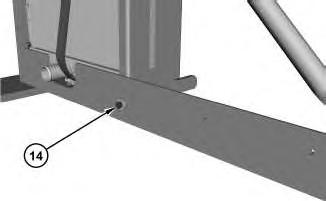
Illustration 2
g03830969
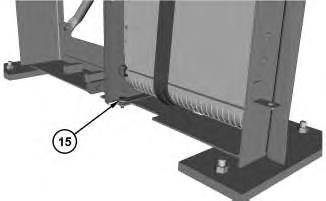
Illustration 3
g03830970
1. Attach a suitable lifting device to radiator (13). The weight of radiator (13) is approximately 21 kg (45 lb)
2. Install radiator (13), bolts (14), and (15). Tighten bolts (14) and (15) to a torque of 100 ± 20 N.m (74 ± 15 lb ft).
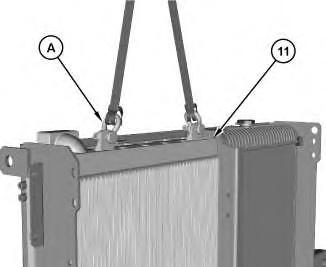
Illustration 4 g03830751
3. Attach Tooling (A) and use a suitable lifting device to install hydraulic oil cooler (11). The weight of hydraulic oil cooler (11) is approximately 63 kg (140 lb).
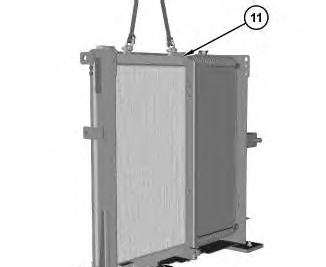
Illustration 5
g03830905
4. Install hydraulic oil cooler (11) and bolts (12). Tighten bolts (12) to a torque of 100 ± 20 N.m (74 ± 15 lb ft).
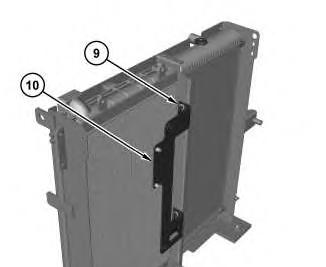
Illustration 6
g03830755
5. Install bracket (10) and bolts (9). Tighten bolts (9) to a torque of 100 ± 20 N.m (74 ± 15 lb ft).
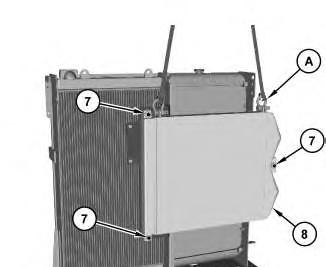
Illustration 7
g03829795
6. Attach Tooling (A) and use a suitable lifting device to install aftercooler (8). The weight of aftercooler (8) is approximately 34 kg (75 lb).
7. Install aftercooler (8) and bolts (7). Tighten bolts (7) to a torque of 100 ± 20 N.m (74 ± 15 lb ft).
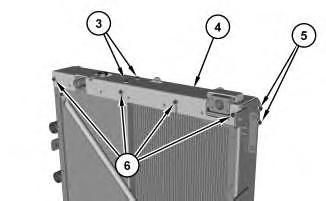
Illustration 8
g03829770
8. Install frame assembly (4) and bolts (3), (4), and (5). Tighten bolts (3), (4), and (5) to a torque of 100 ± 20 N.m (74 ± 15 lb ft).
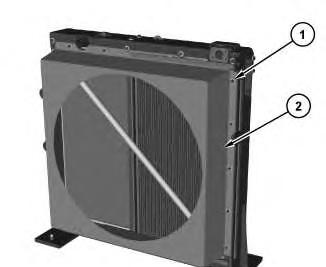
Illustration 9
9. Install shroud (2) and bolts (1). Tighten bolts (1) to a torque of 55 ± 10 N.m (41 ± 7 lb ft).
Copyright 1993 - 2020 Caterpillar Inc. All Rights Reserved. Private Network For SIS Licensees. Mon Mar 30 12:14:01 UTC+0530 2020
Product: EXCAVATOR
Model: 336D2 L EXCAVATOR GJA
Configuration: 336D2 L Excavators GJA00001-UP (MACHINE) POWERED BY C9 Engine
Disassembly and Assembly
336D2/336D2 GC Excavator Engine Supplement
Media Number -M0065624-02 Publication Date -01/09/2015 Date Updated -10/08/2018
Cooling System Package (Radiator, Hydraulic Oil Cooler, and Aftercooler) - Disassemble
SMCS - 1063-015; 1353-015; 1374-015
Disassembly Procedure
1
A 189-0408 Shackle As 2
Start By:
a. Remove the cooling system package (radiator, hydraulic oil cooler, and aftercooler).
Illustration 1
1. Remove bolts (1) and shroud (2).

2
2. Remove bolts (3) and bolts (6).
3. Remove bolts (5) from both sides and remove frame assembly (4).
Illustration 3
4. Attach Tooling (A) and a suitable lifting device to aftercooler (8). The weight of aftercooler (8) is approximately 34 kg (75 lb).
5. Remove bolts (7) and aftercooler (8).
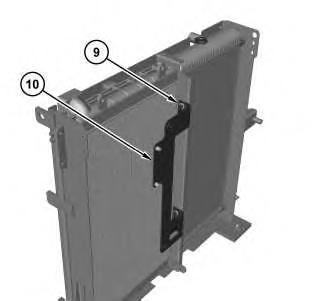
Illustration 4
6. Remove bolts (9) and bracket (10).
g03830755
Illustration 5
g03830751
7. Attach Tooling (A) and a suitable lifting device to hydraulic oil cooler (11). The weight of hydraulic oil cooler (11) is approximately 63 kg (140 lb).
Illustration 6
g03830905
8. Remove bolts (12) and hydraulic oil cooler (11).