DOWNLOAD LINK
For some reason if link does not work download this pdf and then click
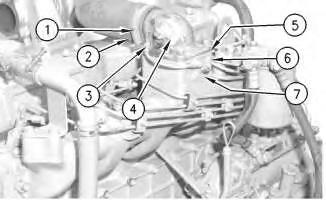
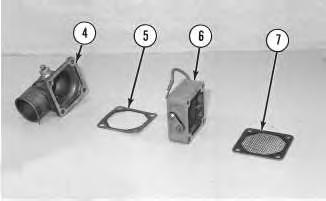
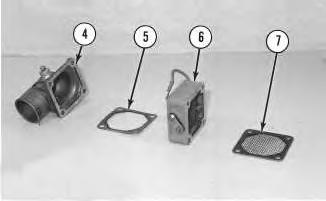
3. Remove four bolts (3) and washers that secure the following items to the air inlet manifold: air inlet elbow (4), gasket (5), air inlet heater (6) and gasket (7) .
Illustration 2 g00611165
4. Remove the following items from the air inlet manifold: air inlet elbow (4), gasket (5), air inlet heater (6) and gasket (7) .
Note: Check the condition of the gaskets that are used between the elbow and the air inlet heater. Check the gaskets between the air inlet heater and the air inlet manifold. If the gaskets are damaged in any way, replace the gaskets.
Installation Procedure
NOTICE
Keep all parts clean from contaminants.
Contaminants may cause rapid wear and shortened component life.
Illustration 3 g00611165
Note: Check condition of the gaskets for the air inlet elbow and the air inlet heater. If the gaskets are damaged, use a new part for replacement. The wire mesh gasket (7) is installed between the air inlet manifold and the air inlet heater.
1. Place the following items in position on the air inlet manifold: gasket (7), the air inlet heater (6), gasket (5) and the air inlet elbow (4) .
Illustration 4
g00611147
2. Install four bolts (3) that secure the following items to the air inlet manifold: gasket (7), the air inlet heater (6), gasket (5) and the air inlet elbow (4)
Tighten bolts (3) to a torque of 28 ± 7 N·m (21 ± 5 lb ft).
3. Connect air inlet hose (2) to air inlet elbow (4) .
4. Tighten hose clamp (1) that secures the air inlet hose to the air inlet elbow. Copyright 1993 - 2024 Caterpillar Inc. All Rights Reserved. Private Network For SIS Licensees. Sat Jan 27 10:30:43 UTC+0530 2024
Product: EXCAVATOR
Model: 312B EXCAVATOR 3ES
Configuration: ISJ HEX COMMONALITY CHART 3ES00001-UP (MACHINE)
Disassembly and Assembly
3064 and 3066 Engines for Caterpillar Built Machines
Media Number -SENR5553-10
Alternator - Remove and Install
SMCS - 1405-010
Removal Procedure
Start By:
A. Remove the V-belts. Refer to Disassembly and Assembly, "V-Belts - Remove and Install".
Disconnect batteries before performance of any service work.
NOTICE
Keep all parts clean from contaminants.
Contaminants may cause rapid wear and shortened component life.
i01134004
Illustration 1 g00604446
Illustration 2 g00604449
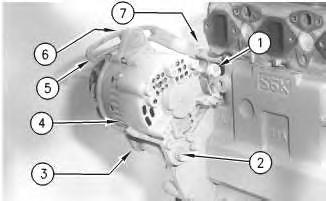
1. Put identification marks on the wires for the alternator. Disconnect wires (1) from the alternator.
2. Remove bolt (6) and the washer from alternator (4) .
3. Remove bolt (7) and the washer from the cylinder block. Remove the belt tensioner (5) from the engine.
4. Remove bolt (2) and the washer from the alternator support. Remove bolt (3) (not shown) and the washer from the alternator support.
5. Remove alternator (4) from the engine.
Installation Procedure NOTICE
Keep all parts clean from contaminants.
Contaminants may cause rapid wear and shortened component life.
Illustration 3 g00604446
Illustration 4 g00604449
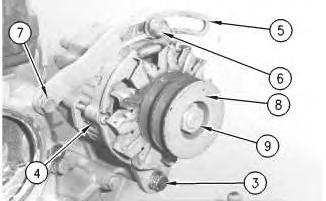
1. Put alternator (4) in position. Install bolt (2) and the washer into the alternator support. Install bolt (3) and the washer into the alternator support. The bolts are installed finger tight into the alternator.
Note: If the alternator pulley (8) is removed, tighten the alternator pulley nut (9) to a torque of 147 ± 15 N·m (108.5 ± 10.5 lb ft).
2. Place the belt tensioner (5) in position on the engine. Install bolt (7) and the washer into the cylinder block in order to secure the belt tensioner.
3. Install bolt (6) and the washer into the alternator.
4. Reconnect wires (1) to the alternator.
End By: Install the V-belts. Refer to Disassembly and Assembly, "V-Belts - Remove and Install".
Product: EXCAVATOR
Model: 312B EXCAVATOR 3ES
Configuration: ISJ HEX COMMONALITY CHART 3ES00001-UP (MACHINE)
Disassembly and Assembly
3064 and 3066 Engines for Caterpillar Built Machines Media
Bearing Clearance - Check
SMCS - 1203-535; 1219-535
Measurement Procedure Table 1
Required Tools
198-9142
Plastic Gauge (Green) 0.025 to 0.076 mm (0.001 to 0.003 inch)
Plastic Gauge (Red)
to 0.152 mm (0.002 to 0.006 inch)
Plastic Gauge (Blue)
to 0.229 mm (0.004 to 0.009 inch)
Plastic Gauge (Yellow) 0.230 to 0.510 mm (0.009 to 0.020 inch)
Note: Plastic gauge may not be necessary when the engine is in the chassis.
NOTICE
Keep all parts clean from contaminants.
Contaminants may cause rapid wear and shortened component life.
i05977048
Note: Cat does not recommend the checking of the actual bearing clearances particularly on small engines. This is because of the possibility of obtaining inaccurate results and the possibility of damaging the bearing or the journal surfaces. Each Cat engine bearing is quality checked for specific wall thickness.
Note: The measurements should be within specifications and the correct bearings should be used. If the crankshaft journals and the bores for the block and the rods were measured during disassembly, no further checks are necessary. However, if the technician still wants to measure the bearing clearances, Tooling (A) is an acceptable method. Tooling (A) is less accurate on journals with small diameters if clearances are less than 0.10 mm (0.004 inch).
NOTICE
Lead wire, shim stock or a dial bore gauge can damage the bearing surfaces.
The technician must be very careful to use Tooling (A) correctly. The following points must be remembered:
• Ensure that the backs of the bearings and the bores are clean and dry.
• Ensure that the bearing locking tabs are properly seated in the tab grooves.
• The crankshaft must be free of oil at the contact points of Tooling (A).
1. Put a piece of Tooling (A) on the crown of the bearing that is in the cap.
Note: Do not allow Tooling (A) to extend over the edge of the bearing.
2. Use the correct torque-turn specifications in order to install the bearing cap. Do not use an impact wrench. Be careful not to dislodge the bearing when the cap is installed.
Note: Do not turn the crankshaft when Tooling (A) is installed.
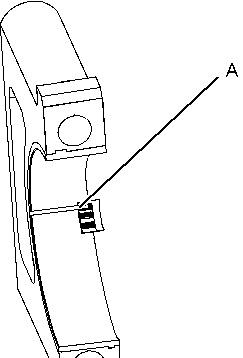
3. Carefully remove the cap, but do not remove Tooling (A). Measure the width of Tooling (A) while Tooling (A) is in the bearing cap or on the crankshaft journal. Refer to Illustration 1.
Illustration 1 g01152855
Typical Example
4. Remove all of Tooling (A) before you install the bearing cap.
Note: When Tooling (A) is used, the readings can sometimes be unclear. For example, all parts of Tooling (A) are not the same width. Measure the major width in order to ensure that the parts are within the specification range. Refer to Specifications Manual, "Connecting Rod Bearing Journal" and Specifications Manual, "Main Bearing Journal" for the correct clearances. Copyright 1993 - 2024 Caterpillar Inc. All Rights Reserved. Private Network For SIS Licensees. Sat Jan 27 10:58:22 UTC+0530 2024
Product: EXCAVATOR
Model: 312B EXCAVATOR 3ES
Configuration: ISJ HEX COMMONALITY CHART 3ES00001-UP (MACHINE)
Disassembly and Assembly
3064 and 3066 Engines for Caterpillar Built Machines
Media Number -SENR5553-10
Camshaft - Install
SMCS - 1210-012
Installation Procedure
Note: In this installation procedure, the engine needs to remain in the upside-down position in order to keep the lifters in position while the camshaft is installed.
NOTICE
Keep all parts clean from contaminants.
Contaminants may cause rapid wear and shortened component life.
Note: During installation, ensure that the camshaft is clean and lubricate all of the components with clean engine oil.
1. Install the valve lifters. Refer to Disassembly and Assembly, "Lifter Group - Remove and Install".
i01568556
Illustration 1 g00569371
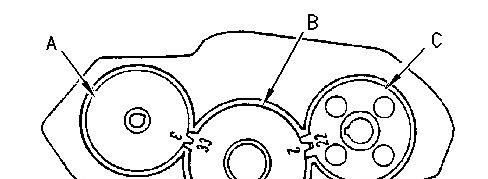
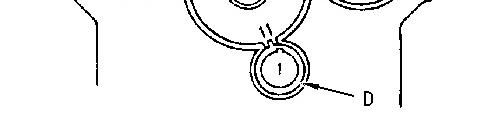
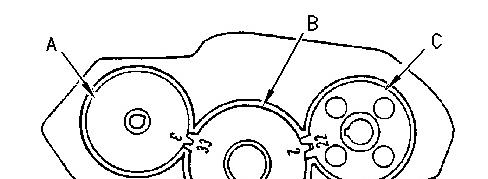
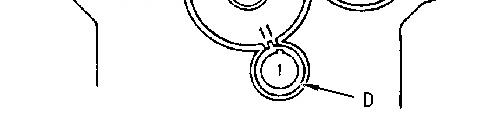
Note: During installation, ensure that the marks on the timing gears are in alignment. Align fuel injection drive gear (A) with the "33" mark with the "3" mark on idler gear (B). Make an alignment of the "2" mark on camshaft gear (C) with the "22" mark on idler gear (B). Align the "1" mark on crankshaft gear (D) with the "11" mark on idler gear (B). The No. 1 cylinder is at the top center position when these marks are in alignment.
2. Carefully install the camshaft assembly into the original location in the cylinder block.
Note: Caution must be used when the camshaft is installed in order to not damage the camshaft lobe or the camshaft bearings.
Illustration 2
g00604521
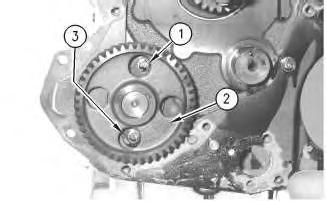
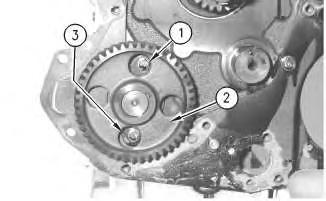
3. Position camshaft gear (2) so that the gear's slots align from the top to the bottom. Install two bolts (1) and the washers that hold thrust plate (3). Tighten bolts (1) to a torque of 11 ± 2 N·m (8 ± 1 lb ft).
End By:
a. Install the oil pan. Refer to Disassembly and Assembly, "Engine Oil Pan - Remove and Install".
b. Install the rocker shaft assembly and the pushrods. Refer to Disassembly and Assembly, "Rocker Shaft and Pushrod - Install".
c. Install the timing gear cover. Refer to Disassembly and Assembly, "Housing (Front)Install". Copyright 1993 - 2024 Caterpillar Inc.
Network For SIS Licensees.
Product: EXCAVATOR
Model: 312B EXCAVATOR 3ES
Configuration: ISJ HEX COMMONALITY CHART 3ES00001-UP (MACHINE)
Disassembly and Assembly
3064 and 3066 Engines for Caterpillar Built Machines
Media Number -SENR5553-10
Camshaft - Remove
SMCS - 1210-011
Removal Procedure
Start By:
A. Remove the front housing. Refer to Disassembly and Assembly, " Housing (Front)Remove".
B. Remove the rocker shaft assembly and the pushrods. Refer to Disassembly and Assembly, "Rocker Shaft and Pushrod - Remove".
C. Remove the oil pan. Refer to Disassembly and Assembly, "Engine Oil Pan - Remove and Install".
Note: In this removal procedure, the engine needs to be placed in the upside-down position. This will allow the lifters to remain in position after the camshaft is removed.
NOTICE
Keep all parts clean from contaminants.
Contaminants may cause rapid wear and shortened component life.
NOTICE
Care must be taken to ensure that fluids are contained during performance of inspection, maintenance, testing, adjusting and repair of the product. Be prepared to collect the fluid with suitable containers before opening any compartment or disassembling any component containing fluids.
i01568538
Refer to Special Publication, NENG2500, "Caterpillar Tools and Shop Products Guide" for tools and supplies suitable to collect and contain fluids on Caterpillar products.
Dispose of all fluids according to local regulations and mandates.
Illustration 1 g00569371
Note: Ensure that the marks on the timing gears are in alignment. Align fuel injection drive gear (A) with the "33" mark with the "3" mark on idler gear (B). Make an alignment of the "2" mark on camshaft gear (C) with the "22" mark on idler gear (B). Align the "1" mark on crankshaft gear (D) with the "11" mark on idler gear (B). The No. 1 cylinder is at the top center position when these marks are in alignment.
1. Rotate the engine at 180 degrees in order to place the engine in the upside-down position. This will ease the removal of the camshaft.
NOTICE
Do not damage the lobes or the bearings when the camshaft is removed or installed.
2. Position camshaft gear (2) so that the gear's slots align from the top to the bottom. Remove two bolts (1) and the washers that hold thrust plate (3) (not shown).
3. Carefully remove the camshaft, the thrust plate and the camshaft gear as an assembly.
4. Remove the valve lifters. Refer to Disassembly and Assembly, "Lifter Group - Remove and Install". Copyright 1993 - 2024 Caterpillar Inc.
Product: EXCAVATOR
Model: 312B EXCAVATOR 3ES
Configuration: ISJ HEX COMMONALITY CHART 3ES00001-UP (MACHINE)
Disassembly and Assembly
3064 and 3066 Engines for Caterpillar Built Machines
Media Number -SENR5553-10
Camshaft Bearings - Install
SMCS - 1211-012
Installation Procedure Table 1 Required Tools Tool
Keep all parts clean from contaminants.
Contaminants may cause rapid wear and shortened component life.
i01568696
1 g00533095
Illustration 2 g00533096
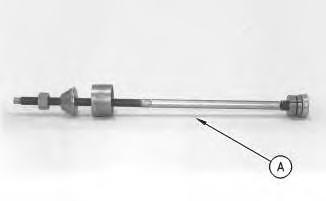
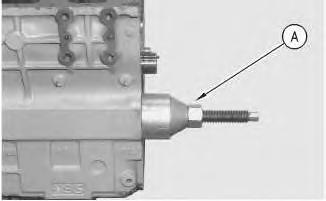
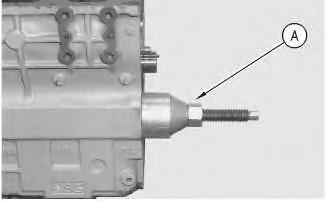
1. Use Tool (A) in order to install the camshaft bearings into the cylinder block. Ensure that the oil hole of the camshaft bearings are in alignment with the oil ports in the engine block.
Note: Refer to the instructions of the 8S-2241 Camshaft Bearing Tool Group for the proper procedure.
3
Illustration
Illustration
g00612707
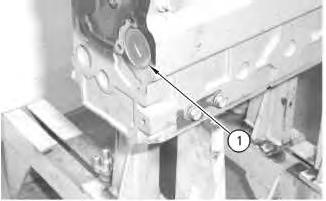
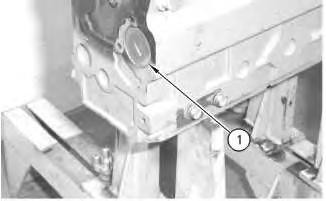
2. Install plug (1) into the cylinder block. Use 8T-9013 Silicone Sealant .
End By:
a. Install the camshaft. Refer to Disassembly and Assembly, "Camshaft - Install".
b. Install the flywheel housing. Refer to Disassembly and Assembly, "Flywheel HousingRemove and Install".
Copyright 1993 - 2024 Caterpillar Inc. All Rights Reserved. Private Network For SIS Licensees.
Product: EXCAVATOR
Model: 312B EXCAVATOR 3ES
Configuration: ISJ HEX COMMONALITY CHART 3ES00001-UP (MACHINE)
Disassembly and Assembly
3064 and 3066 Engines for Caterpillar Built Machines
Media Number -SENR5553-10
Camshaft Bearings - Remove
SMCS - 1211-011
Removal Procedure
Table 1
Required Tools
Start By:
A. Remove the flywheel housing. Refer to Disassembly and Assembly, "Flywheel HousingRemove and Install".
B. Remove the camshaft. Refer to Disassembly and Assembly, "Camshaft - Remove".
NOTICE
Keep all parts clean from contaminants.
Contaminants may cause rapid wear and shortened component life.
i01568680
Illustration 1
1. Remove plug (1) from the cylinder block.
Illustration 2
g00533095
Illustration 3
g00533096
2. Use Tool (A) in order to remove the camshaft bearings from the cylinder block.
g00612707
Note: Refer to the instructions of the 8S-2241 Camshaft Bearing Tool Group for the proper procedure.
Copyright 1993 - 2024 Caterpillar Inc. All Rights Reserved. Private Network For SIS Licensees.
Sat Jan 27 10:52:07 UTC+0530 2024
Product: EXCAVATOR
Model: 312B EXCAVATOR 3ES
Configuration: ISJ HEX COMMONALITY CHART 3ES00001-UP (MACHINE)
Disassembly and Assembly
3064 and 3066 Engines for Caterpillar Built Machines
Media Number -SENR5553-10
Camshaft Gear - Remove and Install
SMCS - 1210-010-GE
Removal Procedure Table 1 Required Tools
Start By:
A. Remove the camshaft. Refer to Disassembly and Assembly, "Camshaft - Remove".
NOTICE
Keep all parts clean from contaminants.
Contaminants may cause rapid wear and shortened component life.
i01558850
Illustration 1
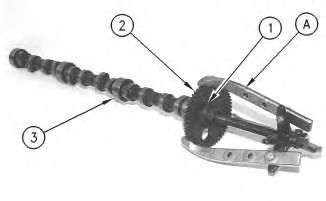
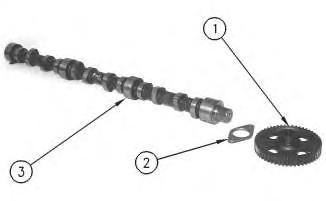
1. Use tool (A) to remove camshaft gear (1) from camshaft (3) .
2. Remove thrust plate (2) from camshaft (3) .
Note: It is not necessary to remove the camshaft gear unless the gear (1) or the thrust plate (2) is damaged.
Note: Check the slot in the camshaft for the woodruff key for wear or damage.
Note: Check the thrust plate (2) for wear or damage.
Installation Procedure NOTICE
Keep all parts clean from contaminants.
Contaminants may cause rapid wear and shortened component life.
Illustration 2 g00598318
g00598317
This is the sample of the manual click on the download link for complete manual