Service Information Document Title: Function Group: E-tools, NET 3004 Collar 080 installation tool for track gearbox
Information Type: Service Information
Date: 10/1/2024
Profile: EC210D L Volvo
E-tools, NET 3004 Collar installation tool for track gearbox Showing Selected Profile Valid for serial numbers Model
Production site
Serial number start
Serial number stop
EC210D L Volvo
Shanghai
231057
250000
EC210D L Volvo
Pederneiras
240141
250000
EC210D L Volvo
Bangalore
251804
280000
EC210D L Volvo
Changwon
282821
310000
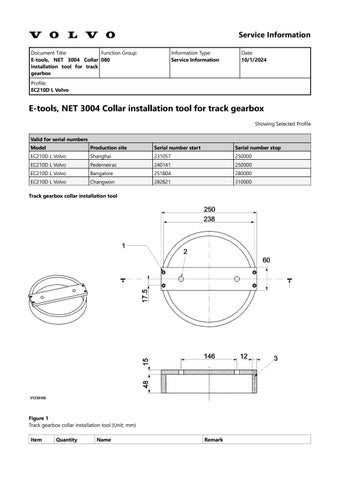
Track gearbox collar installation tool
Figure 1 Track gearbox collar installation tool (Unit; mm) Item
Quantity
Name
Remark
1
4
Drill thru
2x2x Ø5.5 Ø9 C’Bore DP6
2
2
Drill thru
2x Ø5.5
3
4
Tap DP10
2x2x M5
Service Information Document Title: E-tool, 3502 Plate turning crankshaft
Function Group: for 080
Information Type: Service Information
Date: 10/1/2024
Profile: EC210D L Volvo
E-tool, 3502 Plate for turning crankshaft Showing Selected Profile Valid for serial numbers Model
Production site
Serial number start
EC210D L Volvo
Figure 1 Support plate for engine valve clearance adjusting (unit: mm) X: Shaft diameter of a ratchet extension Material: Steel or plastic
Serial number stop
Service Information Document Title: Function Group: Hydraulic return filter on 173 X1 option circuit, replacing
Information Type: Service Information
Date: 10/1/2024
Profile: EC210D L Volvo
Hydraulic return filter on X1 option circuit, replacing Showing Selected Profile Valid for serial numbers Model
Production site
Serial number start
Serial number stop
EC210D L Volvo This is part of another procedure. Op nbr 173-519 NOTE! Change the X1 return filter every 250 hours based on hammer operating hours. When using the hydraulic hammer continuously, change the return element in hydraulic tank every 500 hours and draining/ filling the hydraulic oil every 600 hours. Hydraulic oil return filter, change interval Frequency of hammer use
Change interval
50%
every 1000 hours
100%
every 500 hours
Hydraulic oil, change interval Frequency of hammer use
Change interval
50%
every 1000 hours
100%
every 600 hours
1. Remove the filter cover.
Figure 1
2. Replace the filter element. 3. Install the filter cover.
Service Information Document Title: Function Group: Hydraulic oil return filter, 173 replacing
Information Type: Service Information
Date: 10/1/2024
Profile: EC210D L Volvo
Hydraulic oil return filter, replacing Showing Selected Profile Valid for serial numbers Model
Production site
Serial number start
Serial number stop
EC210D L Volvo This is part of another procedure Op nbr 173-649
WARNING If the pressure is not released before opening the system, oil under high pressure will jet out, resulting in serious personal injuries. NOTE! When using the hydraulic hammer, refer to the table below for changing the return filter.
Service interval according to frequency of the hydraulic breaker (hammer) usage
Figure 1 Hydraulic return oil filter
This is the sample of the manual if you need complete manual
Click Here to download
A. B. C. D.
Operating time (hours) Hydraulic breaker (hammer) usage (%) Long life return oil filter (only for China) Standard return oil filter
Return filter for long-life Hydraulic breaker (hammer)usage (%)
Long life return oil filter(hours)
Standard return oil filter(hours)
0
2500
2000
10
1910
1550
20
1590
1300
30
1410
1160
40
1310
1090
50
1200
1000
60
1050
880
70
940
780
80
820
680
90
700
580
100
600
500
NOTE! Filling hydraulic oil or other system service requires great cleanliness. Even the smallest particles can damage the system or cause system failure. Clean the filling area before filling the hydraulic oil tank with new oil. 1. Release the residual pressure in the hydraulic oil tank from the breather. 2. Clean the area around the cover. 3. Remove the screws and the cover.
Figure 2
1.
Cover
4. Remove the spring, valve, strainer and the filter element.
Figure 3
1. 2. 3. 4.
Filter element Strainer Valve Spring
NOTICE Take care of filters, oils and liquids in an environmentally safe way. 5. Install a new filter element, strainer, valve and spring.
Figure 4
A.
Blank area
NOTE! Make sure blank area (A) of the filter faces toward lower direction when installing. 6. Install the cover.
Service Information Document Title: Function Group: Hydraulic oil servo filter, 173 replacing
Information Type: Service Information
Date: 10/1/2024
Profile: EC210D L Volvo
Hydraulic oil servo filter, replacing Showing Selected Profile Valid for serial numbers Model
Production site
Serial number start
EC210D L Volvo This is part of another procedure Op nbr 173-423 1. Open the side door on the right side of the machine. 2. Place a container under the filter. Remove the filter bowl.
Figure 1
3. Replace the inner element of the servo filter.
NOTICE Take care of filters, oils and liquids in an environmentally safe way. 4. Reinstall the filter bowl.
Serial number stop
Service Information Document Title: Hydraulic oil strainer, cleaning
Function Group: suction 173
Information Type: Service Information
Date: 10/1/2024
Profile: EC210D L Volvo
Hydraulic oil suction strainer, cleaning Showing Selected Profile Valid for serial numbers Model
Production site
Serial number start
Serial number stop
EC210D L Volvo This is part of another procedure. Op nbr 173-349 1. Release the residual pressure in the hydraulic oil tank from the breather. 2. Clean the area around the cover and remove the cover.
Figure 1
1.
Cover
3. Pull out the suction strainer. Clean it with non-flammable solvent and dry with compressed air.
Figure 2
4. Check the O-ring and change it if damaged. 5. Install the suction strainer. NOTE! If the suction strainer has any damage (even minor damage), it must be replaced with a new one. 6. Install the cover.
Service Information Document Title: Hydraulic oil checking
Function Group: level, 173
Information Type: Service Information
Date: 10/1/2024
Profile: EC210D L Volvo
Hydraulic oil level, checking Showing Selected Profile Valid for serial numbers Model
Production site
Serial number start
Serial number stop
EC210D L Volvo Op nbr 173-356 This is part of another procedure. 1. Park the machine on the firm and level ground. 2. Place the machine in service position C. See Service position. 3. Move the control lockout lever down to lock the system securely and stop the engine. 4. Open the side door on the right side of the machine and check the oil level in the sight gauge.
Figure 1
NOTE! If the level is between lower limit line and upper limit line of the gauge, the level is correct. NOTE! If the level is low, open the cover on the tank and add hydraulic oil.
NOTICE Use the same hydraulic oil that is already in the system. The hydraulic system may be damaged if different brands of hydraulic oil are mixed.
Service Information Document Title: Function Group: Air conditioner compressor 173 belt, checking
Information Type: Service Information
Date: 10/1/2024
Profile: EC210D L Volvo
Air conditioner compressor belt, checking Showing Selected Profile Valid for serial numbers Model
Production site
Serial number start
Serial number stop
EC210D L Volvo Op nbr 173-341 This is part of another procedure.
WARNING The engine must be off when checking belt tension - rotating parts may cause personal injury. 1. Open the engine hood. 2. Inspect tension, cracks, wear or damage of the belts. If damaged replace the belts.
Figure 1
1. 2. 3.
Nut Adjustment nut Compressor belt
3. At correct belt tension, it should be possible to depress the belt approximately 15 mm (0.6 inch). Adjust if necessary. a. b. c.
Loosen the nut Adjust tension with adjustment nut Tighten the nut
4. Close the engine hood.
Service Information Document Title: Cab prefilter, replacing
Function Group: 173
Information Type: Service Information
Date: 10/1/2024
Profile: EC210D L Volvo
Cab prefilter, replacing Showing Selected Profile Valid for serial numbers Model
Production site
Serial number start
Serial number stop
EC210D L Volvo This is part of another procedure Op nbr 173-405
WARNING Risk of hazardous inhalation. Dangerous dust can lead to serious health problems. Always wear personal protective equipment, including filter mask, eye protection and appropriate gloves when handling and cleaning the engine compartment, coolers and air filters. 1. Turn the screws counterclockwise using a L wrench (6 mm).
Figure 1
2. Pull the cover out towards rear side and lift up the filter.
Figure 2
3. Install a new filter.
Service Information Document Title: Cab prefilter, cleaning
Function Group: 173
Information Type: Service Information
Date: 10/1/2024
Profile: EC210D L Volvo
Cab prefilter, cleaning Showing Selected Profile Valid for serial numbers Model
Production site
Serial number start
Serial number stop
EC210D L Volvo This is part of another procedure Op nbr 173-346
WARNING Risk of hazardous inhalation. Dangerous dust can lead to serious health problems. Always wear personal protective equipment, including filter mask, eye protection and appropriate gloves when handling and cleaning the engine compartment, coolers and air filters. 1. Turn the screws counterclockwise using a L wrench (6 mm).
Figure 1
2. Pull the cover out towards rear side and lift up the filter.
Figure 2
3. Clean the prefilter with compressed air with a maximum pressure of 0.2 Mpa (30 psi). NOTE! If the filter is clogged, the air flow will be reduced as well as the cooling and heating capacity. Therefore, clean it periodically.
Service Information Document Title: Function Group: Air conditioner main filter, 173 replacing
Information Type: Service Information
Date: 10/1/2024
Profile: EC210D L Volvo
Air conditioner main filter, replacing Showing Selected Profile Valid for serial numbers Model
Production site
Serial number start
Serial number stop
EC210D L Volvo This is part of another procedure. Op nbr 173-424
WARNING Risk of hazardous inhalation. Dangerous dust can lead to serious health problems. Always wear personal protective equipment, including filter mask, eye protection and appropriate gloves when handling and cleaning the engine compartment, coolers and air filters. 1. Move the operator's seat to the front position, and fold the backrest forward. Remove the floor mat and the cover.
Figure 1 Air conditioner filter, floor mat and cover 2. Disconnect wire harness of the air conditioner actuator. Remove the duct and the upper cover of the air conditioner.
Figure 2 Removal, wire harness, duct and cover NOTE! Refer to the method written at the top of the cover when disassembling the cover.
3. Replace the filter with a new one.
Figure 3 Replacement, air conditioner filter 4. Restore the machine to the operating condition. NOTE! Pay attention not to damage the parts. NOTE! If the air conditioner filter is clogged, the air flow will be reduced as well as the cooling and heating capacity. Therefore, clean it periodically.
Service Information Document Title: Function Group: Air conditioner main filter, 173 cleaning
Information Type: Service Information
Date: 10/1/2024
Profile: EC210D L Volvo
Air conditioner main filter, cleaning Showing Selected Profile Valid for serial numbers Model
Production site
Serial number start
Serial number stop
EC210D L Volvo This is part of another procedure. Op nbr 173-334
WARNING Risk of hazardous inhalation. Dangerous dust can lead to serious health problems. Always wear personal protective equipment, including filter mask, eye protection and appropriate gloves when handling and cleaning the engine compartment, coolers and air filters. 1. Move the operator's seat to the front position, and fold the backrest forward. Remove the floor mat and the cover.
Figure 1 Air conditioner filter, floor mat and cover 2. Disconnect wire harness of the air conditioner actuator. Remove the duct and the upper cover of the air conditioner.
Figure 2 Removal, wire harness, duct and cover NOTE! Refer to the method written at the top of the cover when disassembling the cover.
3. Take out the filter and clean with compressed air with a maximum pressure of 0.2 Mpa (30 psi).
Figure 3 Cleaning, air conditioner filter 4. Restore the machine to the operating condition. NOTE! Pay attention not to damage the parts. NOTE! If the air conditioner filter is clogged, the air flow will be reduced as well as the cooling and heating capacity. Therefore, clean it periodically.
Service Information Document Title: Function Group: Cab door, covers, hinges, 173 joints and locks, lubricating
Information Type: Service Information
Date: 10/1/2024
Profile: EC210D L Volvo
Cab door, covers, hinges, joints and locks, lubricating Showing Selected Profile Valid for serial numbers Model
Production site
EC210D L Volvo This is part of another procedure Op nbr 173-336 Total procedure time (hr): 0.10 1. Lubricate the door hinges with grease.
Figure 1 Grease points cab door
Serial number start
Serial number stop
Service Information Document Title: Track tension condition, checking
Function Group: and 173
Information Type: Service Information
Date: 10/1/2024
Profile: EC210D L Volvo
Track tension and condition, checking Showing Selected Profile Valid for serial numbers Model
Production site
Serial number start
Serial number stop
EC210D L Volvo This is part of another procedure Op nbr 173-339
WARNING To check the track tension, the track must be raised off the ground. Make sure that the machine cannot fall down or move while checking. 1. Place the machine in the service position F, See Service position. 2. Raise the track by using boom and dipper arm. For this movement, operate the lever slowly. 3. Turn the track slowly in forward and reverse direction several time. Stop the track while moving in the reverse direction. 4. Measure the track slack (A) at the center of track frame, the clearance between the bottom of track frame and the upper surface of track shoe.
Figure 1
5. Adjust the track tension according to the soil characteristics. Recommended track tension is as below. Track sag according to soil condition, unit: mm (in) Working condition
Clearance (A), unit: mm (in)
General soil
320 - 340 (12.6 - 13.4)
Rocky ground
300 - 320 (11.8 - 12.6)
Moderate soil like gravel sand, snow, etc.
340 - 360 (13.4 - 14.2)
Service Information Document Title: Track shoe bolts, checking
Function Group: 173
Information Type: Service Information
Date: 10/1/2024
Profile: EC210D L Volvo
Track shoe bolts, checking Showing Selected Profile Valid for serial numbers Model
Production site
Serial number start
Serial number stop
EC210D L Volvo Op nbr 173-391 1. Place the machine in the service position F, See Service position. 2. Slew the superstructure to the side, and raise the track using boom down operation. Slowly turn the track in forward and reverse direction several times. Check for missing or loose or damaged shoe screws and shoes. 3. If track shoe bolts (A) are loose, the track shoes are likely to be damaged.
Figure 1
4. Check for looseness. Replace with new bolts and nuts, tighten the bolts to specified torque if needed. NOTE! Tightening torque : see Undercarriage, tightening torque. NOTE! Tighten the bolts in the order as shown in the figure.
Figure 2
5. After tightening, check whether the nut and the shoe are in full contact with the mating surfaces of the link.
Service Information Document Title: Swing bath checking
Function Group: grease, 173
Information Type: Service Information
Date: 10/1/2024
Profile: EC210D L Volvo
Swing bath grease, checking Showing Selected Profile Valid for serial numbers Model
Production site
Serial number start
EC210D L Volvo This is part of another procedure. Op nbr 173-348 1. Open the tool box. 2. Remove the cover. 3. Check the level and condition of the grease. Fill if needed. NOTE! If the grease is contaminated or discolored with water, change the grease.
Figure 1
4. Inspect the seal. Replace the seal if damaged. 5. Install the cover.
Serial number stop
Service Information Document Title: Function Group: Swing ring gear bearing, 173 lubricating
Information Type: Service Information
Date: 10/1/2024
Profile: EC210D L Volvo
Swing ring gear bearing, lubricating Showing Selected Profile Valid for serial numbers Model
Production site
Serial number start
Serial number stop
EC210D L Volvo This is part of another procedure. Op nbr 173-345 1. Clean the grease nipples. 2. Apply grease to the swing ring gear bearing until grease can be seen oozing from the swing bearing seals.
Figure 1
NOTE! Take care not to supply an excessive mount of grease. 3. After greasing, clean off the overflow grease completely.
Service Information Document Title: Swing gearbox changing
Function Group: oil, 173
Information Type: Service Information
Date: 10/1/2024
Profile: EC210D L Volvo
Swing gearbox oil, changing Showing Selected Profile Valid for serial numbers Model
Production site
Serial number start
Serial number stop
EC210D L Volvo Op nbr 173-463
NOTICE Drain the gear oil while it is still warm to flush out any contaminants.
NOTICE Always handle oils and other environmentally hazardous fluids in an environmentally safe manner. 1. Open the oil drain valve cap and attach the drain hose.
Figure 1
1. 2.
Drain hose Drain valve cap
2. Drain the oil into a suitable container. 3. After completely draining, remove the oil drain hose and close the oil drain valve cap. 4. Pull out the oil dipstick, and fill oil to the correct level through oil filler pipe. NOTE! Refill capacity: see Lubricants and filling capacities.
Figure 2
1.
Oil filler pipe
5. Check the oil level using the oil dipstick gauge and refill if necessary. NOTE! Wait about 5 minutes for checking the level accurately after filling oil.
This is the sample of the manual if you need complete manual
Click Here to download