MLS Policy / SOP Playbook

Core Values
• Courage
• Compassion
• Commitment
• Collaboration
• Ownership
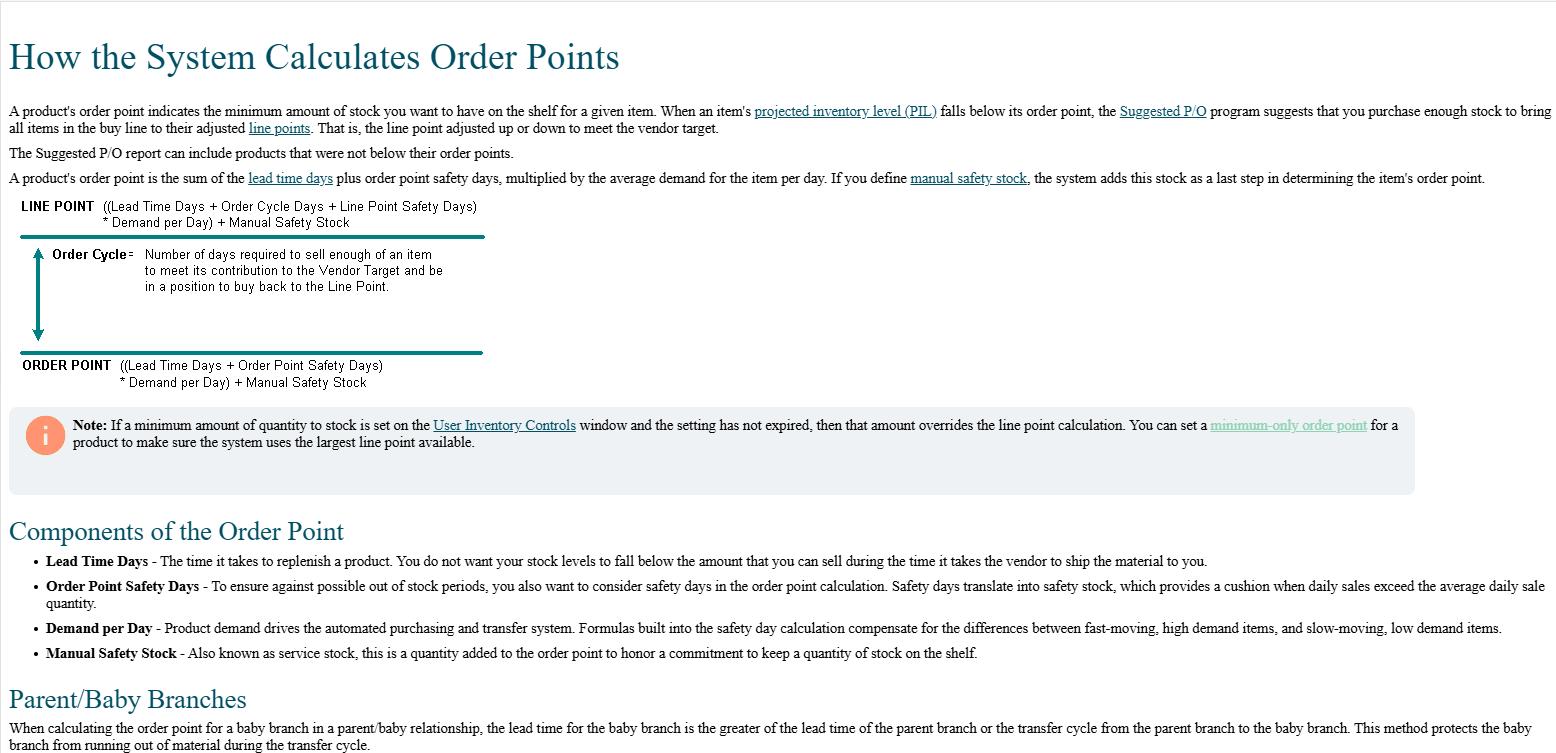
• Optimism

Courage
• Having the strength to have difficult conversations with others. Even when those things you tell them may be hard for them to hear.
• Doing the right thing regardless of who is watching. Having the integrity to live honorably and to do business ethically.
Commitment
• Understanding that staying together is always better than drifting apart.
• Unifying under one vision, one goal, one focus so we get better, faster, and ultimately longer-lasting results.
• Not settling for “good enough”. Making the extra effort to make sure we stand out with our results.
Collaboration
• Taking the time to bring others in on a project so they can grow as a person along with the company.
• Caring enough about getting the best result that you get other’s perspectives and opinions, even if that means sharing the credit.
• Knowing that two minds are always better than one, and three is always better than two. One of our biggest strengths is the collective experience of our employees. Finding ways to utilize that strength.
• Understanding that serving your own needs can best be achieved by serving the needs of others.
• Looking past yourself to recognize others and their struggles, imperfections, and shortcomings.
• Give others the ability to fail, knowing that they will find support should they fall short.
Optimism
• Making even the hardest times feel like the easy times.
• Helping others to not focus on negativity. Being someone that others look forward to being around.
Ownership
• Holding yourself to a standard of performance above what you expect from others.
• Letting others know when you fall short, and that you have a plan to keep it from happening again.
Stocking Inventory Items
• Returns within 90 Days:
Normal, stocking inventory items may be returned to any of our branch locations within 90 days of purchase.
• All returns will be inspected before credit is issued.
• Items must be in new and sellable condition with original, sealed packaging.
• Qualifying returns will be credited within 48 hours with no restock fee.
• Returns between 91–365 Days:
• Items returned after 90 days but within one year (365 days) are subject to a 25% restock fee
• All returns older than one year are non-returnable
• Condition Requirements:
• Products showing evidence of use, installation, or improper storage will not be considered for credit unless the manufacturer determines the product is defective.
Special Order (Non-Stock) Items
• Return Eligibility:
• Special order, non-stock items are returnable only if the manufacturer accepts the return and are subject to our non-stock purchase policy.
• Initial freight charges are not refundable
• Customers are responsible for any return freight and restocking charges.
• Return Authorization:
• All non-stock or defective returns must be pre-approved with a manufacturer’s Return Goods Authorization (RGA).
• No credit will be issued until the manufacturer issues credit.
Additional Terms
• Handling Fee: All returns are subject to a handling fee.
• Jobsite
Pick-Up:
Jobsite pick-up of material by our company does not guarantee that credit will be issued or that items are accepted for return.
Standard Operating Procedure (SOP) Counter Sales
SOP - Receptionist
Receptionist SOP – Training & Compliance Checklist
Owners:
• James Calvert Vice President of Sales & Marketing o Sales Directors
▪ Sales Managers
SALES SOP’S
Standard Operating Procedures for each segment of Sales
Directors
• SOP’s for Directors
Sales Directors SOP’s
Sales Managers
• SOP’s for Sales Managers
Outside Sales
OUTSIDE SALES SOP’S
SOP #…
VERTICALS
Waterworks
Plumbing
Heating & Cooling
Hydronics & Radiant Heating
Pump & Drilling
Horizontal Drilling & Utilities
Geotextiles
Agricultural Irrigation
Landscaping Irrigation
Golf Irrigation
Hardscapes
Pools
Power Equipment
Tools & Safety
Truck Outfitters
Ops Playbook table of Contents
OPERATIONS POLICY
OPERATIONS SOP’S
Standard Operating Procedures for each segment of Operations
Directors
• SOP’s for Directors
Ops Directors SOP’s
• Regional Managers
• SOP’s for Sales Managers
Ops Regional Managers SOP’s
SOP #1
• Identify the report template you will need
o This is based on the type of branch, operating system the branch uses and the total inventory value at the store location
See the options below
• Use the search bar in the top left corner
o Search “Inventory Adjustments Register”
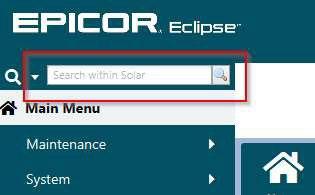

o Update the following parameters
Start Date: The first day of the prior month
End Date: The final day of the prior month
Branch
Detail/Summary: Summary
• Run the report

• Review the report and ensure comfortability with all inventory adjustments made for the report period
o If the total of the inventory adjustments report is greater than the monthly threshold then items need to be initialed until the adjusted total is below the threshold
See the example below. MLHB is a Level III branch with a $2,500 monthly adjustment threshold. The total adjustments were $4,140.46

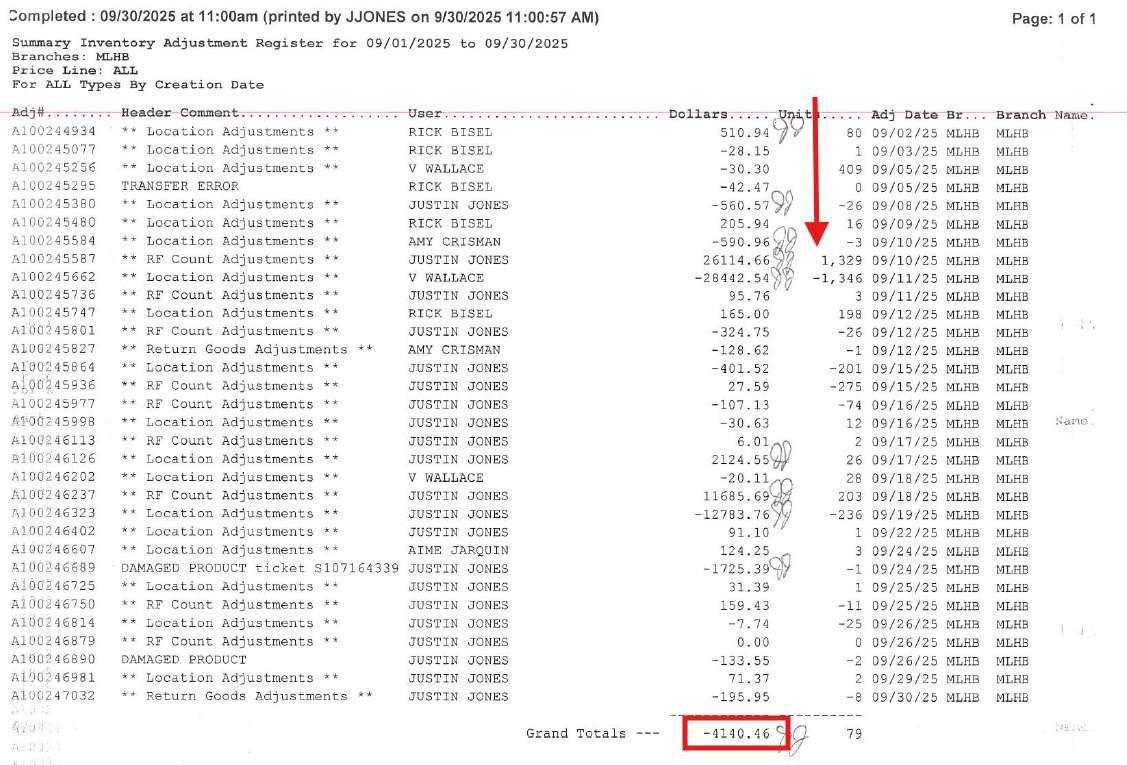
The total on the report is $4,140.46 and $3,667.38 was initialed making the total remaining amount on the report $473.08
• Once reviewed, initial the first page of the Branch Manager Month-end Certification to the right side of the row ‘Inventory Adjustments Register (summary) report, month’

• Transfer the total from the Summary Inventory Adjustments Register to the second page of the Branch Manager Month-end Certification which is the Summary of Reports
o Enter the total on the corresponding line for Inventory Adjustments Report Grand Total – Dollars

• Attach the Summary Inventory Adjustments report to the Branch Manager Monthend Certification
• Use the search bar in the top left corner
o Search “Inventory Valuation”
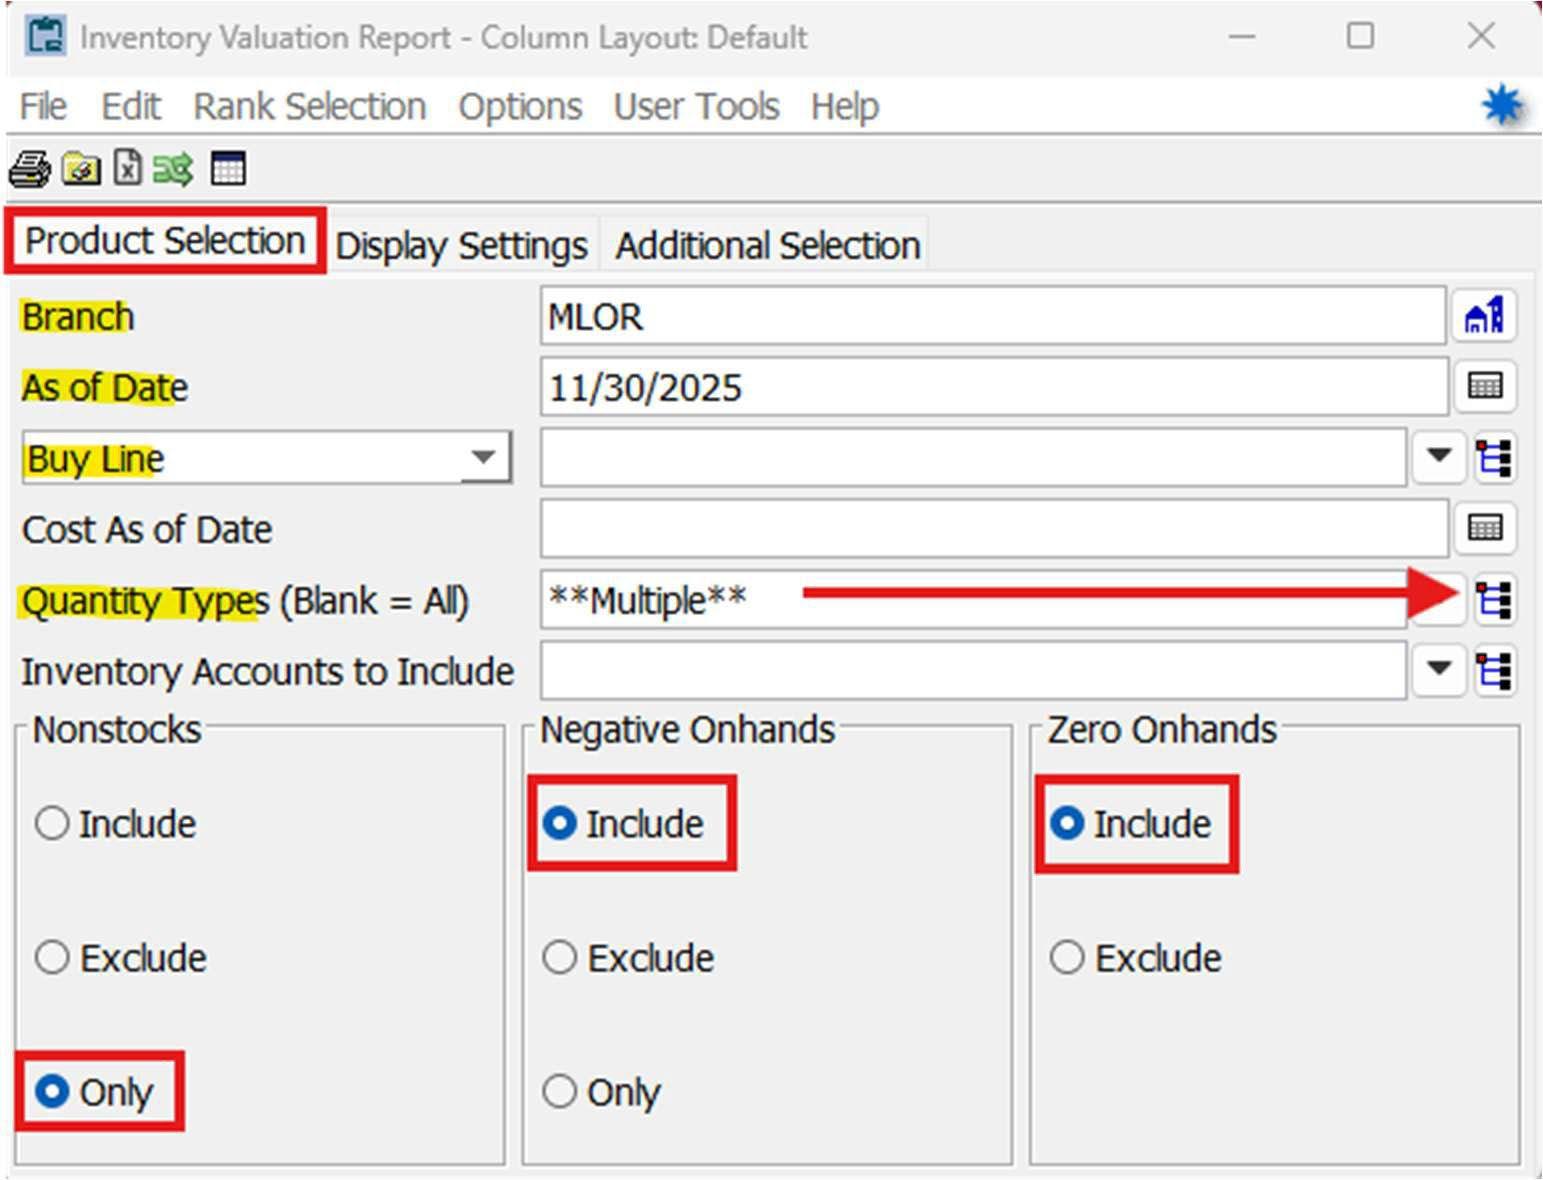
• Update the following parameters
o Branch
o As of Date: Month- end Date
o Select By: Buy Line
o Cost As of Date: [Blank]
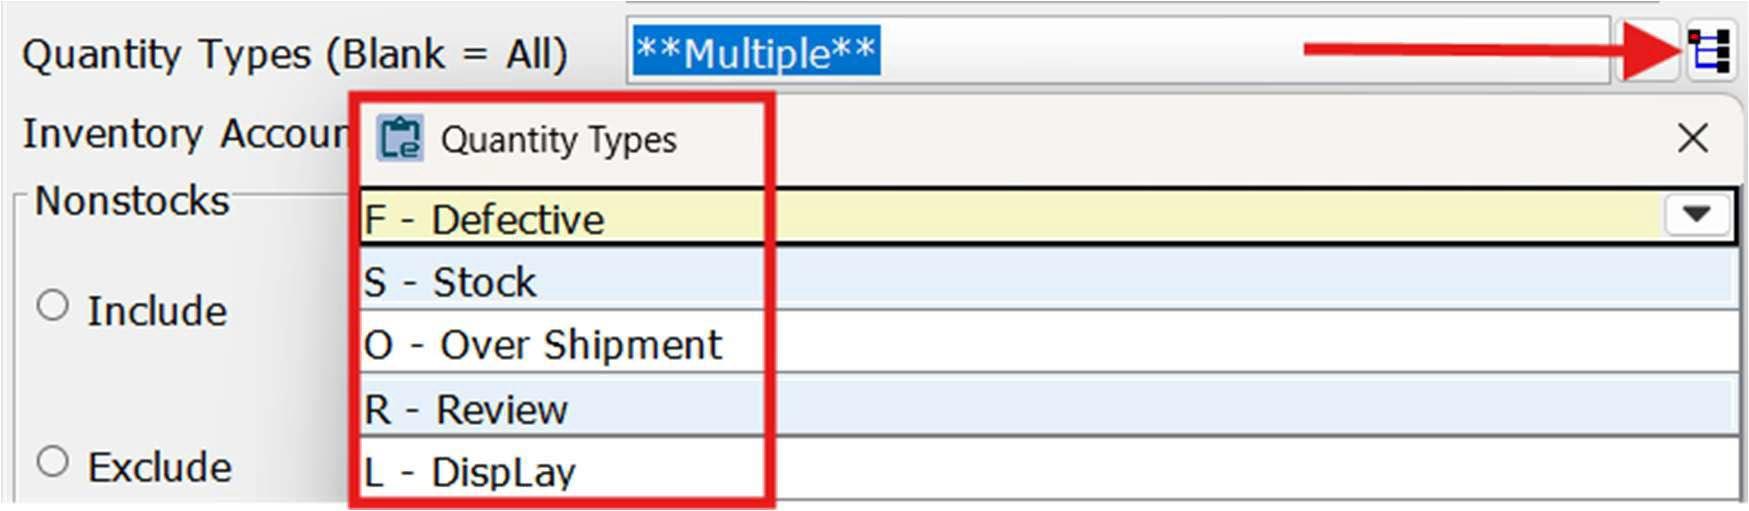
o Quantity Types: All except for “Tagged” (Recall List)
Select each quantity type except “Tagged”
o Inventory Accounts: [Blank]
o Nonstocks: Only
o Negative Onhands: Include
o Zero OnHands: Exclude
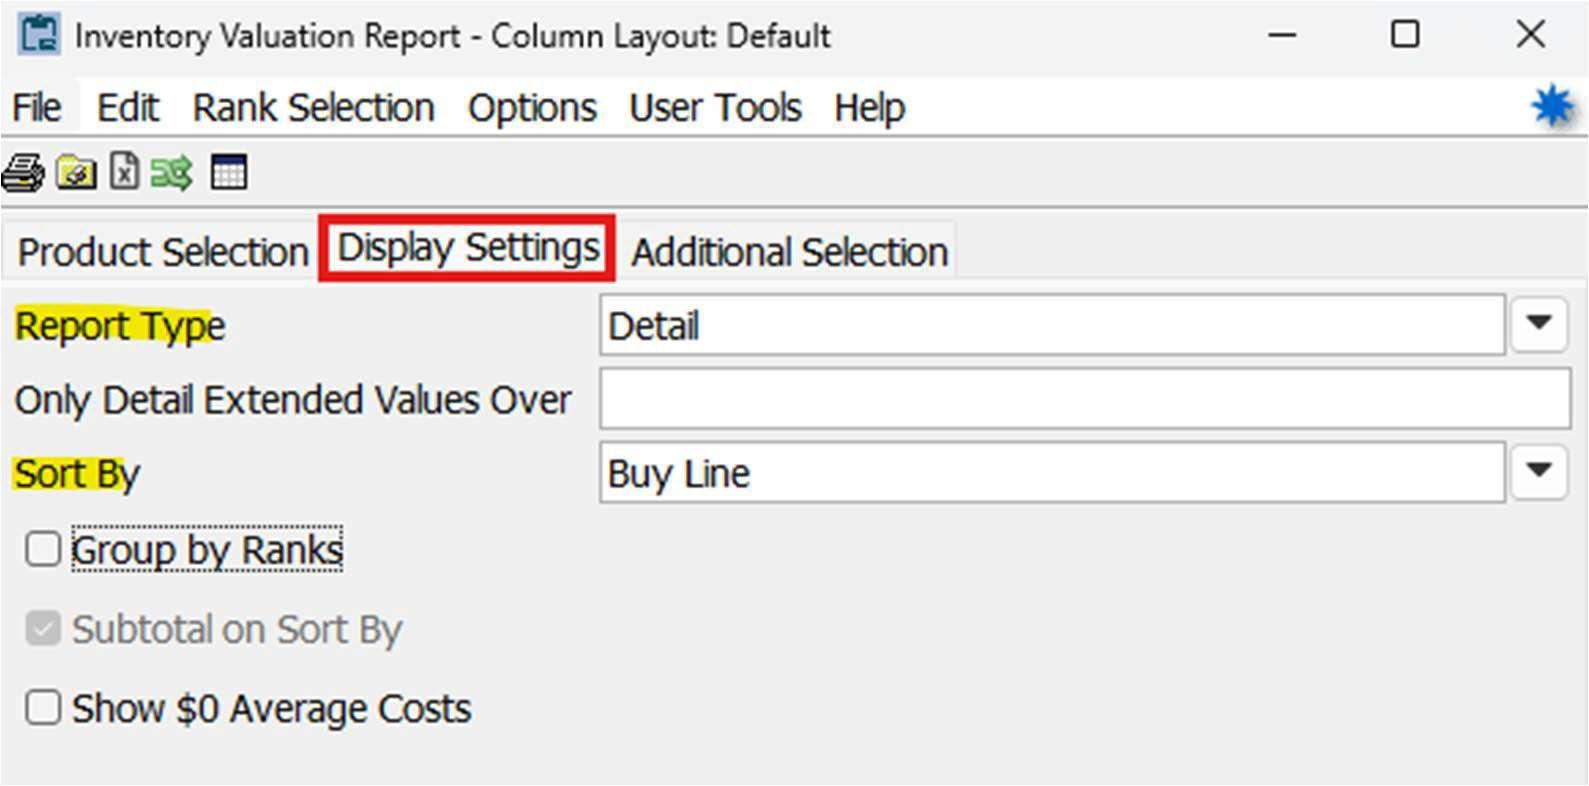
o Display Settings Tab
Report Type: Detail
Sort By: Buy Line
• Review the report and document if action needs to be taken for items needing to be written of, reclassified, transferred to another, etc.
• Once reviewed, initial the first page of the Branch Manager Month-end Certification to the right side of the row ‘Non-stock Inventory Value (No Tags) report’

• Transfer the total from the Non-Stock Inventory Value (No Tags) report to the second page of the Branch Manager Month-end Certification which is the Summary of Reports
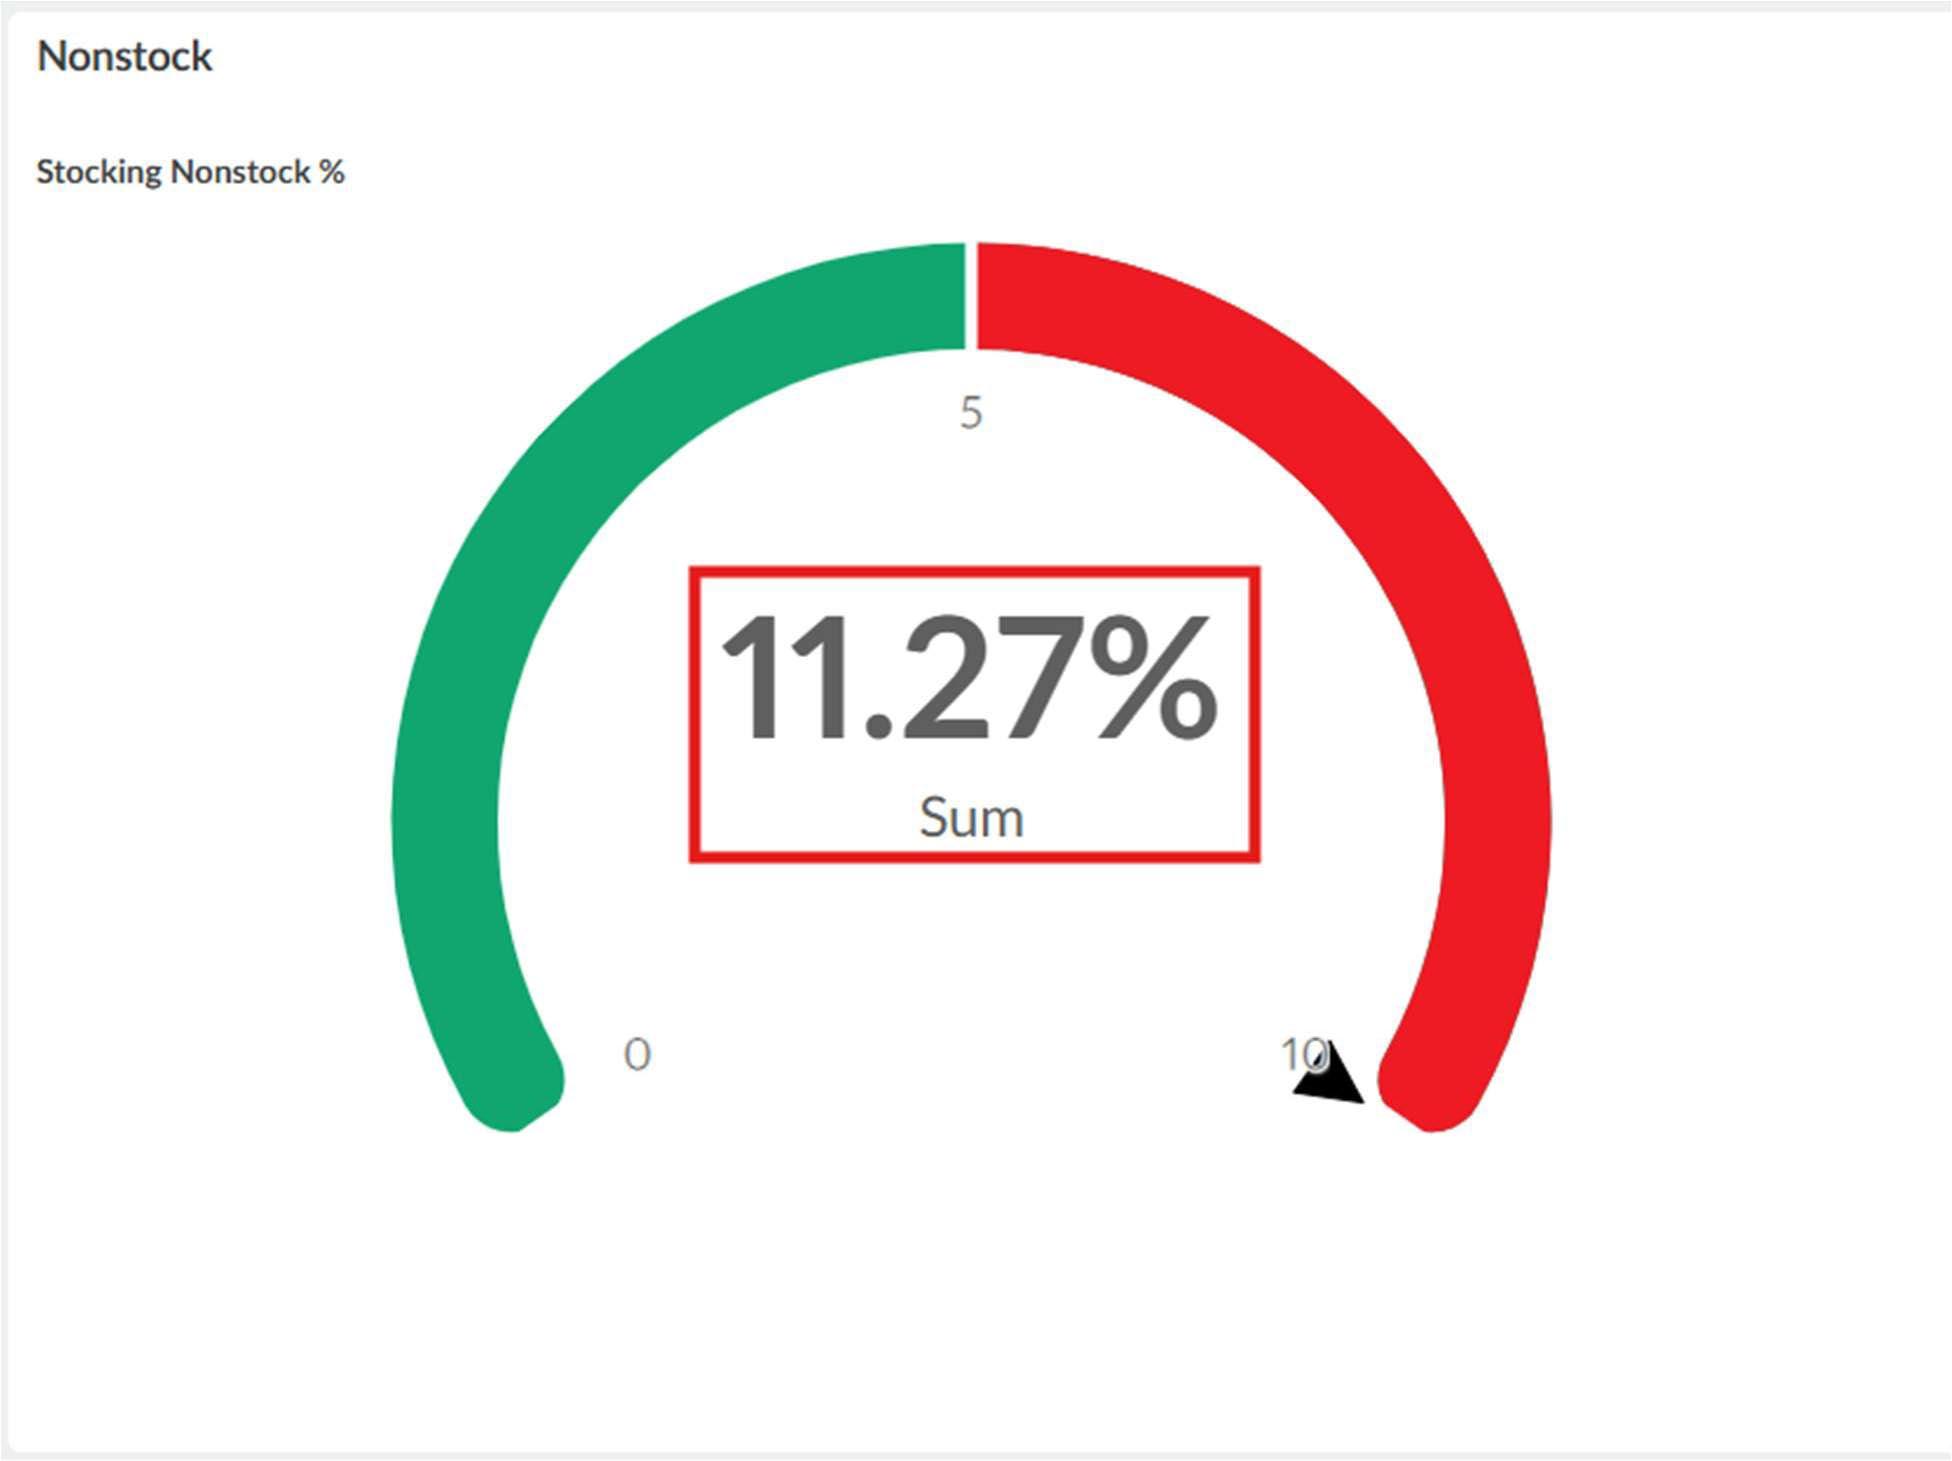
• Document the ‘% of Total Inventory’ total on the second page as well

o This can be found through the branch manager inventory Phocas dashboard:
Find the Nonstock widget and enter the percentage on the second page of the certification
• Attach the Non-Stock Inventory Value (No Tags) report to the Branch Manager
Month-end Certification
• Use the search bar in the top left corner

o Search “Inventory on Hand with No Sales”

o Update the following parameters
Branch
As Of Date: The final day of the prior month
Created in the last: 730 days
Received in the last: 730 days
• Run the report
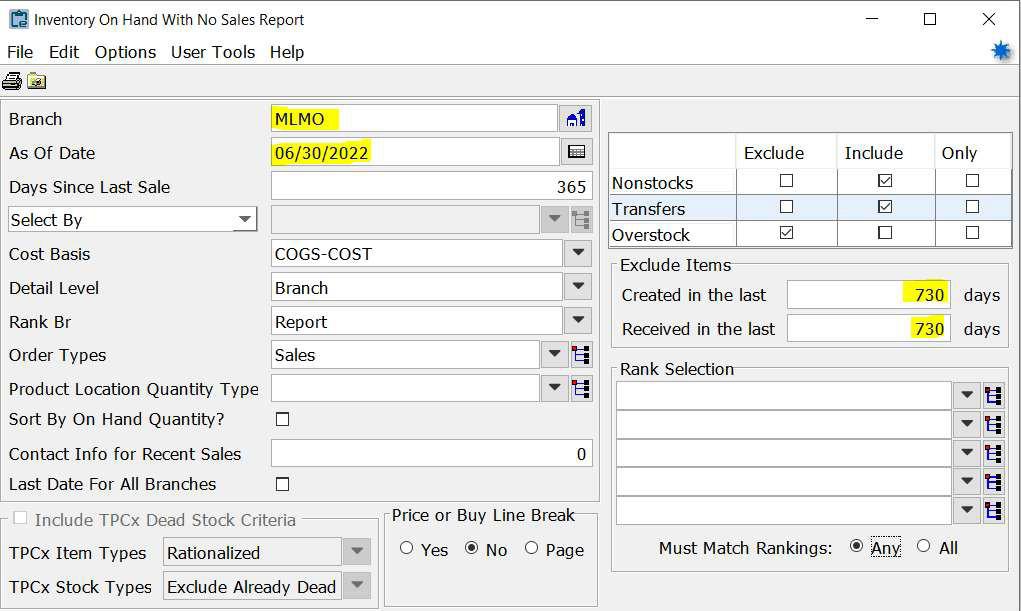
• Review the report and document if action needs to be taken for items needing to be written of, reclassified as damaged, transferred to another, etc.
o Attach any support for items written of, reclassified, or transferred to the certification
• Once reviewed, initial the first page of the Branch Manager Month-end Certification to the right side of the row ‘Inventory 21on Hand with No Sales report, as of month end’

• Transfer the total from the Inventory On Hand With No Sales Report to the second page of the Branch Manager Month-end Certification which is the Summary of Reports
o Enter the total for the current month on the top line
o Pull the beginning balance (8/1) total and enter it on the second line To initially get this number run the above report as of 8/1 for the current fiscal year
• Once it has been pulled you can transfer it from the prior month’s certification
• Example: If you are doing the January 2026 certification the date used would be 8/1/2025

• Attach the Inventory on Hand with No Sales report to the Branch Manager Monthend Certification
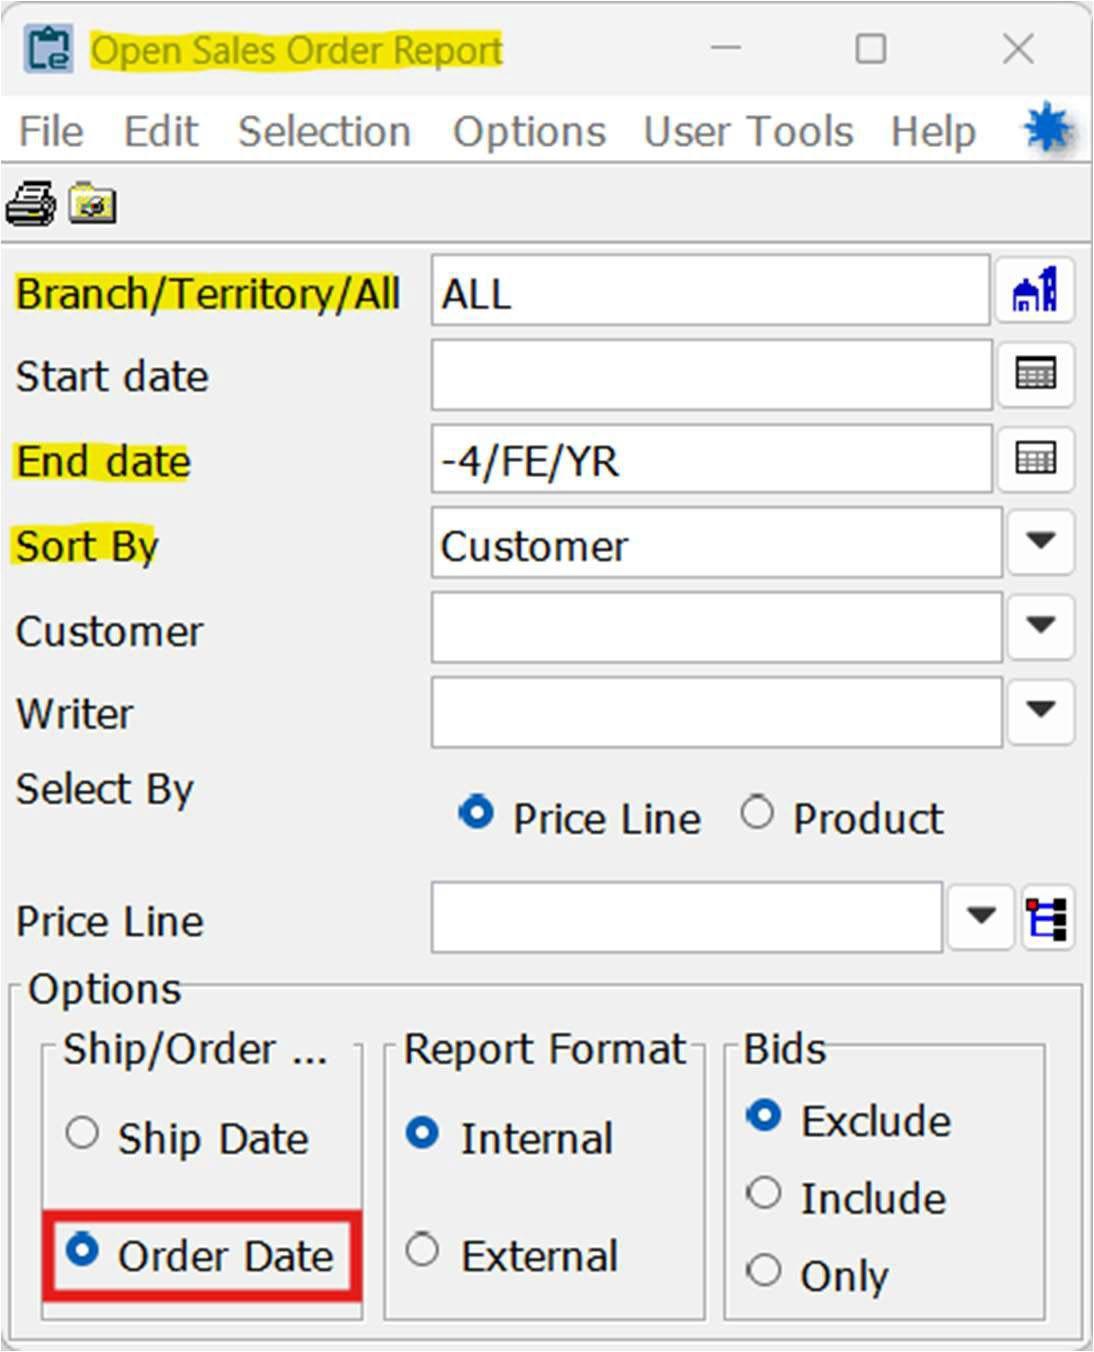
• Use the search bar in the top left corner
o Search “Open Sales Orders”
o Update the following parameters
Branch/Territory/All: ALL
Start date: [Blank]
End date: -4/FE/YR or -3/FE/YR (please note examples below)
• Example: If completing the report for the month ended December, and running the report on January 1 or after, enter “4/FE/YR”
• Example: If completing the report for the month ended December, and running the report on December 31 or before, enter “-3/FE/YR”
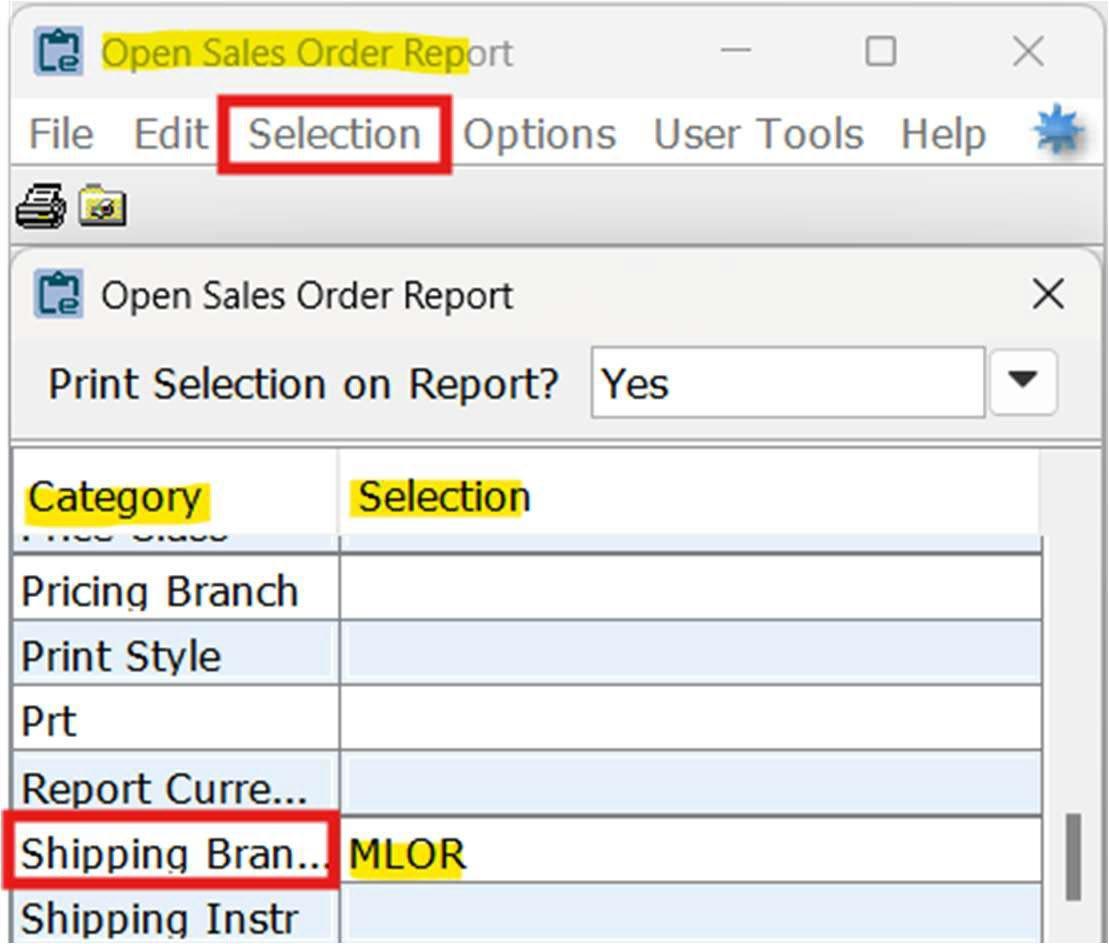
Select tab: Select Criteria
• Category: Shipping Branch
o Enter the specific branch in ‘Selection’ column
Run the report
• Review the report and ensure appropriate follow-up is happening
o These items should be reviewed on a weekly basis
• Once reviewed initial the first page of the Branch Manager Month-end Certification to the right side of the row ‘Open Sales Orders Report’
o Initials indicate the report is being reviewed on a weekly basis
• Transfer the total from the Open Sales Orders Report to the second page of the Branch Manager Month -end Certification which is the Summary of Reports

• Attach the Open Sales Orders report to the Branch Manager Month-end Certification
• Use the search bar in the top left corner

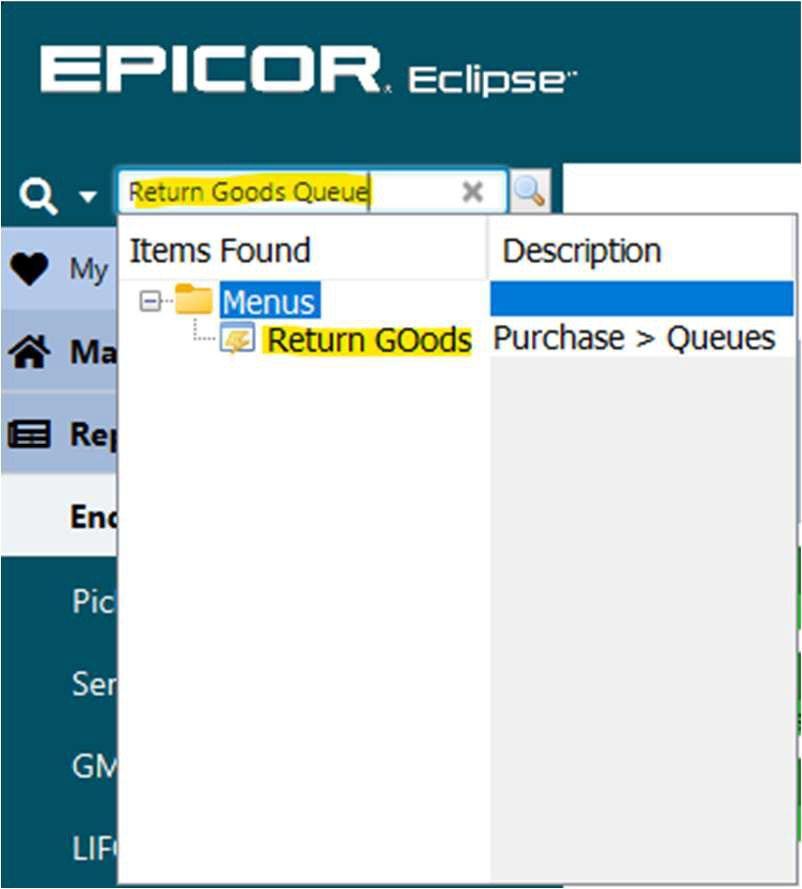
o Search “Return Goods Queue”
o Update the following parameters
Branch
Type: Select Review, Overship, Defective.
• Select Update
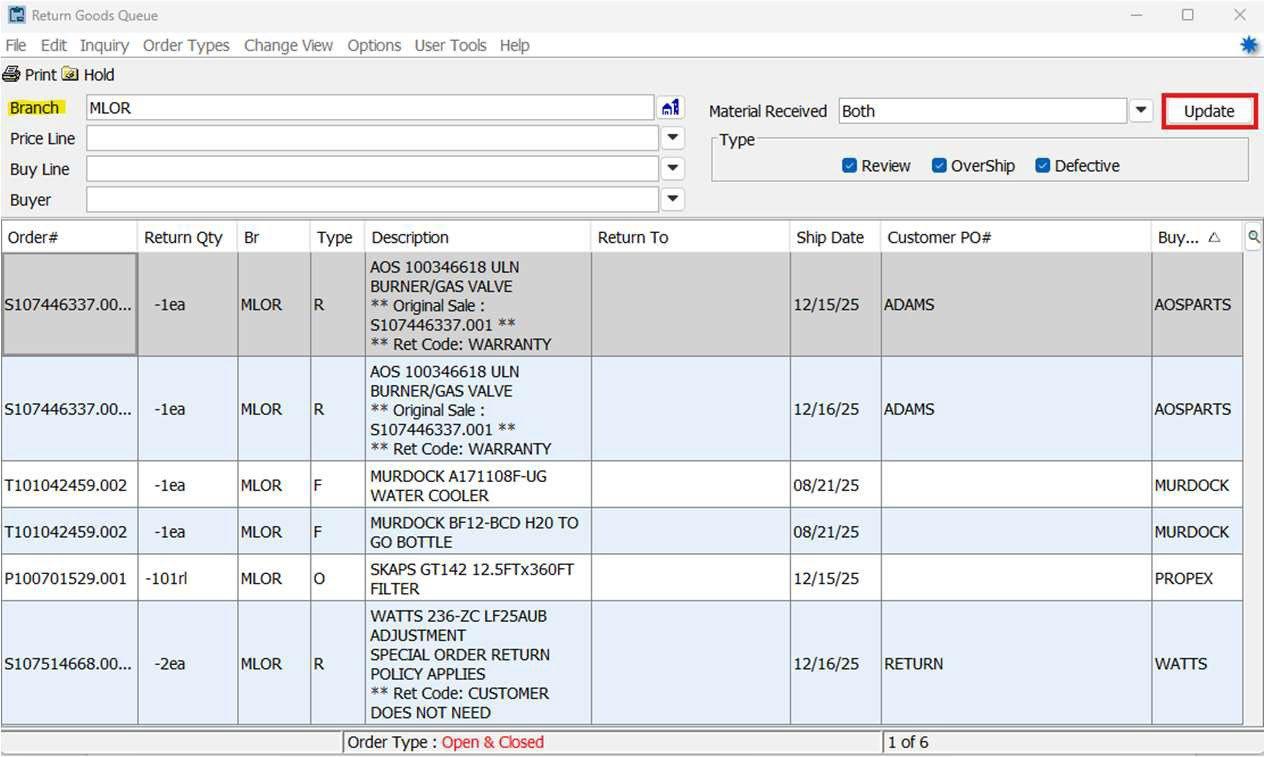
• Review the report and ensure appropriate follow-up is happening
o All outstanding R, O, and F items are being followed up on/in processing of being resolved
All R, O, and F items should have explanations documented on the report for all items
• Once reviewed initial the first page of the Branch Manager Month-end Certification to the right side of the row ‘Return Goods Queue report’
• Transfer the total number of returns from the Return Goods Queue report to the second page of the Branch Manager Month -end Certification which is the Summary of Reports

• Attach the Return Goods Queue report to the Branch Manager Month-end Certification
• It is critical that these reports are run before rolling the dates to the next month
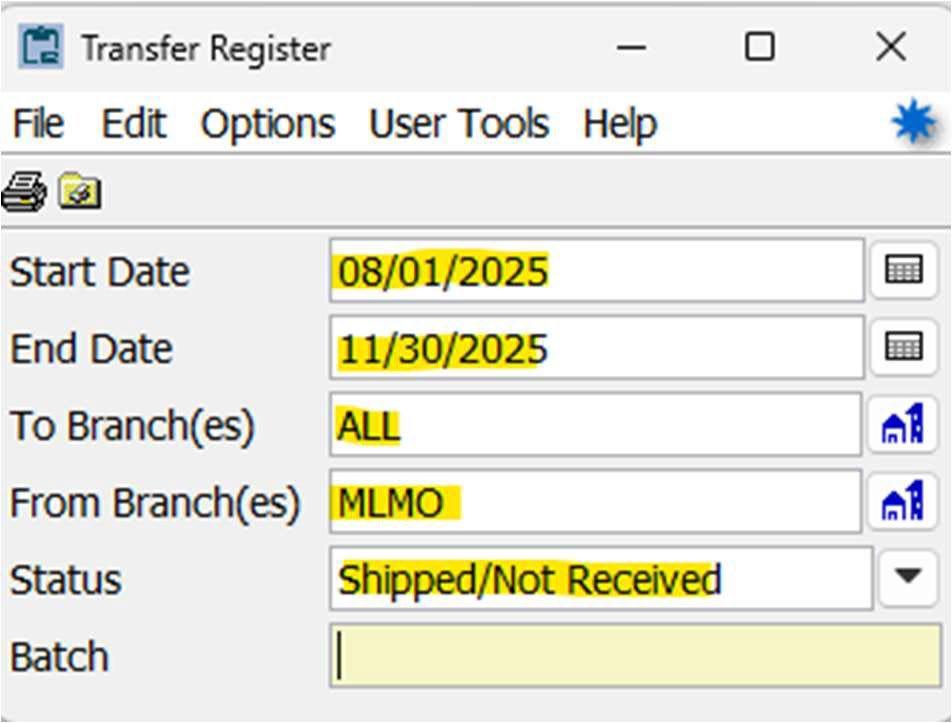
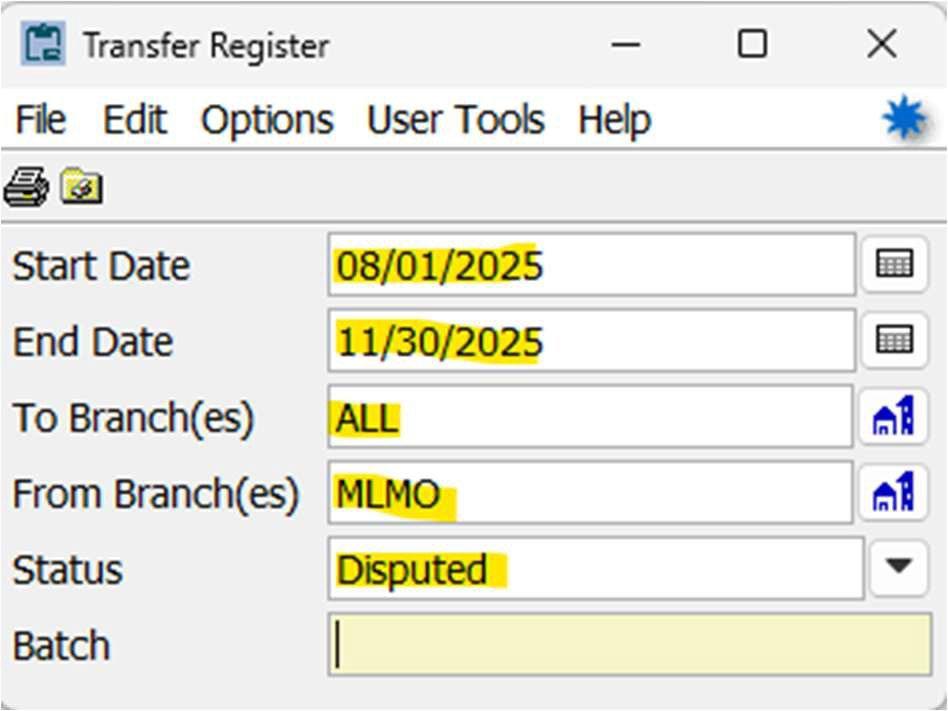
• Use the search bar in the top left corner
o Search “Transfer Register”
o Update the following parameters
Start date: Beginning of fiscal year
End date: Last day of the prior month
To Branch(es): ALL
From Branch(es): The specific branch the report is being performed
Status: Shipped/Not Received
• Run it a second time for disputed transfers
o All parameters are the same except Status
Status: Disputed
• Review the Transfer Register reports for Shipped/Not Received and Disputed and ensure items are in process of being resolved or have been resolved
o Any items on the Shipped/Not Received report that are older than 10 days before month end should have an explanation provided
o All items on the Disputed report should have an explanation provided
• Once reviewed initial the first page of the Branch Manager Month-end Certification to the right side of the row ‘Transfer Register, Shipped Not Received report Transfer Register, Disputed report’
o Initials indicate the report is being reviewed and resolved
• Transfer the total from the totals from the two reports to the second page of the Branch Manager Month -end Certification which is the Summary of Reports
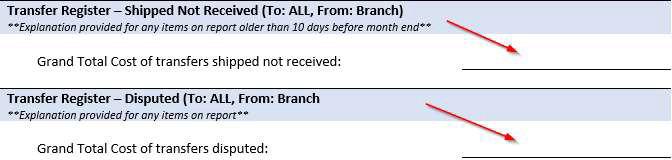
• Attach the Transfer Register reports to the Branch Manager Month-end Certification
• Ensure all reports and documentation are appropriately attached to the Branch Manager Month-end Certification
• The packet should be saved in a single digital format as a PDF
• Save with the following file name format
o YYYY.MM – Branch – Month-end Certification
• Email to accounting@mountianland.com
• If you have any additional questions, please reach out to BJ Zeyer or RJ Springer bj.zeyer@mountainland.com rj.springer@mountainland.com
All items coming into or leaving the warehouse must be scanned with the scanner gun. If you have not been trained to use the scanner, you cannot put items away or pull items in the warehouse.
1. Order gets entered into the system.
2. Product is received into the warehouse using the RF scanner gun.
3. You select the order status
3.1.1. This will dictate how, when and what gets kicked out to be pulled and sent to a customer
3.2. Bid
3.3. Pickup Now – kicks to the gun when you exit the order
3.4. Ship when complete – kicks to the gun when all the item on the order are available in the warehouse
3.5. Ship When Specified – you enter the date that you want the order to kick to the gun
3.6. Call When Complete – the order will kick into your calling queue when all the items are available at the warehouse
3.7. Ship When Available – the order will kick out what items are in stock at the warehouse, and will continue to kick one item out at a time as it becomes available at the warehouse
3.8. Direct – you can procure the product from a vendor and have it shipped direct to a customer. These are not supposed to come to the branch because there is no way for us to receive or track that item.
4. Select the Ship Via
4.1.1. This is how your customer will get the order you wrote
4.2. PK No Print – customer is on the counter and is going to walk away with the order
4.3. 30 Minute W/C – customer will be to the warehouse within 30 minutes to get the order and we need to have it ready when they get here.
4.4. Will Call – customer will come get the order at the warehouse
4.5. Local Truck – ship on the next available local route truck
4.6. Our Truck – ship to a location outside our normally scheduled routes
4.7. OT Afton - ship on the next route truck to Afton WY area
4.8. OT Jackson – ship on the next route truck to Driggs/Jackson area
4.9. Common Carrier – ship using a 3rd party carrier (customer covers freight costs)
4.10. UPS Ground – ship using UPS, these are picked up daily at 4:30pm
4.11. Salesperson – a sales team member will deliver the order
5. Procure any items we do not have at the warehouse
6. Once you close the order, your Order Status will dictate what happens next
7. Orders kicked to the warehouse queue are then pulled in order of importance
7.1. UPS
7.2. OT JACKSON
7.3. OT AFTON
7.4. LOCAL TRUCK
7.5. OUR TRUCK
7.6. WILL CALL
7.7. SALESPERSON
8. The RF gun is used to pull orders. This leads the order puller through the warehouse and will not let them scan the wrong product. Human error can occur, however the use of the RF gun will mitigate errors.
9. The order is staged in the correct location to be loaded or picked up later.
10. The order is then loaded for delivery dictated by your Ship Via or picked up by the customer
10.1. If the order is picked up at the warehouse, IT MUST BE SIGNED for and the customer is given a receipt and the product.
10.2. if the product is delivered using any of our delivery methods, it is manifested to the driver or salesmen that will be doing the delivery.
10.2.1. To close the order from the manifest it must be signed for and have photos of the delivered product
11. The order is now closed, there are no further actions.
Inside Sales
Counter Sales
Counter Inventory Stock Replenishments
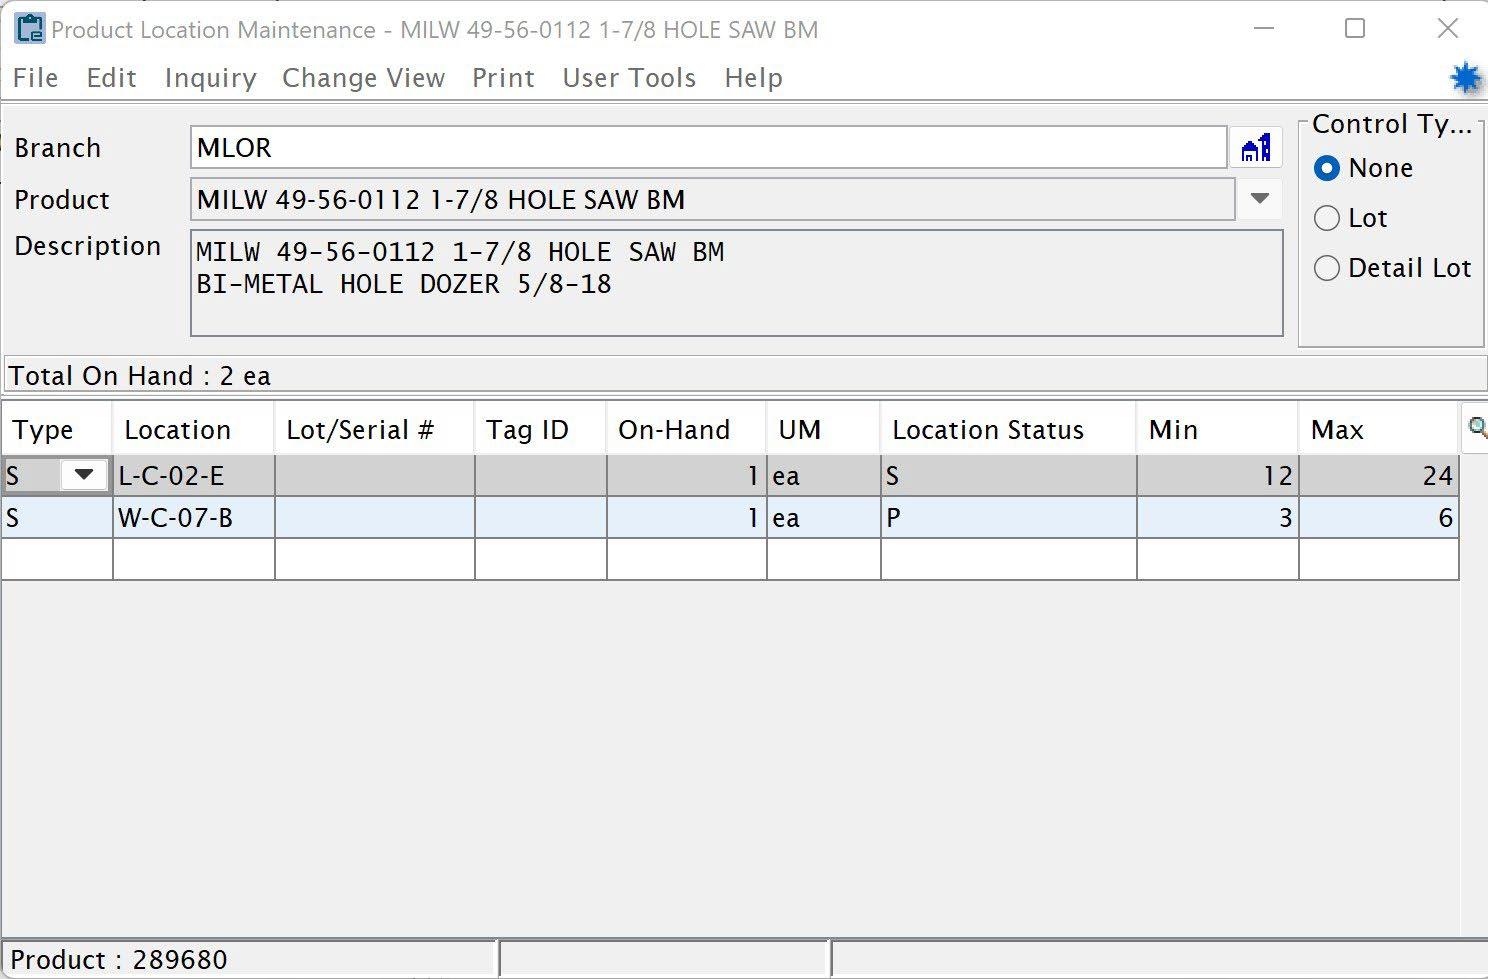
Counter area inventory should be set up with the counter location being the Primary location in Product Maintenance.
Product Maintenance > Inventory > Location Maintenance (or Ctrl-L)
Within Location Maintenance, select the correct branch for the product.
Counter area locations should be set to “S” (Stock) under the Type
Put in the counter area location under Location
Lot/Serial # and Tag ID will not generally apply to counter stock product.
On-Hand will show how many items should be in the specified location.
Location Status for counter stock items should be set to “P” for Primary location
Min should be set to the lowest amount to be stocked at this counter location prior to a replenishment being generated
Max should be set to the highest amount that can be or desired to be stocked on the counter location.
Any inventory in stock over the Max level should be stocked in a “S” (Secondary) location type. This can carry a Min & Max if it has limited space and you wish to stock the bulk of any overstock in a different location.
Note: The Min/Max in a location are just for that location and note what you want to stock in the branch as a whole.
*Auto Replenishment will need to be turned on in the Control Files for replenishment tasks to be generated. These assigned tasks will suggest moving product from a Secondary or Floating location to fill the levels in the Primary location. The person responsible for replenishing the counter area inventory will need to accept the task to get the list of items that need to be replenished.
If you have enough space and wish to only have all your stock stored in the primary location on the counter, you can leave the Min & Max blank and only have a Primary location. If you need to just control the maximum amount you can or want to store in the branch, you can control that through putting a Max under your specific branch in Product Maintenance > Primary Inventory Maintenance > User Control.
Area SOP
• Branch Manager will be responsible to manage stock and maintain counter area.
o This can be delegated to assigned employee, but overall responsibility belongs to the branch manager.
• Tool & Safety will work with each branch to make sure correct products and vendors are displayed.
o Product will be decided by the top selling vendors and items the branch wants to have displayed.
o Regular commodities and products for counter area will be included i.e.… glues, solder, etc.
• Once Product is displayed Tool & Safety and Branch Manager will draw out diagram of counter area layout and label it for reference and review. o Diagram will be given to regional managers, Branch Managers, Tool & Safety Sales team members
o Diagram will be divided into areas for regular maintenance checkups.
Suggest having broken into an area per month.
• All items that are hanging will need to have provided back tag put on hook with barcode sticker on them.
o Mountainland to provide blank back tag and Light blue spool of barcode stickers to print barcode label on.
• Each Month: Listed area for that month will have following done o Min-max or Stocking inventory set in eclipse and expiration date moved out 1 year. Check every item in the area specified for the month
•
Purchasing to provide SOP for doing MinMax and stocking order settings in eclipse and provide training to all branches on this process.
o 365 “Dead inventory” reports ran in eclipse and inventory decisions made on non-selling products.
Items not selling need to be identified and approved by branch manager for one of the following:
• Leave product and continue trying to sell
• Transfer to a branch that is moving the product (With receiving branch managers approval)
• Sell at discount price and mark in eclipse to not restock.
• Check with purchasing to see if we have a guaranteed sale from vendor, if so, work with purchasing to make restocking order to replace dollar amount sending back. o Product must be in resalable condition for vendor to take back on guaranteed sell.
New products purchased and brought into branch need to have Min-Max or stocking replenishment settings set and located to chosen counter area.
• Items with double stocking locations need to have MinMax set on location to have items replenished in counter area (Primary location) from Warehouse stock (secondary location).
SOP #1
Carton Packing:
Put Away
SOP #1 Warehouse
- Carton Packing: Once a Ticket Puller has pulled, printed the ticket, highlighted any pipe, they will give the Carton Packer the paperwork. It is the ticket puller's responsibility to make sure the product is pulled correctly. The Carton Packer is to provide quality control, checking for wrong quantities and wrong product
- Start by checking items line by line. Check for Quality, Quantity, and the Correct Product.
- Put a check mark by the items that were correct, if an item was pulled wrong or had the wrong quantity, have the ticket puller fix the mistake immediately.
- Once everything has been checked, box the product.
- Print shipping labels and label all boxes, pieces, rolls, and pallets.
- Stage product accordingly.
- Label the paperwork (1 box, 1 piece, 1 roll, or 1 pallet).
- Highlight any pipe that still needs to be pulled.
- Highlight Shipping Instructions
- Check for COD (make sure the product has been paid for). - Place paperwork in the correct area.
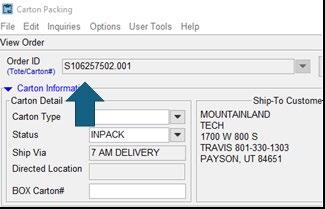
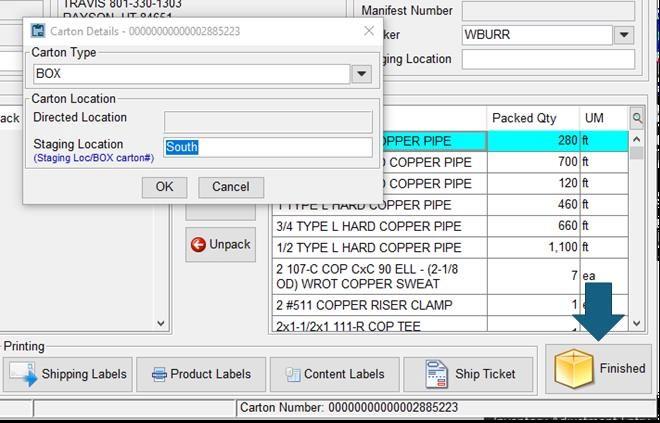
• Carton Packing Widget
• Open Carton Packing Widget
• Type/scan Ticket number into Order ID
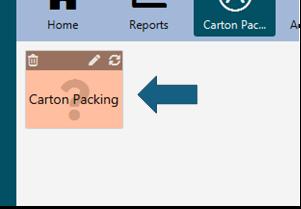
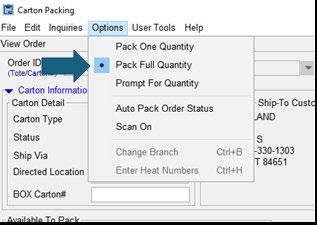
• Change Option to Pack Full Quantity
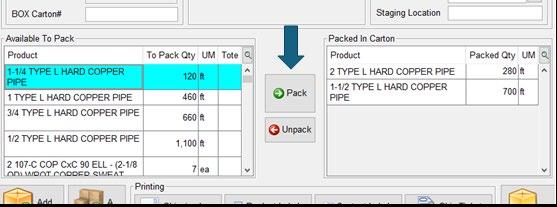
• Once all items have been checked, Pack all items from Available To Pack to Packed In Carton
• Once all items are Packed In Carton, Print Shipping Labels for all boxes and pieces. Write the last three digits of the ticket number on each sticker.
• Label Format is always Carton Shipping Label, Print Selection is Order Only, Total Count is how many Stickers are needed. Boxed Quantity needs to be left blank.
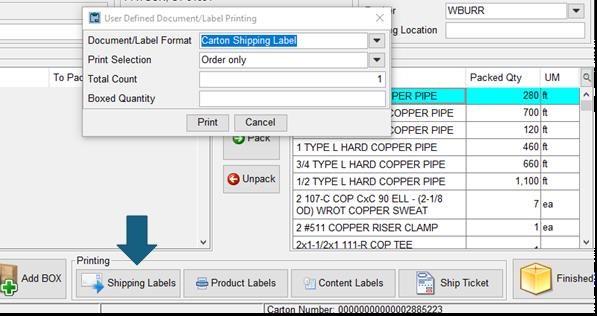
• Once Stickers are printed Click Finished and fill out Carton Type and Staging Location
Shipping SOP #1
Yard SOP #1
SOP #2
Delivery SOP #1
Forklift SOP #1
SOP for Company Vehicle Accident Reporting
Standard Operating Procedure (SOP) for Company Vehicle Accident Reporting
Purpose
This Standard Operating Procedure (SOP) outlines the steps employees must follow to report an accident involving a company vehicle. The objective is to ensure proper documentation, compliance with legal requirements, and to facilitate the claims process in the event of an accident.
Scope
This procedure applies to all employees who operate company vehicles, whether for business or personal use, and includes accidents occurring during regular business hours, off-hours, or while conducting work-related duties.
Responsibility
• Driver: Responsible for immediately reporting vehicle accidents to their manager or Fleet Manager, ensuring safety, taking pictures of the accident and collecting the other driver’s information and cooperating with authorities.
• Supervisor/Manager: Responsible for having the driver fill out an Accident Report, making sure the driver is taken in for a drug and alcohol test, initiating any necessary followup actions, and ensuring proper documentation is submitted to the Accident Review Committee.
• Accident Review Committee: Responsible for maintaining accident records, initiating insurance claims, and ensuring any necessary driver retraining or follow-up actions are completed.
Procedure
1. Immediate Actions After an Accident
• Ensure Safety:
o Check for injuries and provide first aid if necessary.
o If the accident is minor and the vehicle is operable, move the vehicle to a safe location. If the vehicle is not drivable, remain inside until help arrives.
o Turn on hazard lights and use reflective triangles or cones if available to warn other drivers.
• Contact Authorities:
o Call emergency services (911) immediately if there are injuries or significant property damage.
• Exchange Information:
o Exchange the following information with all parties involved in the accident:
Driver's name, address, and phone number
Vehicle registration number and insurance details
Driver's license number
Names and contact information of witnesses
• Take Photos:
o Document the scene of the accident, including vehicle damages, license plates, surrounding area, and any visible injuries. Photos should be clear and comprehensive.
2. Reporting the Accident
• Notify Your Supervisor or Manager:
o Call or send a message to your direct supervisor as soon as possible, even if it’s after hours. Provide them with the details of the accident, including:
Date, time, and location of the accident
Description of the incident
Any injuries sustained or damages caused
The status of the other party involved (if applicable)
Coordinate with your manager on where to take a physical and drug test
• Submit a Formal Accident Report and Drug Test:
o Within 24 hours of the accident, complete a detailed accident report form. Include the following:
The narrative of the accident, including a description of the events leading to the accident
Contact details of any witnesses
A copy of the police report (if applicable)
Copies of photos and any other supporting documents o Submit the completed report to your supervisor.
3. Follow- Up Actions
• Supervisor’s Responsibilities:
o Make sure the driver is taken in as soon as possible for a physical and drug/ alcohol test.
o Submit the completed report and any other related documentation to the Accident Review Committee.
o Determine if any immediate actions are needed (e.g., vehicle repair, driver suspension, or additional training).
• Accident Committee Responsibilities:
o Contact the insurance provider to initiate a claim (if applicable).
o Determine if any immediate actions are needed (e.g., vehicle repair, driver suspension, or additional training).
o Maintain a record of the accident, including any follow-up actions. o Process insurance claims and ensure the company vehicle is repaired.
• Insurance Notification:
o Notify the company’s insurance provider within 24-48 hours of the accident, providing all relevant information, including the accident report, police report, photos, and witness statements.
• Claims Investigation:
o Cooperate with the insurance company’s investigation by providing any requested documentation.
o Follow up with the insurance provider regularly for updates on claim status.
• Accident Records:
o Maintain all records of the accident, including reports, photos, police reports, and insurance claim documents, in the employee’s file and the company’s accident record database.
o Ensure these records are retained for the duration required by company policy and applicable laws.
Purpose
This Standard Operating Procedure (SOP) outlines the guidelines and procedures for the efficient and responsible management of fuel consumption, monitoring, and reporting for company vehicles. The objective is to optimize fuel usage, reduce operational costs, ensure compliance with company policies, and promote sustainability.
Scope
This procedure applies to all employees who operate company vehicles, including fleet managers, drivers, and administrative personnel responsible for vehicle and fuel management. It covers fuel procurement, fuel use, monitoring, reporting, and maintenance practices.
Responsibility
• Fleet Manager/Supervisor: Responsible for ensuring fuel management procedures are followed, overseeing fuel purchases, and monitoring fuel efficiency.
• Drivers: Responsible for following fuel-related guidelines, reporting accurate fuel odometer readings, and reporting discrepancies.
• Drivers Manager: Responsible for educating employees on fuel management policies and ensuring compliance with this SOP.
Procedure
1. Fuel Procurement and Purchasing
• Fuel Cards:
o All authorized drivers will be issued a fuel card pin, which can be used for purchasing fuel. These pins are not to be shared or used by other drivers.
o Fuel cards should only be used for the purchase of fuel for company vehicles. o Fuel card usage will be monitored to ensure compliance with company policies.
• Fuel Stations:
o Drivers can refuel at any fuel stations, but it is preferred that drivers when possible fuel at Maverik gas stations. These gas stations are preferred based on fuel discounts.
2. Fuel Usage Guidelines
• Fueling Procedures:
o Ensure the correct fuel type (e.g., gasoline, diesel) is used for each vehicle, as specified by the vehicle’s manufacturer. o When fueling, make sure to enter your correct odometer reading.
• Vehicle Efficiency:
o Drivers should regularly monitor fuel efficiency and report any sudden changes in fuel consumption to the Fleet Manager. Such changes may indicate mechanical issues that require attention.
o Encourage the practice of driving in a fuel-efficient manner, including maintaining steady speeds and reducing unnecessary idling.
3. Fuel Consumption Monitoring
• Fleet Management System:
o The company utilizes a GPS tracking system or fuel card reports to track and monitor fuel consumption.
o The system will automatically capture data from fuel cards, fuel logs, and vehicle telematics (if applicable) to track fuel usage and identify any discrepancies.
• Fuel Efficiency Analysis:
o The Fleet Manager will conduct regular analyses of fuel consumption to ensure that vehicles are operating efficiently and within expected fuel consumption ranges.
o Regular reports should be generated to identify trends in fuel use and highlight any inefficiencies or potential issues.
4. Reporting and Discrepancies
• Fuel Usage Reporting:
o Any discrepancies or unusual fuel usage patterns (e.g., excessive fuel consumption) must be flagged and investigated promptly.
• Fuel Fraud Prevention:
o Fuel card usage will be monitored regularly to detect unauthorized or suspicious activity, such as fuel purchases for non-company vehicles. o Any suspected fraud or misuse of company fuel cards should be reported immediately to the Fleet Manager and investigated.
6. Vehicle Maintenance and Fuel Efficiency
• Routine Maintenance:
o Ensure that vehicles are serviced regularly. This includes oil changes, air filter replacement, tire maintenance, and other routine checks to maintain fuel efficiency.
7. Compliance and Enforcement
• Compliance with Fuel Policies:
o Employees must comply with all aspects of this fuel management policy. Violations, including misuse of fuel cards, failure to log fuel purchases accurately, or failure to report discrepancies, may result in disciplinary action.
• Monitoring and Audits:
o The Fleet Manager will regularly audit fuel logs and usage to ensure compliance with this SOP and identify areas for improvement.
o Periodic audits will be conducted to verify fuel transactions, confirm the accuracy of fuel logs, and ensure proper fuel management procedures are being followed.
FINANCE DEPARTMENT SOP’S
Finance SOP’s
Standard Operating Procedures for each segment of Finance
Accounting Form 1099 Review and Filing SOP
Last Revision Date: 1/31/2025
Author: BJ Zeyer, Controller
Objective | Review all payments remitted for the previous calendar year to determine which vendors will require a Form 1099, file the forms with the IRS, and send from copies to the vendor
Scope | A review should performed for all business units, across all accounting systems, by the accounting staff with the assistance of the Accounts Payable team
Software | Each of the ERP Systems (Eclipse, IDEAL, and EBMS) houses the vendor payment information. Adams Tax Forms Helper (“1099 Software”) is on an online filing software that offers an annual license to submit 1099 filings as well as offers print and mailing services.
*you must have access to the accounting@mountainland.com mailbox in order to provide multi-factor authentication.
1.1 The IRS requires that any 1) cash, 2) check, or 3) ACH payments made to an individual or company be formally filed via one of the many 1099 Forms. Most, if not all, of the payments made by Mountainland Supply Company will be filed via Form 1099-NEC, 1099-MISC, or 1099-INT.
1.2 Generally, a 1099 filing is required only for:
1.2.1 Total cumulative payments made in the prior calendar were greater than or equal to $600.00 (as of the SOP Last Revision Date).
1.2.2 Payments that were NOT made to your employee.
1.2.3 Payments that were for services, NOT for tangible products
1.3 If these criteria are met, the following general guidelines can be used to determine the type of 1099 Form to be filed for each TIN (Tax Identification Number):
1.3.1 Any entity type (i.e. C or S Corporation, Partnership, Sole Proprietorship, Individual)
1.3.1.1 1099-MISC | Payments for Rents, Gross proceeds paid to an attorney
1.3.1.2 1099-INT | Interest portion of payments made to seller note holders
1.3.2 Partnerships NOT taxed as an S or C Corporation; Sole Proprietorships, Individuals
1.3.2.1 1099-NEC | Any payment made
1.4 For additional reference material and guidance, refer to the “Guidance” tab of the work paper noted in 4.1.
2.1 1099 Form filings are due the following January 31st after the close of a calendar year. They must be filed and vendor copies post-marked by this date.
3.1 Before December 31st, Accounting should work with Accounts Payable to ensure that all vendors are categorized appropriately in the ERP systems and that all necessary filing information for the vendor (the Form W-9 should be stored in each vendor profile. An address and TIN is required for filing). Each ERP system has fields to help flag that a vendor is a 1099 vendor:
3.1.1 Eclipse | Using a User Defined Queue report titled “VENDOR INFO WITH 1099”, run this report with a Pricing Type of “EXP”. This report details the vendors that have been classified as Non-1099 vendors, but it should be reviewed for accuracy by the Accounts Payable team to make sure none of these should have been classified as 1099 vendors.
3.1.2 IDEAL | In IDEAL, a report is available that details all of the payments made to vendors marked as 1099 recipients. This can be ran under Applications > Accounts Payable > Accounts Payable Reports > “Payables 1099 Report”
3.1.3 EBMS | While the EBMS system does have the ability to designate a vendor as a 1099 vendor, it will not report payments if they are GL’d to an expense GL. As not all 1099 payments fall under this category, this report will not work as a comprehensive 1099 vendor list.
3.2 IRS prior year errors notice | If there were any errors in the prior year filings, the IRS will provide a notice with a detailed summary of these errors. This should be used to make any corrections (i.e. get updated W-9s, mailing addresses, etc.)
4.1 Accounting uses a work paper to perform the review of vendor payments. Locate the file titled “[YYYY] 1099 Filing Prep Template.xlsx”, on the Finance Drive at
\\finance.int.mtncom.net\Finance2\Mountain Contractors\Taxes\1099s (look in the prior year’s filing folder for the template to use for the current year)
4.2 Detailed instructions have been recorded in the template detailed in 4.1 above, on the “Instructions” tab. These instructions should help you review the payments and prepare an import file of the recipients.
5.1 Once the recipients have been imported into the 1099 Software, the respective forms need to be created, filed, and then submitted to be printed and mailed
5.2 Once logged into the software, click on the “Create a Form” > “Import File” option. This will allow you to upload forms rather than manually creating one for each recipient.
5.3 Choose the “Download Empty Template” option, selecting the [YYYY] 1099-NEC form. Then click on “Download Template”
5.4 Template Preparation and Import
5.4.1 Using the workpaper created, specifically the “Current 1099 List” tab, you can filter the “1099 Type” column for type 1099-NEC.
5.4.2 Use the information to populate the following fields in the template: Recipients’ TIN Account Number
Box 1 Nonemployee Compensation. Note: the company’s EIN should be entered for each line in the column titled “Payer’s TIN”
5.4.3 In the 1099 Software, under the “Import Forms” section, you can now select the type of form being uploaded, and then drag and drop the file you just created in the space provided.
5.4.4 It will automatically process the file. Be sure no errors occurred during the import. If any did, you will have address them and re-upload only the items that didn’t import.
6.1 Within the 1099 Software, there is a menu item titled “Forms”. Click here. This will pull up a list of all of your forms you have created/imported.
6.2 Use the check box on the left to select all the forms. You can submit them all at once. Note that the check box in the header row will only select all the forms listed on the page. You must navigate to each page and select all forms. NOTE: it’s easier to change the number of items viewed per page to 100 so you can select more at once.
6.3 Once they are all selected, click on the yellow “Checkout & File” button.
6.3.1 There will be an option to verify unverified Tax ID Numbers (TINs). We usually don’t bother with this, as it is expensive.
6.4 Continue through the rest of the prompts to submit for “Federal eFile” as well as “Print & Mail”
7.1 Once all of the forms have been submitted to filed, printed, and mailed, we need to download reports so we have an offline copy of everything that was filed
7.2 Within the 1099 Software, Click on the “Forms” menu link.
7.3 There should be an “Export” button. You can export these as Excel 7.4 Once exported, save on the network drive at Mountain Contractors\Taxes\1099s\[YYYY]\Final Filings (Export)
8.1 For filing errors that occur, an amendment can be made through the 1099 Software. These should be performed as soon as possible, as penalties can result for late filings/amendments
• Identify the
Power Equipment and Truck Outfitters branches all use their specific reports
• Use the search bar in the top left corner
o Search “Inventory Adjustments Register”
o Update the following parameters
Start Date: The first day of the prior month
End Date: The final day of the prior month
Branch
Detail/Summary: Summary
• Run the report
• Review the report and ensure comfortability with all inventory adjustments made for the report period
o If the total of the inventory adjustments report is greater than the monthly threshold then items need to be initialed until the adjusted total is below the threshold
See the example below. MLHB is a Level III branch with a $2,500 monthly adjustment threshold. The total adjustments were $4,140.46
The total on the report is $4,140.46 and $3,667.38 was initialed making the total remaining amount on the report $473.08
• Once reviewed, initial the first page of the Branch Manager Month-end Certification to the right side of the row ‘Inventory Adjustments Register (summary) report, month’
• Transfer the total from the Summary Inventory Adjustments Register to the second page of the Branch Manager Month-end Certification which is the Summary of Reports
o Enter the total on the corresponding line for Inventory Adjustments Report Grand Total – Dollars
• Attach the Summary Inventory Adjustments report to the Branch Manager Monthend Certification
• Use the search bar in the top left corner
o Search “Inventory Valuation”
• Update the following parameters
o Branch
o As of Date: Month- end Date
o Select By: Buy Line
o Cost As of Date: [Blank]
o Quantity Types: All except for “Tagged” (Recall List)
Select each quantity type except “Tagged”
o Inventory Accounts: [Blank]
o Nonstocks: Only
o Negative Onhands: Include
o Zero OnHands: Exclude
o Display Settings Tab
Report Type: Detail
Sort By: Buy Line
• Review the report and document if action needs to be taken for items needing to be written of, reclassified, transferred to another, etc.
• Once reviewed, initial the first page of the Branch Manager Month-end Certification to the right side of the row ‘Non-stock Inventory Value (No Tags) report’
• Transfer the total from the Non-Stock Inventory Value (No Tags) report to the second page of the Branch Manager Month-end Certification which is the Summary of Reports
• Document the ‘% of Total Inventory’ total on the second page as well
o This can be found through the branch manager inventory Phocas dashboard:
Find the Nonstock widget and enter the percentage on the second page of the certification
• Attach the Non-Stock Inventory Value (No Tags) report to the Branch Manager
Month-end Certification
• Use the search bar in the top left corner
o Search “Inventory on Hand with No Sales”
o Update the following parameters
Branch
As Of Date: The final day of the prior month
Created in the last: 730 days
Received in the last: 730 days
• Run the report
• Review the report and document if action needs to be taken for items needing to be written of, reclassified as damaged, transferred to another, etc.
o Attach any support for items written of, reclassified, or transferred to the certification
• Once reviewed, initial the first page of the Branch Manager Month-end Certification to the right side of the row ‘Inventory 21on Hand with No Sales report, as of month end’
• Transfer the total from the Inventory On Hand With No Sales Report to the second page of the Branch Manager Month-end Certification which is the Summary of Reports
o Enter the total for the current month on the top line
o Pull the beginning balance (8/1) total and enter it on the second line To initially get this number run the above report as of 8/1 for the current fiscal year
• Once it has been pulled you can transfer it from the prior month’s certification
• Example: If you are doing the January 2026 certification the date used would be 8/1/2025
• Attach the Inventory on Hand with No Sales report to the Branch Manager Monthend Certification
• Use the search bar in the top left corner
o Search “Open Sales Orders”
o Update the following parameters
Branch/Territory/All: ALL
Start date: [Blank]
End date: -4/FE/YR or -3/FE/YR (please note examples below)
• Example: If completing the report for the month ended December, and running the report on January 1 or after, enter “4/FE/YR”
• Example: If completing the report for the month ended December, and running the report on December 31 or before, enter “-3/FE/YR”
Select tab: Select Criteria
• Category: Shipping Branch
o Enter the specific branch in ‘Selection’ column
Run the report
• Review the report and ensure appropriate follow-up is happening
o These items should be reviewed on a weekly basis
• Once reviewed initial the first page of the Branch Manager Month-end Certification to the right side of the row ‘Open Sales Orders Report’
o Initials indicate the report is being reviewed on a weekly basis
• Transfer the total from the Open Sales Orders Report to the second page of the Branch Manager Month -end Certification which is the Summary of Reports
• Attach the Open Sales Orders report to the Branch Manager Month-end Certification
• Use the search bar in the top left corner
o Search “Return Goods Queue”
o Update the following parameters
Branch
Type: Select Review, Overship, Defective.
• Select Update
• Review the report and ensure appropriate follow-up is happening
o All outstanding R, O, and F items are being followed up on/in processing of being resolved
All R, O, and F items should have explanations documented on the report for all items
• Once reviewed initial the first page of the Branch Manager Month-end Certification to the right side of the row ‘Return Goods Queue report’
• Transfer the total number of returns from the Return Goods Queue report to the second page of the Branch Manager Month -end Certification which is the Summary of Reports
• Attach the Return Goods Queue report to the Branch Manager Month-end Certification
• It is critical that these reports are run before rolling the dates to the next month
• Use the search bar in the top left corner
o Search “Transfer Register”
o Update the following parameters
Start date: Beginning of fiscal year
End date: Last day of the prior month
To Branch(es): ALL
From Branch(es): The specific branch the report is being performed
Status: Shipped/Not Received
• Run it a second time for disputed transfers
o All parameters are the same except Status
Status: Disputed
• Review the Transfer Register reports for Shipped/Not Received and Disputed and ensure items are in process of being resolved or have been resolved
o Any items on the Shipped/Not Received report that are older than 10 days before month end should have an explanation provided
o All items on the Disputed report should have an explanation provided
• Once reviewed initial the first page of the Branch Manager Month-end Certification to the right side of the row ‘Transfer Register, Shipped Not Received report Transfer Register, Disputed report’
o Initials indicate the report is being reviewed and resolved
• Transfer the total from the totals from the two reports to the second page of the Branch Manager Month -end Certification which is the Summary of Reports
• Attach the Transfer Register reports to the Branch Manager Month-end Certification
• Ensure all reports and documentation are appropriately attached to the Branch Manager Month-end Certification
• The packet should be saved in a single digital format as a PDF
• Save with the following file name format
o YYYY.MM – Branch – Month-end Certification
• Email to accounting@mountianland.com
• If you have any additional questions, please reach out to BJ Zeyer or RJ Springer
bj.zeyer@mountainland.com
rj.springer@mountainland.com

Credit Department SOP Manual
Accounts Payable
Auto Freight
Accounts Receivable
SOP#1
HR Playbook
Approving Timecards in ADP
How to Approve a Time Off Request in ADP
How to Check Time Off Balances
How To Complete A Job Salary Change Form
How to Edit a Timecard in ADP
How To Fill Out a New Hire Request Form
How To Fill Out a Position Posting Request Form
How to fill out an I9 Authorization Confirmation
Interviewing Best Practices
Manager New Hire Checklist
SUBSTANCE ABUSE POLICY
Onboarding Process
Requesting Time Off on Behalf of an Employee
Title: Checking Employee Time Off Balances
Filling Out a New Hire Request Form
Time Off Policies
Inventory
SOP for creating a new/nonstock item
SOP for Basic Procurements
Transfer SOP
Inventory SOP’s
Procurement from Vendor SOP
Procurement from Vendor SOP
**Before procuring an item from a vendor, check the bottom of the sales order to make sure it is not on hold. There will be a statement like this if the ticket is on hold. A purchase order cannot be generated off the procurement if the ticket is on hold. Branch transfer procurements will still go through though**
When to procure:
If the item is a Nonstock Special order
If the item has special pricing on a job or quote
If the item is stock but needs to ship sooner than a standard stock order
If the item needs to be ordered from a specific vendor
When procuring an item is not typically needed:
If the item is a stock item and just needs to be on the next stock order
How to procure an item from the Body of the Sales Order:
There are a few different ways to procure an item, this will cover the 2 most common. From the Body of a Sales Order, you can procure from Line Item – Schedule and Line Item – Source.
Schedule:
From the body of the ticket, so go Line Item – Schedule (or Ctrl-S). Within the Line Item Scheduling screen, select Edit – Procurement (or Ctrl-P). Fill in the Procure Qty from a listed vendors if available or one of the default Procure Sources (ie Buyer See Notes). Close the windows and the item will then show in the Procurement Confirmation Queue of the purchasing agent assigned to the Buyline associated with the item.
Sourcing:
This can only be done when the item’s ship date is later than the current date. Sourcing allows you to select a specific vendor that is not available in the Vendor selection options. This can be done by putting the cursor on the “Other Vendor (Specify)” field and then selecting File – Procure (B/O Qty). Then type in the vendor from the database in Eclipse. You can only choose from vendors in the database. If you want to purchase from one of the listed Vendors or Procurement source options, put your cursor on that line and select the File – Procure (B/O Qty). Close the window and the item will now be in the Procurement Confirmation Ques of the purchasing agent assigned to the Buyline associated with the item.
How to procure multiple items from the Status of the Sales Order:
From the Status screen on a sales order, select Edit – Procurement.
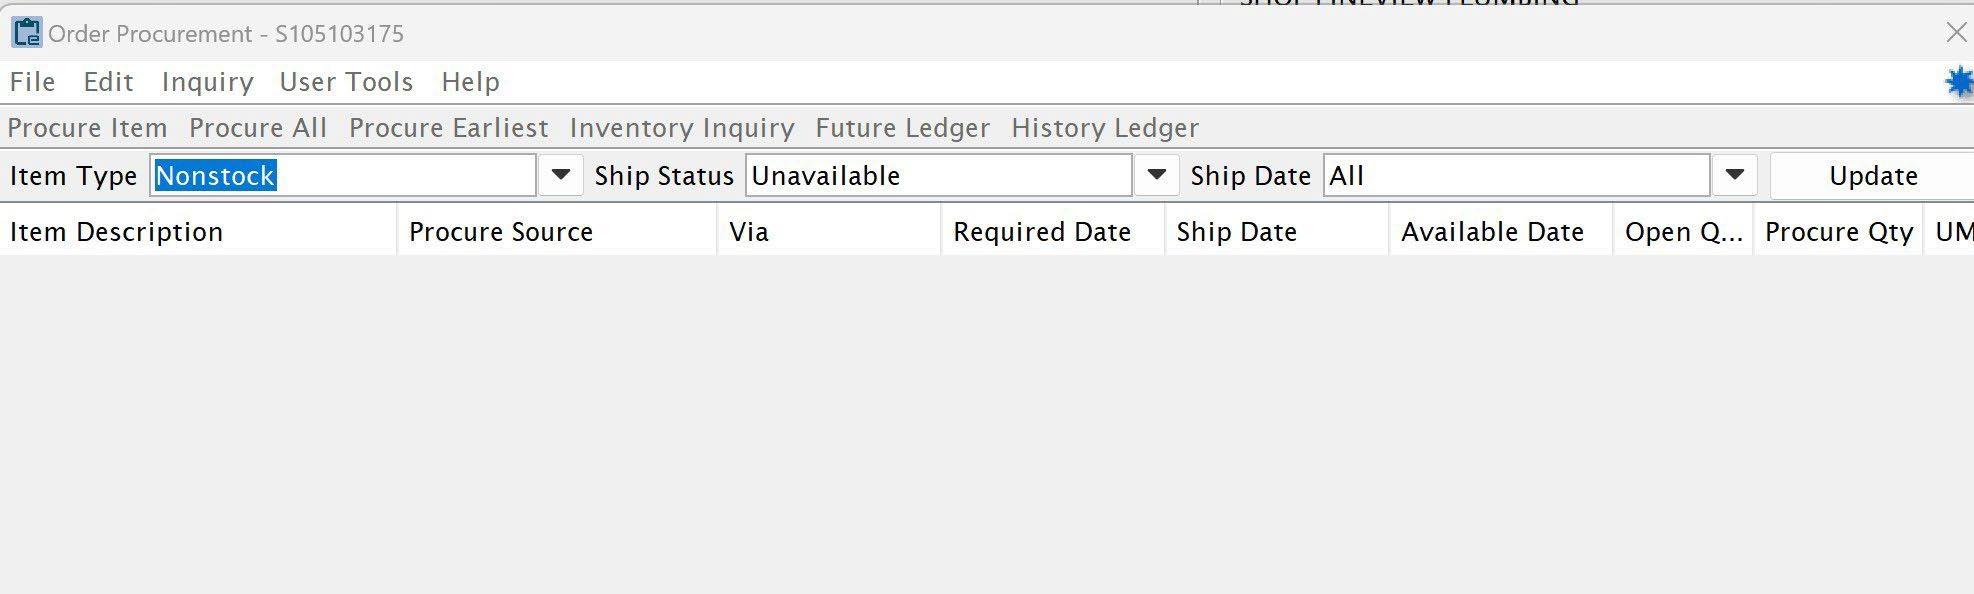
The system will default the Item Type to Nonstock and Ship Status Unavailable. Select Update and all the Nonstock & Unavailable items will appear. The Item Type can be changed to All and the Ship Status to All or Past Required as selection options. By selecting All & All, every item on the sales order will appear.
SHIP Via:
There are multiple ship via’s to choose from depending on the branch. They are crucial in helping the purchasing agent know priority and how to buy the product. These are the some of the most common:
STOCK ORDER – Get the product on the next stock order
BESTWAY- Very ambiguous. The PA will assume you want this on the next order unless notes specify differently
WILL CALL- Expedited Pick up from a local vendor. Notes are important to know who will be picking up. *Please make sure the vendor has in stock so we don’t send a truck too soon*
DAY/3RD DAY SELECT- Expedited shipment FX GROUND/NEXT DAY/2ND
DAY/3RD DAY SELECT- Expedited shipment
COMMON CARRIER- Expedited shipment.
The procurements are often sorted by priority when addressed. The expedited ship via’s are usually addressed first. Ship via’s that are left Blank are often looked at last.
There are a few default sources to procure an item from:
Procurement:
Buyer See Notes, Buyer Please Locate Next Day/2nd Day/3rd Day/Bestway, Buyer Get on Stock Order. Some Buylines will have a primary vendor and potentially secondary vendors to choose from.
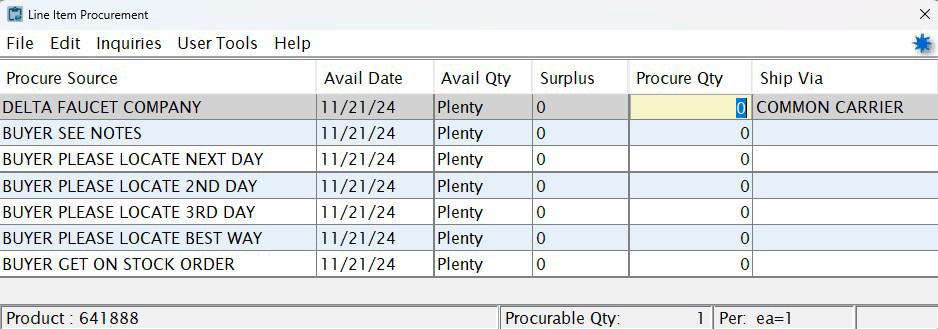
Primary source vendors will be at the top of the list if they are assigned to the Buyline.
“Buyer See Notes” options should include internal notes specifying where to get the product from, who to send the PO to (email address), location for pick up if it is a will call, job quote # for special pricing, html address if it is being purchased online (ie the exact Amazon address when you are going to add to cart).
“Buyer Please Locate” options should only be used when you don’t know where to get the product from. Notes are required informing the Purchaser to try and find it if possible. Note: This should be very rare because the sales person should usually be the one finding the potential vendor.
“Buyer Get on Stock Order” option will let the Purchaser know to get on a stock order. Notes are important if you need to have the order created sooner than later, and job quote should be noted if there is special pricing.
*Note: Transfer Procurements from other branches are not seen by the purchasing department. They will auto generate depending on the spooler schedule for the branch.
Once the procurement is made and the procurement window is closed, it will show in the Procurement Confirmation Queue for purchasing to see. The purchase order against the procurement can not be made until the sales order writer is out of the ticket and the ticket is not on Credit hold.
SOP for Setting Mins, Max and Service Stocks
General Information for Mins, Max and Service Stocks:
Min, max, and service stock levels are predetermined inventory limits that help our company maintain optimal stock levels. These predetermined thresholds can be fixed or dynamically adjusted based on sales trends using sales data from our ERP.
These thresholds establish boundaries, ensuring that inventory levels drop below a certain point (minimum stock level) or rise above a certain point (maximum stock level). By effectively managing these thresholds, our company can limit stockouts, reduce carrying costs, and optimize our supply chain efficiency.
Striking the right balance between Min, Max, and Service stock levels to meet customer demand while avoiding excessive inventory carrying costs is crucial for our company. This is where the concept of min, max, and service stock levels comes into play.
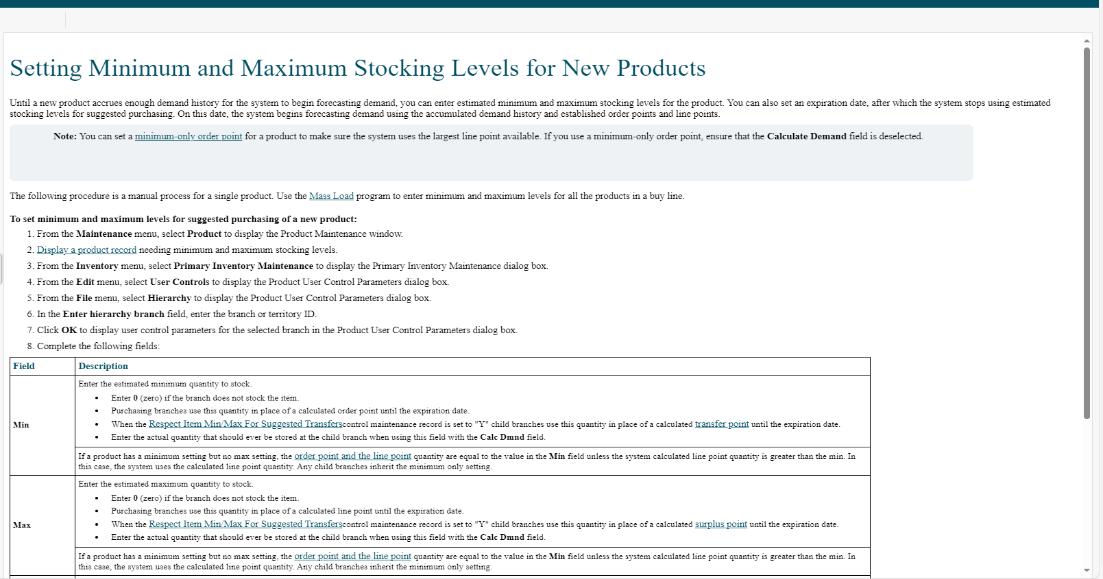
• Min Level: The minimum quantity of stock that should be on hand before reordering.
• Max Level: The maximum quantity of stock to be maintained.
• Service Stock: The quantity of stock kept to meet unexpected demand or delays in supply. Also known as a manual safety stock which is stock above a normal stocking level.
Parameters that must be followed for Min, Max, and Service Stocks:
1) Mins, Max, and Service stocks must have an expiration date.
2) Mins, Max, and Service stocks should not go beyond a 6-month date. They will be adjusted accordingly.
3) Mins, and Max should be used when developing demand for a new product. There are certain levels you should avoid using such as a min of 1. This would take the inventory to 0 before it would be suggested to order. Please communicate with the Inventory Team to help educate you on these types of parameters that may do opposite of what you intend.
4) Service stocks should be used when we run a promotion on an item guaranteeing we will have it stock. Or a customer requests that we keep an item in stock for a job or emergency.
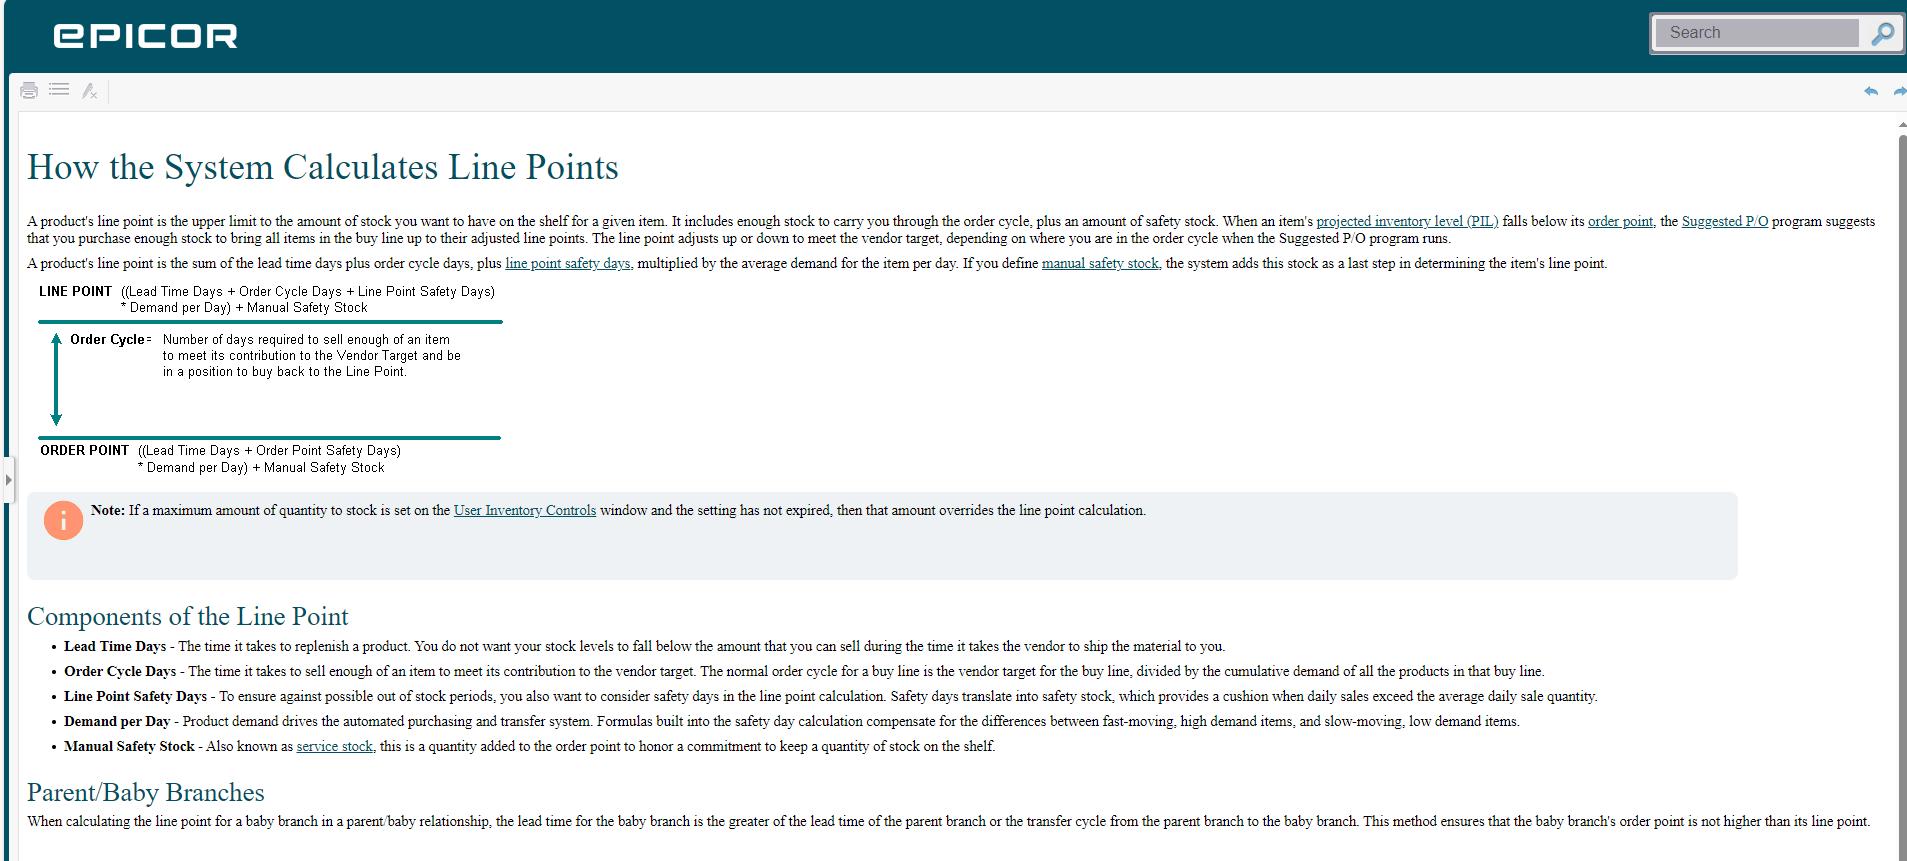
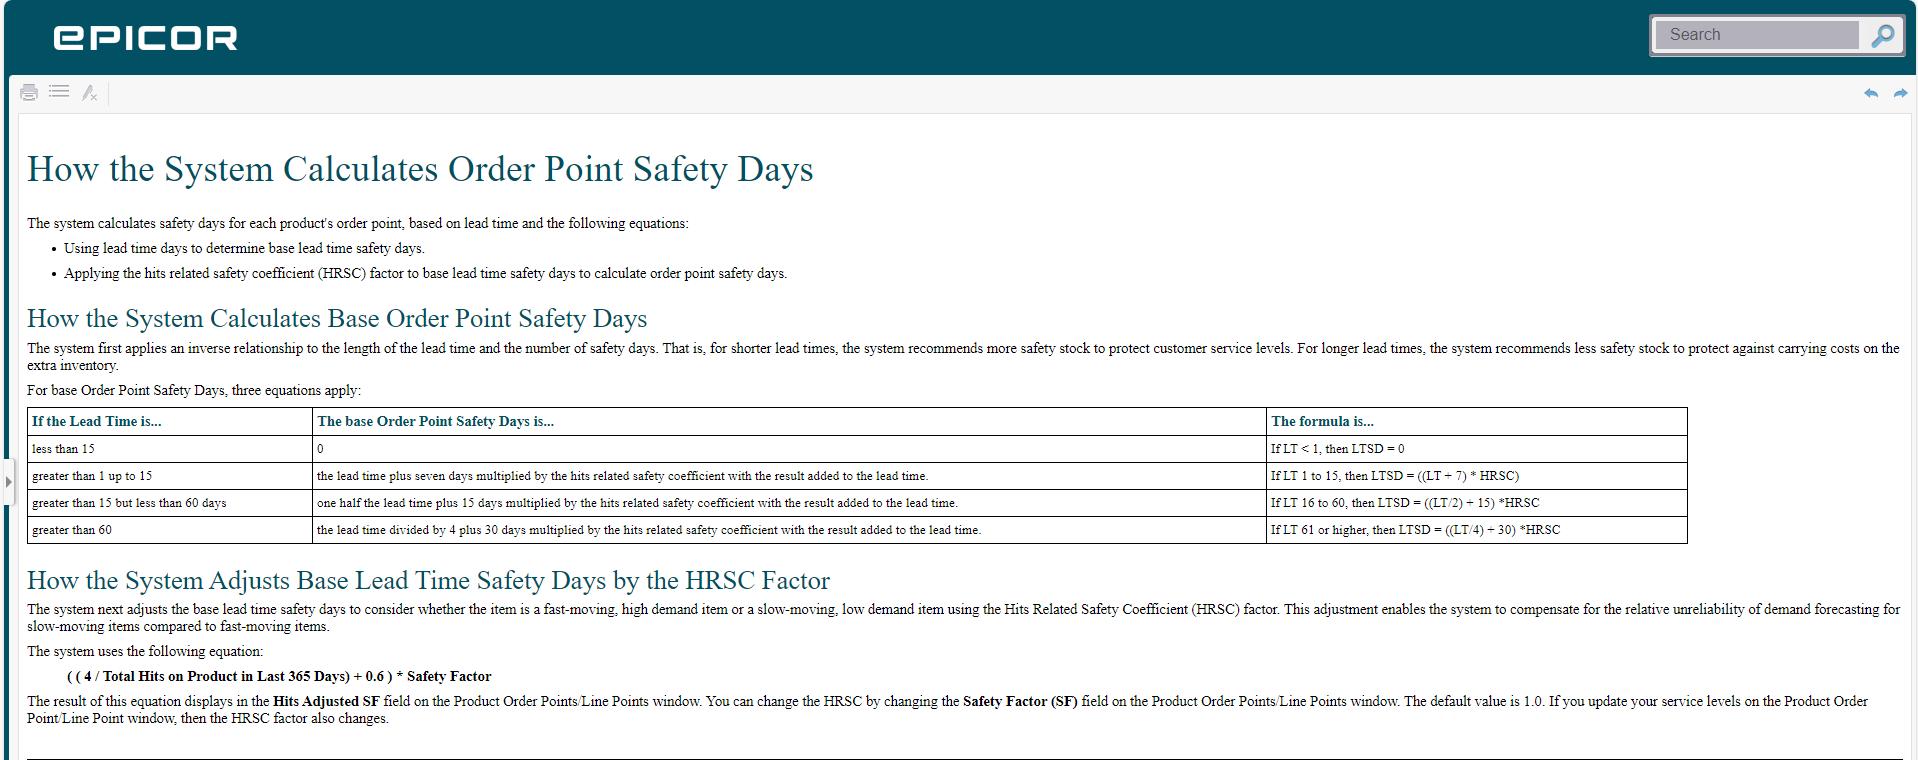
5) Key terms to understand: PIL=Projected Inventory Level and OP=Order Point, XP=Transfer Point. There is documentation below that defines these terms.
6) You must have a complete understanding of what happens when you set a min, max or service stock. Please communicate with the inventory management team at inventory@mountainland.com and they can help address the issue you may have with a product being replenished. There are several reasons why you might have run out of a product and those need to be discussed before you just set a min, max, or service stock.
7) All Min, Max, and Service stocks should be allowed to expire at the end of the 6 months or reviewed and extended if demand has not been created. To review them go to Main Menu>Tools>User Defined Queues>User Defined Queue> Product Min/Max/Serv To Expire>OK>Select Branch>Update. We can walk you through the steps reach out to anyone in the Inventory management department.
Steps for setting Min, Max, and Service Stocks:
1) Go to inventory inquiry and enter the item you want to set the min, max, or service stock for. Select Maintenance in header bar.
2) From Maintenance drop down select product maintenance. From Product Maintenance select Inventory and the Primary Inventory Maintenance.
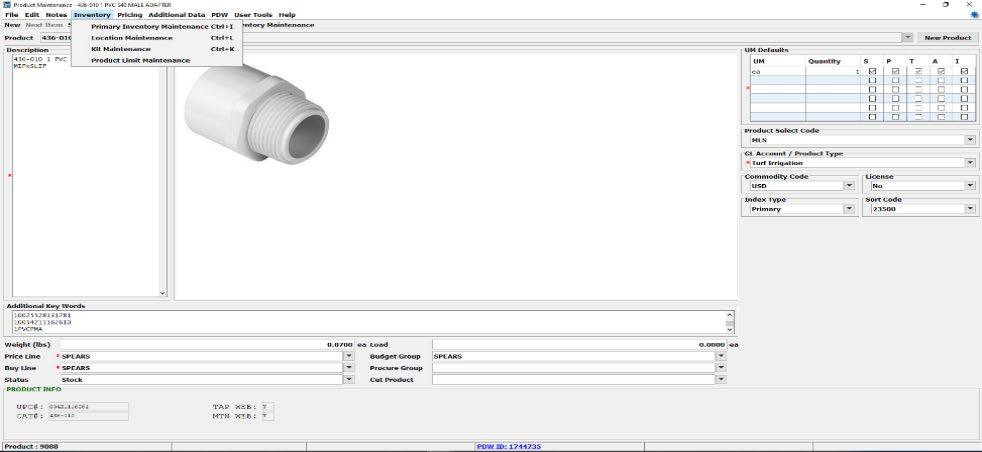
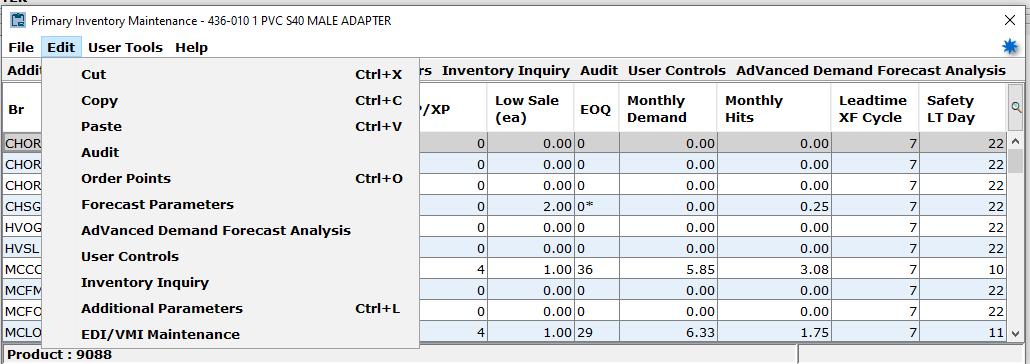
3) Once in Primary Inventory Maintenance select Edit in the header, and then select User Tools.
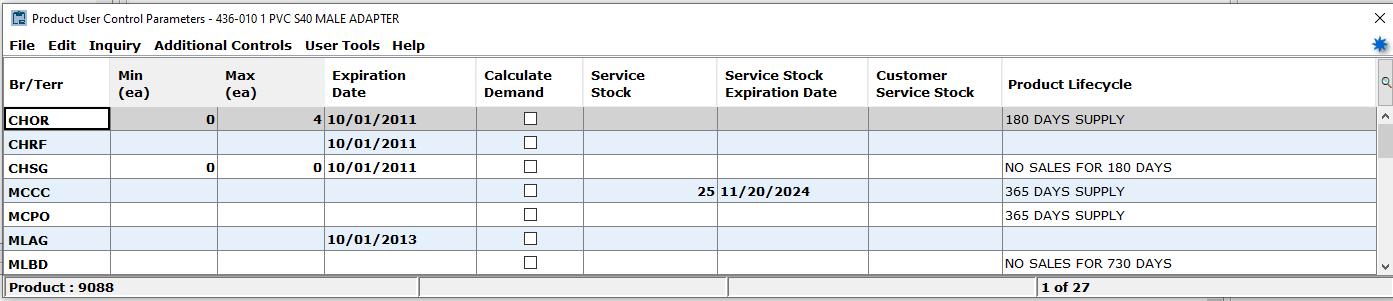
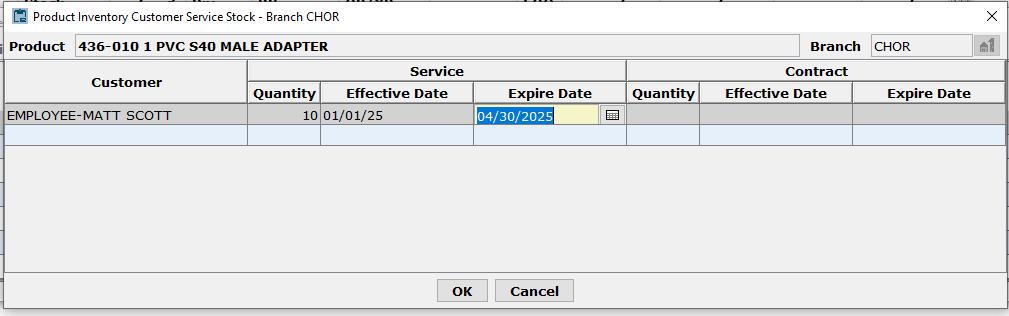
4) Once you select User Controls the Product User Control Parameters window appears. At this point you can start to enter your min, max, or service stock. Find your branch and enter your desired level under the min, max, or service stock. Enter your expiration date as well. There are certain parameters for placing each min, max, or service stock that vary for each product that you should discuss before setting. As you close out the screens it will ask to save your changes.
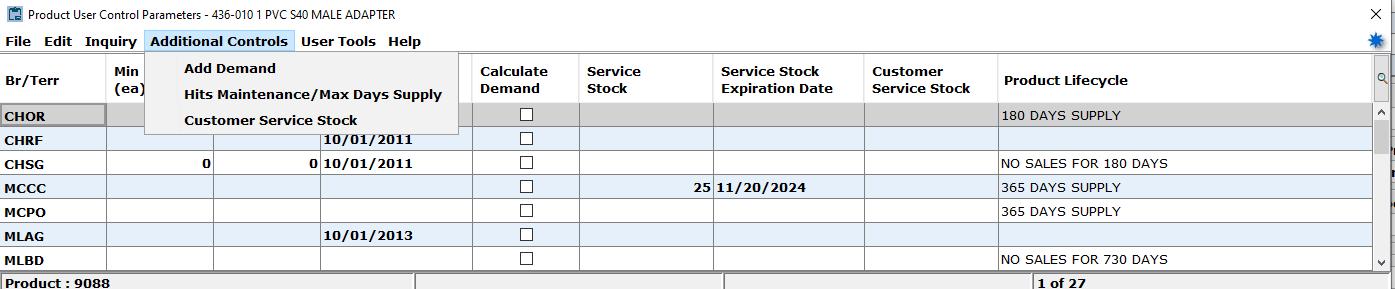
5) To set a Customer Service stock select Additional Controls, in the drop down-menu select Customer Service stock.
6) Enter your customer and set your quantity, effective date, expire date, and click ok. The customer service stock is then set.
Below are support documents that you should read and gain an understanding of when you are setting mins, max, or service stocks. If you need any clarification, please reach out to the inventory management team inventory@mountainland.com.


Procurement Sourcing and Ship Via’s
Procurement Sourcing and Ship Via’s
As some of you have noticed when procuring that Best Way is no longer an option in the Ship Via. We did this because it was a bit too ambiguous for purchasing and with the volume of procurements we do daily we need your help determining how to get your product to you and our customers. Here are the best choices:
UPS Ground/FX Ground (UPS and FEDEX also have the expedited options you can use)
• You want this placed ASAP and shipped and my customer will pay freight because we need it right away.
Common Carrier-The LTL version of UPS/FEDEX Ground.
• If you chose UPS Ground and it’s too big or too heavy for parcel, we will assume Common Carrier.
Will Call-We want this will be picked up from a local supplier.
• Immediate will call:
o Please note if we are picking up the order via will call immediately and confirm material is available and ready.
• Later will call:
o Vendor needs to bring in material before will call. Needs to be date specific with contact info of who the vendor would notify when ready.
Stock Order-We will wait to add to a stock order when the Buy Line is ready to be ordered.
• If it’s a stock item, you might see us remove the procurement so it will travel along with the stocking purchase order.
“BLANK”-If your Ship Via is blank this means you are holding this item to get notes or quotes attached and want purchasing to ignore this item for the time being.
• Please don’t leave it in there for more than a day. If an item is not ready to procure it’s best to not procure it until it’s ready.
A few other things that will help expedite the procurement process:
Sourcing from the right vendor-make sure the vendor you chose is the correct vendor.
• You can assume if you choose a vendor and a proper ship via that your PO will be sent to that vendor with that ship method.
Use of Buyer See Notes- If you chose Buyer See Notes as your Procure From, put comments in internal notes on the header screen.
• No notes mean you are holding this item to get notes or quotes attached and want purchasing to ignore this item for the time being.
Attach Quotes/Use Quote Numbers-If time was taken to get a quote, please attach that quote and reference the quote number in the internal notes.
CC procurements-If you are procuring product that we need to use a credit card to purchase we need the website or the name of the company, person you talked to, email, and phone number along with attaching the quote.
Following the suggestions on this email will help purchasing move through procurements faster and more efficiently making our customers business better and we can keep up the demands of a growing ESOP.