

News & Events

News & Events is where you will find information that is up to date and time sensitive. News articles may link to internal Loop pages or external pages. If you have something that you believe should be added to the News & Events section, please submit a Marketing Project Request (Go to the Departments section, Marketing Department and then click on the Marketing Project Request link).
At this time posting to the News and Events section is limited. Please submit a Marketing request to submit your information.
To view an article, simply click on the button titled “Read Article”. When you are finished reading the article, click the blue “Back” button in the upper left corner to return to the News & Events page.

2 :: The Loop User Guide
*For News & Events Admins Only.
If you have admin access, here are the steps to create a News & Events Update


1. Click the Lock/Admin icon to open the Login screen
2. Use your Independence Health System network login and password (as of 7/28/2023 –it must be an Excela login/password. This will change with an upcoming update of the Loop)

Select News and Events from your options.
(You may have different options than displayed below).
3 :: The Loop User Guide
Click on the “Create New” button.
Using this editor, you can add an image, add text/links and create Publish/Expiration date and time frame.

To upload the thumbnail image, you should use a square image (if possible). A 300 x 300 image will work best.

Click the words ‘Upload Image’ and you will be able to select an image/file that you have saved on your computer.
4 :: The Loop User Guide
Click the green checkmark to accept your image.


You then can enter the Title and Description of your Article, then type in your content. There are formatting capabilities and all that you need to create your Article!
5 :: The Loop User Guide
You will need to choose a Publish date/time as well as an Expiration date/time for your Article to run. You will receive an email notification 24 hours prior to your article expiring.

Toggle the “Publish” switch to make your article live.
You may also select the Facilities that you want your Article to display to. At this time, you can only select either “All Facilities” or one specific facility. Make sure to save your work.
Once you click ‘Save’, your article is published. At this point you can Edit and/or Remove your Article by using the buttons below.

6 :: The Loop User Guide
e-Tweeter
e-Tweeter is the more social part of the Loop. If you want to recognize an accomplishment, send a quick reminder about an upcoming event or due date, or provide a link to a specific page – this is the perfect way to communicate this.
You will need to have administrative access to “tweet”, if you need access, please submit a ticket by visiting the IT department page, or clicking on Service/Support Requests in Quick Links to request access. (As of 7/28/2023 everyone with access to tweet must have an Excela account, which can be created by IT. This will be remedied in a future release when everyone has an Independence Health System account.)
*For eTweeter Admins Only.
If you have admin access, here are the steps to create a tweet
3. Click the Lock/Admin icon to open the Login screen
4. Use your Independence Health System network login and password
5. Before tweeting, you will need to update your photo in the My Profile section. (You will only need to complete this step one time).
Choose “My Profile” (You may not see all other options, but you should see “My Profile” and “eTweet” at a minimum).
7 :: The Loop User Guide
After selecting “My Profile” you will see the following screen. Name/Title/Email will automatically populate. At this time, only the Photo Image can be uploaded. Please select a professional looking photo of yourself (and only yourself) in good lighting. If you do not have an appropriate looking photo, you may use your badge photo from UKG. (To save your badge photo, login to UKG (Ultipro) and right click on your employee photo located on the main page of “Myself” and choose “Save Image As”. You can choose the location of your choice to save your picture.)


*Your e-tweeter photo must be a headshot photo of you. It should not include other people, pets, flowers, etc.
8 :: The Loop User Guide
Click Upload Image and then select the image from your computer. Be sure to click the checkmark in the green box to save your photo! Then... “Save My Profile Changes” so your new profile page is saved!

6. Once logged into the editor, you will select eTweet.

7. Click on “Create New eTweet”
9 :: The Loop User Guide
To begin creating your eTweet, click on the Link icon if you’re adding a link. Copy and paste the link that you need. Type the text that you want your link to be displayed as and you can also add a title! Make sure to hit ‘Save’!


-You can tweet up to a maximum of 280 characters.
-You can add a link to another intranet page or a webpage by clicking the “link” icon. Copy and paste the link that you are saving. Type the words that will be linking to your URL and you may add a title as well. Click ‘Save’ to save your link.

*To link directly to a News and Events Article, you will open the News & Event article in the editor and click the View Permalink button. This will open the News & Event article with a unique URL that you can copy from the URL bar at the top of the page and insert into the Tweet link. (As of 7/28/2023 you can only link to News & Event articles that you created – or you can contact the owner of the News article and ask them to send you the permalink for an article.)
10 :: The Loop User Guide
Type your ‘tweet’ into the text box.
Choose a publish date and time, as well as an expiration date and time. (Your tweet will be posted/removed using this information).
Choose the Facility with the intended audience for your “tweet” and then click ‘Save” to publish your message. You may choose one specific location or all locations (as of 7/28/2023).

Tips for Tweeting:
Keep it short and simple.
Use links appropriately. Link to department pages when appropriate.
Never include sensitive information in a tweet.
11 :: The Loop User Guide
Content
On the Loop, content is defined as the information that is on your departmental page and any subpages under your departmental page.
To update the content, you will need Admin rights and will have to login to the Admin Tool on the homepage, (as of 7/28/2023 you must use an Excela Health login/password – which can be issued through IT. Future updates will allow users to use your Independence Health System credentials).
As of 7/28/2023:
Upon launching the Loop, all content will be locked. Content administrators for each page are being identified and the IT department will be reaching out to users to conduct Admin training over the next few months. We appreciate your patience as we work to train users and get the content updated.
*For Content Admins Only.
Then login to the Content Editor to get started:

(as of 7/28/2023 you must use an Excela Health login/password – which can be issued through IT. Future updates will allow users to use your Independence Health System credentials)
Select “Content”
12 :: The Loop User Guide
You will only see the content for Departmental Pages that you have access to edit:

To Edit your main department homepage or a subpage, choose the edit page button within the area needed.
This will open the live editor to create/edit your main department page or subpages. You can alter text, add images/links and format the page.

13 :: The Loop User Guide
First you can edit your Title Page if needed, then make sure to “Save Page Title Changes”

Next you can Add Meta Tags if needed. Meta Tags are keywords or phrases to help the search engines locate the page needed if you cannot locate it when editing.
Then you can create/edit the actual content that is displayed on your page:
Information should be simply displayed. Avoid using multiple fonts, colors, etc.
When you are finished creating/editing, make certain to save your content changes.
Make sure to go in and view your page to ensure that it looks the way you intended.
14 :: The Loop User Guide
Creating a New Page under your Departmental Page (A Departmental SubPage)

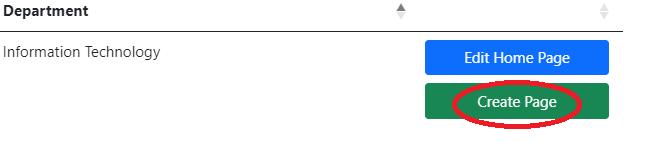
Select “Create Page”
Name your page and hit “Create”
You will see your new page listed within the Editor, you can then “Edit Page” to finish creating the new page you just made.
At last but not least… make sure to click “Publish” to publish your page.
15 :: The Loop User Guide