Box 1.1 Recovery room step down
Stage 1 recovery
Patients who need Stage 1 recovery are those who are physiologically unstable, or who potentially may become so.
Patients in Stage 1 recovery must be attended by specialist staff proficient at advanced cardiac life support. (Advanced cardiac life support includes all the other skills, procedures and equipment needed to deal instantly with a deteriorating cardiorespiratory status, or arrest and include defibrillation.) Resuscitation equipment must be instantly available.
If you have any doubt about a patient’s status then they should remain in Stage 1 recovery. Patients in Stage 1 recovery include those who are comatose; or require airway support, or continued frequent monitoring of their respiratory, cardiovascular, neurological or muscular function; or evaluation of their mental status; or assessment or management of core temperature, pain, nausea and vomiting, surgical drainage, blood loss or urine output. Patients transferred to the intensive care unit (ICU) remain in Extended Stage 1 recovery.
Whether a patient is likely to become physiologically unstable cannot be quantified, but experienced staff readily recognize those patients at risk.
While there is risk of harm the patient remains in Stage 1 recovery.
Stage 2 recovery
At this stage the patients are conscious and fully able to care for their own airways. They are within the physiological limits defined by their preoperative evaluation. These patients must be attended by staff who are proficient at basic life support (this includes the basic ABC of resuscitation: maintenance of a clear airway, support of breathing and external cardiac massage). At this stage patients are fit to return to the ward, which by definition is Extended Stage 2 recovery and remains so for the whole period the patient is in the hospital. For day case procedures it refers to those who are waiting in a supervised area for discharge.
Stage 3 recovery
Following day procedures patients can be discharged into the care of a competent and informed adult who can intervene should untoward events occur. The carer may have no skills in life support, but must be capable of recognizing problems and know what to do about them. Stage 3 recovery also applies to patients who are discharged home from the ward, even after days or weeks in the hospital. Patients remain in Stage 3 recovery until they have completely recovered from their operation, and no longer need hospital care in any form (even as an outpatient).
How to transport the patient to the recovery room
You need at least three people to gently move the patient from the operating table on to a specially designed recovery room trolley. Staff need to adapt their techniques if the hospital has a no-lift policy. It is the anaesthetist’s responsibility to look after the patient’s head, neck and airway.
The trolleys must be capable of being tilted head up or down by at least 15°, carry facilities to give oxygen and apply suction and a pole to hang drains and intravenous fluids. As you move the patient take care not to dislodge catheters, drains and lines.
Position children on their sides with their operation site uppermost. Put the trolley sides up. Adults can be sitting up. Wheel patients feet first to the recovery room. The anaesthetist walks forward (never backward) maintaining the patient’s airway. Put the trolley’s sucker under the patient’s pillow ready to use immediately if needed.
How to admit the patient to the recovery room
First check the patient is stable
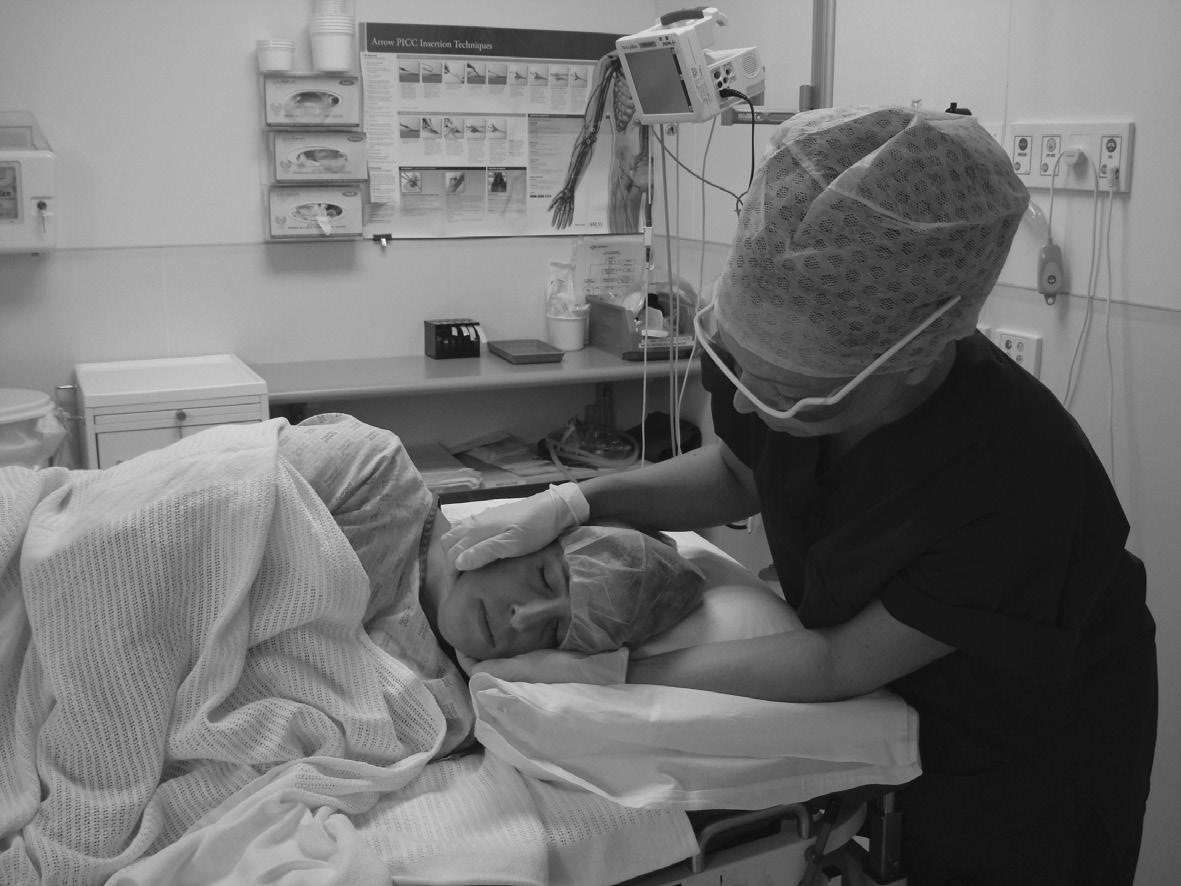
The instant a patient is admitted to the recovery room, check that they are lying in an appropriate position (Figure 1.1). Check they are breathing quietly, put on an appropriate oxygen mask, check their pulse and blood pressure: only receive the handover when you are satisfied the patient’s condition is stable. There are two handovers: the nurse’s and the anaesthetist’s.
Aerial view
Side view 45 degrees
Figure 1.1 an appropriate position.
The nurse’s handover
The nurse’s handover includes:
◆ surgeon’s and anaesthetist’s name;
◆ checking the patient’s name against their medical records, and identity bracelet;
◆ care and placement of surgical drains;
◆ problems with skin pressure areas;
◆ relevant surgical detail, e.g. check flaps for blood supply and take care not to give too much fluid to patients with bowel anastomoses;
◆ organizing the patient’s records;
◆ ensuring the correct charts and X-rays accompany the patient;
◆ care of the patient’s personal belongings such as dentures and hearing aids.
The anaesthetist’s handover
The anaesthetist’s handover includes the:
◆ patient’s name and age;
◆ indications for surgery;
◆ the type of operation;
◆ type of anaesthetic;
◆ relevant medical problems;
◆ conscious state;
◆ blood pressure during surgery;
Additionally the anaesthetist reports:
◆ untoward events occurring before and during surgery;
◆ analgesia given and anticipated needs;
◆ vascular monitoring lines;
◆ blood loss, and details of what intravenous fluids to give next;
◆ urine output during the procedure;
◆ drain tubes;
◆ patient’s psychological state;
◆ additional monitoring if required in recovery room;
◆ how much oxygen, and how to give it;
◆ orders for any further investigations;
◆ and provides a recovery room discharge plan.
Before the anaesthetist leaves the recovery room the patient must be breathing, have good oxygen saturation, a stable blood pressure and pulse rate. Anaesthetists should tell the
nursing staff where to find them if necessary, and they must remain close by while the patient is in the recovery room.
Maintain the patient’s airway during the handover.
Initial assessment
Immediate steps
Once the patient is transported to the recovery room, immediately apply an appropriate oxygen mask. First note the patient’s conscious state. Then have an assistant attach the monitoring devices while you gain control by doing things in the following order of priority: A, B, C, D and E.
A Airway
B Breathing
C Circulation
D Drips, drains and drugs
E Extras
A = Airway
◆ Make sure patients have a clear airway, are breathing and air is moving freely and quietly in and out of their chest (Figure 1.2). Briefly, put one hand over their mouth to feel the airflow and the other hand on their chest to feel it rise and fall in synchrony.
Figure 1.2 attention to the patient’s airway.
◆ Begin administering oxygen with a face mask at a flow rate of 6 L/min.
◆ Attach a pulse oximeter to obtain a baseline reading.
◆ If necessary gently suck out the patient’s mouth and pharynx. Be gentle otherwise you may provoke laryngospasm
◆ If the patient is still unconscious make sure an airway is properly located between the teeth and tongue, and the lips are not in danger of being bitten.
◆ If the patient has clamped his teeth shut and you are unable to insert an airway into the mouth, then gently slide a lubricated nasopharyngeal airway along the floor of the nose.
Hint
Tidal air exchange is best felt in the palm of your hand as you support the chin; now you can feel every breath taken. Do not remove the oxygen mask for more than a few breaths.
B = Breathing
◆ Check the chest is moving, and you can feel air flowing in and out of the mouth.
◆ Count the respirations for one full minute.
◆ Just because patients fog up their face masks, does not mean that they are moving adequate amounts of tidal air.
◆ Listen for abnormal noises as the patient breathes: wheezes, rattles, gurgles or snoring or crowing noises called stridor.
◆ Look at the strap muscles in the patient’s neck; they should not tense with breathing. If they are contracting it suggests the patient is working hard to breathe. Check that the airway is not obstructed, and the patient is not wheezing. Airway obstruction is dangerous: notify the anaesthetist immediately.
◆ Look for signs of cyanosis. Cyanosis is a bluish tinge of the lips or tongue. It is a sign of severe hypoxaemia. If you are uncertain whether the patient is cyanosed then squeeze the tip of the patient’s finger to engorge it with blood, and compare it with the colour of your own finger tip.
◆ Note in the patient’s record the reading on the pulse oximeter. If the reading is less than 95%, change the oxygen mask to a rebreathing mask this will give a higher percentage of oxygen delivered than a Hudson mask.
◆ If the oxygen saturation does not improve rapidly then search for a reason. Seek help immediately if it is less than 90%.
◆ Chest movement does not always mean that breathing is adequate.
C = Circulation
◆ Once you are sure your patient is breathing properly and well oxygenated, measure the blood pressure, pulse rate and rhythm and record them in the chart.
◆ Record the patient’s perfusion status in the notes.
◆ Check the patient is not bleeding into drains or dressings, or elsewhere. Look under the sheets.
D = Drugs, drips, drains and dressings
◆ Note the drugs given in theatre, particularly opioids that may depress the patient’s breathing.
◆ Check whether the patient has any drug allergies or sensitivities.
◆ Note the intravenous fluids in progress, how much fluid, and what types have been given during the operation. Make sure the drip is running freely and is not sited across a joint (where it may be obstructed) or in the back of the hand (where it can be dislodged). Replace any pieces of sticky tape encircling the arm because they will cause distal ischaemia if the arm swells for any reason such as the drip fluid running into the tissues. If the cannula is sited across a joint, splint it until it is re-sited in a safer place away from the joint.
◆ Check the patency of drains and tubing; how much, how fast and what is draining out of them. Make sure the urinary catheter is not blocked, urine is dripping freely, and note the volume of the collecting bag’s contents.
◆ Check vacuum suction devices are functioning properly.
◆ Check wound dressings and make sure blood or ooze is not seeping through them.
E = Extras
◆ Measure the patient’s temperature. This is essential for babies and patients who have had major surgery.
◆ Measure the blood glucose of diabetic patients with a finger prick.
◆ If the patient has a limb in plaster, check the perfusion of the fingers or toes. Gently squeeze blood out of the tip of a finger or toe. It will turn white. If it does not turn pink again within 3 seconds of releasing the pressure then the limb is ischaemic; notify the surgeons. If the fingers or toes are congested and blue, this indicates venous obstruction; notify the surgeons immediately.
◆ Check peripheral pulses following vascular surgery.
◆ Check the circulation to graft sites.
Perfusion status
As the heart pumps blood to the tissues it must do so at sufficient pressure to ensure perfusion. There are two parameters involved: cardiac output and blood pressure. We do not routinely measure cardiac output in non-cardiac surgery, but we can estimate whether it is adequate from monitoring other variables such as blood pressure, peripheral perfusion, urine output, pulse oximetry and where necessary, acid base status and central venous pressures.
Measuring perfusion status
Poor peripheral perfusion is sometimes called peripheral shutdown, because circulation to the hands and feet is almost absent, the patients’ hands are blue or even white and cold, and their radial pulse may be feeble or absent. Perfusion status is graded according to Table 1.1.
Table 1.1 Perfusion status
Observation Adequate Poor No perfusion
Conscious state alert, oriented in time and place obtunded, confused, anxious or agitated unconscious
skin Warm, pink, dry Cool, pale, clammy, sweating Cool/cold, pale ± sweating
Pulse 60–100/minute either < 60/minute or > 100/minute absent or feeble pulse
Blood pressure > 100 mmHg < 100 mmHg unrecordable
Other signs of poor perfusion include:
◆ poor capillary return in fingernail beds;
◆ peripheral or central cyanosis;
◆ ischaemic changes on the electrocardiogram (ECG).
A useful way of testing perfusion is to press firmly for a moment on a patient’s fingernail. When you let go the blood should blush back within a second or so. If the capillary return time (CRT) takes more than 3 seconds, your patient has poor peripheral perfusion. During longer operations patients often cool down. This causes their skin perfusion to slow, so that when they first come to the recovery room their perfusion status is not a reliable indicator of how well their cardiopulmonary unit is functioning. In this case look at the perfusion inside their lips, rather than their fingertips. Even cold patients should not have central cyanosis, or a tachycardia.
Observations
There are no agreed criteria on how often to take patients’ vital signs in the recovery room because it depends on the patient’s clinical state. As a guide, if patients are stable, record their vital signs every 5 minutes for the first 15 minutes after their admission, and then every 10–15 minutes during their stay. If patients’ vital signs are unstable then measure them at least every 5 minutes.
Recovery room records
The recovery room records are a direct continuation of the anaesthetic record. Keep them on the same chart.
Good records are eloquent evidence of your competence.
Medical and legal responsibilities
Scrupulous and detailed records are your only medical and legal defence if problems should occur. If you do not write it down then it did not happen—it is a case of no record, then no defence. Remember that you may be called to a courtroom to account for an adverse event many years hence. Record only what you see and hear, and do not pass opinion unless it is directly applicable to the situation. ‘The patient appears to me to be irrational’ is an acceptable comment, but ‘the patient is irrational’ is passing a judgement you may not be able to substantiate years later.
Keep it legible, keep it relevant, and keep it factual. Only use abbreviations approved by your hospital and sign off on each entry.
The minimum information to document
Document your evaluation of the patient on their admission to the recovery room.
◆ Record the time the patient comes to the recovery room.
◆ Vital signs and levels of consciousness at specified times and intervals.
◆ All drugs given, including the dose and route.
◆ Amounts and types of intravenous fluids given.
◆ An ECG rhythm strip if one was taken.
◆ All unusual or untoward events.
◆ Certify the vital signs are stable.
◆ The patient can sustain the 5-second head lift test.
◆ Details about planned follow-up of the patient.
◆ Sign and date your entry.
Records and quality control
If you enter the recovery room scoring system on a standard spreadsheet computer program you can collect data and analyse it later. Use this data to identify potential problems, provide objective evidence about workloads, and help deploy staff effectively. Good data collection is an essential part of risk assessment and quality control.
Emergence from anaesthesia
Anaesthesia consists of three elements: coma, muscle relaxation, and abolition of unwanted reflexes.
Coma
The principal component of a general anaesthetic is a drug-induced and maintained coma. A useful definition of coma is a state of consciousness where the eyes are closed, and the patient does not respond to verbal or tactile stimuli. Practically, this means if the patient does not open their eyes when you gently shake them by the shoulder, and call their name, then they are by definition comatose.