Chapter 10: Putting It All Together: General Examination Strategies
On-Site Examination
Acute Examination
Clinical Examination
Summary
Part II: Region-Specific Examination Strategies
Chapter 11: Cervical and Upper Thoracic Spine
Functional Anatomy
Regional Examination
Injury Recognition and Special Tests
Injury Examination Strategies
Summary
Chapter 12: Shoulder and Arm
Functional Anatomy
Regional Examination
Injury Recognition and Special Tests
Injury Examination Strategies
Summary
Chapter 13: Elbow and Forearm
Functional Anatomy
Regional Examination
Injury Recognition and Special Tests
Injury Examination Strategies
Summary
Chapter 14: Wrist and Hand
Functional Anatomy
Regional Examination
Injury Recognition and Special Tests
Injury Examination Strategies
Summary
Chapter 15: Lower Thoracic and Lumbar Spine
Functional Anatomy
Regional Examination
Injury Recognition and Special Tests
Injury Examination Strategies
Summary
Chapter 16: Leg, Ankle, and Foot
Functional Anatomy
Regional Examination
Injury Recognition and Special Tests
Injury Examination Strategies
Summary
Chapter 17: Knee and Thigh
Functional Anatomy
Regional Examination
Injury Recognition and Special Tests
Injury Examination Strategies
Summary
Chapter 18: Hip, Pelvis, and Groin
Functional Anatomy
Regional Examination
Injury Recognition and Special Tests
Injury Examination Strategies
Summary
Chapter 19: Head and Face
Functional Anatomy
Regional Examination
Injury Recognition and Special Tests
Injury Examination Strategies
Summary
Chapter 20: Thorax and Abdomen
Functional Anatomy
Regional Examination
Injury Recognition and Special Tests
Injury Examination Strategies
Summary
Glossary
References
About the Authors
Preface
The fourth edition of Examination of Musculoskeletal Injuries addresses several areas of clinical practice that you must master to pass the Board of Certification (BOC) examination, including pathology of injury and illnesses, examination and assessment, and general medical conditions and disabilities.
As a certified athletic trainer, your ability to recognize and examine musculoskeletal injuries will prove essential to managing the broad spectrum of injuries you will encounter. These injuries will range from acute to chronic, obvious to subtle, and minor to life threatening. The injury examination includes obtaining an accurate injury history, inspecting the injured area and related structures, testing active and passive motion, conducting strength and neurological examinations, palpating bony landmarks and soft tissues, and examining function to determine an athlete’s readiness to return to unrestricted physical activity. In addition, you will use special tests to isolate relevant structures and identify specific pathologies, including ligament stress testing and fracture examination. The order in which and the extent to which you address these components of examination will be determined in part by the injury acuity, the injury setting, and your initial history and observation. Examination of Musculoskeletal Injuries is unique in its presentation of injury examination strategies, dividing them into on-site, acute, and clinical protocols. These protocols allow you to focus your evaluation skills on emergent, nonemergent, and postacute conditions. Checklists provide a framework for developing a systematic approach to injury examination in each setting.
Examination of Musculoskeletal Injuries, Fourth Edition, is divided into two parts. Part I is geared to entry-level students and presents the general principles and foundational skills for each component of the injury examination. Chapters 1 and 2 review injury terminology and classifications and present an overview of the general concepts and rationale for each of the components of the examination procedure. Chapters 3 through 9 delve into the specifics of each of these components (history, observation, palpation, range of motion examination, strength examination, neurological
examination, and cardiorespiratory examination), presenting the goals, purposes, and general principles and techniques you will need to perform the region-specific tests presented in part II. Because special tests are unique to each joint and typically incorporate the principles of several examination techniques, they are addressed in part II as they apply to injuries in specific body regions. Chapter 10 concludes part I by incorporating these individual examination components into systematic examination strategies tailored to the injury acuity and environment.
Part II of Examination of Musculoskeletal Injuries applies the general principles presented in part I to the recognition and examination of injuries and conditions specific to each body region. Chapters 11 through 20 address each body region and consist of four primary sections. Each chapter opens with a section on functional anatomy that provides an overview of the primary anatomical characteristics of the region. This is followed by a section on region-specific examination, including the palpation of regional structures, the examination of joint motion (both physiologic and accessory), the examination of strength, and the examination of neurovascular status, and where appropriate the examination of cardiorespiratory status. Acute and chronic injuries specific to the region are then discussed, with a focus on the etiology, signs and symptoms, and special tests that will help you recognize and differentiate injuries commonly incurred during physical activity. Each chapter in part II concludes by incorporating the examination components into specific injury examination strategies for injuries evaluated on-site, immediately after the injury has occurred (acute examination), and at a later time in the treatment facility (clinical examination). One or two scenarios precede the discussion of each examination strategy to orient you to the types of situations you can expect to encounter.
Each chapter of the fourth edition of Examination of Musculoskeletal Injuries will optimize your understanding and mastery of the material. All chapters open with objectives that highlight key learning points followed by an openended real-life scenario that illustrates the complexity and exciting challenge of athletic injury examination. Each chapter closes with a summary; key concepts that show how the chapter met the chapter objectives; and a list of review questions, critical thinking questions, and laboratory activities to ensure your mastery and application of the material. Throughout each
chapter, you will find several learning aids: key terms are boldfaced in blue and their definitions are provided in the glossary; test titles are boldfaced in orange; and warnings marked by exclamation points alert you to procedures you should not omit because they may make the difference between complete recovery and permanent disability or even death.
New for the Fourth Edition
Updates in content have been made throughout the text based on the fifth edition of Athletic Training Educational Competencies. Part II (chapters 1120) has been substantially revised and reorganized to enhance comprehension and the presentation of the material. The functional anatomy sections include images and medical artwork to enhance the presentation of relevant structures and set the stage for the region-specific examination that follows. Following the presentation of anatomy, the middle of each chapter has been reorganized to present the region-specific examination first, followed by an integrated discussion of the recognition of injury pathologies including the associated signs and symptoms and special tests to identify each one. All special tests are presented with a video or photo showing the examiner performing the test and a description of the purpose, patient and clinician positions, the action to be performed, positive results, and the sensitivity and specificity of the test (based on available research). We are particularly pleased to include in this edition 51 video clips that provide more detailed demonstrations of test performance. Photos and figures have also been added or updated throughout the text, and we are pleased to once again make available to instructors the videos, photos, figures, and tables from the text through the ancillary website. Finally, this edition does not include a presentation of general medical conditions (part III of previous editions), because that topic is now well covered in other stand-alone texts.
Instructor and Professional Resources
Additional resources for instructors and professionals continue to be available at www.HumanKinetics.com/ExaminationOfMusculoskeletalInjuries. An updated instructor guide, test package, and image bank are available. The
instructor guide includes learning objectives, chapters at a glance, suggested lecture outlines, and suggested classroom and student activities to assist with lecture and exam preparation. It also provides sample answers for the book’s critical thinking questions. The test package contains more than 460 questions, including true-or-false, fill-in-the-blank, short-answer, and multiple-choice. The image bank includes most of the art, tables, and content photos. A blank PowerPoint template is also provided to help instructors build their own lecture content tailored to their individual styles.
Student Resources
Many of the special features in the text are provided in an easily reproducible format that students can print to use as study guides during laboratory and review sessions. These resources encompass examination checklists and tables detailing range of motion, strength, and neurological examinations. These reproducible elements, which can be accessed at the Student Resources section of www.HumanKinetics.com/ExaminationOfMusculoskeletalInjuries, are identified with this icon:
Course and clinical instructors will find these elements useful as teaching aids or as proficiency checklists for oral or practical examinations to assess students’ mastery.
We trust that you will find this new edition of Examination of Musculoskeletal Injuries an indispensable resource for developing your confidence in examining and differentiating the pathologies that you will encounter over your career as a certified athletic trainer.
Acknowledgments
We extend our thanks to Jennifer Hogg, MS, ATC for her research on the sensitivity and specificity of region special tests that have now been added to all chapters in this fourth edition. We also wish to again acknowledge Dr. Theodore E. Keats, alumni professor of radiology; the film library staff in the department of radiology; and Dr. Brian C. Hoard, associate professor of clinical dentistry, all from the University of Virginia Health Sciences, for their assistance in obtaining radiographs of skeletal pathologies, Salter-Harris illustrations, and dental injuries. This text has been greatly enhanced by the collective contributions of these outstanding individuals.
Finally, we would like to thank our publisher, Human Kinetics, as well as acquisitions editor Joshua Stone, for their support and invaluable contributions to this effort.
Accessing the Web Resource
In addition to the reproducible examination checklists and forms for laboratory work and review sessions that were included with the third edition, this fourth edition now includes online streaming video, with 51 videos demonstrating key concepts from the book and evaluation techniques for various musculoskeletal disorders. You can access the web resource by visiting www.HumanKinetics.com/ExaminationOfMusculoskeletalInjuries.
If you purchased a new print book, follow the instructions on the orangeframed page at the front of your book. That page includes access steps and the unique key code that you’ll need the first time you visit the Examination of Musculoskeletal Injuries website. If you purchased an e-book from www.HumanKinetics.com, follow the access instructions that were e-mailed to you after your purchase. If you have purchased a used book, you can purchase access to the web resource separately by following the links at www.HumanKinetics.com/ExaminationOfMusculoskeletalInjuries.
Checklists, Forms, and Tables
To download and print out the examination checklists, forms, and tables, select Web Resource in the ancillary items box in the upper left corner of the screen. You’ll see a Web Resources page with description about the handouts. At the bottom of the screen, select the link to open a handout. Here are the checklists, forms, and tables that are available in PDF format:
Examination Checklists and Forms
Form 2.1: SOAP Notes Form
Checklist 3.1: General Questions for Acute Injuries
Checklist 3.2: General Questions for Nonacute Injuries
Checklist 3.3: General Questions for Chronic Injuries
Checklist 4.1: Summary Observation Checklist
Checklist 4.2: Anterior, Lateral, and Posterior Posture Examination
Checklists
Checklist 4.3: Gait Inspection Checklist
Checklist 6.1: Range of Motion Measurement Technique
Checklist 6.3: Ligament and Capsule Stress Test Technique
Checklist 10.1: Checklist for the Examination of an Unconscious Athlete
Checklist 10.2: General Checklist for On-Site Examination
Checklist 10.3: General Checklist for Acute Examination
Checklist 10.4: General Checklist for Clinical Examination
Checklist 11.1: Checklist for On-Site Examination of Cervical and Upper Thoracic Spine
Checklist 11.2: Checklist for Acute Examination of Cervical and Upper Thoracic Spine
Checklist 11.3: Checklist for Clinical Examination of Cervical and Upper Thoracic Spine
Checklist 12.1: Checklist for On-Site Examination of the Shoulder and Arm
Checklist 12.2: Checklist for Acute Examination of the Shoulder and Arm
Checklist 12.3: Checklist for Clinical Examination of the Shoulder and Arm
Checklist 13.1: Checklist for On-Site Examination of the Elbow and Forearm
Checklist 13.2: Checklist for Acute Examination of the Elbow and Forearm
Checklist 13.3: Checklist for Clinical Examination of the Elbow and Forearm
Checklist 14.1: Checklist for On-Site Examination of the Wrist and Hand
Checklist 14.2: Checklist for Acute Examination of the Wrist and Hand
Checklist 14.3: Checklist for Clinical Examination of the Wrist and Hand
Checklist 15.1: Checklist for On-Site Examination of the Lumbar and Thoracic Spine
Checklist 15.2: Checklist for Acute Examination of the Lumbar and Thoracic Spine
Checklist 15.3: Checklist for Clinical Examination of the Lumbar and Thoracic Spine
Checklist 16.1: Checklist for On-Site Examination of the Leg, Ankle, and Foot
Checklist 16.2: Checklist for Acute Examination of the Leg, Ankle, and Foot
Checklist 16.3: Checklist for Clinical Examination of the Leg, Ankle, and Foot
Checklist 17.1: Checklist for On-Site Examination of the Knee and Thigh
Checklist 17.2: Checklist for Acute Examination of the Knee and Thigh
Checklist 17.3: Checklist for Clinical Examination of the Knee and Thigh
Checklist 18.1: Checklist for On-Site Examination of the Hip, Pelvis, and Groin
Checklist 18.2: Checklist for Acute Examination of the Hip, Pelvis, and Groin
Checklist 18.3: Checklist for Clinical Examination of the Hip, Pelvis, and Groin
Checklist 19.1: Checklist for On-Site Examination of Head Injury
Checklist 19.2: Checklist for Acute Examination of Head Injury
Checklist 19.3: Checklist for Examination of Facial Injuries
Checklist 20.1: Checklist for On-Site Examination of the Thorax and Abdomen
Checklist 20.2: Checklist for Clinical Examination of the Thorax and Abdomen
Range of Motion Examination Tables
Table 6.1: Ranges of Joint Motion
Table 11.1: Tape Measure Examination of Cervical ROM
Table 12.1: Goniometric Examination of Shoulder and Scapular Motions
Table 13.1: Goniometric Examination of Elbow ROM
Table 14.1: Goniometric Examination of Wrist and Hand Motions
Table 15.1: Tape Measure Examination of Thoracolumbar (TL) and Lumbar (L) ROM
Table 16.1: Goniometric Examination of Ankle and Foot ROM
Table 17.1: Goniometric Examination of Knee ROM
Table 18.1: Goniometric Examination for Hip Motions
Strength Examination Tables
Table 11.2: Manual Strength Tests for Cervical Motions
Table 12.2: Manual Muscle Tests for Glenohumeral Motion
Table 12.3: Manual Muscle Tests for Scapular Motion
Table 13.2: Manual Muscle Tests for Muscles Acting on the Elbow
Table 14.2: Manual Muscle Tests for the Wrist and Hand
Table 15.2: Manual Muscle Tests for the Thoracolumbar Spine
Table 16.2: Manual Muscle Testing for the Leg, Ankle, and Foot Musculature
Table 17.2: Manual Muscle Testing for the Knee
Table 18.2: Manual Muscle Testing for the Hip Musculature
Neurological Examination Checklists and Tables
Checklist 8.1: Checklist for Upper-Quarter Neurological Screen
Checklist 8.2: Checklist for Neurological Examination of the Lumbar and Sacral Plexuses
Table 8.1: Nerves of the Cervical, Brachial, Lumbar, and Sacral Plexus
Table 8.4: Deep Tendon, Superficial, and Pathological Reflexes
Table 8.5: Sensory, Motor, and Reflex Distributions for the Cervical Plexus
Table 8.6: Sensory, Motor, and Reflex Distributions for the Brachial Plexus
Table 8.7: Sensory, Motor, and Reflex Distributions for the Lumbar and Sacral Plexuses
Table 11.3: Dermatome, Myotome, and Reflex Testing for the Upper and Lower Cervical Spine
Table 20.1: Thoracic Spinal Segment Innervations for the Trunk Musculature
Miscellaneous Tables
Table 1.1: Chart of Anatomical Terms
Table 1.2: Common Chronic Inflammatory Conditions
Table 1.3: Classifications of Closed Fractures
Table 1.4: Salter-Harris Classifications of Epiphyseal Fractures
Table 1.5: Classifications of Open (Exposed) Wounds
Table 2.1: Interpretation of Likelihood Ratios
Table 2.3: Accepted Abbreviations and Symbols
Table 5.1: Palpable Bony Structures
Table 6.2: Normal End Feels
Table 6.4: Joint Resting Positions
Table 7.1: Grading Criteria for Gravity-Resisted Muscle Strength
Table 9.2: Stages of Hemorrhage
Online Video
To view the video clips, select Online Video in the ancillary items box in the upper left corner of the screen. You’ll then see an Online Video page with description about the video. At the bottom of the screen, select the link to open the online video. You will now be taken to a web page with buttons for the chapters that feature video. Select the button for the chapter you want. Once you select a chapter button, you’ll see a video player. The video numbers along the right side of the player correspond with video number cross-references in the book, and the title under the player corresponds with the assessment title in the book. Scroll through the list of clips until you find the video you want to watch. Select that clip and the full video will play.
Here are the items available in video:
Video 4.1 Examining gait
Video 5.1 Palpating still and moving structures
Video 5.2 Palpation of superficial and deep fascia
Video 6.1 Arthrokinematics of roll, glide, spin
Video 6.2 Range of motion measurement
Video 6.3 Accessory motion assessment for the wrist
Video 8.1 Dermatome and myotome testing for the cervical plexus
Video 8.2 Dermatome and myotome testing for the brachial plexus
Video 8.3 Dermatome testing for the lumbosacral plexus
Video 8.4 Myotome testing for the lumbosacral plexus
Video 11.1 Passive upper-limb tension test: Median nerve
Video 11.2 Passive upper-limb tension test: Radial nerve
Video 11.3 Passive upper-limb tension test: Ulnar nerve
Video 12.1 Anterior and posterior load and shift test
Video 12.2 Apprehension test
Video 12.3 Relocation test
Video 12.4 Anterior release test
Video 12.5 External rotation lag sign
Video 12.6 Active impingement test
Video 12.7 Impingement relief test
Video 12.8 Crank test
Video 12.9 Anterior slide test
Video 12.10 Passive compression test
Video 12.11 Jerk test
Video 13.1 Valgus-varus stress test
Video 13.2 Moving valgus stress test
Video 14.1 Radial and ulnar collateral stress tests
Video 14.2 Bunnel-Littler test
Video 14.3 Retinacular test
Video 15.1 Straight-leg raise test
Video 15.2 Slump test
Video 16.1 Anterior drawer test
Video 16.2 Medial talar tilt test
Video 16.3 Lateral talar tilt and Kleiger test
Video 16.4 Modified Kleiger and squeeze tests for syndesmotic separation
Video 17.1 Lachman test and modified Lachman tests
Video 17.2 Lateral pivot shift maneuver test
Video 17.3 Side-lying Slocum test
Video 17.4 Hughston's test
Video 17.5 McMurray’s test
Video 17.6 Patellar grind test
Video 18.1 Ober's test
Video 18.2 Gaenslen's test
Video 18.3 Flexion, Adduction, and Internal Rotation (FADDIR) test
Video 18.4 Hip scouring test
Video 18.5 Femoral nerve traction test
Video 19.1 Using an ophthalmoscope
Video 19.2 Using an otoscope
Video 19.3 Balance Error Scoring System (BESS) test
Video 20.1 Palpation of the liver, right kidney, and spleen
Video 20.2 Lateral rib and anteroposterior rib compression tests
Part I
Principles of Examination
An examination is a systematic procedure through which the athletic trainer determines the severity, irritability, nature, and stage of an injury. Part I of this text presents the principles of athletic injury examination, including the nine primary components of injury examination:
History
Observation
Palpation
Range of motion
Strength
Special tests
Neurological status
Circulatory status
Functional capacity
The extent to which you will use each of these examination techniques and the order that you follow will depend on the specific injury scenario.
Chapter 1 helps you learn the basic injury terminology and classification criteria that are used throughout the text. Chapter 2 introduces the examination process by providing an overview of the goals and essential components of the subjective and objective portions of the examination. Chapters 3 through 9 describe the general terminology, principles, and techniques of the primary examination components, with the exception of special tests and functional tests. Because functional and special tests are unique to each joint and include principles of the other examination techniques (palpation, joint motion, strength, neurological, and circulatory testing), they are addressed as they apply to specific injury pathologies in region-specific chapters 11 through 20. Chapter 10 closes part I by incorporating the individual examination components into systematic procedures tailored to injury acuity and environment.
Chapter 1 Anatomical Nomenclature and Injury Classifications
Objectives
After completing this chapter, the reader will be able to do the following:
1. Describe the anatomical reference position
2. Use appropriate anatomical terminology to describe the location and position of a structure relative to the rest of the body
3. Differentiate between a sign and a symptom
4. Classify injuries as either acute or chronic based on the onset and duration of symptoms
5. Define the common chronic inflammatory conditions, including signs and symptoms
6. Define the various classifications of closed soft tissue wounds, including degrees of severity
7. Define and classify closed and open wounds of the bone and joint articulations
8. Classify nerve injuries according to mechanism, severity, and signs and symptoms
9. Identify the classifications of open exposed wounds
Diane had just begun her clinical rotation at Blue Ridge High School. Because she had a late-afternoon class on Tuesdays and Thursdays, she was able to attend only prepractice preparation on those days. On Wednesday and Friday afternoons, she would often arrive early so that she could read through the injury records documented by her approved clinical instructor (ACI) to
learn about any new injuries sustained by athletes during practice or games on those afternoons. Reading through these evaluation notes, she appreciated the importance of using consistent terminology when documenting the injury and evaluation findings so that she had a clear picture of the type and severity of the injury and the associated signs and symptoms.
Clear communication is fundamental to your clinical practice. Proper anatomical reference and injury terminology are essential for communicating effectively with other health professionals and accurately documenting the findings of your examinations. This chapter reviews common anatomical terminology and injury classification systems that will help you both understand this text and clearly articulate the findings of your examinations. With few exceptions, these terms and systems will consistently apply to the different joints and body regions.
Anatomical Reference Terminology
The anatomical position is the standardized position of the body on which all anatomical descriptions are based. The anatomical position allows us to reference specific body regions as related to the body as a whole (Moore 2013). It also allows us to describe the relationship of one anatomical landmark to another. For example, we can clearly describe the location of the tibial tubercle by indicating that it is anterior on the proximal tibia, just inferior to the patella. Whenever you refer to a body region or anatomical structure, you will always describe it relative to an anatomical reference position. Doing so will help you avoid confusion and misinterpretation of your findings.
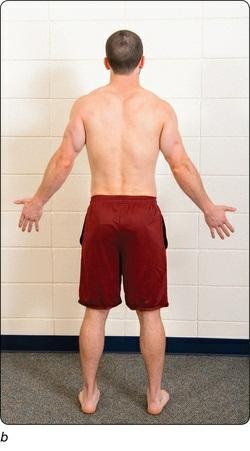
Anatomical position can be described with the body either standing erect or lying supine (lying on the back), but it is probably easiest to visualize it as standing (figure 1.1). When the body is standing or lying supine, the head, eyes, and toes point directly forward. This is an anterior (front, or forward) position. The arms are positioned at the patient’s side, with the palms facing forward, and the lower limbs are straight and together with the feet pointing anteriorly.
Figure 1.1 Anatomical position from (a) front and (b) back.
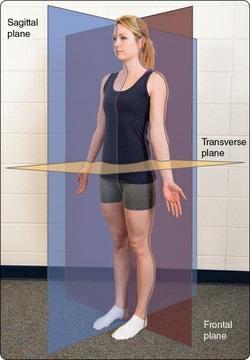
From the anatomical reference position, we can define three anatomical planes (figure 1.2). Anatomical planes are imaginary planes that separate the body into left and right (sagittal), top and bottom (transverse), and front and back (frontal). At times, the sagittal plane is referred to as the anterior–posterior plane, and the frontal plane is referred to as the coronal plane. These planes of reference are useful when describing postural positions (chapter 4) and common movement patterns (chapter 6).
Figure 1.2 Anatomical planes.
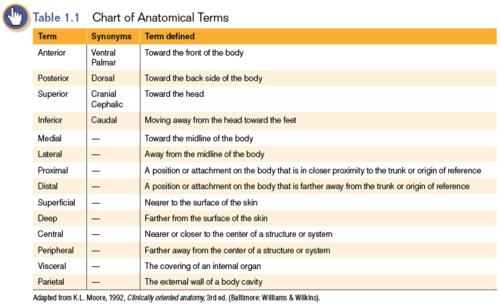
Table 1.1 lists terms that describe the position of body parts in reference to other parts of the body and the body itself in the anatomical reference position. The table also includes synonyms that are usually reserved for particular body regions. For example, anterior describes structures on or near the front of the body, while posterior describes structures on or near the back. The anterior surface of the hands is also commonly referred to as the palmar or ventral surface, while the posterior surface is also referred to as the dorsal aspect, or dorsum, of the hand.
Physical Maturity Classifications
Physical maturity classifications allow us to define stages of physical growth. This standard classification system describes normal anatomic and physiologic development from infancy to older adulthood. These classifications are particularly relevant to this text in understanding the maturity and strength of the musculoskeletal system, but they are also used for differentiating physiological findings where appropriate (e.g., normal vital signs for child versus adult in chapter 9). Physical maturity is defined by the following classifications:
Infant (0-12 months).
Childhood (1-11 years) spans infancy to the onset of puberty and is characterized by steady growth and development. The skeleton is immature with epiphyseal (growth) plates open to allow bones to elongate. The age range of 1 to 5 years is considered young childhood and 6 to 11 years, middle childhood.
Adolescence (11-13 through 18-20 years) spans the onset of puberty through full skeletal maturity. The onset of puberty is marked by the development of secondary sexual characteristics (pubic hair, menarche, and increased breast development in females; deepening voice and axillary pigmentation and facial hair in males) and peak height growth
and weight gain (growth spurt). Skeletal maturity is marked by full closure (ossification, the formation of bone) of the epiphyseal plates and cessation of further growth in height. The age at which different bones complete ossification differs widely, ranging from early teens to early 20s. Because growth and development vary among individuals, it’s difficult to name exact age limits. Adolescence begins approximately 2 years earlier in females than in males.
Adulthood (18-40 years) indicates full physical maturity and development. Young adults are those aged 18 to 40 years. In this stage, bone and muscle mass increase through 25 to 30 years of age, after which mass levels off and then slowly declines.
Middle adulthood (40-60 years) is marked by a gradual decline in strength, coordination, and balance.
Older adulthood (greater than 60 years) spans the rest of the human being’s life. This stage is marked by accelerating decline in strength, coordination, and balance. However, this decline can be highly individual depending on lifestyle, activity, nutrition, and disease.
Injury Classifications
Injuries are classified by the structure involved and the length of time experienced symptoms are present. In some cases subclassifications describe the severity of injury. This section defines the common injury classifications and subclassifications and cardinal signs and symptoms.
Sign Versus Symptom
The terms signs and symptoms are two separate injury descriptors rather than synonyms. A sign refers to a finding that is observable or that can be objectively measured, such as swelling, discoloration, deformity, crepitus, or redness. A symptom, on the other hand, denotes a subjective complaint or an abnormal sensation the patient describes that cannot be directly observed. Complaints or perceptions of pain, nausea, altered sensation, and fatigue are symptoms that patients commonly report.
Acute Versus Chronic
Injuries are classified as either acute or chronic. Acute injuries are conditions that have a sudden onset and are of short duration. They typically result from a single traumatic event or mechanism. Usually, the athlete clearly knows and recalls the mechanism of injury, as the signs and symptoms associated with the injury typically begin to surface immediately.
Chronic injuries, on the other hand, usually have a gradual onset and are of prolonged duration. Many times the exact mechanism or time of injury is not known. Chronic injury usually results from an accumulation of minor insults or repetitive stresses that would not be sufficient to cause injury if the same stress or insult were applied in an isolated event. Consequently, chronic injuries are primarily inflammatory conditions in which the demands on the tissue exceed its ability to heal and recover before additional stress is applied. Common inflammatory conditions are listed in table 1.2. Chronic injury often occurs following periods of inadequate rest or recovery, overuse of a muscle or body part, repetitive overloading of a structure, or repetitive friction between two structures. As such, these injuries may also be referred to as overuse injuries. Chronic injuries are often more difficult to treat than acute injuries, as the longer the pathologic state continues, the longer it takes for healing to occur and symptoms to subside.
Closed (Unexposed) Wounds
Closed wounds include any injury that does not disrupt the surface of the skin. Although closed wounds are not always visually obvious, most result in noticeable signs (e.g., swelling, discoloration, and deformity) that aid in injury examination. Common examples of closed wounds include contusions, ligament sprains, muscle and tendon strains, inflammatory conditions, some bony fractures, joint dislocations, and neurovascular injuries.
Closed Soft Tissue Injuries
Closed injuries to soft tissue can occur as contusions, sprains, or strains. These types of soft tissue injuries are further classified according to the degree of severity or the extent of injury.
Contusion
A contusion, or bruise, refers to the compression of soft tissue by a direct blow or impact sufficient to cause disruption or damage to the small