STRAPPING TOOL HELIOS
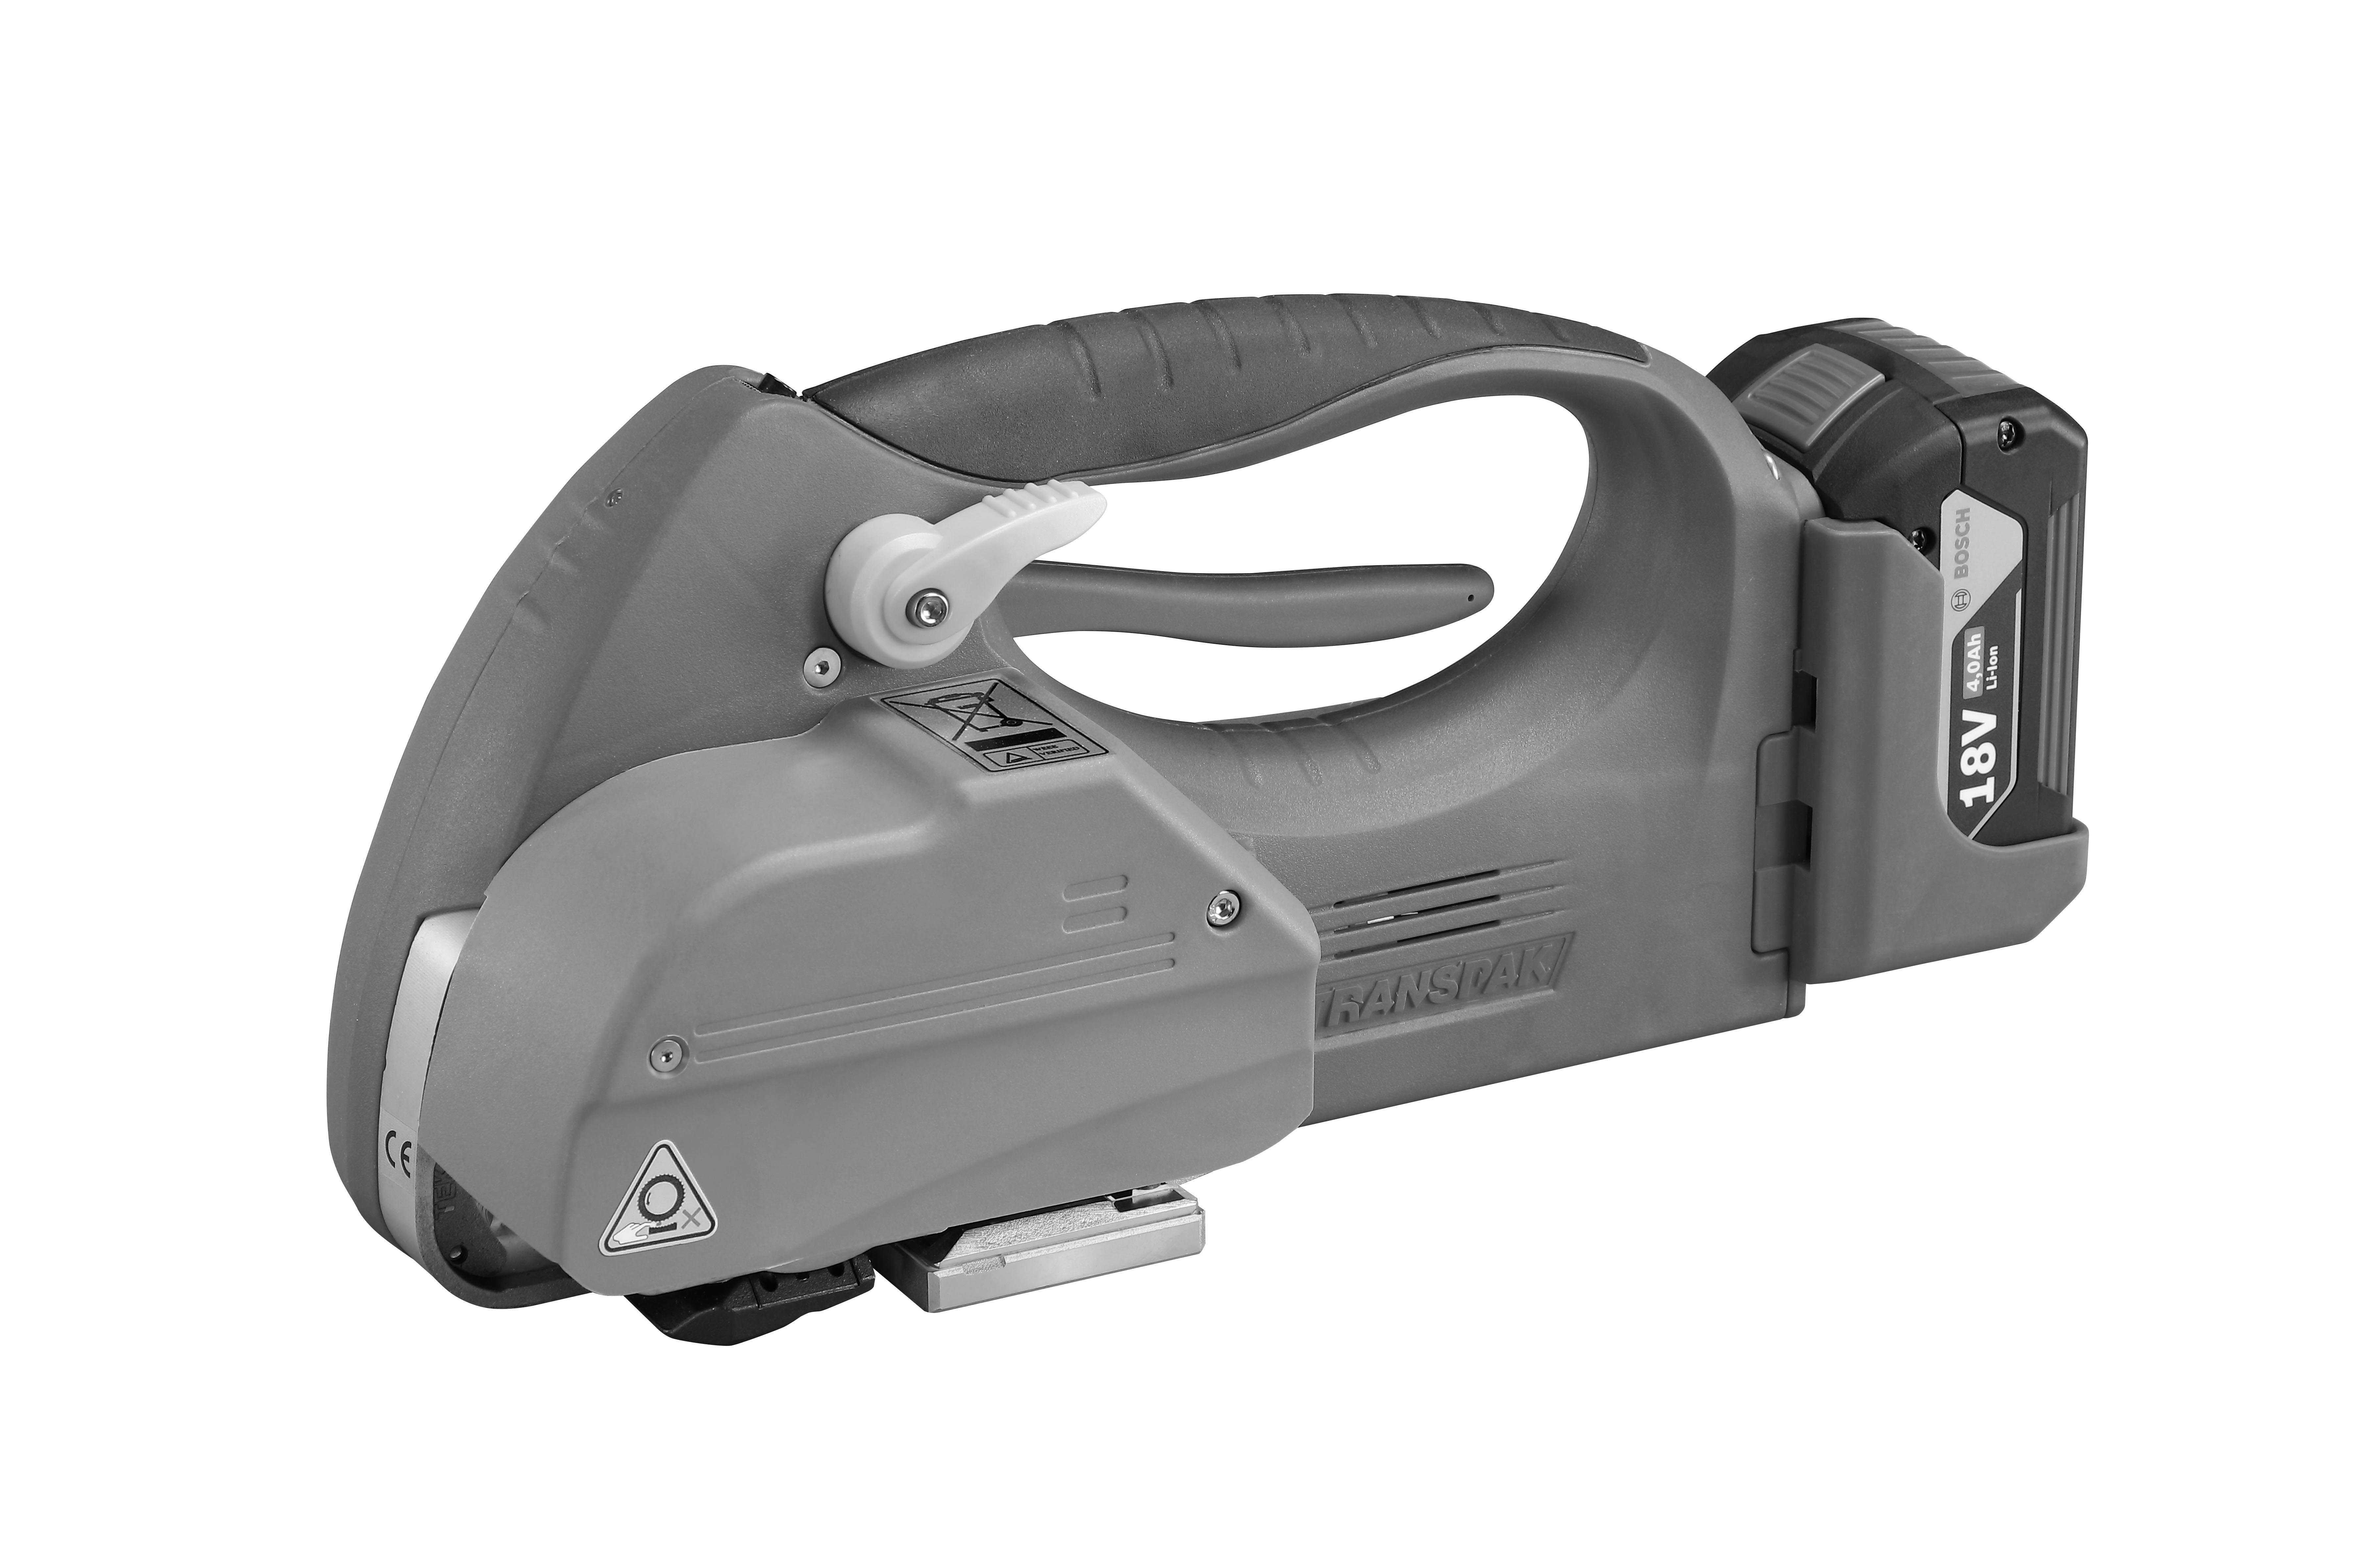

DO NOT attempt to operate the tool until you have read and understood all instructions and safety rules contained in this manual. Failure to comply may result in accidents involving fire, electric shock, or serious personal injury. Save this owner’s manual for future reference and review it frequently for safe operation.
a. Keep work area clean and well lit. Cluttered and dark areas invite accidents.
b. Do not operate Power tools in explosive atmospheres, such as in the presence of flammable liquids, gases or dust. Power tools create sparks which may ignite the dust or fumes.
c. Keep bystanders, children and visitors away while operating a tool. Distractions can cause you to lose control.
a. Charger’s plugs must match the outlet. Never modify the plug in any way. Do not use any adapter plugs with earthed (grounded) power tools. Unmodified plugs and matching outlets will reduce risk of electric shock.
b. Avoid body contact with earthed or grounded surfaces such as pipes, radiators, ranges and refrigerators. There is an increased risk of electric shock if your body is earthed or grounded.
c. Do not expose power tools to rain or wet conditions. Water entering a power tool will increase the risk of electric shock.
d. Do not abuse the cord of charger. Never use the cord for carrying, pulling or unplugging the power tool. Keep cord away from heat, oil, sharp edges or moving parts. Damaged or entangled cords increase the risk of electric shock.
e. When operating a power tool outdoors, use an extension cord suitable for outdoor use. Use of a cord suitable for outdoor use reduces the risk of electric shock.
a. Stay alert, watch what you are doing and use common sense when operating a tool. Do not use a tool while you are tired or under the influence of drugs, alcohol or medication. A moment of inattention while operating power tools may result in serious personal injury.
b. Use personal protective equipment. Always wear eye protection. Protective equipment such as dust mask, non-skid safety shoes, hard hat, or hearing protection used for appropriate conditions will reduce personal injuries.
c. Avoid accidental starting. Ensure the switch is in the off-position before insert Battery. Carrying tools with your finger with the switch on invites accidents.
d. Remove any adjusting key or wrench before operation the tool. A wrench or a key left attached to a rotating part of the tool may result in personal injury.
e. Do not overreach. Keep proper footing and balance at all times. This enables better control of the tool in unexpected situations.
f. Dress properly. Do not wear loose clothing or jewellery. Keep your hair, clothing
a. Do not use the tool if the switch does not turn it on and off. Any tool that cannot be controlled with the switch is dangerous and must be repaired.
b. Take off the battery pack from the tool before making any adjustments, changing accessories, or storing tools. Such preventive safety measures reduce the risk of starting the tool accidentally.
c. Store idle tools out of the reach of children and do not allow persons unfamiliar with the tool or these instructions to operate the tool. Tools are dangerous in the hands of untrained users.
d. Maintain tools. Check for misalignment or binding of moving parts, breakage of parts and any other condition that may affect the tool’s operation. If damaged, have the tool repaired before use. Many accidents are caused by poorly maintained tools.
e. Use the tool, accessories and tool bits etc. In accordance with these instructions, taking into account the working conditions and the work to be performed. Use of the tool for operations different from those intended could result in a hazardous situation.
a. Ensure the switch is in the off position before inserting the battery pack. Inserting the battery pack into power tools that have the switch on invites accidents.
b. Recharge only with the charger specified by the manufacturer. A charger that is suitable for one type of battery pack may create a risk of fire when used with another battery pack.
c. Use power tools only with specifically designated battery packs. Use of any other battery packs may create a risk of injury and fire.
d. When the battery pack is not in use, keep it away from other metal objects like paper clips, coins, keys, nails, screws, or other small metal objects that can make a connection from one terminal to another. Shorting the battery terminals together may cause burns or a fire.
e. Under abusive conditions, liquid may be ejected from the battery; avoid contact. If contact accidentally occurs, flush with water. If liquid contacts eyes, additionally seek medical help. Liquid ejected from the battery may cause irritation or burns.
f. Once you receive the battery powered tools, please take out the Bosch battery and charge it fully by Bosch charger to maintain its lifespan.
g. If the battery powered tools will keep in the warehouse for a while, please charge the battery (20 minutes) every 6 months.
a. Have your power tool serviced by a qualified trained person using only identical replacement parts. This will ensure that the safety of the power tool is maintained.
b. Tool service must be performed only by qualified trained personnel. Service or maintenance performed by unqualified personnel may result in a risk of injury.
c. When servicing a tool, use only identical replacement parts. Follow instructions in the Maintenance section of this manual. Use of unauthorized parts or failure to follow Maintenance Instructions may create a risk of shock or injury.
-A2and gloves away from moving parts. Loose clothes, jewellery or long hair can be caught in moving parts.
6 Battery Unit
H45-60006
3 Linkage Unit
H45-30000
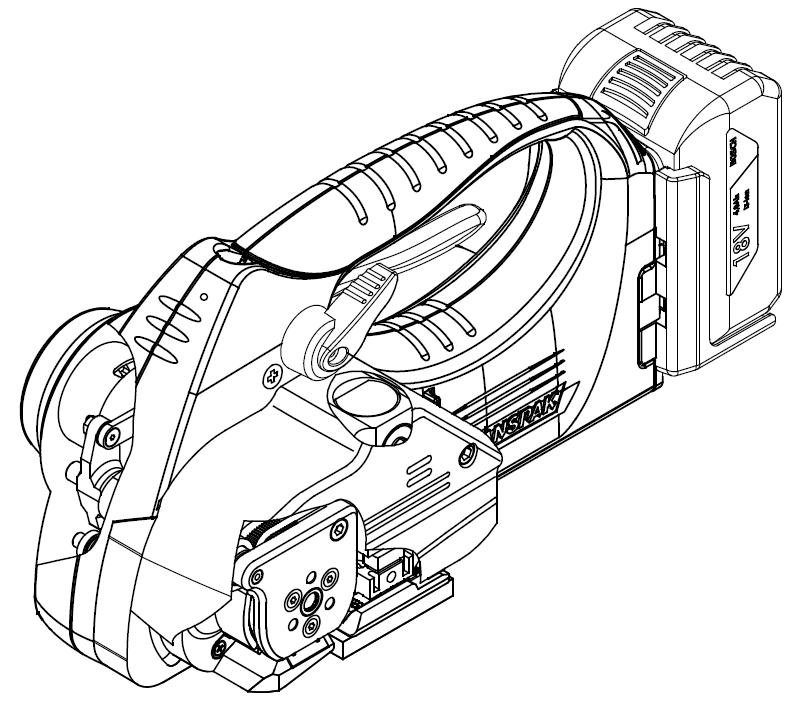
2 Gripper Unit
H45-20000
5 Body Frame Unit
H45-50000
1 Tensioning Unit
H45-10006
4 Sealing & Cutting Unit
H45-40006
Battery Type remarks BOSCH Li-Ion , 18Vdc , 4.0Ah
Charging Time
About35 minutes (after 20 minutes, approx. 70% charge capacity)
Strapping Speed 3 sec/cycle (Auto)
Strap Width 9mm, 12mm, 16mm
Strap Type PET, PP
Strap Thickness PET : 0.5mm-1.05mm PP : 0.55mm~1.05mm
Sealing Joint friction weld
Vibration 7.77m/s^2
Noise emission
sound pressure level: 83.8dB(A)
sound power level: 94.8dB(A)
Tension (max) 250 kg (551 lbs)
Dimensions (L)×(W)×(H)
350mm × 157mm × 160mm
Weight 4.4 kg (9.7 lbs)
The ambient temperature should be between -5℃ and 45℃ ( 23 ℉ and 113℉)
Working Temperature
Remarks:
The best performance is achieved between 15℃ and 20℃ (59℉ and 68℉)
If the tool will be idle for a long time, be sure to take out the battery to avoid reducing the battery's life span.
Sealing switch (Semi) Tension switch (Auto)
Inserting the Battery
Insert the battery from the top downward to the bottom into the battery slot of the tool until hear the “click” sound. (refer to Fig. a) When the LED lights on GREEN shortly, the battery is installed correctly.
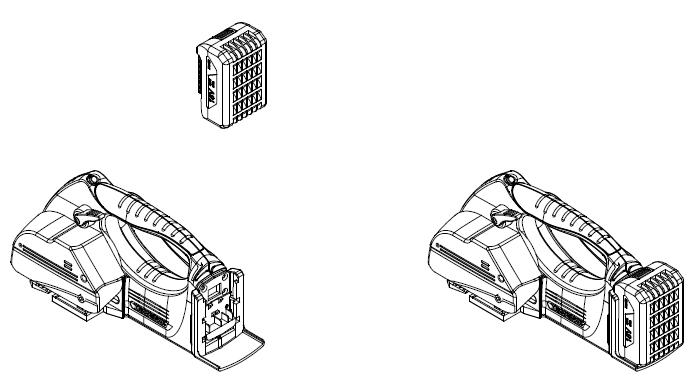
Removing the Empty Battery
If the LED lights on RED while tensioning or welding, that means the battery is exhausted. Please push the unlatching buttons (red color) on the top of the battery to take off the battery.
Warning!
The last welding on the package might not have sufficient seal efficiency and you would need to do it again after recharging the battery.
In order to assure optimal welding, the pressure of the welding gripper to the straps to be welded must be within a certain range. Depending on the thickness of the strap, this pressure is adjusted by means of the adjusting the quantity of shim(s). Please see the following chart. (Fig. a)

When adjusting the welding pressure, the shim must be inserted into "steel insert".
Disregarding this regulation will cause considerable trouble.
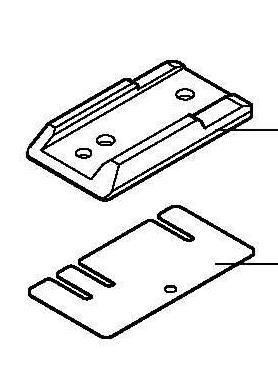
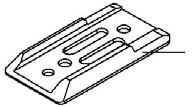
H45-40260
Steel Insert
H45-40270
Shim
smooth strap embossed strap strap thickness
for shim(s) H45-40270
for shim(s) H45-40270
0.5-0.6 mm
(0.02”-0.024)
0.7-0.8 mm
(0.028”-0.032”)
0.9-1.05 mm
(0.035”-0.041)
(a) Preselecting of Strap Tension and Tensioning Speed Do not adjust the tensioning force too high. If the tensioning force is higher than the strength of the strap, the strap will tear while tensioning. Tensioning force can be preselected with the left adjusting knob. Turning it clockwise increases the tensioning force, while turning it counterclockwise decreases the tensioning force.
Adjusting knob for tensioning force
Adjusting knob for sealing time
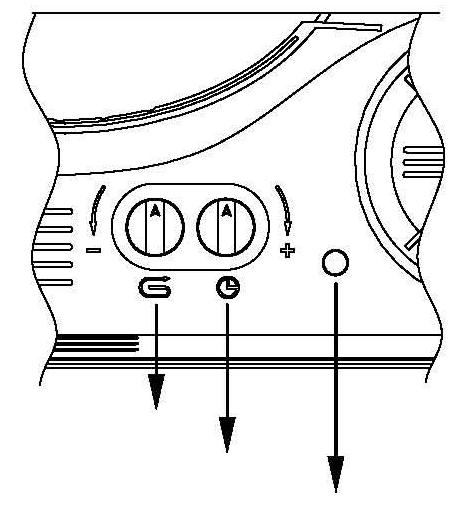
Protection cover
When P.P. straps or straps with thinner thickness around 0.55mm to 0.7mm are still being damaged by H45-10090 (tension wheel) during strapping while the tension is at the lowest level (make a counterclockwise turn on the tension knob to the end), simply use an allen key wrench to make a counterclockwise turn on the trimmer of P.C. Board. You need to take off the protection cover first and you will then see the VR underneath the protection cover. After making all the adjustments, tension will become lower. When the tension becomes as low as you desired, just put the protection cover back. On the other hand, if tension is not enough while it is at the highest level (make a clockwise turn on the tension knob to the end), simple make a clockwise turn on the trimmer of P.C. Board for even higher tension.
(b) Adjusting the Sealing Time
Depending on the size and quality of the strap, different welding times are required. Turning the knob clockwise increases the welding time, while turning it counterclockwise decreases the welding time.
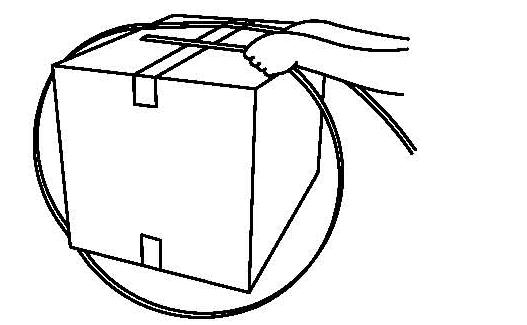
(4) Feeding the Strap Around the Package
The strapping is fed around the package as illustrated.

Warning! The plastic strap which will be welded must be free from oil, grease and other dirt. Dirty plastic straps can't be welded correct!
(5) Inserting the Strap
Pull up the handle lever firmly with your right hand. Insert the two straps well aligned on each other into the strap guide using your left hand.
Release the handle lever.
(6) Tensioning and Sealing the Straps
-Auto
Press down the rocker switch until the desired strap tension is reached. The tool will do sealing by itself. Release the rocker switch when it’s finished.
-Semi
Press down the rocker switch and then release it, and press down again and again till the desired tension is reached.
-Sealing the Straps
Press the black switch to sealing the straps.
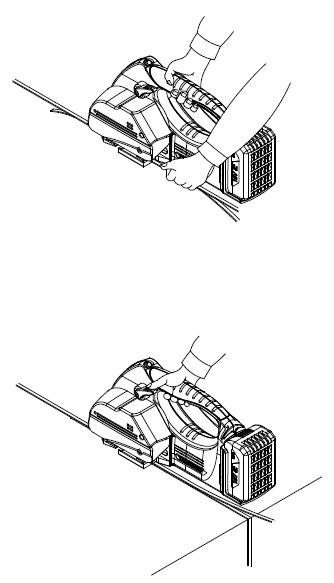
The plastic strap is welded and cut off from the strap coil at the same time.
During welding, the LED lights green.
After expiration of the adjusted welding time, the cooling down time begins (LED lights yellow).
When the LED lights green again, the sealing procedure is finished.
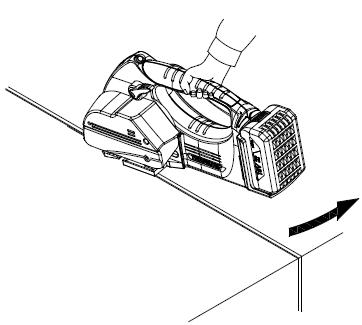
Pull up the handle lever, pull the tool right / backwards and off the strapping.
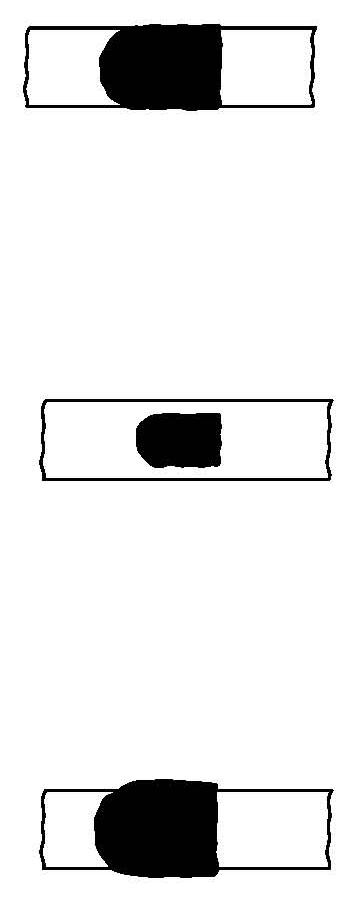
A regular control of the seal is necessary. The seal can be examined visually. Make a seal, peel it apart and examine it as follows:
Correct Seal
The seal must be completely welded over the whole width of the strap on a length.
Minor quantities of fused plastic may overflow on sides.
The plastic strap is not welded over the whole width of the strap.
The seal efficiency is insufficient.
Warning! Straps with insufficient seal strength must be removed from the package!
Adjust the welding time.
Welding
If the welding time is too long the straps are overheated.
The fused plastic overflows on both sides of the straps. The seal efficiency is affected.
Warning! Straps with insufficient seal strength must be removed from the package!
Adjust the welding time.
Please take off the battery before doing maintenance.
(1) Use air gun to clean the area around Tensioning Wheel (H45-10090) and Gripper (H45-10072) and the area around Cutter (H45-40090) daily. Be sure to use the air gun by blowing the debris from the left side to avoid any debris blowing to inside of the tool.
H45-10090
Air blow
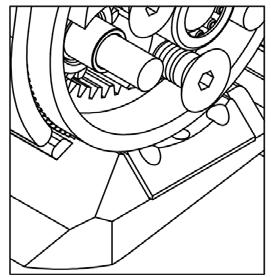
H45-10072
Air blow
H45-40090
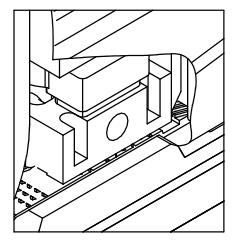
(2) If air gun could not dislodge the debris between the teeth of Tensioning Wheel (H45-10090), it is suggested to sharp the tip of PET (or other plastic) strap and use it as a tool to clean the strap debris.
Please do not use any metal material or hard material to clean the teeth to avoid any damage to the teeth.
H45-10090
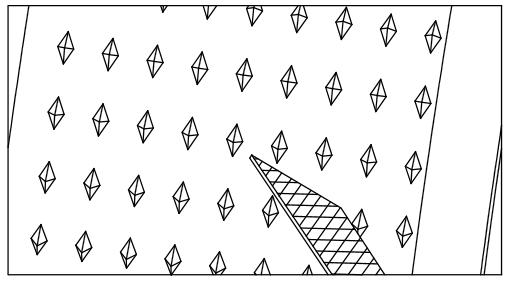
(3) DISPOSAL
The power tool, accessories and packaging materials should be sorted for environmental-friendly recycling.
Do not dispose of power tools into household waste!
According the European Guideline 2002/96/EC for Waste Electrical and Electronic Equipment and its implementation into national right, power tools that are no longer usable must be collected separately and disposed of in an environmentally correct manner.
(1) The strap slips while tensioning
a. Tension force setting is higher than the Strap Strength. Please turn down the tension (refer to Page no.6 in Part I of Manual).
b. There is too much strap debris on the teeth of the Tensioning Wheel (H45-10090) or Gripper (H45-10072)
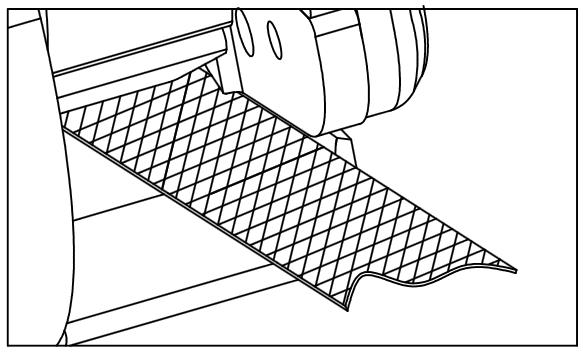
c. Strap Stop (H45-10280/H45-10281) touches the straps. (shown as following drawing). Please clean the Strap Stop (H45-10280) and feed the strap appropriately until the Strap Stop won’t affect the strap while tension.
H45-10280/10281
Strap Stop touches the straps
touch the strap
d. The Tensioning Wheel (H45-10090) or the Gripper’s (H45-10072) teeth is worn and need replacement.
(2) The strap can not be cut completely
a. The sealing time might be set too short.
b. The strap is not thread correctly so a small part of the strap is not cut completely.
c. The Shim (H45-40270) are too many or insufficient.
d. The Cutter (H45-40090) is worn.
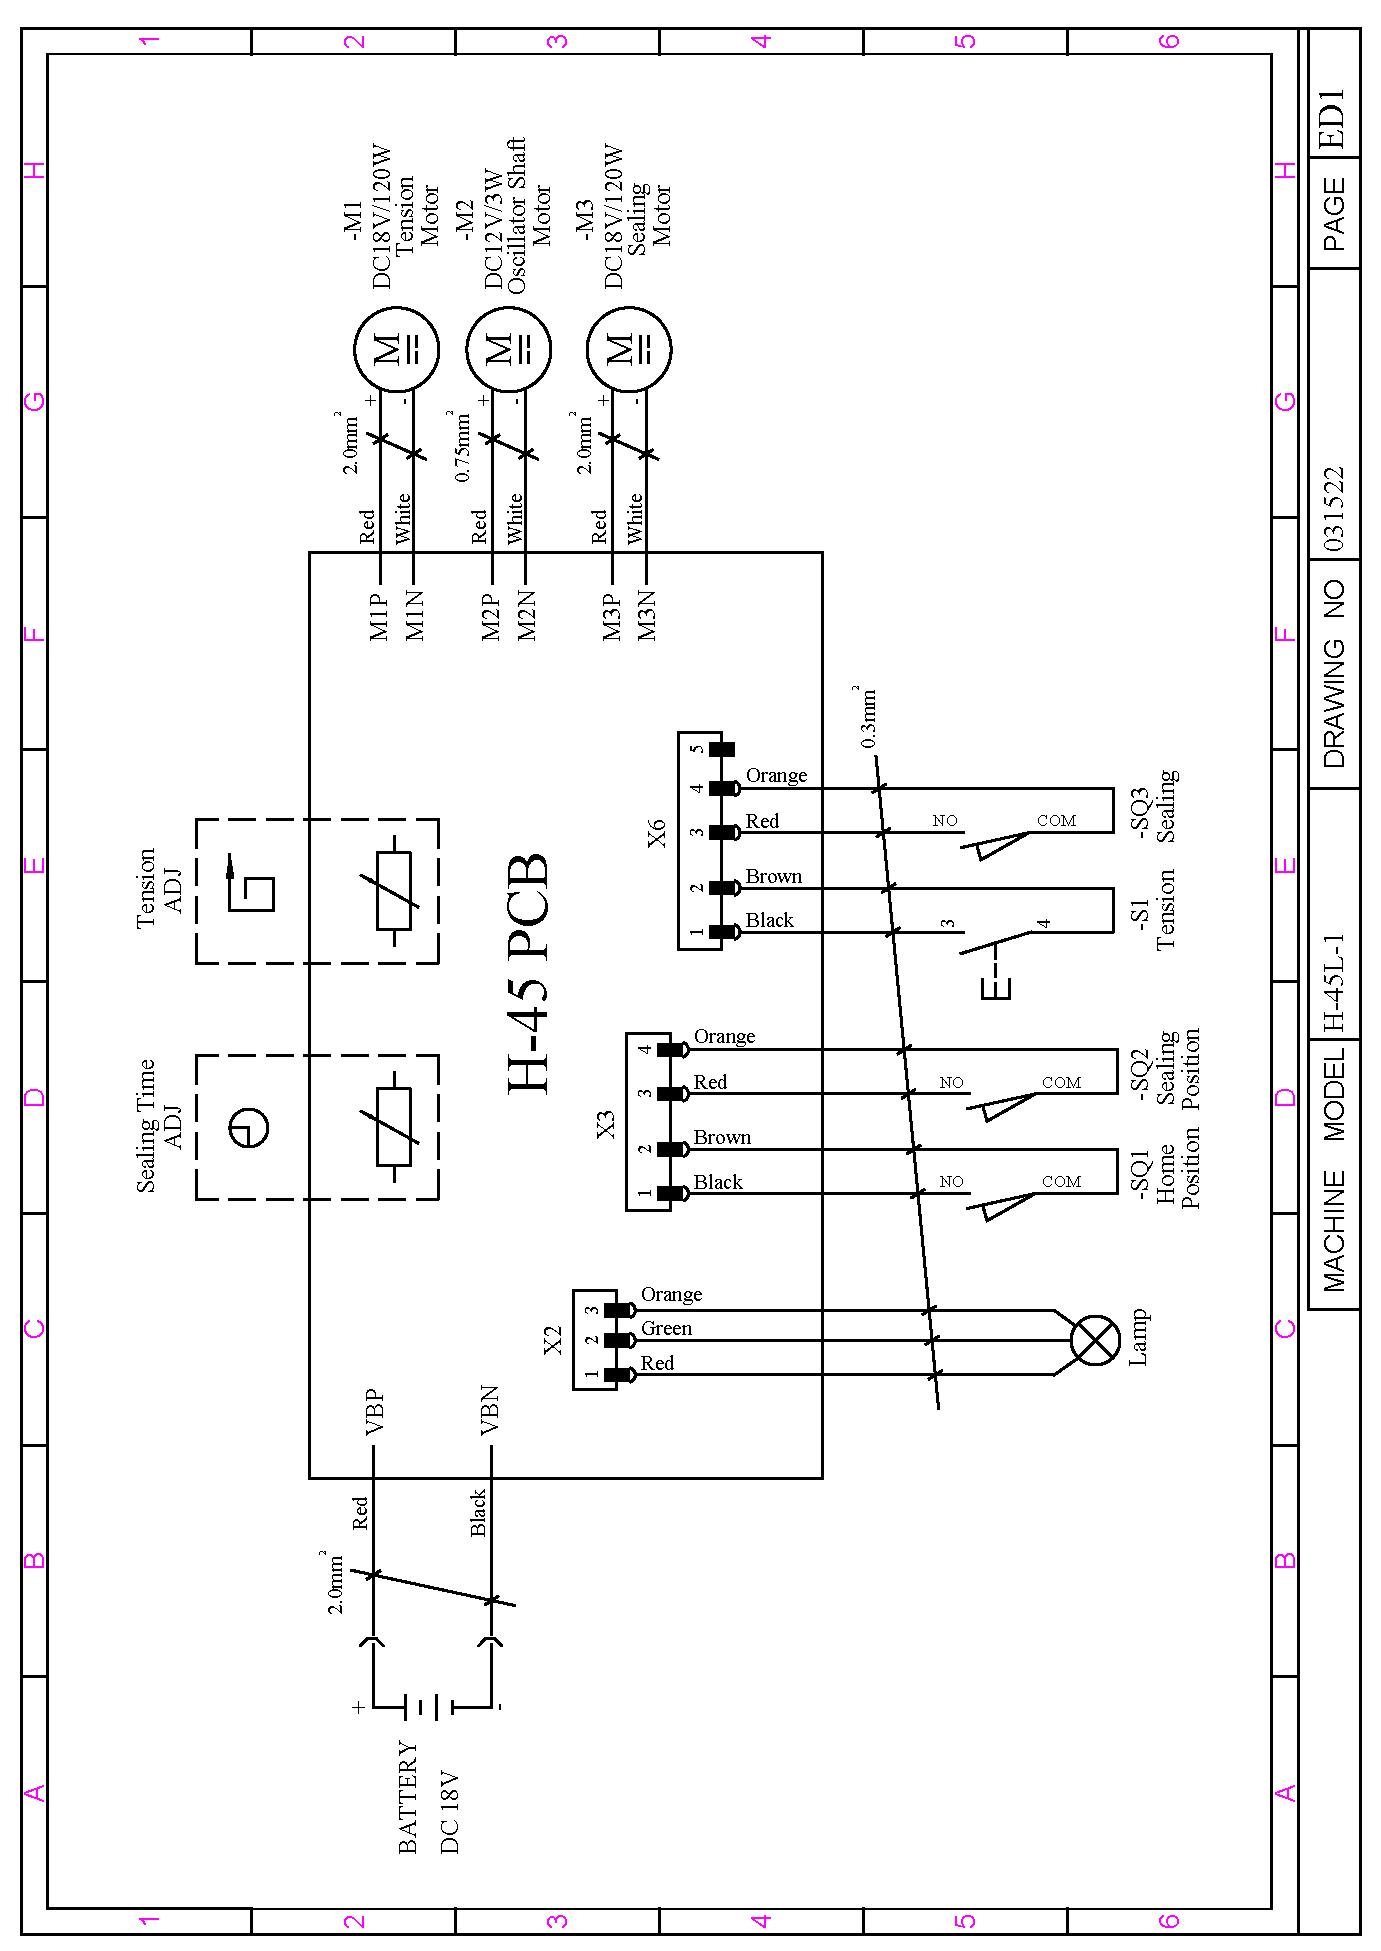
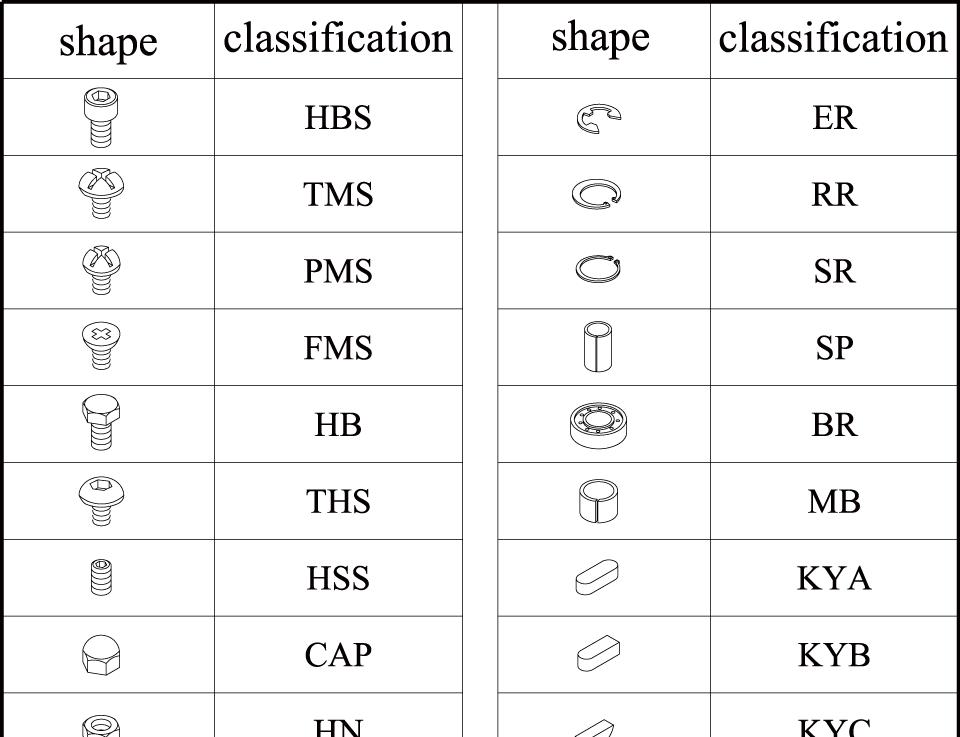
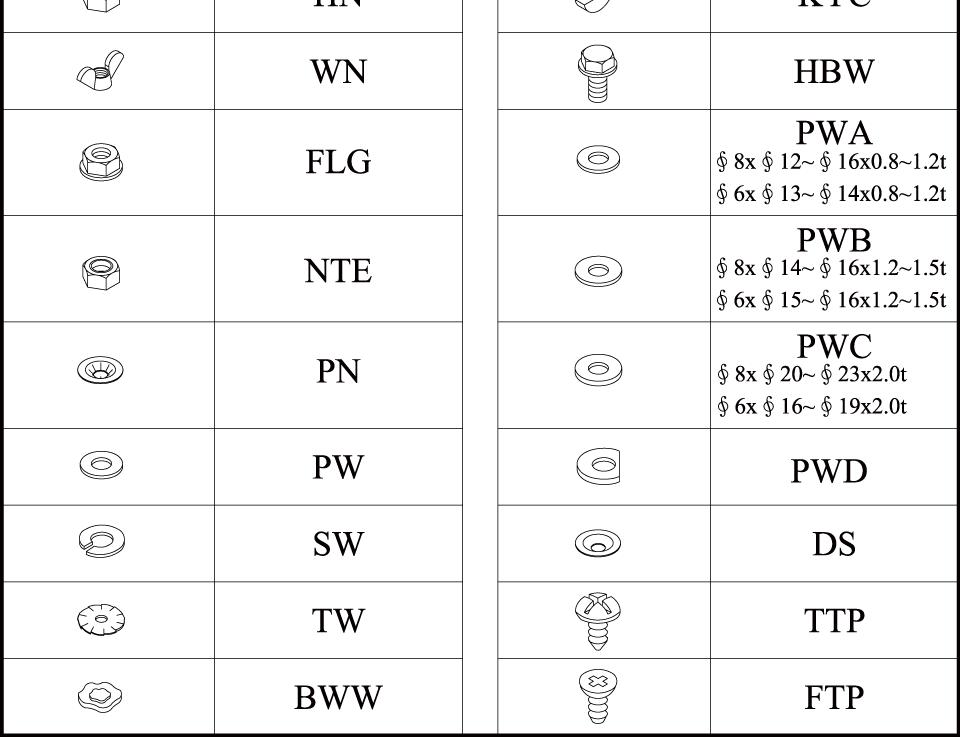
REF. NO. PART NO.DESCRIPTION
Q'TYREMARKS
H45-10006Tensioning Unit (For 12mm)1
H45-10007Tensioning Unit (For 16mm)1
H45-10008Tensioning Unit (For 9mm)1
1H45-10010End Cover1
2 MSP-T-2822601 Torsion Spring1
3H45-10030Strap Stop (For 16mm)1
H45-10031Strap Stop (For 9mm/12mm)1
4H45-10040Tensioning Body1
5H45-10050Swivel Shaft1
6H45-10060Holder1
7H45-10072Gripper 1
8H45-10081Holder 1
9H45-10090Tensioning Wheel1
10H45-10100Dowel3
11H45-10110Parallel Pin3
12H45-10120Idle Gear3
13H45-10130Washer1
14H45-10140Tensioning Wheel Shaft1
15H45-10150Parallel Pin3
16H45-10160Idle Gear3
17H45-10170Cover1
18H45-10180Bearing1
19H45-10190Tension Gear1
20H45-10200Spur Wheel1
21H45-10210M1 Motor Support1
24H45-10240Screw1
25H45-10250Washer2
26H45-10260Tube1
27H45-10270Set Ball1
28H45-10280Strap Stop (For 12mm/16mm)1
H45-10281Strap Stop (For 9mm)1
29H45-10450M1 Motor Ass'y1
REF. NO. PART NO.DESCRIPTION Q'TYREMARKS
30H45-10300Cover1
31BK0808ZNeedle Bearing, 0808Z1
32BR6806Bearing, 68061
33BR6806ZBearing, 6806Z2
34BR6808ZBearing, 6808Z1
35FHS0408NFHS, M4×8 (N)3
36FHS0514NFHS, M5×14 (N)3
37FHS0308NFHS, M3×8 (N)2
38HBS0410NHBS, M4×10 (N)2
39HBS0430HNHBS, M4×30 (H)(N)2
40HBS0516NHBS, M5×16 (N)1
41HN05HN, M51
42KT-477NNeedle Bearing, 477N3
43KT-5810NNeedle Bearing, 5810N3
44HBS0412N HBS, M4×12 (N)2
45SB04Ball, Ø41
46MB0815Metal Bushing, 08152
47FHS0306NFHS, M3×6 (N)2
48SP0306Spring Pin, 3×65
49SP0432Spring Pin, 4×321
51SW04SW, M46
52SW05SW, M52
60H45-10600Tensioning Wheel Shaft Ass'y1
61H45-10700Tensioning Body Ass'y (For 16mm)1 H45-10701Tensioning Body Ass'y (For 9mm/12mm) 1
2GRIPPERUNITH45-20000
REF.
3H45-20030Spring2
4H45-20041Eccentric Shaft1
5H45-20050Inner Raceway1
6H45-20060M2 Motor Gear1
7H45-20072Switch Rocker1
8H45-20080Motor (M2)1
10H45-20100Eccentric Shaft Gear1
11H45-10250Washer1
12H45-20120M2 Motor Ass'y1
13H45-20111Spring Slide Ass'y1
18LA-40220Label2
23HBS0320NHBS, M3×20 (N)1
24HN05HN, M51
25HSS0305HSS, M3×54
26MB0805Metal Bushing, 08051
27MB1709Metal Bushing, 17091
28PMS0220PMS, M2×202
29PW05BPW, M5 (B)1
30SP0310Spring Pin, 3×101
32SW02SW, M22 33SW03SW, M31
35SW05SW, M51
1H45-30010Pressure Roller1
2H45-30020Front Toggle Link1
3H45-30030Lever1
4H45-30040Torsion Spring1
5H45-30050Stanchion1
6H45-30060Collar1
7H45-30070Spur Wheel1
8H45-30080Collar1
9H45-30090Handle Arm1
10H45-30100Collar1
11H45-30110Arm1
12H45-30120Coupler1
13H45-30130Coupler Shaft1
14H45-30140Handle Lever1
15H45-30150Connector1
16H45-30160Handle Shaft1
17H45-30170Washer4
18H45-30180Shaft1
19H45-30190Spur Wheel Ass'y1
21H45-10250Washer4
22HBS0420NHBS, M4×20 (N)1
23H45-30230Collar2
24PMS0312PMS, M3×121
25HFL0615Bearing, 6×10×151
26NTE04NTE, M42
27HSS0305HSS, M3×5 1
28HSS0508GHSS, M5×8 (G)2
29KYA020210Key, 2×2×102
30MB0810Metal Bushing, 08101
31PW03PW, M32
32SW03SW, M31
33MB0812Metal Bushing, 08122
34MB0606Metal Bushing, 06062
35FMS0420FMS, M4×201
36SW04SW, M42
H45-40007
REF. NO. PART NO.DESCRIPTION Q'TYREMARKS
H45-40006Sealing & Cutting Unit (For 12mm)1
H45-40007Sealing & Cutting Unit (For 16mm)1
H45-40008Sealing & Cutting Unit (For 9mm)1
1H45-40011Bearing Support1
2H45-40020Rocker1
5H45-40051M3 Motor Support1
7H45-40070Thrust Piece1
8H45-40080Coupler1
9H45-40090Cutter1
10H45-40100Pressure Spring1
11H45-40110Driver2
12H45-40120Driver Pin1
13H45-40130Bolt1
14H45-40140Thrust Piece1
15H45-40151Ball Cage1
16H45-40160Welding Gripper1
17H45-40170Seesaw Lever (In Side)1
18H45-40180Guide Case1
19H45-40190Seesaw Lever (Out Side)1
20H45-40201Parallel Pin1
22H45-40220Pressure Spring2
23H45-40230Guide Pin (For 16mm)1
H45-40231Guide Pin (For 9mm/12mm)1
24H45-40240Guide Pin (For 12mm/16mm)1
H45-40231Guide Pin (For 9mm)1
25H45-40250Welding Stop Gripper1
26H45-40260Steel Insert 1
27H45-40270Shim
Strap Thickness 0.4~0.6mm2
Strap Thickness 0.7~0.8mm1
Strap Thickness 0.9~1.05mm0
28H45-40280Shaft1
REF. NO. PART NO.DESCRIPTION Q'TYREMARKS
29H45-40351M3 Motor Ass'y1
30H45-40300Welding Excentric Ass'y1
32T7-5-20210Rubber Plug2
33H44-10710Lock Pin, 4×81
35H45-40340Cover1
40HBS0545HNHBS, M5×45 (H)(N)1
41BR627ZZBearing, 627ZZ1
42TMS0408TMS, M4×81
43HBS0407.8NHBS, M4×7.8 (N)2
44HBS0416NHBS, M4×16 (N)2
45HBS0420NHBS, M4×20 (N)1
46HBS0425NHBS, M4×25 (N)3
47SR05Snap Ring, S-58
48SB04Ball, Ø46
49SP0318Spring Pin, 3×181
50SW04SW, M48
51TAL1012Needle Bearing, 10122
52SW05SW, M51
1H45-50010Body Frame1
2H45-50023Cover Front1
H45-50024Cover Front (Black)(Option)1
3H45-50032Cover Rear1
H45-50033Cover Rear (Black)(Option)1
4H45-50040Plate1
6H45-50060Cover1
7H45-50070Stiff Suspension Bracket (Option)1
8H45-50080Stiff Suspension Bracket Set (Option)1
9H45-50090Bottom Base Wearing Protection Plate (Option) 1
10H45-50100Bottom Base Wearing Protection Plate Set (Option) 1
11FHS0310NFHS, M3×10 (N)2
12FHS0410NFHS, M4×10 (N)6
14FTP0410BNFTP, M4×10 (B)(N)4
15HBS0416NHBS, M4×16 (N)2
16TTP0420BNTTP, M4×20 (B)(N)3
17HBS0440HNHBS, M4×40 (H)(N)2
18PW04PW, M42
19SW04SW, M47
20H45-50160 Washer (M4×∮ 8×0.8t) 1
21HBS0410N HBS, M4×10 (N)2
23PW04SPW, M4 (SUS)1
24HBS0516NHBS, M5×16 (N)(Option)4
25SW05SW, M5 (Option)4
26FHS0410NFHS, M4×10 (N)(Option)6
27H45-50110Turnable Suspension Bracket (Option)1
28H45-50140Block (Option)1
29H45-50150Turnable Suspension Bracket Set (Option) 1
30HSS0410GNHSS, M4×10 (G)(N)(Option)1
31AD-2-20181Washer (Option)1
32T7-5-20210Rubber Plug1
33LA-40010Label1
34LA-50008Label1
REF. NO.PARTNO.DESCRIPTIONQ'TYREMARKS
H45-60006BatteryUnit(For220V/230V/240V)1
H45-60007BatteryUnit(For110V)1
1H45-50211AdapterSet1
H45-50216AdapterSet(Black)(Option)1
2H45-50200BatteryLockPin1
3H46-51102Adapter1
6H46-60310Battery(ProcoreUNIVersion)1
H46-60311Battery(ProcoreUSVersion)1
7H45-50173AdapterFrame1
H45-50178AdapterFrame(Black)(Option)1
8H45-40100PressureSpring1
12H46-61000Li-IonBatteryCharger(For110V)1
H46-61010Li-IonBatteryCharger(For 220V/230V/240V) 1
13H45-60130TensionSwitch(Auto)1
14H45-60144ControlBox(PCB)1
15H45-60150Knob2
16H45-60161PushButton1
17H45-60171Lock1
18H45-60182Cam1
19H45-60190Spring1
21HBS0412NHBS,M4×12(N)1
22NTE05NTE,M51
23TTP0312BNTTP,M3×12(B)(N)2
24PMS0430PMS,M4×302
25PW03PW,M32
26 MWA-A-0510050 Washer1 27SW04SW,M43
28H45-20090MicroSwitch3
29H45-60210PositionWiresAss'y1
30H45-60220Start/SealingWiresAss'y1
31H45-60230LEDWire1
32H45-60242ElectricControlGroup1
34H45-50300Plate1
35FMS0420NFMS,M4×20(N)4
37HSS0610GNHSS,M6×10(G)(N)1