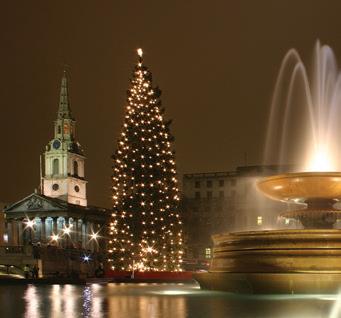
DD_CHRISTMAS_DIGITAL MAGAZINE_NO LINKS_ 30.10.25 europe HR
DIAMOND DOTZ ®
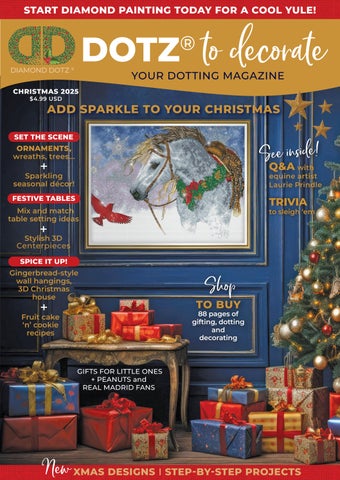
SPARKLE TO YOUR CHRISTMAS ORNAMENTS, wreaths, trees... + Sparkling seasonal décor!
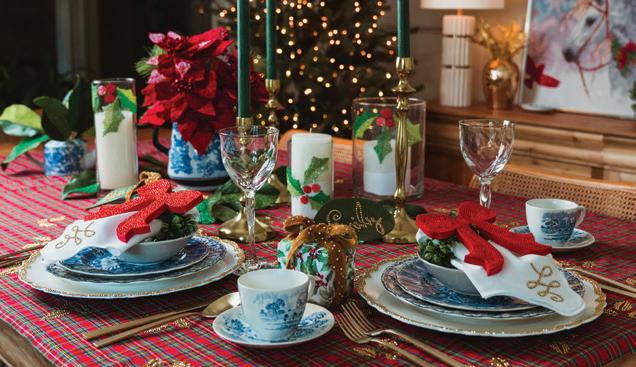
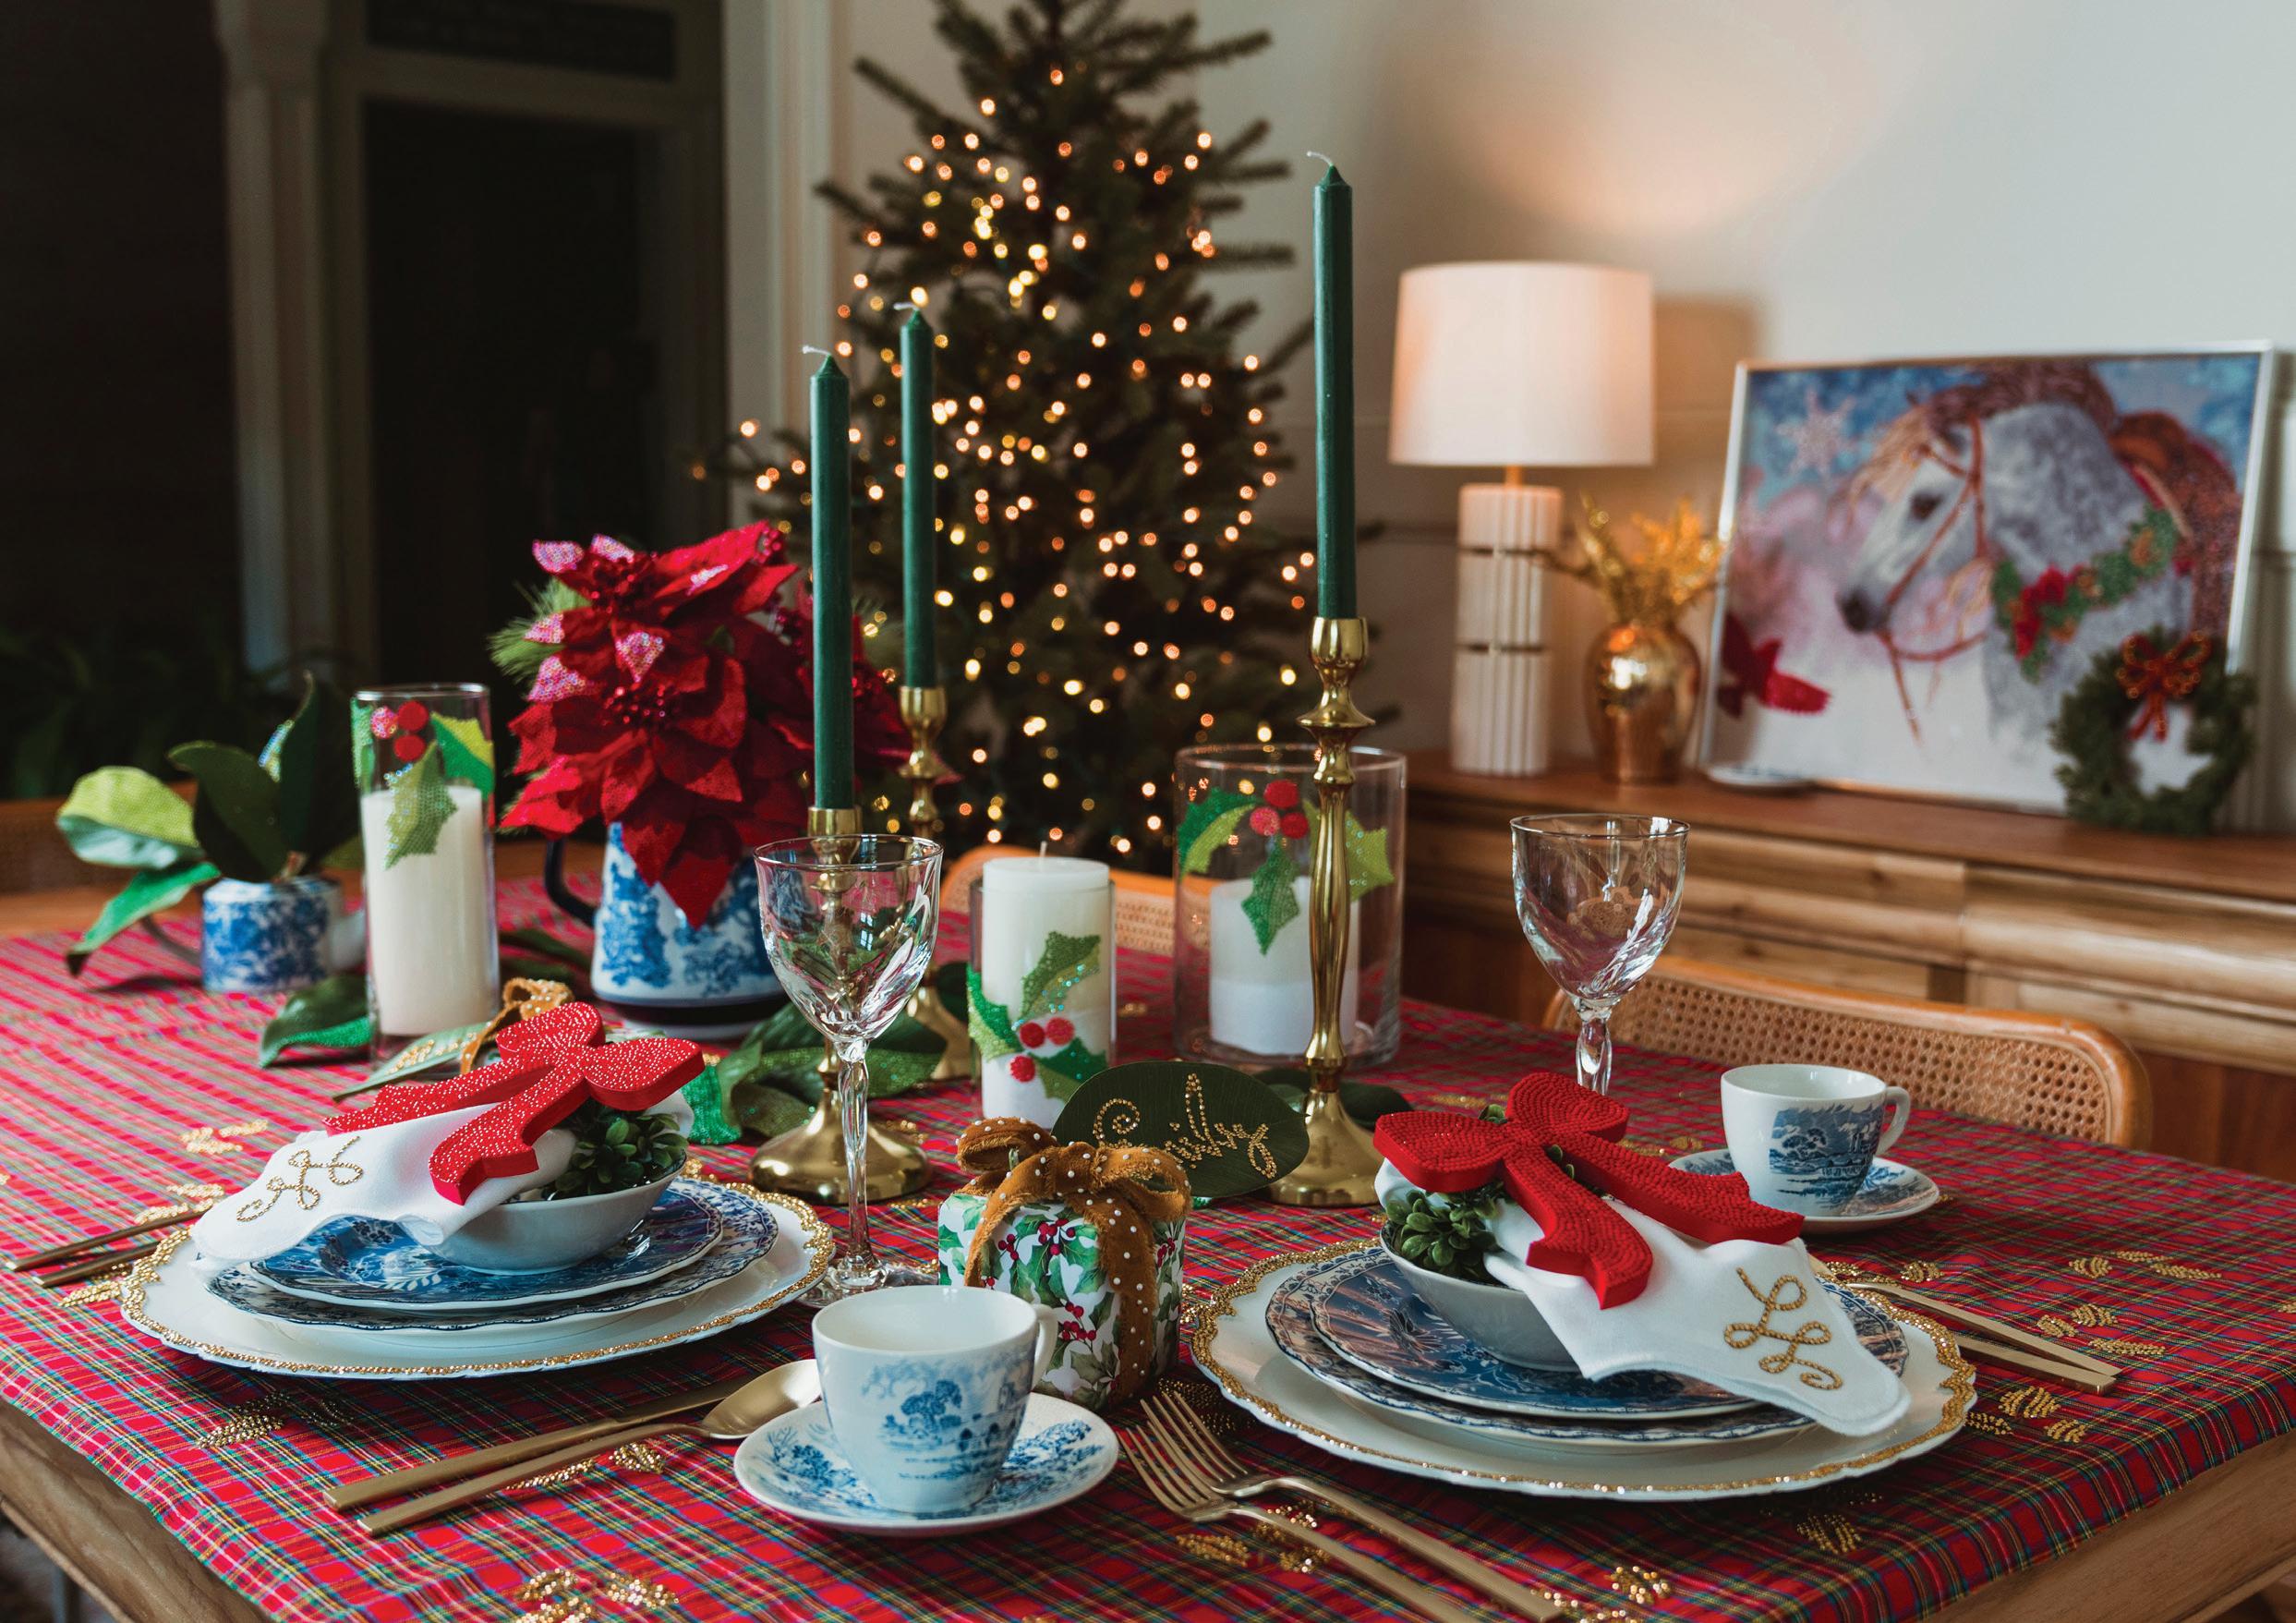
FESTIVE TABLES
Mix and match table setting ideas +
$4.99 USD Q&A with equine artist Laurie Prindle TRIVIA to sleigh ‘em
Stylish 3D Centerpieces
SPICE IT UP!
Gingerbread-style wall hangings, 3D Christmas house +
Fruit cake ‘n’ cookie recipes
DIAMOND DOTZ® CLUB VIP REWARDS PROGRAM
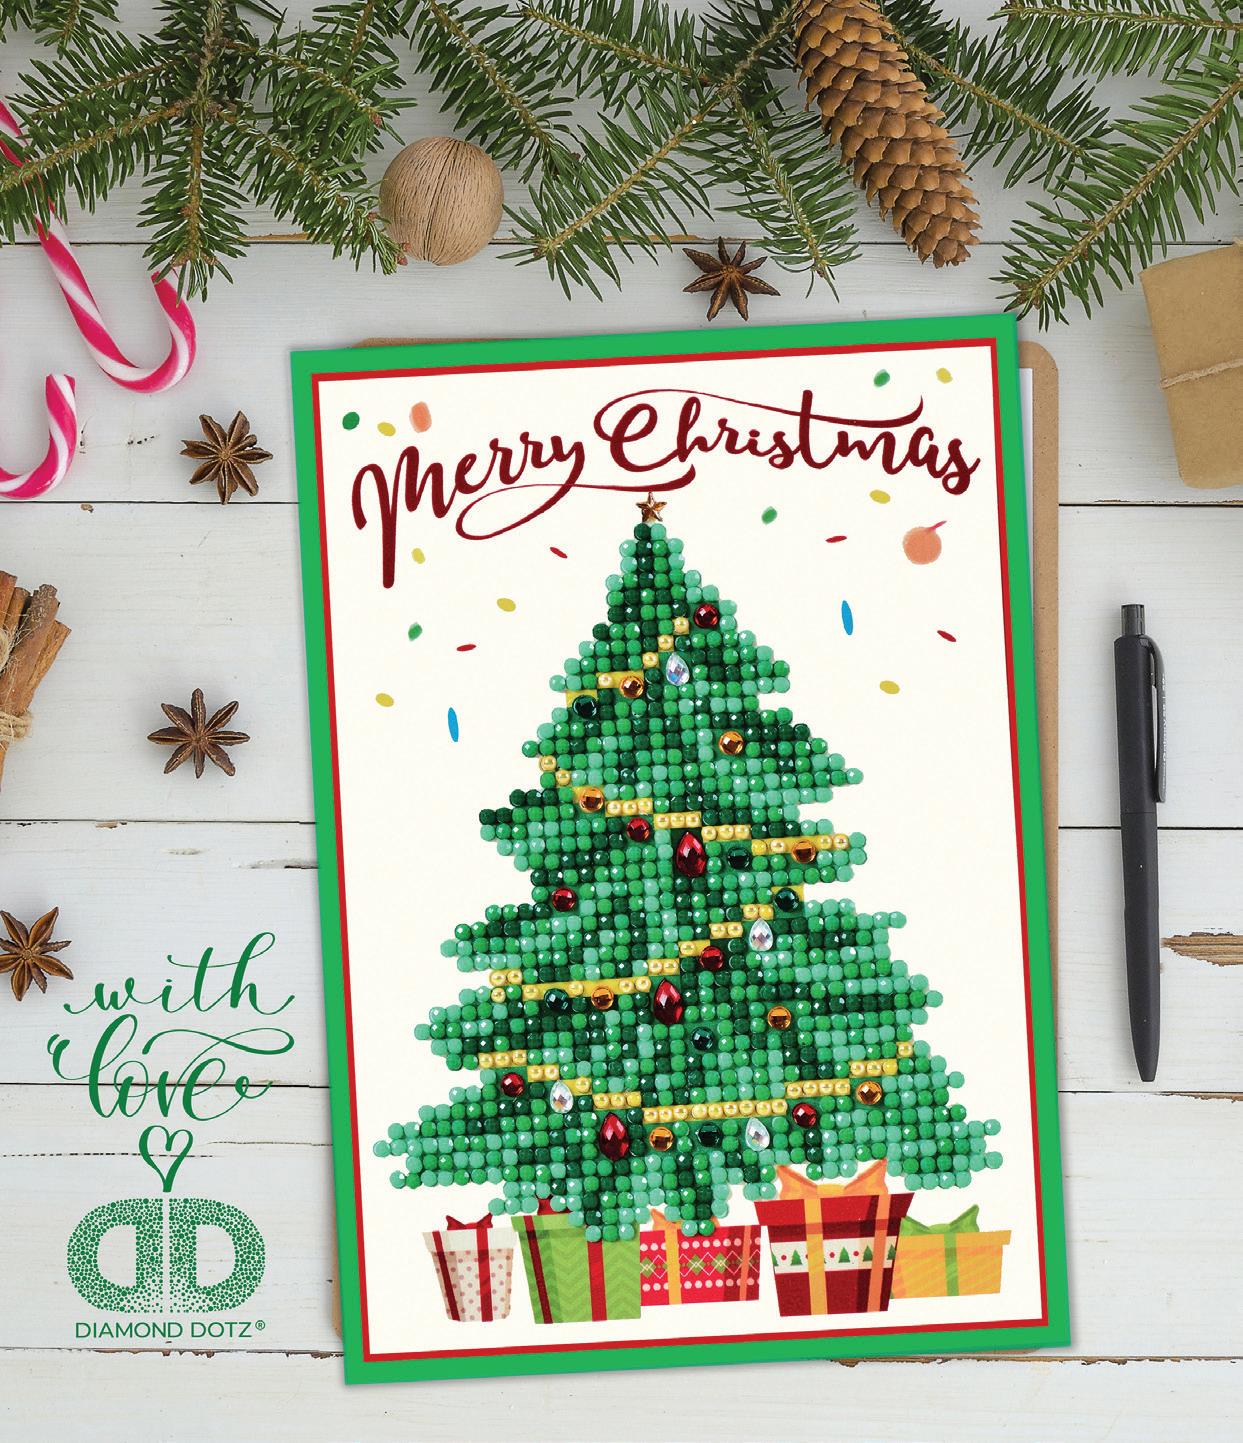
SAY MERRY CHRISTMAS WITH A DIAMOND DOTTED CARD
MERRY CHRISTMAS TREE GREETING CARD
Awaiting your creative touch is this greeting card featuring a Christmas tree, festooned with decorations and garland. So much more than a generic card, the diamond painted card will become a treasured keepsake for years to come.
Size: 5 x 7” KIT DDG.014
12
CONTENTS
Inspiration
6, 34 THE ART OF HANGING AROUND
DOTZ® TO DECORATE YOUR DOTTING MAGAZINE
It’s Sparkle Time!
EDITORIAL
EDITOR-IN-CHIEF
36 28
Sparkling plaques to display, plus awesome present and tree trims..
16, 28 CELEBRATE THE SEASON
8
See how to style your home with diamond paintings that capture the magic and spirit of the season: poinsettias, a sacred nativity scene, winter wonderlands and more.
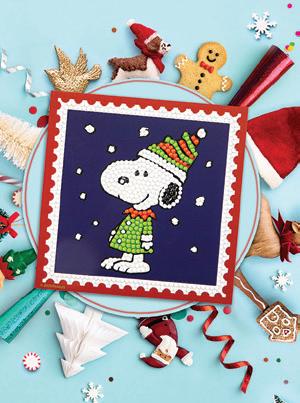
62 PEANUTS® FOR CHRISTMAS
Celebrate the season with Peanuts® iconic characters, as popular today as ever.
60, 66 STOCKING STUFFERS AND GIFTS
Introducing Real Madrid kits for soccer fans and fabulous diamond painting kits for kids.
Features
27 STYLE YOUR TREE
There is an art to decorating Christmas trees. Follow our expert tips, from stringing lights like a pro to perfectly placed ornaments.
14, 82 HOLIDAY BAKING
From spiced gingerbread cookies to an indulgent golden fruit cake, these recipes are perfect for festive gifting and serving.
87 FESTIVE TRIVIA
Entertaining fun facts to share with guests, from chart-topping seasonal songs to extravagant street decorations and more.
Dora Papas
ART DIRECTOR
Cathy Holt
CONTRIBUTORS
Natalia Melnikova (Senior Design and Product Manager); Victoria Anderson (Senior Product Manager); Tara McLoughlin (Junior Product Development); Kirsten Jones (Creative Director Project Assets/Photography and Video Art Director)
SPECIAL THANKS TO ARTISTS
Laurie Prindle; Dona Gelsinger; Donna Race
PHOTOGRAPHY
Shutterstock; Dreamstime; Adobe Stock; Dylan Estes; Carol Roach
SUBSCRIPTION AND GENERAL ENQUIRIES diamonddotz.com customerservice@diamonddotz.com
Diamond Dotz® magazine is published under license by Needleart World (North America) LLC
Chief Executive Officer: Dennis Papas
Vice President Product Development: Cathy Barzyk
Business Development Manager North America: Ray Shelgosh
Chief Strategic Officer: Michael Stanley
Marketing Director Andrea Whitcomb
Director of Digital Strategy: Natalie Baiden
Director of Sales (USA): Laura Mooney
Finance: Loizos Nikolaou; Elena Pavlidou
Content Creator/Social Media Manager: Kim Buffington
IT Head: Ruben Vilalobos
FOLLOW US @diamonddotzcom FACEBOOK, INSTAGRAM and PINTEREST
EUROPE
42 ARTIST PROFILE
Regulars
Equine artist, Laurie Prindle, opens up about her journey from wildlife watercolor paintings as a young girl to sought-after digital artist and why horses are her greatest inspiration.
48, 78 FREESTYLE IDEAS + PROJECTS
Dotz® it your way, from unique presents to complete table setting ideas.
Needleart World (Hong Kong) Ltd 1001-03, 10/F, 345 Nathan Rd, KOWLOON HONG KONG USA
Needleart World (North America) LLC 1280 Lakes Parkway Ste 100, Lawrenceville 30043, GEORGIA USA
PHONE: +1 770 493 9102
Merry Christmas
The festive season is a favorite time of the year for all – a chance to decorate our homes, plan joyous gatherings, bake delish treats and curate thoughtful gifts for family and friends. It will come as no surprise then that the weeks leading up to the big day inspire our most creative endeavors.
And that’s where Dotz® to Decorate Your Dotting Magazine comes in! We’ve been beavering away, working almost as hard as Santa’s elves to bring you everything you need to have a magical Christmas.
Whether you’re an experienced dotter or having a go for the first time, we have a wonderful selection of all-inclusive kits and inspiring freestyle projects for this very special celebration.
There are ideas for table settings that are easy yet look amazing (p48), dazzling décor as well as custom gifts – from wreaths and baubles (p56) to a recycled card display (p78), a serving tray with festive typography (p86) and so much more.
Looking to spread the joy of Christmas throughout your home? We show you how to integrate diamond painting into your decorative mix with options for different rooms, themes and color schemes.
And we have a plethora of decorating hints and finishing touches. You’ll find our tree trimming tips essential reading (p27). We even share stylist’s secrets on how to estimate the length of string lights needed for the height of your tree.
For stocking stuffers with a creative twist, check out the new Real Madrid (p58) and Peanuts ranges (p60). They are ideal for sports- and cartoon-lovers of all ages! And we’ve got the kids covered too (p68).
A few of my favorite kits include the new wall plaques (p6), and the flat pack Gingerbread house (p12) – no Allen key in sight Actually, it was this 3D house that led to the inclusion of the gingerbread cookie (p14) and the Golden Fruit Cake (p82) recipes, which you can also make as individual servings for gifting – yum!
Get started on your Christmas wish list today –all the kits featured are just a click away! Go on, make this your most sparkling Christmas yet!
Dora FROM THE EDITOR
SPRINKLE A LITTLE SEASONAL SPLENDOUR THROUGHOUT YOUR HOME WITH BEAUTIFULLY DOTTED PLAQUES
Whether hung from a door to welcome your guests, dangling from your staircase’s newel post or displayed prettily from wall hooks, these lovely wall plaques are guaranteed to capture attention.
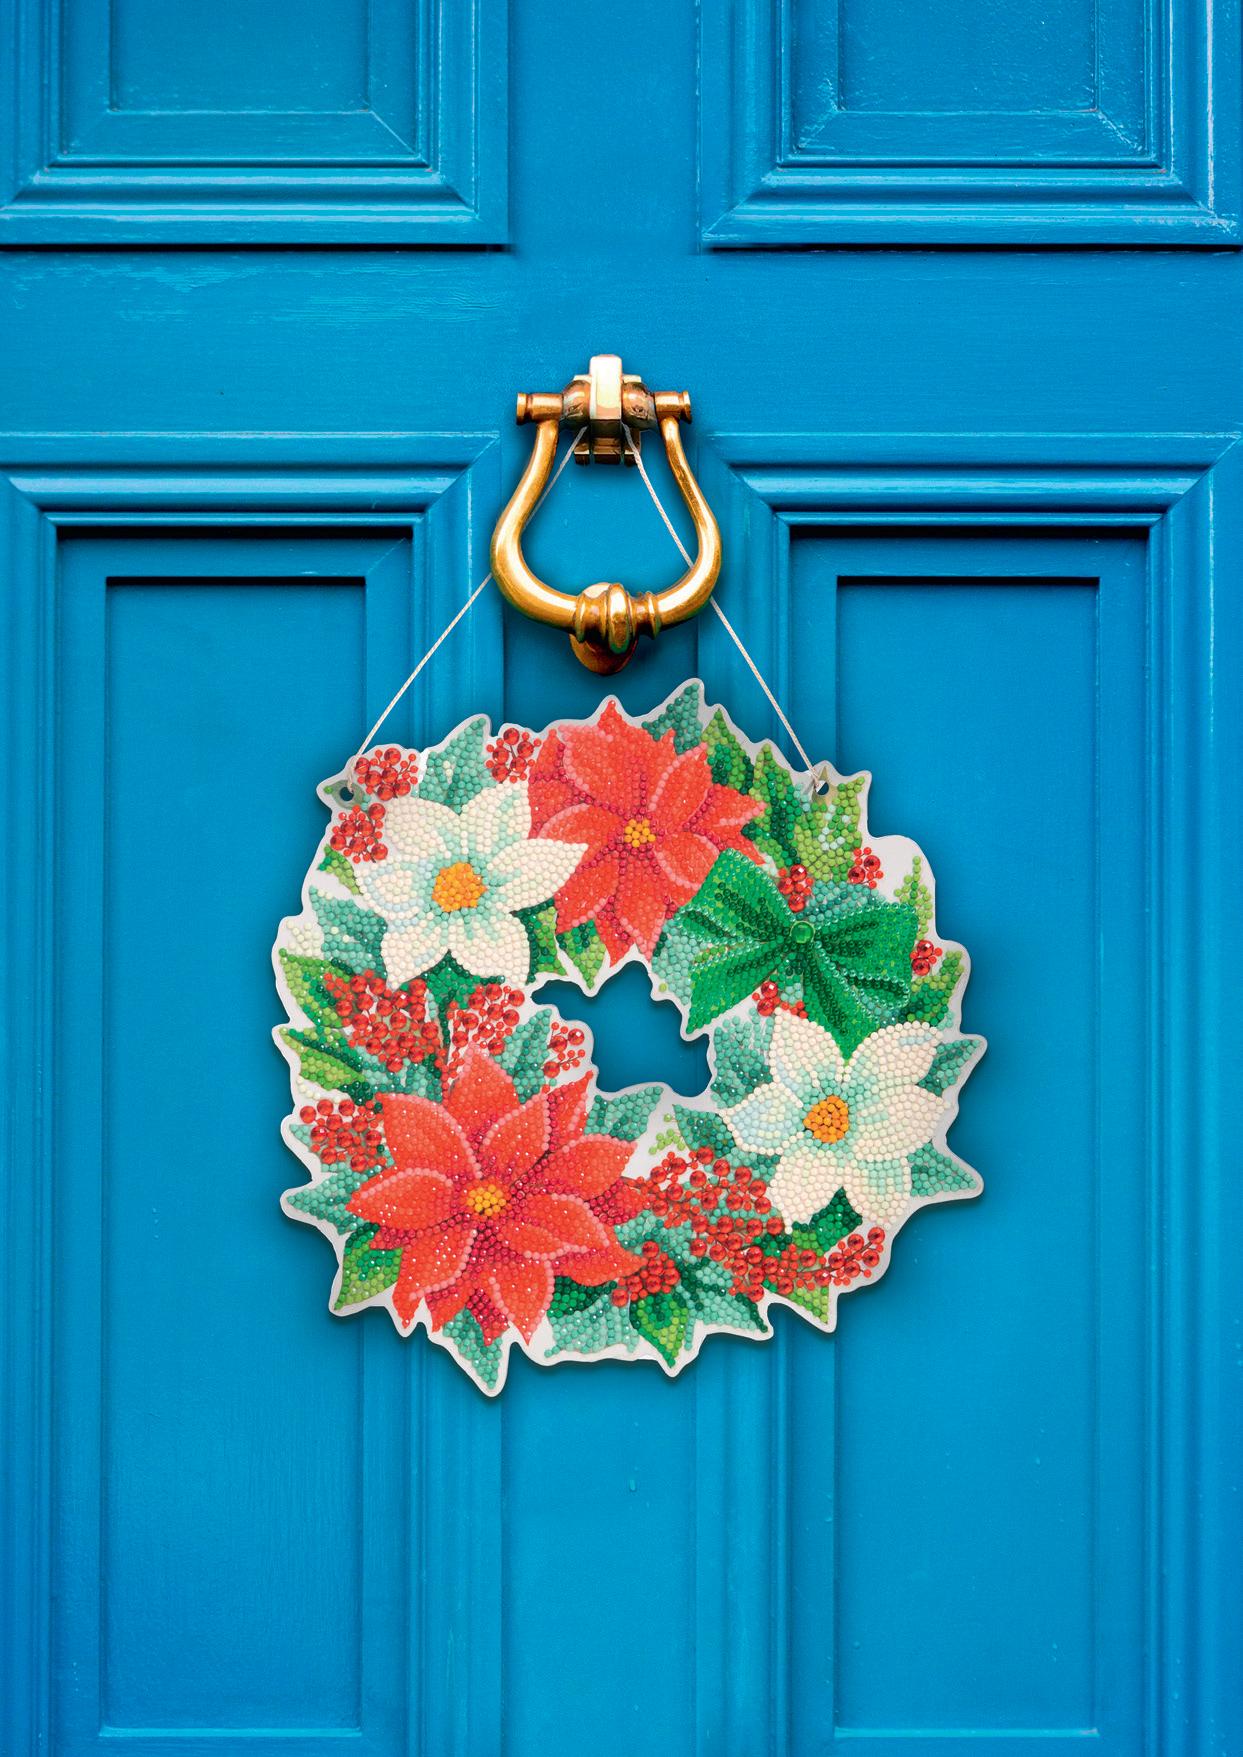
CHRISTMAS WREATH
Knock, knock! Bring on the bling and add joyous charm to your front door with a stylish diamond-dotted wreath. Here, the stunning mix of poinsettias – rich red bracts and wintry whites –interspersed with glitzy red berries exudes a festive welcome well before guests step inside. Design Size: 10 x 10in (25.2 x 25.2cm) KIT
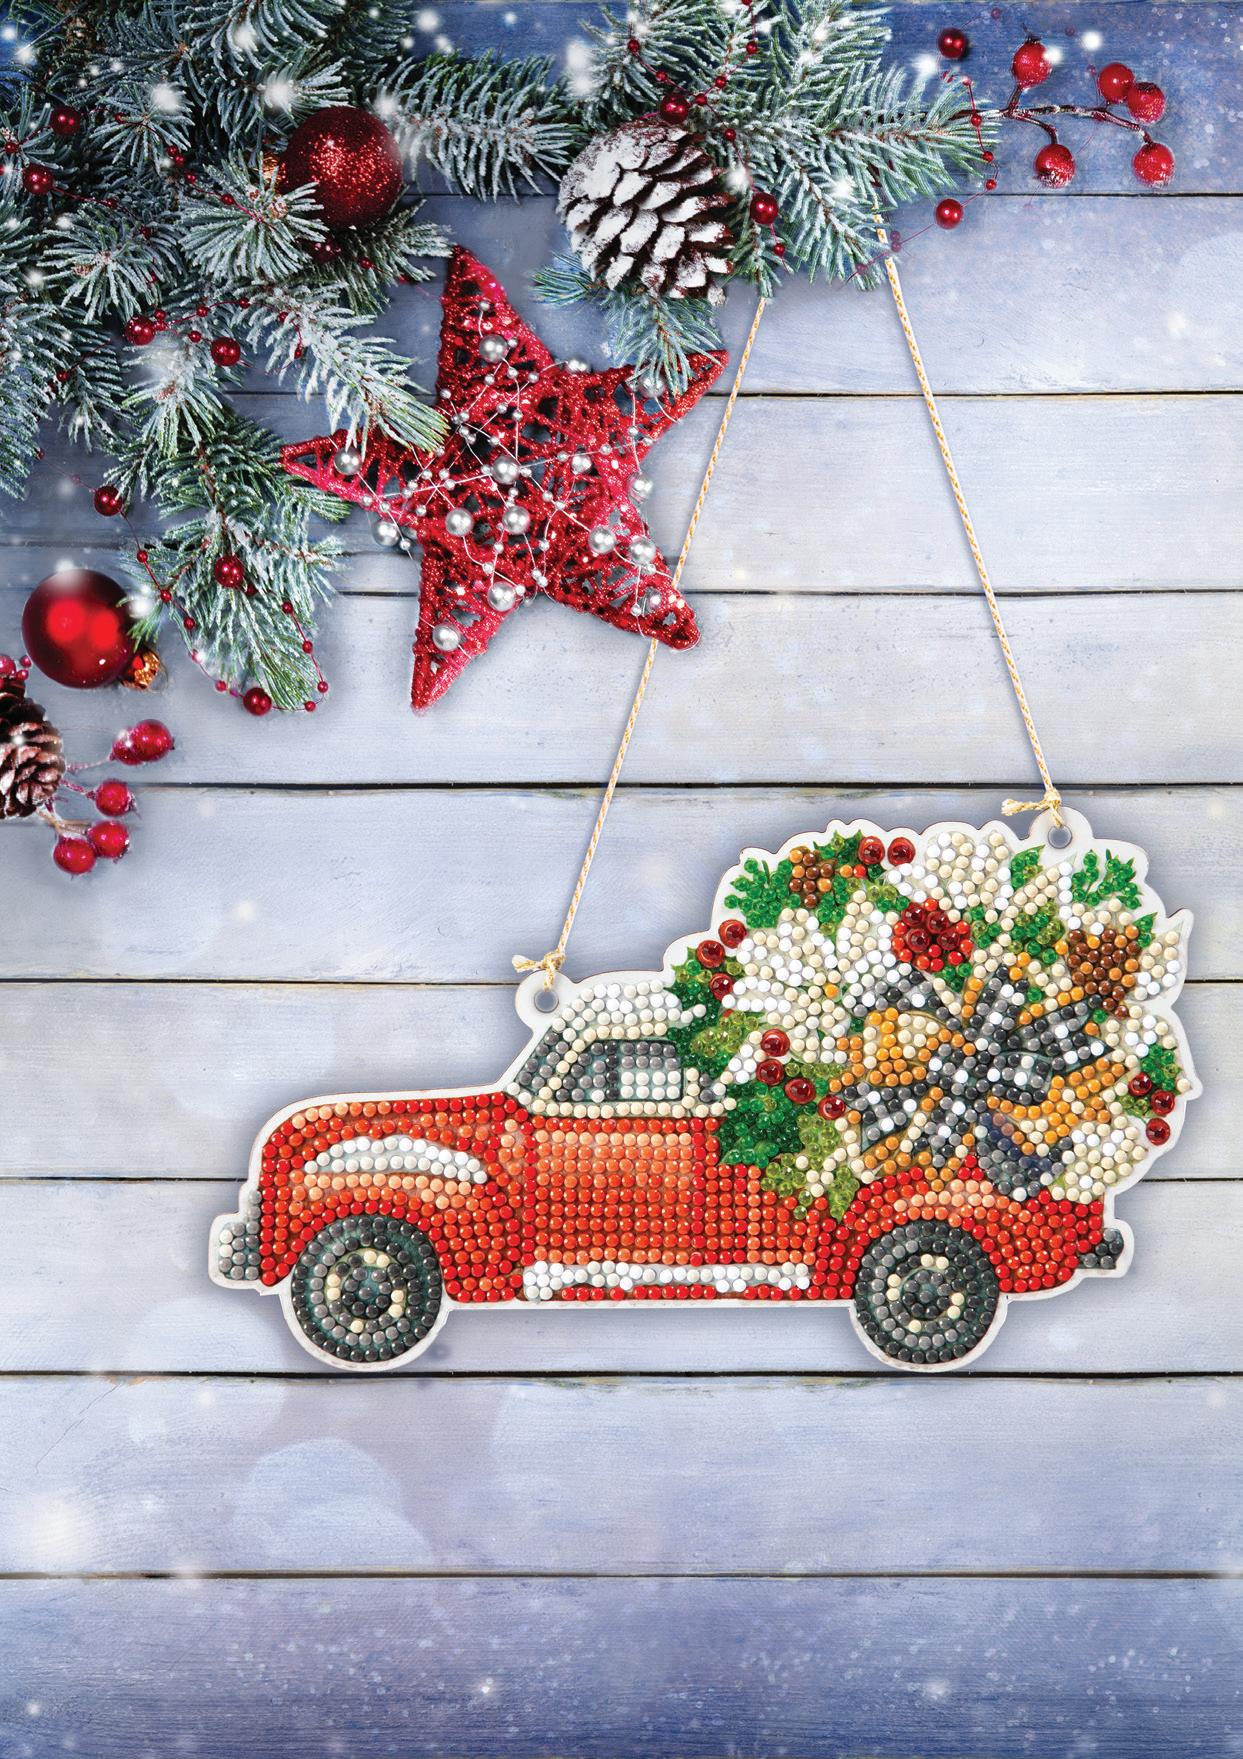
CHRISTMAS TRUCK
Reminiscent of a classic American red pickup truck, this vintage-inspired wall plaque will introduce a touch of nostalgia to any room you chose to display it.
Design size: 4.72 x 8.27in (12 x 21cm) KIT DD17.015
FUN FACT
Classic farm pickup trucks of the 1940s, 50s and 60s are synonymous with Christmas and have become a favorite decorating motif! Their iconic status stems from bygone days when dads, occasionally with their families in tow, would lug a freshly cut tree home, usually in the truck bed or strapped to its roof. As for the truck’s eye-catching red, the color is no coincidence – not only does it mirror Santa’s suit, it embodies the warmth, joy and festive goodwill that defines the Christmas spirit.
Twinkling Treasures
Capture the charm of a beloved festive symbol, using glittering gems to
FUN FACT
As a young 20-year-old, Michelangelo received an unusual commission from his employer, Piero de’ Medici, ruler of Florence at that time. He was tasked with creating a snowman to grace his Palace courtyard. The snow sculpture was reputed by observers of the day to be ‘very beautiful’ but alas no detailed description of its appearance has survived.
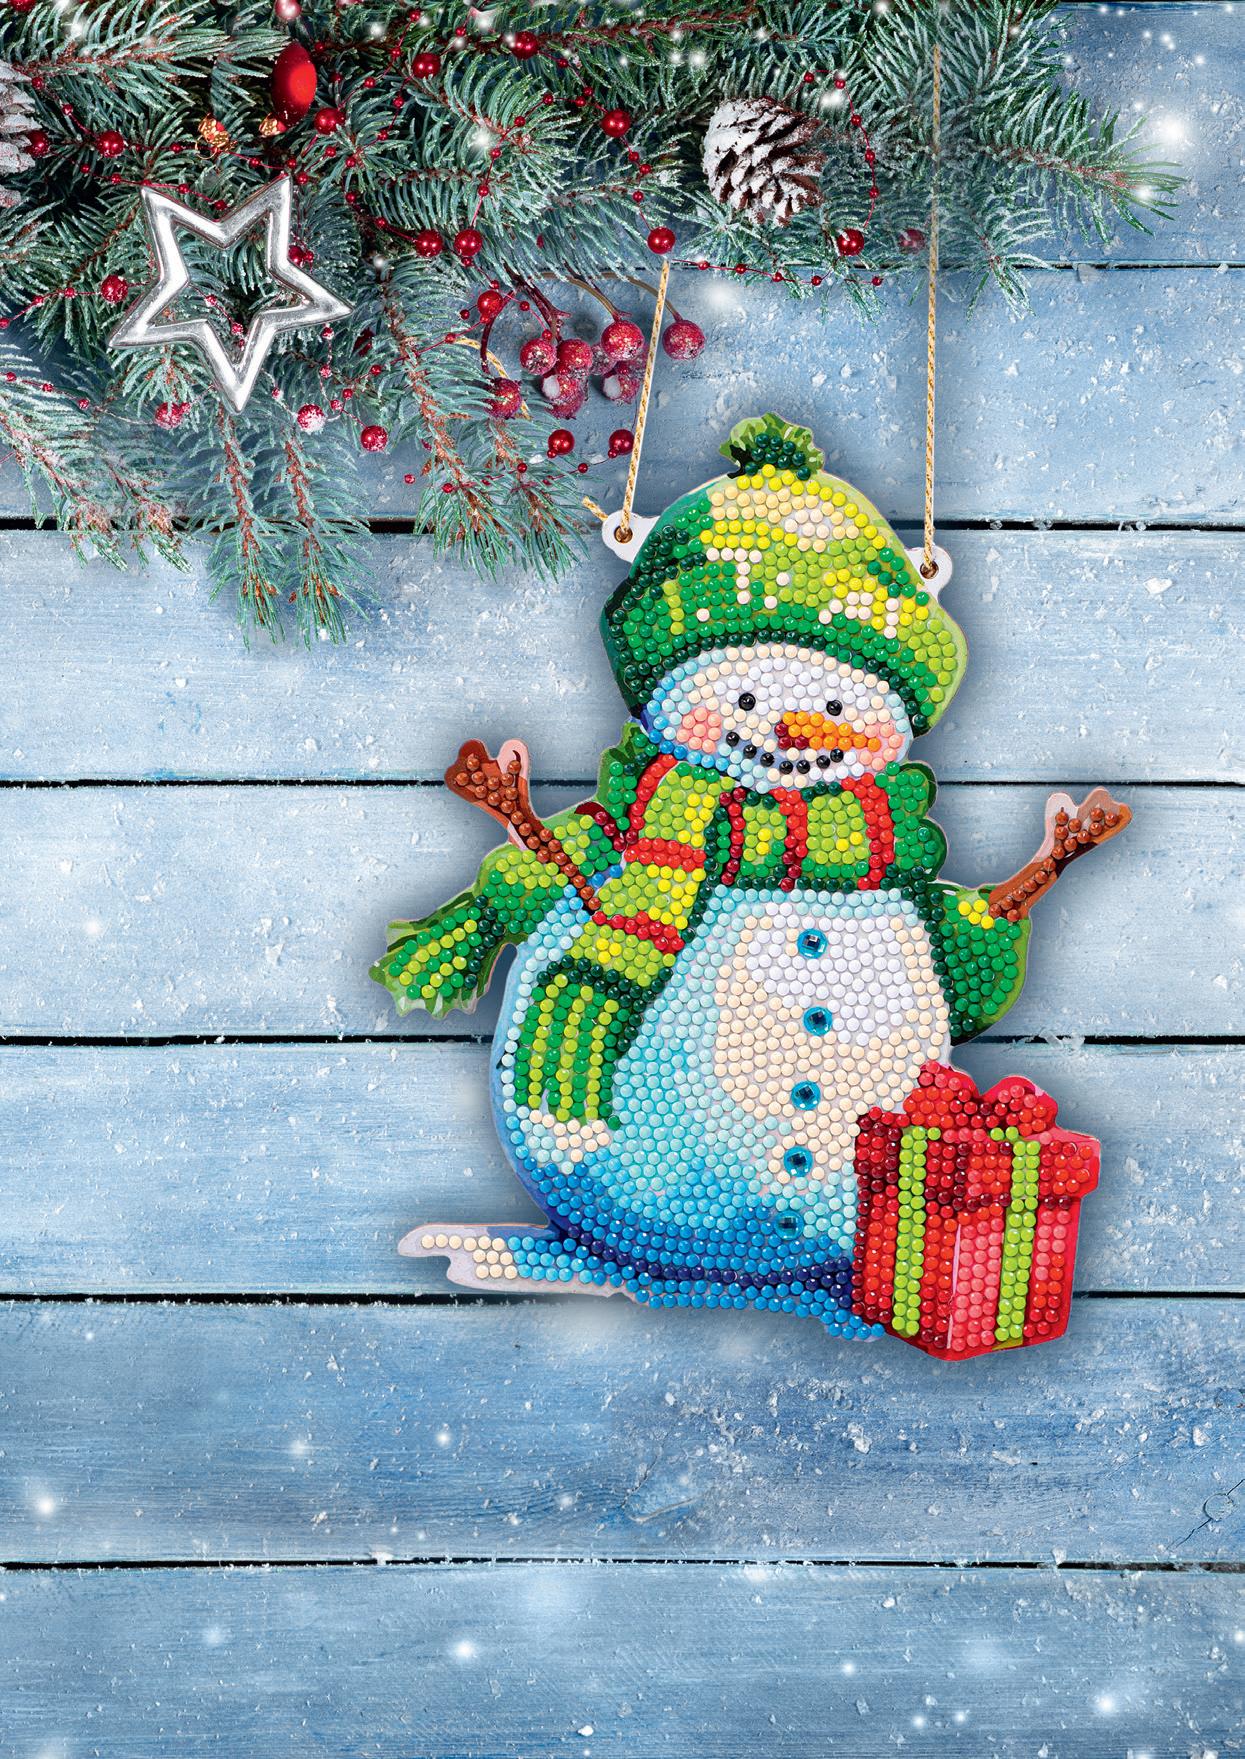
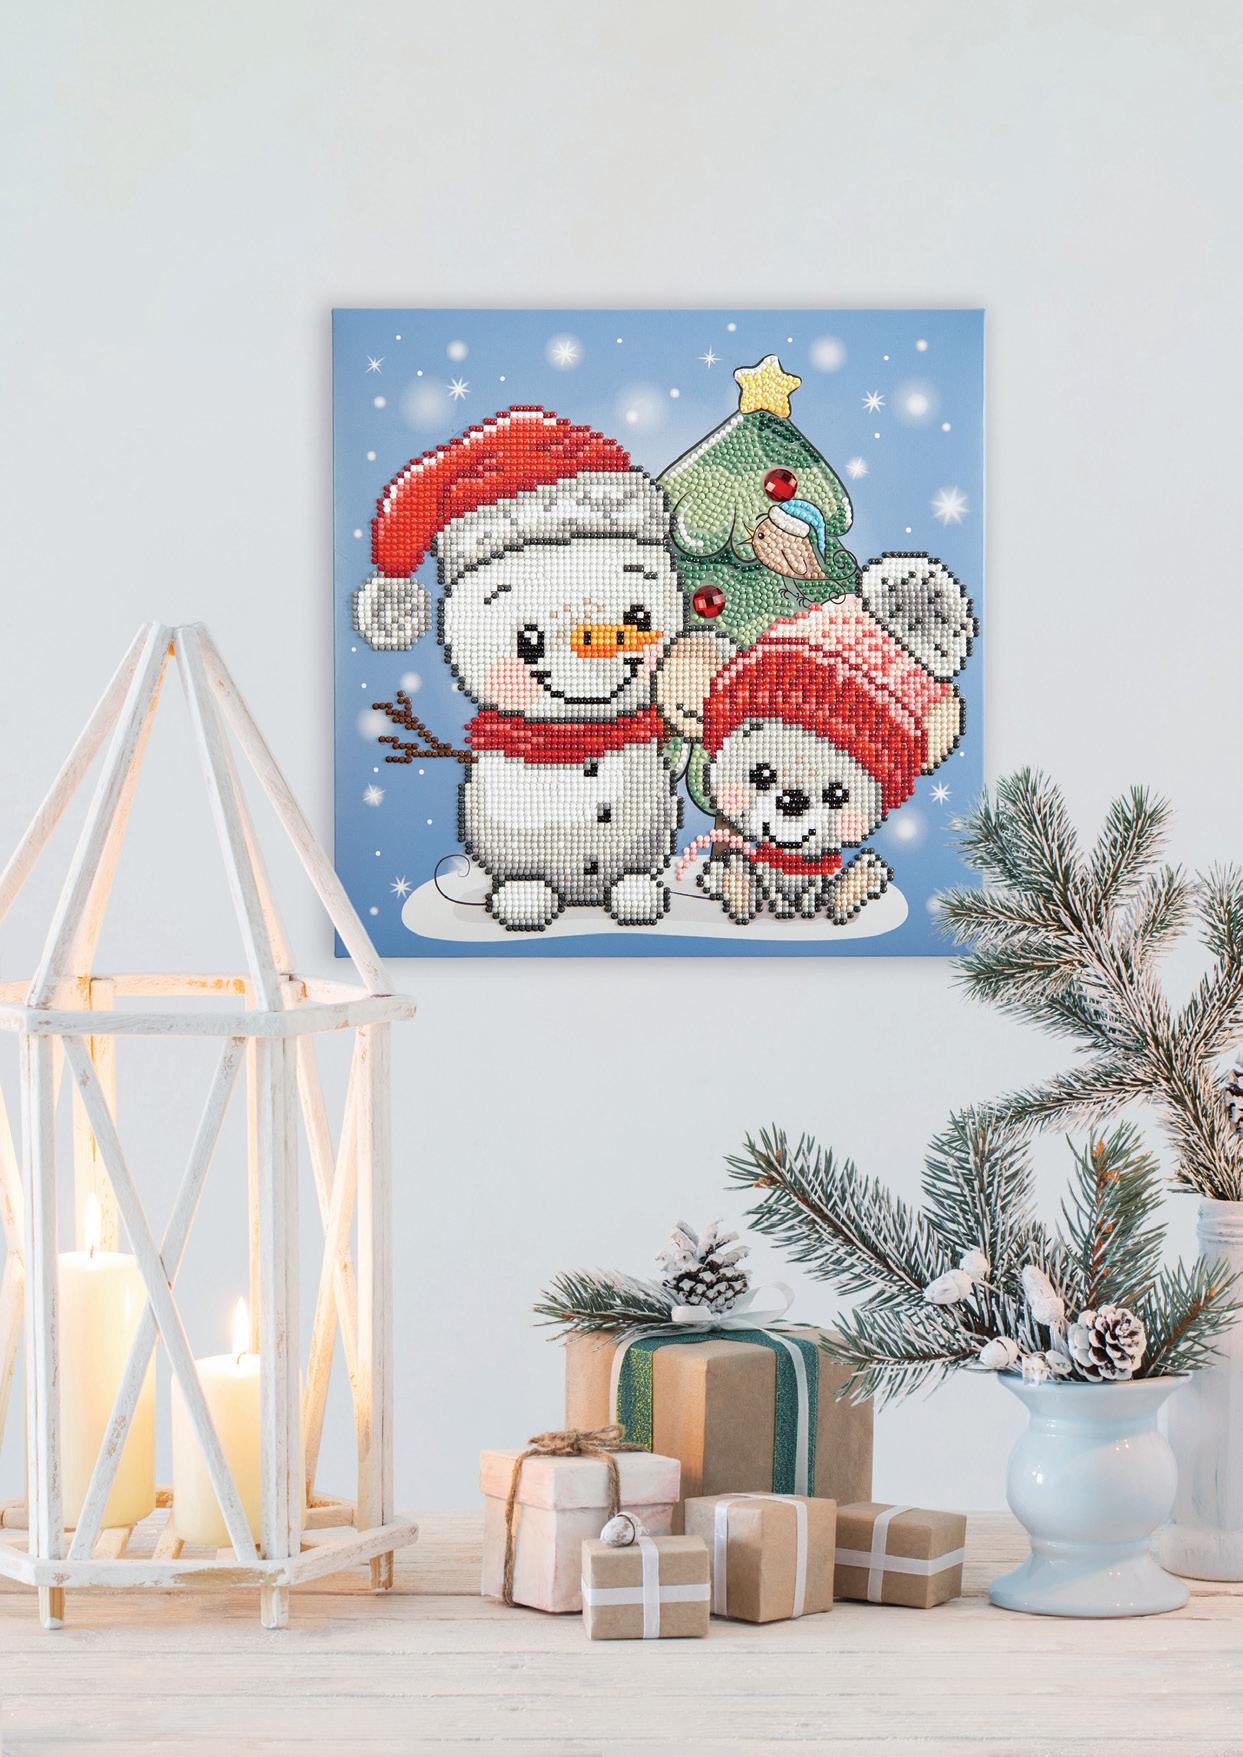
FROSTY FRIEND
Create your very own no-melt snowman from the warmth and comfort of your home. This jolly fellow’s beanie and festive-colored fringed scarf, rosy cheeks and ear-to-ear smile will dazzle, year after year!
Design size: 7.5 x 6.1in (19 x 15.5cm)
KIT DD17.042
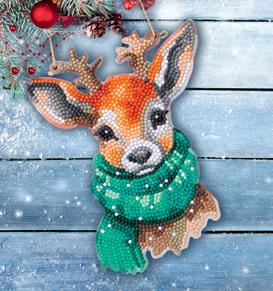
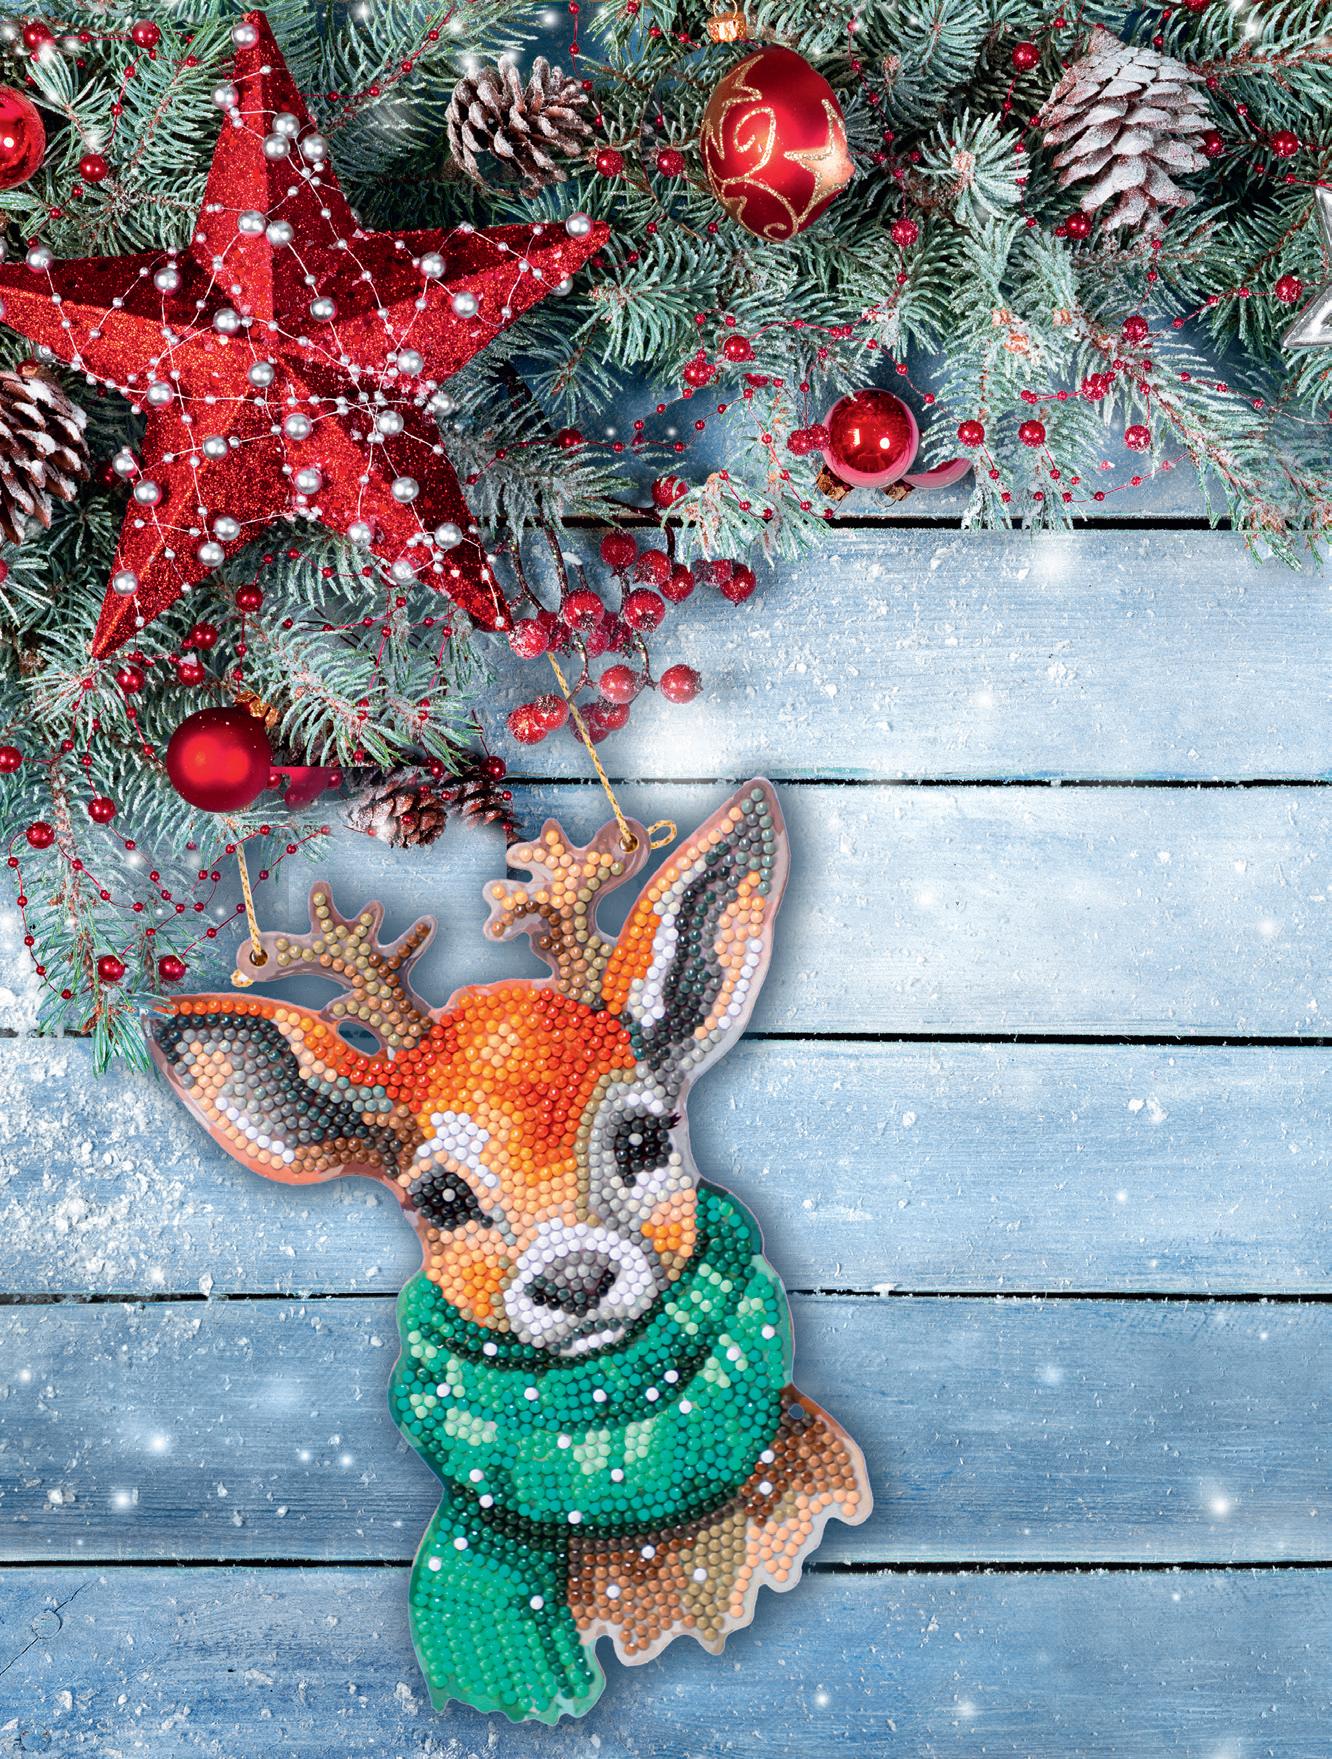
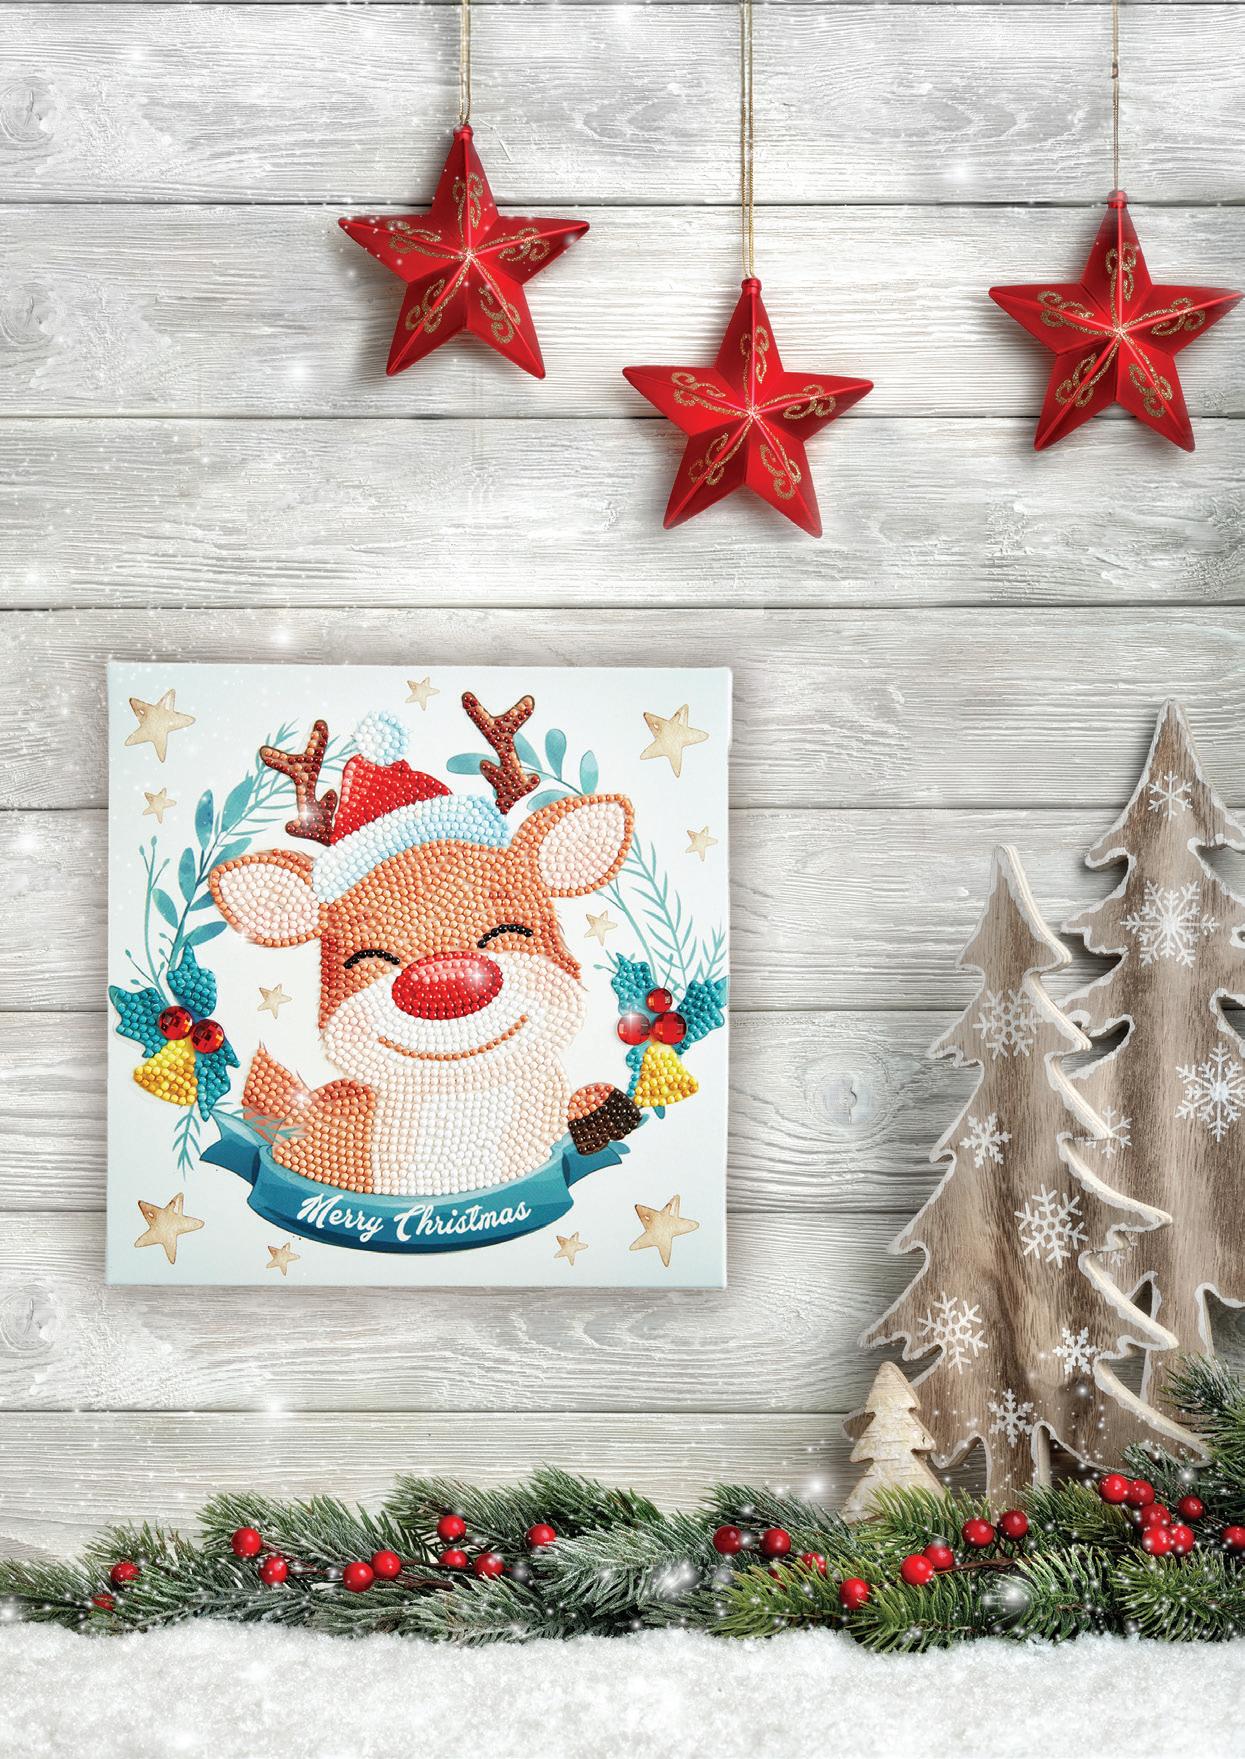
REINDEER
Add a touch of woodland whimsy to your festive scene with a cute ‘diamond’-encrusted reindeer. You’ll love his chunky scarf which effortlessly conveys a feeling of warmth and cosiness.
Design size: 7.5 x 5.7in (19 x 14.5cm)
KIT DD17.041
WALL WONDERS
These mini sparklers are lightweight and one of the quickest ways to make your home season-ready now! The kits are all-inclusive and when dotted can be dangled from:
l Over-the-door racks
l Coat hooks or peg rails
l Cabinet handles or pulls
l Newel posts
l Picture hanging hooks
l Nails or screws in walls
A snowman’s life is pretty short,but they sure do have a blast!
UNKNOWN
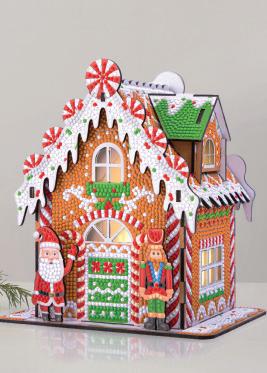
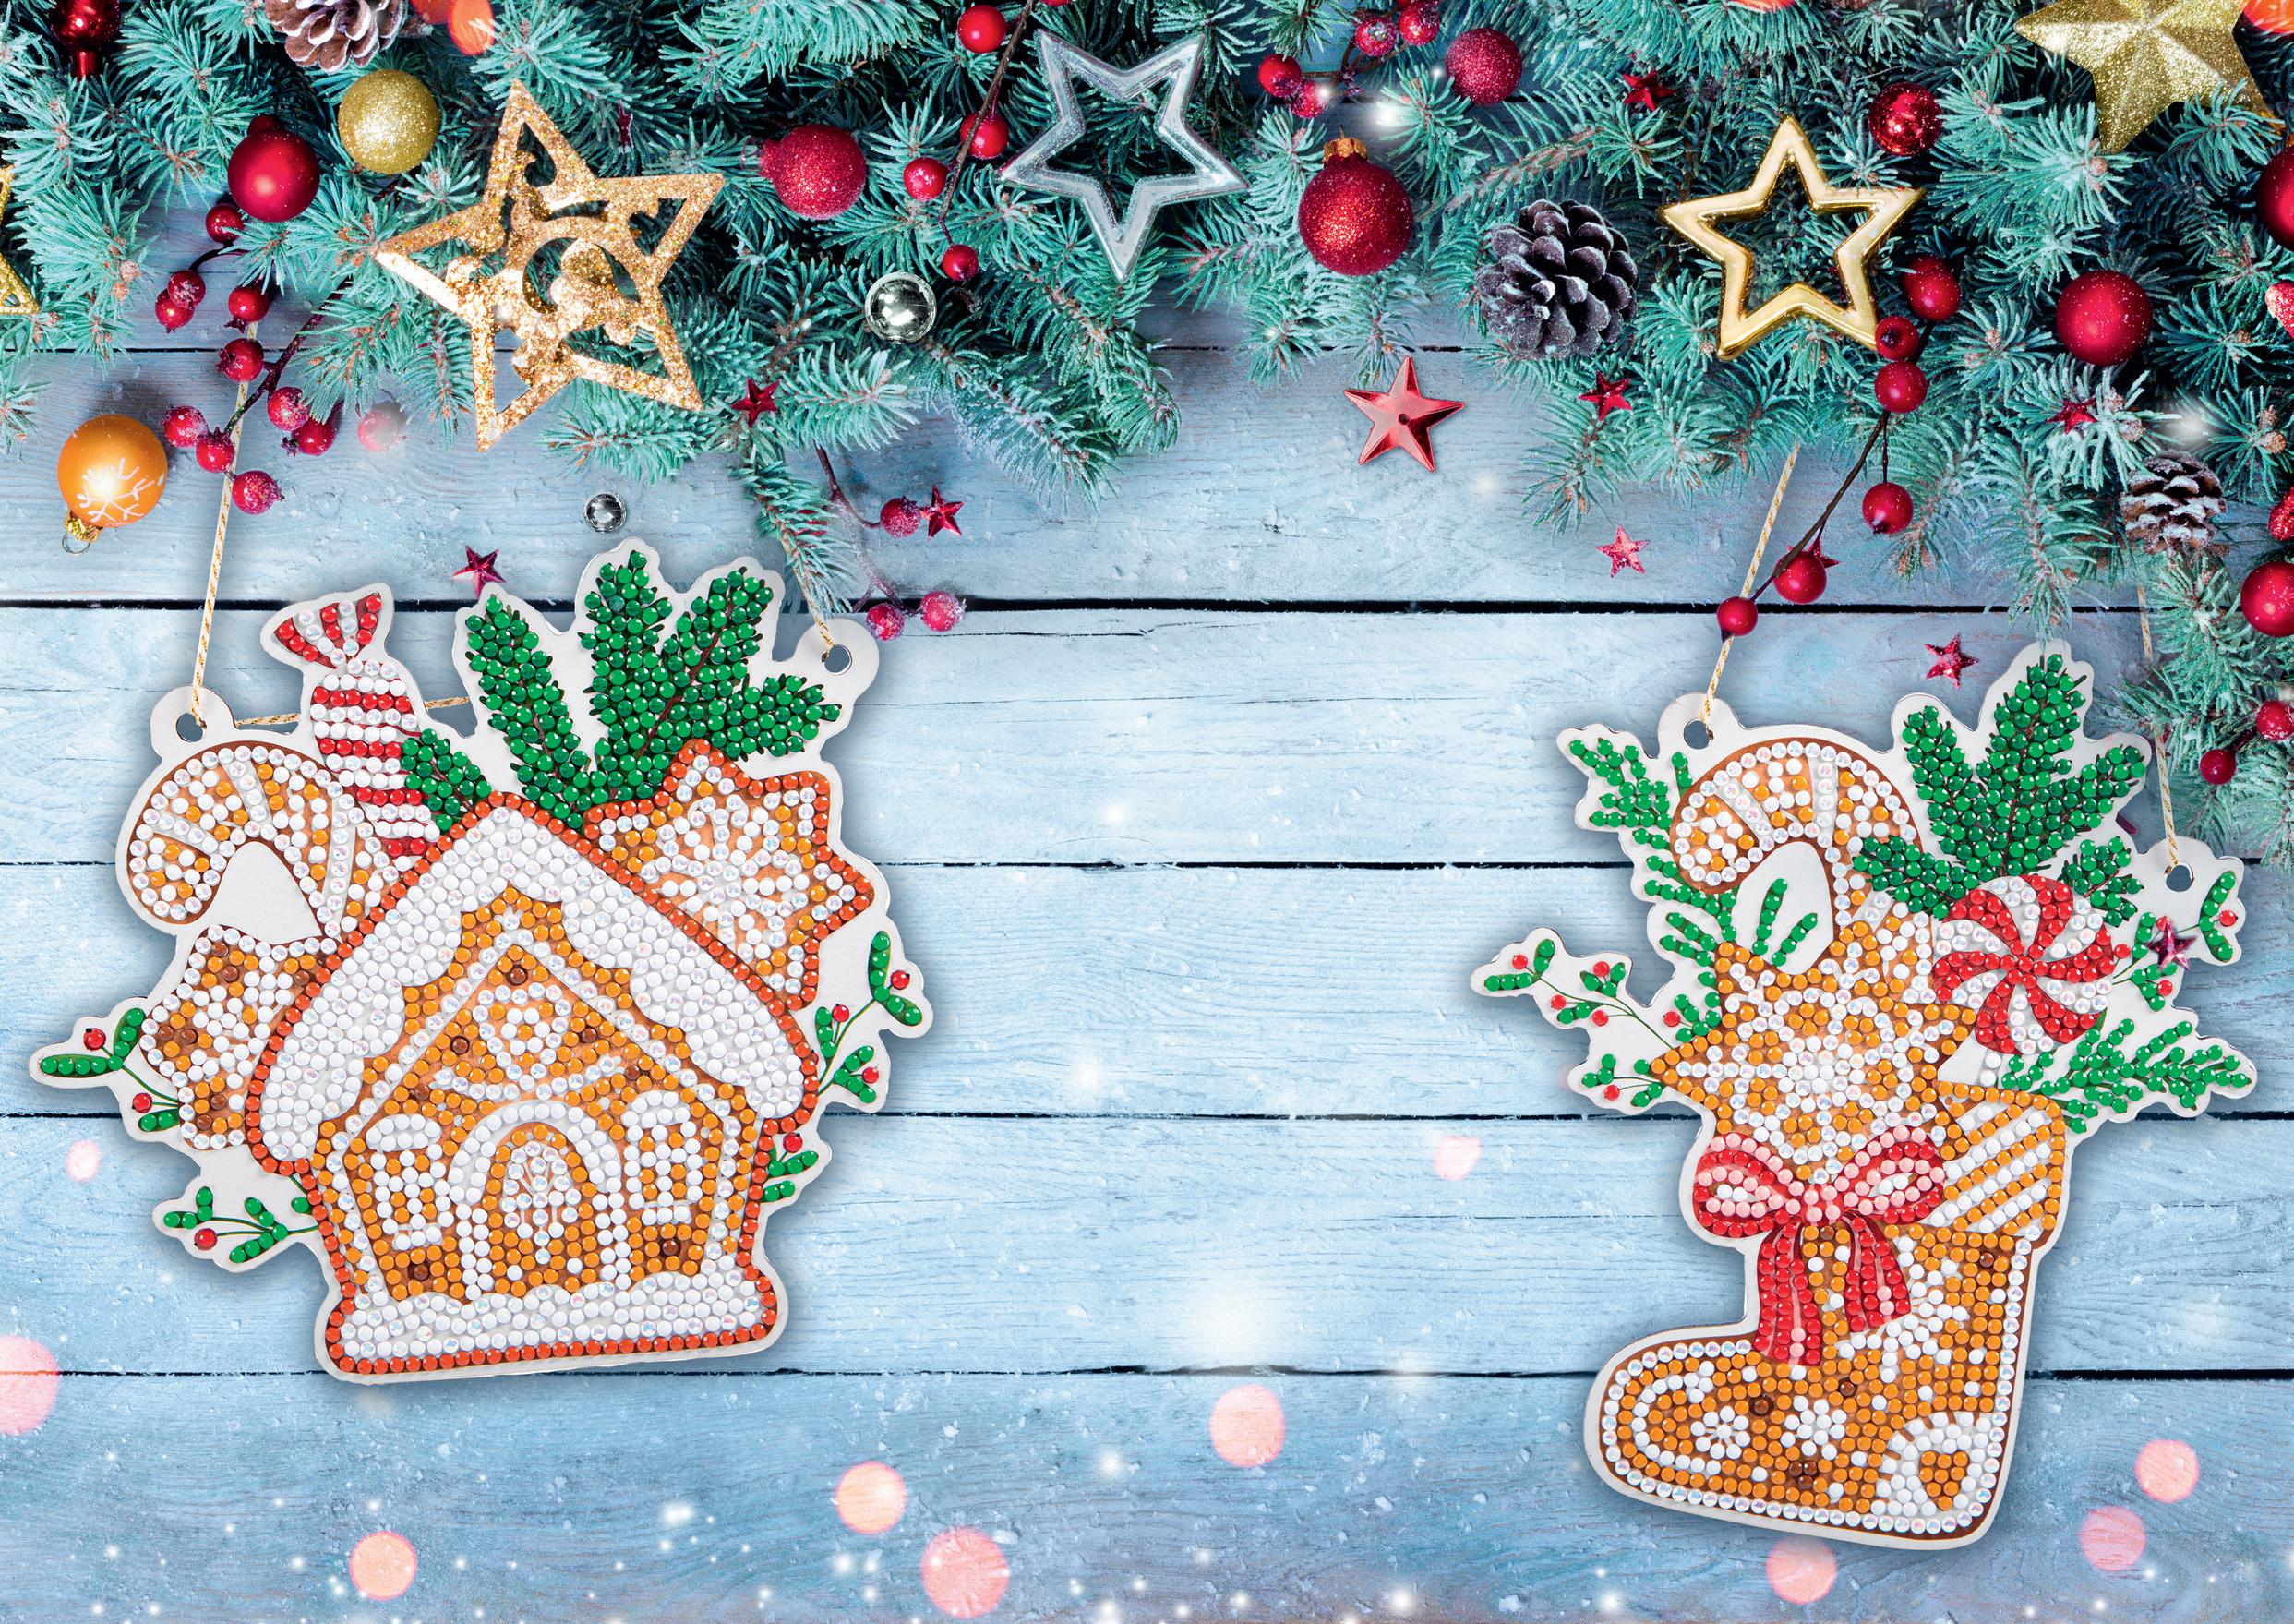
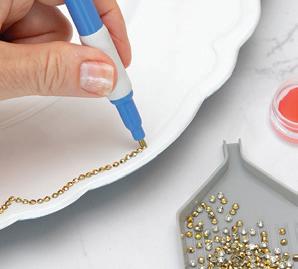
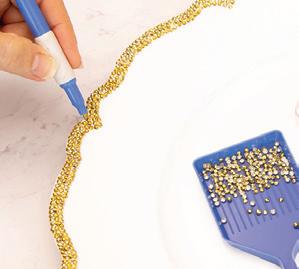
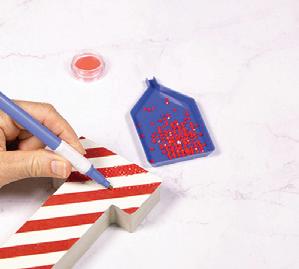
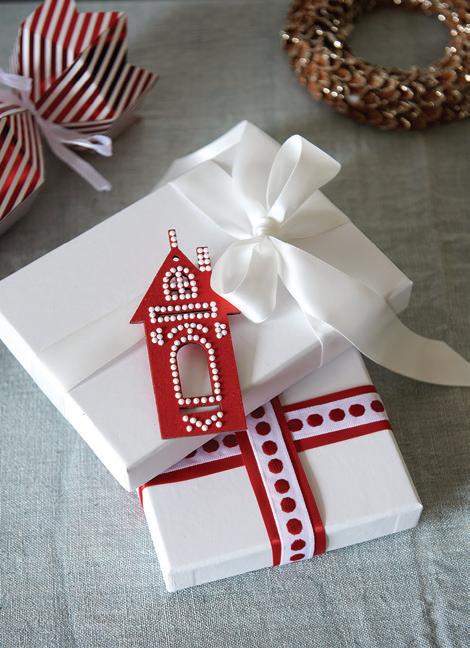
GINGERBREAD HOUSE
Skip the crumbs! Dot a gingerbread-themed plaque, which will sparkle for years to come!
Design Size: 6.2 x 6.1in (16 x 14.5cm) KIT DD17.034
HUMBLE BEGINNINGS
The festive season is steeped in traditions and folklore, one of which is the origin of decorating with Christmas stockings. It is said that St Nicholas, our modern-day Santa Claus, heard of the desperate plight of a widowed father who could not provide his three daughters with a dowry each, affecting their marriage prospects. One night, when the family was sleeping, St Nicholas secretly dropped gold coins down the chimney which fell into the girls’ freshly washed stockings, drying by the fire. Upon waking, the family were overjoyed to discover this Christmas miracle. Little wonder that people have hung up Christmas stockings ever since!
GINGERBREAD STOCKING
Deck your hall with this delightful gingerbread stocking, brimming with snowflake cookies, candy canes and other red and white sugary confections.
Design Size: 6.9 x 5.7in (17.5 x 14.5cm) KIT DD17.033
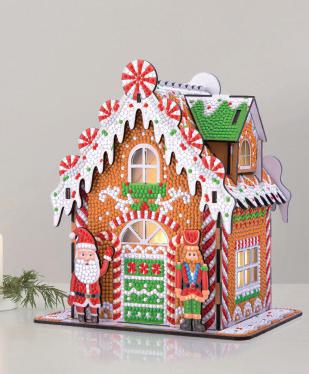
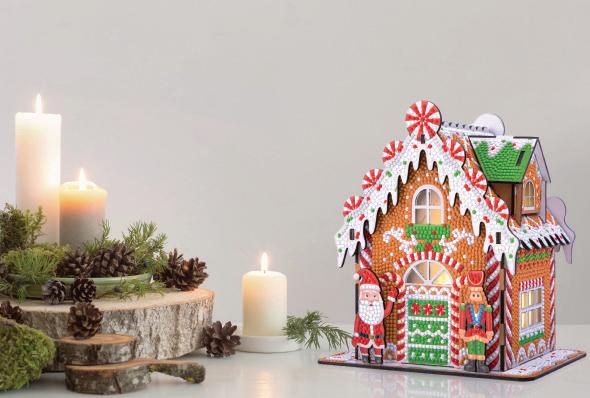
Keepsake Christmas Cottage ... sweet as!
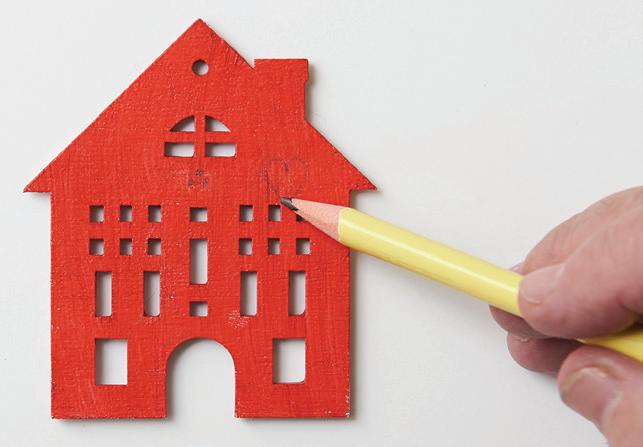
Sprinkle festive magic throughout your home with a gem-encrusted wood ornament, inspired by baked gingerbread traditions. This enchanting lit cottage comes as a flat-pack kit with everything you need, including the LED tealight. Diamond dot each piece then snap them together to assemble the house. Simply gorgeous!
DIAMOND PAINT A SPARKLING GINGERBREAD HOUSE THAT GLOWS FROM WITHIN
GINGERBREAD AT THE WHITE HOUSE
Since 1969, White House chefs have created gingerbread houses for the First Family and White House visitors to enjoy during the festive season. The annual tradition began when First Lady Pat Nixon collaborated with Assistant Executive Chef Hans Raffert to create a German A-frame style house, displayed in the State Dining Room. Over time, the houses have evolved into architectural wonders. A notable example is Roland Mesnier’s 1993 “House of Socks” in the shape of the White House, and so named after the Clinton family’s pet cat, Socks.
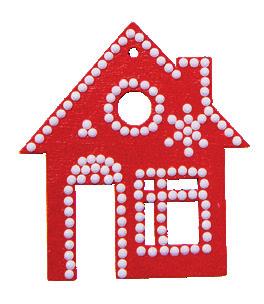
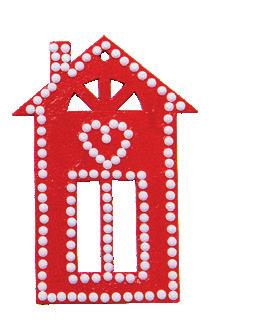
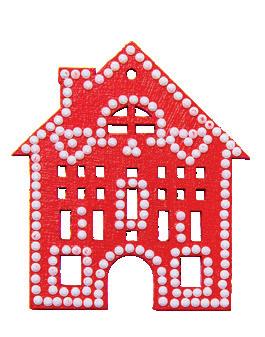
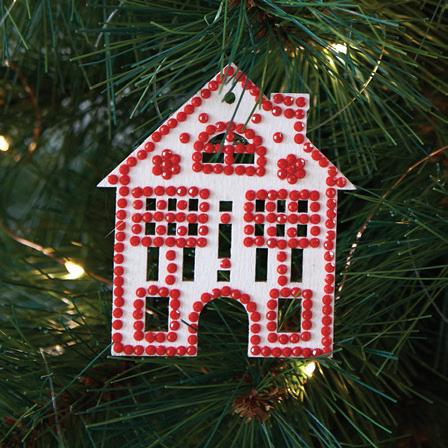
GINGERBREAD HOUSE
No baking required! Simply dot each of the wooden pieces with the Dotz® gems in the kit. Then snap the pieces together to create your own special 3D Christmas keepsake. Design
A taste of festive joy!
GINGERBREAD COOKIES
If you were inspired to diamond paint the gingerbread house on the previous pages, you may be similarly tempted by these delish and edible gingerbread sweet treats!
SWAP YOUR DOTZ ® FOR DOUGH! BAKE A BATCH OF OH-SO-NICE AND SPICY GINGERBREAD COOKIES!
GINGERBREAD COOKIES
Prep time 20 mins
Baking time 10-12 mins
Makes about 40
1 stick (4oz) softened butter
+ 1 tablespoon
½ cup (4 oz) light brown sugar
½ cup (4 oz) light treacle or honey
1 egg yolk (reserve egg white)
3½ cups (14½ oz) all-purpose flour, sifted
1 tsp baking soda
3 tsp ground ginger
1½ tsp mixed spice
1 tsp ground cinnamon
Icing
1 egg white (reserved)
1 cup (4 oz) powdered/ confectioners’ sugar, sifted
½-1 tsp lemon juice
STEP 1 Preheat oven to 350°F. Line
2 baking sheets with parchment paper (non-stick baking paper).
Using electric mixer, beat butter, sugar and light treacle together in a bowl until mixture is pale and creamy. Add the egg yolk and beat the mixture well until combined. Spoon mixture into a large bowl and add sifted flour, baking soda and spices. Beat on low speed until all the flour mixture is combined, then using your hands, knead the mixture until smooth. Wrap the dough in plastic wrap (cling film) and refrigerate for 30 mins.
STEP 2 Roll the dough out on a lightly floured surface to about 1/8 in thick. Using a 2 ¾in or similar size cookie cutter, cut out shapes and place on the prepared tray. Bake for 10-12 mins or until lightly golden. Cool thoroughly before decorating.
STEP 3 While the cookies are baking, make the icing. Place egg
white in a medium bowl and beat lightly with a fork to form a few bubbles and to break up the white. Gradually add sifted confectioners’ sugar. Add enough lemon juice to make a glossy spreadable icing. Note: the consistency is important when decorating. For outlines, icing should be thick enough to hold its shape, while flooding icing should be fluid enough to spread easily.
STEP 4 Place the icing in a small piping bag, fitted with a small plain nozzle, then proceed to decorate each cooled cookie as described in Step 5 or as desired. It is important to hold your piping bag at a slight angle, keeping the tip close to the cookie surface to ensure clean lines.
STEP 5 To create an outline, gently squeeze the piping bag as you pipe a smooth continuous line around your gingerbread shape. Try to maintain even pressure.
• When each outline has set, you may want to fill in the cookie by flooding it with more icing. Start inside the outline and work inwards toward the center. Do not overfill. You can use a toothpick to help spread the icing within the outline and to pop any air bubbles.
• To create details inside an outlined shape, pipe squiggly lines or small ‘v’ shapes to mimic tree branches. Add dots of icing within star cookies to imitate tree baubles or Christmas lights. When dotting, hold your piping bag at a 90-degree angle to the cookie.
• For gingerbread men, pipe small, curved lines for smile, hands and boots, as shown, two dots on the face for eyes and three dots on the body for buttons. If you wish, flood the hands and boots with icing.
• Leave for several hours until set.
For iced gingerbread, flood each pre-outlined cookie with icing.
TIPS
1. You can use a variety of Christmas cookie cutters.
To make a similar quantity of gingerbread cookies to this recipe, use 2 ¾in or similar size cookie cutters.
2. If hanging the gingerbread cookies, use a small drinking straw to make a small hole at the top of each shape before baking. Make hole slightly larger than you need as it may shrink slightly while baking.
Hold tip of piping bag close to the cookie as you pipe facial, hand, boot and button details.
Blooms ’n’ Songbirds
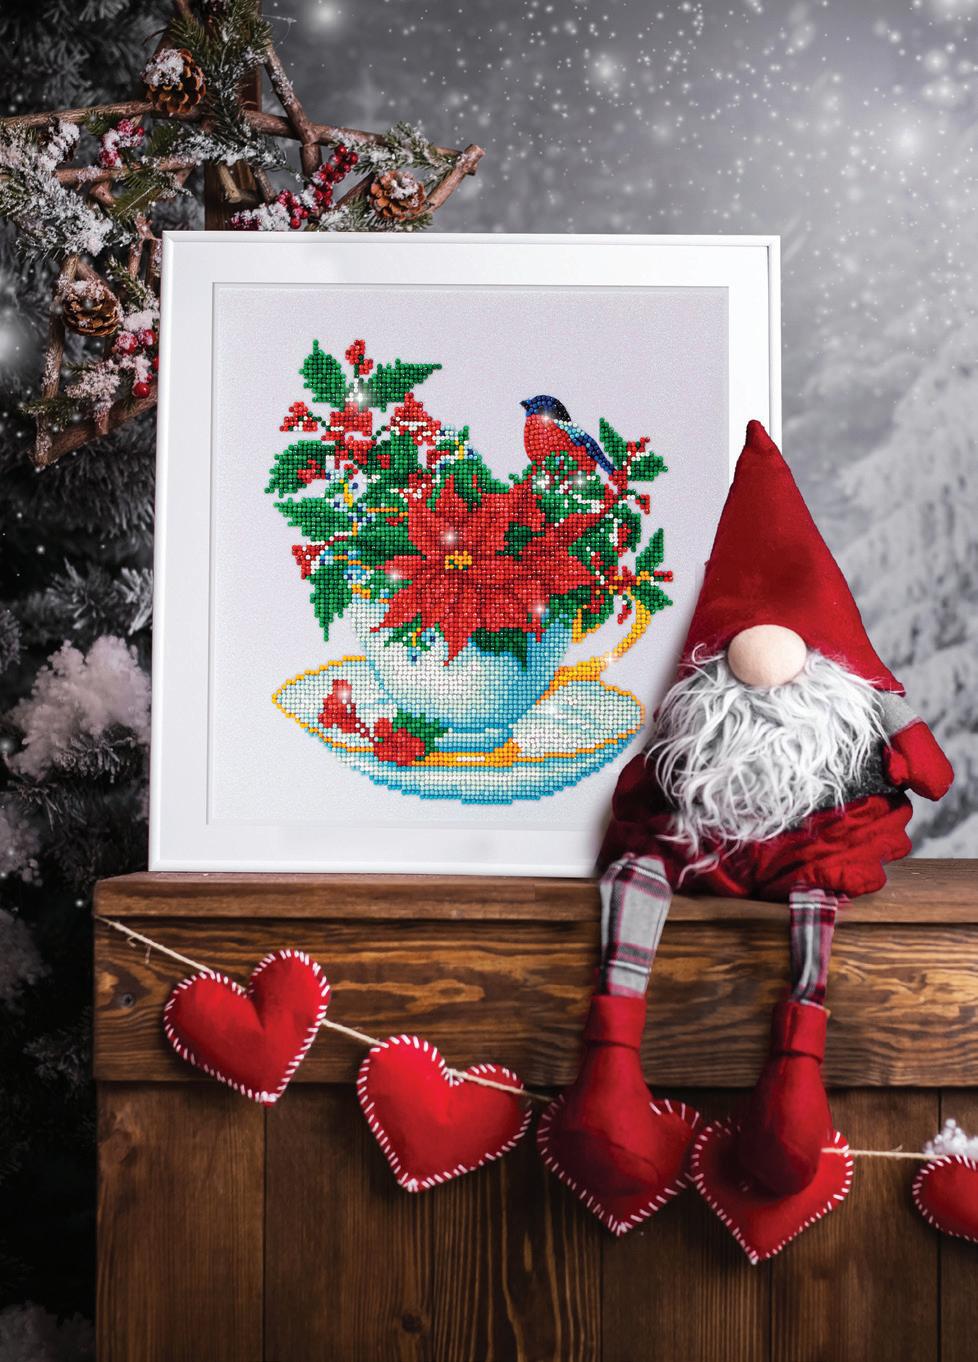
FESTIVE CUPPA
Display a dotted vignette
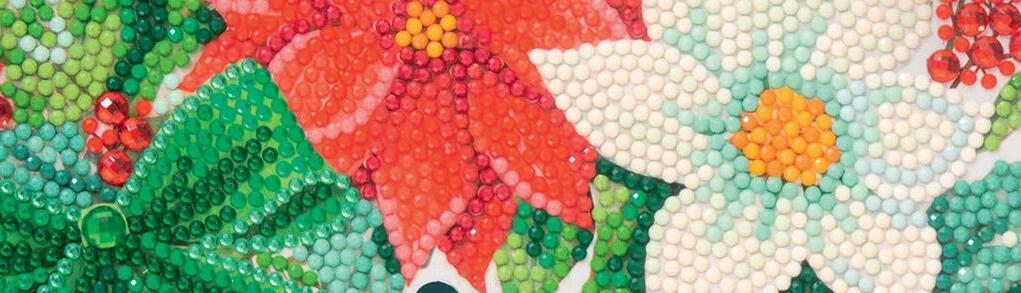
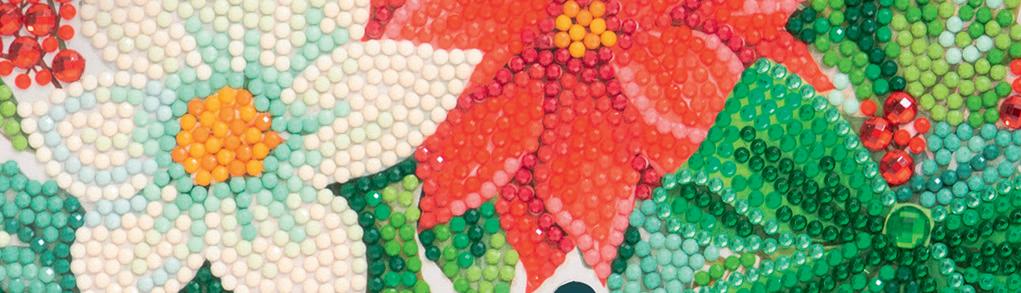
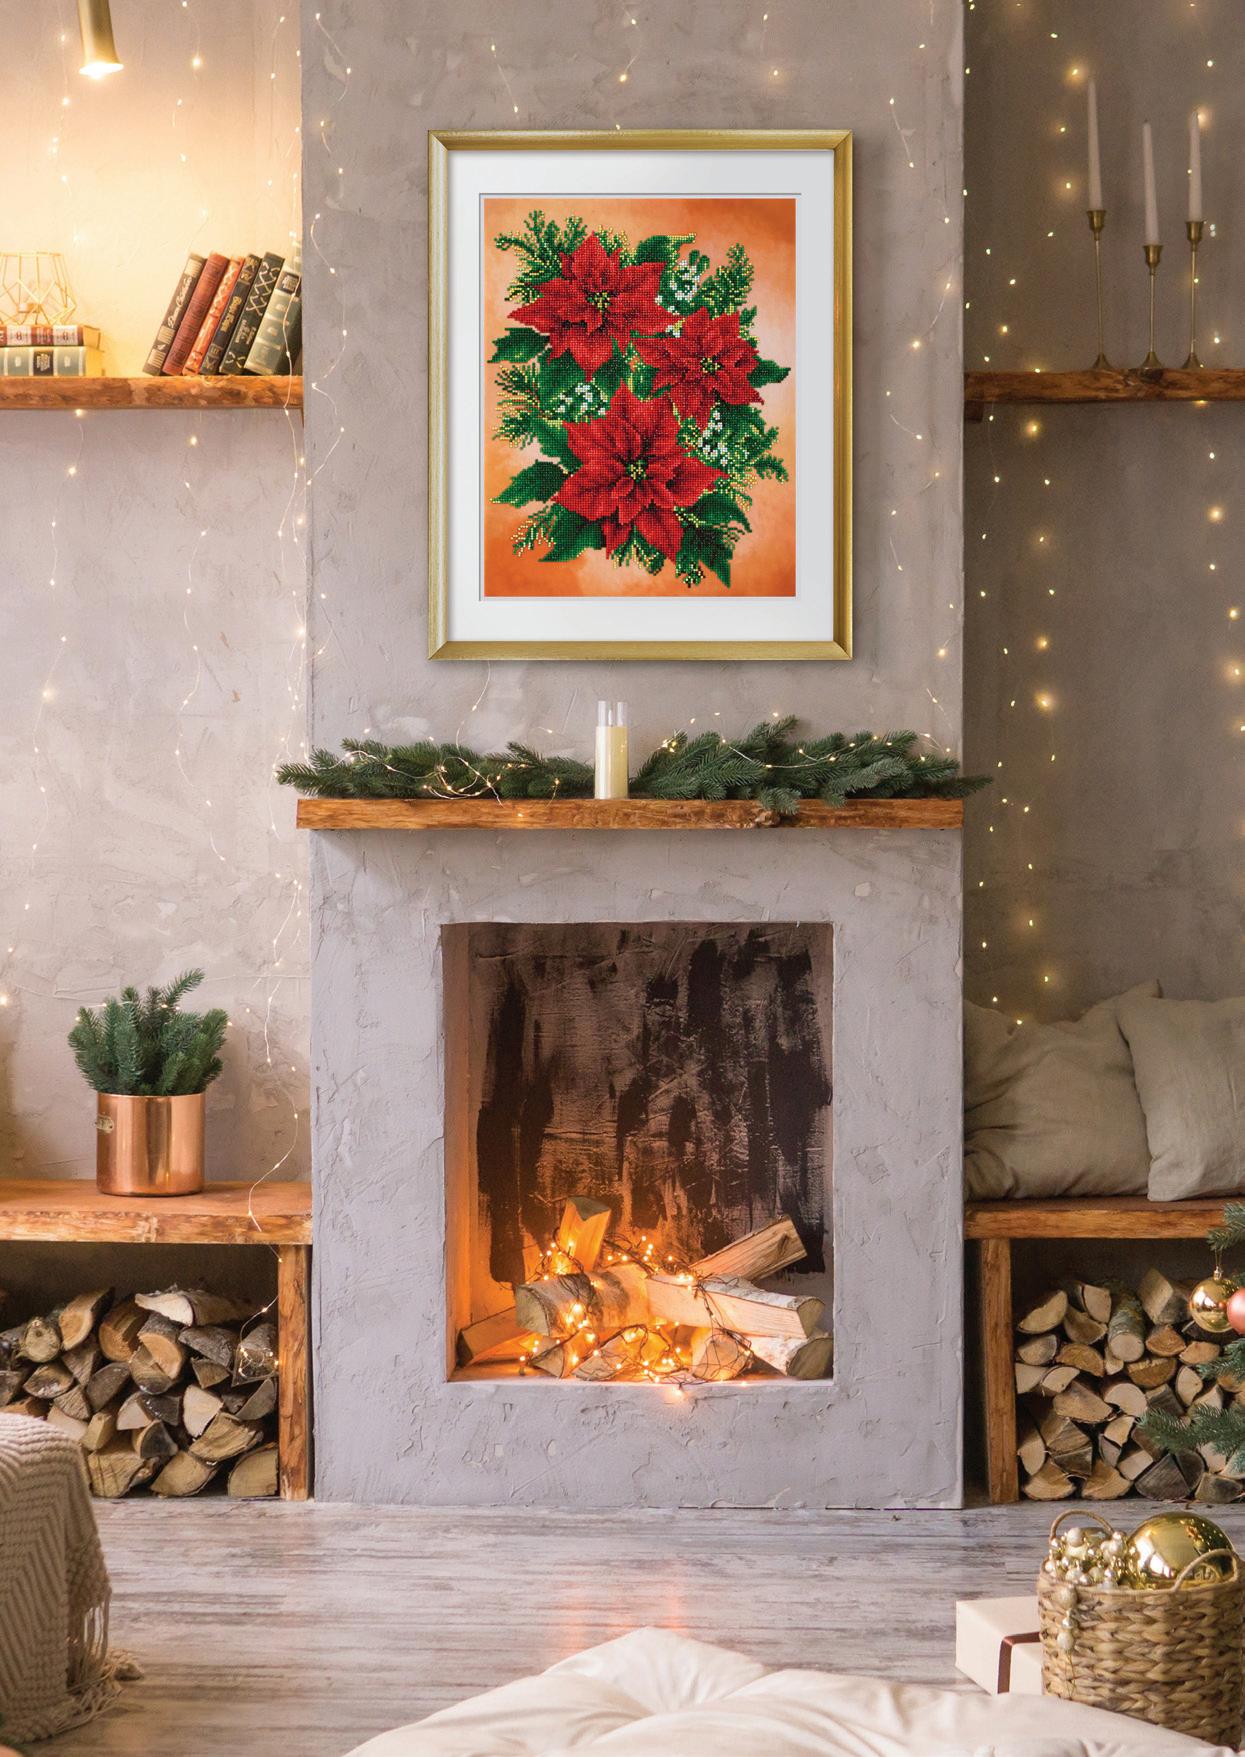
Poinsettias have undergone a makeover... a diamond painting transformation so to speak. And we think you will be entranced by their sparkling good looks along with those of the cardinals on the following pages! So go on, put on a festive show with these portraits of seasonal splendor.
FESTIVE CHEER
There are few plants more synonymous with the holidays than poinsettias! And with this diamond painting you have an iron-clad guarantee the blooms won’t fade, making it an everlasting gift to yourself, a family member or someone close to you. PS. The kit is all-inclusive.
Design size: 14 x 18in (36 x 46cm)
KIT DD9.068
MMake a statement with Dona Gelsinger’s brilliant bouquet of fiery poinsettias, reinterpreted for fans of diamond painting.
As a symbol of good cheer, look no further than poinsettias!
Cardinals don’t knock, they just show up in red and steal the show!
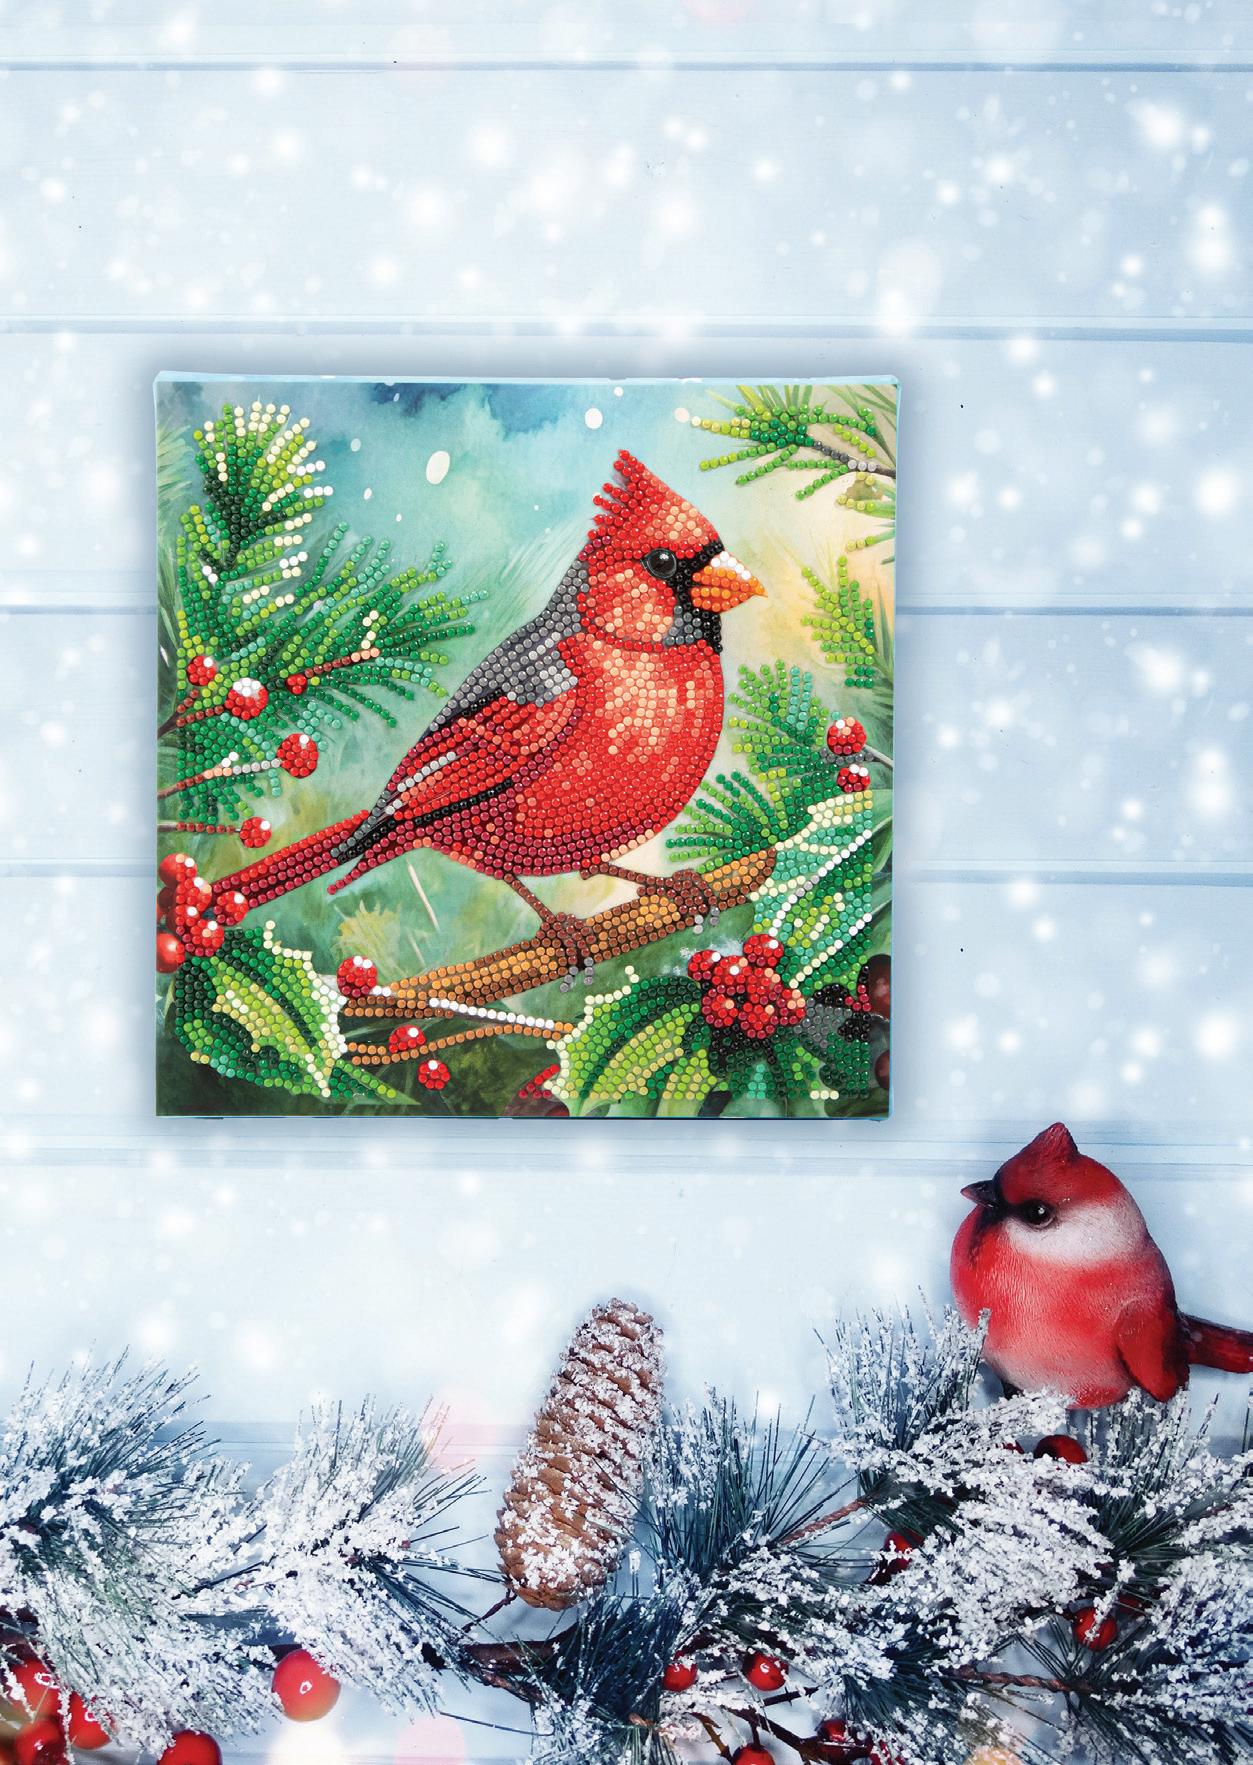
CARDINAL & HOLLY
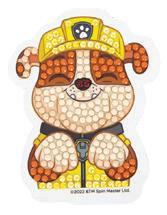
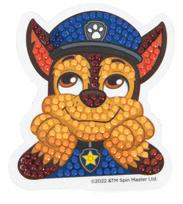
This engaging fellow could be yours to dot or to gift. The all-in-one color-printed Dotz® Box kit has everything you need. Better still, there’s a hanging tab at the back so framing is not needed, making it an affordable project!
Design size: 8.7 x 8.7in (22 x 22cm) KIT DBX.221
FUN FACT
Q: Do Northern Cardinals visit more often in winter? A: They’re probably just more noticeable. They don’t migrate for winter, staying in the same area year-round. Their vivid feathers never dull, despite molting. Thus, the spectacular bright red plumage of male cardinals is highly visible against a snowy landscape.
GOOD FORTUNE CARDINAL
Pure diamond painting artistry in a kit! You will be thrilled to dot and display this pre-printed scene showcasing an elegant, dapper cardinal, flaunting his rich red coat and signature crest while perched on a snow-laden branch, oblivious to the chill of winter.
Design size: 14 x 17.9in
(35.5 x 45.5cm) KIT DD7.034
OUR HEARTS ARE ALL AFLUTTER FOR CARDINALS
CHRISTMAS WINDOW
Is teddy looking out?
Or are these adorable cardinals peering in, entranced by the cozy Christmas scene playing out in front of them? Perhaps wishing they were perched on the tree inside? This exquisite diamond painting is worked with square Dotz® gems for full coverage.
Design size: 16.1 x 20.1in (41 x 51cm)
KIT DQ11.002
FUN FACT
Cardinals are nature’s musical songbirds. Although unusual, both males and females sing, often performing duets using their varied repertoire. Listen for their clear, melodious whistles with distinct rhythmic patterns – notes that carry well across the landscape. And like all youngsters across many species, juveniles learn the ‘tunes’ by listening to the adults.
Simply red!
In the lead up to Christmas, stores stock up on an indisputable symbol of Christmas: the poinsettia plant. Often mistaken for petals, the star-shaped red bracts are in fact large leaves that surround tiny delicate yellow flowers (the cyathia) at the center. Originally native to Central America and Mexico and now grown worldwide, the shrub flowers naturally during winter, reaching a height roughly between 2 to 10 feet. While red remains a classic choice, poinsettias also come in white, creams, pinks and even speckled varieties.
FLOWERS OF THE HOLY NIGHT
The shrub’s earliest known association with the yuletide dates back to the 1600s when Franciscan friars in Mexico began using the plant to decorate Nativity scenes. About that time, the legend of Pepita was born. As the story goes, young Pepita was on her way to church on Christmas Eve. Realizing she didn’t have an offering, she fashioned a bouquet of roadside ‘weeds’ as a gift to the newborn Jesus. When she placed the flowers at the altar, the ‘weeds’ burst into the colorful blooms of the wild ‘cuetlaxochitl’, the Aztec word for poinsettia, which Spanish colonizers renamed ‘La flor de Nochebuena’, Spanish for ‘the Christmas Eve flower’. The literal translation for Nochebuena is ‘good night’ or ‘holy night’, in reference to Christmas Eve.
CULTIVATING BEAUTY
Joel Roberts Poinsett, a former US ambassador to Mexico, is credited with introducing the plant to the USA. Struck by its unique beauty, he brought it back from Mexico to his South Carolina home in 1828. Successfully cultivating it in his greenhouse, he shared the plant with family and friends who were captivated by its dramatic color change during the festive
season. Little wonder that the plant’s common name honors Poinsett over its botanical name, Euphorbia pulcherrima.
FLORAL ARTISTRY
It wasn’t long before poinsettia spread to Europe, beginning its
FESTIVE BOUQUET
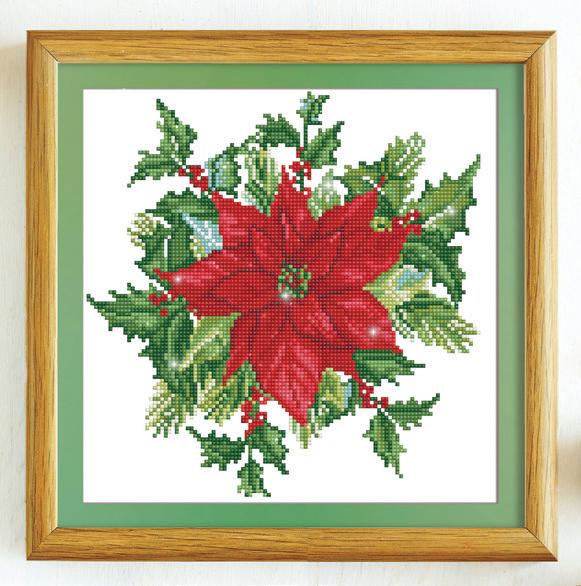
It’s a timeless combination –holly’s glossy green leaves and the poinsettia’s scarlet bracts. This diamond painting embodies this classic color scheme. When framing it, consider a colored mat in a shade drawn from the leaves.
Design size: 12.6 x 12.6in (32 x 32cm)
KIT DD5.055
Style it
Merry
Celebrate the season by diamond painting oneof-a-kind centerpieces and cute tabletop accents.
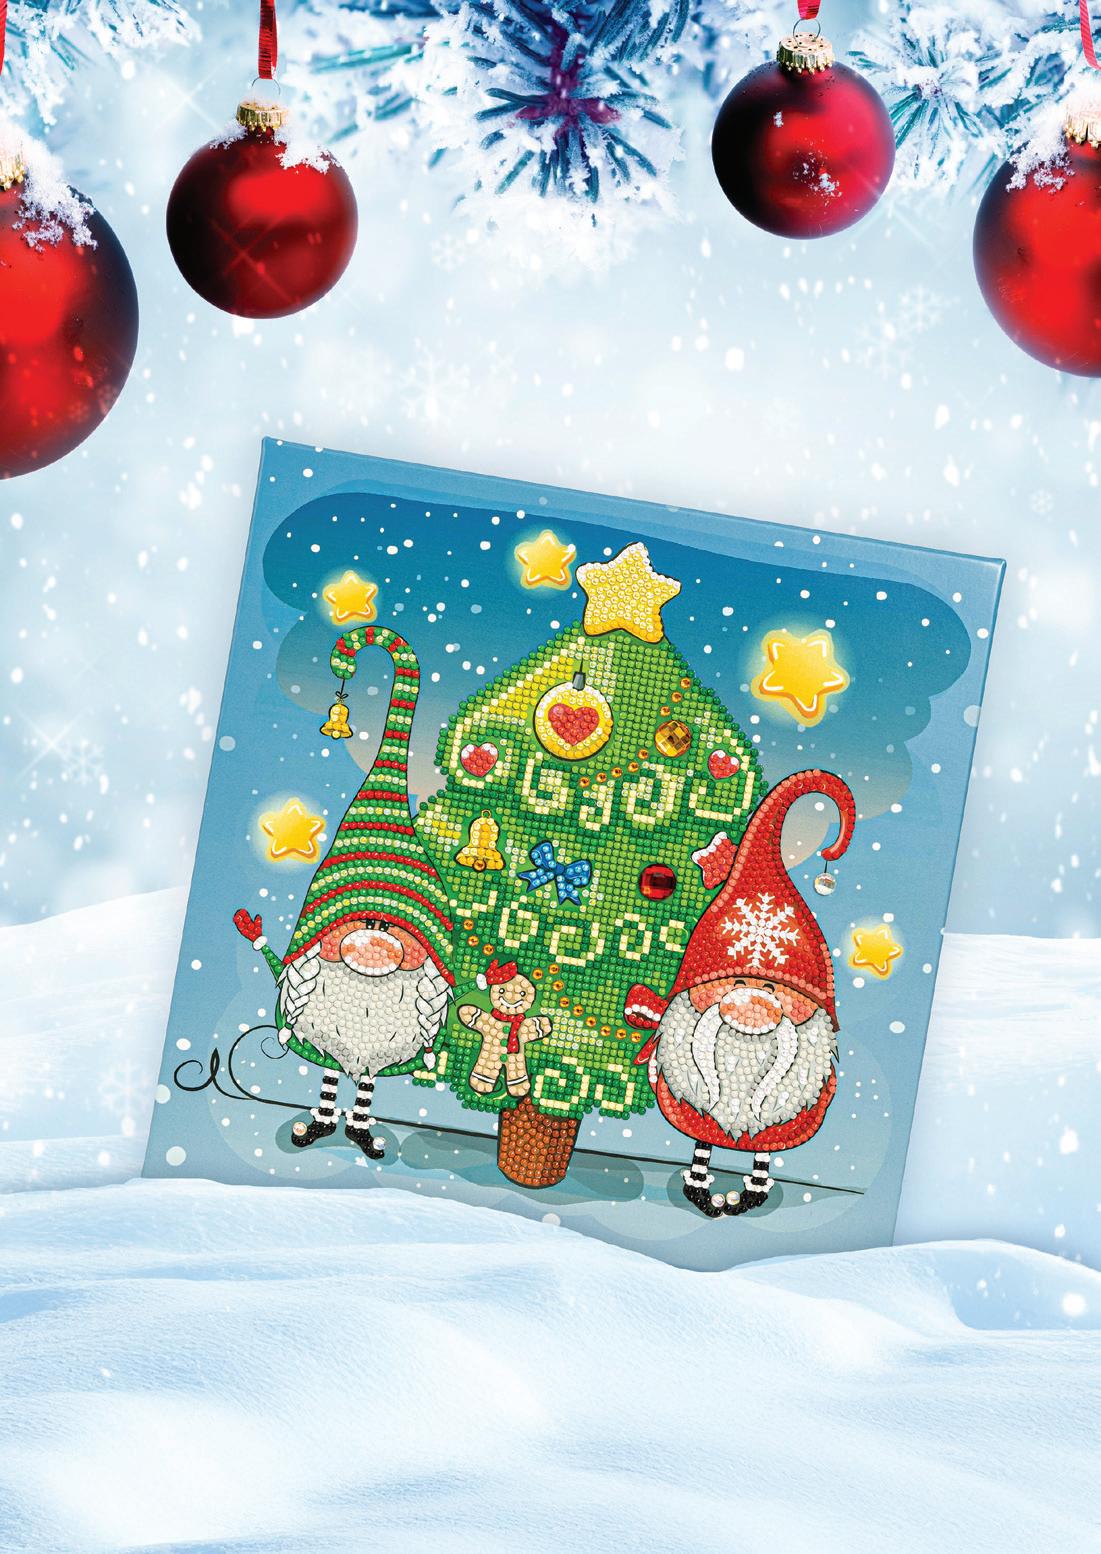
A delight to the eye, this array of freestanding shimmering decorations will spread the spirit of Christmas throughout your home. Almost any level surface is fair game for these ornaments – from shelves and mantels to console, coffee and dining tables. Dotted or as a kit, they also make excellent presents.
Celebrate the dazzling outdoor festive installations that light up homes across the USA. This 2D tabletop diamond painting is best viewed from the comfort of your home.
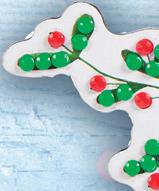
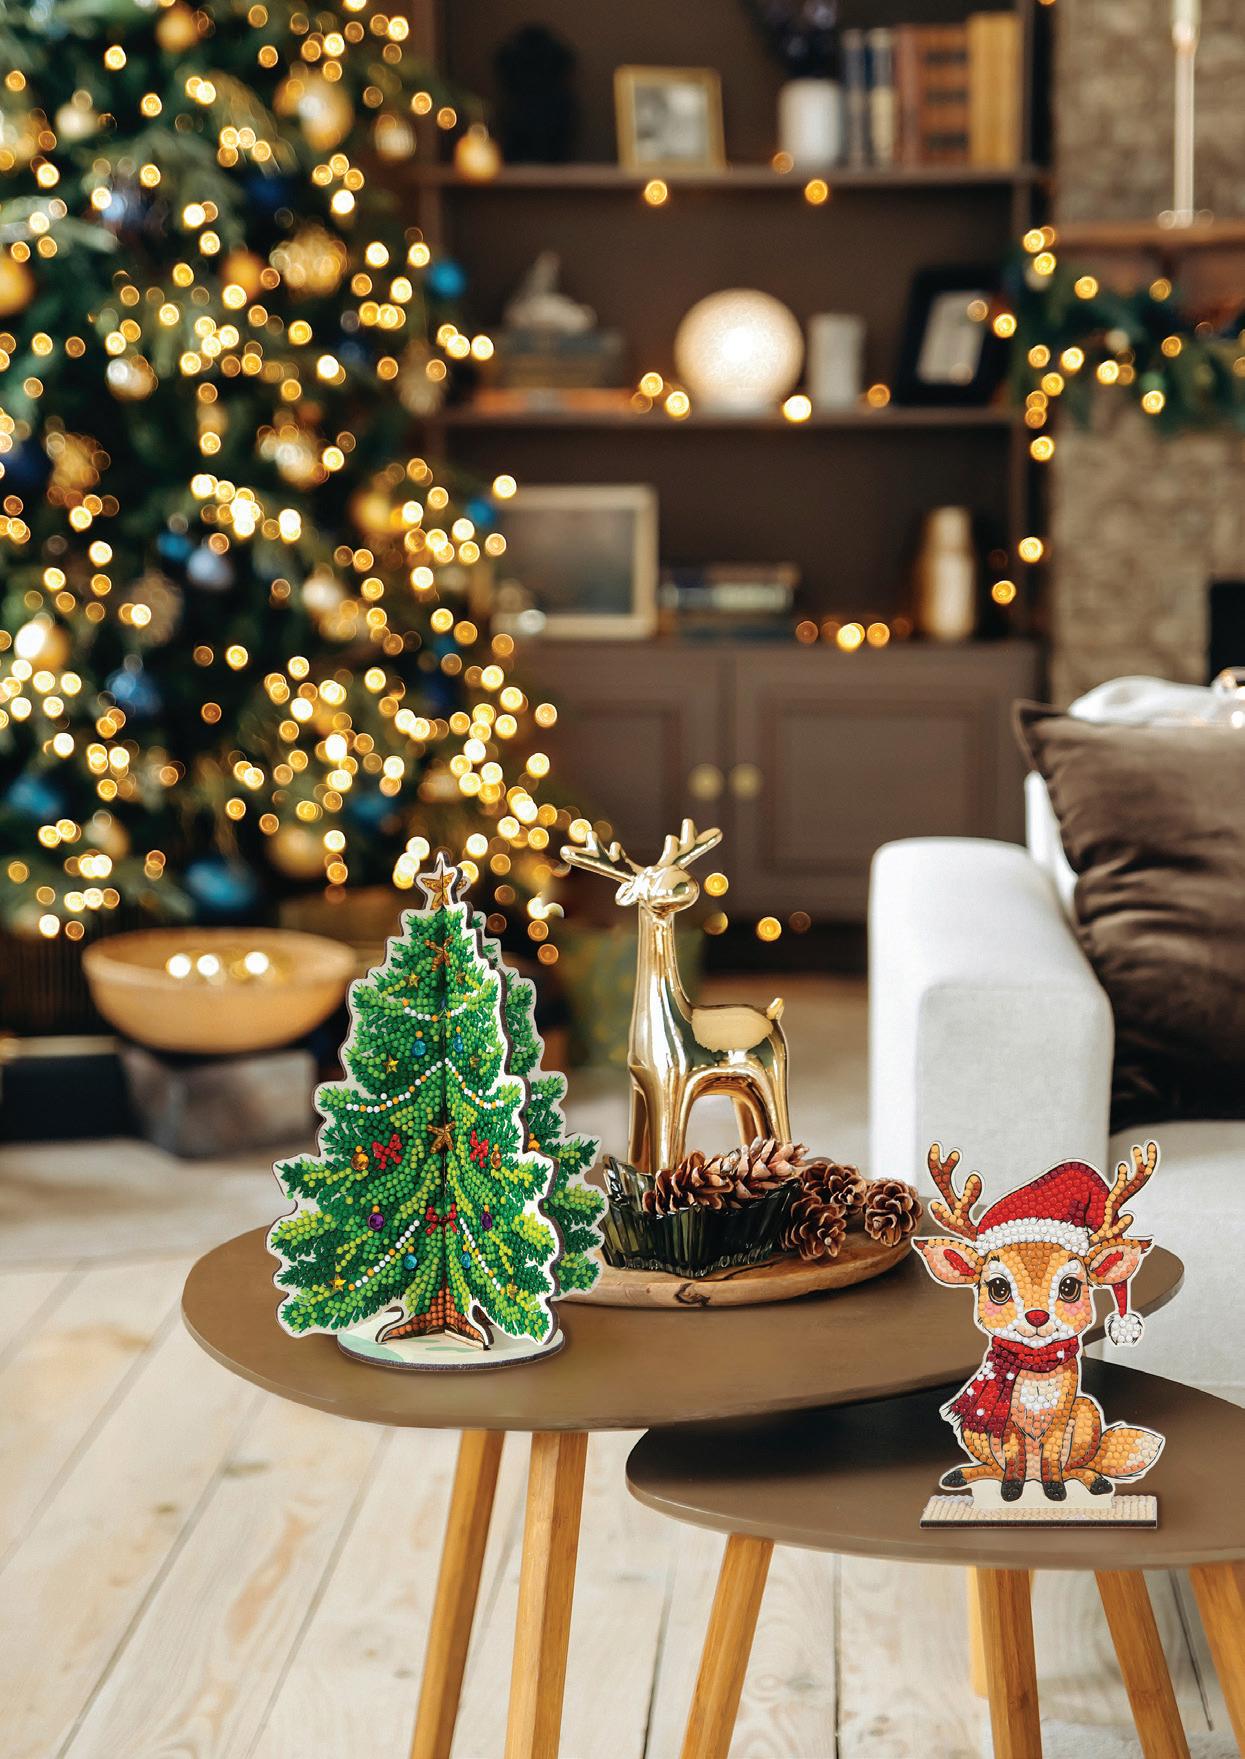
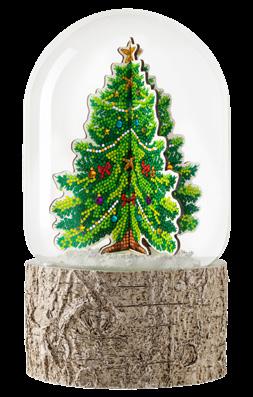
Simply dot both sides of this ornament-laden tree’s pieces, then slot together for an enchanting display.
Design Size: 6.3 x 7.7in (16 x 19.5cm)
SPRINKLE YULETIDE MAGIC THROUGHOUT YOUR HOME WITH CHARMING DIAMOND ART TOUCHES HERE, THERE AND EVERYWHERE!
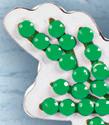
CHRISTMAS TREE STARS
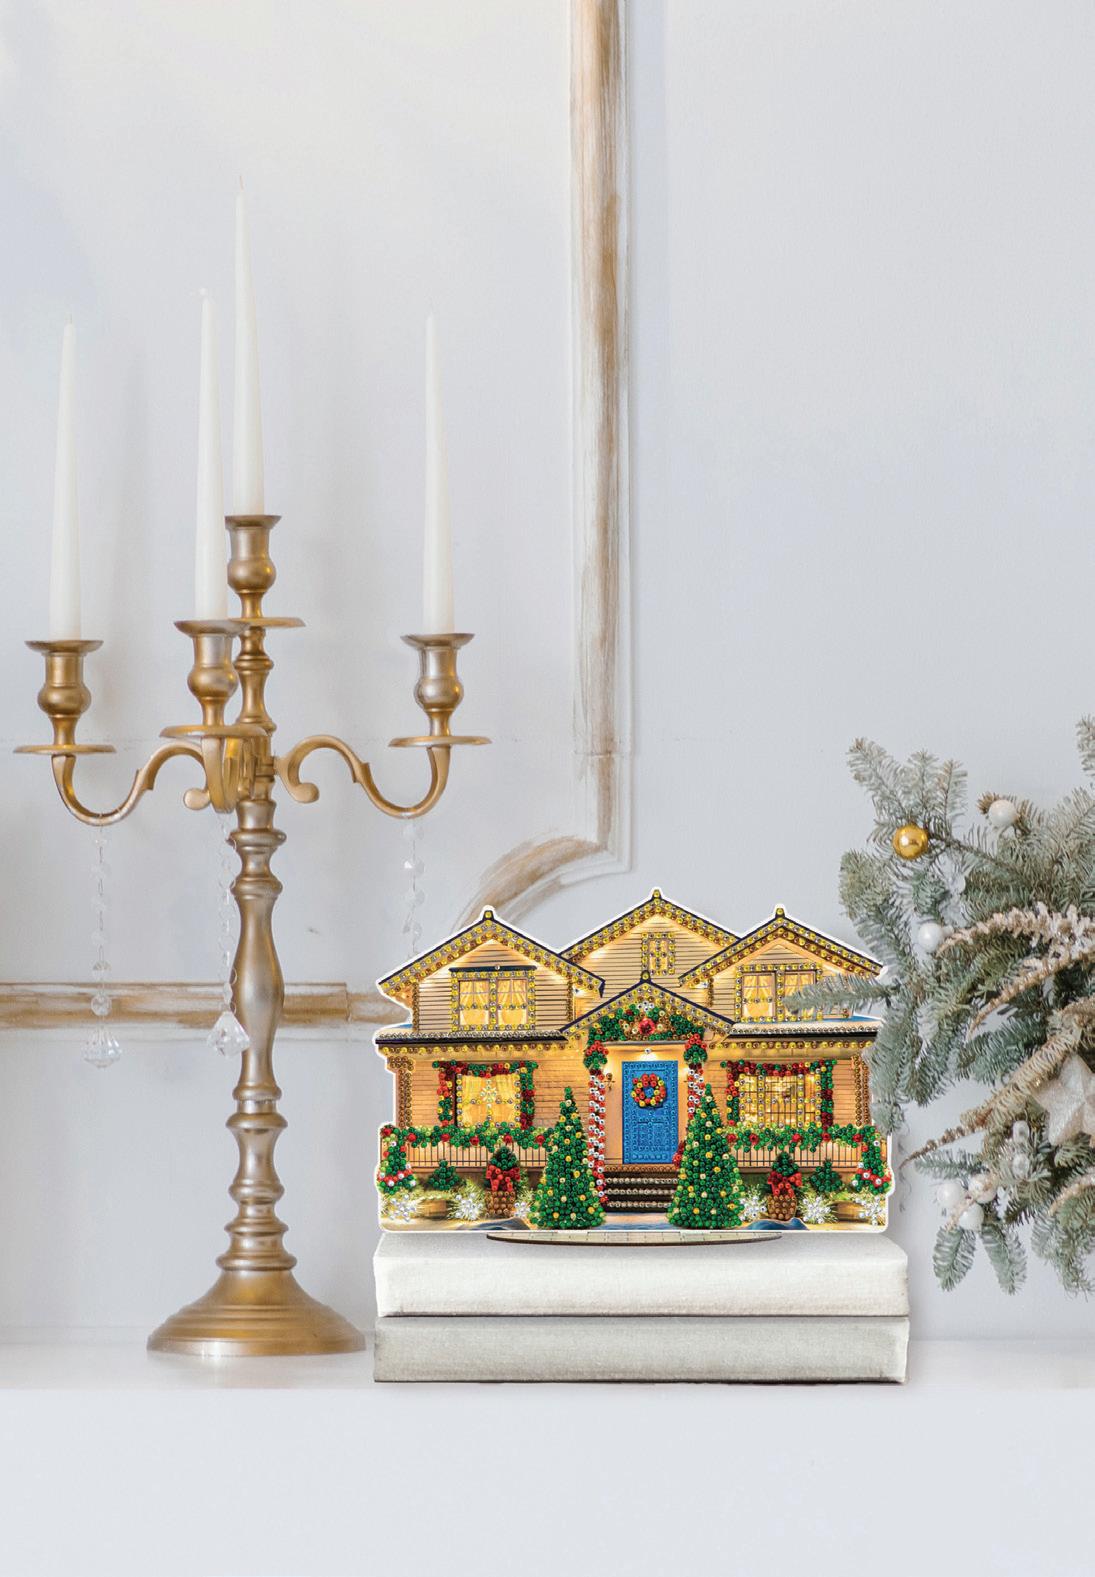
CHRISTMAS HOUSE
REINDEER REST
After a well-earned rest, this tiny dotted fellow will be up, ready to prance.
Design Size: 3.9 x 5.5in
x 14cm)
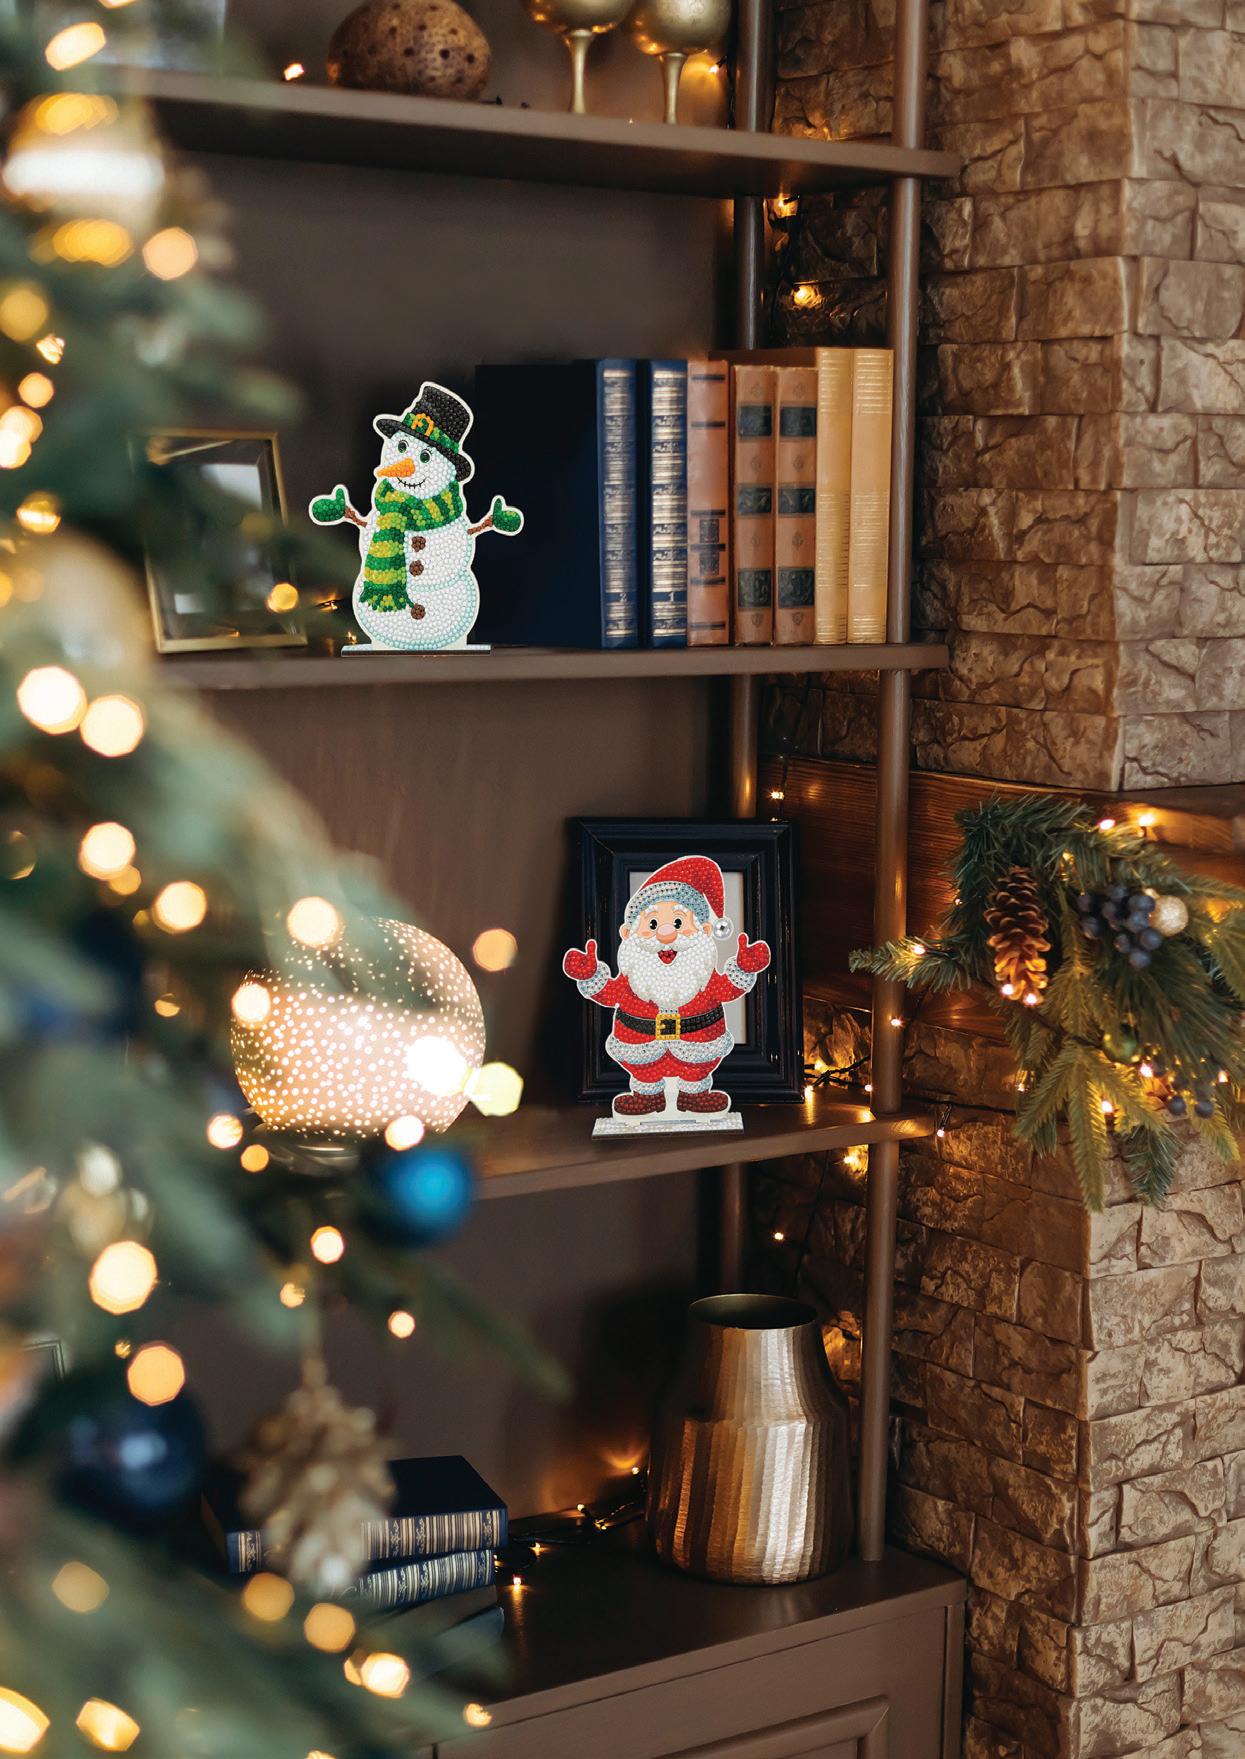
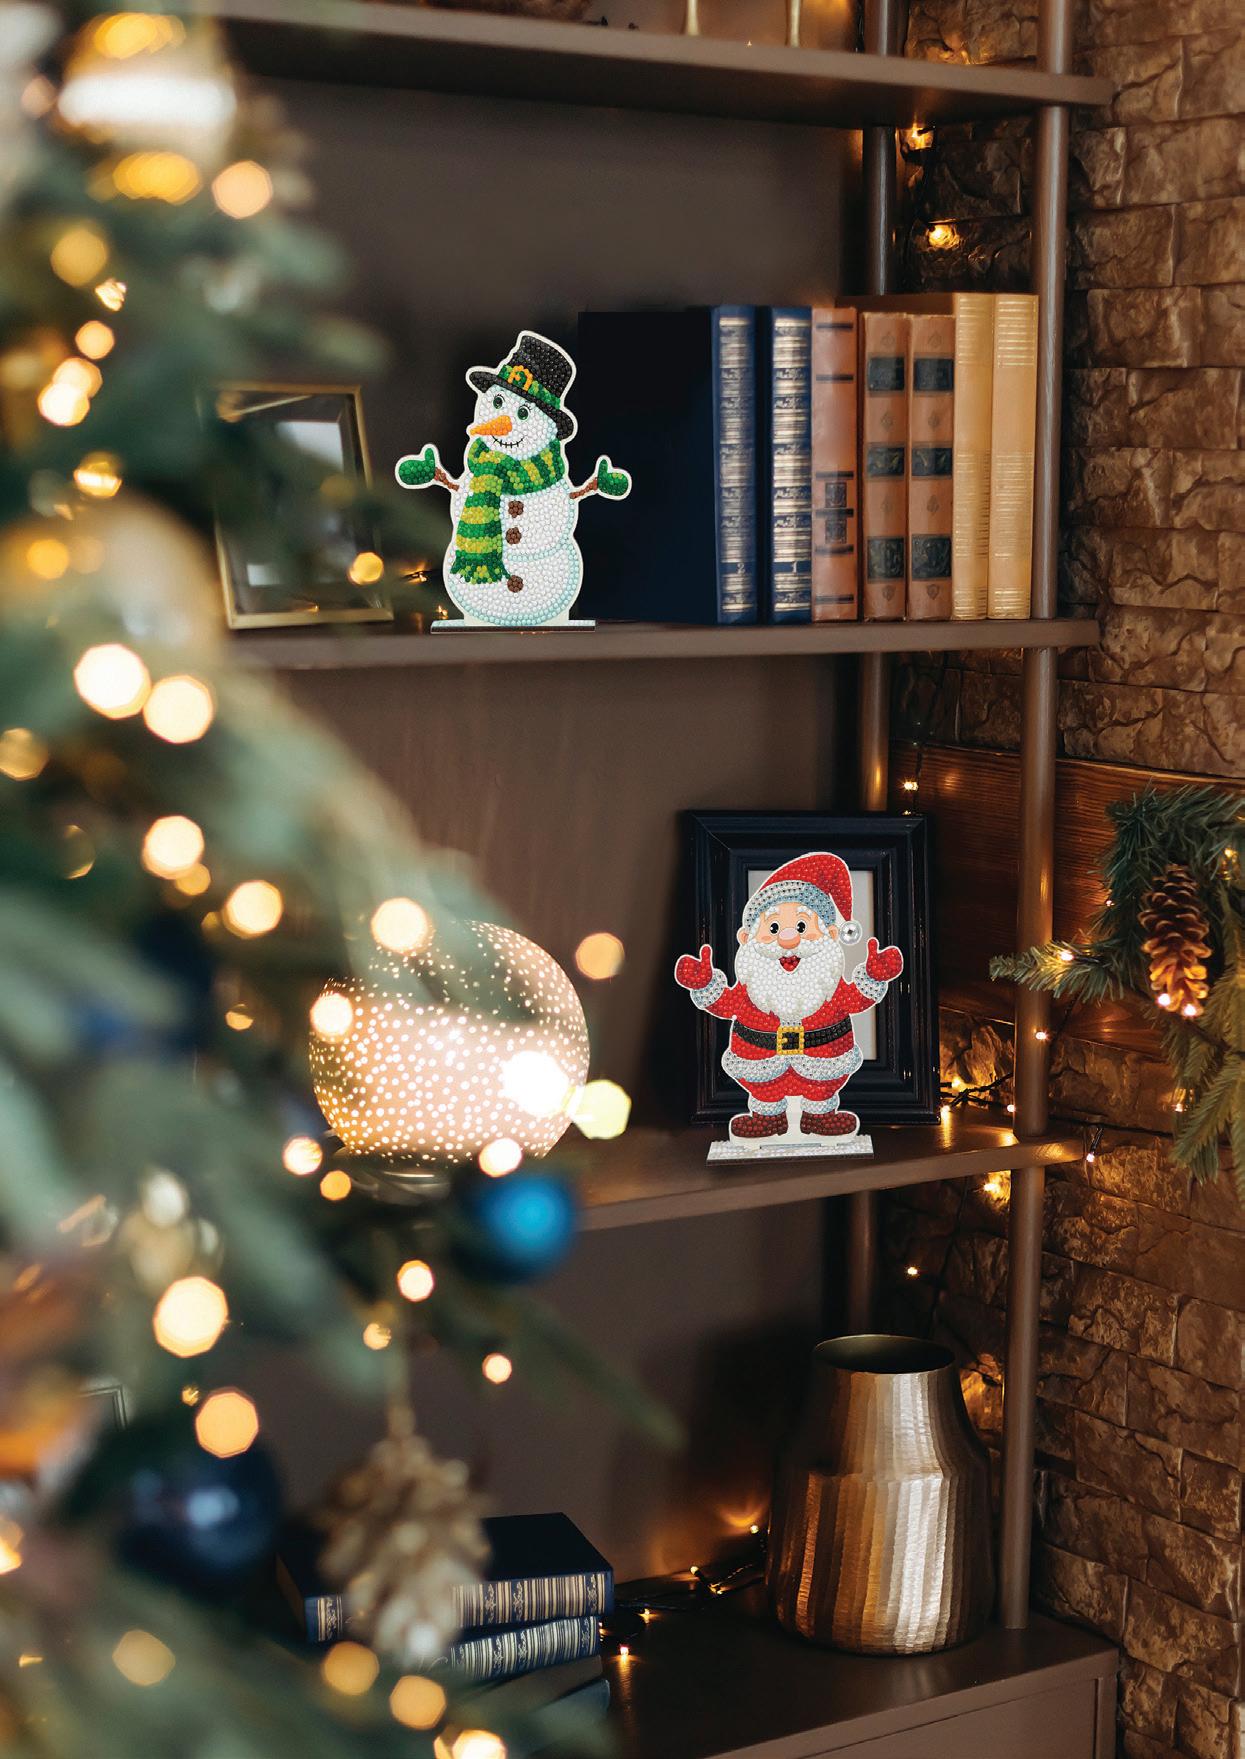
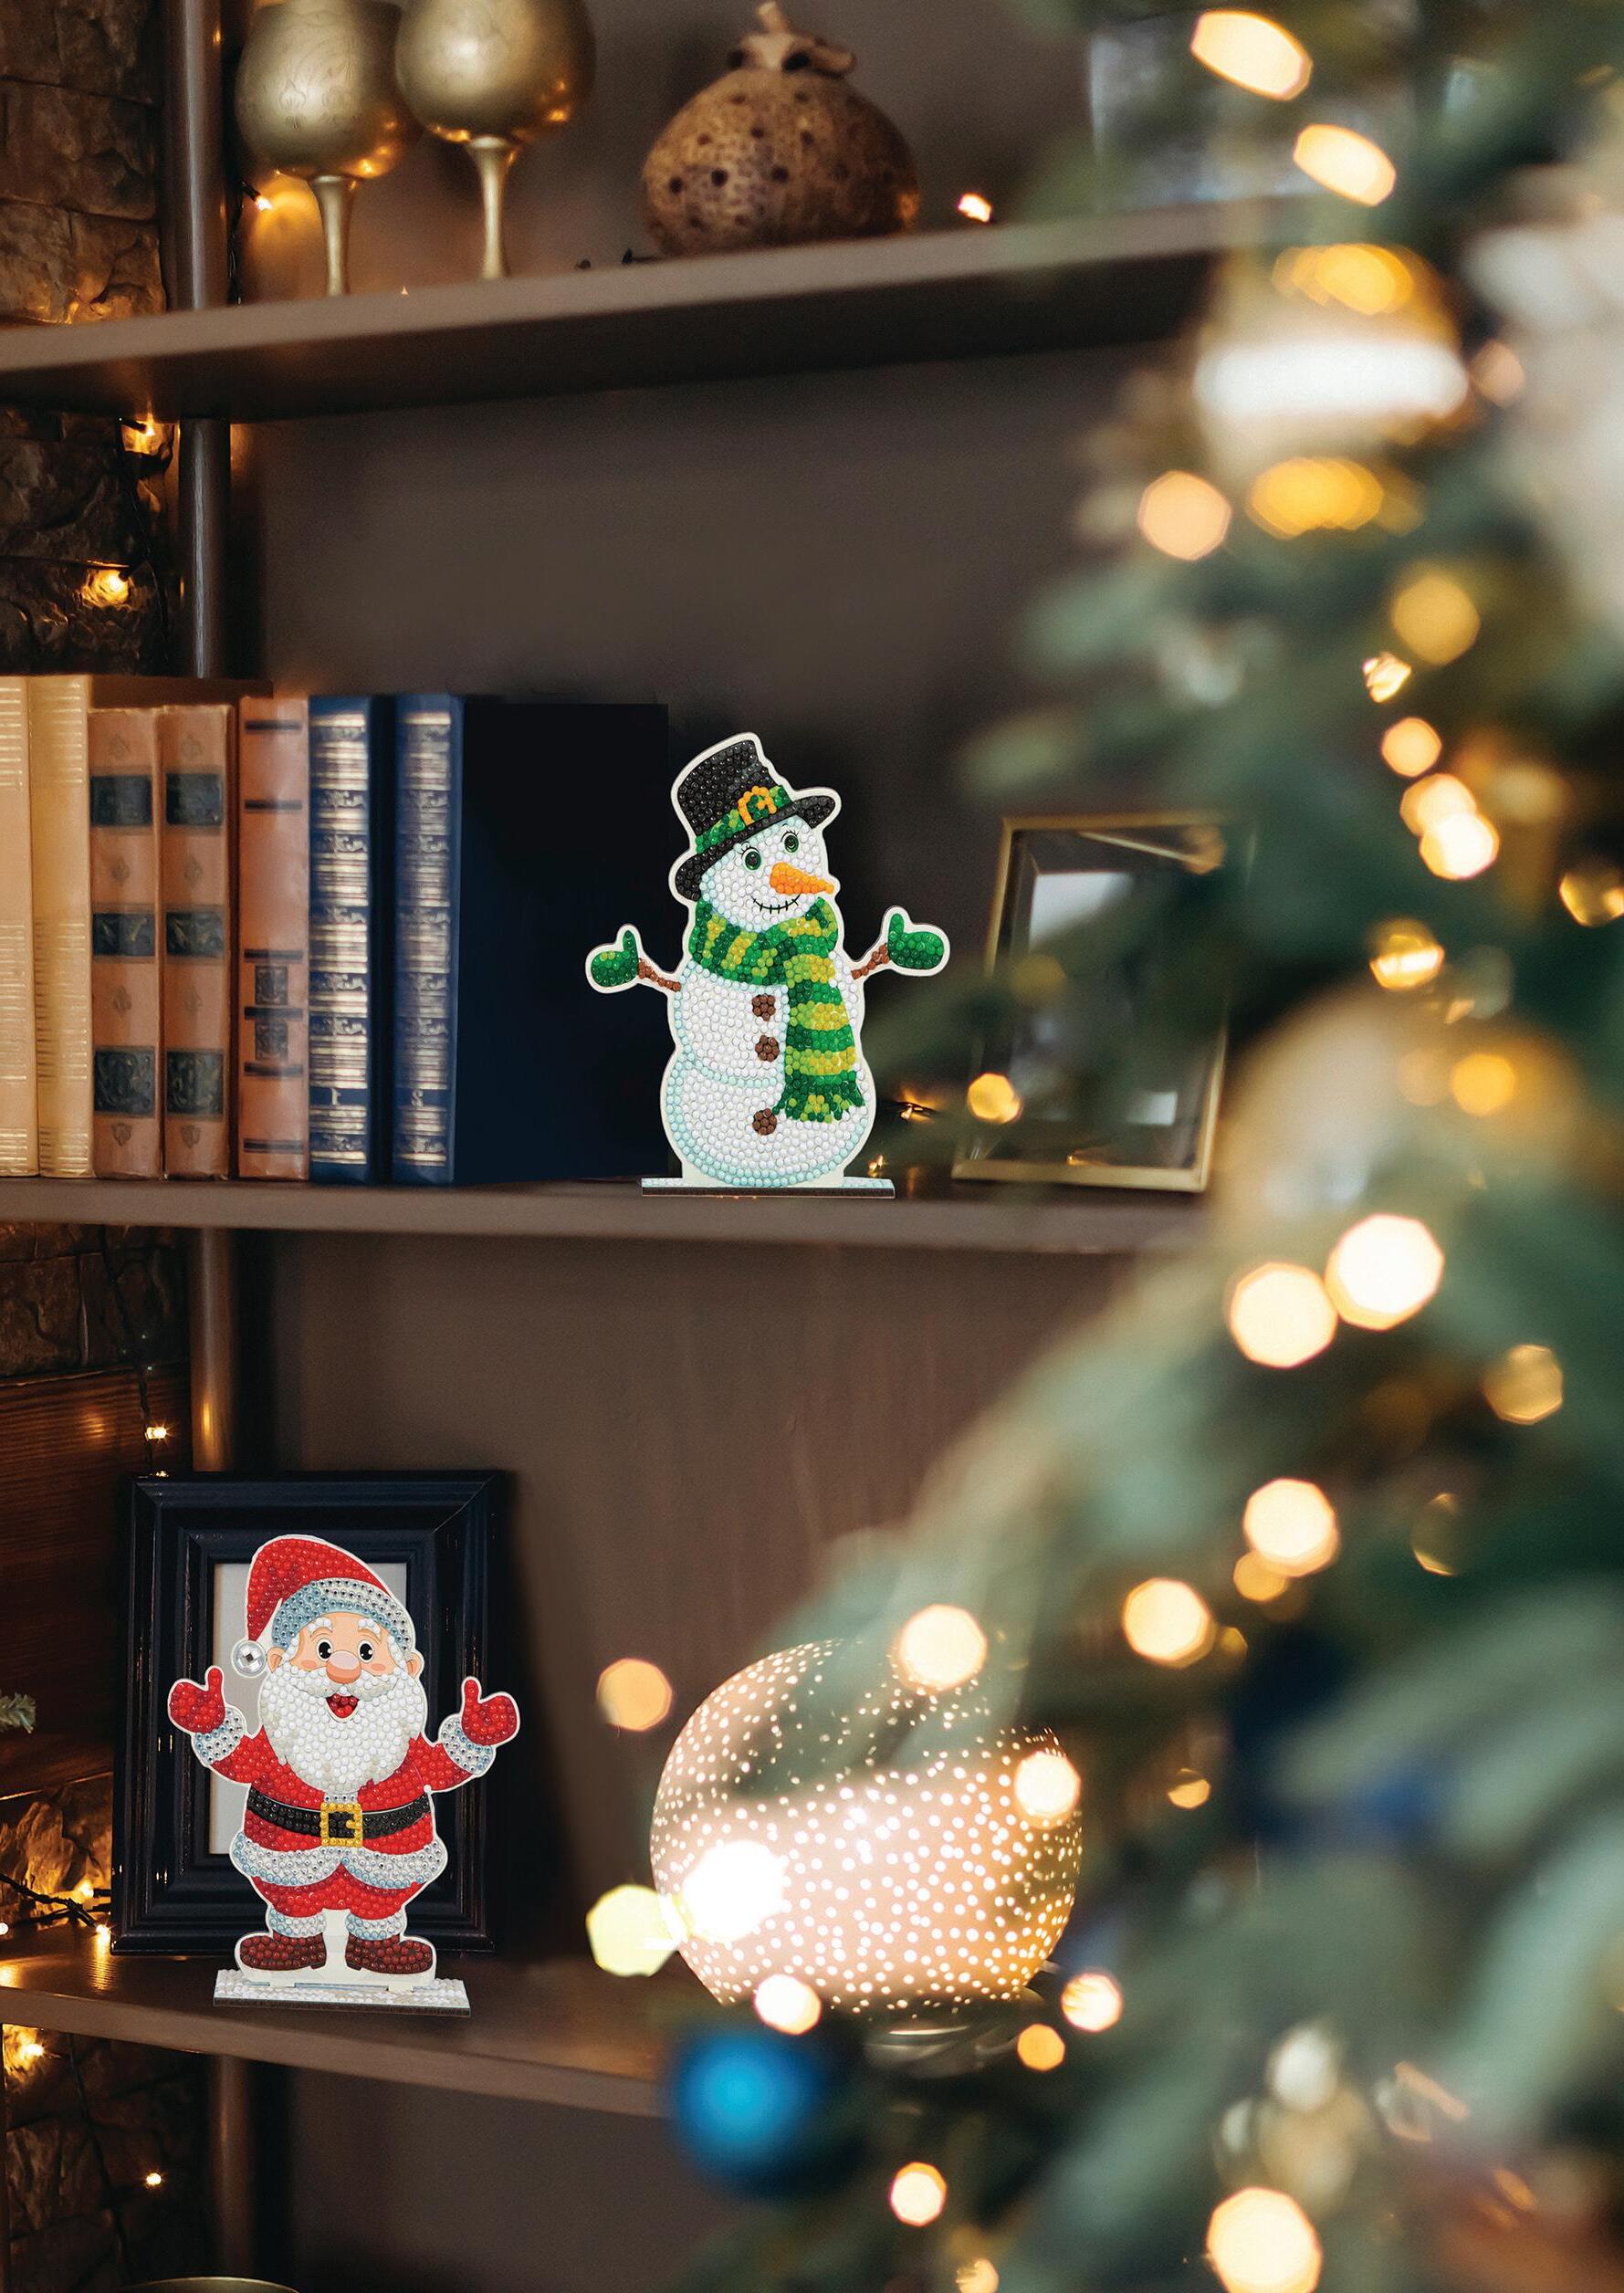
TOP HAT SNOWMAN
Get ready to bring winter magic to your shelf or tabletop with this dotted frosty fellow on a stand.
Design Size: 5.2 x 5.7in
(13 x 15cm)
KIT DD29.002
Transport yourself to magical snow-kissed scenes where warmth and beauty flourish
SANTA’S JOY
Strike a pose! Dressed in his best diamond-painted outfit, Santa stands ready for you to whisper your gift wish list! After you’ve dotted him of course!
Design Size: 5 x 5.8in
(13cm x 15cm)
KIT DD29.004
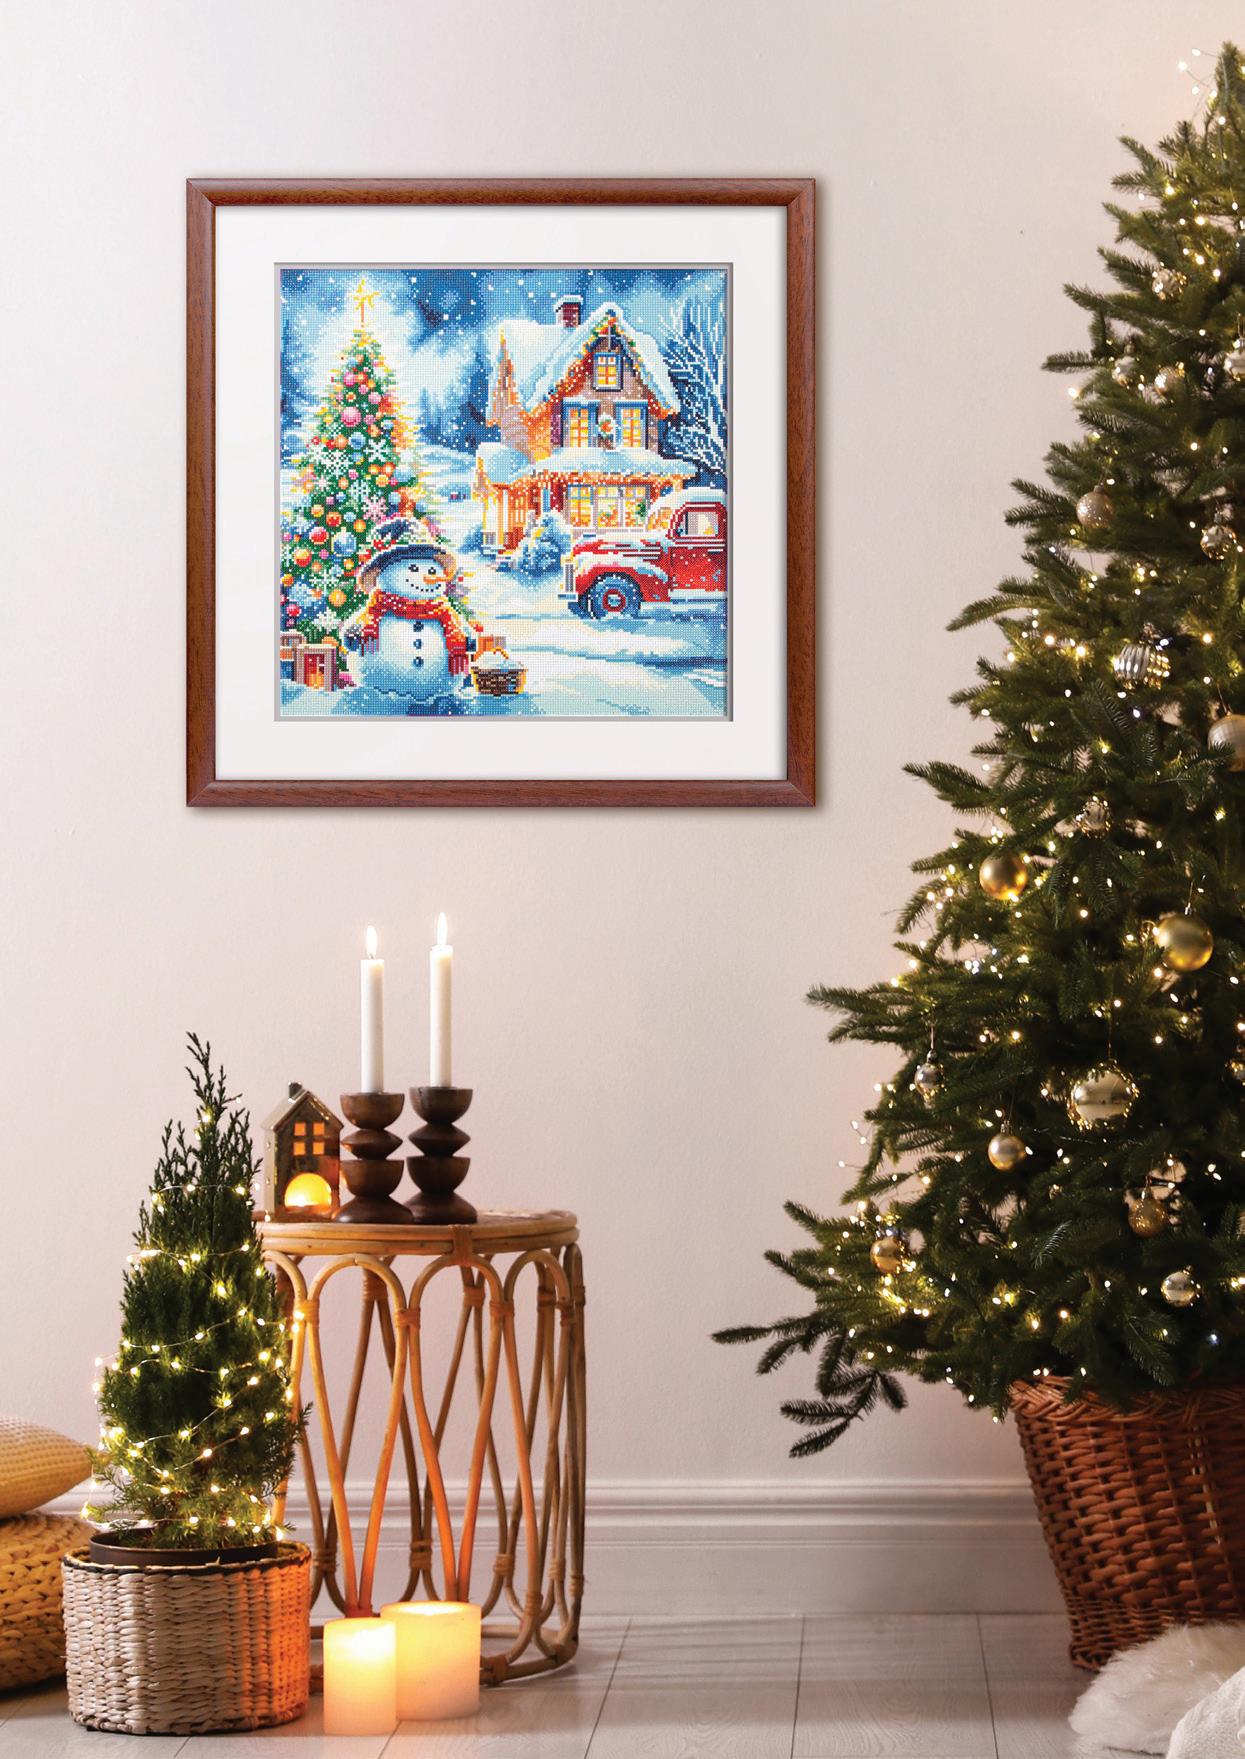
WINTER WONDERLAND
Nestled in freshly fallen snow stands an enchanting two-storey cottage, its well-lit windows glowing warm and inviting – a comforting refuge from the cold that beckons visitors inside. PS, when framing, opt for multiple mat boards to add visual depth to your diamond painting.
Design Size: 35.4 x 24in (90 x 61cm)
KIT DD15.020
DID YOU KNOW?
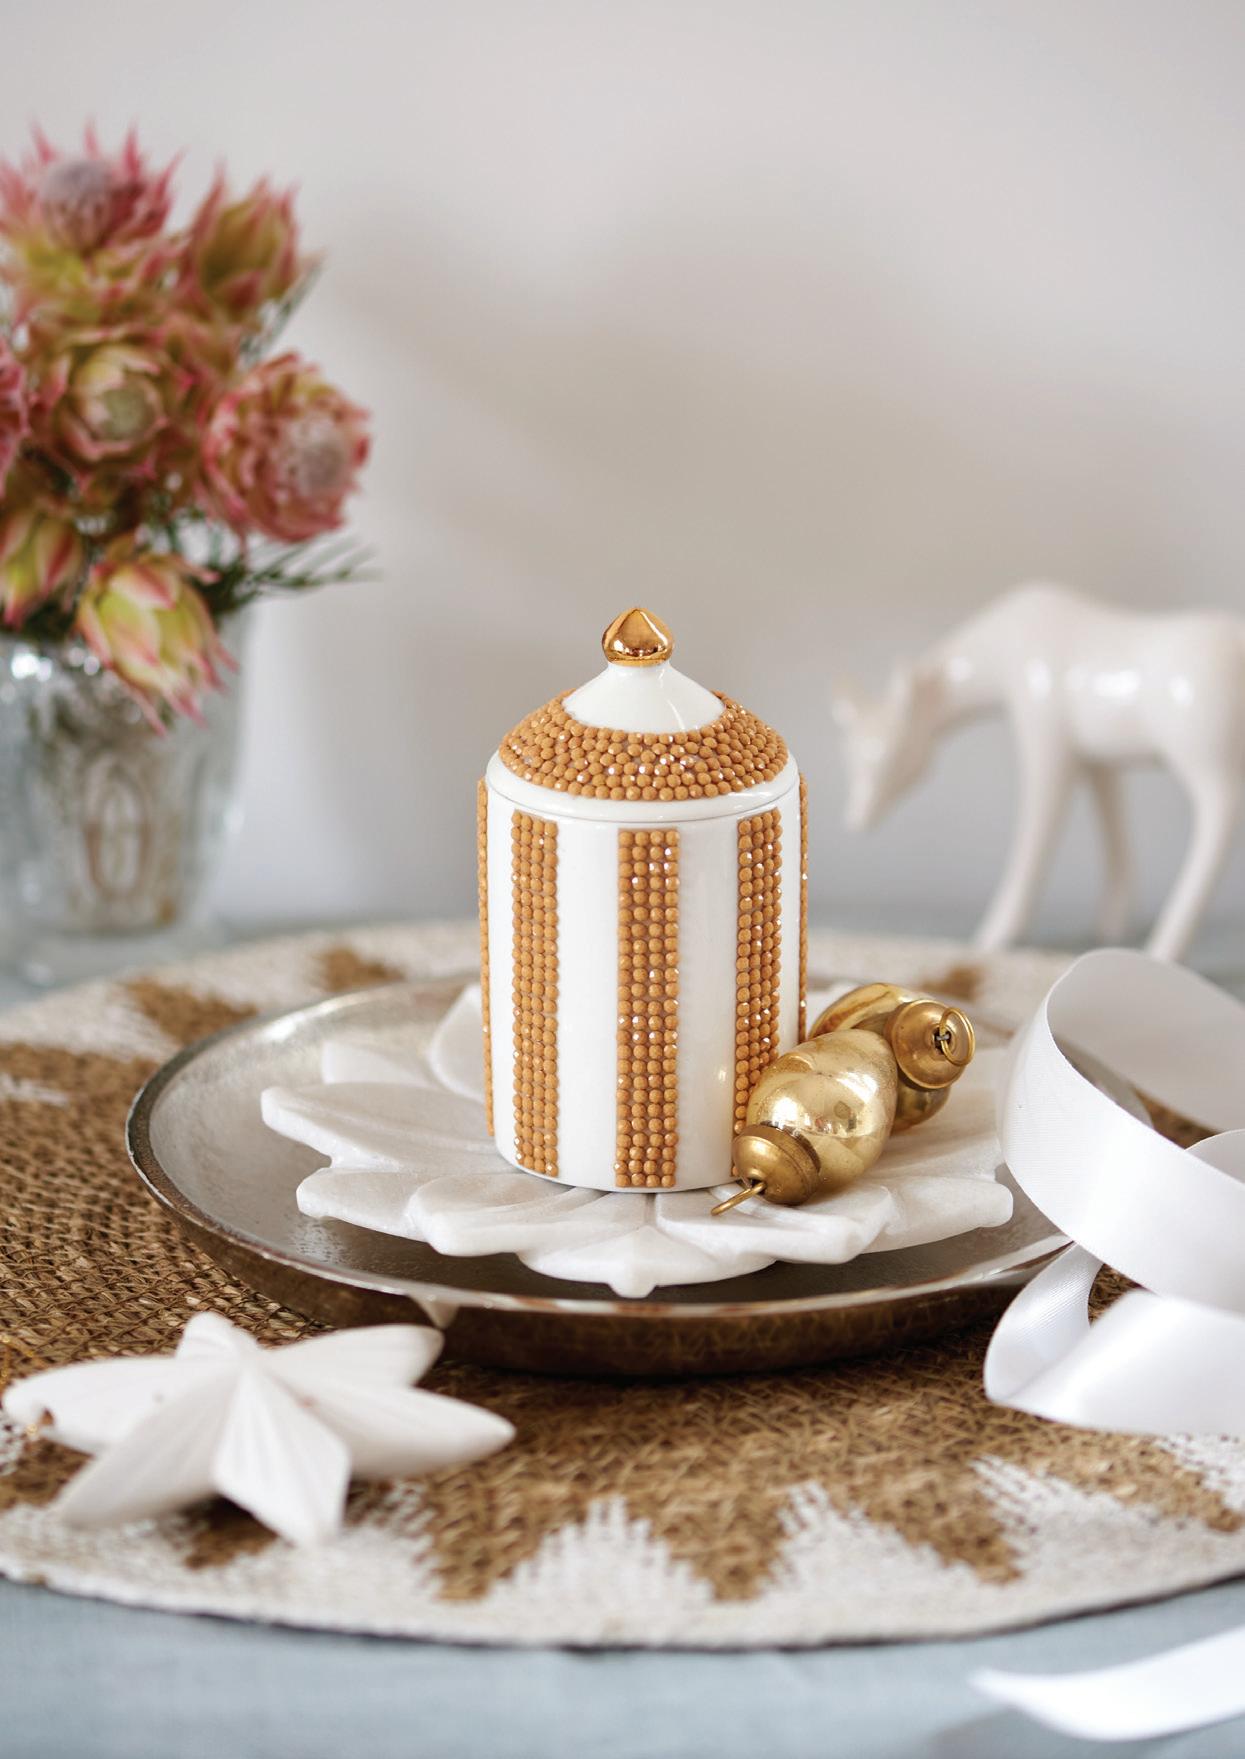
Popular opinion suggests that glass cloches (bell-shaped jars) were developed in 17th century Italy to protect young seedlings from the harsh winter winds and frost. Before long, the concept spread to France, and then to England for cultivation of off-season vegetables. Today, mini to large cloches can serve as display cases. Put anything under glass – even a single Diamond Dotz® figurine –and it instantly elevates it into an elegant, curated display.
Tree-mendous!
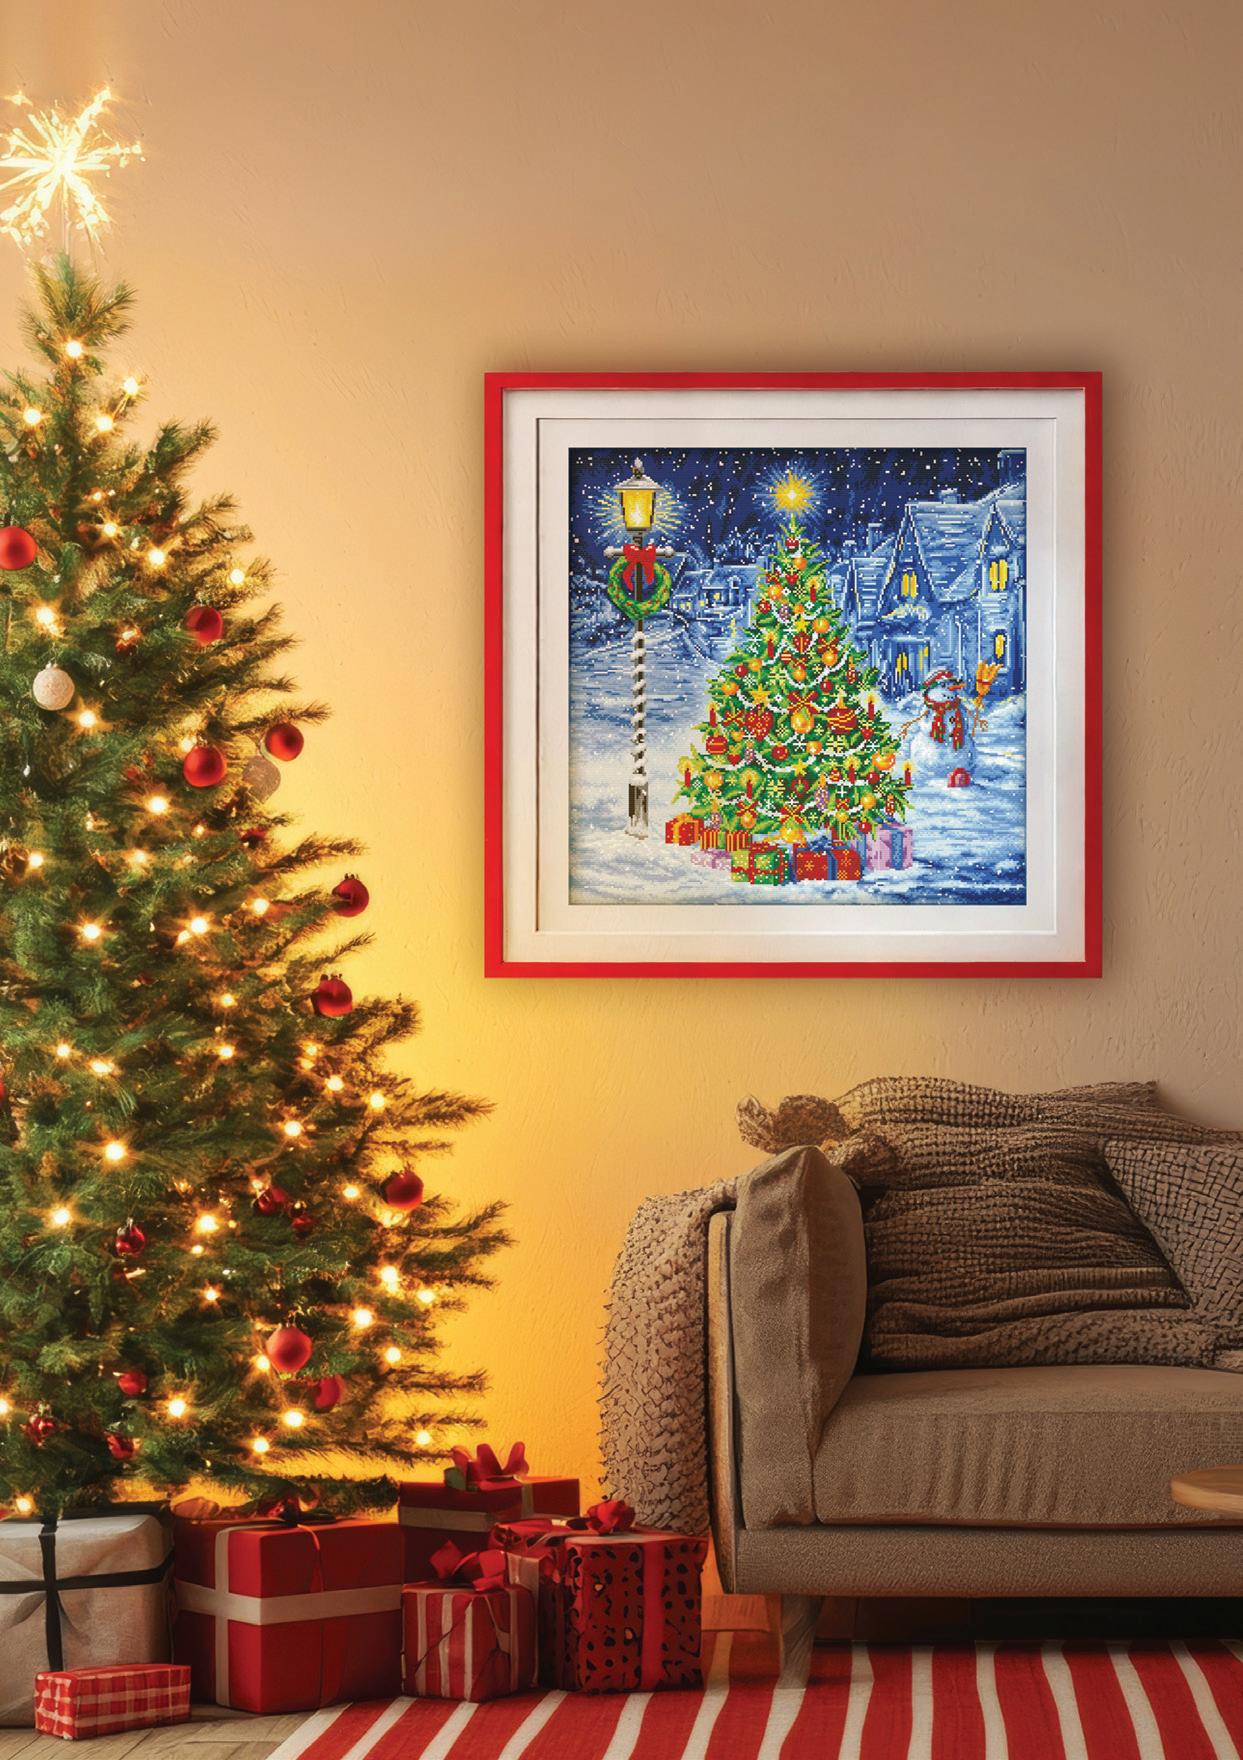
OH CHRISTMAS TREE
Standing at the heart of a snow-kissed town square, this diamond painting of a candlelit evergreen with its shimmering decos will warm your soul.
Design Size:
26.4 x 26.4in (67 x 67cm) KIT DD15.016
SEVEN TIPS TO STYLE YOUR TREE, TAKING IT FROM BASIC TO BREATHTAKING!
1. FOR GOOD MEASURE Measure the available space where you intend to set up your tree ie height (with stand and tree topper), width and depth. Allow for furniture and foot traffic. Take the measurements with you when you head to a tree farm, garden center or store.
2. THE REAL ROUTE Check for freshness. The tree’s needles should be green and flex when you bend them. Run a branch through your fingers to ensure the tree doesn’t shed too many needles. If buying from a tree farm, ask if they have a tree shaking service to rid the tree of dead needles.
3. WATT’S YOUR PLAN Aim for 100 lights per foot of tree height. A six-foot tall tree will require about 600 fairy or stringed LEDs. Warm light is more atmospheric, so check the packaging before you buy.
4. A STRING AFFAIR Buying an artificial tree? Go for a pre-lit option – it offers instant illumination and it’s tangle-free. Or, opt for tree lights that cascade from a ring for a super-quick install. All you do is place the ring at the top of your tree, untie each light string attached to the ring and let each strand hang down vertically. Existing tree lights in good working order? Picture your tree in three triangular sections, top to bottom. For each set of lights, run the string up the trunk then wrap its length along each branch to the tip and once on the way back. Repeat till all branches have been ‘lit’.
DECORATOR
TIP
Choose a frame and mat to flatter your diamond painting. Visually busy pieces tend to work best with thinner frames, while double mats in neutral tones create an opportunity for a colored frame without it distracting the eye.
5. TRIM IT For a considered, curated look, first establish a theme and color scheme then assemble ornaments in different shapes, sizes, textures and patterns to create visual interest. That’s not to say you can’t mix styles, but if you have a defined color scheme, even the most unlikely pairings will work.
• Place baubles deep within the tree branches and work your way out to the tips. This creates depth. Hang the biggest baubles evenly around the tree then fill in gaps with medium and small baubles.
• As you near the top of the tree, use smaller baubles and ornaments.
• Use wire hanger or paper clips to attach your baubles to the tree.
6. TOP IT OFF Double over the tree tip then insert it into the base of your topper. Use fishing line to secure the topper to branches.
7. SKIRT IT Cover the base with a tree skirt or collar to suit your theme/color scheme.
Celebrate the season’s sacred story!
Transform your mantelpiece or console table into an eye-catching focal point that captures the wonder and joy of Christmas. Whether it’s a nativity scene, a heavenly angel or a depiction of the Maji’s journey, as here, these exquisite diamond dotted decorative artworks are a visual reminder of the seaon’s deeper meaning.
GRACE YOUR MANTEL WITH ART THAT SPARKLES WITH GEMS IN HONOR OF THE BIRTH OF CHRIST!
DID YOU KNOW?
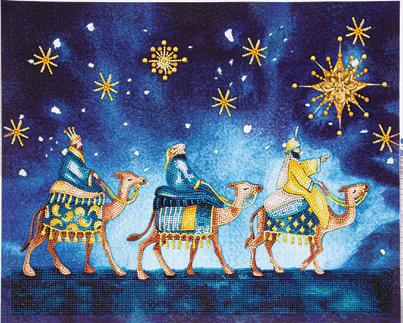
The Three Wise Men were learned men who studied astronomy, practised astrology and were advisers to rulers. Guided by a ‘star’ to Bethlehem, they sought to pay homage to the Newborn King with gifts – gold for the earthly King, frankincense traditionally burned in religious ceremonies, and Myrrh foreshadowing his eventual sacrifice.
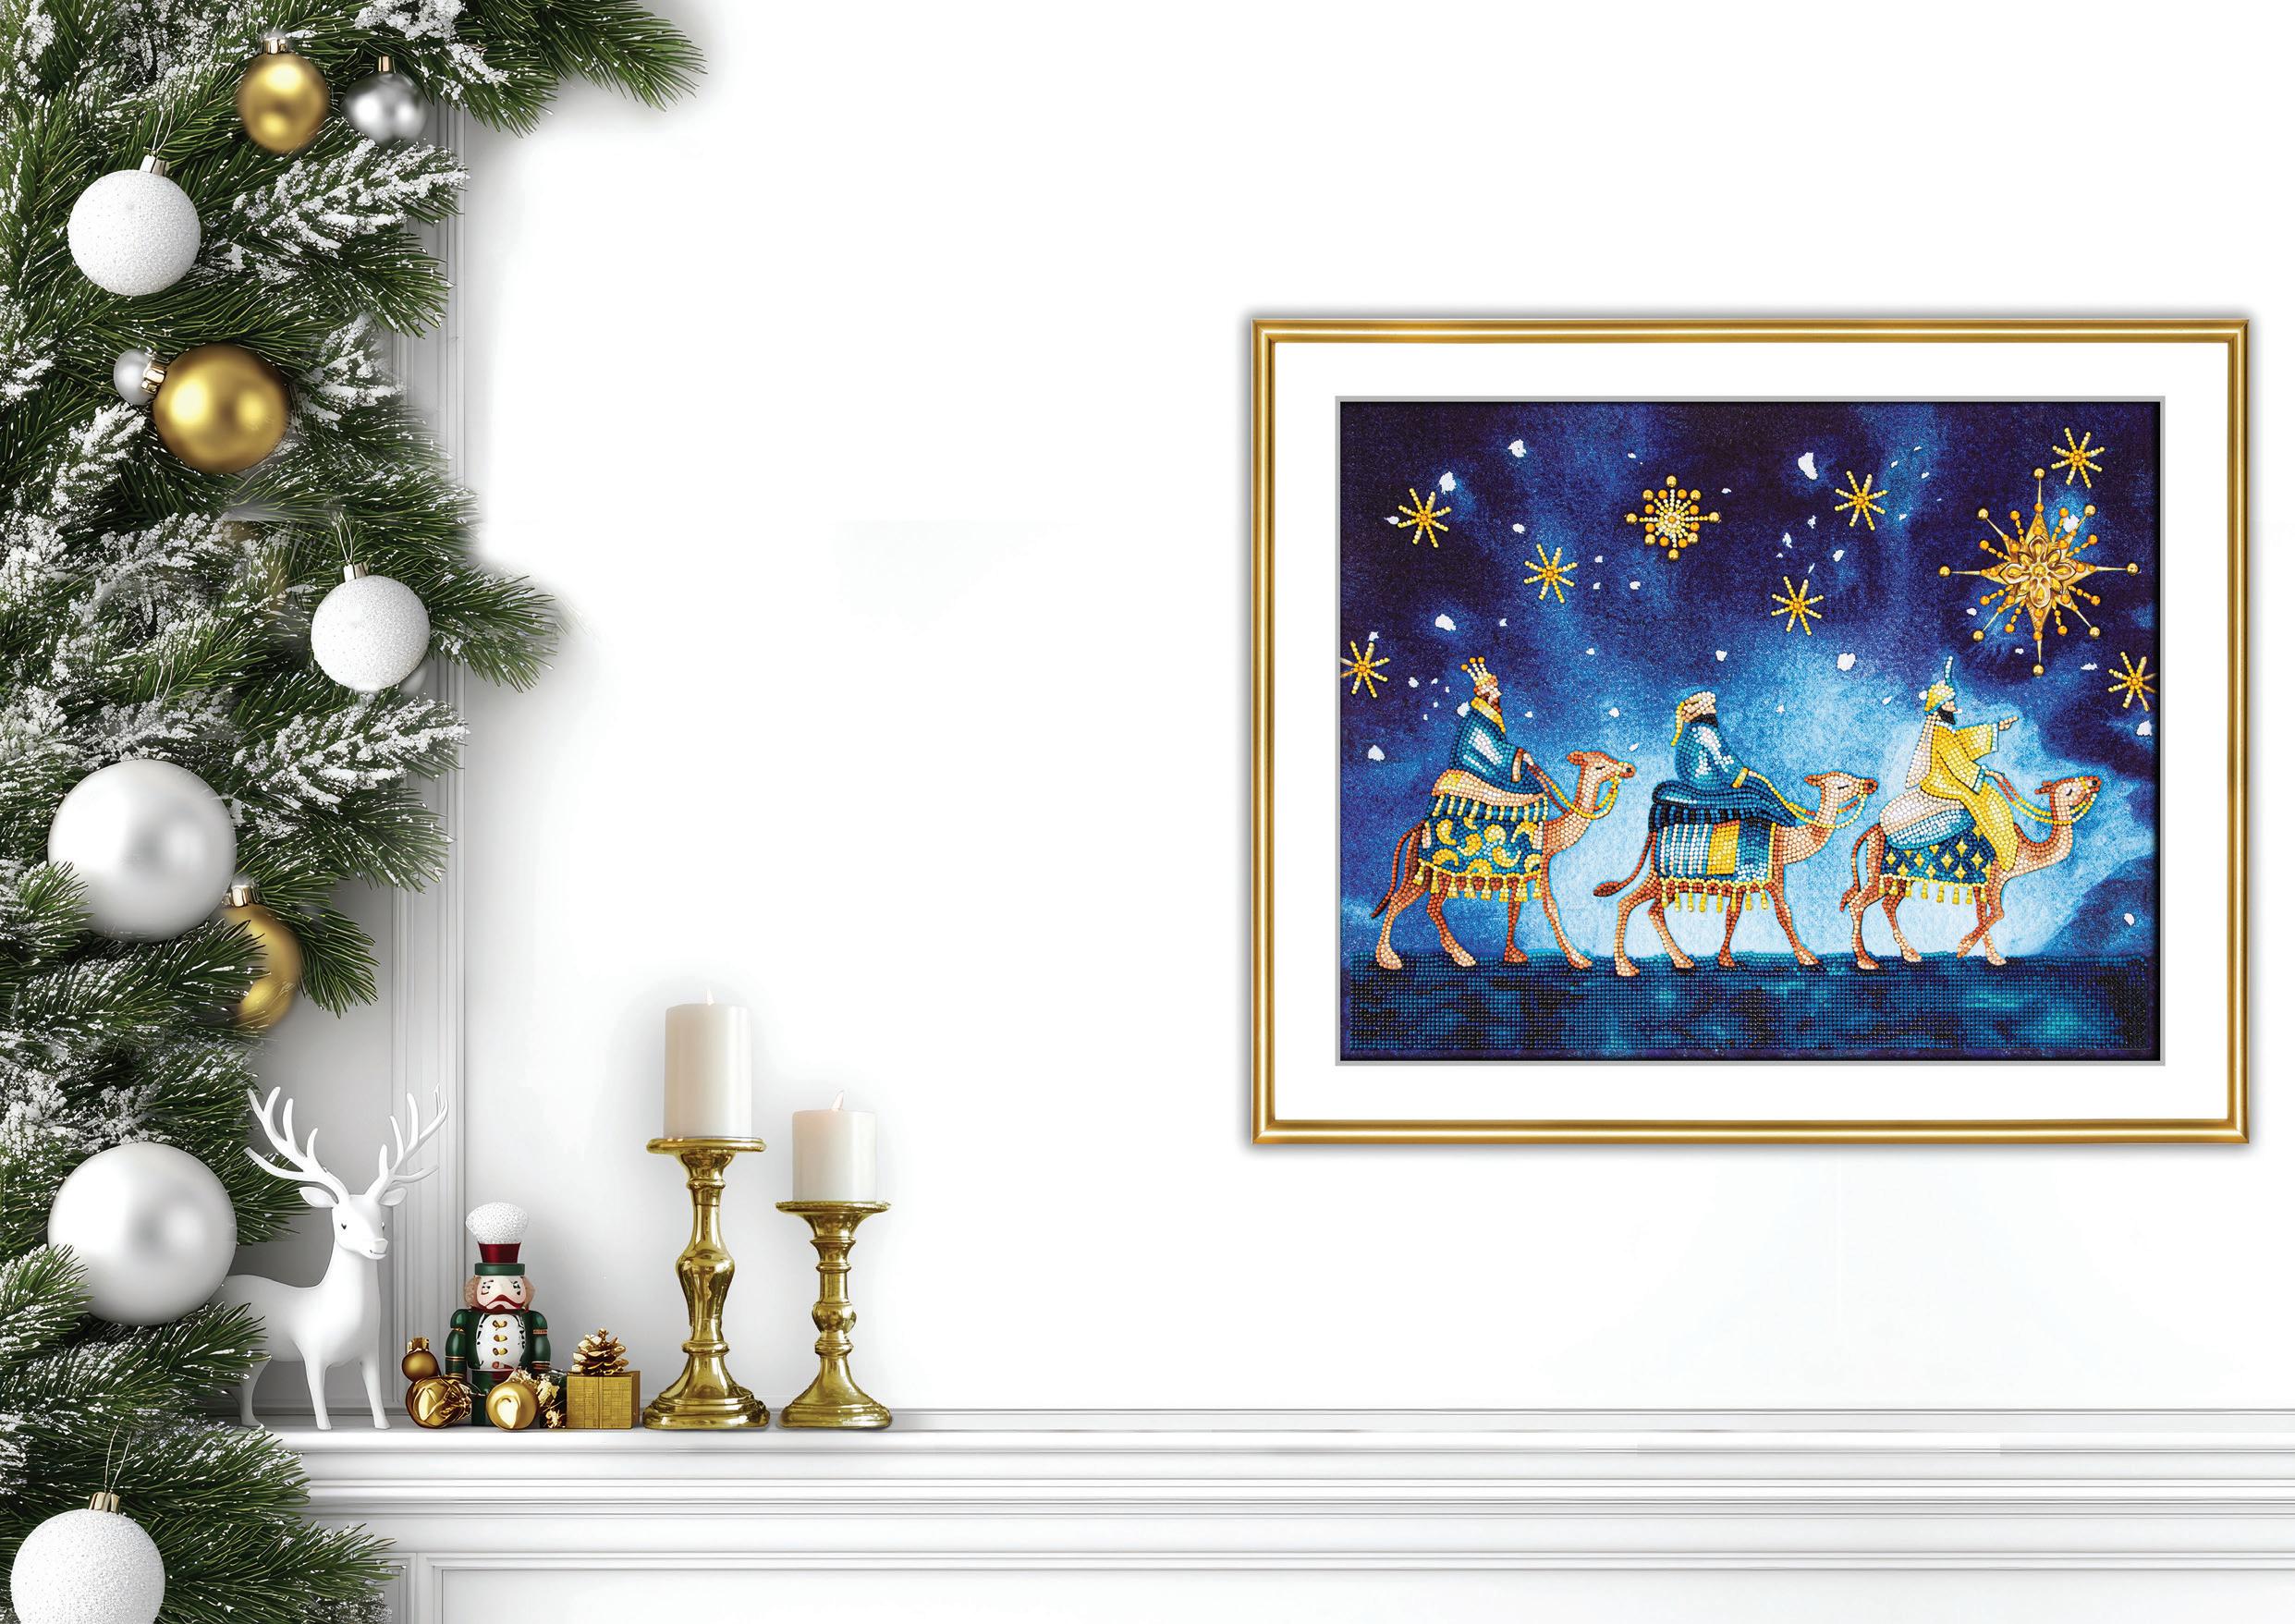
THREE WISE KINGS
Dot this sparkling diamond painting depicting the Magi (Latin for Wise Men) guided by the bright Star of Bethlehem to the birthplace of Jesus. Divine!
Design Size: 20 x 16in (50.8cm x 40.6cm) KIT DD10.095
DECORATOR TIP
Complement this nativity scene with accesories in keeping with the humble stable setting. Opt for a neutral palette, a blonde wood frame, kraft paper or plain timber stars as well as snippets of branches and pine cones.
"
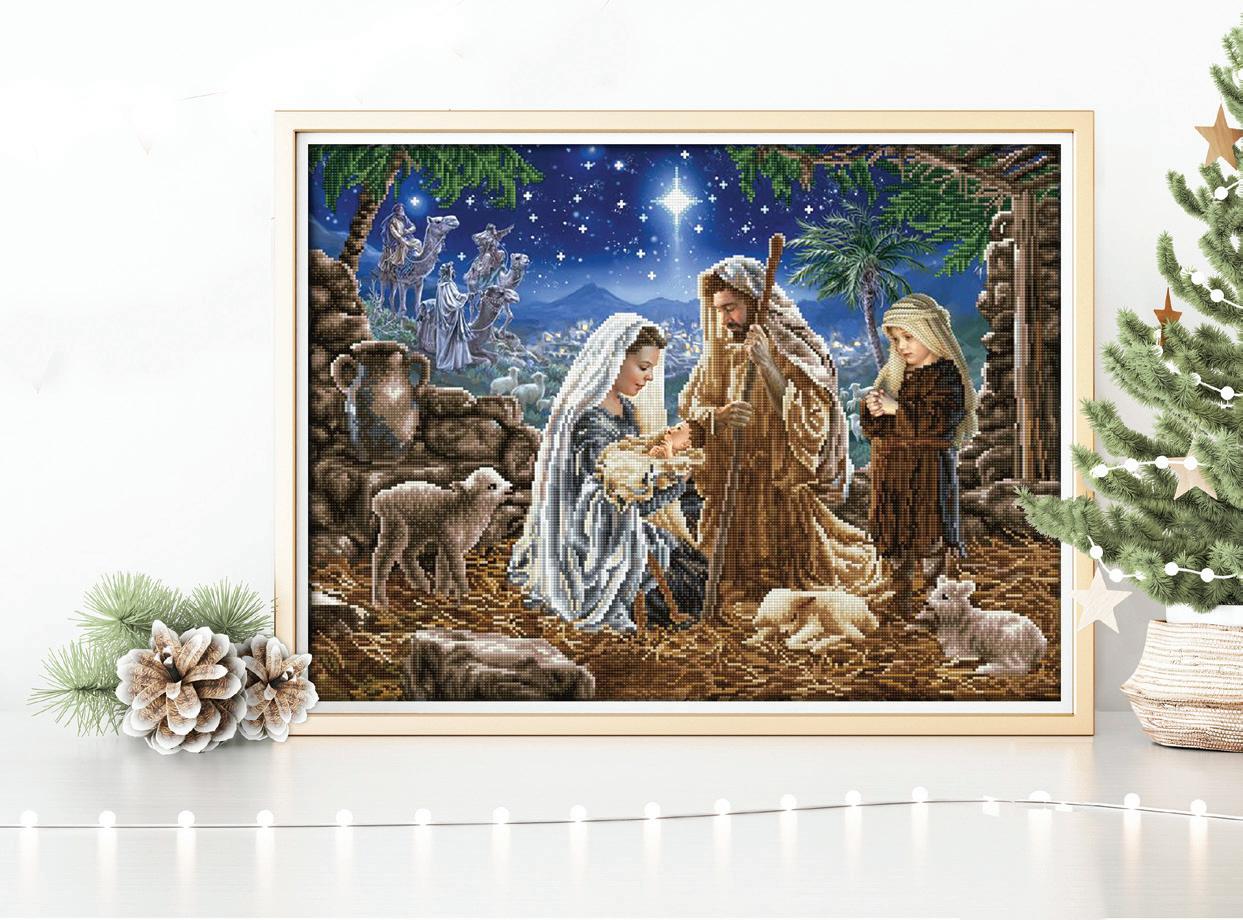
LET US ADORE HIM Commemorate Christ’s birth with Dona Gelsinger’s reverent nativity scene, reinterpreted for devout fans of diamond painting. Design
x 30.3in
Hark! The herald angels sing, Glory to the newborn King...
”
THE GIFT OF PEACE
Capture the wonder of Dona Gelsinger’s artwork with this snow-capped rustic birdhouse which features Square Dotz® gems. At its peak is a glittering cross with adorable chickadees perched on the branches of tall pines while a luminous star sparkles in the sky! Design size: 20 x 16in
(51 x 40.5cm)
KIT DQ11.003
Let your creativity shine this Christmas!
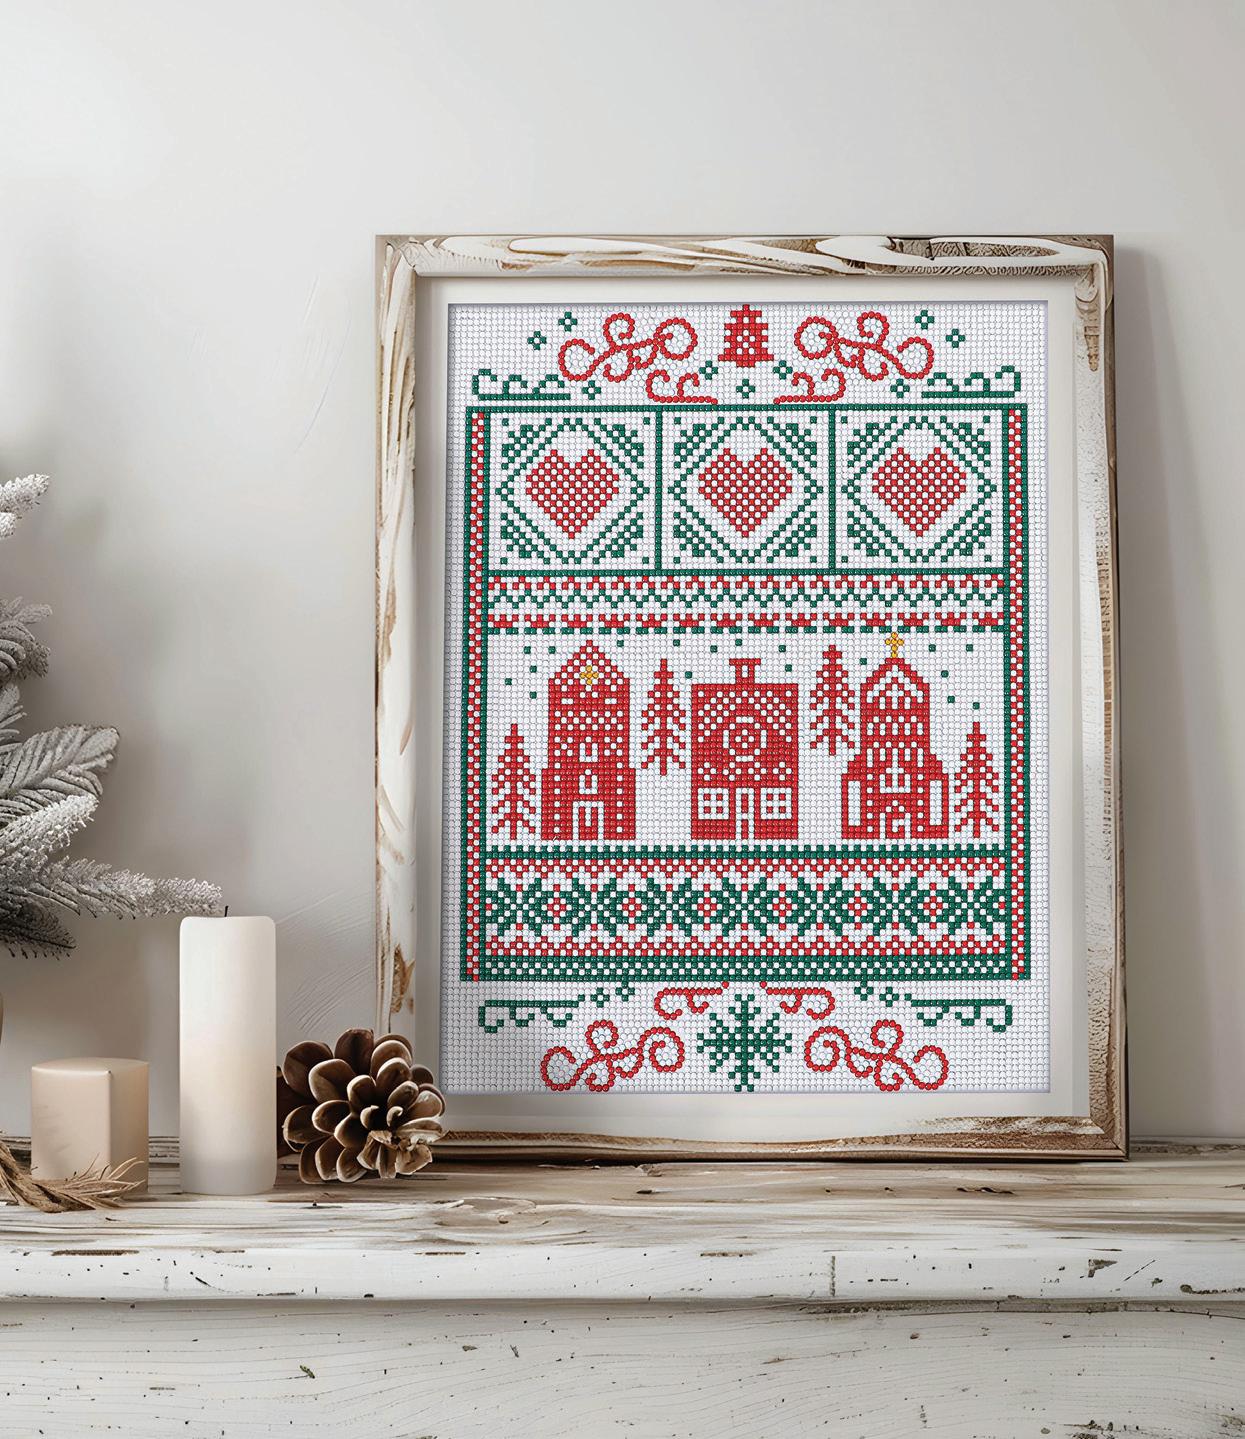
CHRISTMAS SAMPLER
This diamond painting offers a fresh take on a classic crossstitch sampler. Swapping threads for sparkly Dotz® gems, it retains the same timeless charm but with radiant appeal.
Design size: 11 x 14in (28 x 35.5cm)
Guardian angels are considered divine messengers. Their very name reflects their purpose – angel comes from the Greek ‘angelos’, meaning messenger.
MIn this depiction, renowned artist, Dona Gelsinger, has captured the ethereal nature of guardian angels as symbols of hope, protection and spiritual guidance. Reimagined for a diamond painting kit, the art takes on sparkling form.
Design size:
20.5 x 26.8in
(52 x 68cm)
DECORATOR TIP
When hanging artwork above a mantel, the general rule of thumb is to allow 4 - 12in (10 - 30cm) between it and the bottom of the frame. This also ensures your diamond painting doesn’t appear to float as a visual connection is maintained between it and the mantel.
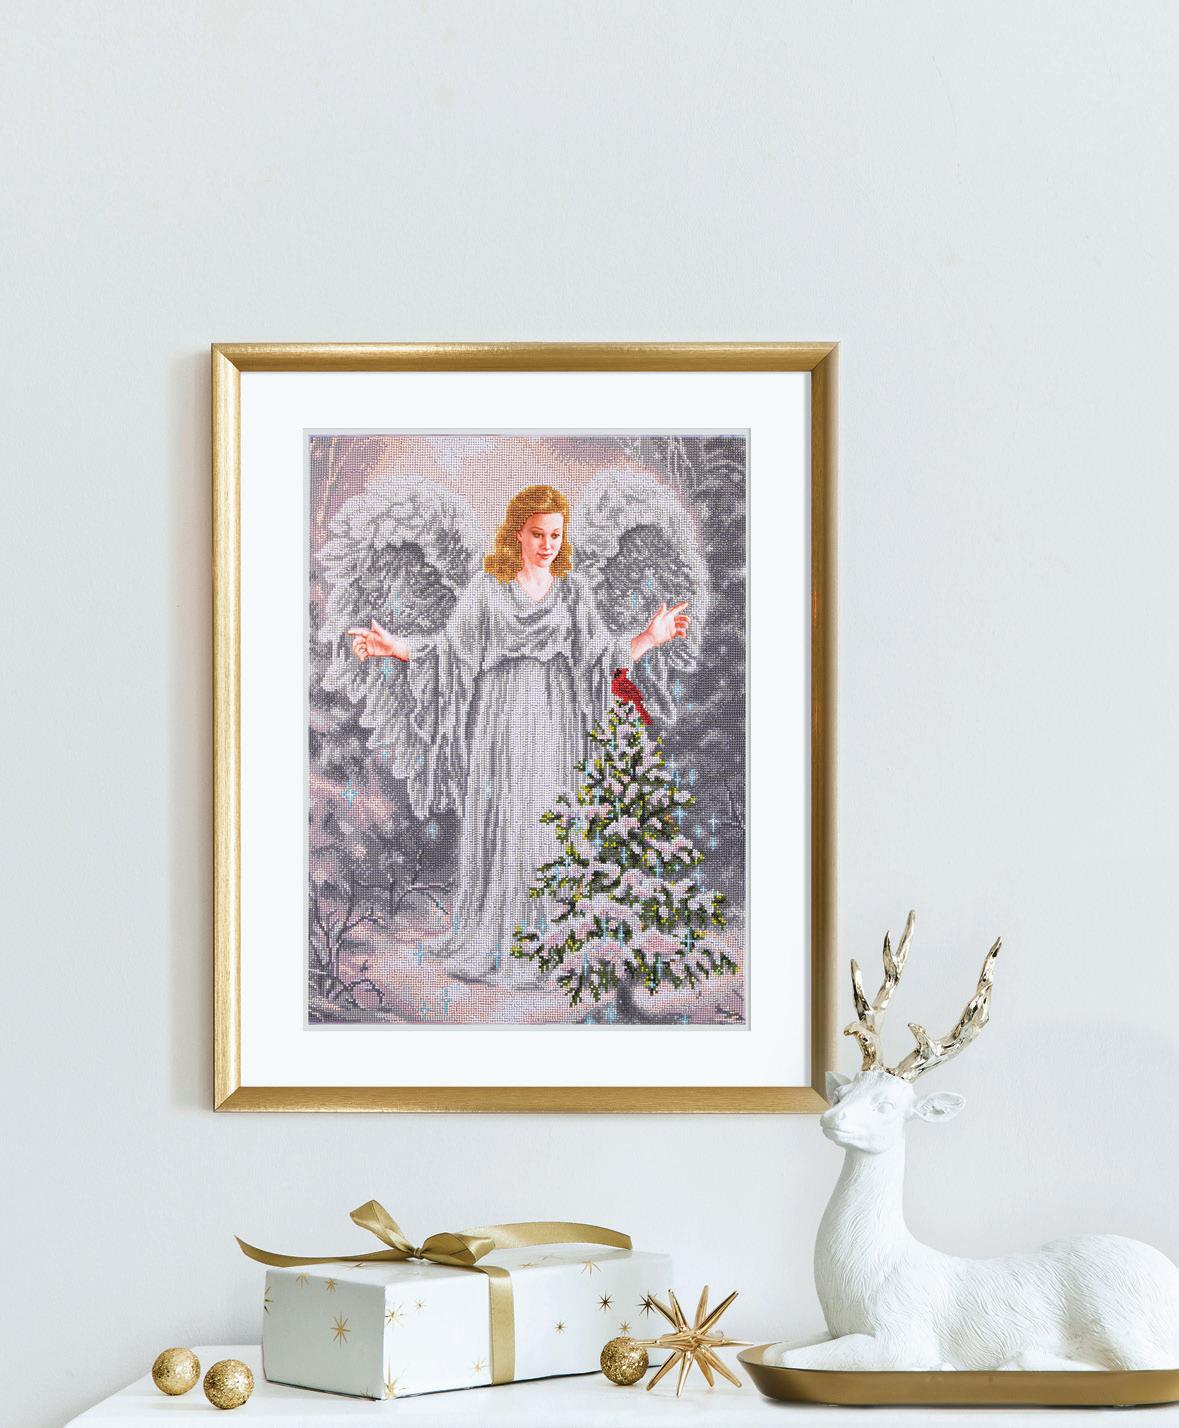
CHRISTMAS ANGEL
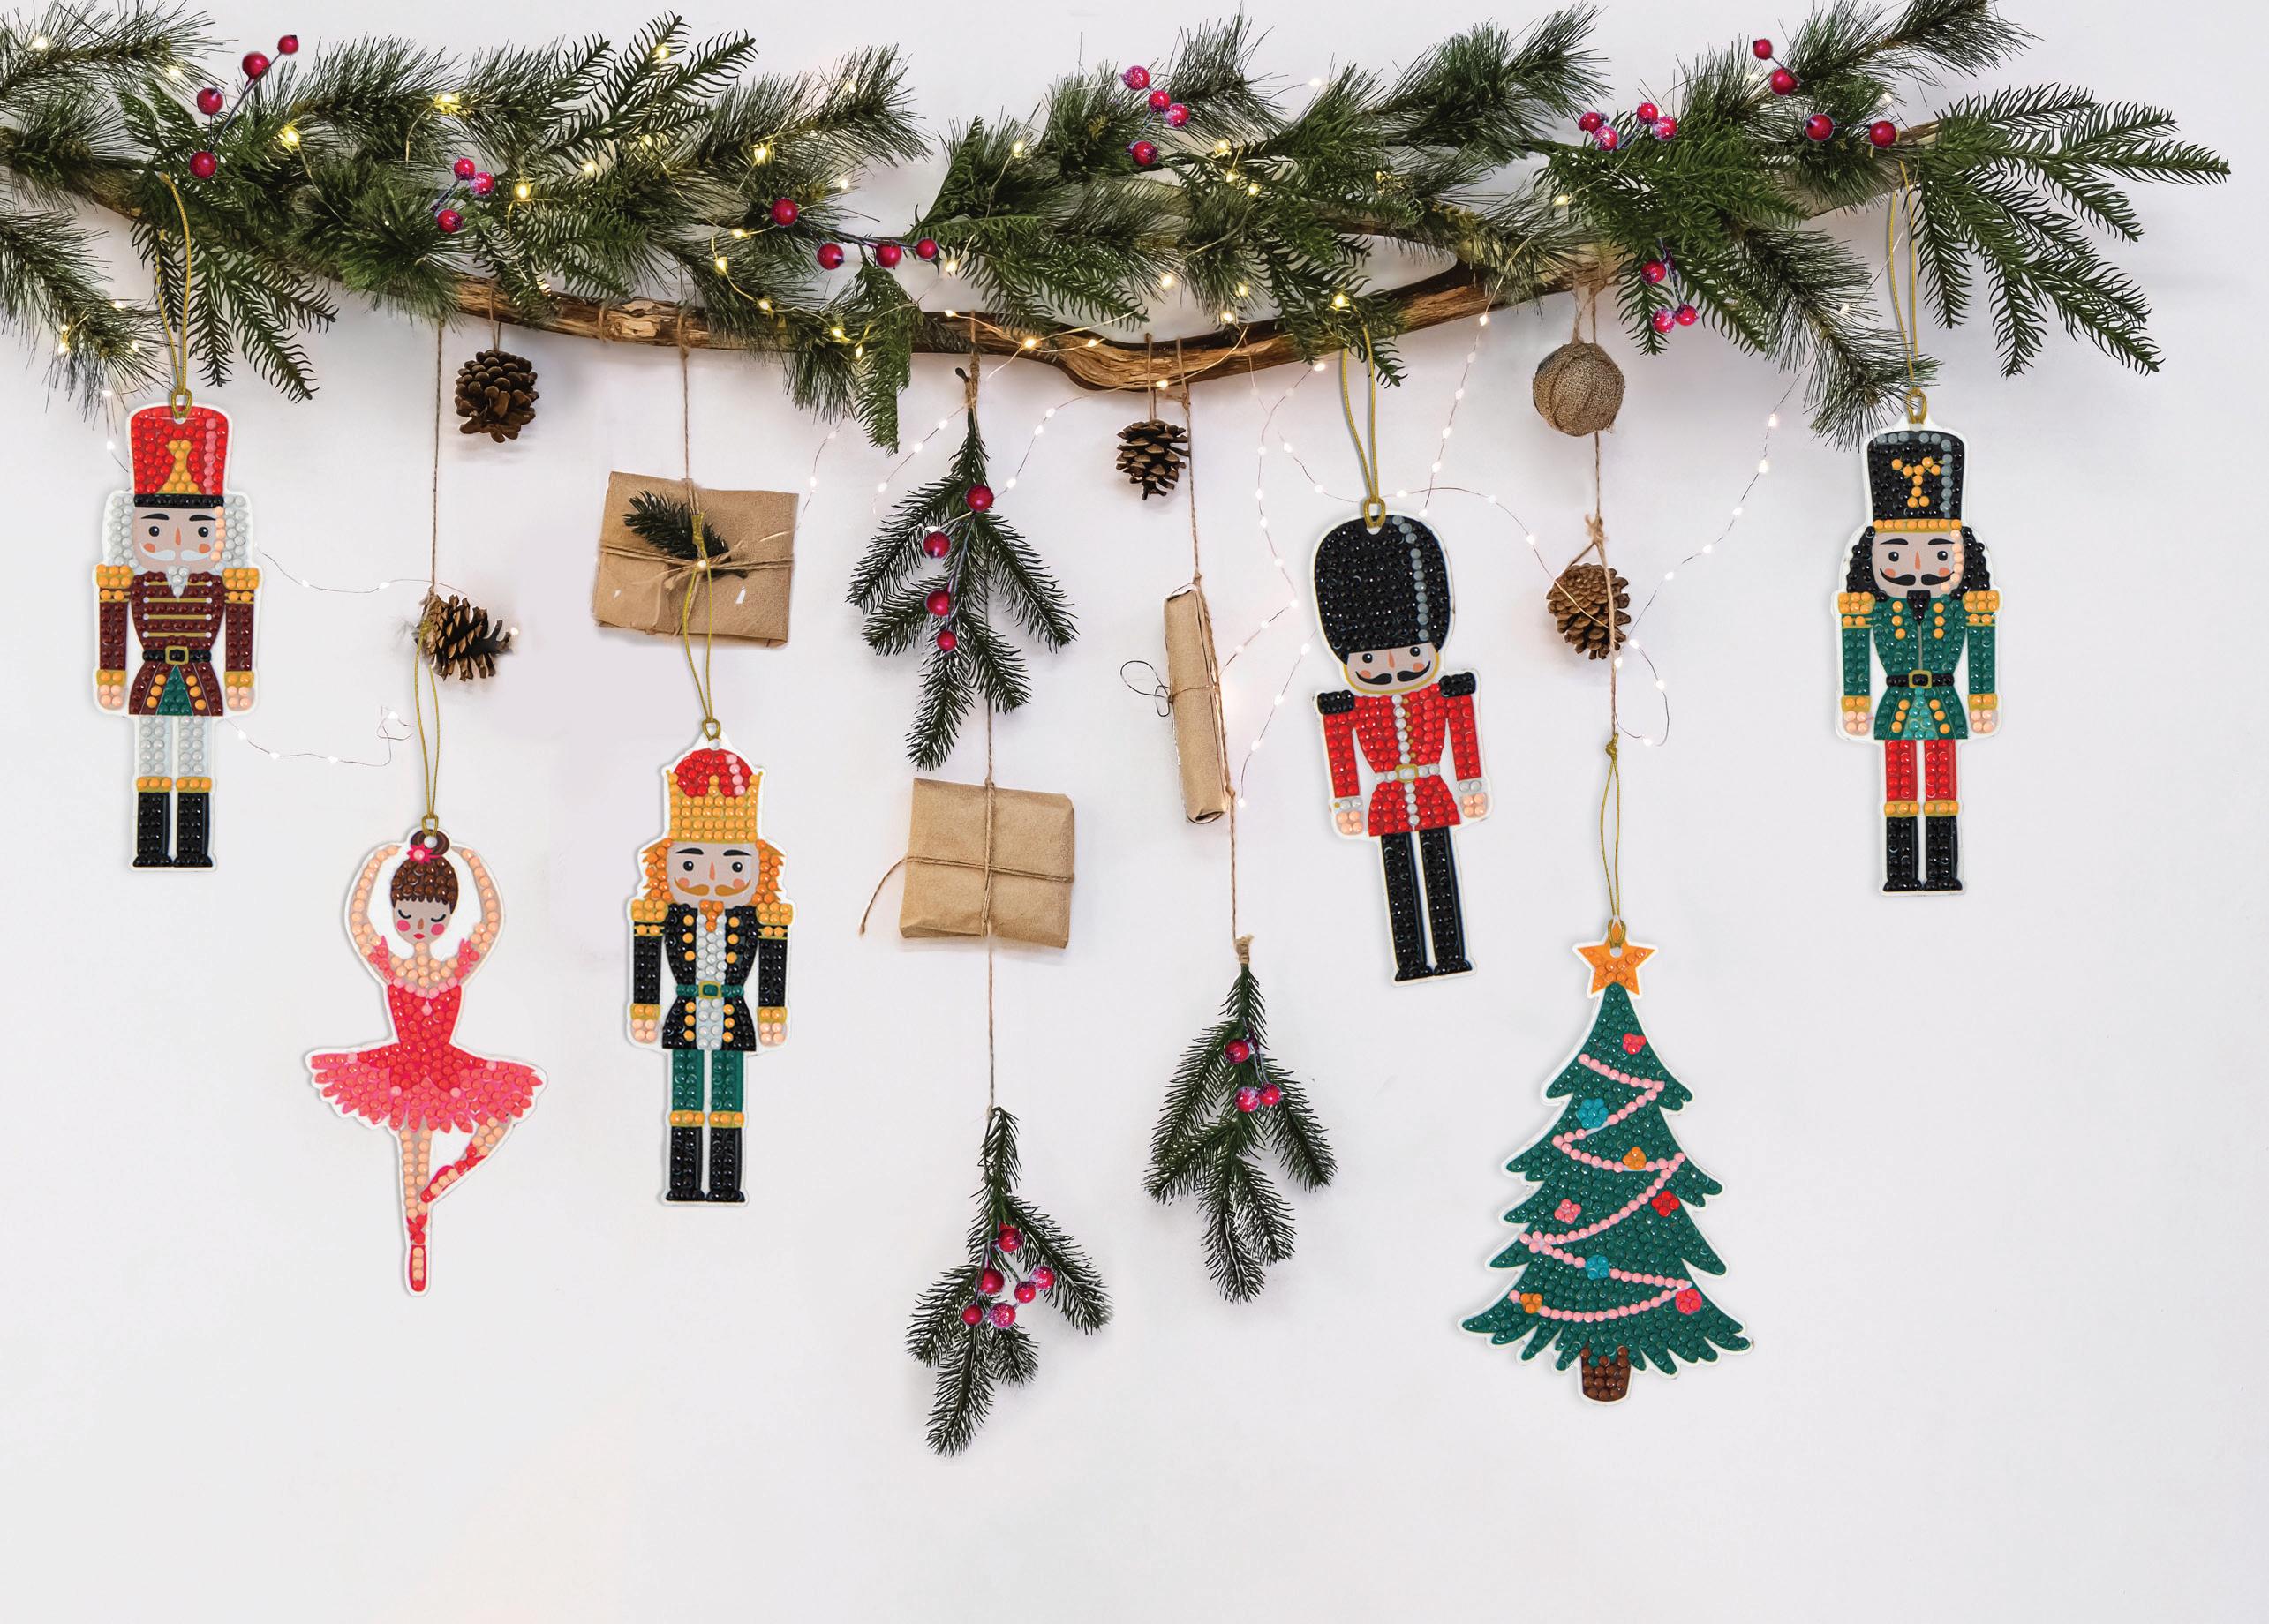
Vintage and trad decos are enjoying a revival. Perhaps this explains the rise in popularity of nutcrackers. Tap into this trend with these tiny soldiers (resplendent in their ornate uniforms and tall hats), a ballerina inspired by The Nutcracker ballet’s Sugar Plum Fairy and a tree festooned with baubles and garlands – all diamond painted of course! PS, See the following pages for more tag and trim ideas.
FUN FACT
During the course of 17th Century Germany, wooden nutcrackers evolved to become dining entertainment. Over dessert, guests marveled at the novel carvings and much mirth was had at the sight of nuts being cracked between the teeth of the figures.
DECO TIP
Beyond their use as tree trims, you can display the decorations in your window at varying lengths, use them as gift toppers or as guest take-home mementos at each place setting.
Nuts for nutcrackers
NUTCRACKER
Decorations
Mount a faux or evergreen bough on the wall and you have the start of a festive focal point. All that’s left is to weave in fairy lights and to dangle these six diamond-painted ornaments.
Average size:
5 x 2.2in
(12.7 x 5.6cm)
KIT
DTZ13.019P
CARVED IN HISTORY
Back in the 15th century, artisans used plentiful supplies of local wood to carve figures as tools to prise open unshelled nuts. As time marched on, these became more decorative – the most celebrated were from the Erzgebirge region in Germany around the 17th and 18th centuries. The hand-painted carvings were intricate with moving arms and accessories. Once considered a year-round gift, the nutcracker’s association with Christmas is due in part to the popularity of the 1892 ballet The Nutcracker by Pyotr Tchaikovsky which features battle soldiers and a nutcracker turned prince!
DOT AND DAZZLE WITH DECORATIONS THAT CELEBRATE TCHAIKOVSKY’S THE NUTCRACKER BALLET!
Let warm LED fairy lights cascade down the wall and your decos will catch the glow!
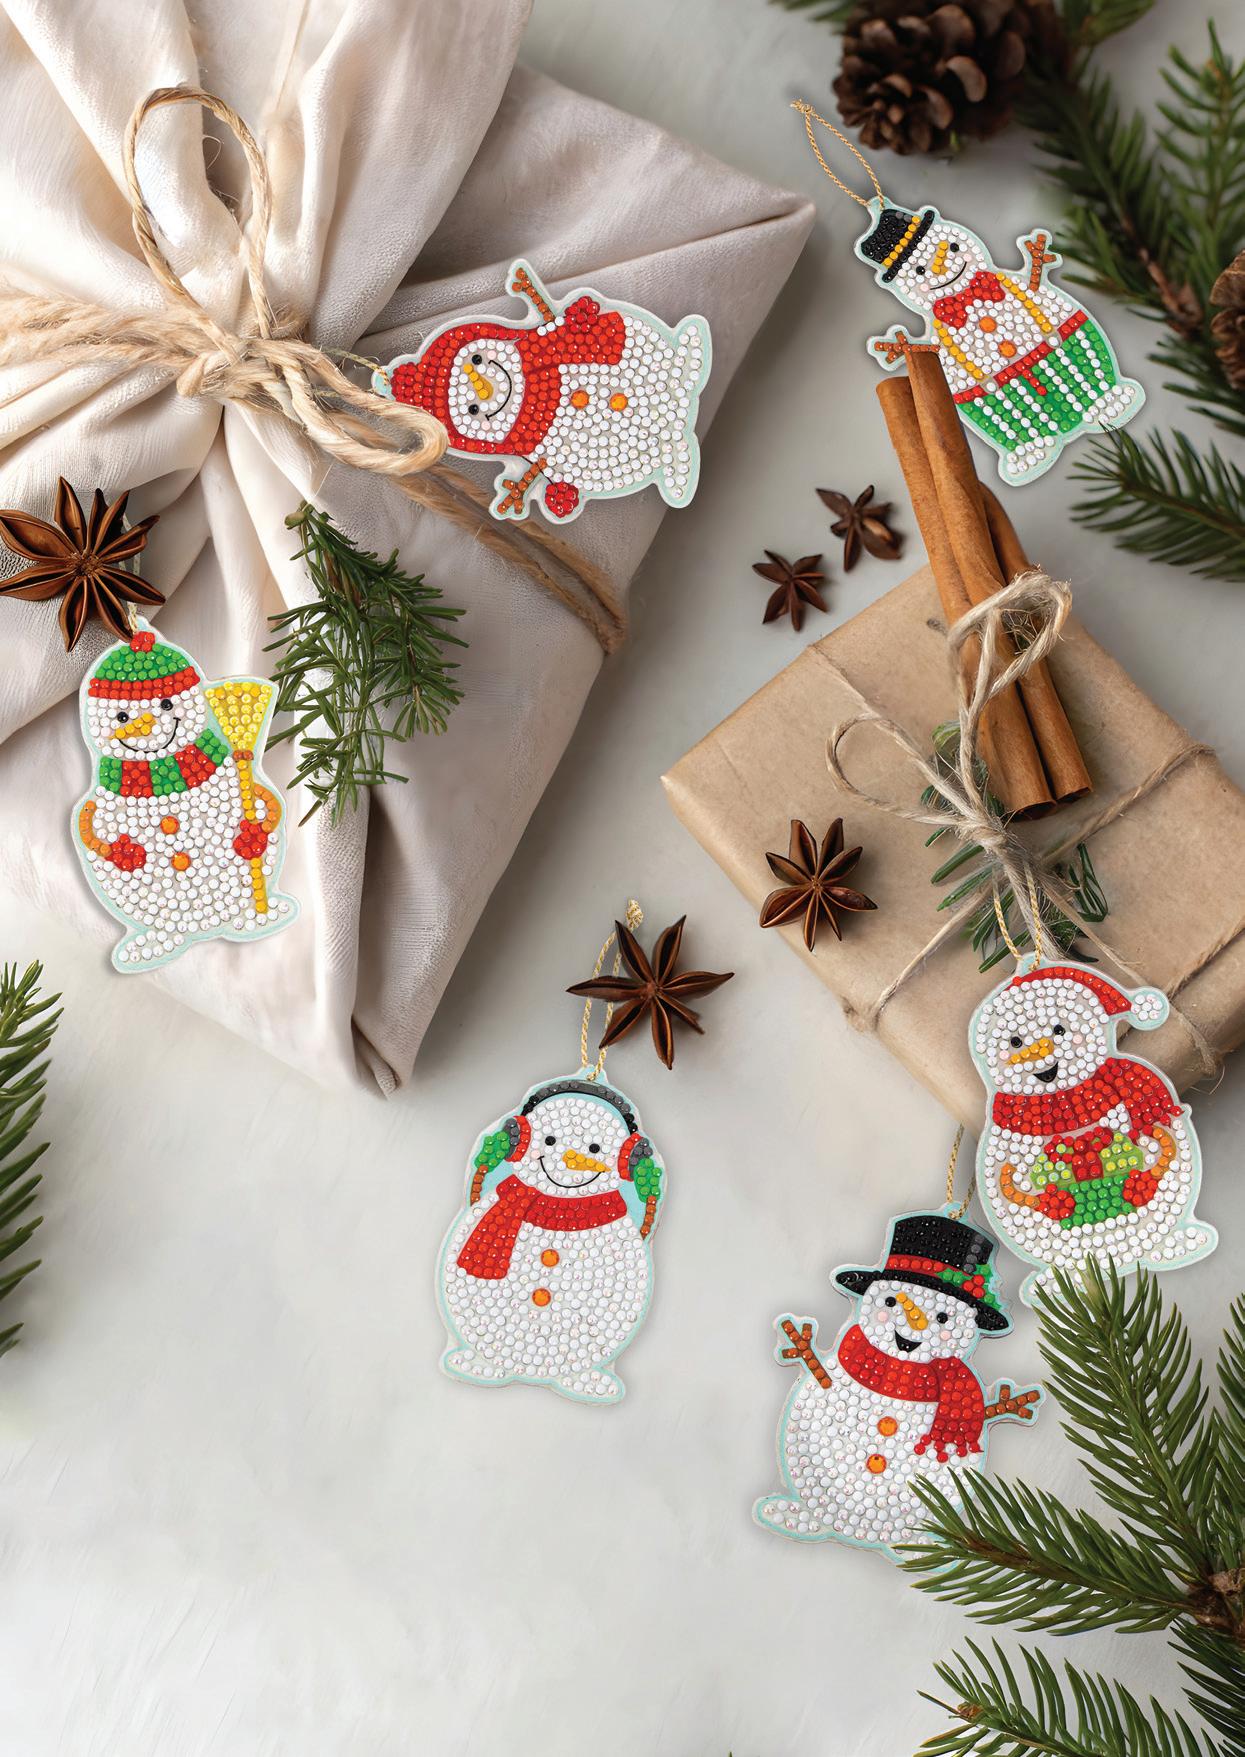
SNOWMEN Decorations
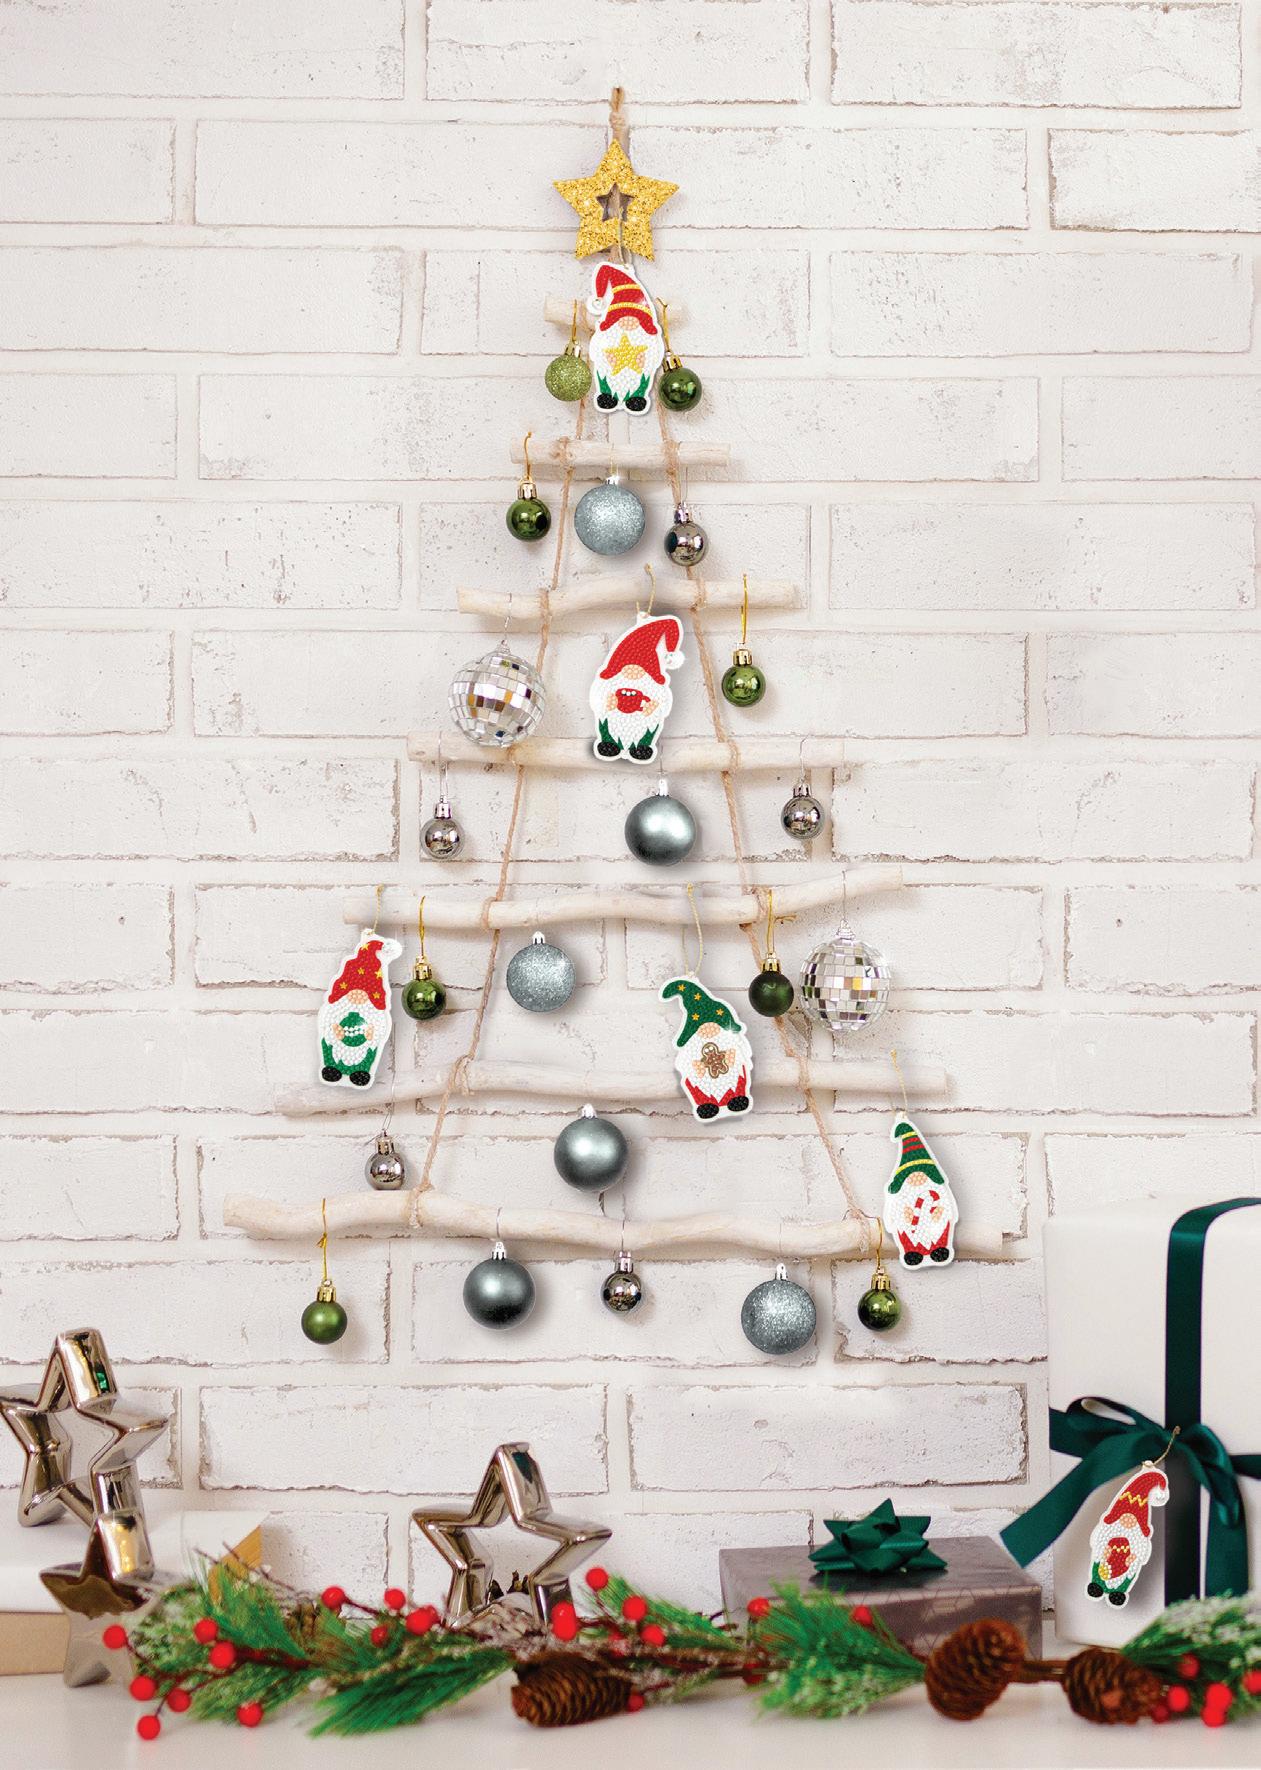
Gnome for Christmas!
CHRISTMAS GNOMES
These whimsical gnomes have swapped everyday garden attire for dashing Christmas finery. Dressed top to toe in sparkling gems, they’re enchanting! Whether you nestle them among the tips of a classic evergreen tree or dangle them from a DIY ladder-style tree, they’ll bring cheeky charm to your living room. The all-inclusive diamond-painting kit, with six cute gnomes, features decorative gems and cord for hanging.
Average size: 2 x 4in (10 x 5cm)
KIT DTZ13.012P
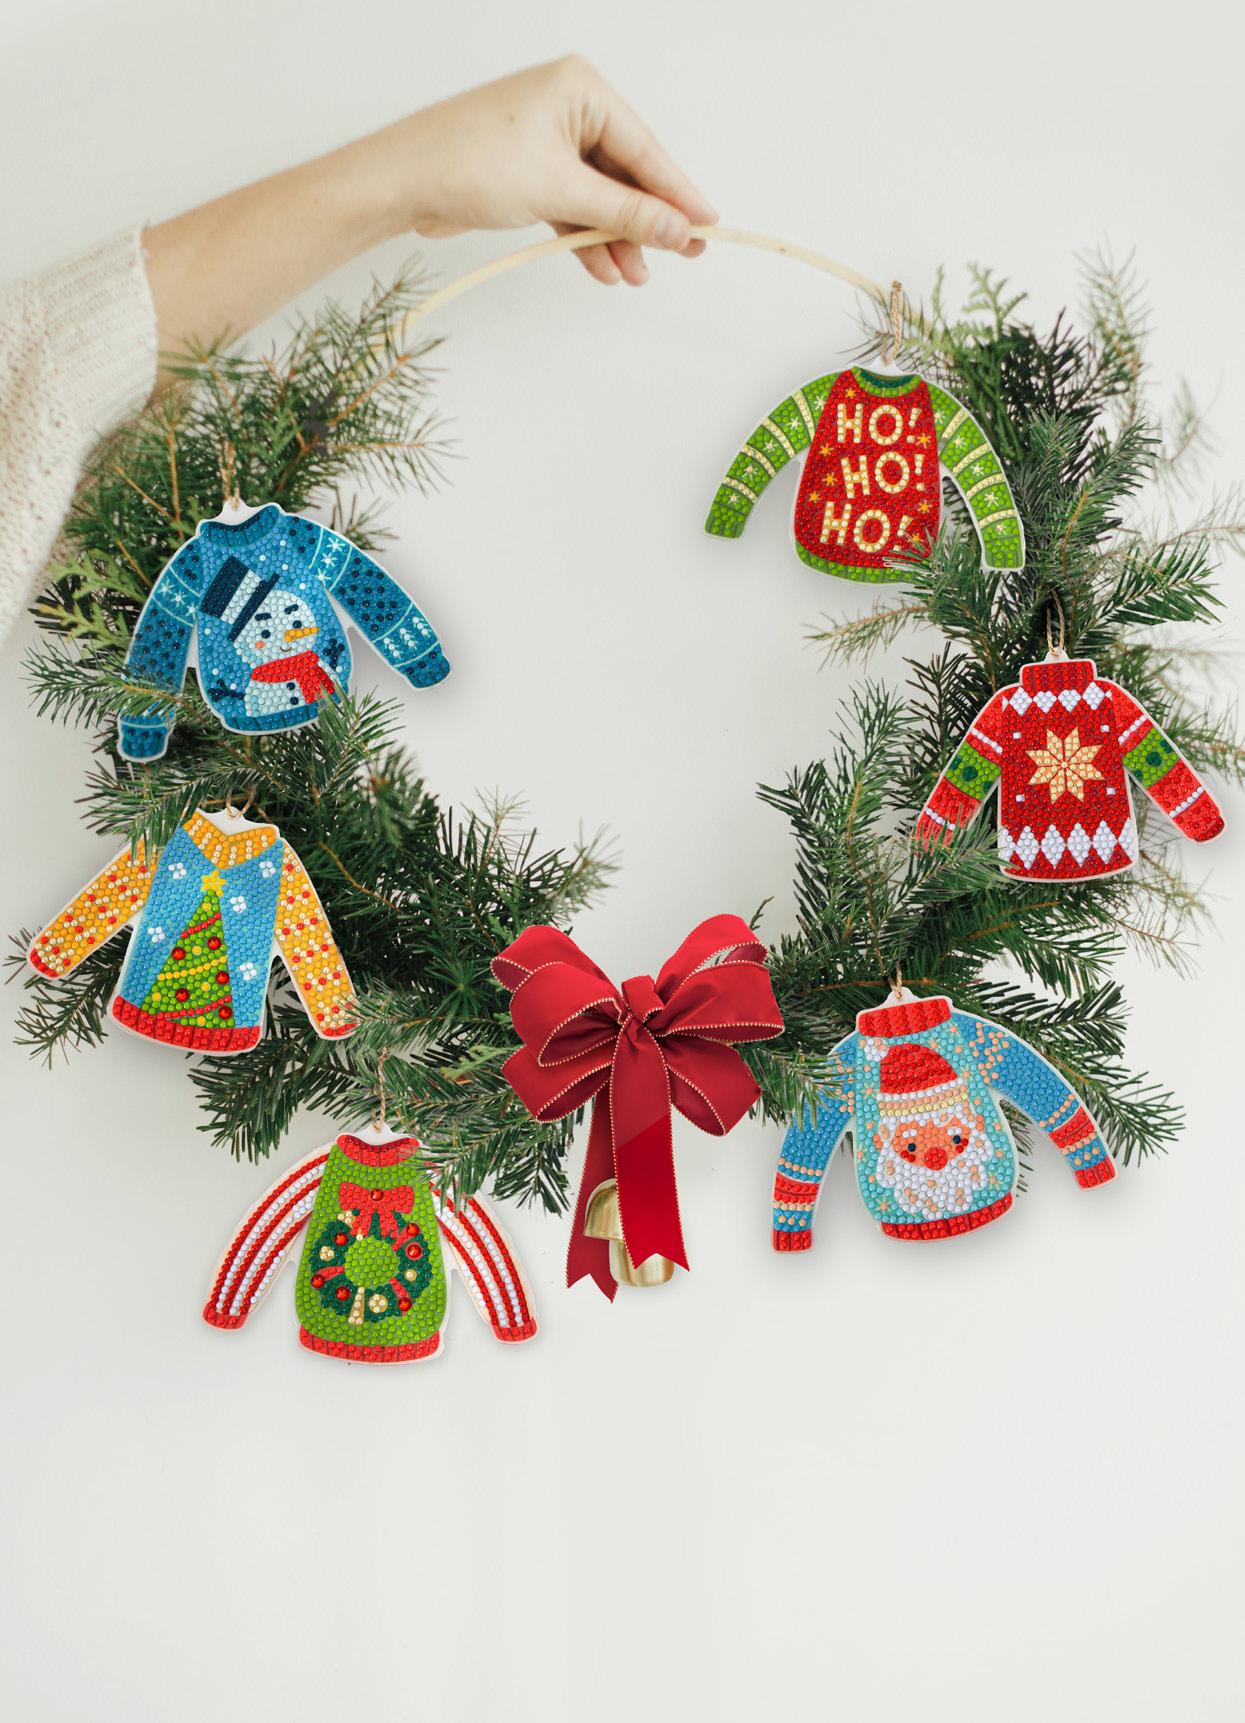
IT’S SILLY SWEATER SEASON! WHO SAYS THEY’RE JUST FOR WEARING?
FUN FACT
The third Friday in December of every year is National Ugly Sweater Day. Knitting or sewing your own jumper to mark the occasion?
Add a quote like: “So ugly, it’s cute, duh!’; “Watch out Vogue, here I come.”; Dear Santa, define ‘good’.”
Jumping for joy!
CHRISTMAS JUMPERS
Cheerful Christmas couture at its finest! All six ugly sweater designs come in one diamond painting kit. Ideal as personalized place markers, gift toppers and trims, the back of each deco is printed to mirror the front, minus the Dotz® gems, so it can be viewed from all sides.
Average size: 5.1 x 3.9in (13 x 10cm) KIT DTZ13.017P
Drinks on me!
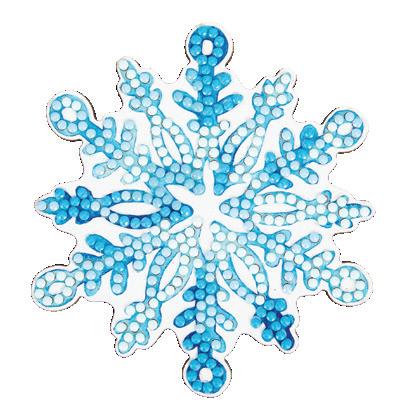
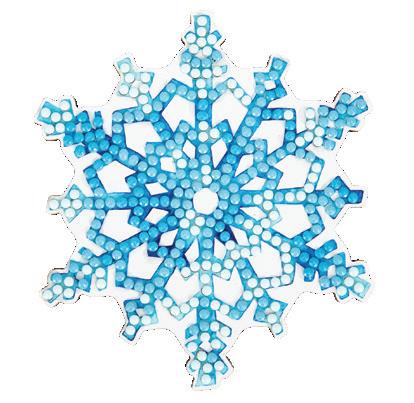
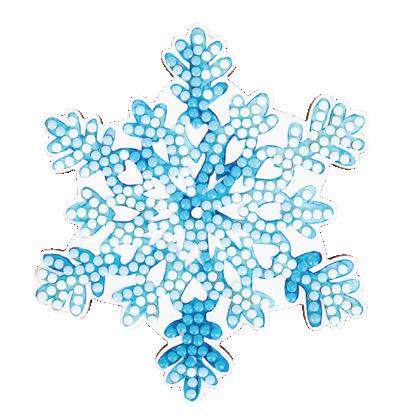
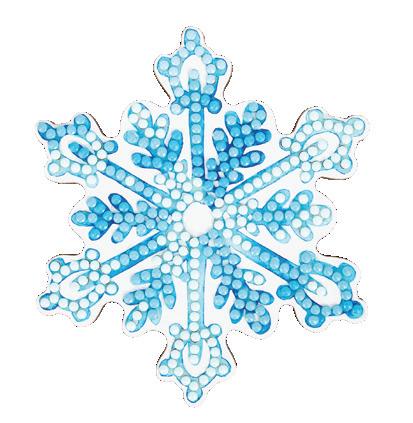
SERVE GUESTS SEASONAL SIPS ON THESE SPLENDID SNOWFLAKE COASTERS
Set to be admired for their crystalline-like beauty, which captures the essence of the season perfectly, and for their everyday practicality, these diamond painted snowflake coasters double as festive accents. Whether you’re serving hot chocolate by the fire or hosting celebratory drinks, these pieces of functional art pay homage to winter’s most enchanting creation. The kit also makes a thoughtful hostess gift to be used and appreciated long after Christmas.
SNOWFLAKE COASTERS
Diamond paint these intricate yet perfectly coordinated ice-blue coasters. Simple to dot, no two designs are identical, just like no actual snowflakes are alike. These ready-to-dot coasters with cork-like backing come as an all-inclusive kit.
Average size: 4 x 4in (10 x 10cm) KIT DD23.020 (pk/4)
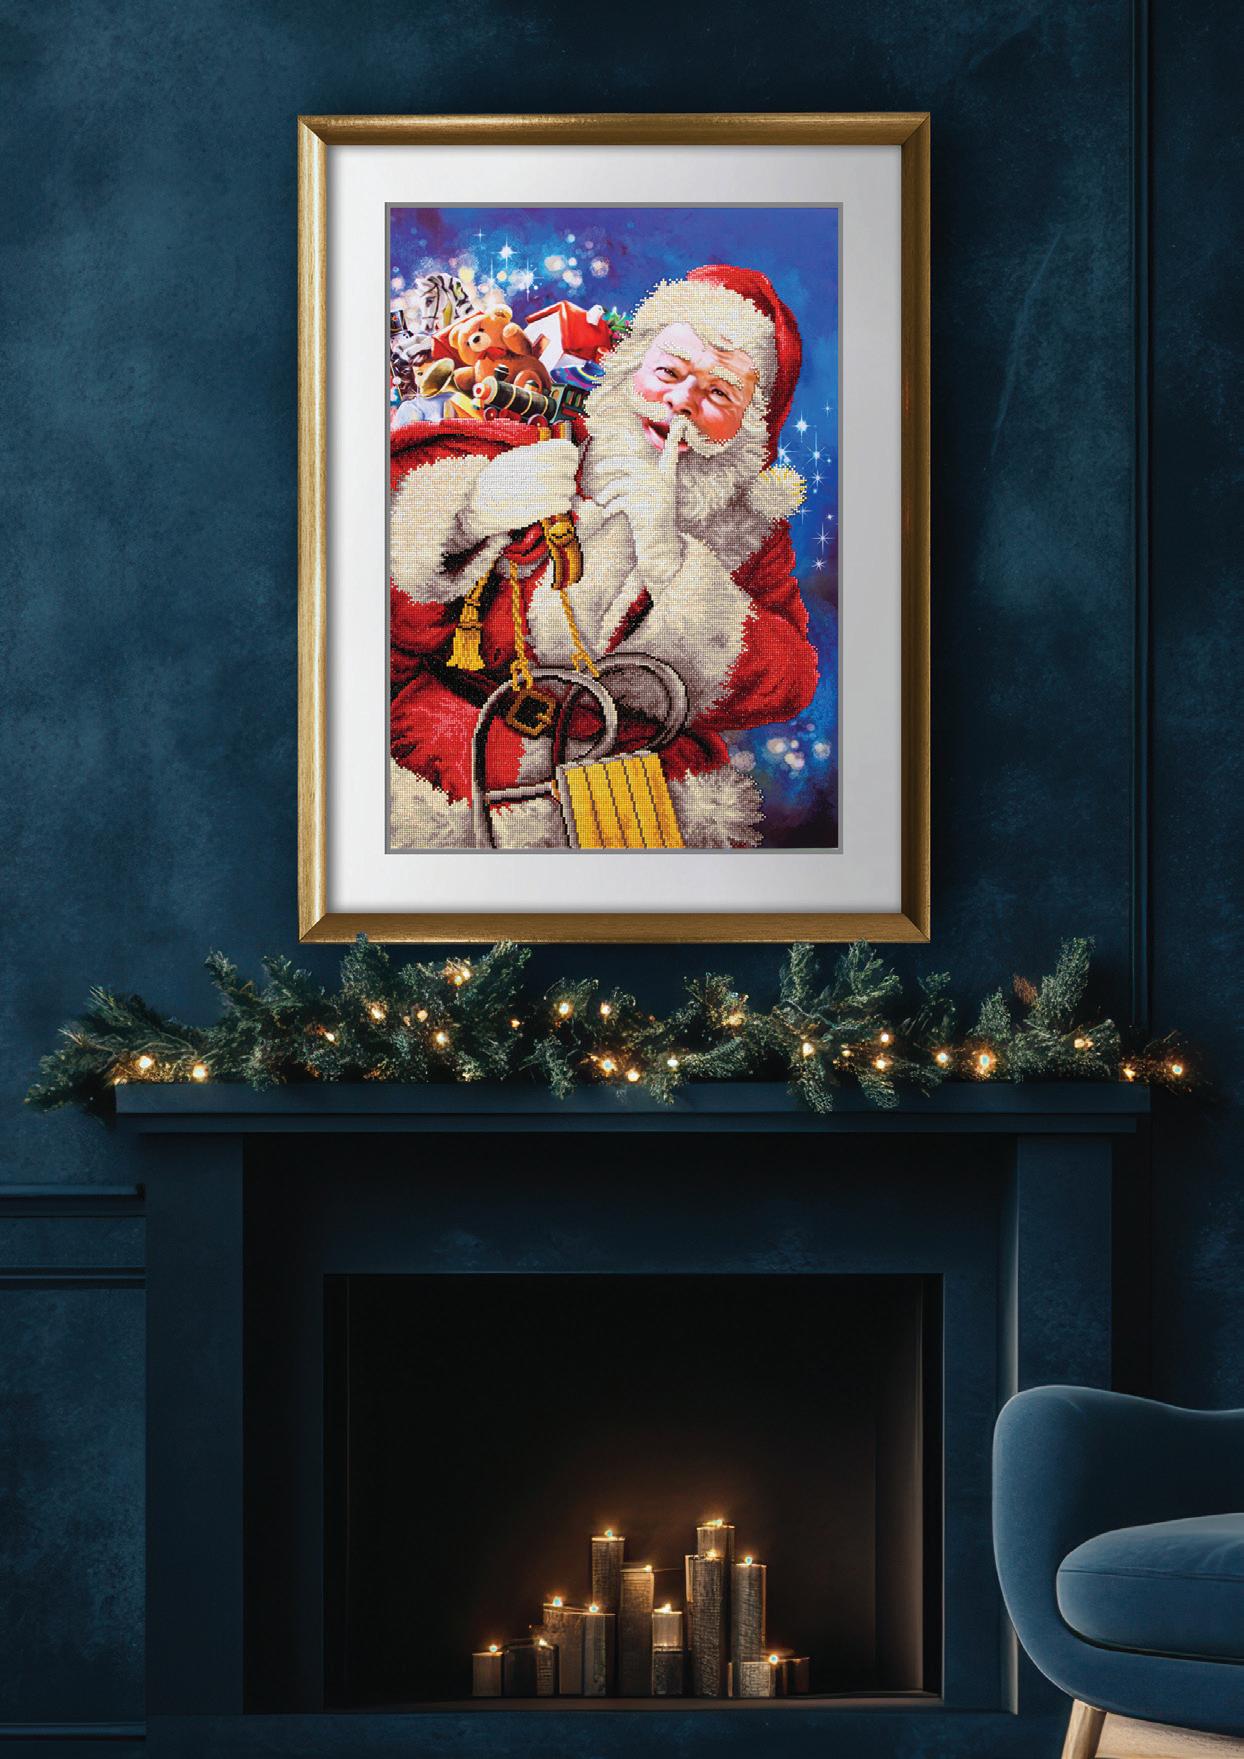
Watch your little ones faces as they gather around these colorful diamond paintings. Wide-eyed with excitement, they’ll whisper “Is Santa really coming? Are all those gifts for us?” Santa’s silent hush will remind them the best surprises are worth waiting for. As for the nutcracker, resplendent in military uniform, he is bound to become the heirloom of tomorrow.
SANTA’S SECRET
Family-friendly and the perfect project in the lead-up to the festive season. Anticipation of the big day builds as Santa comes to life, one sparkling Dotz® gem at a time. These are the memories you will forever cherish!
Design Size:
22.4 x 32.3in
(57 x 82cm) KIT DD13.008
SWAP WHITE WALLS FOR MOODY HUES. BRIGHT ACCENTS WILL POP AGAINST THE DRAMATIC BACKDROP, WHILE SAME COLOR FURNITURE WILL BLEND SEAMLESSLY. IT’S A WIN WIN!
DID YOU KNOW?
German folklore would have you believe that nutcrackers bring good luck and protect homes from evil spirits. Whether you believe this or not, Christmas isn’t complete without a nutcracker or two. Diamond Dotz® has you covered with our wall hanging kit, but to go all out, look for nutcracker-themed dinner plates, platters and more on Etsy and online stores – some even offer personalization.
In salute of Santas & Sentinels
NUTCRACKER WALL HANGING
Quick to dot, this distinguished soldier, in full dress uniform, stands ready to watch over festive gatherings.
Design Size: 15 x 7.09in (38 x 18cm) KIT DD17.039
MKit comes complete with a magnetic hanger for easy display.
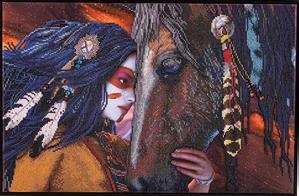
Unbridled passion
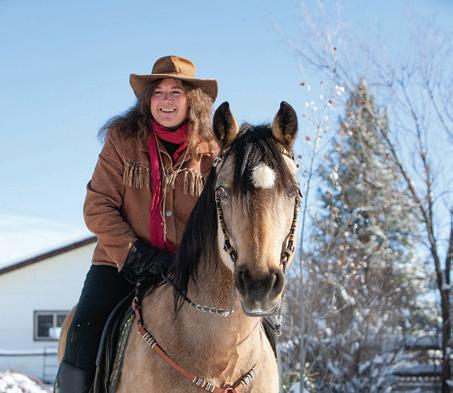
LAURIE PRINDLE
Professional artist, Laurie Prindle, opens up about her passion for horses and wildlife. Her affinity with these clever creatures, coupled with careful observation, is the very foundation of her art. These works often dance between reality and fantasy, several of which have been adapted for Diamond Dotz® diamond painting kits. And here’s a fun fact: she creates new holiday art every year for family and friends. The following year, it is released to be licensed and to the public to buy and share. Read on and enjoy… →
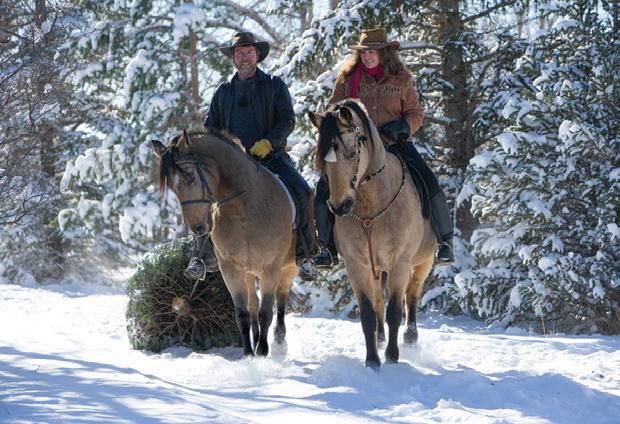
Bill and Laurie with their beloved horses, hauling a freshly cut Christmas tree home across the snow.
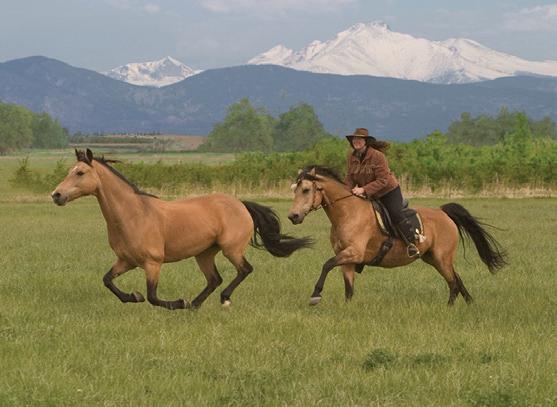
Laurie with her buckskin Morgan mares, sisters Mighty Mouse and Juanita.
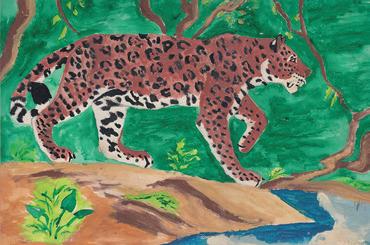
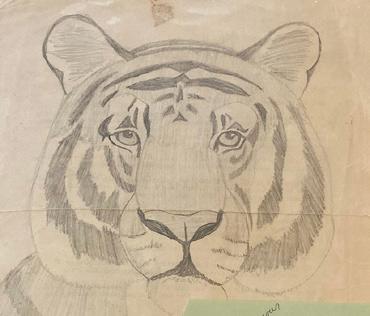
Laurie was 10 years of age when she painted the Jaguar and 11 when she sketched this Tiger.
Q. Your Welsh grandmother, a talented artist herself, gifted you a set of Japanese watercolors when you were six years old. Can you recall your first attempts at painting?
A. Actually, I still have that set of Japanese watercolors, or what is left of them! I don’t know what I had against people, but I just drew and painted animals.
Q. Do any of these early pieces still exist?
A. I have a few early ‘artworks’ that friends and family saved over the years. At the time, I sold or gave away most of what I did. I would set up a lemonade stand on the strip of grass (outside our apartment in downtown Burlington, Vermont) where I would hang my drawings up to sell so I could save money to buy a new bicycle.
Q. Horses been a passion of yours ever since you first rode one in Central Park, New York City. Can you recall how the ride came about?
A. That is a pretty funny story! I didn’t really like horses while growing up in Vermont. I was about six when I first tried riding and was almost killed for my trouble when the naughty little pony reared and threw me off. All I could recall were hooves flying in my face. After that, I thought horses were pretty, but nuts. I kept my distance.
My passion for horses really began in 1980 when I moved to Greenwich Village, New York City, to attend Parsons School of Design. There, I met my significant other, Bill, and he along with a crazy Irish friend (also Bill!), dared me to go riding in Central Park with them. Back then, one could rent a livery horse at the 100+-year-old famous Claremont Stables (sadly, they closed in 2007). I took their dare and the ‘rest is history’.
For the next four years, the three of us rode over a 100 different horses, from barely-broke to well-schooled, in the public parks of the surrounding boroughs of New York. I then went on to ride horses all over the United States when I worked for Simply Morgan magazine as Art Director and Ad Manager from 2000-2008; Hyde Park, London; the Okavango Delta in Botswana, Africa; from beaches to rainforest in Queensland, Australia.
Q. What is it about horses that makes them such compelling subjects to paint?
A. Their beauty, their energy, their power, their grace! As someone who owns, rides and trains horses, one of the greatest joys of working with and training a horse is watching its physical and mental development. The horse’s body becomes a work of art unto itself as it develops, becoming more confident, beautiful, graceful and supple
Laurie loves to dress her horses in Santa hats and other festive nonsense for a spot of Yuletide fun!
FUN FACT
Laurie is also enthralled by ‘big cats’ no doubt due to her having had ‘kitties’ since she was a little kid. Three years ago, her fascination led her to adopt a white lion named Gus at the Wild Animal Sanctuary, Keenesburg, Colorado.
Laurie’s tongue-in-cheek humor is evident in this artwork, which has been interpreted as a diamond painting. She found it amusing to dangle a bauble from a unicorn’s horn! No doubt you will too.
CHRISTMAS UNICORN
with correct training. My Morgan gelding, Flash, came to me as a very powerful but uncoordinated and gawky youth, with no muscling and a very short attention span. He went on to become an amazing partner and a beautiful athlete over his many years, thanks to classical training.
Q. You describe your Morgan horses as your best friends and ‘muses’. What characteristics do they possess that makes them so special to you as both an artist and horse lover?
A. When people are asked what kind of horses they see/know, most in the United States would likely say Quarter Horse… in Vermont, it’s Morgans, the breed originating over 200 years ago there. The Foundation Morgan is known for its incredible beauty and grace, as well as smarts and a strong innate desire to please. I got my first Morgan, Grace, a 6-year-old mare, in 1987 when I moved to Colorado. She was such an incredibly generous horse and truly a dear friend and teacher. Later, I was blessed with Juanita, my buckskin Morgan mare who I considered my ‘soul sister’ – we could read each other’s minds and hearts. Every one of them is special in their own way. Horses are so much smarter than most people think, and they live very deep emotional lives. I am embarrassed to admit that before I had my own horses, I hadn’t realized how smart they truly are and the depth of personality they have.
Q. Your award-winning studio specialized in design and illustration for the equine industry. Was this a natural evolution of your interests?
A. Yes, as I spent a lot of time in the horse world clients were primarily from the equine industry. Projects ranged from marketing and advertising to packaging, logos and brand development. We also handled jobs for several equine businesses, including Equine Network (publisher of well-known US horse magazines), equestrian clubs/organizations, horse breeders and more. On the illustration side, I worked for the National Western Stock Show/An Evening of
Dancing Horses (which I rode in several times!).
I also did equine illustrations for several books written by my veterinarian and designed books and calendars by the renowned wild horse activist and photographer
Carol Walker.
In the late 80s/ early 90s, when I was getting my design business off the ground, I did horse and pet portraits on the side for about five or six years, an example of which is Top Cat (above).
Q. What prompted the move to digital painting in 2004?
A. I got interested in CGI (computer generated imagery) and alternative ways to create art. In my design business, I had been using Photoshop for many years to do ‘photo’ illustration, Adobe Illustrator for different types of illustration, including my style of ‘illustrative’ logos and more. Back then I was influenced by illustrators such as Peter Max and then Milton Glaser (who I was lucky to take some classes with when I was in design school). I then discovered new software, such as Corel’s Painter.
Q. How did you adapt traditional painting techniques to digital?
A. I don’t consider myself a painter at all. Yes, when I was young, I did a lot of watercolor, and ‘mixed media’, using watercolors, gouache, and colored pencil or markers. I did try oil painting one year – I hated it, and acrylics didn’t ‘speak’ to me.
I really am a ‘drawer’ but that just sounds so odd! Hence, artist is really more accurate. What I love about so-called digital ‘painting’ is I can make ‘paintings’ by drawing. For years in Illustrator, I ‘drew’ with a computer mouse (often I would do rough pencil sketches then scan them to draw over in Illustrator).
In 2004, I took the leap and got a Wacom Intuos drawing tablet to use with Photoshop and Painter. Wow! I was in love. With the early drawing tablets, one still had to draw on the tablet but look at your computer screen while drawing. It took a year or two to master the hand/eye coordination needed. Later, I stepped up and bought a used Wacom Cintiq 16, where one draws directly on the tablet/ screen. I never looked back! ‘Command+Z’ (undo) is the digital artist’s best friend! After watercolor, the freedom to experiment and make big mistakes without ruining an entire artwork and having to start all over again really appealed to me.
I also work in Photoshop and Painter in often a hundred layers or more, giving me the ability to experiment and make changes, again and again.
For me, part of the joy of making art is the play/experimentation.
Q. Do you still engage in traditional painting methods to unwind or for the pure pleasure of picking up a brush and putting paint to canvas?
A. I still like pencil sketching once in a great while. I haven’t done any watercolors for years. When I graduated from art school in 1984 Mac computers started being used in the design business (and for me around 1987-88 where I worked one had to learn Photoshop, Illustrator and QuarkExpress), and so as I had to learn that world quickly, so I think I just got into that groove more than ‘conventional art’ methods. Drawing/making art for pleasure was a bit more of a sideline for many years other than the pet portraits I did in first few early years. I did very much love designing/visual problem solving and that was my creative outlet for many years.
Q. How have indigenous cultures and art forms influenced your art? And how do you balance artistic inspiration with cultural sensitivity?
A. The graphical nature of a lot of indigenous art appeals to me as both a designer and an artist. I am also influenced by my travels where I get to directly interact with the indigenous peoples and cultures of the various lands. Inspired to delve deeper into the meanings, customs and cultures, I diligently research the specific art form/culture I’m interested in/curious about, which often sparks the inspiration for a particular piece. I always strive to honor the cultures whose art forms I interpret and incorporate into my art.
Q. Your artworks span both realistic equine portraits and fantasy art. What draws you to explore mythical horses and unicorns alongside more traditional representations?
A. Pure fun. Who doesn’t love unicorns, centaurs, hippocampi, kelpies, Pegasi, and more? I do like to try to come up with my own fantasy critters too. It really is just a fun thing to do!
Q. Do you draw from specific mythologies, fairy tales or create your own interpretations?
A. Sometimes directly from classic mythology and fairy tales. Even then, I do like to put my own twist on things. Of course, I was influenced by all the wonderful ‘kid’s’ books like The Chronicles of Narnia (which I saved up my pennies to buy and read when I was 6 and never looked back as well as fabulous fantasy illustrators like Arthur Rackham, Kay Nielsen, and later Roger Dean, Roger Hane, Michael Whelan and so on.
Q. Are you surprised by the level of consumer interest in fantasy artwork?
A. Kind of an odd question. Fantasy has always been a huge market throughout history. Doesn’t everyone fantasize about something?
SOUL TOUCH
Experience the serene unity between a horse and his rider.
Design Size:
16.5 x 26.4in
42 x 67cm
DD12.080
SORAYA
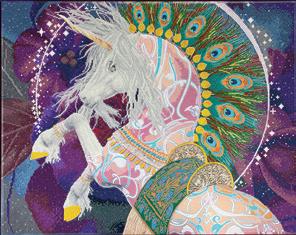
MASTERCLASS
A sparkling fusion of fantasy and equine beauty to dot and admire!
Design Size:
28.4 x 22.1in
72 x 56cm
DD21.005
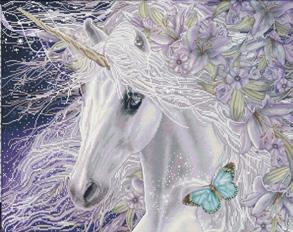
LILLICORN
Her flyaway mane, adorned with blooms, awaits you. Get set to soar as you dot this ethereal creature.
Design Size:
33.1 x 26.4in
84 x 67cm
DD15.028
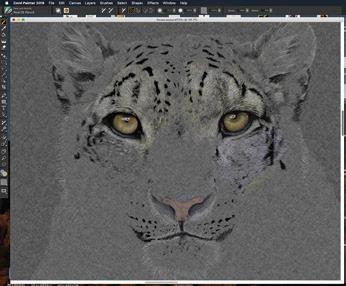
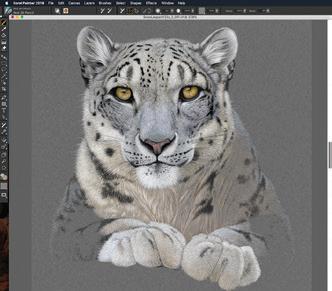
Snow Leopard Study Screen shots showing the work in progress in Painter
Top Cat: commissioned portrait
Jolly-good entertaining
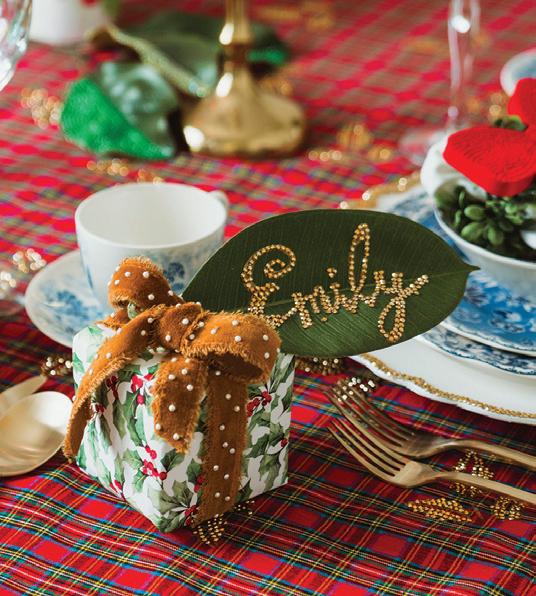
Memorable yet easy to create, these diamond painting ideas will put the merry into your Christmas celebrations. From shimmering holly candleholders, floral centerpieces and arty displays to glittering napkin rings, charger plates, personalized leafy place ‘cards’ and more, these projects are sure to dazzle your guests.
SET THE SCENE WITH HANDMADE TABLE DECORATIONS THAT WILL SPARK JOY AND MAKE YOUR GUESTS SMILE AT YOUR CREATIVITY!
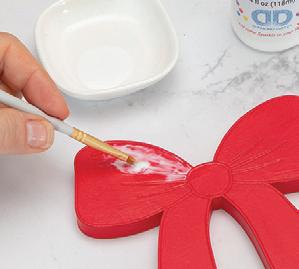
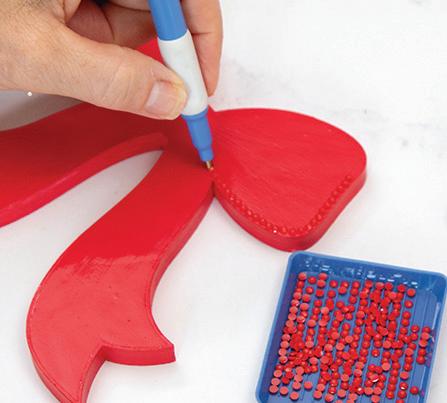
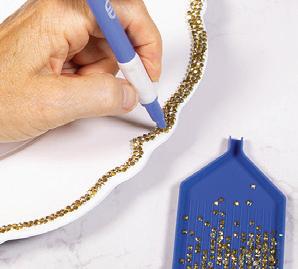
BOW NAPKIN RING
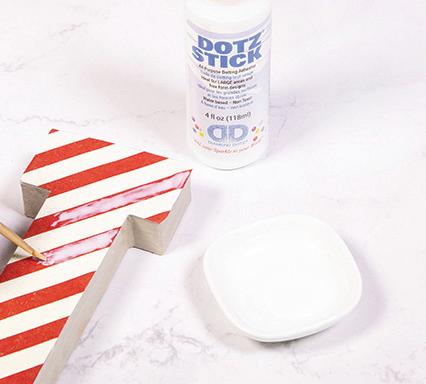
STEP 1 Brush entire bow with 2 coats of red paint, allowing each coat to dry before proceeding.
STEP 2 Brush face of bow with 2 coats of Dotz® Stick, allowing each coat to dry clear but tacky.
STEP 3 Pour gems into 3 separate craft trays, 1 for each color. Shake each tray gently from side to side so gems settle, curved side up, in grooves of tray. Load stylus with wax then, working with 1 shade of gems only, pick up and place them, 1 at a time, around edge of bow.
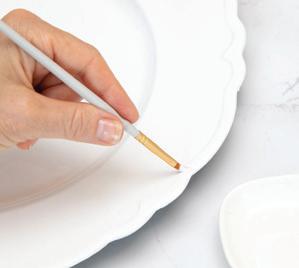
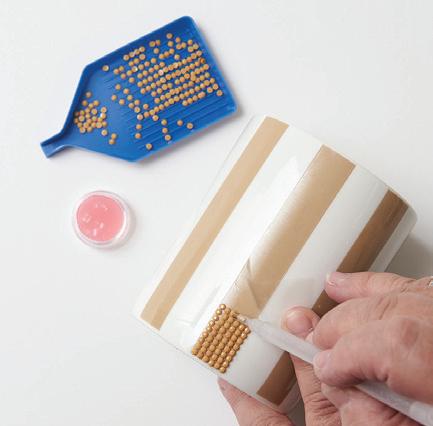
Charger Plate and Custom Napkin
Gild a standard charger plate and personalize guest napkins.
CHARGER PLATE
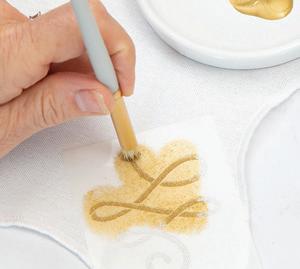
STEP 1 Brush raised rim of charger with 2 coats of Dotz® Stick, letting each coat dry clear but tacky.
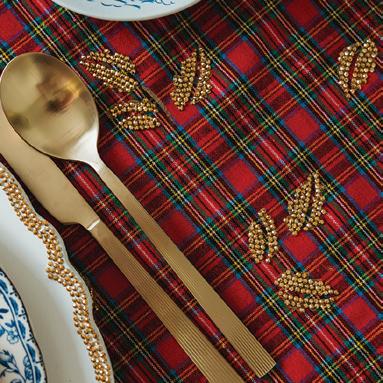
Stencil and diamond paint gold holly leaves in groups of two or three across your plaid fabric, tablecloth or runner. Simply use a holly stencil and adapt the napkin instructions (below left) to suit.
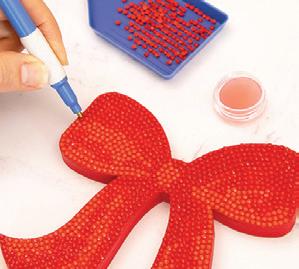
STEP 5 Shading and highlighting parts of the bow creates a 3D look – less flat and more realistic.
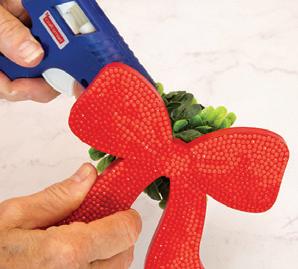
STEP 6 When bow is completed, gently press down on gems to secure them in place. Hot glue bow to napkin ring.
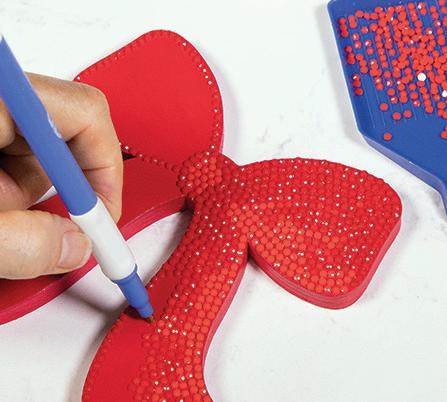
STEP 4 Fill in bow by using 3 shades of red to establish highlights and shaded areas. To do this, first dot details, like the folds and creases with 1 shade of red. Then, as you soft dot to fill in each section, stagger the change of shades within each section (ie bow’s loops and tails). Subtle initially, the effect becomes more noticeable as you dot.
YOU WILL NEED
Bow Napkin Ring
l Plywood bow/s, 5.5 x 5.7in
l Red artist’s acrylic paint
l Boxwood napkin ring/s
l DIAMOND DOTZ® Gems: Red 8015, Scarlet 8013, Flag Red 8020
Charger plate
l Scalloped charger plate/s
l DIAMOND DOTZ® Gems: Red Gold Metallic 7001
Custom napkin
l Scalloped linen napkin/s (washed, dried and pressed)
l General craft items: sml/med flat and round paintbrushes; paint/ glue dishes; hot glue gun/glue sticks; paper towel
STEP 2 Pour gems into tray, shake it from side to side so they settle in grooves of tray, curved side up. Load stylus with wax then, picking up and placing 1 gem at a time, dot inside edge of scalloped rim (1st round).
STEP 3 Dot subsequent rounds with gems until rim is covered.
STEP 4 If needed, use stylus tip to nudge a few gems for better placement. Gently press down on all gems to secure them.
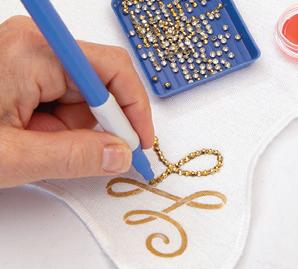
CUSTOM NAPKIN
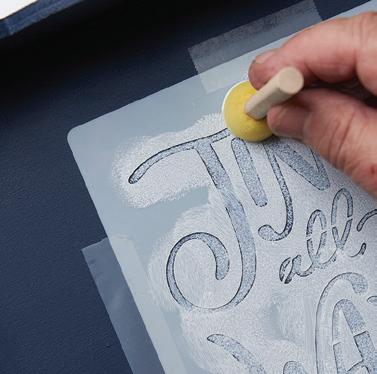
STEP 1 Lay napkin on a flat surface. Spray stencil back with adhesive then place it in a napkin corner, as shown). Starting on stencil plastic, use a dry brush technique (see DD TIP right) and a pouncing motion to dab gold paint into stencil design’s cut-out sections.
STEP 2 Remove stencil. Apply 2 coats of Dotz® Stick onto gold design, letting it dry clear but tacky after each coat.
STEP 3 Load stylus with wax. Pick up and place 1 gem at a time onto stenciled design until complete.
STEP 4 Carefully brush a thin coat of Dotz® Guard around edge of dotted design where tacky if not covered by gems. Let dry.
TIP
For dry-brush stenciling, first dip stencil brush into paint. Swirl loaded brush on paper towel and wipe it from side to side several times to remove excess paint. This also helps work paint up into bristles of the brush.
Bow Napkin Ring Napkin rings go next level with this ribbon accent.
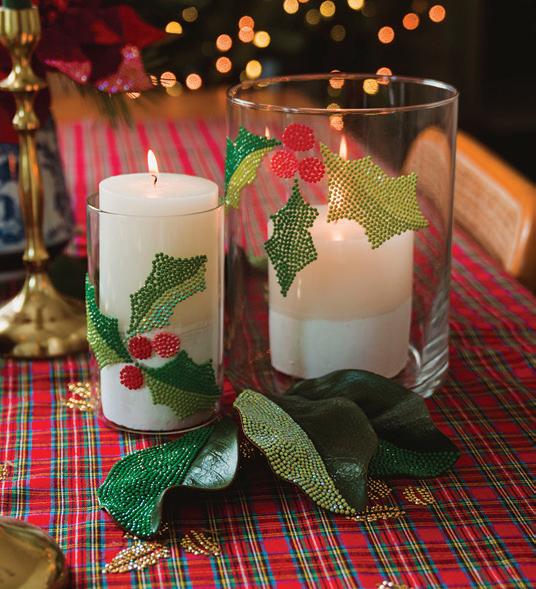
Holly candleholders
Decorate glass vases with diamond painted holly – ideal for pillar candles.
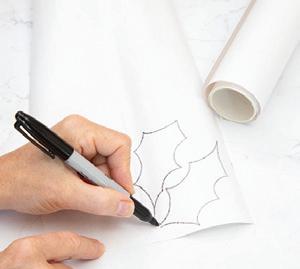
STEP 1 Using marker pen, freehand draw holly leaves and berries onto the opaque side of sandwich adhesive.
STEP 2 Following outline, use scissors to cut out all holly leaves and berries.
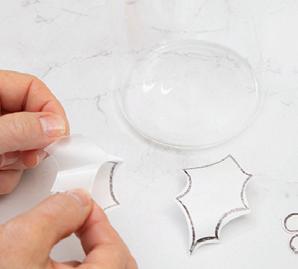
STEP 3 Working with 1 holly leaf at a time, peel off opaque backing of sandwich adhesive.
STEP 4 Attach sticky side of a holly leaf to glass vase then peel away clear film from sandwich adhesive.
STEP 5 Pour gems into separate craft trays. Shake each tray gently from side to side so gems settle in grooves of tray, curved side up. Repeat as needed.
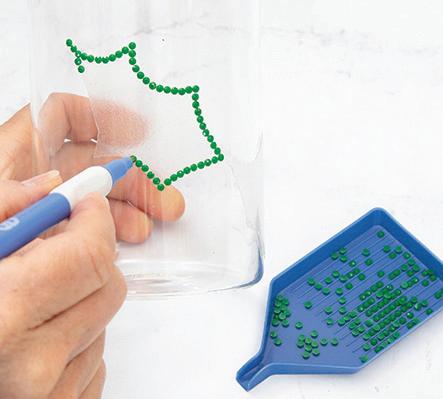
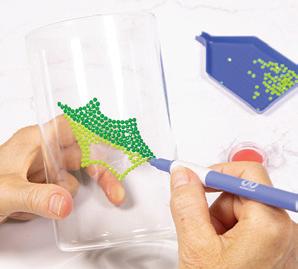
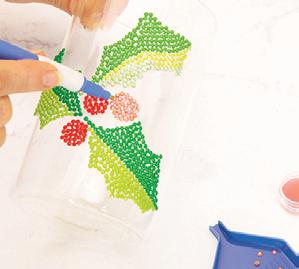
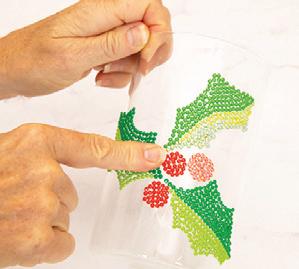
STEP 6 Load stylus by dipping tip into wax. Using stylus to pick up and place the gems, outline holly leaf around edge of sandwich adhesive with your choice of green gems. Holly leaf can be outlined in 1, 2 or 3 shades of green, although 2 is recommended to begin with.
STEP 7 Dot central vein in your choice of green gems. Fill in each leaf half with green gems to match outline shades.
STEP 8 Repeat Steps 3, 4, 5, 6 and 7 to attach remaining holly leaves and berries onto vase in a pleasing arrangement prior to diamond painting them, 1 leaf and berry at a time. Each berry is dotted in either a red or orange gem.
STEP 9 Gently press down on gems to secure them in place.
YOU WILL NEED
Holly Candleholder
l Glass vase
l DIAMOND DOTZ® Sandwich Adhesive
l DIAMOND DOTZ® Gems: Red 8015, Orange AB 5012, Red AB 5006; Parrot 8242, Kelly Green 8245, Frog 8249; Bright Green AB 5008
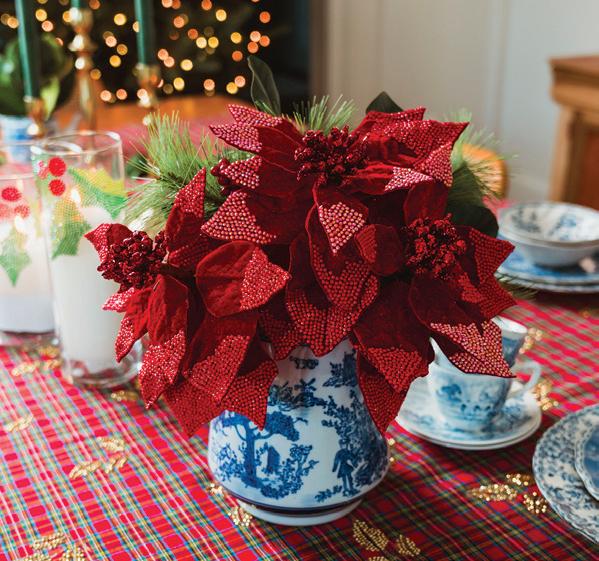
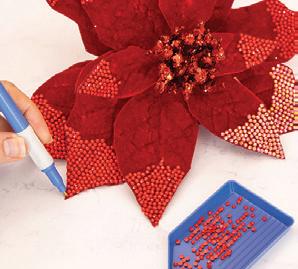
Poinsettia Bouquet
l Poinsettia picks, preferably flocked
l DIAMOND DOTZ® Gems: Red 8015, Red AB 5006
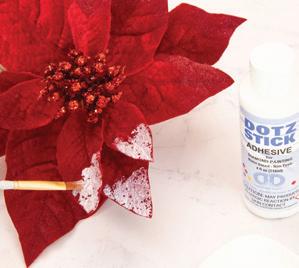
POINSETTIA BOUQUET
STEP 1 Brush end of each poinsettia bract with 2 coats of Dotz® Stick (as shown), letting each coat dry clear but tacky before proceeding.
Note: Start about 1½ to 2in or so out from tip of each bract and brush the adhesive toward the tip. Aim for an irregular start line.
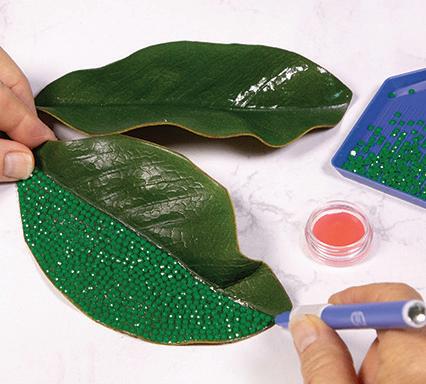
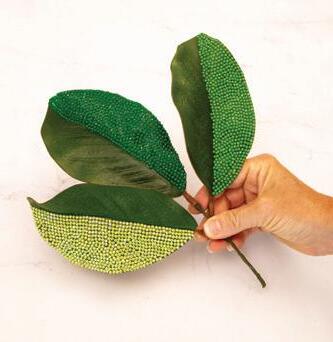
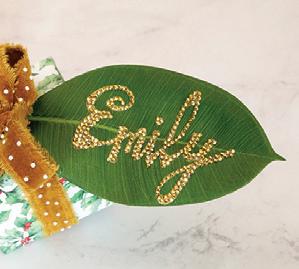
What a Leaf
l Magnolia leaves (3 leaves per snippet)
l DIAMOND DOTZ® Gems: Kelly Green 8245, Parrot 8242, Bright Green5008
l General craft items: fine black permanent marker pen; small scissors; flat paintbrushes, (small/medium); paint trays/small dishes
STEP 2 Pour gems into separate craft trays. Shake each tray gently from side to side so gems settle in grooves of tray, curved side up. Repeat as needed.
STEP 3 Load stylus by dipping its tip into wax. Working with 1 gem at a time, use stylus to pick up and place gems directly onto tacky end of each bract. It’s best to work from the irregular start line toward tip of each bract.
Note: Diamond dot a few bract ends with Red 8015 gems and others with Red AB 5006.
STEP 4 When all gems are in place, gently press down on gems to secure them in place. Repeat Steps 1 to 4 until you have sufficient poinsettias to create a bouquet.
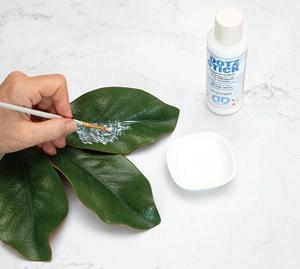
WHAT A LEAF
STEP 1 Apply 2 coats of Dotz® Stick onto half of each magnolia leaf, allowing each coat to dry clear but tacky before continuing.
STEP 2 Pour gems into separate craft trays, shake each gently from side to side so gems settle in grooves of tray, curved side up. Repeat this
step as necessary while you work.
STEP 3 Load stylus with wax. Working with 1 shade of green gems per leaf, dot gems around tacky upper half of leaf’s curved edge first. Dot a couple more lines next to 1st row of gems.
STEP 4 Proceed to dot gems along remaining curved edge of leaf and along center vein. Then fill in tacky areas of leaf with more gems.
STEP 5 Using different shades of green gems per leaf (see above right), repeat Steps 3 and 4 for remaining leaves per snippet of magnolia leaves.
STEP 6 When dotting is complete, press down on gems to secure them in place. Tuck a few diamond painted magnolia leaves in a small vase as a decorative element on your sideboard, dining table or decorative shelf. Or add them to a wreath.
Poinsettia Bouquet
Create an everlasting Poinsettia centerpiece.
Wrap take-home gifts with ribbon dotted with Dotz® gems
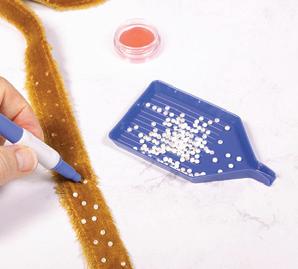
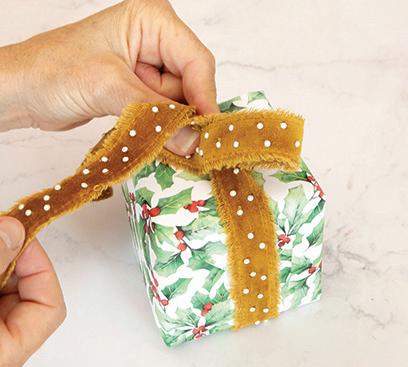
YOU WILL NEED
Velvet Ribbon
l ⁷ 8in-wide velvet ribbon/frayed edge in golden brown, length to suit
l General craft items: pencil; small sharp scissors; flat and round paintbrushes, (small and medium); paint trays/small dishes; hot glue gun/glue sticks
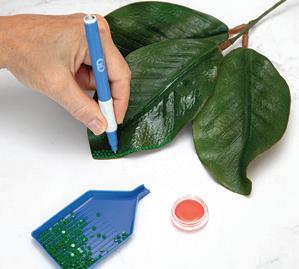
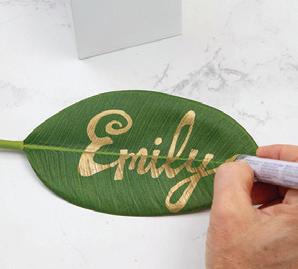
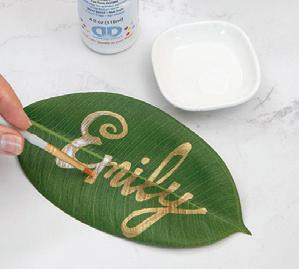
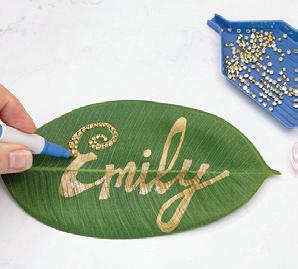
LEAFY ‘PLACE CARD’
STEP 1 Using gold marker, write your guest’s name on the magnolia leaf. Let marker dry.
STEP 2 Brush 2 coats of Dotz® Stick onto gold lettering, letting adhesive dry clear but tacky after each coat.
STEP 3 Pour gems into tray, shake gently from side to side so gems settle, curved side up,
in grooves of tray. Load stylus with wax. Pick up and place gems, following outline of each letter first, then fill in with more gems. When complete, press down on gems to secure.
STEP 4 Slip stem of leaf place ’card’ under the ribbon tied around the gift box. If needed, hot glue leaf in place.
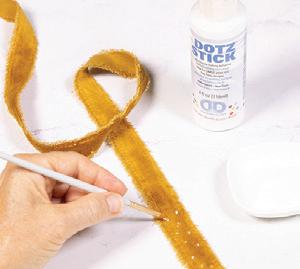
DOTTY VELVET RIBBON
STEP 1 Using tip of small paintbrush, apply dots of adhesive in a zigzag pattern along ribbon length. When adhesive is clear but tacky, apply a 2nd coat. Leave to dry clear and tacky.
STEP 2 Pour gems into craft tray and shake gently from side to side so gems settle in grooves of tray, curved side up. Load stylus
Letter Perfect This is a joyous time of the year so spell it out in style!
with wax by dipping tip of stylus into wax. Use stylus to pick up a gem and place it directly onto a tacky dot of adhesive. Repeat until all gems are in place. Gently press down on all gems to secure them in place.
STEP 3 Wrap ribbon around take-home gift box and tie it into a decorative bow.
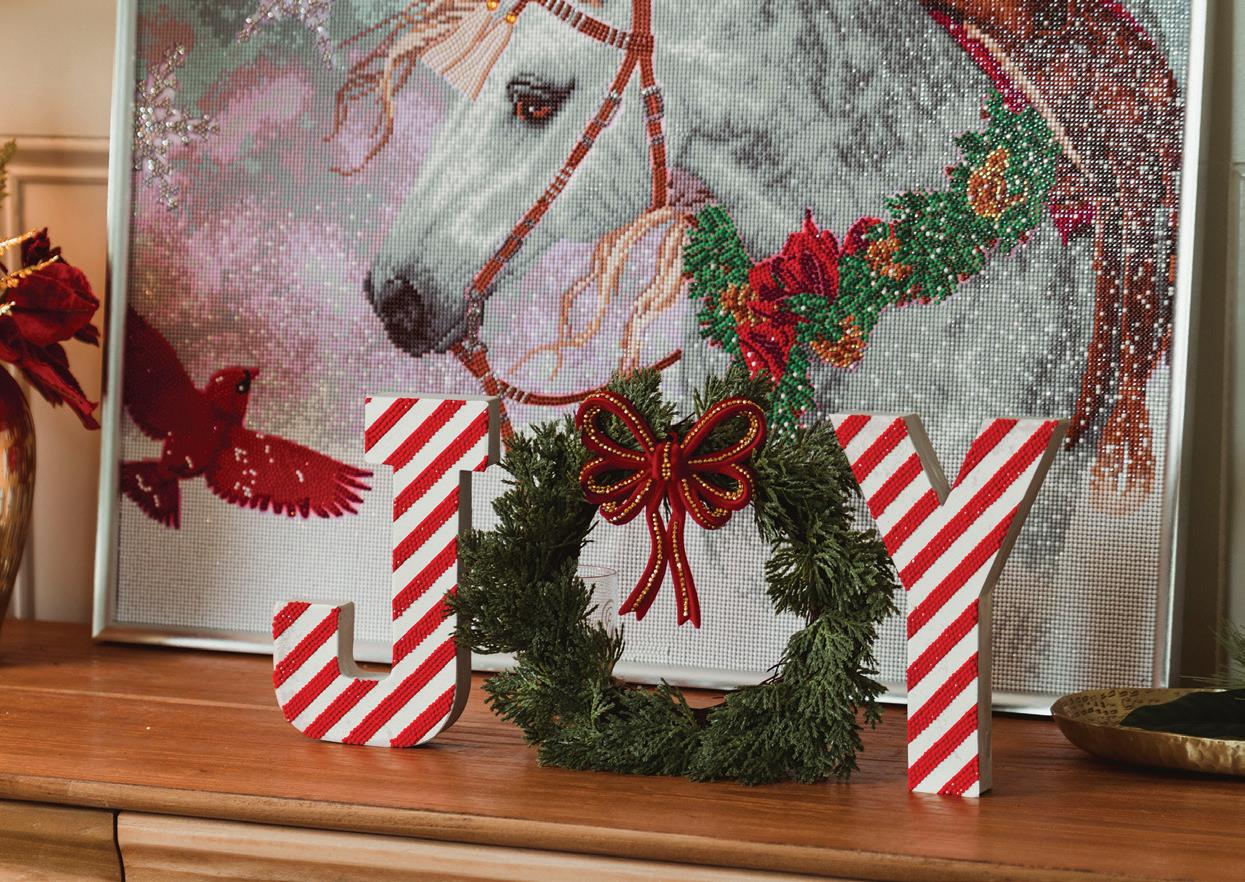
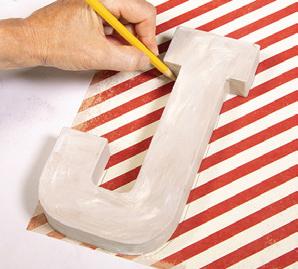
LETTER PERFECT
STEP 1 Paint each letter (front face/sides/ back) with 2 coats of white paint. Let each coat of paint dry.
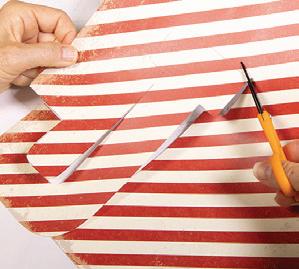
STEP 2 Place each letter onto right side of striped paper. Pencil trace letter.
STEP 3 Using sharp scissors, cut out each letter, following penciled outline.
STEP 4 Brush Mod Podge onto face of white letter. Place paper letter onto papier mâché letter, aligning the edges. Work from center out, and gently smooth paper in place with your hand. The aim is to avoid wrinkles in paper and to smooth out any air baubles. Let Mod Podge dry.
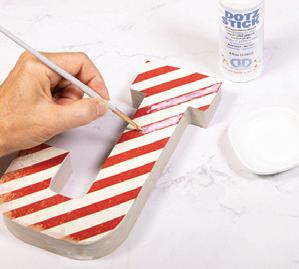
STEP 5 Using a small flat paintbrush, apply 2 coats of Dotz® Stick onto red stripes, letting each coat dry clear but tacky before continuing.
STEP 6 Pour gems into craft tray and shake gently from side to side so gems settle in grooves of tray, curved side up. Load stylus with wax then, pick up and place gems onto tacky red stripes, as shown. Repeat until all diagonal red stripes are dotted.
STEP 7 Embellish bow ornament with gold gems, as desired, in the usual manner. When complete, hot glue to top of ring.
Dotty Velvet Ribbon & Leafy ‘Place Card’
– luxe!
MIf you’ve ever wondered what else you can do with a diamond art canvas, how about an opulent ribbon bow, as here? If the idea is anathema to you, a plush velvet ribbon will look just as beautiful!
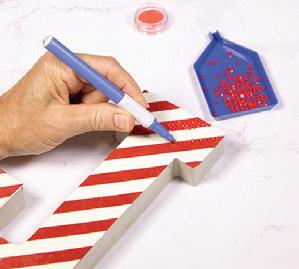
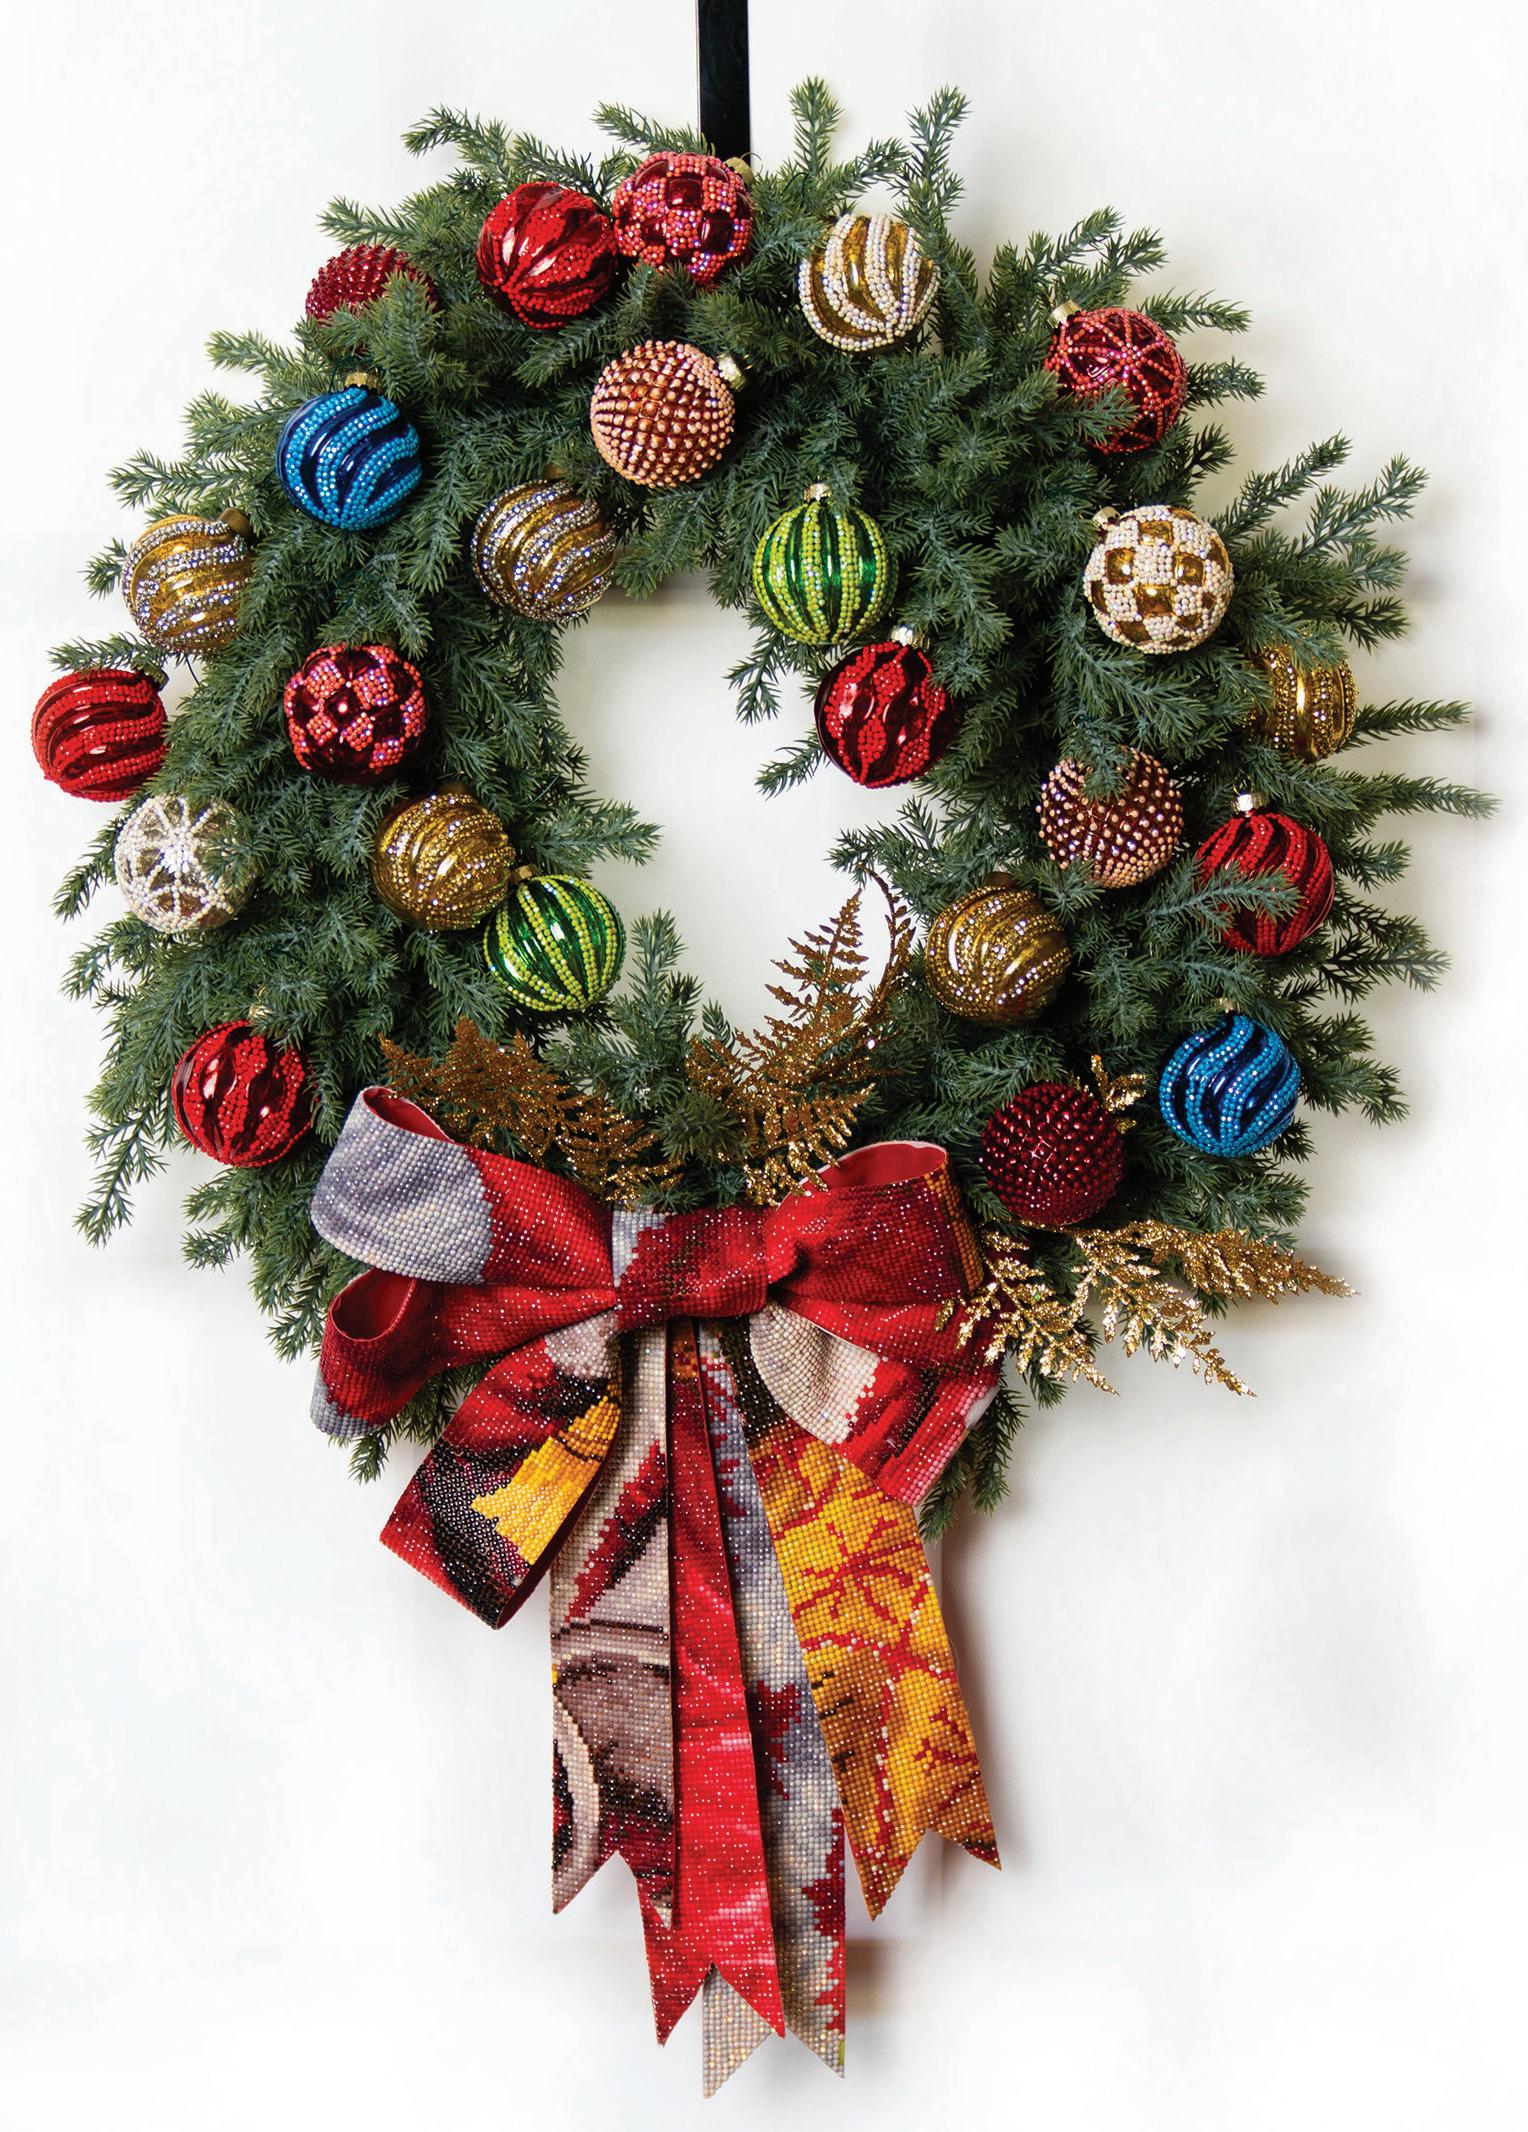
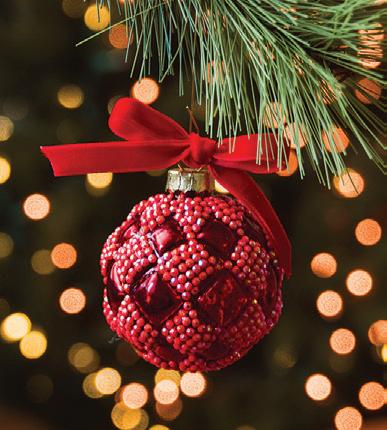
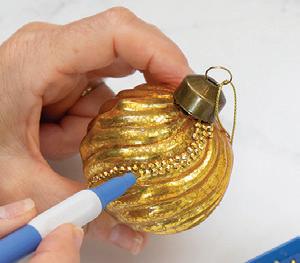
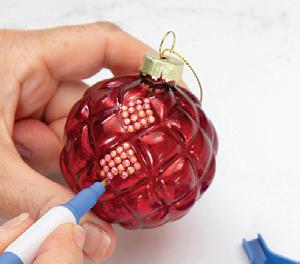
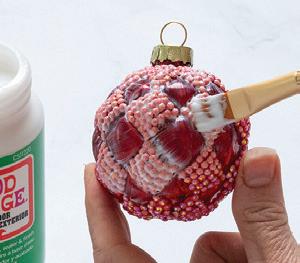
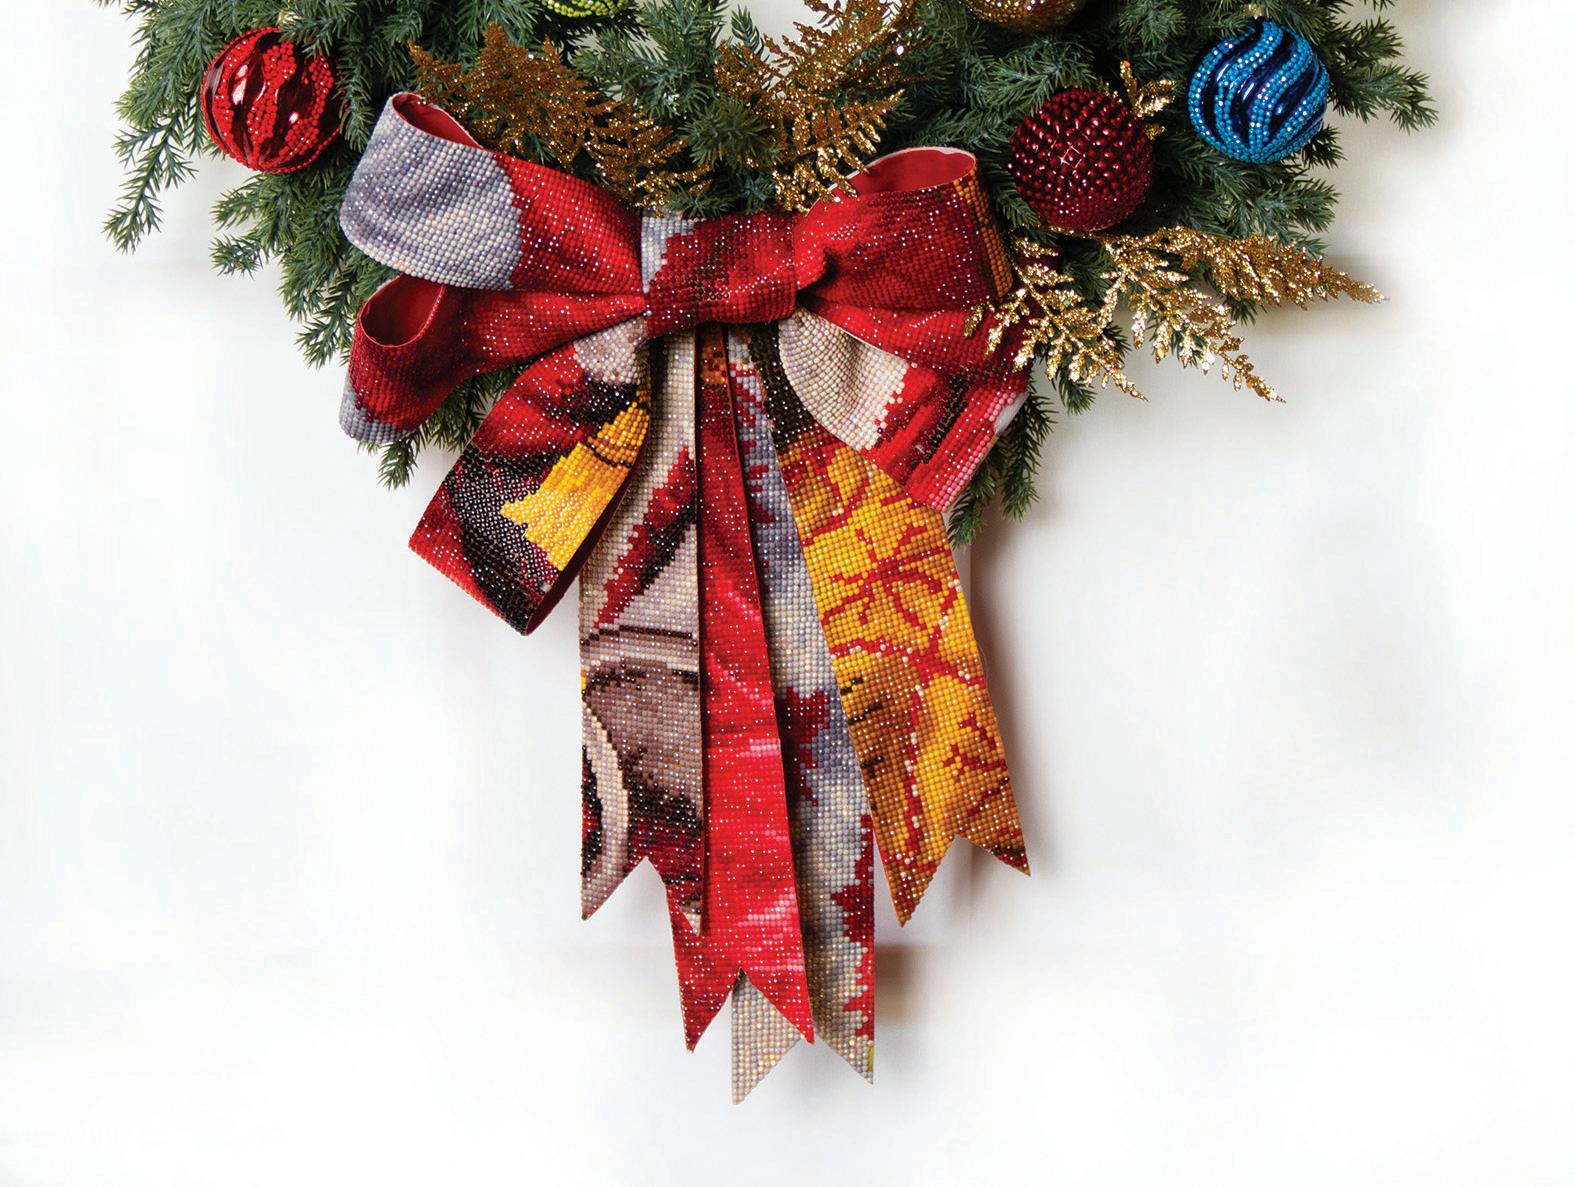
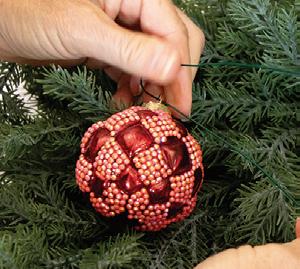
Dotzy for Baubles! Give new or existing baubles a gorgeous and glitzy facelift simply by diamond painting them. It couldn’t be easier. You can dangle them from tree branches, adorn a plain wreath with a few or many, and even opt for their holiday sparkle in a bowl or glass vases.
YOU WILL NEED Holiday Wreath (with baubles/canvas ribbon)
l Swirl, diamond, ribbed and textured baubles, colored
l DIAMOND DOTZ® Gems: colors to match or tone with baubles (here we used Red Gold Metallic 7001 and Red AB 5006 for the gold and red baubles)
l Mod Podge Outdoor sealer
l Christmas-themed diamond painting, large for ribbon reuse
l General craft items: flat and round paintbrushes (small and medium); craft brush; paint trays/small dishes; hot glue gun/ glue sticks; rotary cutter; selfhealing cutting mat; sharp scissors
STEP 1A, 1B Brush 2 coats of Dotz® Stick onto select raised areas of bauble, allowing adhesive to dry clear but tacky after each coat.
STEP 2A, 2B Pour gems into separate craft trays, shake each gently from side to side so gems settle in grooves of tray, curved side up. Repeat this step as necessary while you work.
STEP 3A, 3B Load stylus with
wax then, referring to photos for guidance, use stylus to place 1 gem at a time onto tacky surface of each bauble.
STEP 4A, 4B Continue dotting each bauble with gems. When dotting is complete, gently press down on all gems to secure them in place.
STEP 5A, 5B Brush Mod Podge Outdoor over entire bauble and allow to dry.
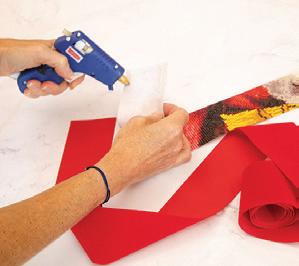
CANVAS RIBBON
Make your wreath sparkle and shine with glittering gold fern leaves. Use them as fillers around the entire wreath or around the bow, as here.
Canvas Ribbon
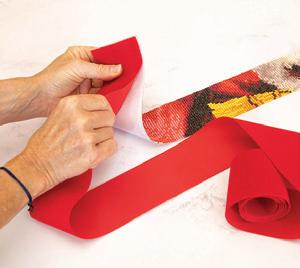
GO FREESTYLE WITH DIAMOND DOTZ ® GEMS FOR DECORATIONS THAT SPARKLE!
A voluminous, richly colored bow with cascading ribbons and gem-encrusted baubles will turn your wreath into a statement piece that exudes elegance.
2A
STEP 1 Working on cutting mat, use rotary cutter to cut several long 2½in-wide strips (4 to 8 depending on your bow preference) plus 1 short strip from a large diamond painted canvas. Cut velvet ribbon to match each canvas strip.
STEP 2A Working sections at a time, apply hot glue to wrong side of each canvas strip.
STEP 2B Almost simulataneously as you apply hot glue, adhere each velvet ribbon to canvas strip, wrong sides facing.
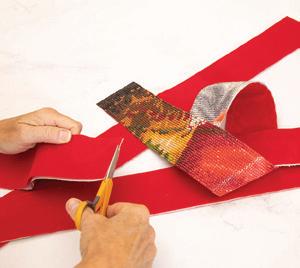
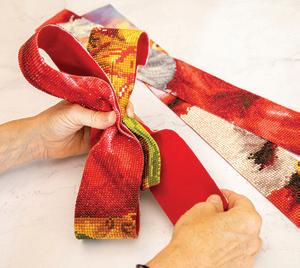
STEP 3 Trim ends of each canvas/velvet ribbon to neaten them.
STEP 4A Form ‘ribbon’ loops. To do this, take 1 strip of canvas/velvet ribbon and form into a loop, crossing ends and pinching ribbon at center back to form a pair of loops. Repeat with 2nd strip. Layer 2nd pair of loops on top of 1st pair, pinching them together in the center. Repeat for any remaining long strips except for 2 strips for ribbon tails.
STEP 4B Pinch each of the 2 remaining strips in the center. Pinch these together with all looped pairs at the center back.
STEP 4C Secure center of ‘ribbon bow’ with florist’s wire, wrapped tightly around pinched area. Fluff and adjust loops to create an even, full bow shape. Snip excess wire. Using hot glue to overlap and secure ends at back of bow, wrap a small piece of canvas ribbon around center to hide florist’s wire.
STEP 4E Make diagonal cuts or V cuts in the long loose ends of ribbon.
HOLIDAY WREATH
STEP 1 Thread florist’s wire through bauble hanger.
STEP 2 Secure each bauble to wreath by wrapping wire ends around wreath base. Snip off excess wire with wire cutters.
STEP 3 Hot glue ribbon bow to wreath, as shown.
STEP 4 Hot glue ends of gold fern leaves (or similar) to the wreath, positioning them in and around the ribbon bow.
Game changer!
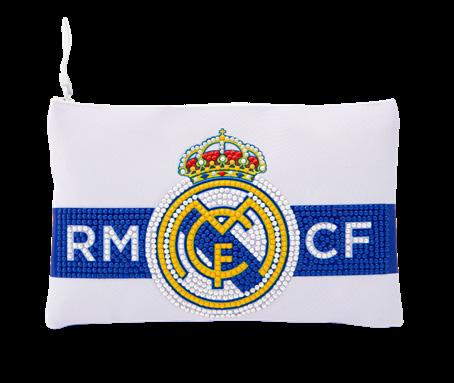
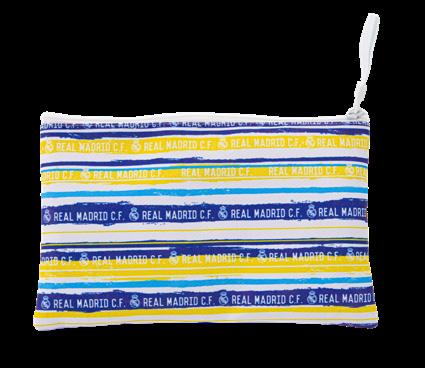
RFROM CHRISTMAS GIFTS TO TREASURED KEEPSAKES, THESE REAL MADRID KITS ARE WORTH CELEBRATING!
eal Madrid is one of the most popular football (soccer) clubs in the world, with a loyal fanbase that extends beyond Spain. ‘Real’ (‘Royal’ in English) reflects the club’s connection with the Spanish monarchy – in 1920 the club received official royal endorsement. Its iconic symbols – the distinctive white jersey and royal crest – are revered worldwide. In time for the gifting season, and designed to appeal to fans of all ages, these all-inclusive diamond painting kits feature iconic elements and emblems. Game on! 1 3
4
1. REAL MADRID
Cuddle up with your fave pillow! Design
Keep the family busy. Design Sizes:
3. REAL MADRID
Stick with style! These stickers are bound to become fan favorites.
5
This banner kit comes with magnetic hanger. Simply dot and hang!
Design Size: 5.12 x 12.2in (13 x 31cm) KIT DD17.045
7
Cheers to champions and celebratory coasters. Time to raise your glasses!
Design Sizes: 3.9in each (10 x 10cm each) KIT DD23.031
6
Zip and go! This handy pouch is essential for your game day needs!
Design Size: 7.9 x 5.3in (20 x 13.5cm) KIT DTZ14.027
4. REAL MADRID BANNER
5. REAL MADRID COASTERS
6. REAL MADRID ZIPPER POUCH
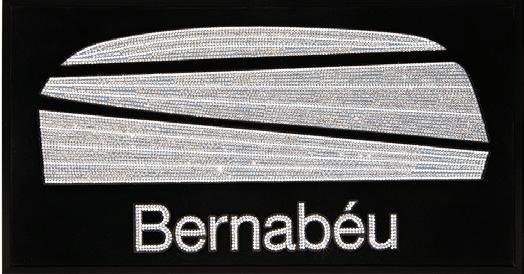
stadium, Bernabéu, on black flock with white and metallic silver gems. Design Size: 19.7 x
DECORATIVE PILLOW
STICKERS
Meet the Gang!
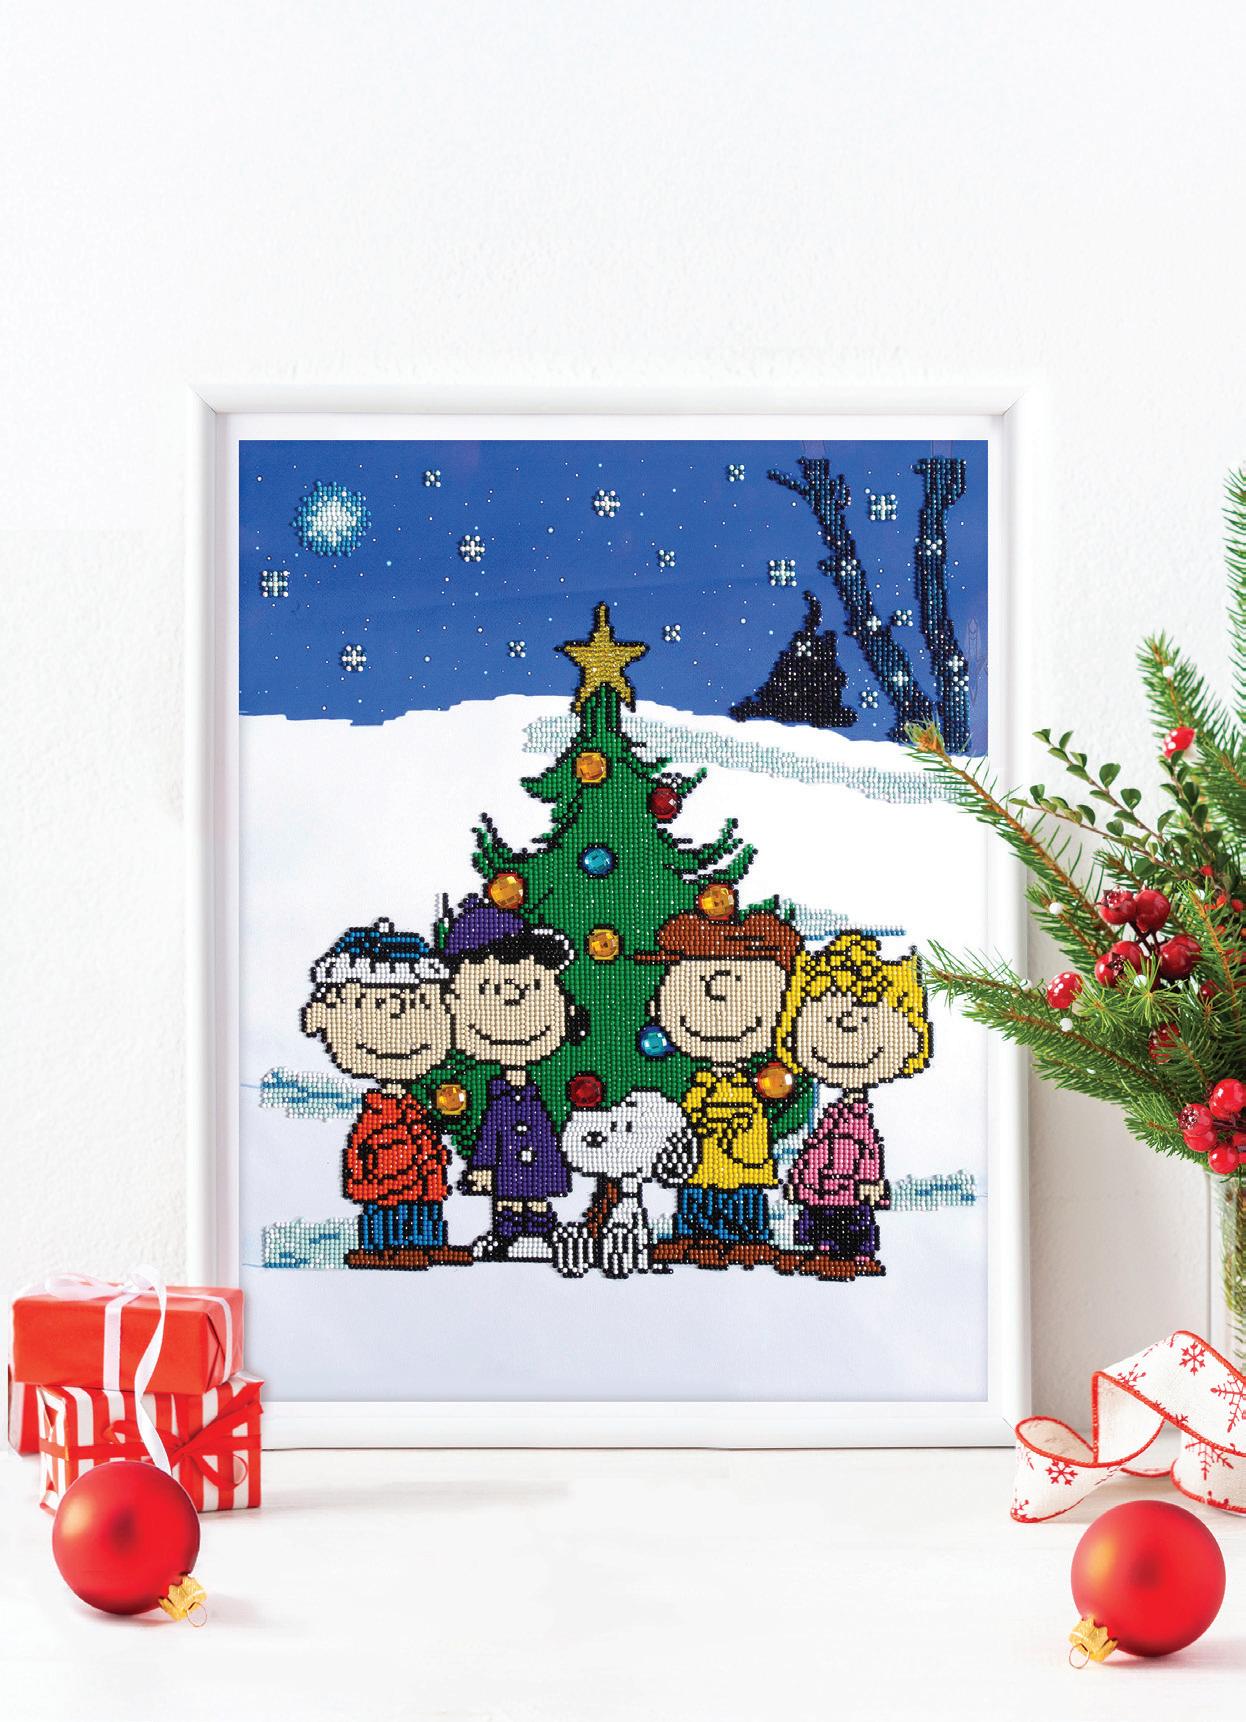
GET TO KNOW CHARLIE BROWN’S LOVABLE CREW
PEANUTS CHRISTMAS
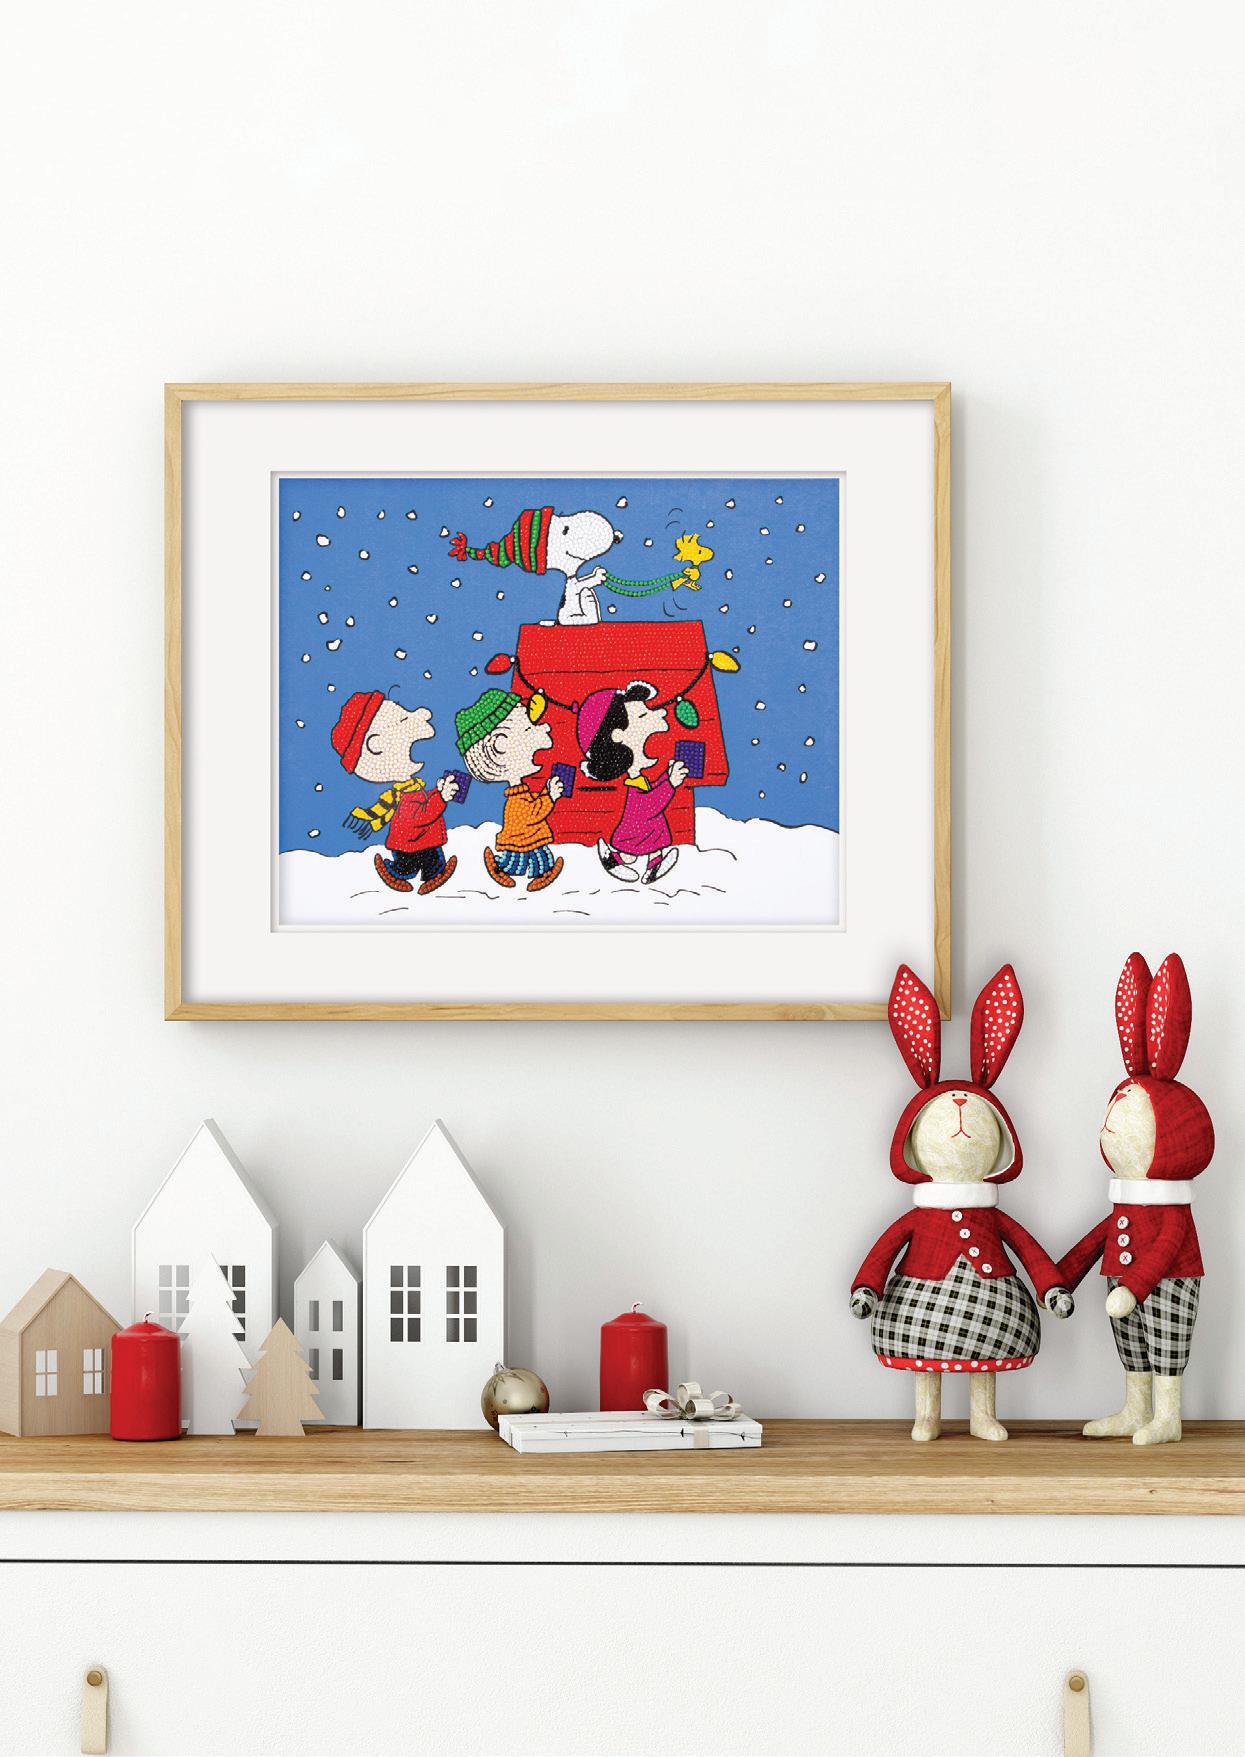
Charlie Brown knows some of the best winter memories come with a side of snow. He and his crew are ready, willing and able to show off their outdoor Christmas tree decorating skills. It’s a scene worth diamond painting to display for your enjoyment!
Average design size: 16 x 20in (41 x 51cm)
KIT 20221
BRING ICONIC PEANUTS COMIC STRIP CHARACTERS TO SPARKLING LIFE THIS FESTIVE SEASON! DIAMOND PAINTING AT ITS ABSOLUTE BEST!
CHRISTMAS CAROLS Mariah or Bublé? Cue your fave Christmas songs and sing along as you dot this fun, diamond painting, available as a kit. Here, the Peanuts gang spread joy, one carol at a time. Even traipsing through the snow, they sure know how to carry a tune!
Design size: 14 x 11in
(35.5 x 28cm)
KIT
DD7.124
PEANUTS STICKERS
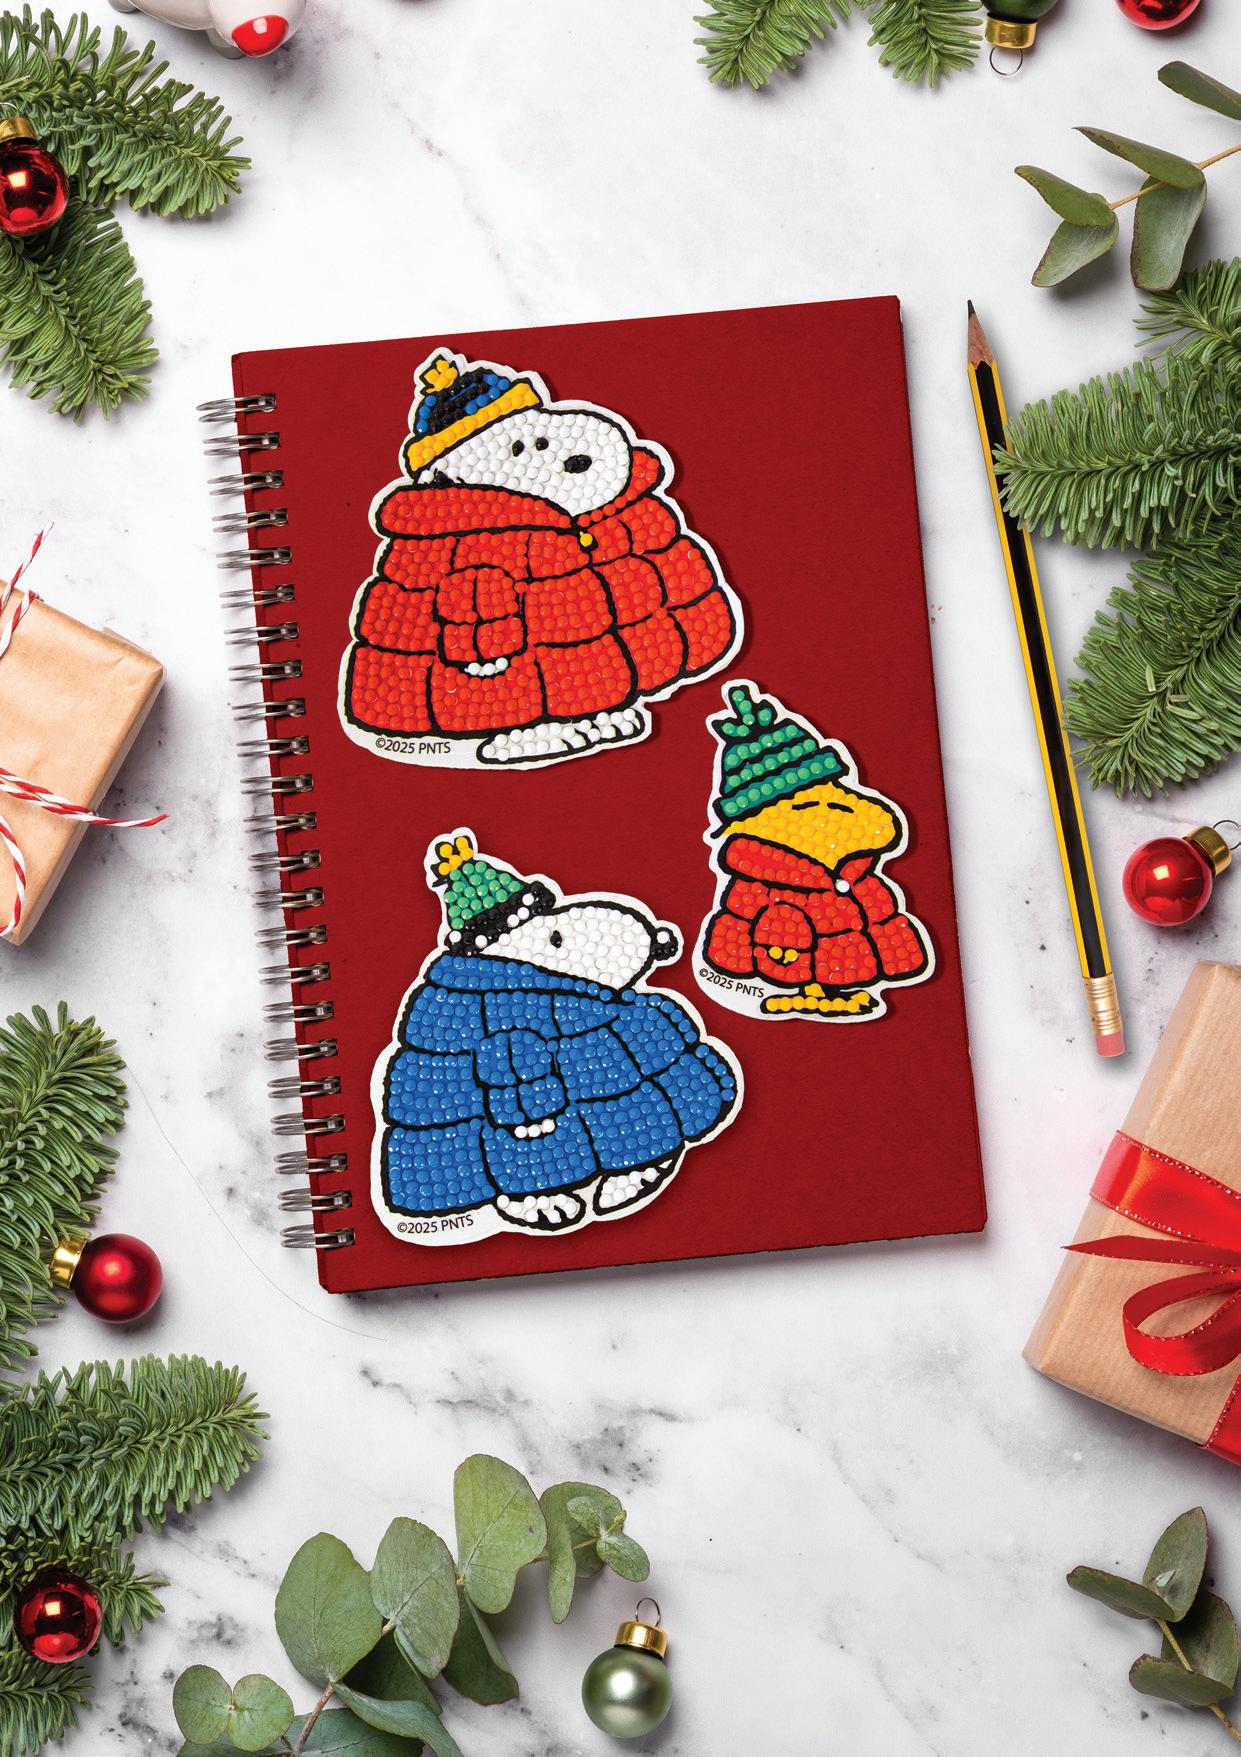
Fashion-conscious Snoopy and Woodstock model smart puffer jackets and beanies to keep warm and cosy despite the winter chill! This trio is available as an all-inclusive diamond painting sticker kit.
Average size: 3.7 x 2.4in
(9.3 x 6.18cm)
KIT DTZ12.045
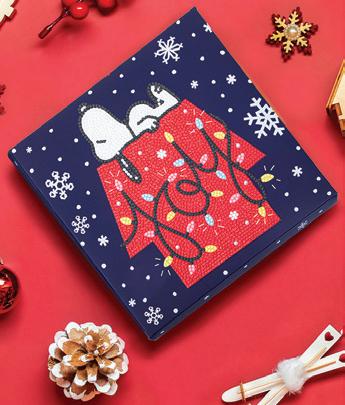
Snoopy in full relaxation mode! Blissfully content, lying atop his doghouse, he watches snow drift gently down and sparkling lights shine bright in the night sky.
Design size: 8.7 x 8.7in (22 x 22cm) KIT DBX.220
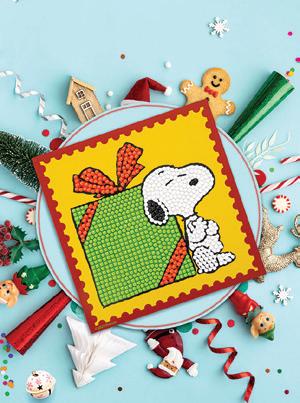
SPECIAL DELIVERY
Snoopy strikes a pose!
Wonder why It just happens to be next to a prettily wrapped gift?
Design size: 5.1 x 5.1in (13 x 13cm)
CAMEO KIT DTZ5.059
Dressed
FACT
OR FICTION?
Was Snoopy a product of Peanuts comic creator Charles Schulz’s imagination? Or did this lovable beagle exist in the real world? Yes and no! Schulz’s childhood dog, Spike, inspired the original sketches which evolved into today’s iconic character.
WINTER FUN
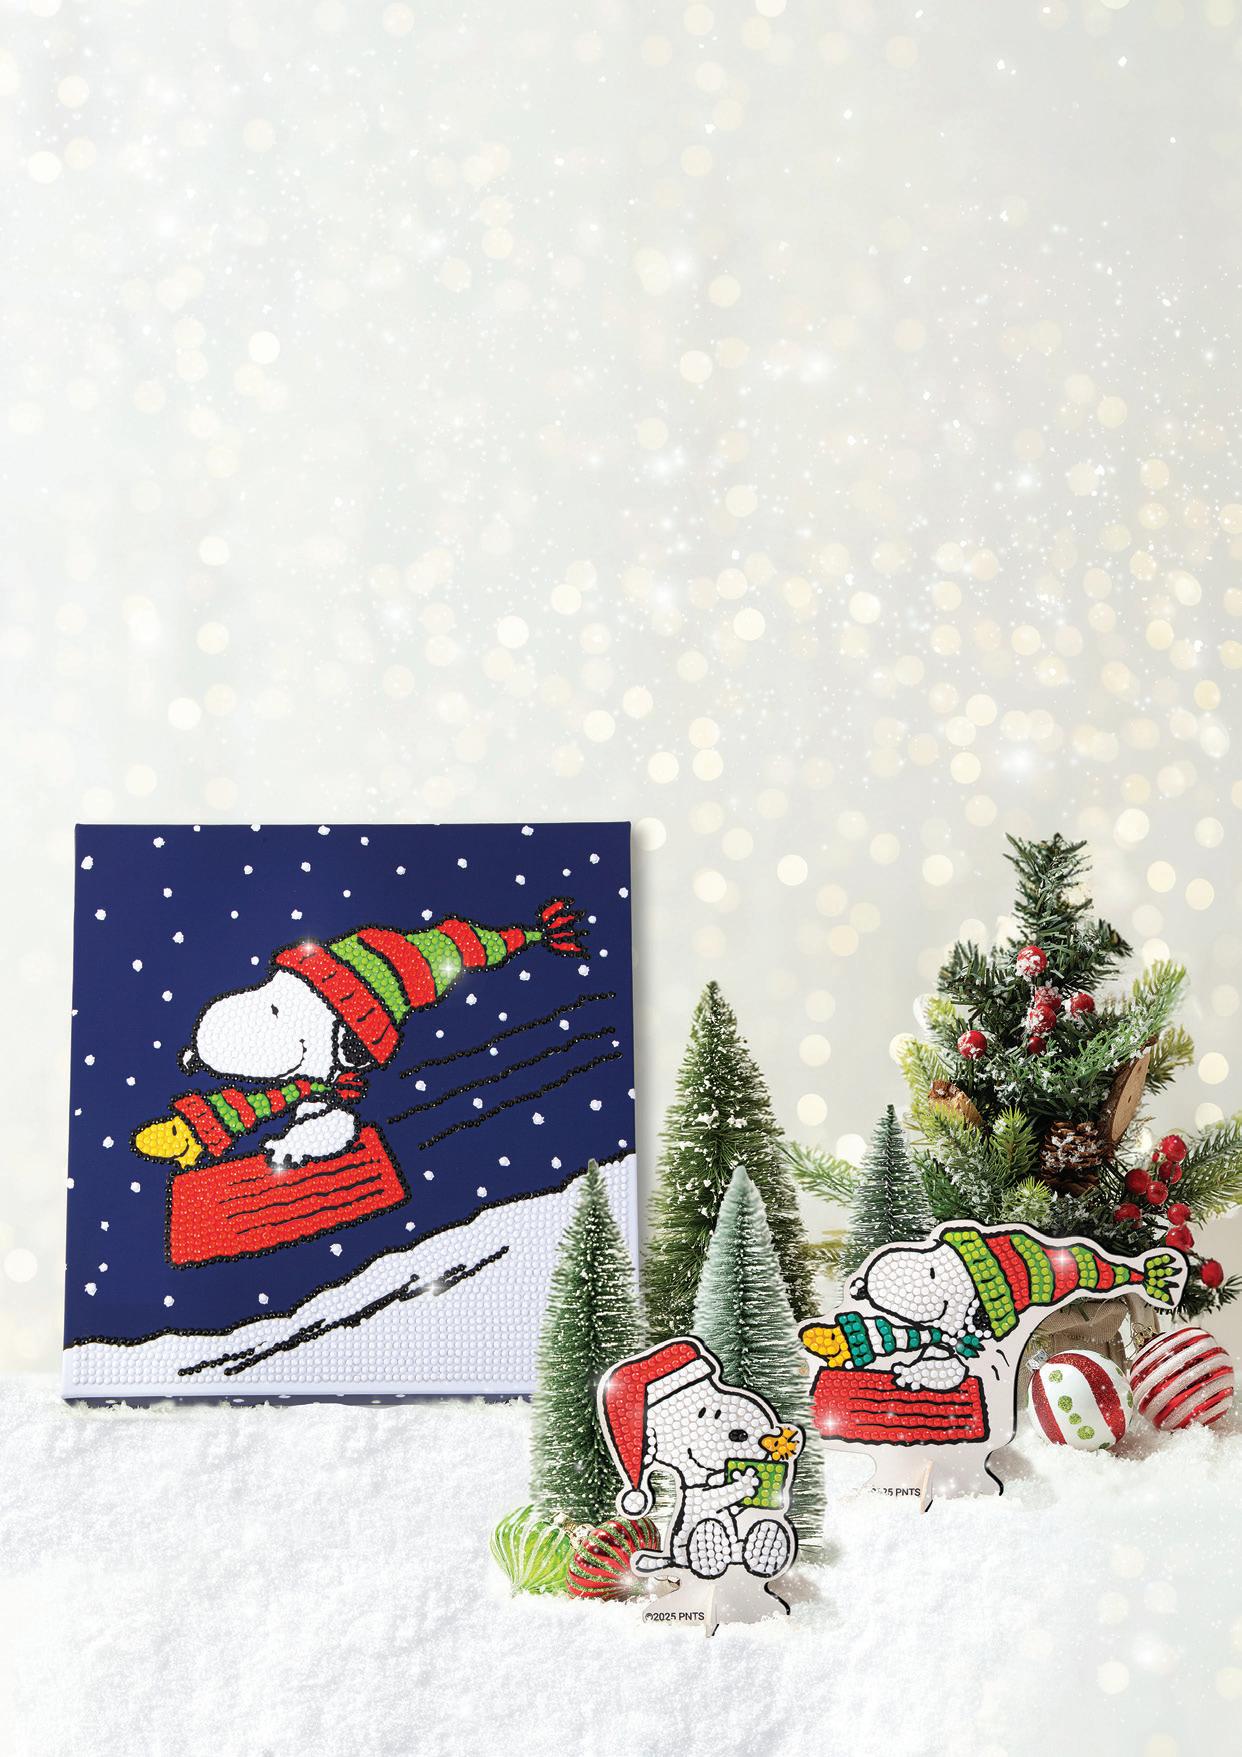
Share Snoopy’s and Woodstock’s thrill as they race down a snowy slope, knitted beanies dancing in the wind behind them. Love the food bowl toboggan!
Design size: 8.7 x 8.7in (22 x 22cm) KIT DBX.219
CHRISTMAS JOY
SNOOPY CHRISTMAS
as the cutest elf ever, Snoopy stands ready to help Santa – and you – spread festive cheer.
PEANUTS CHRISTMAS POP UPS
Introduce your kids to Snoopy with this pair of sweet diamond painting pop ups!
size: 3.4 x 3.9in
Mini merry makers!
Pure kid-spiration! These diamond painting kits prove that children can have a blast with a hands-on activity and get involved with decorating their rooms. It’s the ideal blend of holiday decorating and joyful creative play. Observe them as they beam with pride seeing their creations on display!
YOUR LITTLE ONES WILL CREATE MAGICAL MEMORIES AS THEY DOT THEIR WAY TO CHRISTMAS DECOR
MFor peace of mind around kids, decorate with flameless
CHRISTMAS JUMPERS
BABY CHRISTMAS
STYLE YOUR CHILD’S DIAMOND PAINTING AS A CHARMING VIGNETTE WITH FAUX SNOW, STARS, PINE GREENERY...
Consider adding Dotz® gems to snowflake motifs on similar wooden trees.
MCHRISTMAS REINDEER
You will be hooked on diamond painting once you dot this endearing red-nosed reindeer for your toddler’s playroom. So much so, you’ll want to buy the other two kits in the series.
Design Size: 8.7 x 8.7in (22 x 22cm) KIT DBX.055
CHRISTMAS ELVES
You can just imagine these rosy-cheeked, merry mischief makers giggling as they dressed their tree – tinsel tangling, standing on each other’s shoulders to hang the highest ornaments… Check out the special gems in this all-inclusive kit.
Design Size: 11 x 11in (28 x 28cm) KIT DBX.054
Santa’s elves totally rock at festive decorating and happily share their styling secrets
Giftguide KIDS
with zipper pouch, 2 bracelets + 2 stickers.
Design Sizes: Vary KIT DTZ10.012
3. SLIP N SLIDE STICKERS
Kids can dot, peel and stick cute critters onto notebooks etc.
Average Size: 2.9 x 3in (7.5 x 7.6cm) KIT DTZ12.036
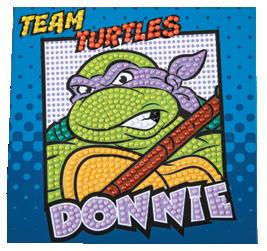
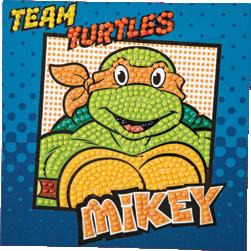
4. TEAM TURTLES LEO, DONNIE, RAPH, MIKEY
The renewed interest in TMNT makes any of these cameo kits a no-brainer.
Design Size: 5.1 x 5.1in (13 x 13cm) KITS DTZ5.030; .028; .031; .029
5. SPONGEBOB SURPRISE CAMEO
SpongeBob’s toothy smile will have the kids grinning from ear to ear as they complete this mini masterpiece with built-in stand.
Design Size: 5.1 x 5.1in (13 x 13cm) KIT DTZ5.041
1
3
4 5
6
7
6. LET’S PLAY ACTIVITY SET
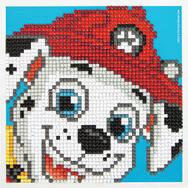
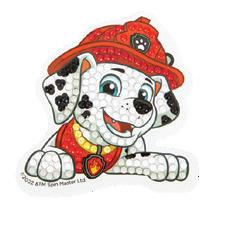
Paw Patrol’s cool pups are sure to be a hit. Kit has 3 pictures, 3 stickers. Design Sizes: Vary KIT DTZ10.008
7. SPARKLE ON ACTIVITY SET
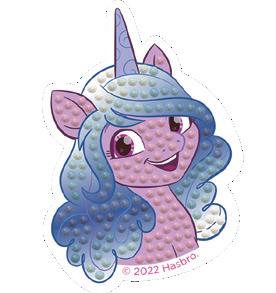
This is the ultimate My Little Pony all-inclusive kit with six projects – 2 stickers, 2 bracelets and 2 mini pictures. Now, that’s value!
Design Sizes: Vary KIT DTZ10.009
8. TOP FLIGHT
The sky’s the limit for your young pilot-inwaiting who will be thrilled to receive this Dotz® Box kit.
Design Size: 8.7 x 8.7in (22 x 22cm)
KIT DBX.037
9. FRIENDSHIP FUN
The ideal starter kit for little ones and a perfect way to bring color and fun into their rooms. And it emphasizes the joy friendships bring.
Design Size: 5.1 x 5.1in (13 x 13cm)
KIT DTZ5.025
8
9
Winter wonderland
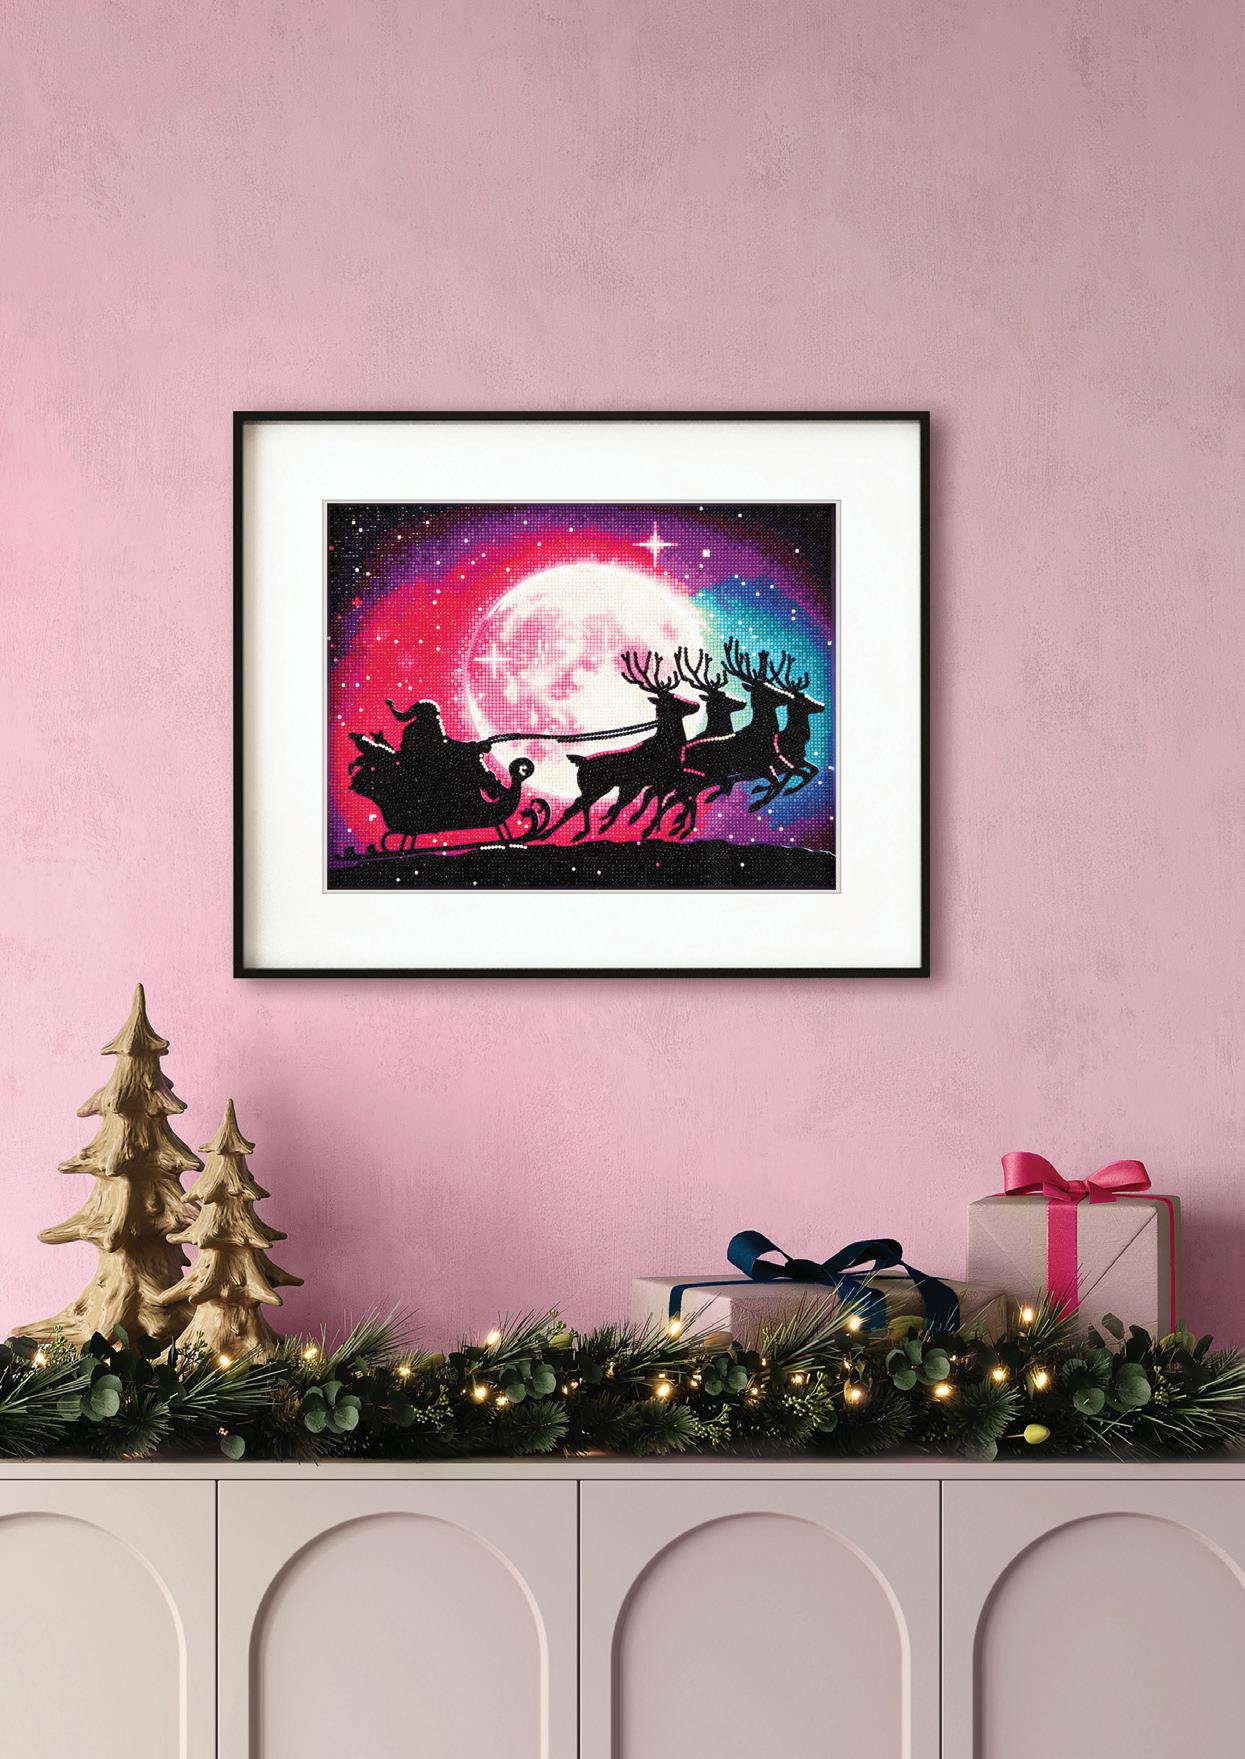
MAY YOUR DAYS BE MERRY AND BRIGHT AND MAY ALL YOUR CHRISTMASES BE WHITE!
Create a sparkling silhouette of Santa and his reindeer dashing across a starlit night sky as the moon radiates enchanting hues of blue, pink, and purple that cast a celestial aura over this scene. Quite simply breathtaking!
Design Size: 16 x 12in (41 x 31cm) KIT DD7.128
When Christmas draws near and your thoughts turn to decorating your home, you’ll find no better way to capture the spirit of the season with a festive-inspired diamond painting kit. Along with the comforting ritual of unpacking and displaying familiar ornaments of Christmases past, there will be the growing anticipation of placing the last few ‘diamonds’ on your canvas before framing it for display. It is bound to be a striking addition to your Christmas decor.
WINTER VILLAGE
Diamond paint this pretty picturesque village with its stone bridge connecting the town folk as graceful swans glide along the river below. It’s the ideal holiday accessory for it speaks to how snow can transform an everyday town into something magical!
Design Size: 31.1 x 19.7in (79 x 50cm) KIT DD12.010
Dare to be different with a fresh twist on traditional colors!
WHITE CHRISTMAS BY IRVING BERLIN
SANTA’S SLEIGH
Although you’ll be drawn to the cottage’s glowing warmth, you will find this diamond painting’s snowy garden just as enticing. There the cheerful snowman stands ready to greet guests alongside an impressive evergreen, laden with sparkling lights and brightly colored ornaments. Joy! Design Size: 20 x 20in
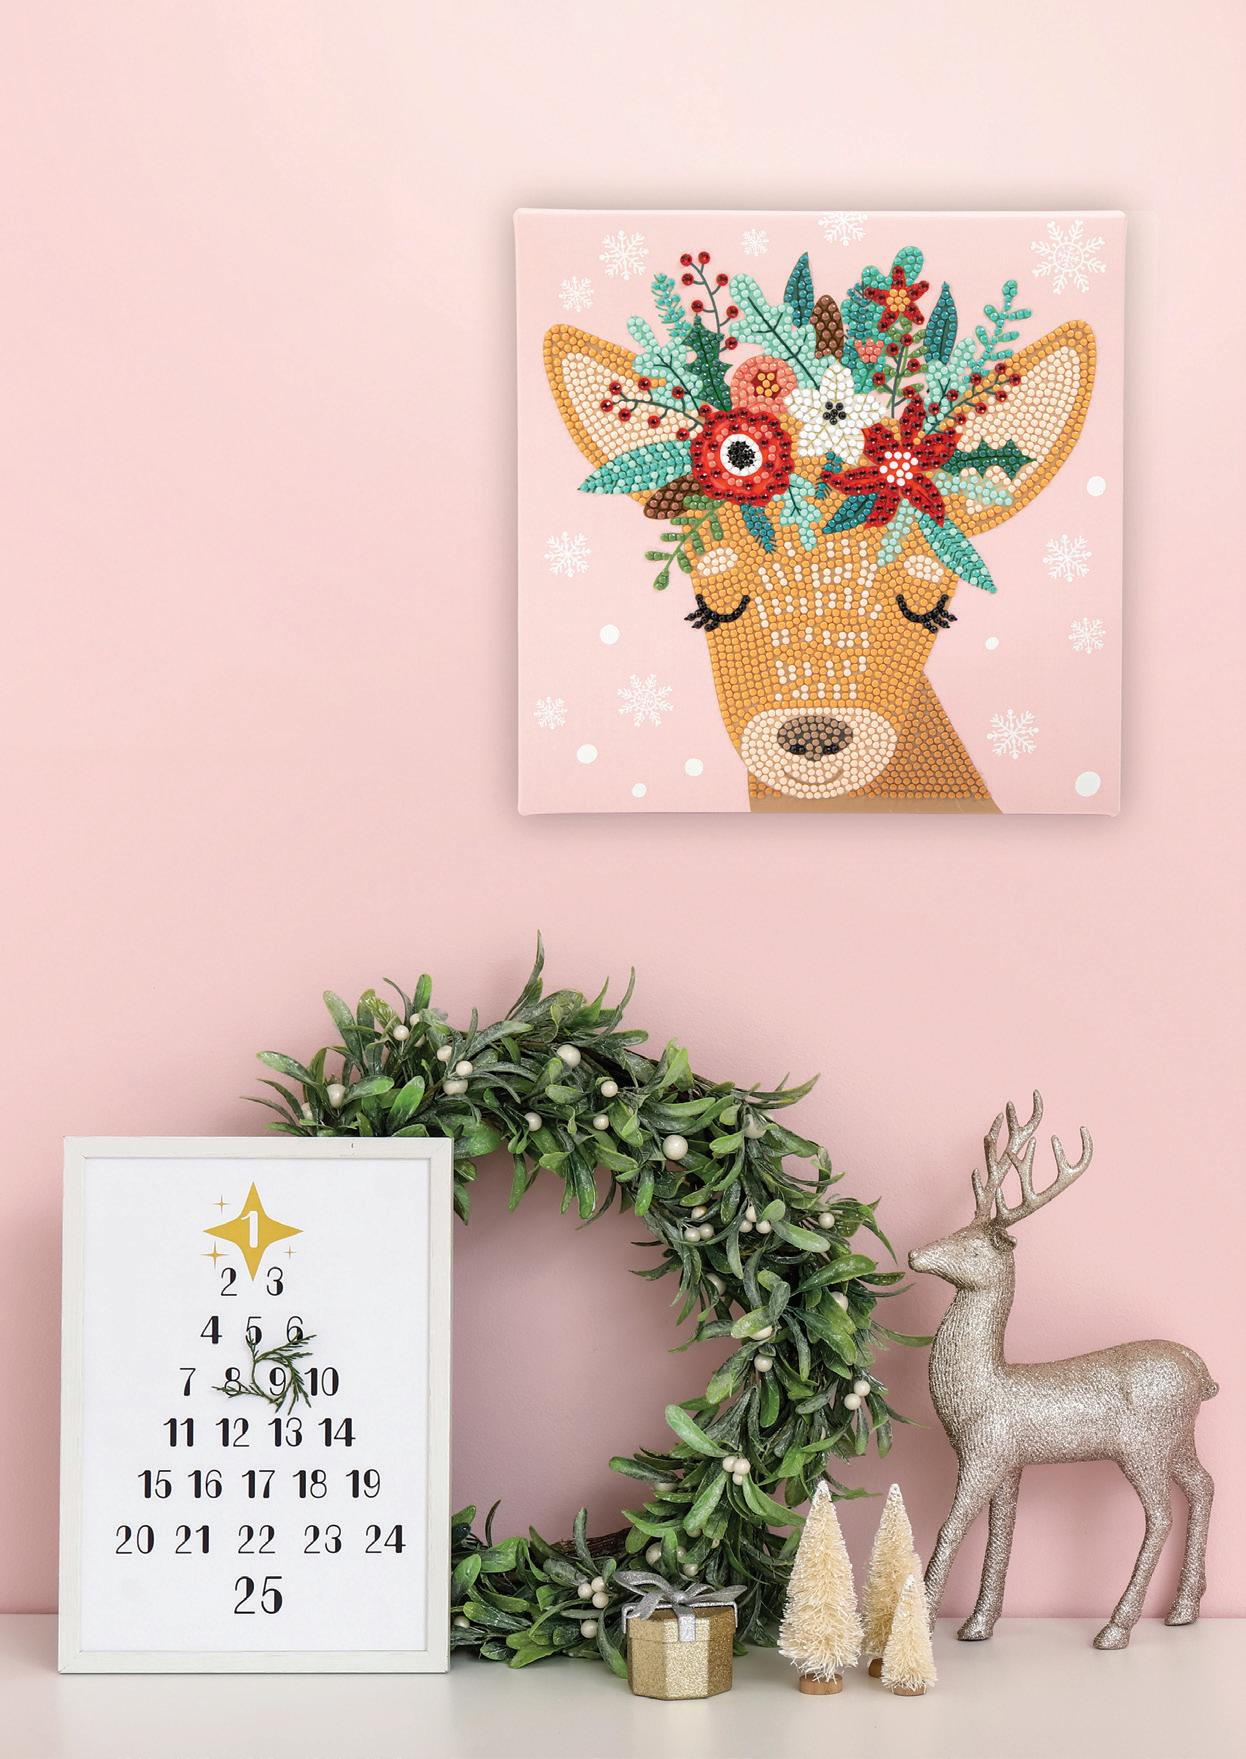
Oh deer, Christmas is here... and I’m blooming withspirit!holiday
Deck your halls with boughs of holly... and adorable forest friends like this darling deer, wearing her finest floral crown. This all-in-one, dot ’n’ hang, diamond painting kit features select extra-sparkle decorative gems.
Design Size: 8.7 x 8.7in (22 x 22cm) KIT DBX.168
CUTIE
CHRISTMAS EVE GLOW
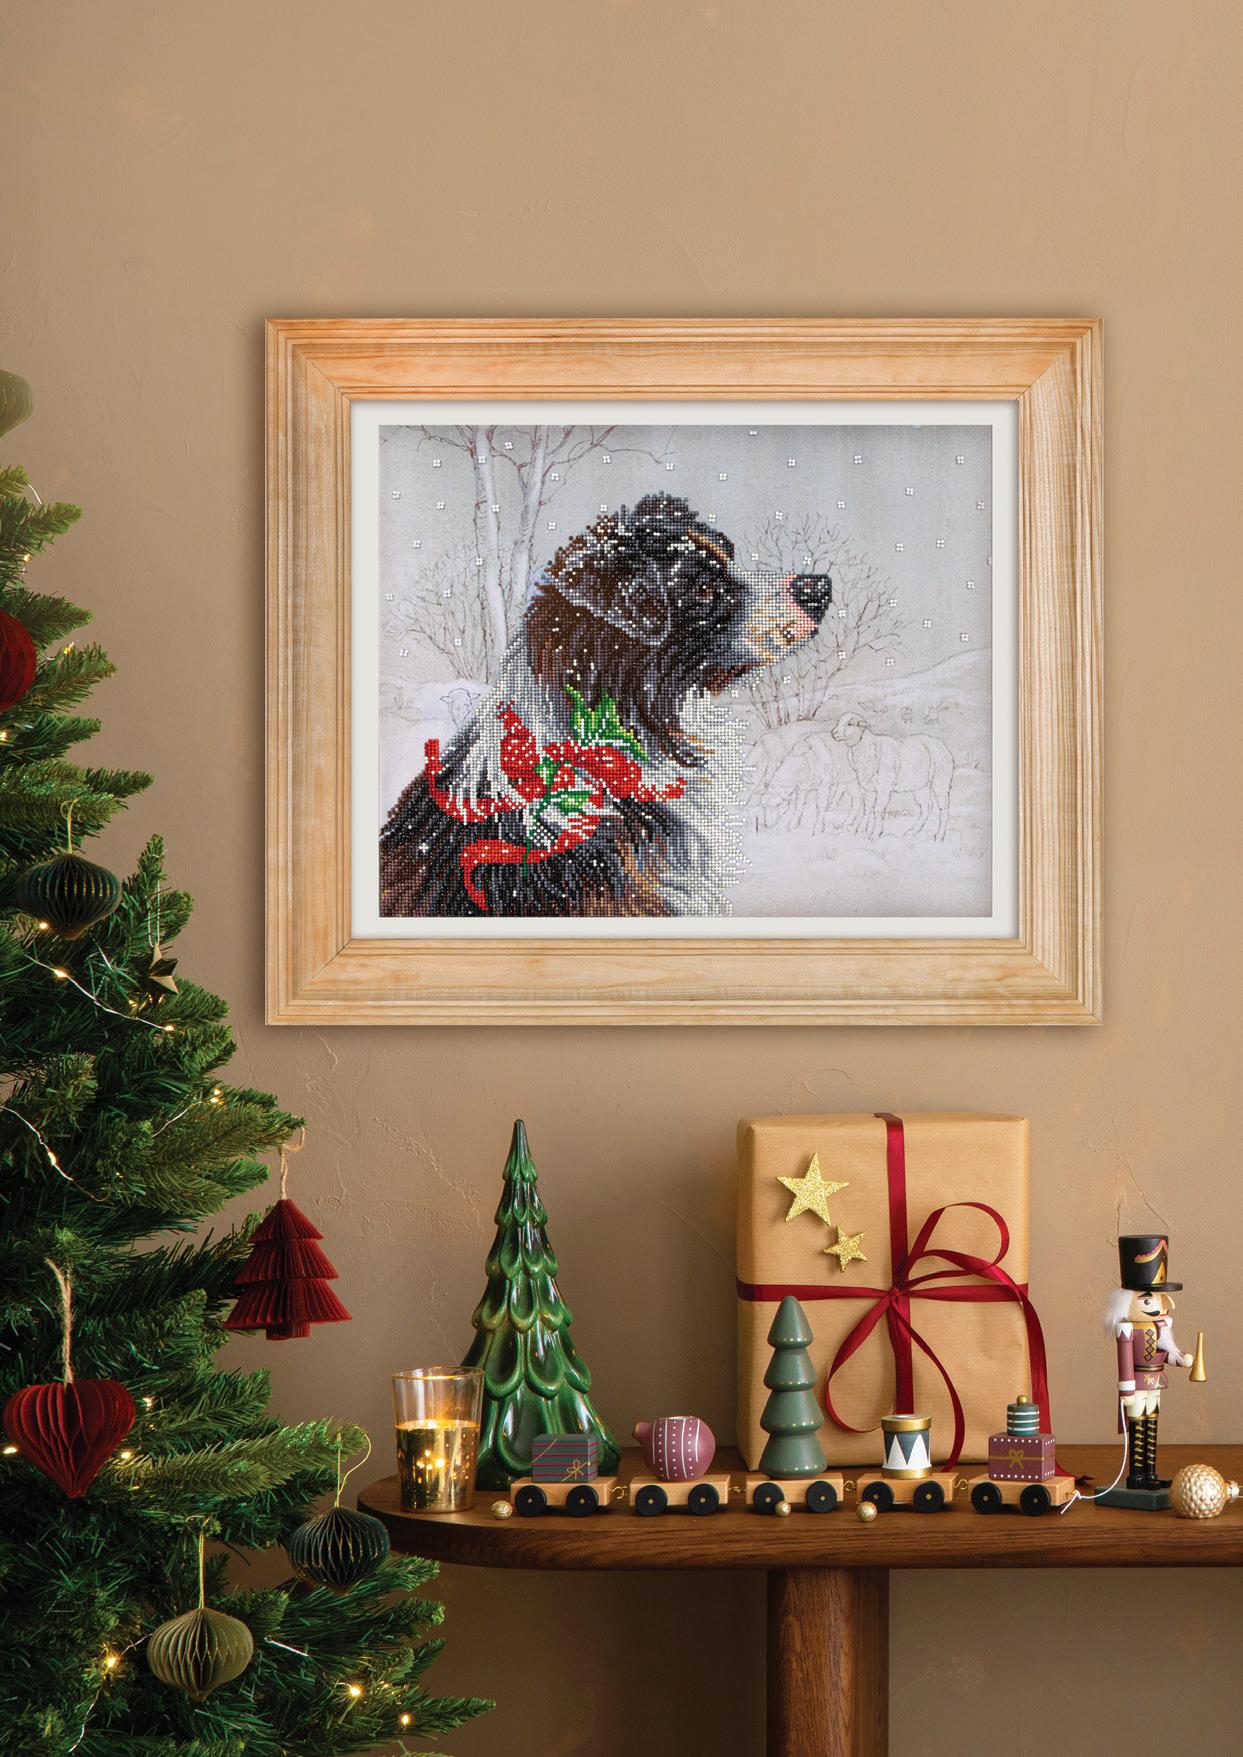
CHRISTMAS COLLIE
Keen dog lovers will be drawn to this – Donna Race’s original portrayal of a gentle border collie. Rich in detail, it is set against a muted sketch of a cluster of sheep and a wintry landscape.
Design Size:
19.7 x 15.8in
(50 x 40cm)
Paws ‘n’ portraits
Captured with exquisite detail, these charming yuletide canine portraits honor our faithful friends.
Dressed for the holidays, they embody the joy of sharing Christmas with our fur babies. So, if you are stumped for a gift, these diamond painting kits are ideal for any devoted dog lover.
A RECENT SURVEY* FOUND 49% OF AMERICAN PET OWNERS PLAN TO BUY CLOTHES AS CHRISTMAS GIFTS FOR THEIR PETS – GEN X SPEND THE MOST
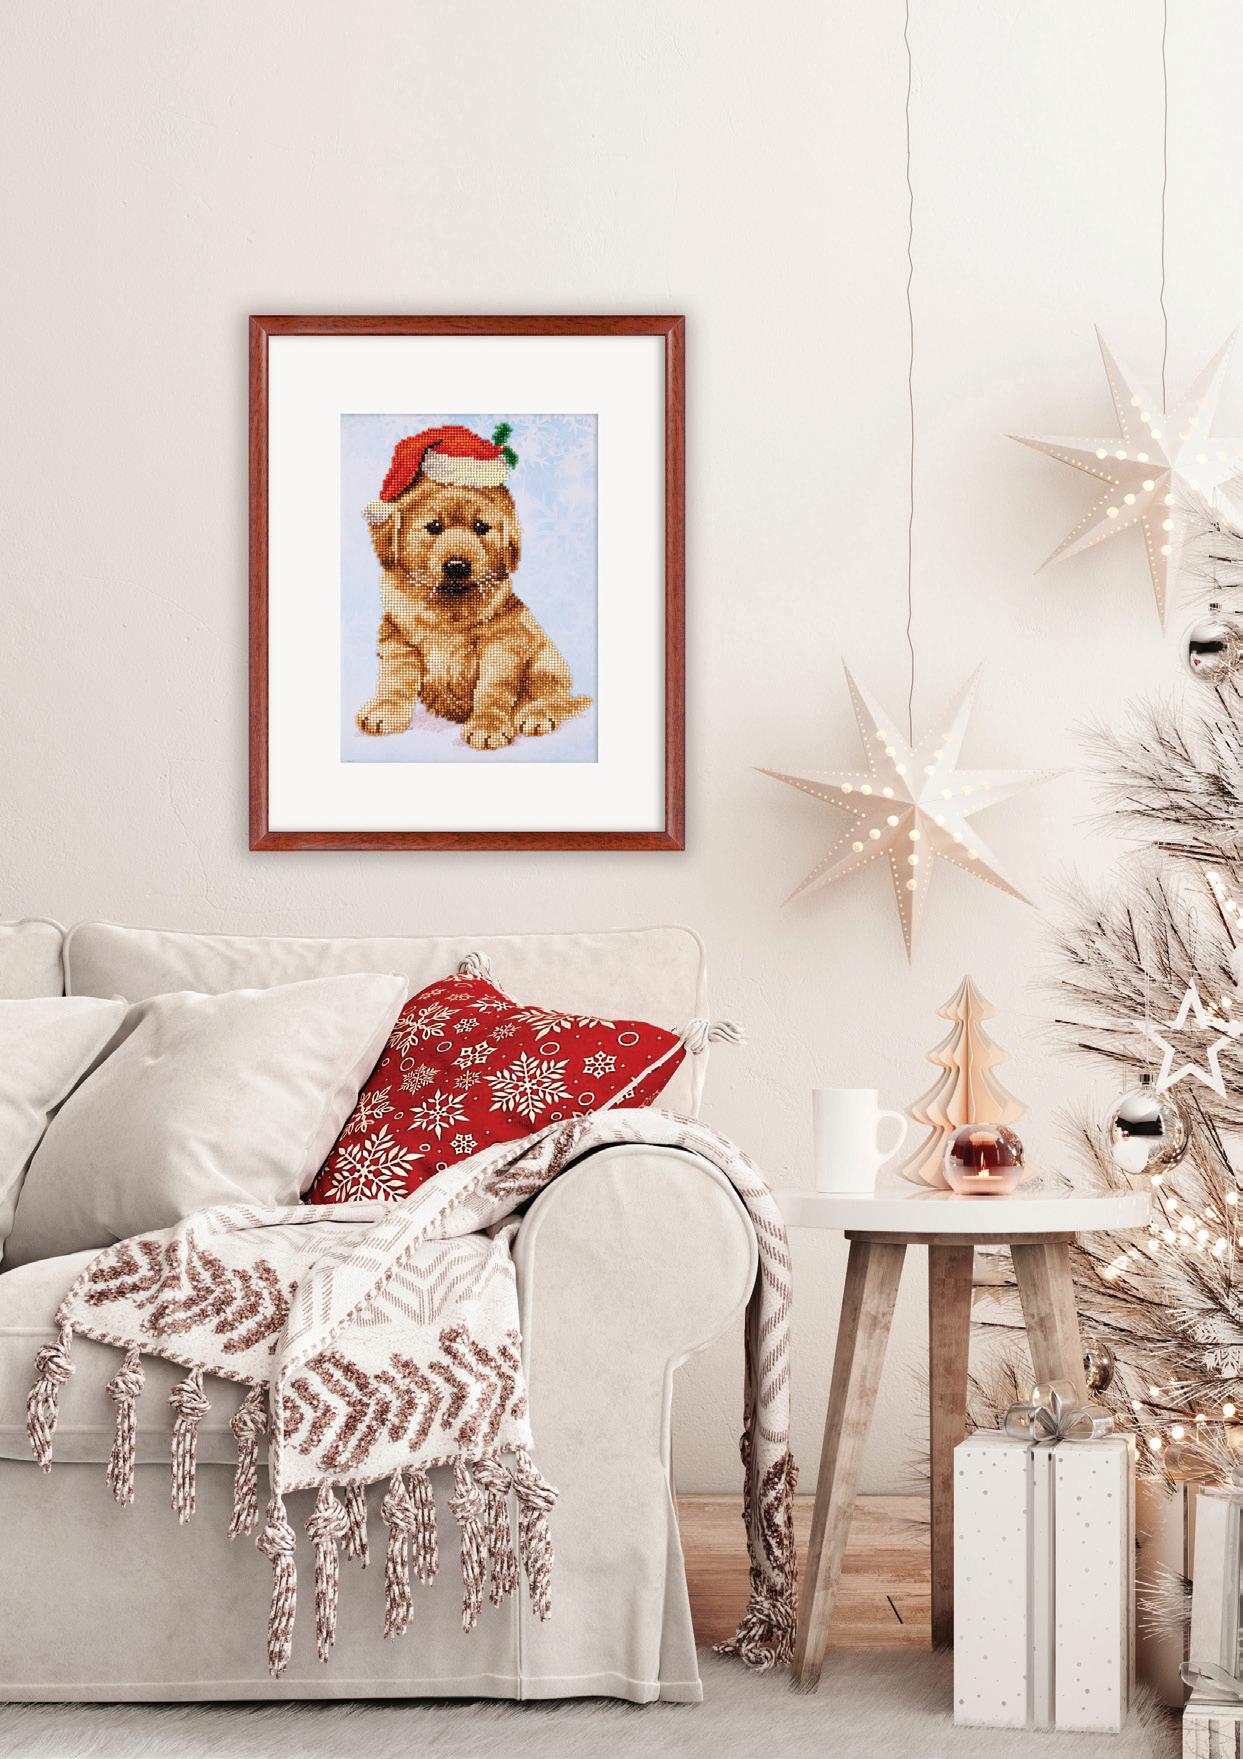
CHRISTMAS LAB
This has to be the cutest little Labrador puppy! His soulful eyes make you want to pluck him out of the frame for a quick cuddle. Settle for diamond painting him instead for a piece that will melt hearts!
Design Size:
10.6 x 13.8in
(27 x 35cm)
KIT DD5.010
Free and easy
LET YOUR DIY INGENUITY SHINE!
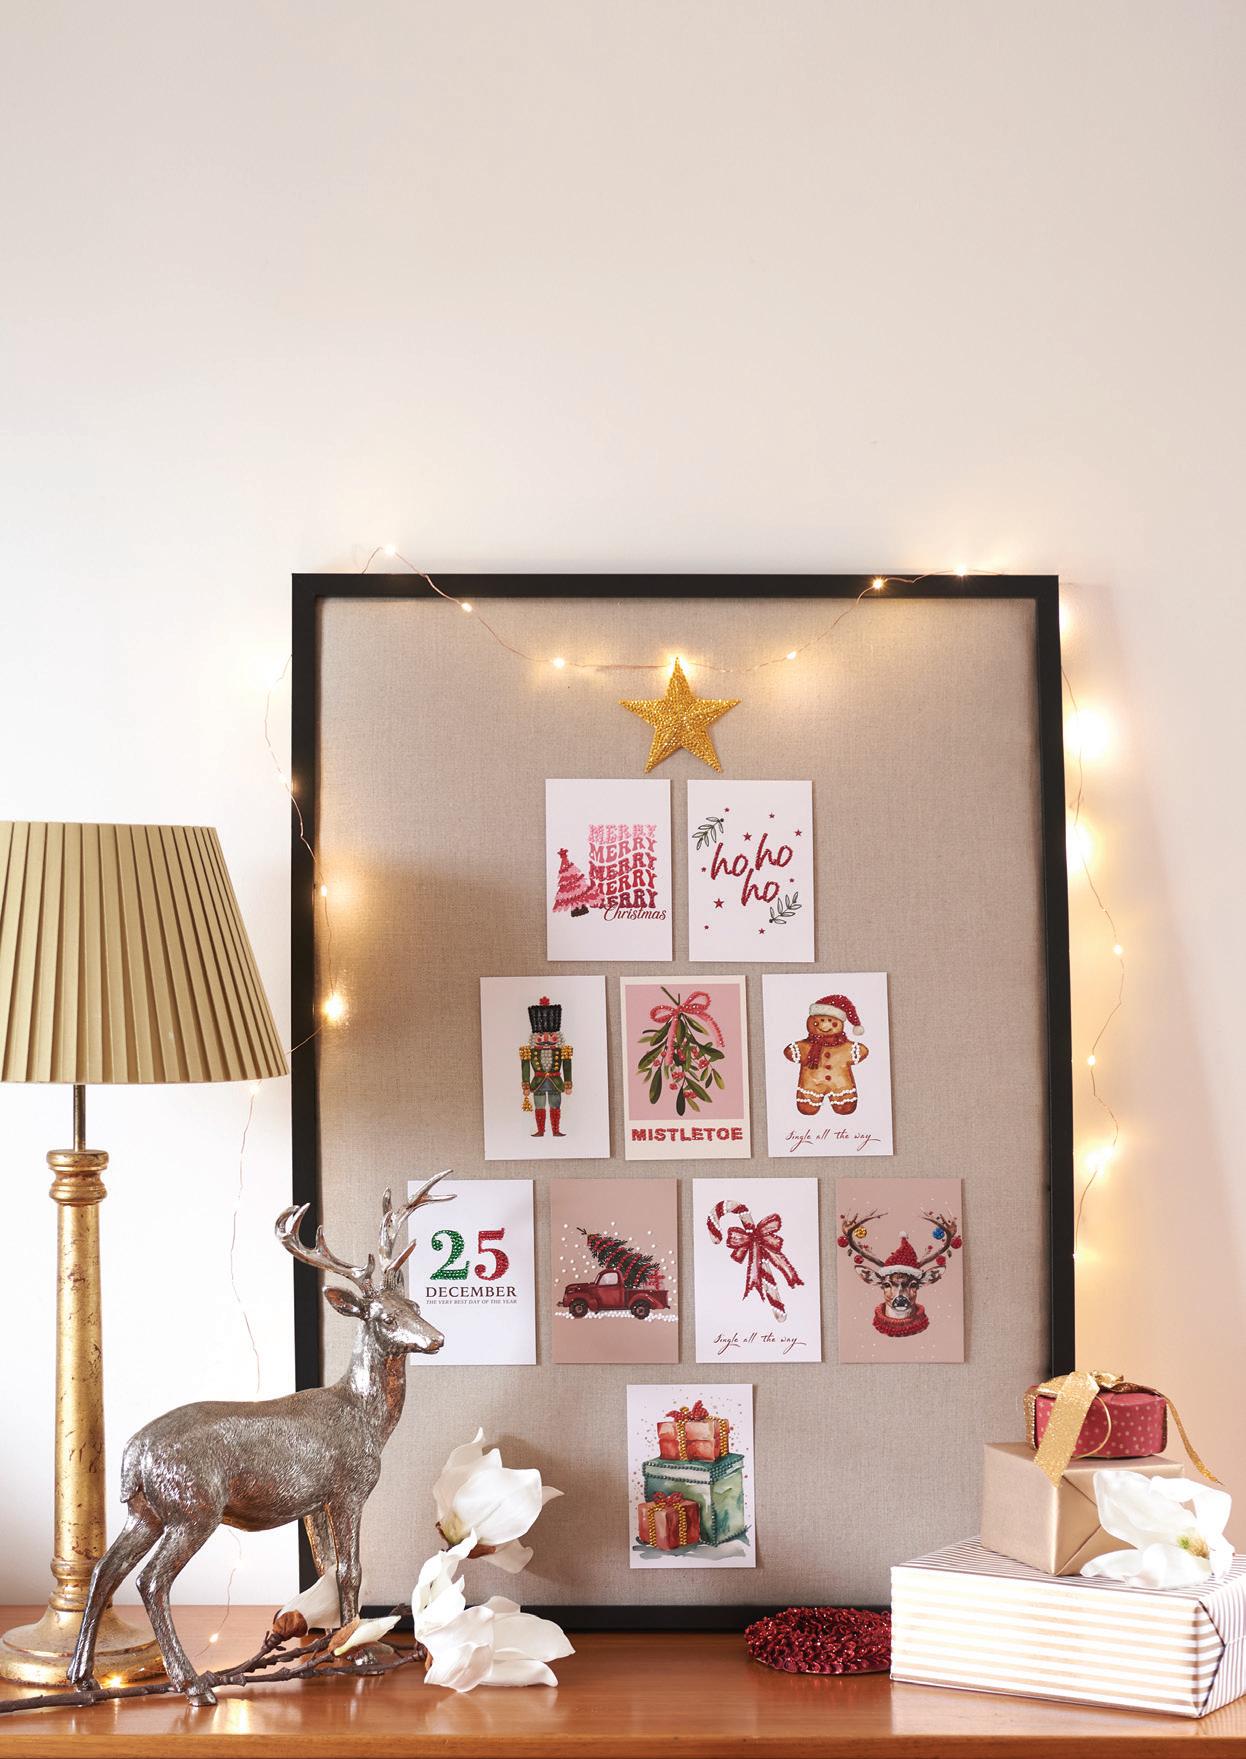
Dive into the wonderful world of freestyle diamond painting with these handmade dotted decorations and gift ideas. They’re simple, quick and easy – no special skills required! Look around for base pieces you can add a few fabulous finishing touches and you will be well on your way to creating unique gifts and décor for your home that sparkle and shine!
TREE-RIFIC DISPLAY
YOU WILL NEED
l A1 poster/picture frame
l A1 foam core board
l Wadding, cut to A1 size
l Linen fabric, cut 3.5in larger all around than A1 board
l Mercerized crochet cotton
l 10 Christmas cards/postcards
l DOTZ® STICK adhesive
l DIAMOND DOTZ® Gems: colors to suit cards + Metallic Gold 7001
STEP 1 Dismantle frame, removing back board, mat and plexi glass. Store these pieces if intending to re-use. Place foam core in frame. If needed, use craft knife to trim foam core slightly to suit frame. Remove.
STEP 2 Spray 1 side of foam core with adhesive then attach wadding with all edges even. Place wadding face down onto wrong side of linen. To stretch the linen taut and evenly around the foam core, use crochet cotton and needle to lace opposite long sides of linen together in a zigzag pattern. Repeat for short sides. Insert linen-covered foam core in frame then attach and secure back board in place. Set aside frame.
STEP 3 For each card/postcard, apply Dotz® Stick adhesive on areas of card you wish to highlight with
gems. Apply 2 coats of adhesive, allowing to dry clear but tacky after each application.
STEP 4 Pour gems into craft tray and shake gently from side to side so they settle in grooves of tray, curved side up. Repeat as necessary.
STEP 5 Load stylus with wax, then picking up and placing one gem at a time, dot tacky areas of card. When finished dotting each card, press down gently on gems to secure.
STEP 6 When all cards are dotted, stick mounting tape onto all 4 corners of card back. Lay cards on the linen covered foam core to determine their final placement. Aim for a grid placement to suit your card sizes, leaving room for a star at the top. When happy with the arrangement, remove backing from each piece of mounting tape and press in place.
Tree-rific Display
STEP 7 Make a star template. To do this, photocopy star diagram to desired size then paste it onto scrap card. When glue has set, use a metal ruler and craft knife to cut out this template, following outline.
STEP 8 Place star template onto gold card, pencil trace around shape and use bone folder to score fold lines (indicated on diagram). Cut out star, as before, then fold to create valley and mountain folds. Unfold star, then using flat paintbrush, coat card star with Dotz® Stick twice, letting each coat dry until clear but tacky. Avoiding fold lines, diamond paint star with gold gems. Gently press down on gems to secure them in place. Carefully arrange mountain and valley folds to create 3D star.
STEP 9 Secure star at peak of card ‘tree’. To do this, secure a ball of Blu Tack to center of wrong side of star. Push pin head into center of Blu Tack ball. Place star in postion, then carefully push the star so the pointy end of the pin penetrates the fabric/ wadding/foam core.
No need to worry if you don’t have room for a living or even a faux Christmas tree. This showstopper of an idea is a terrific way to recycle last year’s holiday cards or postcards and it saves space! Simply pick out the areas on each card you wish to highlight, apply Dotz® Stick and attach the sparkling Diamond Dotz® gems in the usual manner. Then it is a simple matter of attaching your cards to a linen-covered back board of an A1 poster frame. For extra sparkle, top off your ‘tree’ with a gold star and drape festive lights around the frame.
Tree-cycle your old Christmas cards and give them a second season to shine!
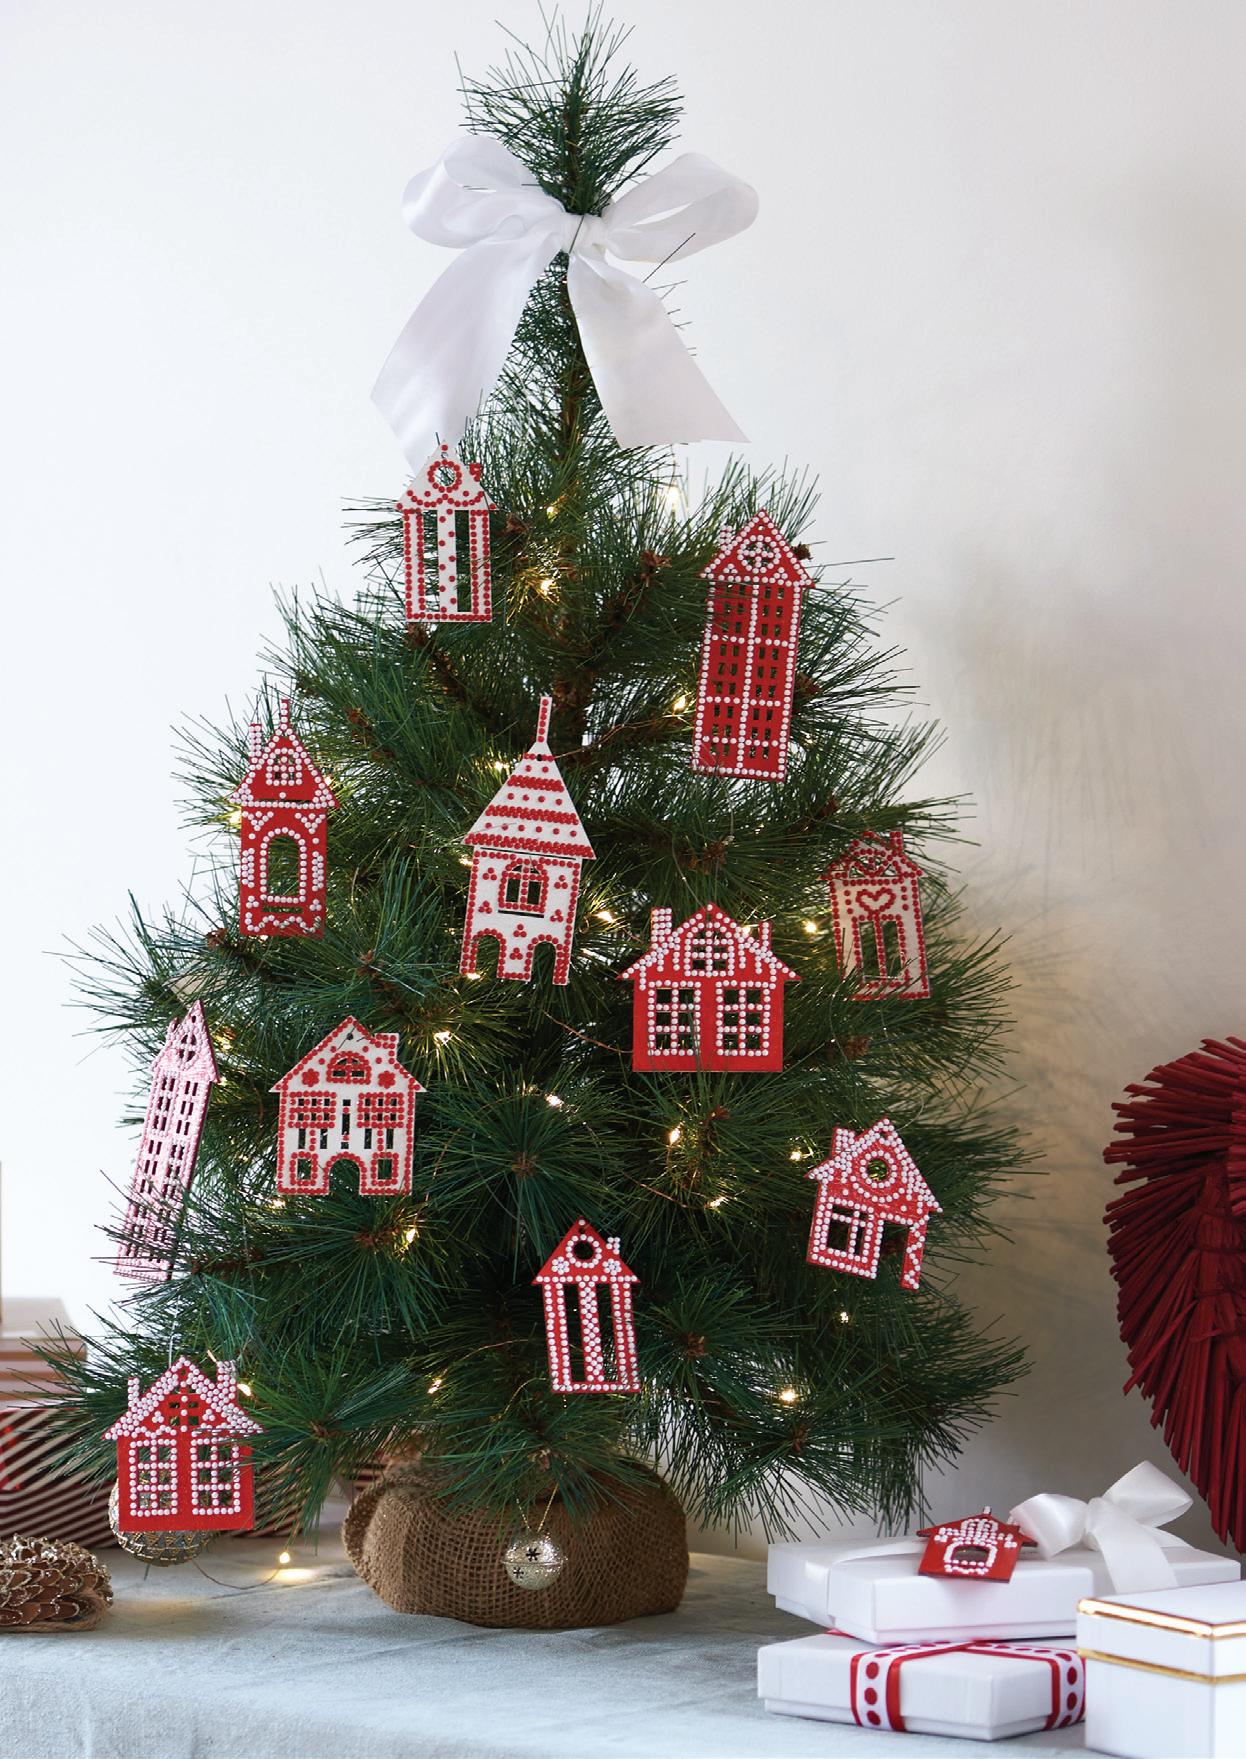
Home Sweet Home
Do you have a spot in your home that could do with some festive cheer? Or perhaps you like to sprinkle decorations throughout? All you need is a tabletop tree and these tiny wood houses, painted to suit your color scheme prior to being embellished with a few contrasting Diamond Dotz® gems. Go for Scandi red and white, bold brights or pastel tones – the choice is yours!
HOME SWEET HOME
YOU WILL NEED
l White wood house-shaped hanging ornaments
l Artist’s acrylic paints in white and red, matte finish
l DOTZ® STICK adhesive
l DIAMOND DOTZ®gems: White 8002 and Red 8015
Create a Scandi feel by choosing a simple red and white palette for your tiny houses and buildings
Ml DIAMOND DOTZ® Wax Pot, Craft Tray and Stylus
Extra supplies
Ruler; pencil/fine marker pen; sponge brush; small flat or round paintbrush; narrow ribbon, cord or twine; fine fishing nylon
STEP 1 Using sponge brush, paint front and back of each house with two coats of white or red paint, allowing it to dry after each coat.
STEP 2 Using pencil or marker and photos for reference, freehand-draw curved designs/areas of houses you wish to dot. It may not be necessary to use a ruler and pencil to draw straight lines for applying adhesive and later dotting but you may find it easier to follow a marked line.
STEP 3 Following marked lines or working just inside house/window/ door edges etc., use paintbrush to apply 2 coats of Dotz® Stick onto each house. Allow each coat to dry clear but tacky before proceeding.
STEP 4 Pour gems into craft tray and shake gently from side to side so some gems settle in grooves of tray, curved side up. Repeat this step, as necessary, to complete your project.
STEP 5 Load stylus with wax. Pick up and dot gems, 1 at a time, along marked lines or following shape of house/windows/ door – red gems on white houses and vice-versa. When each house is dotted to your satisfaction, gently press gems to secure them in place.
STEP 6 Trim your tree or gift with these dotted decos using ribbon, cord or twine to attach them. For an almost invisible ‘hanger’, use fishing line to tie the houses to tree branches, snipping off tail ends.
Two gifts in one – a dazzling miniature present topper and a cute keepsake!
Draw motifs to be dotted prior to applying Dotz® Stick.
Now, this really takes the cake, what a scene stealer!
TASTE OF CHRISTMAS
YOU WILL NEED
l Wood cake/fruit stand
l DOTZ® STICK adhesive
l DIAMOND DOTZ® Gems: White 8002, Red 8015 and Metallic Gold 7006
l DIAMOND DOTZ® Wax Pot, Craft Tray and Stylus
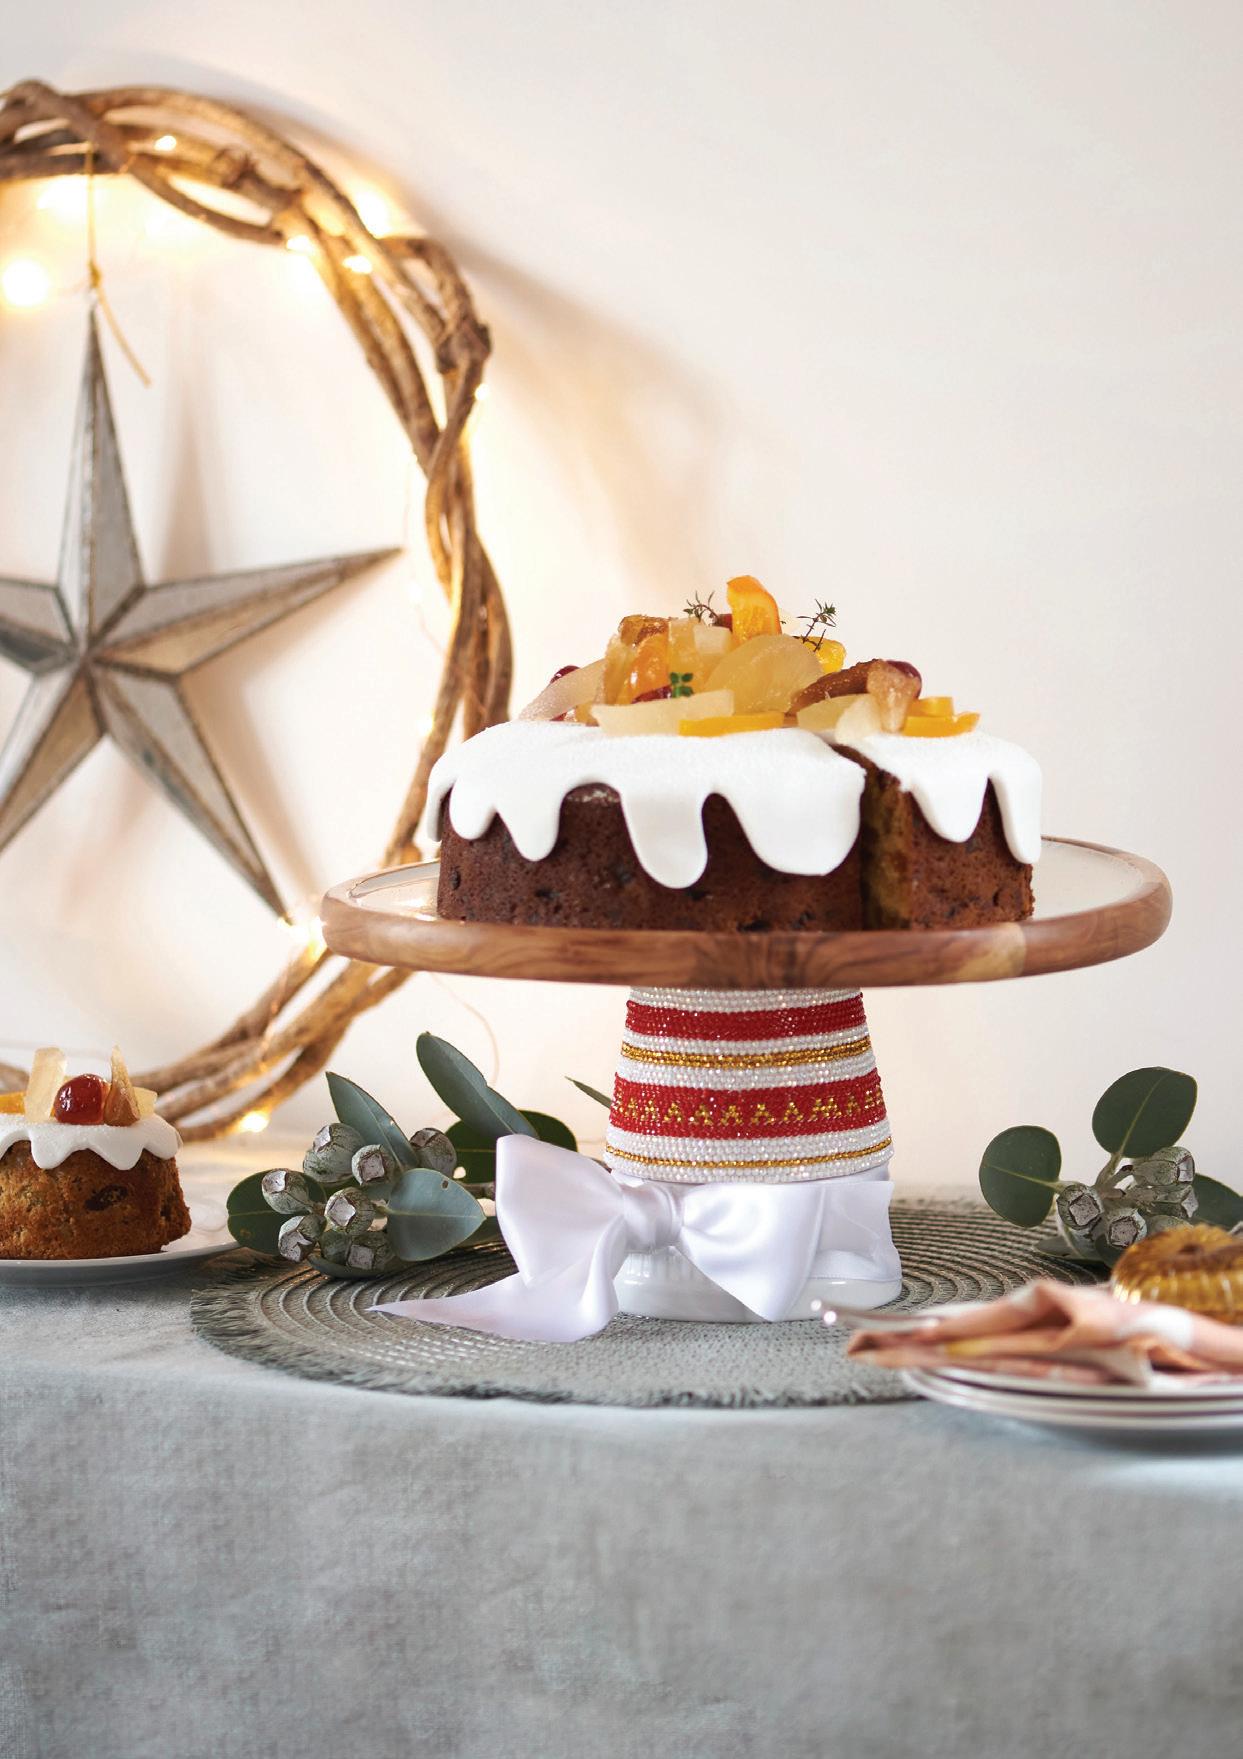
This Christmas we have you covered. The grand finale to a festive feast or individual cakes to gift, this Golden fruit cake is bound to become a family favorite.
MTaste of Christmas
Make a feature of your sweet indulgence by serving your Christmas cake on a raised cake platter. Simply dot rows of sparkling diamond painting gems in whites, reds and metallic gold around the pedestal. Start with the bottom row and work your way up the pedestal, row by row, alternating colors. If you would like to create a zigzag pattern as here, mark the base first with a pencil or light marker pen as a guide for placement. M
l Flat paintbrush, medium
l Pencil/fine marker pen
NOTE: Place cake stand on a book or lazy Susan to make it easier to dot.
STEP 1 To create an upside down ‘V’ pattern on pedestal, as here, turn cake stand upside down and draw evenly spaced ‘V’ shapes around stand, about 1 to 1½in from edge (or to suit). As you near the start, you may need to carefully space the ‘V’s to form a ‘W’ at the join.
STEP 2 Brush 2 coats of Dotz® Stick around cake stand's pedestal. Let each coat dry clear but tacky before proceeding to the next step.
STEP 3 Pour white gems into craft tray and shake gently from side to side so gems settle in grooves of tray, curved side up. Repeat this step, as needed, to complete project.
STEP 4 Load stylus with wax. With cake stand right way up, pick up and place 1 gem at a time around bottom edge of pedestal (1st row). As you work your way up, follow your own color sequence/pattern or use this photo as a guide. If your pedestal tapers, as here, subsequent rows may require you to fill the slight gaps between gems of the row prior, similar to a beading brick stitch pattern.
STEP 5 When finished, gently press down on the gems to secure them in place.
Serves: 20 (8in round cake) or 9 individual cakes
Baking time: 1½ – 1¾ hours (cake) or 40-45 mins (for individual cakes)
Cake
10½ oz golden raisins
7oz dried Turkish apricots
3oz glace ginger
1 cup (7½ oz) Light brown sugar, lightly packed
2 sticks (8 oz) butter, chopped
2 tsp finely grated orange zest
4fl oz fresh orange juice
2fl oz alcohol (brandy, rum or whiskey), plus a little extra
1½ tsp pumpkin spice (or mixed spice)
1½ tsp ground cinnamon
1 teaspoon baking soda
3 eggs, lightly beaten
10¾ oz all-purpose flour
1 teaspoon baking powder
Oil spray or extra butter, and non-stick baking paper to line cake pan
Icing 14oz ready-to-roll white fondant
1oz smooth apricot jam
2 tsp water
Powdered sugar for rolling Assorted candied fruits and thyme to decorate
STEP 1 Preheat oven to 320°F.
Lightly coat 8in round cake pan with oil spray or melted butter; line base and sides with non-stick baking paper, allowing paper to extend 2in above cake pan edge.
STEP 2 Cut fruit roughly into ¼in pieces and place in a large saucepan with the brown sugar, 6fl oz water, butter, orange zest and juice, 2fl oz alcohol, pumpkin spice and cinnamon. Stir mixture over medium heat until butter is melted and sugar has dissolved. Bring to the boil, remove from heat; stir in baking soda; transfer to a large bowl and leave to cool to room temperature.
STEP 3 Stir in the beaten eggs, sifted flour and baking powder; mix well until combined.
STEP 4 For the round cake: spread mixture into prepared 8in
cake pan and smooth surface. Bake for about 1½ – 1¾ hours or until a skewer comes out clean when tested in center of cake. Use a skewer to make 20 or so holes in top of each cake, then use a pastry brush to brush a little extra alcohol on top of cake. Allow to cool for about 15 minutes before removing from pan and cooling on a wire rack completely. Wrap cake well or place in an airtight container.
For individual cakes: lightly coat 9 holes of 2 x 6 Texas muffin pans (6fl oz) with oil spray or melted butter and line base with a round of non-stick baking paper. Follow instructions as for round cake to make cake mixture then divide mixture evenly between prepared pans. Bake for 40 -50 minutes or until a skewer inserted into center comes out clean. Use a skewer to make 2 holes in top of each cake; use pastry brush to brush a little extra alcohol on top of cake. Cool the cakes in pans for 5 minutes; remove and place them on a wire rack to cool completely. Wrap or place cakes in airtight container.
ICING
Large cake: Trim top of cake, if desired, to flatten. Brush top and ½in down side of cake very lightly with jam so fondant icing sticks to cake. Knead fondant on powdered sugar-covered board until soft, then roll out to about 1½in- 2in slightly larger than top of cake. Use a sharp knife to cut fondant icing, creating varying 'drips' of 'snow' around fondant edging (as shown). Gently pick up and place fondant icing on prepared cake, smoothing cut edges. Brush a little jam under longer drips then smooth to secure fondant icing to the cake. Top cake with assorted candied fruits and thyme sprigs. Individual cakes: Trim top of cakes flat and turn upside down. Repeat as for round cake, using about 1½oz of icing per cake. Note: Cake lasts 1 – 2 weeks and can be refrigerated, if desired.
GOLDEN FRUIT CAKE
All dressed up and ready to glitter and glow!
A Touch of Sparkle Candles may come in smart ceramic jars, sometimes plain and sometimes striped. Even so, they are begging for a little extra something to make them even more alluring. And that’s where diamond painting comes into the picture, adding that special sparkle. It’s a gift that is bound to delight!
A TOUCH OF SPARKLE
YOU WILL NEED
l Striped ceramic candle
l DOTZ® Sandwich Adhesive
l DIAMOND DOTZ® Gems: color to suit
l DIAMOND DOTZ® Craft Tray, Wax and Stylus
l Round paintbrush
Extra supplies
Cutting mat; metal ruler; craft knife; pencil or fine permanent marker; scissors
STEP 1 Measure the candle container’s stripe width and height. Transfer these measurements onto the opaque backing sheet of Dotz® Sandwich Adhesive.
STEP 2 Working on a cutting mat, use a metal ruler and craft knife to cut the required number of Dotz® Sandwich Adhesive strips. For this project, only enough strips were needed for alternate stripes. Work with 1 strip at a time and, carefully removing opaque backing paper of sandwich adhesive, adhere it to a candle stripe. Repeat for all stripes.
STEP 3 Pour gems into craft tray and shake gently from side to side so gems settle in grooves of tray, curved side up. Repeat this step, as needed, until project is complete.
STEP 4 Load stylus with wax then working with 1 stripe at a time, carefully lift film covering the tacky sandwich adhesive and begin dotting stripe with gems, from the bottom to the top, as shown. When finished dotting each stripe, gently press down on gems to secure them in place.
STEP 5 For a curved color section (as on lid here), cut a sandwich adhesive strip. Remove opaque backing paper and carefully stick it to the surface, pinching and making small folds along top edge as you follow the curve. Load stylus with wax then, lifting protective film, dot gems around outer edge of the curve or shape. Dot subsequent rows, following curve established by the preceding row. When finished dotting, gently press down on gems to secure them in place.
TIP
As you dot each stripe, don't peel off the film in one go. It's best to lift away sections as you dot, as here.
MEARN YOUR STRIPES
If your ceramic cylinder container isn’t striped, use painter's tape to mask off an even number of alternate stripes. Using a medium-grit sandpaper, lightly sand the untaped stripes to create a grip for paint to adhere to. Using your color of choice, apply 2 coats of a multi-surface acrylic paint to each stripe, letting paint dry after each coat. Then follow Steps 1 – 4 (left) to decorate the candle's newly painted stripes with Dotz® gems in a color to match the paint.
YOU WILL NEED
l Wood tray (unfinished)
l Acrylic paint satin or matte in midnight blue, white, and red (or desired colors)
l Reusable Christmas stencil/s
l DOTZ® STICK adhesive
l DIAMOND DOTZ® Gems: White AB, White 8002 and Red 8015
To remove artist’s acrylic paint from stencil, use a foam dish sponge, dishwashing liquid and warm water to gently scrub Mylar or plastic surface clean. Let the stencil dry well before storing it flat.
Merry Message Chalkboard artwork and typography is a real style statement. Try this spin on the idea. Stencil a festive welcome or lyrics on a painted tray and highlight lettering and any motifs with sparkling Dotz® gems for a diamond painting with a difference. And the final flourish, rub gold wax along the top edge. Make it a part of your holiday décor!
MERRY MESSAGE
STEP 1 Using sponge brush, paint tray with 2 – 3 coats of midnight blue paint. Let paint dry after each coat.
details in white or in a color to suit.
STEP 2 Tape stencil to tray. Tape over any cut-out sections you later wish to stencil in a contrasting color to the lettering, such as the bells’ red ribbon bows, as seen here.
STEP 3 Using foam pouncer and white paint, stencil lettering. If using pouncer, pounce straight up and down to help prevent paint seeping under surface of stencil.
DD TIP If using a stencil brush, use a dry brush technique (see p51).
STEP 4 When paint is dry, remove tape from stencil to reveal cut-outs. Tape over any adjacent lettering. Using foam pouncer and red paint (or desired color), stencil contrasting colored details. Let paint dry then remove stencil.
STEP 5 If tray looks as if it needs a few extra small details around the lettering, you can either freehand paint random snowflakes and stars or utilize sections of other stencil designs. Paint or stencil the extra
STEP 6 Using paintbrush, apply 2 coats of Dotz® Stick onto stenciled lettering and details. Let Dotz® Stick dry clear, but tacky after each coat before proceeding.
STEP 7 Pour gems into craft tray and shake gently from side to side so gems settle in grooves of tray, curved side up. Repeat this step, as necessary to complete your project.
STEP 8 Load stylus with wax, then picking up and placing 1 gem at a time, dot tacky stenciled areas of tray. Here, the lettering and bells were dotted with White AB gems, bows in Red and snowflakes/stars in White. When completed, gently press down on the dotted areas to secure the gems in place.
STEP 9 Wearing gloves, use your finger and lint-free cloth to apply gold wax finish around top edge of tray. For a brilliant finish, buff wax with the polishing cloth.
Shopping: Set of 6 reusable Christmas stencils (6 x 6in each), DLY Lifestyle Store, amazon.com.
Trivia
2
The famous poem Twas the Night Before Christmas introduced us to Santa’s reindeer – Dasher, Dancer, Prancer, Vixen, Comet, Cupid, plus Donder and Blitzen (originally Dunder and Blixem, Dutch for thunder and lightning).
3
In 1874, Louis Prang was the first to mass-produce affordable Christmas cards in America – simple floral designs with the words ‘Merry Christmas’. His cards evolved to include classic holiday motifs, some luxuriously trimmed with silk fringes, cords and tassels.
4 The tallest Christmas tree ever displayed was a 221foot Douglas fir at Seattle’s Northgate Shopping Center in 1950.
It still holds the Guinness World Record 75 years later!
5
In the film, The Polar Express (2004), Tom Hanks voiced multiple characters. He also acted out the movements and expressions captured by the film’s motion capture technology, subsequently translated into the animated characters in the film.
6
Jingle Bells was written in 1857 by James Lord Pierpont. Originally titled One Horse Open Sleigh, it was meant to be a Thanksgiving song, but it became popular around Christmas time. The rest, as they say is festive history!
8
Robert May, a Montgomery Ward copywriter, originally wrote Rudolph the RedNosed Reindeer in 1939 for his daughter. As part of a store promo to boost sales, the illustrated booklet was handed out free to children visiting the store. Pester power disguised as a freebie!
9
Every December, thousands of people flock to Dyker Heights, Brooklyn, New York to witness its famously elaborate Christmas light displays, roughly within a six-block area.
10
The No. 1 most streamed Christmas song on Spotify (2024) was Mariah Carey’s All I Want for Christmas Is You at 2.08 billion streams. Coming in at No. 2 was Wham’s Last Christmas at 1.77 billion streams.
11
On December 24, 1912, the first public Christmas tree lighting ceremony in the United States took place in Madison Square Park, New York City. The 60-foot-tall tree was transported from the Adirondacks by truck and decorated with 1,200 colored lights.
12
Norway has gifted a Christmas tree to London’s Trafalgar Square every year since 1947 as thanks for Britain’s support during WWII. The tree, a Norwegian spruce, features hundreds of white lights and is decorated in signature Norwegian minimalist style.
DIAMOND PAINTING THE ART OF CHRISTMAS STORYTELLING