TABLE OF CONTENTS
GAME CREDITS
Road to the Rhine, Compass Games
Copyright © 2026, Compass Games, LLC
Project Director: John Kranz
Project Lead: Greg Warren
Artwork: Joe Youst
Rules Layout: Greg Warren
Development Assistance: Ryan Pendergast
Road to the Rhine, Original Edition
Copyright © 1979, Game Designers’ Workshop
Game Research and Design: Frank Chadwick
Research Assistance: Shelby L. Stanton
Art Direction: Paul Richard Banner
Playtesting: Greg Novak, Tony Svajlenka, Dave Emigh, Tom Harris, John Harshman, Bill Stone, John Astell
SEPTEMBER 1, 1944
The German army has been beaten in the cataclysmic battle of the Falaise Pocket and chased back across France in disorder. In the south of France, American and French troops of the 6th Army Group have stormed ashore and driven the remnants of the German 19th Army north toward the border. The war can perhaps be over by Christmas if only the momentum can be maintained...
Road to the Rhine is a simulation of the Allied drive against the German Western Front, from September 1944 through April 1945. The game covers the initial attempts by the Allies to maintain the pace of their advance in the face of a rapidly deteriorating logistical situation, the German recovery culminating in the Battle of the Bulge, and the Allied drive across the Rhine.
Two battle games (one-turn scenarios) are included, along with two longer scenarios, and one full campaign game.
The game also includes extensive designer’s notes from original game designer Frank Chadwick, along with a historical playthrough of the Bulge battle game.
1. GAME COMPONENTS
• Two 22” x 34” Maps
• Two countersheets (9/16”) for 456 total counters
• One strip of 18 Attack Declared markers
• Two Terrain Effects Chart player aids
• Two Combat Results Table and Weather Table player aids
• Three German Setup and New Unit displays
• Three Allied Setup and New Unit displays
• One German Supply and Replacement display
• One Allied Supply and Replacement display
• One Rulebook
• Two dice
If any of these parts are missing or damaged, please contact:
Compass Games, LLC
PO Box 271
Cromwell, CT 06416
Phone: 860-301-0477
Email: support@compassgames.com
Online game support is available. Visit us on the web: https://compassgames.com
You can also use the URL or QR code to reach Compass Games online:
https://linktr.ee/compassgames

2. UNITS
The counters included in the game represent the forces that fought over the area covered by the map. Each counter is either a functional marker or represents a single unit that was present in the conflict.
2.1 Counter Format
Counters are printed with a variety of information which is then used by the players throughout the game. The data may easily be read because of the consistent format used; the counter format examples indicate the arrangement of the data.
Counter Format Examples
Ground Combat Unit
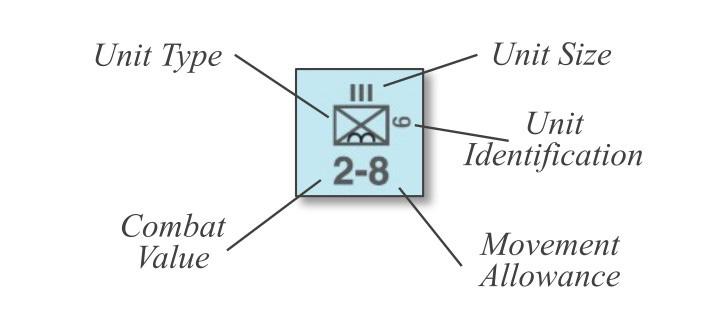
The ground combat unit shown above is the 6th Parachute Regiment, with a combat value of 2 and a movement allowance of 8.
Air Combat Unit
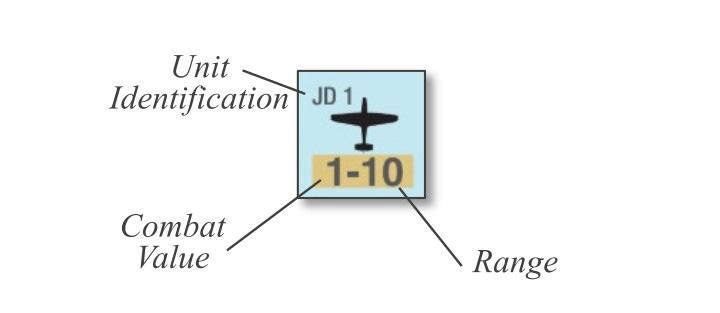
The air combat unit shown above is the 1st Jagd Division Fighter Bomber Wing, with a combat value of 1 and a movement allowance of 10.
Air Transport Unit
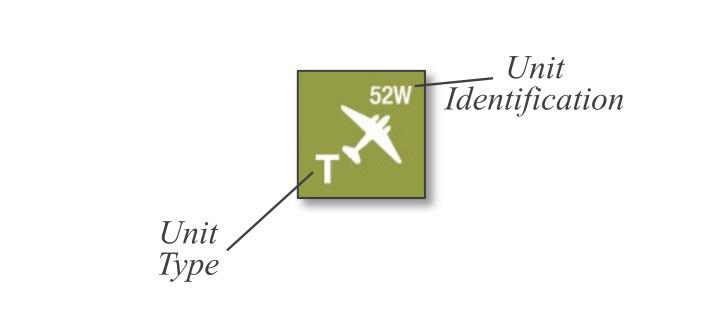
The air transport unit shown above is the 52nd Wing.
2.2 Markers
Shown below are the various markers used in the game and their definitions.
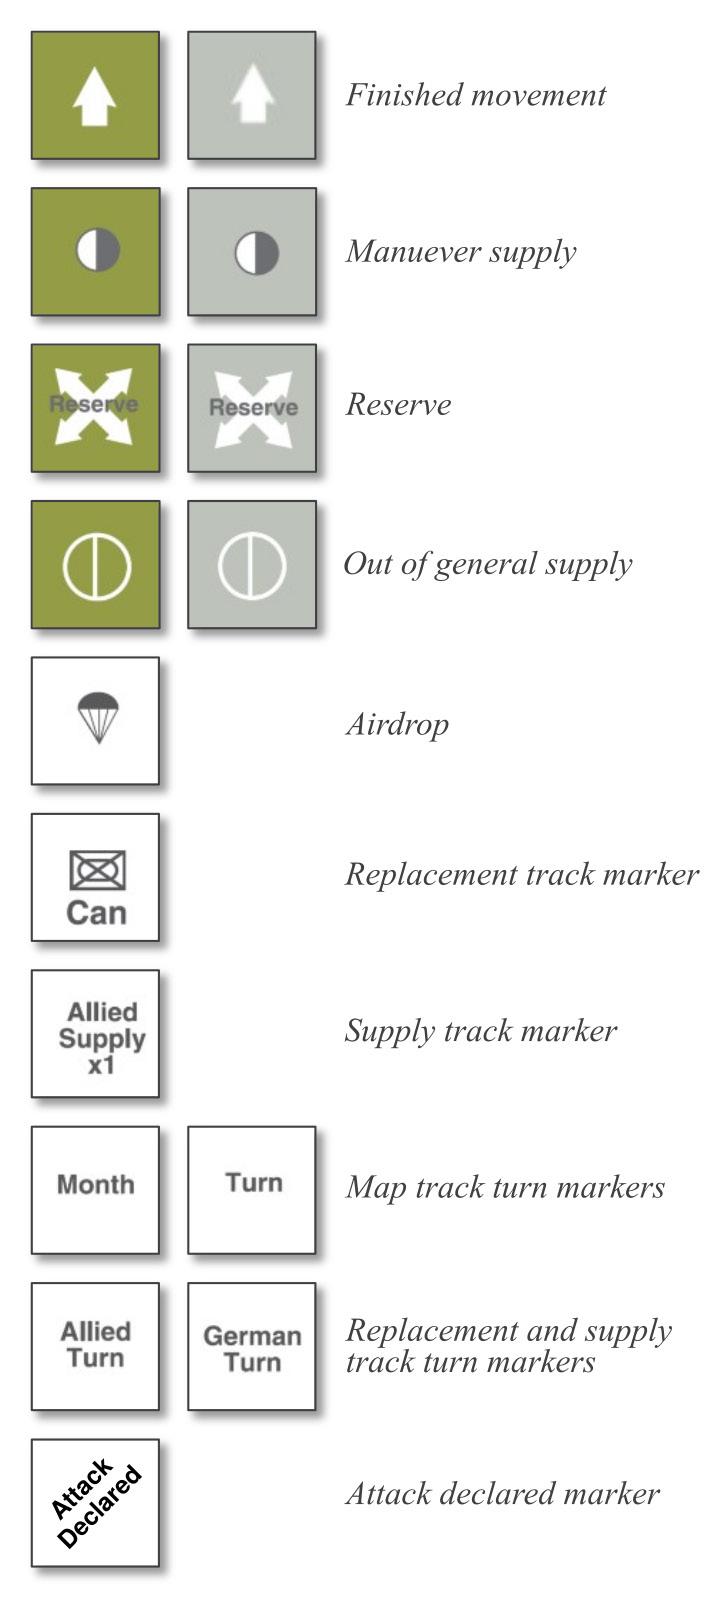
2.3 Unit Type Symbols
Shown below are symbols for the unit types in the game.
Air units
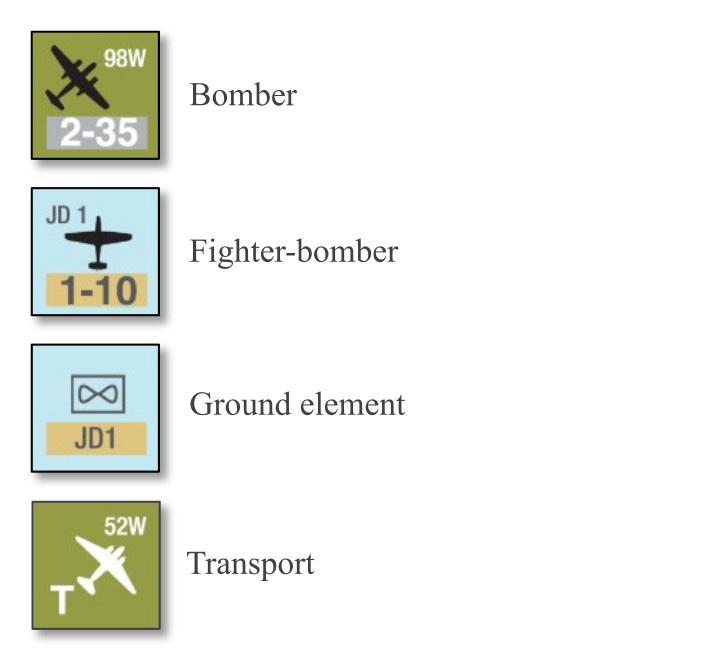
Ground units
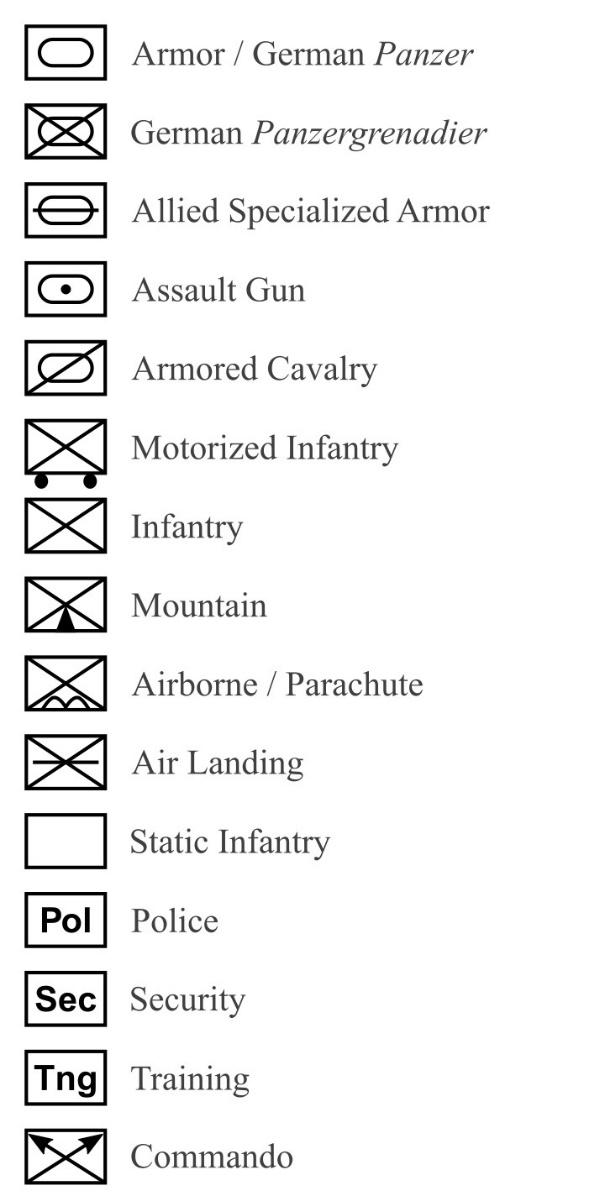
2.4 Unit Size Symbols
Below are the various unit size symbols shown on ground unit counters.
Symbol Definition
XX Division
X Brigade (U.S. Combat Command, French Groupment)
III Regiment
II Battalion
KG Kampfgruppe (Battle Group)
Group Group
2.5
Counter Colors
Counters are also color-coded for fast recognition of nationality or arm of service.
Miscellaneous markers black on white
Allied








German





United States white on olive
British black/red on light brown
Br. Royal Marines black/blue on light brown
Canadian white on light olive
French white on blue
Polish white on red
Other Allies black on light olive
Markers white on olive
Army black on gray
Navy white on dark blue
Luftwaffe black on light blue
SS white on black
Markers white on gray
3. THE MAP
The game map is a schematic representation of the terrain in Western Europe over which the campaign was fought. Several special items of information also require mention.
3.1 The Hex Grid
Each hex covers an area approximately seven miles across (measured from hexside to hexside). The numbers in each hex have been included to ease set-up and enable precise plotting of airdrops. Each hex can
be identified by the letter N or S (referring to the north or south map) followed by the distinct four-digit code of the hex.
3.2 Switzerland
Switzerland was, throughout the campaign, a neutral. No unit may move into Switzerland. No air unit may fly over Switzerland. Ground units forced to retreat into Switzerland are eliminated instead.
4. ZONES OF CONTROL
4.1 Definition
Each ground unit in the game has a zone of control (ZOC) consisting of the six hexes on the map immediately surrounding the hex it occupies.
4.2 Primary and Secondary Zones of Control
Adjacent hexes separated from the hex a unit occupies by either a full sea hexside or major river hexside (either bridged or unbridged) are referred to as being in the unit’s secondary zone of control. All other adjacent hexes are referred to as being in their primary zone of control.
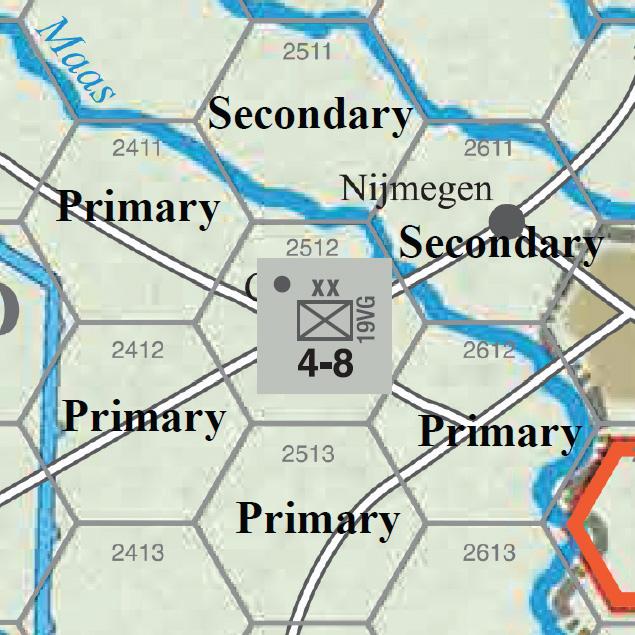
4.3 Effects of Primary Zones of Control
4.3.1 Movement
• During movement, a unit that enters the primary ZOC of an enemy unit must stop and may not move any farther that turn.
• A unit that begins its movement in an enemy primary ZOC may freely exit that hex and later reenter the primary ZOC of that enemy unit or any other enemy unit.
• A unit may never move directly from one enemy primary ZOC to an adjacent enemy primary ZOC, however
Zone of Control Example
4.3.2 Retreat
• Units forced to retreat into the primary ZOC of an enemy unit are eliminated.
4.3.3 Supply
• Supply may not be traced through an enemy primary ZOC.
4.3.4 Presence of Friendly Unit in ZOC
• The presence of a friendly unit in an enemy unit’s primary ZOC negates its effect on the final 8 hexes of a supply line (only) but does not negate its effect on movement and retreat.
4.4 Effects of Secondary Zones of Control
4.4.1 Movement
• A unit may not cross a full sea hexside or an unbridged major river hexside while moving directly from the secondary ZOC of an enemy unit to the primary ZOC of that or any other enemy unit.
4.4.2 Retreat and Supply
• No effect.
5. STACKING
5.1 Ground Combat Units
More than one ground unit may be placed in a single hex on the map. Certain limitations apply to this process.
5.1.1 Only units from the same side may occupy a single hex. (Exception: see Rule 21, Dunkirk.)
5.1.2 A player may place up to three ground combat units in a hex, no more than two of which may be divisions.
5.1.3 Units may move through hexes containing friendly units already stacked to the limits of the rule but must end their movement, their retreat, and their advance after combat within the stacking limits.
5.1.4 Units forced to retreat in violation of stacking limits retreat additional hexes until a hex is reached where they are not in violation of stacking limits. If no such hex is available, the retreating unit is eliminated.
5.2 Air Combat Units
5.2.1 One air combat unit and its associated ground element (the ground element bearing the same unit identification) may be placed in each city or town hex on the map.
5.2.2 Air combat units and their ground elements do not count against ground combat unit stacking limits.
6. SEQUENCE OF PLAY
Road to the Rhine is played in game turns, with each turn representing approximately one week of the actual campaign. Each game turn consists of a weather determination segment and two identical player turns: a German player turn followed by an Allied player turn. Each player turn consists of an initial segment, several impulses, and a terminal segment. The specific order of events within a turn is outlined below and detailed in subsequent rules. All actions in a game turn must be conducted in this sequence.
6.1 The Game Turn Sequence
Weather Determination Segment
German Player Turn
Initial Segment
First Impulse
Supply Determination Phase
Movement Phase
Air Support Phase
Combat Phase
Reserve Movement Phase
Reserve Air Phase
Reserve Combat Phase
Second Impulse (identical to the first impulse)
Additional Impulses as Needed
Terminal Segment
Allied Player Turn
(identical to the German Player Turn)
6.2 Initiative
The rules will often refer to the player with the initiative and the opposing player. In the German player turn, the German is the player with the initiative and the Allied player is the opposing player. In the Allied player turn, the roles are reversed.
6.3 Impulses
Each player turn includes a variable number of impulses, with the exact number being determined by the player with the initiative. In each player turn, every ground combat unit of the player with the initiative may move and/or attack once, but all units need not do so at the same time. In the first impulse the player with the initiative moves and attacks with as many units as the player desires. In the second impulse, the player with the initiative moves and attacks with any units the player desires except for those which have already moved and/or attacked. This continues until the player
with the initiative has moved and/or attacked once with all the units they desire. After the last impulse, players conduct the terminal segment, thus completing one player turn.
7. MANUEVER SUPPLY
During the initial segment of each player turn, the player with the initiative receives a number of Maneuver Supply Points (MSPs) which can be used for a variety of purposes. MSPs for the most part represent gasoline but are also a more general gauge of the logistical capabilities of each side overall. Players will expend MSPs for the operational use of air units and for ground units that rely on motor vehicles for their primary mobility. Additionally, the player with the initiative must pay one MSP for each impulse that is used in their player turn, after the first, and must pay one MSP to attack across certain obstacles (see Rule 7.3.4, Waterborne Assaults).
Maneuver supply markers


7.1 German Maneuver Supply
The German player receives a certain number of MSPs per turn according to the following schedule:
September through November 1944
December 1944
January through April 1945
10 MSPs
14 MSPs
6 MSPs
MSPs may be used in the player turn received or may be accumulated for later use. MSPs are accumulated by placing the German supply markers at the correct location on the track provided in the on-map chart box.
7.2 Allied Maneuver Supply
The Allied player receives MSPs from four sources: the invasion ports, the southern ports. the on-map ports, and airlifts.
7.2.1 Invasion Ports The invasion ports are off-map to the west. The Allied player receives a certain number of MSPs from the invasion ports per turn according to the following schedule:
September I through III
September IV through October I
October II through October III
October IV through December I
December II through February IV
March I through April IV
MSPs from the invasion ports may be used for any purpose on any map or accumulated using the Allied player’s on-map track and the two Allied supply markers.
7.2.2 Southern Ports The southern ports are offmap to the south. The Allied player receives a certain number of MSPs from the southern ports per turn according to the following schedule:
September I through III
September IV through October I
October II through October III
25 MSPs
20 MSPs
14 MSPs
20 MSPs
10 MSPs
20 MSPs
3 MSPs
5 MSPs
7 MSPs
October IV through November II 9 MSPs
November III through April IV 10 MSPs
MSPs from the southern ports may only be used to supply ground units and air units on the southern map or to make attacks across major river hexsides on the southern map.
They may not be used to supply units on the north map, attack across major river hexsides on the north map, or purchase additional impulses in which units on the north map move and/or attack.
If MSPs from the southern ports are accumulated, they must be kept track of separately (because of the limits on their use) by using the two markers labeled Allied South.
7.2.3 On-Map Ports (Port Capture) Two small ports (Dunkirk and Ostende) and one large port (Antwerp) may be used by the Allies to bring in additional MSPs. Before these ports can be used, however, they must be captured and cleared.
MSPs brought into play from on-map ports may be used without restriction (identical to MSPs from the invasion ports.)
7.2.3.1 Dunkirk and Ostende As soon as the Allied player is the only player with units in either Dunkirk or Ostende, the port has been captured. After two complete game turns, the Allied player begins receiving one MSP per turn per port.
Example If Ostende were captured on the September III turn, the Allied player would begin receiving an additional MSP in the initial segment of their player turn of the October II turn.
The Allied player must hold the port for the entire two game turns before receiving the supplies. If the port is recaptured, the Allied player does not receive the additional MSP until they have again captured the port and again waited two complete turns.
7.2.3.2 Antwerp To begin using the Antwerp port, the Allied player must have captured all three hexes of Antwerp and all sixteen hexes of the Scheldt Estuary. (All hexes of the Scheldt Estuary are marked on the map with a blue anchor symbol.) Once all the required hexes are captured, the allied player begins receiving MSPs after three complete game turns.
Example If Antwerp were captured on the September III turn, the Allied player would begin receiving an additional MSP in the initial segment of their player turn of the October III turn.
MSPs received for the capture of Antwerp:
• On the first turn of operation, the Allied player receives 4 additional MSPs.
• On the second turn of operation, the Allied player receives 8 additional MSPs.
• On the third turn of operation, the Allied player receives 12 additional MSPs.
• On the fourth and every subsequent turn of operation, the Allied player receives 16 additional MSPs.
If the port of Antwerp itself is recaptured by the German player. the Allied player may not use Antwerp until they have repeated the entire above procedure and would start with receiving 4 MSPs in the first turn of operation.
If a hex of the Scheldt Estuary is recaptured by the German player, it merely interrupts the operation of Antwerp until the estuary hex is recaptured. At that point, Antwerp resumes operation at its former level.
7.2.4 Airlifts Allied air transport units may be used to bring MSPs into play. No actual physical movement of counters is required, the Allied player instead simply declares during the initial segment of the player turn which transports are airlifting MSPs. Each transport unit airlifts one MSP, which may be used without restriction (identical to MSPs from the invasion ports.)
Transports used to Airlift MSPs may not be used for any other purpose during that player turn or in the immediately following German player turn.
7.3 Uses of Maneuver Supply
7.3.1 Ground Units All ground units with a movement allowance of greater than 10 require maneuver supply to function at full effectiveness.
Each MSP places one division or two non-divisional units in maneuver supply. MSPs are allocated to ground
units during the initial segment of the player turn. Only the player with the initiative allocates MSPs to ground units during their player turn. The player with the initiative designates which units are in maneuver supply by placing a maneuver supply marker on top of the unit.
A ground unit with a movement allowance greater than 10 which has not had maneuver supply allocated to it has its movement allowance halved. Additionally, such a unit may not attack if it moves at all. If the unit moves instead of attacking, the unit may not enter the primary ZOC of an enemy unit unless entering the ZOC hex is the only move the unit makes. That is, the unit must begin its impulse adjacent to the hex containing the enemy primary ZOC to be able to enter the hex.
Units that require maneuver supply but do not receive it defend with their printed combat value and attack with half their printed combat value. Units with an odd number retain the fraction caused by halving their combat value.
Example A unit with a combat value of 5 without maneuver supply would attack with a strength of 2½.
7.3.2 Air Units Allied transports do not require or use MSPs. All other aircraft (bombers and fighterbombers) require maneuver supply to fly missions.
Air units must have one MSP per air combat value point allocated to them to become operational during the first impulse of a player turn. On any subsequent impulse of a player turn, two MSPs per air combat value point are required to make the air unit operational. Thus, an Allied bomber unit with an air combat value of 2 would require 2 MSPs on the first impulse of a player turn but would require 4 MSPs on the second and any subsequent impulses.
Air units may be allocated MSPs during the supply determination phase of each impulse. Both players may allocate MSPs to air units in each impulse.
When an air unit is allocated maneuver supply, the air unit is placed on top of its associated ground element to indicate that it is operational. It may fly a mission during that or any subsequent impulse. Once it flies a mission, it is returned to its associated ground element and placed under it, indicating that it is non-operational. It may not fly again until additional maneuver supply has been allocated to it.
7.3.3 Purchasing Impulses Each player may execute one impulse (the first) in their player turn at no cost. Thereafter, each impulse executed requires the expenditure of one MSP in the supply determination phase of the impulse. During storm, winter storm, and thaw weather turns (see Rule 19, Weather) the cost for additional impulses is increased to two per impulse after the first.
7.3.4 Waterborne Assaults
7.3.4.1 Attack Across Unbridged Major River Hexside For each attack made across an unbridged major river hexside, the attacking player must expend one additional MSP.
7.3.4.2 Attack Across Full Sea Hexside (Allied player only) For each attack across a full sea hexside, the Allied player must pay one additional MSP. (The Germans cannot attack across full sea hexsides; see Rule 24, Special Units.)
7.3.5 General Restrictions In addition to the restrictions on the use of MSPs listed above, no ground or air unit may be allocated maneuver supply unless a general supply path can be traced to it as detailed in Rule 8, General Supply.
Units in general supply through airdrops may not receive MSPs.
8. GENERAL SUPPLY
To operate at full effectiveness, ground combat units must be in general supply. Air units are not affected directly by a lack of general supply (although air units to which a general supply path cannot be traced may not receive MSPs).
8.1 When to Determine General Supply
General supply is determined for both sides at the beginning of each impulse during the supply determination phase. Units in general supply at that time are considered to be in supply for the entire impulse. Units out of general supply at that time suffer the effects of non-supply throughout the entire impulse. Units out of supply at the beginning of the impulse are designated so by placing an Out of General Supply marker on them.
Out of General Supply markers


8.2 How Units Trace General Supply
8.2.1 How to Determine General Supply A unit is in general supply if a line can be traced from a map edge, following a road to a point that is eight full or partial land hexes from the unit to be supplied.
8.2.1.1 Switzerland The eight hexes from the road to the unit may be through any full or partial land hex other than through Switzerland.
8.2.1.2 Full Sea and Unbridged Major River hexsides
The line may cross full sea hexsides and unbridged major river hexsides but may not extend farther than four hexes past the first unbridged major river hexside crossed or the last full sea hexside crossed.
8.2.1.3 Enemy Units and Primary ZOC No part of either the road segment of the line or the final eight hexes of the line may pass through a hex containing an enemy unit or the primary ZOC of an enemy unit. A friendly unit present in a hex negates the effect of an enemy primary ZOC on the final eight hexes (only) of the supply line.
Note With the number of roads on the map, it is unlikely for a unit to be more than eight hexes from a road. The key to tracing general supply is to be sure the line following the road to the friendly map edge and from the road to the unit is free of enemy units and/or enemy unit primary ZOCs.
8.2.2 Friendly Map Edges
The presence of a road to a friendly map edge is not necessary if the unit is within eight hexes of the map edge.
8.2.2.1 Allied Friendly map edges for the Allies are the west edge of both maps and the south edge of the southern map west of Switzerland.
8.2.2.2 German Friendly map edges for the Germans are the north edge of the northern map, the east edge of both maps, and the south edge of the southern map east of Switzerland.
8.3 Effects of Non-Supply
8.3.1 Effects on Movement and Combat Units out of general supply have their movement allowances and combat values halved, retaining fractions.
8.3.2 Strength Reduction If a unit is out of supply for the owning player’s entire player turn (that is, out of supply during the supply determination phase of each impulse) the unit is reduced one strength level during the terminal segment of the player turn.
• Full-strength units with a back printed reduced strength are flipped over.
• Units without a back printed strength and units already at their reduced strength are removed from the map and placed in the owning player’s Units Destroyed box.
8.3.3
Combat Losses
Any division which would normally be placed in the Cadre box due to combat losses (see Rule 13, Ground Combat) and which is out of general supply at the time is instead placed in the Units Destroyed box.
8.4 Allied Airlifts
Allied transports not engaged in any other mission during an impulse and not committed to airlifting MSPs may instead be used to place units in general supply. Each transport unit may place one ground combat unit in general supply.
Supply airdrops are flown during the supply determination phase, and the ability of transports to fly the mission is based on the air visibility condition (see Rule 19, Weather) of the previous impulse.
Example If the second impulse of a player turn was cloudy. no units could be placed in general supply by airdrops on the third impulse.
8.5 Cumulative Supply Effects
Units with a movement allowance greater than 10 that are out of both general and maneuver supply suffer the effects of both.
That is, such units would have their movement allowances quartered, their attack values quartered, and their defense values halved. They would be unable to enter an enemy primary ZOC unless that was their only move and would be unable to attack an enemy unit if they moved at all.
9. GROUND MOVEMENT
Ground movement takes place during the movement phase of each impulse. Only the player with the initiative may move ground units during the movement phase.
Each ground combat unit moves by expending movement points (MPs) for each hex it enters, paying additional MPs for crossing certain hexsides. The printed movement allowance of a unit is the number of MPs it may expend in a movement phase.
Units are moved individually during a movement phase, each unit tracing its path through hexes entered and expending MPs as it does so. Once a unit has completed its movement, a Finished Movement marker is placed on the unit to indicate that it may not move in later impulses of the player turn.
Finished Movement markers


No ground unit may ever move out of general supply during the movement phase. That is, no unit that begins the impulse in general supply may end its movement phase in a hex to which a general supply path cannot be traced. A unit that begins the impulse out of general supply is not obligated to attempt to move back into general supply.
10. TERRAIN AND MOVEMENT
Units pay a cost in MPs to enter each type of hex on the map and pay an additional cost to cross certain types of hexsides. These costs are listed on the Terrain Effect Chart (TEC) and are generally self-explanatory. A few special types of terrain require a more detailed explanation.
10.1 Unbridged Major River Hexsides
A unit may not cross an unbridged major river hexside unless the unit began the impulse adjacent to the hexside. A unit expends half of its printed movement allowance to cross an unbridged major river hexside, retain all fractions.
10.2 Full Sea Hexsides
Allied units treat full sea hexsides as unbridged major river hexsides for movement purposes. German units may not cross full sea hexsides except per the procedures outlined in Rule 28, German Naval Movement.
10.3 Western Holland
The light blue shaded hexes in Western Holland do not affect the movement of ground units. All such hexes are treated as clear or road hexes. (There are consequences of Allied units being in these hexes, see Rule 31, Western Holland.)
10.4 Road Hexes
Units that move along roads pay the movement cost of a road hex instead of that for the terrain of the hex the road passes through, not in addition to the terrain in the
hex. Units moving on roads also ignore any additional costs for crossing hexsides crossed by the road.
To use the road movement rate, a unit must move along the road, moving from hex to hex connected by the road. A unit is not required to spend its entire movement phase on a road to receive the benefits of the road but uses the road movement rate only for those hexes moved through while on the road.
11. RESERVE CREATION
At the conclusion of each movement phase, the player with the initiative may create reserve units.
11.1 Which Units May Be Reserves
Any ground unit which has completed its ground movement may become a reserve provided:
• it was not in an enemy primary ZOC at any time during the movement phase,
• it was in supply during the impulse, and
• it did not expend more than half of its MPs in the movement phase.
• Units with a movement allowance greater than 10 must also have been in maneuver supply to become reserves.
11.2 Functions of Reserves
Units that become reserves are designated so by placing a Reserve marker on top of them instead of a Finished Movement marker. Reserves may not attack in the combat phase but may move and attack in the enemy player turn, as explained in Rule 15, Reserve Movement and Rule 17, Reserve Combat.
Reserve markers


11.3 Losing Reserve Status
The following actions cause a unit to lose its reserve status:
• The reserve unit is attacked.
• The reserve unit is placed in an enemy primary ZOC due to enemy movement, retreats, or advances after combat.
• The reserve unit is out of supply during the supply determination phase of an impulse.
• The reserve unit moves and/or attacks during the enemy player turn.
12. AIRCRAFT
12.1 Combat Aircraft
Air combat units can be differentiated from air transports by the fact that air combat units have an air combat value and range while transports have only a transport type code (see sample units in Rule 2). There are two types of air combat units: bombers and fighterbombers. Bombers are represented by multi-engine silhouettes, and all have ranges over 30.
Air combat units are made operational by the expenditure of MSPs (as explained in Rule 7, Maneuver Supply). Operational aircraft may fly one of four missions: offensive support, defensive support, interception, and transfers. Since air combat units may have additional MSPs allocated to them each impulse. it is possible for an air unit to fly one mission each impulse, provided the owning player has a sufficient supply of MSPs.
12.1.1 Air Combat Missions
12.1.1.1 Offensive Support Bombers and fighterbombers may both fly offensive support. Only one aircraft flying within its normal range or two aircraft flying at extended range (see below) may fly offensive support over any one hex. Offensive support air units are placed on a hex containing enemy units that will be attacked by friendly ground units that impulse. The ground attack is increased a number of odds columns on the Combat Results Table equal to the air combat value of the air unit flying offensive support.
12.1.1.2 Defensive Support Defensive support is flown in the same manner and with the same restrictions as offensive support with two exceptions: Defensive support may not be flown to a hex that already has an enemy air unit flying offensive support in it, and defensive support lowers the odds column used instead of raising it.
12.1.1.3 Interception Only fighter-bombers may fly interception. Only enemy air units flying offensive or defensive support may be intercepted. Only one fighter bomber unit may fly interception against a hex.
An air unit flying interception may attempt to shoot down or abort an enemy air unit or units in the hex it occupies. The player who owns the interceptor rolls the die once per combat value point of the interceptor. If the intercepting player is entitled to roll the die more than once, they must indicate whether they are dividing the rolls between the two enemy aircraft or concentrating on one of them. If there are two enemy aircraft in the
hex, the intercepting player must decide which aircraft is being attacked before the die is rolled. On a roll of:
• 5, the enemy aircraft is aborted.
• 6, the enemy aircraft is destroyed.
After the interceptor has fired, the defending aircraft may return fire. All defending aircraft in the hex that were fired at may return fire, regardless of whether they were shot down, aborted, or unaffected by the fire of the interceptor. The owning player rolls one die per air combat value point, as did the intercepting player. On a roll of:
• 6, the enemy aircraft is destroyed.
Aborted air units are returned to their associated ground element, placed under it, do not complete their mission, and may not be refueled (allocated additional MSPs) for the remainder of that player turn. Air units that are shot down are removed from play, along with their associated ground element, and may not be returned to play except through the provisions of Rule 20, Replacements.
12.1.1.4 Transfer Any air combat unit may fly a transfer mission. The air unit and its associated ground element are moved to any other city or town on the map not already containing an air unit or its ground element. There is no limit to the range of a transfer mission, After the mission. the air unit is placed under its associated ground element to indicate that it has used its maneuver supply and is no longer operational.
12.1.2 Movement of Air Combat Units Air combat units move during the air support phase in the following sequence:
1. The player with the initiative flies offensive support and transfer missions.
2. The opposing player flies defensive support, interception, and transfer missions.
3. The player with the initiative flies interception missions.
4. Both sides resolve air combat.
5. Both sides note surviving offensive and defensive support missions and return all air units to their associated ground elements.
When flying extended range, two air units may fly to the same hex. The air values of all air units are halved, with each air unit retaining fractions but the total of air value points in the hex being rounded down.
12.1.4 Overrunning Air units and their associated ground elements have no ZOC or combat value against ground units. If a ground unit moves into a hex containing an enemy air unit and its ground element, the air unit and its ground element are destroyed.
12.2 Transports
Only the Allied player has transports. Transports are always considered to be based in England, do not require maneuver supply to fly, have unlimited range, and may not be intercepted. Each transport aircraft may fly one of three types of missions: MSP airlifts, general supply airdrops, or airborne troop airdrops.
12.2.1 MSP Airlift Transports are allocated to MSP airlifts during the initial segment of the Allied player turn and may not be used for any other mission in either that player turn or the immediately following German player turn, as explained in Rule 7, Maneuver Supply.
12.2.2 General Supply Airlift Transports not allocated to MSP airlifts may be used to put ground units in supply as detailed in Rule 8, General Supply. Each air transport unit may put one friendly unit in general supply each impulse of each player turn.
12.2.3 Airborne Troop Airdrop Each transport unit not allocated to MSP airlifts or general supply airdrops may airdrop one airborne unit each impulse of the Allied player turn, as explained in Rule 23, Airborne Assaults. Transports may alternate dropping general supplies and airborne units in the Allied player turn, provided each transport flies only one mission per impulse. That is, a transport could fly an airborne troop drop in the first impulse and then a general supply airdrop in a subsequent impulse.
13. GROUND COMBAT
12.1.3 Extended Range Missions Only air combat units flying offensive or defensive support missions may fly at extended range. Extended range enables an air unit to fly to a target within twice its printed range.
During the combat phase, the player with the initiative may attack enemy units with adjacent ground combat units. Attacks are not required, and it is not necessary that any specific number of units participate in any attack. All units in a defending stack, however, must be attacked together. As long as all attacking units are adjacent to the defending unit or stack, any number of attacking units may combine their combat values to attack.
It is not required that all units in a stack participate in an attack; if an adverse result affecting the attacker occurs, those units not participating are not affected. In a combat phase, no one unit may attack or be attacked more than once. (Due to the nature of the impulse system, it is possible for one unit to be attacked more than once in a player turn. but never more than once per impulse.) Attacks are resolved one at a time in any order desired by the attacking player.
All attacks for the combat phase must be declared as the last step of the movement phase. Place an Attack Declared marker on all units being attacked.
13.1 Ground Combat Procedure
13.1.1 Which Units May Attack Any unit which has not yet moved, or which moved in the movement phase of an impulse, may attack in the combat phase of that impulse. Units that moved and/or attacked in prior impulses that game turn may not attack. A unit that has not moved, but which attacks, may not move or attack in subsequent impulses that game turn, and should be marked with a Finished Movement marker.
13.1.2 Attack Procedure Once an attack has been designated:
1. Total the combat strengths of all attacking units and of all defending units.
2. Apply any modifications to either the attacker’s or the defender’s values due to supply status or terrain.
3. Using these values, create a combat odds ratio expressing the attacker’s strength first. Reduce the ratio to one of the odds ratios given on the Combat Results Table (CRT), always rounding fractions in favor of the defender.
4. Once the basic odds ratio has been arrived at, modify the odds column for any odds shift for terrain effects or for the presence of offensive or defensive support air missions.
5. Note the correct column on the CRT and roll one die. The intersection of the odds column and the die roll row indicates the results of the attack.
13.2 Combat Results
There are eight separate combat results possible on the CRT:
NE No Effect. Neither side is required to retreat or take losses.
AL Attacker Loss. The attacker must reduce one unit which participated in the attack by one
strength level.
ARL Attacker Retreat with Loss. The attacker must reduce one unit which participated in the attack by one strength level and must retreat all units which participated in the attack two hexes.
DX Defender Exchange The defending player decides how many strength levels they wish to lose. The attacker must lose one more strength level than the defender. The defender may choose to lose no strength levels, in which case the attacker loses one. Following losses, the defender retreats two hexes, and the attacker may advance.
EX Escalating Exchange. Both the attacker and the defender lose a strength level. The defender must retreat two hexes and the attacker may advance unless the defender chooses to escalate the exchange. If so, the defender loses an additional strength level (for a total of two), the attacker still loses just one, and there are no retreats or advances. The attacker may then in turn escalate their loss to two strength levels as well, thus reinstituting the retreat and advance. This continues until one side declines to escalate further.
If the defender escalates to the point that, after taking losses, there are no defending units remaining in the hex, the attacker may still not advance after combat without escalating their losses to the level of the defender’s.
Note The way Escalating Exchanges work is that essentially if the defender takes one more strength level loss than the attacker, then the requirement for the defender to retreat and the ability for the attacker to advance is eliminated. The attacker can then choose to lose another strength level to reinstate the retreat requirement for the defender and the advance ability for the attacker. This can be repeated until one side declines to escalate further or one side runs out of strength levels to lose.
DR Defender Retreat. The defender retreats their units two hexes. The attacker may advance.
DRL Defender Retreat with Loss. Retreat as with DR, but the defender must also reduce one of the defending units by one strength level.
DM Defender Mauled. The defender must retreat
all defending units two hexes and must reduce each defending unit one strength level. The attacker may advance.
13.2.1 Losses All losses in the game are taken in terms of strength levels. A unit has one or two strength levels.
One strength level
• Any unit without a reduced strengtth on the reverse side of the counter.
Two strength levels
• Any unit with a reduced strength on the reverse side of the counter. (These units have a dot in the upperleft corner of the counter front, indicating that they have a second step.)
In addition, all divisions, and only divisions, have a cadre strength level.
When a non-division unit loses its last strength level printed on the counter – for one-sided counters this would be the full-strength level, for two-sided counters, this would be the reduced strength level – it is placed in the Units Destroyed box.
13.2.2 Cadre strength level When a division loses its last strength level printed on the counter, it is reduced to cadre strength level.
13.2.2.1 A division reduced to cadre strength level is removed from the map and placed in the Cadre box.
13.2.2.2 A division may not voluntarily lose its cadre strength level by bidding it away in an escalating exchange or a defender exchange.
13.2.2.3 A division may not lose its cadre strength level as the result of any normal combat result (except when out of general supply as in Rule 13.2.2.4).
13.2.2.4 The cadre strength level is only lost when:
• a division that would normally be placed in the Cadre box due to combat losses and which is out of general supply at the time is instead placed in the Units Destroyed box (see Rule 8.3.3), or
• a division is forced to retreat into an enemy primary ZOC, across a full sea hexside, or off the map (see Rule 13.2.3).
In the above instances, the division is moved directly to the Units Destroyed box, skipping the Cadre box.
13.2.3 Retreats
13.2.3.1 Whenever a unit is called on to retreat, it retreats two hexes.
• The owning player chooses the first hex of the retreat.
• The enemy player chooses the second hex of the retreat.
The second hex must be two hexes from the hex originally occupied by the retreating units. A stack of units is not required to remain stacked together during the retreat.
13.2.3.2 Units may not retreat:
• into an enemy primary ZOC hex, off the map, or across a full sea hexside, or
• in violation of stacking unless no other retreat path is available.
13.2.3.3 Units forced to retreat off the board, into an enemy primary ZOC, or across a full sea hexside are instead eliminated (placed in the Units Destroyed box).
13.2.3.4 Units forced to retreat in violation of stacking must be retreated additional hexes until in a hex no longer in violation of stacking.
13.2.4 Advances After Combat The defender may never advance as a result of combat, The attacker may advance as a result of combat if the attack vacates the defending hex of enemy units, either through retreats or loss (exception: see Escalating Exchange above). The attacker may advance up to two hexes, but the first hex entered must be the hex vacated of defending units by the attack. The second hex of the advance may be in any direction.
• Units advancing after combat must stop immediately upon entering an enemy primary ZOC.
• Units may not advance across an unbridged major river hexside or a full sea hexside except to occupy the hex vacated by combat and may not advance any farther than that hex.
• Units advancing after combat may, by placing an enemy reserve unit in their own primary ZOCs, remove the reserve status of such enemy unit.
14. TERRAIN AND COMBAT
Different types of terrain affect combat, either by affecting the combat value of the attacker or the defender or by modifying the odds column used. The effects of terrain on combat are summarized on the Terrain Effects Chart (TEC) but are explained in detail below.
14.1 Hexes
Clear terrain hexes, and the presence of roads or the blue shading indicating Western Holland (Rule 31, Western Holland), do not affect combat.
14.1.1 Town If the defending units are in a town hex. the odds column of the attack is lowered by one. Thus, a 3:l attack would become a 2:1, a 2:1 attack would become a 1.5:1, etc.
14.1.2 City The combat value of all units defending in a city is doubled.
14.1.3 Fortified Hex The combat value of all defending German units in a fortification hex is doubled. Ignore any other terrain effects in a fortified hex. German units ignore any retreat results called for by all combat results. All defending Allied units treat fortification hexes as rough terrain.
14.1.4 Rough If the defending units are in a rough terrain hex (or, if Allied, in a fortified hex or rough terrain hex), the attack is conducted at one odds column lower. The defender may ignore any retreat called for by reducing one unit one strength level (in addition to normal losses).
14.1.5 Mountain Mountain hexes are treated as rough terrain for combat. In addition, armor, armored cavalry, assault gun, and specialized armor units may not attack into mountain hexes. All other units, except for mountain units, have their combat value halved when attacking into mountain hexes.
14.2 Hexsides
International borders and army boundary hexsides do not affect combat.
14.2.1 Canal Hexside If all attacking units in an attack are attacking across canal hexsides, the odds are lowered by two odds columns.
14.2.2 Minor River Hexside All units attacking across minor river hexsides have their combat values halved.
14.2.3 Unbridged Major River Hexside No unit may attack across an unbridged major river hexside unless it began the impulse adjacent to the hexside. (Exception: see Rule 24, Special Units.) All armor, assault gun, and armored cavalry unit combat values are quartered when attacking across unbridged major river hexsides. All other unit combat values are halved.
14.2.4 Bridged Major River Hexside No unit may attack across a bridged major river hexside unless it began the impulse adjacent to the hexside or it is attacking from a town or city hex. All units attacking across a bridged major river hexside have their combat value halved.
14.2.5 Causeway Hexside Armor, armored cavalry, assault gun, and specialized armor units may not attack across a causeway hexside. All other units have their combat value halved attacking across causeways.
14.2.6 Dam Hexside No unit may attack across a dam hexside until the dam has been blown (see Rule 26, The Roer Dams).
15. RESERVE MOVEMENT PHASE
After the player with the initiative conducts all attacks and advances after combat, the opposing player may move reserves. Reserves move in the reserve movement phase of an impulse, following the same rules as for movement in a movement phase.
15.1 Moving Reserve Units
Only units designated as reserves and belonging to the opposing player may move during the reserve movement phase. As many or as few reserves may be moved in any one reserve movement phase as desired, but each reserve unit may move only once per player turn. Thus, once a reserve unit moves, the reserve marker is removed from it, and it loses its reserve status.
15.2 Non-Moving Reserve Units
Any unit with a movement allowance greater than 10 must have been allocated maneuver supply to be in reserve, as explained in Rule 11, Reserve Creation. If such a reserve unit does not move or attack and does not lose its reserve status on account of a lack of general supply or enemy units moving adjacent, then the unit does not consume its maneuver supply and is automatically in maneuver supply for the next player turn of the owning player.
16. RESERVE AIR SUPPORT PHASE
Both sides may fly operational aircraft during the reserve air support phase. Any mission may be flown, exactly as in the air support phase, except that the sequence in which missions are flown is altered to reflect the fact that the opposing player, rather than the player with the initiative. is about to conduct ground
attacks. The specific sequence followed is:
1. The opposing player flies offensive fire support and transfer missions.
2. The player with initiative flies defensive support, interception, and transfer missions.
3. The opposing player flies interception missions.
4. Both sides resolve air combat.
5. Both sides note surviving offensive and defensive support missions and return all air units to their associated ground elements.
17. RESERVE COMBAT PHASE
The purpose of reserve movement and combat is to counter the offensive thrusts of the player with the initiative; it is not to enable the opposing player to launch simultaneous offensives elsewhere.
All attacks for the reserve combat phase must be declared as the last step of the reserve movement phase. Place an Attack Declared marker on all units being attacked.
17.1 Limitations
Reserve units may only attack units of the player with the initiative which have already moved and/or attacked (and thus have a Finished Movement marker on them) that player turn.
17.2 Attacking
During the reserve combat phase, all reserve units of the opposing player may attack if they have moved that impulse or if an enemy unit has moved adjacent to them that impulse. Thus. if a unit of the player with the initiative advanced adjacent to a reserve unit after combat, that unit would lose its reserve status and be unable to move but could attack in the reserve combat phase of that impulse (only).
18. FINAL IMPULSE
At the end of the combat phase of any impulse, the player with the initiative may declare that impulse to have been their final impulse.
Exception A player may not declare an impulse to be their final impulse if they have conducted an airborne assault during the impulse.
The three reserve phases which normally follow the combat phase are omitted from that impulse and the
terminal segment of the player turn is conducted, thus completing the player turn.
19. WEATHER
Weather is determined for the complete game turn during the weather determination segment. A die is rolled (by either player) and the resulting die roll is referenced to the appropriate column of the weather table. A separate column is provided for each month of the game.
19.1 Types of Weather
There are six types of weather listed below with an explanation of their effects.
Clear [C]
• Clear weather does not affect movement, combat, or supply.
Rain [R]
• All movement allowances of ground units are reduced by 2.
• Aircraft are subject to the air visibility table (see Rule 19.2.2 below).
Storm [S]
• All movement allowances of ground units are halved, retaining fractions.
• All minor rivers are in flood (see Rule 19.2.1 below).
• All attacks into mountain hexes are reduced by one additional odds column.
• Aircraft are subject to the air visibility table (see Rule 19.2.2 below).
• Each impulse after the first impulse of a player turn requires the expenditure of two MSPs instead of one.
• No amphibious attacks may be made.
Frost [F]
• All movement allowances of ground units are reduced by one.
• All attacks into mountain hexes are reduced by one additional odds column.
• No attacks are allowed across unbridged major river hexsides, except during the month of November.
• Aircraft are subject to the air visibility table (see Rule 19.2.2 below).
Winter Storm [WS]
• All movement allowances of Allied units are reduced by two.
• All movement allowances of German units are reduced by one.
• No air units may conduct any air missions.
• All attacks into mountain hexes are reduced by two additional odds columns.
• No attacks across unbridged major river hexsides are allowed, except during the month of November.
• Each impulse after the first impulse of the player turn requires the expenditure of two MSPs instead of one.
• No amphibious attacks may be made.
Thaw [T]
• All movement allowances of ground units are halved.
• Aircraft are subject to the air visibility table (see Rule 19.2.2 below).
• All attacks into mountain hexes are reduced by two additional odds columns.
• No attacks are allowed across unbridged major river hexsides.
• All minor rivers are in flood.
• Each impulse after the first impulse in the player turn requires the expenditure of two MSPs instead of one.
19.2 Special Weather Conditions
19.2.1 Minor Rivers in Flood Whenever the weather result calls for minor rivers in flood, all minor river hexsides are treated as unbridged major river hexsides for all purposes except tracing general supply. During thaw turns, minor river hexsides are not subject to the prohibition against attacks across unbridged major river hexsides.
19.2.2 Air Visibility Table During certain weather conditions (rain, storm, frost, and thaw) the weather for air purposes is variable throughout the turn. To simulate this and provide a measure of operational uncertainty, the air visibility table is used.
At the beginning of the air support phase of each impulse, the player with the initiative rolls the die and consults the proper column of the table. Two results are possible: clear and cloudy.
Clear [–] A clear result indicates that air units may fly missions that impulse normally.
Cloudy [C] A cloudy result indicates that air units may not fly at all that impulse.
This die roll determines the ability of air units to fly throughout that impulse, including in the reserve air
support phase. Allied transport aircraft which conduct missions prior to the air support phase use the weather of the immediately preceding impulse to determine their ability to fly. In the first impulse of a player turn, this would be the final impulse of the previous player turn. Transports flying MSP airlifts are never affected by air visibility (but are prohibited from flying during winter storm turns).
20. REPLACEMENTS
Units will become reduced in strength as a result of combat and supply attrition. Replacements may be used to build units back up to strength.
20.1 Types of Replacements
There are four types of replacements: infantry, armor, parachute, and panzergrenadier. The German player receives all four types; the Allied player receives only the first three types. Units may only be rebuilt using replacements of the corresponding type, with exceptions as noted below.
20.1.1 Infantry replacements may be used to rebuild infantry, mountain, air landing, static infantry, police, security, training, and commando units.
20.1.2 Armor replacements may be used to rebuild armor, assault gun, armored cavalry, and specialized armor units.
20.1.3 Parachute replacements may be used to rebuild parachute units.
20.1.4 Panzergrenadier replacements may be used to rebuild panzergrenadier and motorized infantry units and, under the special circumstances noted below, may rebuild panzer units.
20.2 Using Replacements
The player with the initiative receives replacements each turn during the initial segment of their player turn. The numbers and types of replacements received are noted on the Allied and German Supply and Replacement tracks.
Example Referring to Allied Supply and Replacement track, during the second week of each month in 1944 the Allied player would receive one U.S. infantry replacement, one U.S. armor replacement, one British armor replacement, and one Canadian infantry or armor replacement.
20.2.1 On-Map Units Any units on the map must
be in general supply to receive replacements. Allied units in general supply by airdrop may not receive replacements.
20.2.2 Units in the Units Destroyed or Cadre Box Any units in the Units Destroyed box or Cadre box may receive replacements.
20.2.3 Tracking Replacements Replacements can be used immediately or accumulated for later use. Markers are provided to record the total number of replacements of each type and nationality accumulated. Place the markers on the correct boxes on the on-map track.
20.2.4 When to Use Replacements A player may only use replacements in the initial segment and the terminal segment of their player turn. Replacements may not be used during an opponent’s player turn.
20.2.5 Limits on Replacements The Allied player may use only replacements of the correct nationality to rebuild units, except as noted below under special cases. No unit may receive more than one replacement per player turn.
20.3 Effects of Replacements
20.3.1 Divisions Each replacement raises a division one strength level:
• Divisions in the Units Destroyed box are moved to the Cadre box.
• Back-printed divisions in the Cadre box are placed on the map at reduced strength.
• Non-back printed divisions in the Cadre box are placed on the map at full strength.
• Divisions at reduced strength on the map are flipped to full strength.
Divisions moved from the Cadre box to the map appear in the same manner as new units (see Rule 24, New Units).
20.3.2 Non-Divisional Units Each replacement raises:
• One non-divisional unit (brigade, regiment, battalion, or kampfgruppe) from the Units Destroyed box to full strength on the map (regardless of whether or not the unit is back printed). Non-divisional units moved from the Units Destroyed box to the map appear as do new units (see Rule 24, New Units).
• Two non-divisional units on the map at reduced strength to full strength.
20.4 Special Cases
20.4.1 Canadians All Canadian replacements may be taken as armor or infantry. If accumulated, they are accumulated as raw replacements. The decision as to whether they are armor or infantry is not made until they are used.
20.4.2 French The French receive only infantry replacements; all French armor units may be rebuilt using the armor replacements of any Allied power. French infantry replacements may only be used to rebuild French non-divisional units and to raise the French mountain division or French infantry divisions from reduced strength to full strength. Infantry replacements from another Allied power (Britain, Canada, or the United States) must be used to raise French infantry divisions and mountain divisions from the Units Destroyed box to the Cadre box, and from the Cadre box to on-map at reduced strength.
20.4.3 Dutch and Belgian The Dutch and Belgian infantry brigades do not require replacements to be rebuilt. Each brigade may be rebuilt once during the game at no cost. If destroyed a second time, the units are permanently lost.
20.4.4 Czechs The Czech armor brigade may be rebuilt using British armor replacements.
20.4.5 Poles The Polish armor division may be rebuilt using British armor replacements. The Polish parachute brigade may be rebuilt once at no cost in the same manner as the Dutch and Belgian brigades. If lost a second time, the brigade is permanently lost.
20.4.6 U.S. Armored Cavalry The United States fielded several more armored cavalry groups (regiments) than are included in the game, but many of them were broken up to create new groups or to replace losses, and thus all were not in action at the same time. To represent this, the U.S. Player may rebuild one armored cavalry regiment per month each month of 1945. This may be done at any time during the month and does not require the expenditure of any replacements. This is also in addition to any armored cavalry regiments rebuilt using the standard replacement procedure.
20.4.7 German Panzer Divisions The German player may use panzergrenadier replacements to rebuild panzer divisions, but may do so only if raising a panzer division from the Units Eliminated box to the Cadre box, or if raising it from the Cadre box to reduced strength. An armor replacement is always required to
raise a panzer division to full strength.
20.4.8 Aircraft The aircraft of both sides are infinitely replaceable at no cost. However, no more than one air unit (and its associated ground element) may be replaced per turn. An air unit may not be replaced sooner than two complete game turns after its destruction.
Example A German air unit lost during the September II turn could not be replaced before the October I turn.
20.5 Cannibalization
Both sides may create additional replacements by cannibalizing units.
• The German player may cannibalize any nondivisional unit on the board or any division in the Cadre box.
• The Allied player may cannibalize any British or French division on the map or in the Cadre box. Players cannibalize units during their initial segment but may not use the replacements received from the cannibalization during that segment. Only units in general supply may be cannibalized. Allied units in general supply by means of an airlift may not be cannibalized.
A player receives:
• one replacement per full-strength non-divisional unit or divisional cadre cannibalized.
• one replacement for each two reduced strength non-divisional units cannibalized.
• two replacements for each reduced strength division or full strength non-back printed division cannibalized.
• three replacements for each full-strength backprinted division cannibalized.
In other words, as many replacements are received for cannibalizing a unit as it would take to raise that unit to its current strength from the Units Destroyed box.
When a unit is cannibalized, it is removed from play and placed in the Units Cannibalized box. Once a unit has been cannibalized, it may never be returned to play.
21. DUNKIRK
Due to the accumulated stocks of supplies in Dunkirk, German units in Dunkirk are always considered to be in general supply. Unlike other fortification hexes, the Allies may invest Dunkirk.
Note Investment is the military process of surrounding an enemy fort (or town) with armed forces to prevent entry or escape.
21.1 Investment Procedure
Any Allied unit (exception: see Rule 23.4, Dutch and Belgian Units) which moves adjacent to Dunkirk may move one hex farther into the Dunkirk hex, even if the unit has no movement points remaining. Once an Allied unit has moved into the Dunkirk hex, the fortress of Dunkirk is invested.
Allied units investing Dunkirk may switch off investing duties. That is, an Allied unit may move to the Dunkirk hex and allow the Allied unit already there to move away, so long as a unit is in the Dunkirk hex at the end of the impulse.
The presence of enemy units in the Dunkirk hex does not limit the ability of friendly units to stack in the hex.
The Allies may not invest Dunkirk if there is a German unit or its ZOC adjacent to the Dunkirk hex.
21.2 Investment Effects
Any German units in the fortification (stacked under the Allied unit) lose their ZOC and may not attack so long as they are invested. Such units do not lose their ZOC until the end of the impulse in which Dunkirk is invested.
22. AIRBORNE ASSAULTS
Both sides may conduct airborne assaults during the game. Different rules are used by the Allied player and the German player. Certain general rules apply to both, however.
22.1 General Rules
22.1.1 The Drop Impulse Airborne units may be dropped during any impulse of the owning player’s player turn. On the impulse of the drop, airborne units may not move or attack (exception noted below) and have no ZOC. To designate airborne units during their impulse of drop, place an Airdrop marker on top of them. The drop impulse does not count as the impulse of movement. Thus, airborne units may move and/or attack in any impulse after the impulse of drop.
22.1.2 Immediate Assault An airborne unit that drops directly on top of an enemy unit must immediately attack it. This attack is conducted during the combat phase but must be the first attack conducted. Normal
combat rules apply. However, if the hex attacked is not vacated of enemy units, each airborne unit in the hex must be reduced one strength level and retreated one hex by the owning player. The primary ZOCs of enemy units in the hex under attack do not interfere with the ability of the airborne unit to retreat, but the primary ZOC of any other enemy unit does. Airborne units forced to conduct immediate assaults are considered to have completed their movement and combat for the player turn.
22.1.3 Supply Airborne units are in general supply the impulse they are dropped; in subsequent impulses, they are treated as normal units.
22.1.4 Terrain Airborne units may not be dropped into major city hexes or into fortification hexes. During the September I game turn Allied airborne units may not be dropped in Holland or Germany.
22.1.5 Planning Airborne operations require advanced planning. Both players plot their airborne assaults during the weather determination segment of the game turn, immediately after the weather has been determined. Plotting consists of noting on a separate piece of paper the identification of each unit the player intends to airdrop and the hex number the unit will be dropped in.
• Allied player: It is not necessary to plot which impulse the unit will be dropped.
• German player: The German player must plot both the hex and the impulse in which the unit will be dropped.
A unit need not be dropped even if a plot is made for it, but no unit may be dropped in any hex except the one plotted.
Optional
Airborne Assault for Solo Play In order to add some uncertainty as to the location for airborne assaults during solo play, do not plot airborne assaults ahead of time. When a player wishes to make an airborne assault in the movement phase, choose a target hex, then roll one die. On a result of 1 or 2, the assault lands in the chosen hex; on a result of 3 or 4, the assault lands one hex away from the plotted hex; on a result of 5 or 6, the assault lands two hexes away from the plotted hex. After determining the distance, roll one die again to determine the direction of deviation. A roll of 1 moves the unit the determined number of hexes to the north, then proceeding clockwise around
the hexgrid from 2 to 6. If the hex determined not allowed for airborne assault, then the assault does not take place.
22.1.6 Movement Airborne units have their movement allowances halved (retaining fractions) the player turn they are dropped.
22.2 Allied Airborne Assaults
22.2.1 Airlift Each airborne unit must be airlifted to the target hex. There is no limit to the number of hexes moved through, but there is a limit to how many units may be airlifted in any one impulse. Each Allied transport may airlift one airborne unit per impulse. Allied transports airlifting airborne units may not fly any other mission that impulse.
22.2.2 Airborne Units All Allied parachute units are airborne, as is the British 52nd Air Landing Division. Allied parachute divisions are used normally and follow all rules listed above. The 52nd Air Landing division is treated as a normal airborne division except that it may only be dropped into a hex containing an Allied parachute unit dropped into that hex during a previous impulse. The 52nd Air Landing division does not require maneuver supply the turn it is used in an airborne role.
22.2.3 Regrouping Once an Allied airborne unit has been dropped, it may not be airdropped again until it has been regrouped. An airborne unit has been regrouped once it has spent a total of six consecutive turns not in an enemy primary ZOC. Airborne units may be placed in reserve while regrouping. but moving them into an enemy primary ZOC would interrupt the regrouping process.
22.2.4 Basing Allied airborne units are normally based in England and placed in the Units in England box to so designate. Units on the map may be transferred to England by exiting them from the west map edge. They appear in England one turn later.
Airborne units in a major city on the map may also conduct airborne assaults, but only one such unit per turn may do so. Airborne assaults may consist of a combination of the unit based on the map and one or more units based in England.
22.3 German Airborne Assaults
The German player has only one unit capable of conducting airborne assaults: the 1-8 parachute regiment v.d.H. (von der Heydte). This unit may only
be dropped once per game. The unit must begin the impulse of drop stacked with a German air unit. No air unit actually flies to the drop hex, but the unit may only be dropped up to ten hexes away from the friendly air unit. Unlike Allied airdrops, the German airdrop may only take place in an impulse with weather normally prohibiting air missions (either cloudy or winter storm). If the impulse plotted is a clear weather impulse, the drop is aborted. Another drop may be plotted for a subsequent player turn.
23. SPECIAL UNITS
Certain units in the game have special abilities or limitations over and above those applying to normal units.
23.1 Breakdown Units
The counters provided which bear the identification BD to the left of the unit box are breakdown counters. These counters may be used to break down full-strength divisions to cover a broader front. Sufficient breakdown counters are provided to break down one U.S. infantry division, one U.S. armor division, one British infantry division, one British armor division, and one German panzergrenadier division.
British armor divisions and German panzergrenadier divisions break down into two counters each. All other divisions break down into three counters each.
23.1.1 When Units Break Down A unit can break down into its components at any time while it is moving. That is, it can break down during the movement phase, the reserve movement phase, while advancing after combat, and while retreating. It may not break down while stationary (to facilitate taking losses, for example).
23.1.2 When Units Can Recombine A unit broken down can recombine at any time during movement, reserve movement, advance after combat, or retreat, when all surviving breakdown counters of the unit are in the same hex.
23.1.3 Lost Breakdown Counters Breakdown counters are non-divisional units and are not back printed. Thus, any breakdown counter which suffers a loss is placed in the Units Destroyed box. Such a counter may be rebuilt at the normal replacement cost. If a broken-down division is recombined while one or more of the component breakdown counters is in the Units Destroyed box, all such breakdown counters are
removed from the box and are available to breakdown a different division. The recombined division is placed on the map reduced in strength a number of levels equal to the number of breakdown counters destroyed.
Example 1 A US infantry division with one breakdown counter destroyed would be recombined at reduced strength.
Example 2 The same division with two breakdown counters destroyed would be recombined in the Cadre box. (Such a recombination would be accomplished merely by removing the one remaining breakdown counter from play and placing the division in the Cadre box.)
If all of the breakdown counters of a division are destroyed. the division is automatically recombined in the appropriate box on the map and the destroyed breakdown counters are immediately available to break down a different unit. Divisions with two breakdown counters would be recombined in the Cadre box in this event; divisions with three breakdown counters would be recombined in the Units Destroyed box.
23.1.4 Changes in Strength In some cases, breaking a division down into its components may cause it to increase or decrease its strength. This does not affect the ability of the unit to break down, nor does it alter the strength of the breakdown counters. Any full-strength division of the correct nationality and type may break down using the provided counters.
23.1.5 Stacking and Supply Breakdown counters are treated as non-divisional units for all purposes. They may not be considered to count as one division when stacked together, nor may all three breakdowns of a single division be placed in maneuver supply by the expenditure of a single maneuver supply point.
23.2 Allied Commandos
The Allied player receives four commando units during the game. Commandos have two special abilities as detailed below.
23.2.1 Crossing Water Barriers While commando units pay half of their movement allowance to cross a full sea hexside or unbridged major river hexside, as do other units, they need not begin their impulse adjacent to the hexside to do so.
Example 1 A commando brigade with fifteen movement points could expend up to 6½ MP to move adjacent to an unbridged major river hexside, then expend 7½ MP to cross the river and 1 MP to enter the hex on the opposite side (assuming it is a clear terrain hex).
Example 2 Alternatively, it could spend 2½ MP to move adjacent, 7½ MP to cross, 1 MP to enter the opposite hex, and have 4 MP remaining for further movement.
23.2.2 Amphibious Assaults Commandos may conduct amphibious assaults. Two such types of assaults are possible.
23.2.2.1 Full Sea Hexsides Commandos may attack across full sea hexsides by moving adjacent to them and conducting a normal attack. The presence of the full sea hexside does not affect combat.
23.2.2.2 River Hexsides Commandos need not begin their impulse adjacent to an unbridged major river hexside to attack German units across it. Additionally, commandos are not halved when attacking across major or minor river hexsides and do not suffer the odds column reductions resulting from canal attacks if attacking alone or exclusively in conjunction with other units conducting amphibious assaults.
23.3 Allied Specialized Armor
Four brigades of specialized armor of the British 79th Armor Division are provided in the counter mix. These units have several special functions.
23.3.1 Factors and Coding The four brigades have a letter code instead of a normal combat factor. This code will consist of either the letter S, A, or B.
• S indicates that the brigade has support capabilities,
• A indicates that the brigade has amphibious capabilities, and
• B indicates that the brigade has both amphibious and support capabilities.
In addition to, and regardless of, the special capabilities indicated, each of the four brigades of specialized armor has an understood combat factor of 1.
23.3.2 Stacking Only one brigade of specialized armor may be placed in any hex, but the brigade does not count against stacking in that hex. Thus, it may be added to a normal stack of three ground units. Specialized armor may not stack with U.S. or French units.
23.3.3 Functions
23.3.3.1 Support Brigades capable of support actions shift the odds by two columns in favor of the attacker when attacking major cities, fortifications, and fortified towns and cities. Only one brigade per attack may be used in this function.
23.3.3.2 Amphibious Assaults Each brigade capable of amphibious operations may convert up to two infantry brigades (including breakdown counters) to amphibious troops. These units (the specialized armor brigade and the two associated infantry brigades) must begin the impulse stacked together and must remain stacked together throughout the impulse.
The three brigades assume all of the characteristics of commandos. If the specialized armor brigade begins the impulse stacked with a British infantry division. the division may break down into brigades and any two of the breakdowns may accompany the armor brigade and conduct amphibious assaults and/or water barrier crossings, The specialized armored brigade need not have infantry present to carry out this function and may conduct water barrier crossing or amphibious crossing assaults by itself at any time.
23.3.3.3 Both The brigade capable of both support and amphibious functions may only function in one such role per turn.
23.3.4 Reserves Specialized armor brigades may not use their special functions while serving as reserves. While serving as reserves, they function as ordinary units.
23.4 Dutch and Belgian Brigades
For political reasons associated with the liberation of their home countries, the Dutch and Belgian brigades may not be used to invest Dunkirk.
Additionally, they have their combat factors halved when outside of Holland (Dutch unit) or Belgium (Belgian unit).
Note The Dutch brigade functions at full effectiveness in Belgium, and vice versa.
23.5 30th SS Division
The 30th SS Infantry Division begins the game in Belfort, where it was being reformed after having mutinied, and its reliability was in considerable doubt. The first time that the German player moves the 30th SS Division into an Allied primary ZOC, but after all German movement for the impulse is completed, the German player rolls a die to check for mutiny. On a roll
• 1-3, no effect, and the unit behaves normally for the remainder of the game.
• 4-6, the division mutinies and is immediately reduced one strength level and retreated 2 hexes as if it had suffered a DRL result. From that point on, the division may not enter an enemy primary ZOC.
23.6 150th SS Panzer Brigade
The 150th SS Panzer Brigade was partially equipped with captured US vehicles and was intended to act as an infiltration/surprise spearhead force. The first time that the German player moves the 150th SS Panzer Brigade adjacent to an Allied unit, provided all of the Allied units it is adjacent to are U.S. units, it may be used in one of two ways.
23.6.1 Surprise Attack If the brigade is used in an attack, its factors are included in the total German factors attacking and the odds are increased by one odds column due to the confusion caused by the appearance of the unit.
23.6.2 Subsequent Infiltration If the 150th brigade is stacked with German units that attack, but does not participate in the attack, it may participate in the advance after combat and may ignore all Allied ZOCs while doing so.
23.7 501st SS Tiger Battalion
The German 501st SS Tiger battalion requires maneuver supply, even though it has a movement allowance of only 10.
24. NEW UNITS
New units appear as called for by the Allied and German Setup and New Unit displays. New units are always considered to be in general supply the impulse they enter the map, and units requiring maneuver supply may have maneuver supply allocated to them.
24.1
New German Ground Units
New German units enter the map as specified on the German Setup and New Unit display, paying the cost to enter the first hex on the map edge. German units may not enter a hex occupied by an Allied unit but may enter a hex in an Allied primary ZOC, ending their movement when they do so.
24.1.1 Unspecified Appearance German units without a hex or edge for entrance specified on the
Order of Appearance display appear on the north edge of the north map or the east edge of either map, paying the cost to enter the first hex on the map edge. There is an alternate method of entry for German units with unspecified appearance, as discussed below.
24.1.1.1 If No Allied Units in General Supply in Germany Alternatively, German units with unspecified appearance may appear in any city or town in Germany so long as there are no Allied units in general supply in Germany. (Allied units supplied by airdrops and Allied units that entered Germany during the final impulse of the Allied player turn do not count for this purpose.)
24.1.1.2
If Allied Units in General Supply in Germany
On any turn that there is an Allied unit in general supply in Germany at the beginning of the German player turn (except as noted above), new German units may only appear on the north edge as specified in 24.1.1., or in any German city or town east of the Rhine River to which a general supply path may be traced, and
• is not in the primary ZOC of an Allied unit, or
• occupied by an Allied unit or last passed through by an Allied unit.
24.1.2 West or South Edge Appearance Units
noted as entering on the west (indicated by appearance hex numbers S-01## or N-01##) or south map edges must do so and may not alternatively enter in Germany, the north map edge, or appear in German cities. Units that enter on the south map edge must do so in France (hex numbers S-0128 – S-0628), not Germany or Switzerland.
Units scheduled to enter the map on the west edge, but unable to do so due to the presence of Allied units are instead destroyed.
24.1.3 Maneuver
Supply for New
German Ground Units German units may be allocated maneuver supply on their turn of entry but need not be.
24.2 New Allied Ground Units
24.2.1 Appearance
All units listed as appearing on the south edge enter the map on the south edge in France, paying to enter the first hex on the map edge.
All other U.S. units may enter any hex on the west edge of either map.
All British, Canadian, Belgian, Dutch, Czech, and Polish units enter on the west edge of the northern map.
All French units enter on the west or southwest edge of the south map.
All Allied airborne units may appear in England.
24.2.2 Maneuver Supply for New Allied Ground
Units All Allied ground units which require maneuver supply must be allocated maneuver supply to enter the map. While units need not enter the map the turn indicated on the order of appearance, delaying the entry of a unit until a later turn does not eliminate the requirement that when it does enter, it must be in maneuver supply.
Place new units received, but not allocated maneuver supply to enter the map, in the Allied Units Off Board box.
24.3 New Air Units
Air units enter the map by means of a transfer mission (see Rule 12, Aircraft), consuming one MSP in so doing. No other mission may be flown the impulse of transfer, as the air unit has exhausted its maneuver supply.
German air units enter free of cost, and although they may only fly the transfer mission in the impulse of entry, the MSP used to enter the map is not charged against the total of accumulated German MSPs.
25. UNIT WITHDRAWAL
Some units are listed as being withdrawn at a certain time during some scenarios. These units are indicated by a thick red border on the Setup and New Unit display. The units should be withdrawn from the game during the initial segment of the owning player’s turn on the turn indicated on the Setup and New Unit display.
If the unit has been cannibalized, or if the unit is surrounded by enemy units and/or a combination of full sea hexes and enemy primary ZOCs, a different unit of the same type and size (although not necessarily strength) must be withdrawn.
If the unit is in the Units Destroyed or in the Cadre box, the unit is removed from the box and play and thus is not available for rebuilding.
If a unit is not at full strength when it is withdrawn, sufficient replacements must also be withdrawn to bring it up to strength.
If the player does not have sufficient replacements accumulated to do so, additional needed replacements are subtracted from those received in future turns. If
there are not enough replacements scheduled to arrive for the rest of the game to replace losses among withdrawn units, the player does not suffer any additional penalty beyond losing those replacements.
26. THE ROER DAMS
The two dam hexsides on the map are the Roer dams. At the conclusion of any phase in either player turn in which the German player has a unit in hex N-2522, N-2622, or N-2523, they may destroy the Roer dams. For the rest of that game turn and all of the next game turn, all hexsides of the Roer River, beginning with the hexside between hexes N-2522 and N-2621 and ending where the Roer River empties into the Maas River, are treated as unbridged major river hexsides for all purposes, including supply. Additionally, no unit may retreat across any of these hexsides. If forced to do so, the unit is instead eliminated.
From the time the dams are destroyed until the end of the game the two dam hexsides are treated as minor river hexsides.
27. GERMAN NAVAL MOVEMENT
German units may only cross full sea hexsides by using naval movement. The German player conducts naval movement by using naval movement points.
27.1 Naval Movement Points
The German player receives the following number of naval movement points during each turn:
September 8 naval movement points
October 4 naval movement points
After October no naval movement points
Naval movement points may only be used the turn they are received; they may not be accumulated.
27.2 Use of Naval Movement Points
27.2.1 Cross Full Sea Hexside For the expenditure of one naval movement point, one German unit may cross a full sea hexside, paying the normal terrain costs (the cost to enter the hex plus one-half of the unit’s printed movement allowance) to do so.
27.2.2 Transfer Between Ports For the expenditure of two naval movement points, the German player may transfer one unit from either Flushing or Breskins to either The Hague, Rotterdam, or Dordrecht. This naval transfer costs half of the unit’s printed movement
allowance but does not require the expenditure of movement points to enter the destination hex. Units conducting a transfer from one port to another must be able to trace a path of hexes through partial sea hexes which do not contain enemy units or their primary ZOCs. Naval movement takes place during any movement phase or phases of the German player turn.
28. GERMAN FIRST TURN DISORGANIZATION
During the first week of September, (the first turn of the full campaign game) the German armies in the west, especially in the northwest, were in considerable disorder. Consequently, the German player has several special constraints on the first turn of the game.
28.1 Restrictions
No German unit may:
• enter an Allied primary ZOC during the German player turn,
• end its movement adjacent to the west or south map edge.
• attack during the German player turn. All Allied attacks during the Allied player turn are raised one column on the CRT.
28.2 Reserve Restrictions
During the Allied player turn, the German player is also restricted in their ability to utilize reserves on the north map.
At the beginning of each reserve movement phase, the German player must indicate which reserves they wish to attempt to move on the north map or move from the south map to the north map.
After designating all such units, roll the die once for each unit. On a roll of:
• 1-2, the unit may move and function as a normal reserve.
• 3-6, the unit may not move.
Note Reserves on the south map which will remain on the south map need not be rolled for, and function normally.
28.2.1 Reserve Units Which May Move All units enabled to move by the die roll lose their reserve status at the end of the impulse, regardless of whether the German player actually moves them or not. All units with a movement allowance of 10 or less which fail the required die roll immediately lose their reserve status.
All units with a movement allowance greater than 10 do not lose their reserve status and the German player may again attempt to release them on subsequent impulses.
29. ALLIED NATIONAL FRONTS
For both political and logistical reasons, the Allies tended to form national fronts (although units were occasionally loaned to neighboring armies of different nations). To reflect this, the following rules are in effect.
29.1 National Groups
For the purposes of this rule, there are three national groups
• U.S. units form one national group
• French units form a second national group,
• all other Allied nationalities form a third national group.
29.2 Front Limitations
29.2.1 U.S. troops may be used on either map.
29.2.2 French troops may only be used on the south map, except for the French 2nd Armor Division which may be used on either map.
29.2.3 All Other Allied troops may only be used on the north map.
29.3 Air Support
Air units may only support an attack in which the majority (or exactly half) of the attacking units are of the same national group as the air unit. Air units may only fly defensive support over a hex if it contains at least one unit of the same national group.
30. WESTERN HOLLAND
The part of Holland shaded light blue is Western Holland. Much of Western Holland lies below sea level, protected from inundation by extensive dikes. Had the Allies attempted to seize Western Holland, the Germans planned to open the dikes and conduct extensive flooding. While this would have added to the defensibility of the region, of far more concern to Allied planners were the economic effects of such a move.
Had Western Holland been flooded, Dutch agriculture would have been ravaged for years to come. and a considerable amount of Allied shipping tonnage during the rest of the campaign (and for some time after the war) would by necessity have been devoted to importing food to Holland. Every time that the Allies appeared to
be moving into Western Holland, the Germans began flooding, which invariably caused an Allied withdrawal to their previous positions.
In the game, at the end of every Allied player turn in which there is an Allied unit in Western Holland, and at least one German unit in Amsterdam, The Hague, or Hoek van Holland, the Allied level of incoming MSPs from the invasion ports is permanently reduced by two per turn. Allied units forced to retreat into Western Holland may instead surrender and are eliminated.
31. SCENARIO GENERAL RULES
There are a total of five scenarios in Road to the Rhine: two battle games, two campaign games, and the fulllength campaign game. Each scenario contains the following information.
31.1 Scenario-specific Rules
This section will indicate on which turn the game begins and through which turn the game runs. In the case of the battle games the game length will be only one player turn. The section will also include which map, or maps, to use, as well as any special rules used in the scenario.
31.2 Victory Conditions
This section will explain the levels of victory possible for each side and what actions are necessary to achieve them.
31.3 Setup
All setup information is shown on the German and Allied Setup and New Unit displays. Some units are set up at reduced strength as indicated on the displays.
31.4 Supply
Supply information is shown on the German and Allied Supply and Replacement displays. Additional information on supplies appears for each scenario in this rulebook.
31.5 New Units
All new unit and unit withdrawal information is shown on the German and Allied Setup and New Unit displays. Some units appear at reduced strength as indicated on the displays.
31.6 Replacements
Replacement information is shown on the German and Allied Supply and Replacement displays. Additional information on replacements for some scenarios appears in this rulebook.
32. MARKET-GARDEN: BATTLE GAME
32.1 Scenario-specific Rules
32.1.1 Scenario Length This battle game consists of the Allied player turn of the September III game turn.
32.1.2 Map Only the north map is used.
32.1.3 Weather The weather for the turn is considered to be rain, with the air visibility condition of the impulse immediately before the first Allied impulse considered to have been clear.
32.1.4 Airborne Planning The Allied player sets up first and must plan all airborne assaults before the German player sets up. (The Allied player does not get to plan their assault based on foreknowledge of the German dispositions.)
32.2
Victory Conditions
Allied Strategic Victory
At the end of the scenario, the Allied player has at least one division (in general supply by means other than airdrop) across the Lek-Rhine River.
Allied Tactical Victory
At the end of the scenario, the Allied player has at least one division (in general supply by means other than airdrop) east of the Waal River north of hex N-2812 or east of the Roer River south of hex N-2615.
German Victory
Failing either of the above, the German player wins.
Optional Victory
The battle game’s victory conditions are structured to recreate the actual Market-Garden operation or a similar operation aimed at a rapid penetration across the Rhine. In retrospect, it has become obvious that an operation against the Scheldt Estuary, while less spectacular, would have been far more productive. To reflect this, if the Allied player manages to capture all hexes of the Scheldt Estuary, their final level of victory is raised one level.
• A German victory becomes an Allied tactical victory.
• An Allied tactical victory becomes an Allied strategic victory.
• An Allied strategic victory becomes an Allied miraculous victory.
32.3 Setup
Players set up according to the German and Allied Market-Garden Setup and New Unit displays. The German player sets up first.
32.4
Supply
32.4.1 Allied player Total of 22 MSPs to expend.
32.4.2 German player Total of 4 MSPs to expend.
32.5 New Units
32.5.1 Allied player Receives September III, 1944 new units as shown on the Allied Market-Garden Setup and New Unit display.
32.5.2 German player None
32.6 Replacements
Neither side receives any replacements during this scenario.
33. MARKET-GARDEN: CAMPAIGN GAME
33.1 Scenario-specific Rules
33.1.1 Scenario Length The scenario lasts from the Allied player turn of the September III, 1944 turn through the end of the December II, 1944 turn.
33.1.2 Map Only the north map is used.
33.1.3 Weather The weather for the first turn is considered to be rain, with the air visibility condition of the impulse immediately before the first Allied impulse considered to have been clear. In subsequent turns, weather is rolled for normally.
33.1.4 Airborne Planning The Allied player sets up first and must plan all airborne assaults before the German player sets up. (The Allied player does not get to plan their assault based on foreknowledge of the German dispositions.)
33.2 Victory Conditions
Allied Strategic Victory
At the end of the scenario, the Allied player has captured 18 or more cities in Germany.
Allied Substantial Victory
At the end of the scenario, the Allied player has captured 12 or more cities in Germany.
Allied Tactical Victory
At the end of the scenario, the Allied player has captured 6 or more cities in Germany.
Draw
At the end of the scenario, the Allied player has captured 3 or more cities in Germany.
German Victory
At the end of the scenario, the Allied player has captured less than 3 cities in Germany.
33.3 Setup
Players set up according to the German and Allied Market-Garden Setup and New Unit displays. The German player sets up first.
33.4 Supply
33.4.1 Allied player The Allied player MSPs from:
• Invasion Ports (Rule 7.2.1), as shown on this display.
• Port Capture (Rule 7.2.3)
• Airlift (Rule 7.2.4)
No MSPs are received from Southern Ports (Rule 7.2.2).
Each turn, the Allied player subtracts 3 MSPs from the number they are receiving to represent supplies sent to the U.S. 3rd Army (off-map to the south).
33.4.2 German player The German player has 3 MSPs accumulated initially and receives an additional 7 per turn throughout the scenario.
33.5 New Units
Players receive new units according to the German and Allied Market-Garden Setup and New Unit displays.
33.6 Replacements
33.6.1 Allied player Each turn the Allied player receives one less replacement (of a type of their choice) than shown on the Allied Market-Garden Setup and New Unit display.
33.6.2 German player Each turn the German player receives two fewer replacements (of a type of their choice) than shown on the German Market-Garden Setup and New Unit display.
34. THE BULGE: BATTLE GAME
34.1 Scenario-specific Rules
34.1.1 Scenario Length This battle game consists of the German player turn of the December III game turn.
34.1.2 Map Both maps are used.
34.1.3 Weather The weather for the turn is considered to be winter storm.
34.1.4 Airborne Planning The German player sets up first. If the German player intends to airdrop the von der Heydte regiment during the scenario, the target hex and drop impulse must be recorded before the Allied player sets up.
34.2 Victory Conditions
German Strategic Victory
If the German player has a unit, in or out of supply, in Antwerp at the end of any impulse.
German Tactical Victory
If the German player has units (in or out of supply) in Liege, Namur, and Maastricht at the end of the game.
German Marginal Victory
If at the end of the game, the German player has captured (was the last to pass over) any of the bridge hexsides at Liege, Namur, or Huy.
Allied Victory
Failing any of the above, the Allied player wins.
If at the end of the game, there are no Allied units between the Waal and Lek Rivers, the level of German victory is increased by one.
Note This battle game is included for historical interest; it is not intended as a balanced scenario. There is virtually no hope of even attaining a marginal German victory, and only by great good fortune can the German player hope to equal the German historical gains (the capture of St. Vith, Houffalize, and Marche.)
34.3 Setup
Players set up according to the German and Allied Bulge Setup and New Unit displays. The German player sets up first.
34.4 Supply
34.4.1 Allied player Total of 5 MSPs to expend.
34.4.2 German player Accumulated 14 MSPs at the start. In addition, receives 14 MSPs at the start of the German player turn.
Also, up to six units that are not placed in an enemy ZOC may be considered to be in maneuver supply as former unmoved reserves.
34.5 New Units
34.5.1 Allied player None
34.5.2 German player Receives December III, 1944 new units as shown on the German Bulge Setup and New Unit display
34.6 Replacements
Neither side receives any replacements during this scenario.
35. THE BULGE: CAMPAIGN GAME
35.1 Scenario-specific Rules
35.1.1 Scenario Length The scenario lasts from the German player turn of the December III, 1944 turn until the end of the April IV, 1945 turn.
35.1.2 Map Both maps are used.
35.1.3 Weather The weather for the turn is considered to be winter storm. In subsequent turns, weather is rolled for normally.
35.1.4 Airborne Planning The German player sets up first. If the German player intends to airdrop the von der Heydte regiment during the scenario, the target hex and drop impulse must be recorded before the Allied player sets up.
35.2 Victory Conditions
Allied Strategic Victory
At the end of the scenario, the Allied player has captured 18 or more cities in Germany.
Allied Substantial Victory
At the end of the scenario, the Allied player has captured 12 or more cities in Germany.
Allied Tactical Victory
At the end of the scenario, the Allied player has captured 6 or more cities in Germany.
Draw
At the end of the scenario, the Allied player has captured 3 or more cities in Germany.
German Victory
At the end of the scenario, the Allied player has captured less than 3 cities in Germany.
35.3 Setup
Players set up according to the German and Allied Market-Garden Setup and New Unit displays. The German player sets up first.
35.4 Supply
35.4.1 Allied player Accumulated 5 MSPs at the start.
Receive MSPs from:
• Invasion Ports (Rule 7.2.1), as shown on the Allied Bulge Setup and New Unit Display.
• Southern Ports (Rule 7.2.2), as shown on the Allied Bulge Setup and New Unit Display.
• Port Capture (Rule 7.2.3)
• Airlift (Rule 7.2.4)
35.4.2 German player Accumulated 14 MSPs at the start. In addition, receives MSPs each turn as shown on the German Bulge Setup and New Unit Display.
35.5 New Units
Players receive new units according to the German and Allied Bulge Setup and New Unit displays.
35.6 Replacements
Neither side begins with any accumulated replacements. Both sides receive replacements as shown on the German and Allied Bulge Setup and New Unit displays.
36. FULL CAMPAIGN GAME
36.1 Scenario-specific Rules
36.1.1 Scenario Length The game begins with the September I, 1944 turn, and proceeds until either April IV, 1945, or until the Allied player fulfills their victory conditions, whichever comes first.
36.1.2 Maps Both maps are used.
36.2 Victory Conditions
To win, the Allied player must capture every German major city on the map and maintain it in supply at the conclusion of the Allied player turn of any game turn.
Allied Overwhelming Victory
Meet victory conditions by the end of November 1944.
Allied Strategic Victory
Meet victory conditions by the end of December 1944.
Allied Substantial Victory
Meet victory conditions by the end of January 1945.
Allied Tactical Victory
Meet victory conditions by the end of February 1945.
German Tactical Victory
Meet victory conditions by the end of April 1945.
German Strategic Victory
Allied player does not meet the victory conditions at all.
36.3 Setup
Players set up according to the German and Allied Full Campaign Setup and New Unit displays. The German player sets up first.
36.4 Supply
Neither player has any MSPs accumulated initially. Both sides receive the normal number of MSPs each turn as shown on the German and Allied MarketGarden Setup and New Unit displays, and as outlined in Rule 7, Maneuver Supply.
36.5 New Units
New units appear or are withdrawn as shown on the German and Allied Market-Garden Setup and New Unit displays, as outlined in Rule 24, New Units and Rule 25, Unit Withdrawal.
36.6 Replacements
Replacements are received as shown on the German and Allied Full Campaign Setup and New Unit display, and as outlined in Rule 20, Replacements.
37. ABBREVIATIONS
All
BD Breakdown
German Army
FB Fuehrer Begleit
FG Fuehrer Grenadier
FHH Feldherrnhalle
HvH Hoek van Holland
LS Landesschuetzen
Otter. Otterbeck
R Reserve
VG Volksgrenadier
German SS
Nieb. Niebelungen
T Tiger
German Luftwaffe
JK Jagd Korps
JD Jagd Division
LW Luftwaffe
R Replacement
v.d.H. von der Heydte
Walt. Walter
U.S.
A Combat Command A
B Combat Command B
PTAC Provisional Tactical Air Command
R Combat Command R
W Wing
French
AC Air Corps
Al Algerian
AF Africa
C Colonial
FR France
Mar Marche
M Moroccan
MT Moroccan Tabor
Other Allies
AE Armored Engineer
Belg Belgian
Cnd. Canadian
G Group
Gds Guards
PI Princess Irene
Pol Polish
RM Royal Marines
38. PROJECT LEAD NOTES
By Greg Warren
One of the advantages of working on a game like Road to the Rhine is that it’s already a darn good game to begin with. So, a lot of thought went into how to make the game more accessible to players. Some of the improvements made were:
Map Since the original map was a late 1970s design with the traditional GDW use of four colors, the map graphics were improved to full color with updated symbology. In addition, the map legend and holding boxes on the southeast corner of the original south map were removed and replaced with more territory. Much of the added territory is unplayable as it is in Switzerland, which cannot be entered in the game, however, this change improves the aesthetics of the map. Since the original maps were 22” x 28” and the new maps are 22” x 34”, this will allow the terrain key, CRT, and other tables to be added to the margins.
Counters The original counters had the very clean look typical of GDW back in the day. The basic look of the counters is unchanged, but the unit ID is now larger, allowing for easier reading. In addition, the unit ID was not on the back of counters for those units with a reduced strength side; the ID has now been added to the counter backs. A dot symbol has been added to the front of those counters which have a reduced strength side.
Each air unit and their associated ground element have been given a unique color bar which allows for more ready identification of which air unit is associated with which ground element.
Also, given the hex size of the maps, it has allowed us to slightly increase the size of the counters from 1/2” in the original to 9/16” in this version.
Player Aids This new edition contains graphical setup and reinforcement displays for all scenarios, as well as the full campaign game. The map legend and the terrain effects chart have been combined into one sheet. Supply and Replacement Tracks have been added for each side, which show the number of supply points and replacements received per turn.
We hope these enhancements to this GDW classic improve the playability and your enjoyment of this new Compass Games version of Road to the Rhine.
39. DESIGNER NOTES
By Frank Chadwick
These designer’s notes are reproduced in their entirety from the original game. Minor edits have been made for typos, grammar, and punctuation.
39.1 An Informal Bibliography
The orders of battle for Road to the Rhine were compiled from a variety of sources. The British ground order of battle was drawn primarily from Joslin (the British government’s official published order of battle for the Second World War) but was supplemented extensively from operational accounts as to actual arrival times at the front. The German order of battle was drawn exclusively from Georg Tessin’s Verbande und Truppen der deutsches Wehrmacht und Waffen SS im Zweiten Weltkrieg, which is at least the most readily useable source available. The German air order of battle was drawn from Tatun and Hoffschmidt’s The Rise and Fall of the German Air Force while the Allied air orders of battle are from the appendices to Victory in the West, Volume II (L. F. Ellis - the official British history).
As is too often the case, the United States orders of battle proved the most frustratingly elusive, as the Office of the Chief of Military History several years ago decided that there was insufficient demand for an order of battle work to justify its publication. Fortunately, Capt. Shelby Stanton (retired) has been compiling the research material for such a project for some time and was gracious enough to make available the considerable fruits of his labor.
The volume of the U.S. official history of the European Theatre of Operations dealing with the rearmament program of the French was the primary source for the French order of battle and details of the French Metropolitan program.
In addition to order of battle sources, a large number of operational accounts were consulted in preparing the game, but the ones relied upon most heavily were the three volumes of the U.S. official history of the ETO dealing with the Lorraine campaign, the 1944 fighting in the West Wall, and the final assault across the Rhine. For the Market-Garden operation and the clearing of the Scheldt Estuary, the British official history (Ellis) was relied on heavily. Finally, the volume of the U.S. history of the ETO dealing with the logistical side of the campaign was invaluable, even though the final supply rules are heavily abstracted.
39.2 Units
A variety of decisions were made throughout the design process that prompted questions from the playtesters. These and other items of interest concerning the units are covered below.
39.2.1 German Units
A number of questions were raised about the widely varying strengths of German units, especially the infantry and static infantry divisions. When researching the German order of battle, I made a conscious effort to avoid stereotyping units by their official designation. This is not to say that there is a wealth of hard data behind every factor assignment; only that I felt it justified to depart from the normal convention that German infantry is good, static divisions are bad, etc. when information seemed to warrant it. Several examples come to mind. The 64th Bodenstandige (static infantry) Division was only formed in June of 1944 and was barely organized when it was caught up in the retreat from the Pas de Calais. By rights, it should have disintegrated, but a good NCO and junior officer cadre not only held the division together but turned it into one of the best divisions on the western front. (The Canadian official history claims that it was the best division Canadian troops fought against.) Contrast this with the 70th Bodenstandige, a “white bread” or stomach division charged with the defense of Walcheren Island, which collapsed almost immediately.
As a general rule, I took a strength of four combat factors as a starting point for the average German division and varied the strength of units from that norm if information as to its composition or performance warranted it. In many cases, the very fact that a division survived (or failed to) was the basis for change.
Several selected German units constitute special cases. The 654th Assault Gun battalion is included in the game with the same strength as a standard assault gun brigade primarily because it was equipped with Jagdpanthers. The 100th Motorized brigade appears as it was referred to in the U.S. history of the Lorraine campaign. Its actual designation was the 100th Panzer Brigade, although it would appear that the unit was no more than a motorized infantry force by the beginning of September. The designation of the 80th Landesschutzen regiment is a fabrication on my part. There was a security regiment formed of landesschutzen companies operating in the German 80th Corps sector in early September, but I have been unable to trace the exact designation of this
regiment, hence the conventionalized one appearing in the game. The 249th infantry brigade was officially a division, but only nominally so. The 249th was actually a shadow division, the division number being given to the fortress troops in the Hook of Holland as an intelligence ruse. The troops were never organized as a division, but instead fought as the Hoek van Holland group, hence the double identification on the counter.
39.2.2 Allied Units
Strength assessments of Allied units are straightforward. Several special cases are present, however. All divisions of the French Metropolitan program are included in the counter mix, although due to equipment and manpower shortages only about half of them actually became operational during the period covered by the game. They were included because the possibility of lighter Allied casualties in the game makes raising them a possibility. The requirement that French units be raised from cadres using Allied replacements stems from the French equipment shortage and the reluctance of the Allied powers to sacrifice too great a proportion of their shipping tonnage to equipment earmarked for the French when their own troops were also in need of it.
Several U.S. infantry regiments were excluded from the counter mix, primarily since they were engaged exclusively in line of communication duty. The purists may wish to include these regiments in their Allied order of battle. They are the 65th, 118th, 156th, and 159th regiments. The armored cavalry groups excluded from the counter mix by the special US armored cavalry replacement rule are the 11th, 16th, 101st, 114th, and 115th.
The four U.S. divisions which arrive at reduced strength do so to represent the fact that in each case only part of the division was available at the listed arrival time, and in each instance, that element of the division fought alone for several weeks (and in some cases for several months) before the main body of the division joined. For the curious, only Combat Command A of the 8th Armor Division was initially available, while the advanced elements of the 42nd, 63rd, and 70th Infantry Divisions fought for some time as Task Force Linden, Task Force Harris, and Task Force Aaron, respectively.
The U.S. 66th Infantry Division is an entirely different story. The division is available only on a roll of 1 or 2, any other result means that it is sunk in transit. On the 24th of December, the 66th Division boarded ship in England for the trip across the channel to France. In
mid-channel, the convoy was attacked by German E boats and three large transports were sunk. Casualties ran into the thousands and the division was permanently ruined for combat, relegated to containment duties in Brittany for the remainder of the war.
39.3 Rules
The first thing that struck me about the campaign in the west starting in September was the incredible gains made in relatively short periods. When you consider that Antwerp was taken historically on the first turn by the Guards Armor Division, that the entire Market-Garden operation took place within the span of about one turn, and that most of the German gains in the Bulge were made in the first week, it becomes obvious that either a turn scale of less than a week is necessary or the traditional one or two impulse turn has to be scrapped. The multiple-impulse system used in Fall of Tobruk was the starting point for the system. The increased mobility of units, increased importance of geographic objectives, and clearer preponderance of force on one side mandated the reserve system as a means of plugging holes. The dividend was the aspect of continuing combat without bookkeeping problems. The prohibition of reserve movement in the final impulse is primarily a means of nullifying a game artifact that exposed itself - the ability of the defender to use their reserves to pinch off a salient after the attacker had committed all of their units.
The use of MSPs in the game to represent the Allied logistical problems was settled on because it was a fairly easy game rule to deal with. Actual truck convoys and physical movement of supplies would certainly be a better simulation of the process at work, but that was not the type of complexity I was searching for in the design. With the existing system, I could impose reasonably realistic constraints on both players and also use the system to tinker with game balance.
The decline in Allied MSPs in the winter months represents the increased amount of tonnage taken up with coal to meet French civilian needs in 1944-45. The initial decline represents the eating up of forward stocks of supplies and the lengthening of the Allied supply line. Admittedly, it is possible that the Allied supply lines will not get longer in the game, but I considered this a sufficiently remote possibility to discount its effect. The cost in MSPs to conduct attacks across unbridged major river hexsides is an attempt to take into account both the logistical strain caused by funneling units through a small assault bridgehead and
the cost of bringing forward the necessary engineering equipment.
Of all the rules in the game, the most difficult to develop was the first turn German disorganization rule, and this rule went through more different versions than any other. Several considerations seemed to work at cross-purposes. On one hand, the British and U.S. spearheads cut through the German defenders north of the Meuse as if they weren’t there. The difficulty with a general first-turn disorganization rule was that, given the relatively low troop density in the south, with even a little extra gas Patton ran wild and usually was in Germany the first turn. Some argue that this would have happened under these circumstances, but I don’t think so. Beyond that, and more important than my opinion is the fact that it made for a short, lousy game. German resistance did coalesce faster in the south, especially south of the Moselle River, and thus the current rule was developed. One final point in the game that has raised a few eyebrows is the ability to infinitely replace aircraft. Actually, the rule is not as outlandish as it seems. For most of the game, the Germans have relatively few air units in play, and thus the loss of one of them will seriously reduce their operational strength while it is being replaced. Furthermore, throughout this period (except toward the very end) German fighter production was very high and the Luftwaffe suffered not from a shortage of planes, but rather from a shortage of pilots. Thus, the constraints on replacing lost aircraft are more of a training lag than any shortage of machines, and in the final analysis, the number of aircraft will have much less impact on the balance of force than will the number of MSPs available to make aircraft operational.
40. THE GAME AS HISTORY
This section was written by Frank Chadwick in the original version of the game. It has been edited for clarity, punctuation, and typos. A few notes have been added to explain certain concepts in the game.
While I do not believe that designers should be heavyhanded in their attempts to force historical outcomes, I do believe that one of the hallmarks of minimum acceptability of a historical game is that it at least be possible to approximate history with it. As a general rule, I try to walk through several historical events with a game early on in the design process, both to make sure I know what’s going on historically and also to provide a check on the ability of the system to reflect that historical reality, in at least approximate terms. Normally, these exercises end up buried in my research notes and eventually misplaced or forgotten. Recently, however, a number of people have expressed interest in this sort of thing, and as a result, the following is experimentally presented as a combination historical overview and example of play.
In order to follow the explanation, sort the counters specified for the Bulge battle game by army. It is not necessary to sort the counters of the French 1st Army, U.S. 7th Army, or German 19th Army. This example will give the approximate initial positions of all units of the British 21st and U.S. 12th Army Groups and the German units facing them. Air units will not be dealt with as they cannot fly during the battle game. There is a step-by-step explanation of the game following the setup information.
40.1 German Setup
25th Army
88th Corps
KG Walter in hex N2912
604 inf div and 280 aslt gun bde in hex N2710
6 para div in hex N2510
6 para regt in hex N2410
712 static div in hex N2210
711 static div in hex N2010
30th Corps
HvH/249 inf bde in hex N1804
26 sec regt in hex N2104
346 static div in hex N1809
1st Parachute Army
2nd Parachute Corps
606 inf div in hex N2517
7 para div in hex N2616.
86th Corps
180 inf div in hex N2715
84 inf div in hex N2713
190 inf div in hex N2712
15th Army
67th Corps
272VG div in hex N2523
246VG div in hex N2622
74th Corps
85 and 257 inf divs in hex N2621
344 static div in hex N2722
31st Corps
47VG div in hex N2620
363VG div in hex N2619
12th SS Corps
183VG div and 59 static div in hex N2518
176 inf div in hex N-2417
Army Reserve
10 SS pnz div in hex N2723
341 aslt gun bde in hex N2718.
6th SS Panzer Army
68th Corps
326VG and 277VG divs in hex N2423
1st SS Panzer Corps
12 SS pnz, 3 pnz gren div, and 654 aslt gun bn in hex N2324
12VG div in N2424
1 SS pnz div, 3 para div, and 501 SS tiger bn in hex N2524
2nd SS Panzer Corps
2 SS pnz and 9 SS pnz divs in hex N2623
5th Panzer Army
47th Panzer Corps
Pnz Lehr div, 26VG div, 911 aslt gun bn in hex N2126
2 pnz div in hex N2226
58th Panzer Corps
116 pnz and 560VG divs in hex N2225
66th Corps
18VG and 62VG divs in hex N2325
7th Army
80th Corps
212VG and 276VG divs in hex N2128.
85th Corps
352VG and 5 para div in hex N2127.
1st Army
90th Corps
25 pnz gren div in hex S2508
17 SS pnz gren div in hex S2507
36VG div in hex S2307
13th SS Corps
559VG and 347 static divs in hex S2206
19VG and 719 inf divs in hex S2105
82nd Corps
416 inf div in hex S2003
526R inf div in hex S2102.
Army Reserve
21 pnz div in hex S2505
11 pnz div in hex S2202.
89th Corps
256VG, 361VG, and 245 inf divs facing U.S. 7th Army (not set up)
German New Units and Reserves
340VG div in hex S2301
79VG div, FG pnz gren bde, and FB pnz bde in hex N3126
v.d.H. para regt in hex N3021
9 pnz, 15 pnz gren divs, and 150 SS pnz bde in hex N2327
40.2 Allied Setup
Canadian 1st Army
British 1st Corps:
1 Belg inf bde in hex N-1810
4 Br cdo bde in hex N-2211
30, 31, and 1AE spec arm bdes in hex N-2012 (reserve)
4 Cnd arm div in hex N-2111
1 Pol arm div in hex N-1911
Pl Dutch inf bde in hex N-2311
1 Pol para bde in hex N-2313 (reserve)
Canadian 2nd Corps
2 Cnd arm bde in hex N-2511
49 Br inf div in hex N-2711
2 Cnd inf div in hex N-2611
3 Cnd inf div in hex N-2612
British 2nd Army
British 30th Corps
33 spec arm bde and 43 Br inf div in hex N-1816 (reserve)
Br Gds arm div and arm grp BD in hex N-1717 (reserve)
Br 51 inf div and Br 6 Gds arm bde in hex N-1616 (reserve)
Br 53 inf div and Br 34 arm bde in hex N-1617 (reserve)
British 12th Corps
Br 52 air lndg div and Br 4 arm bde in hex N-2416
Br 7 arm div in hex N-2516
Br 8 arm bde in hex N-2415 (reserve)
British 8th Corps
Br arm group BD in hex N-2615
Br 3 inf div in hex N-2613
Br 15 inf div in hex N-2514 (reserve)
U.S. 9th Army
13th Corps
84 inf div in hex N-2318
102 inf div and 2 arm cav regt in hex N-2418
7 arm div in hex N-2319 (reserve)
19th Corps
2 arm div and 106 arm cav regt in hex N-2519
29 inf div in hex N-2520
30 inf div in hex N-2419 (reserve)
U.S. 1st Army
7th Corps
36 and 83 inf divs and 102 arm cav regt in hex N-2521
104 inf div and 4 arm cav regt in hex N-2522
1 inf div in hex N-2421 (reserve)
3 arm and 9 inf divs in hex N-2321 (reserve)
5th Corps
8 and 78 inf divs and 113 arm cav regt in hex N-2422
2 and 99 inf divs in hex N-2323
BD/B (CCB) arm bde in hex N-2322 (reserve)
24 inf regt in hex N-1820
8th Corps
14 arm cav regt in hex N-2223
106 inf div in hex N-2224
26 inf div (reduced) in hex N-2025
BD/R (CCR)arm bde in hex N-1825
BD/A (CCA) arm bde in hex N-2027
BD inf regt in hex S-2101
BD inf regt in hex S-2001
BD inf regt in hex S-2002
U.S. 3rd Army
20th Corps
3 arm cav regt in hex S-2004
90 inf div in hex S-2005
95 inf div in hex S-2106
10 arm div in hex S-1905 (reserve)
5 inf div in hex S-1906 (reserve)
3rd Corps
6 arm div and 6 arm cav regt in hex S-2207
28 inf div in hex S-2108 (reserve)
12th Corps
35 inf div in hex S-2308
87 inf div in hex S-2408
4 arm div and 80 inf div in hex S-1909 (reserve)
Allied Theater Reserve
18th Airborne Corps
82 and 101 para divs in hex N-0528
40.3 The Battle
The German player has scheduled a parachute drop on hex N2222 on the second impulse.
First Impulse
Note At the beginning of each impulse, players must determine which units are out of general supply (Rule 8.2). At the beginning of this impulse, all units are in general supply.
In the meantime, four attacks will be run.
German Attacks
The Lehr Panzer Division, the 26th Volksgrenadier Division, and the 911th Assault Gun Brigade attack the U.S. 26th Division in N2025 at 2:1 odds. The result of the attack is a DX (Defender Exchange, see Rule 13.2). The U.S. player chooses not to lose the already reduced 26th Division and retreats to N1826. The German player must reduce one unit and chooses the 26th Volksgrenadiers, which then advances to hex 1925. The Panzer Lehr Division advances to hex 1926 while the 911th Assault Gun Brigade moves into hex 2024. The U.S. 106th Division is now surrounded and most likely will be out of general supply in upcoming impulses (if not eliminated first).
The 352nd Volksgrenadier, 212th Volksgrenadier, and 276th Volksgrenadier divisions attack Combat Command A (CCA) of the 9th Armor Division in N2027 at 2:1 odds with a result of DX. CCA retreats without a loss to N1827. The 276th Volksgrenadiers are reduced and advance to N2027. The 352nd Volksgrenadiers advance to N1928. The 212th Volksgrenadiers remain in position.
The 3rd Panzergrenadier Division and the 654th Assault Gun Battalion attack the U.S. 14th Armor Cavalry in
N2223 at 3:1 odds and roll an EX (Escalating Exchange, see Rule 13.2). The defender chooses to not escalate the exchange, so each side loses a strength level. Both the 14th Armored Cavalry and the 654th Assault Gun Battalion are eliminated, with the 3rd Panzergrenadiers advancing to N2223.
The last attack is by the 18th and 62nd Volksgrenadiers against the U.S. 106th Division in N2224 at 1:1 odds surrounded. The result is another EX.
Note The defender must retreat two hexes and the attacker may advance unless the defender chooses to escalate the exchange. If so, the defender loses two strength levels, the attacker one, and there are no retreats or advances. The attacker may then in turn escalate their loss to two strength levels as well, thus reinstituting the retreat and advance.
The U.S. player (defender) escalates to two strength levels and the German player follows suit. The U.S. player does not escalate any further. The 106th Division is destroyed and both German Volksgrenadier divisions are reduced and advance to N2124.
Allied Reserve Movement Phase
The U.S. 1st Division moves from hex to N2222, the U.S. 7th Armor Division moves to N2023, the U.S. 82nd Airborne Division moves to N2022, the U.S. 101st Airborne Division moves to N1825, and the U.S. 10th Armor Division moves to S1901 on the south map.
Note Once a reserve unit moves, the reserve marker is removed indicating loss of reserve status, see Rule 15, Reserve Movement Phase.
Second Impulse
Note Must expend one MSP for each impulse after the first.
German Movement
The 1st SS Panzer Division and 3rd Parachute Division move to N2124. The 12th SS Panzer Division and the 150th SS Panzer Brigade move to N2223. The von der Heydte Regiment carries out its pre-planned airborne assault on N2222, now occupied by the U.S. 1st Division, and is eliminated.
Note The von der Heydte Regiment must perform an immediate assault as the first attack of the combat phase, see Rule 22.1.2. If the defending unit is not forced to retreat from the hex, the assaulting unit must be reduced by one strength level. Since the defending unit has a combat value of 6 and the
assaulting unit has a combat value of 1, the odds for the combat would be 1:6. Since 1:3 is the lowest odds, the combat would use that column. At that odds level, there are no results that would cause the defending unit to retreat, so the assaulting unit would be forced to lose a strength level. Since the von der Heydte regiment only has one strength level, it is eliminated.
(The German player could have chosen to not carry out the drop, see Rule 21.1.5, and another drop could be planned in a subsequent game turn.)
German Combat
The 1st SS Panzer Division and 3rd Parachute Division attack the U.S. 7th Armor Division in N2023 at 1.5:1 odds and roll a DX. With a die roll of 4, the result is DX. The 7th Armor Division chooses to retreat without loss to hex 1922. The 3rd Parachute Division is reduced and remains in place. The 1st SS Panzer Division advances to hex 2023.
The 12th SS Panzer Division attacks the U.S. 1st Division in hex N-2222 at 1:1 odds. The 150th SS Panzer Brigade, though stacked with the 12th SS Panzer, does not join the attack, instead intending to exercise its option to advance after combat through U.S. primary ZOCs, see Rule 23.6.2. The result of the attack is NE (No Effect).
Allied Reserves
The U.S. player moves the 30th Division to N2123 and CCB of the 9th Armor Division to N1823.
Third Impulse
German Movement
The 116th Panzer Division and the 580th Volksgrenadier Division move to N1924. The 9th SS Panzer Division moves to N2124 while the 2nd SS Panzer Division moves to N2023. The 5th Parachute Division moves to N1926.
German Attacks
The 116th Panzer and the 580th Volksgrenadier Division attack CCB of the 9th Armor Division at 3:1 and achieve a DR result. CCB retreats to N1722, the 116th Panzer Division advances to N1723, and the 580th Volksgrenadiers advance to N1923.
The 2nd SS Panzer Division attacks the U.S. 82nd Airborne Division in N2022 at 1.5:1 and rolls a DX. The 2nd SS Panzer Division is reduced by one level. The 82nd Airborne also reduces itself by one level to avoid retreating.
Note Units defending in rough terrain have the option to take a strength level loss, which eliminates the requirement to retreat.
The 9th SS Panzer Division attacks the 30th Division in N2123 at 1.5:1 odds and rolls a DR result. The 30th Division retreats to N2221 while the 9th SS Panzers advance to N2123.
Finally, the 5th Parachute Division attacks the reducedstrength U.S. 28th Division in N1826 at 2:1 odds and rolls a DR. The 28th Division retreats to N1626 and the 5th Parachute Division advances to N1826.
Allied Reserves
The U.S. 5th Division moves to S1901 on the south map and the U.S. 3rd Armor Division moves to N1623.
Fourth Impulse
German Movement
The German 2nd and 9th Panzer Divisions move to N1724.
German Attacks
The two German panzer divisions attack the U.S. 3rd Armor Division in N1623 at 1.5:1 and roll an EX result. The U.S. player does not choose to escalate the result and instead reduces the 3rd Armor division and retreats to N1522. The German player reduces the 9th Panzer Division and advances it to N1622. Bastogne is surrounded. The 2nd Panzer Division advances to N1622.
Allied Reserves
The British 43rd Division moves to N1920. The British Guards Armor Division moves to N1520. The armored breakdown of the British 11th Armor Division (actually, the 29th Armor Brigade of that division) moves to N1322. The British 53rd Division moves to N1219. The U.S. 4th Armor Division moves to N1525.
Fifth (Final) Impulse
Note During the Supply Determination Phase, which is the first phase of an impulse, it would be noted that the Allied units in Bastogne [N1825] are surrounded and cannot trace general supply, see Rule 8, General Supply. Place an Out of General Supply marker in the hex to indicate these units would suffer the effects of being out of general supply, namely having their combat value and movement allowance each halved.
German Movement
A number of units move into the line or assume reserve status. Additionally, the 15th Panzergrenadier Division moves to N1725.
German Attacks
The 15th Panzergrenadiers attack Bastogne [N1825] (the 101st Airborne Division and CCR of the 9th Armor Division, both at half strength due to being out of general supply) at 1:1 odds. The German player rolls a DX. The 15th Panzergrenadiers are reduced; the U.S. player removes CCR to avoid retreating (taking advantage of the option to take a strength level loss in lieu of retreating).
Wrap Up
These are the approximate positions reached at the German high-water mark. At this point, the German player discontinues their attack, having no hope for success.
EXPANDED SEQUENCE OF PLAY AND RULES INDEX
Weather Determination Segment
• Determine Weather (19)
• Plot Airborne Assaults (22.1.5)
German Player Turn
Initial Segment
• Receive and Use Replacements (20)
• Receive Maneuver Supply and Allocate to Ground Units (7.3.1)
• Conduct Withdrawals (25)
First Impulse
Supply Determination Phase
• Determine General Supply Status for Ground Units (8.2)
• Allocate Maneuver Supply Points to Air Units (7.3.2)
• Pay MSPs for Impulse (after the first impulse) (7.3.3)
Movement Phase
• Player with the Initiative Moves Ground Units, including New Units (9, 10, 24)
• Player with the Initiative Creates Reserves (11)
• Player with the Initiative Conducts Airborne Assaults (22)
• Player with the Initiative Declares Attacks (13)
Air Support Phase (12)
• Consult Air Visibility Table (19.2.2)
• Player with the Initiative Flies Support and Transfer Missions
• Opposing Player Flies Support and Interception Missions
• Player with the Initiative Flies Interception Missions
• Conduct Air Combat
Combat Phase
• Player with the Initiative Conducts Attacks (13, 14)
Reserve Movement Phase
• Opposing Player Moves Reserves (15)
• Opposing Player Declares Reserve Attacks (17)
Reserve Air Support Phase (16)
• Opposing Player Flies Support and Transfer Missions
• Player with the Initiative Flies Support and Interception Missions
• Opposing Player Flies Interception Missions
• Conduct Air Combat
Reserve Combat Phase
• Opposing Player Conducts Attacks with Reserve Units (17)
Second and Additional Impulses - as First Impulse
Final Impulse (18)
Terminal Segment
• Player with the Initiative Uses Replacements (20)
• Player with the Initiative Reduces Unsupplied Units (8.3.2)
• Player with the Initiative Removes Finished Movement Markers (9)
Allied Player Turn
Identical to German Player Turn