TABLE OF CONTENTS
(1.0) INTRODUCTION
Oh, the roads, dust and mist Cold, Wind and steppe grass … In snow or wind, Let us remember, my friends! We cannot forget These Roads.
“Oh, the Roads” Russian song from the Great Patriotic War
For the Motherland! is a wargame depicting the fierce fighting between German and Soviet armies on the Eastern Front of World War II from May 1941 to June 1944. The game is designed for two players, with one player controlling German and Axis forces and the other player controlling the Soviet Union. For the Motherland! has six scenarios, each with different setups, duration, and victory conditions.
Game Credits
Designer: Masahiro Yamazaki
Game Artist: Masahiro Yamazaki
Box Cover Design: Bruce Yearian
Translator: Nicola Saggini
Development and Editing: Maurice Fitzgerald and Greg Warren
Playtesters: Hiroshi Ishida, Jason Cawley, and John Clarke
(2.0) COMPONENTS
(2.1)
If any of these parts are missing or damaged, please contact the publisher:
Compass Games LLC
PO Box 271
Cromwell, CT 06416 USA
Phone: (860) 301-0477
E-Mail: support@compassgames.com
Online game support is available. Visit us on the web at https://compassgames.com

(2.2) The Map
The game map covers the western part of the Soviet Union, where most of the battles of the Eastern Front took place. The map also includes portions of Germany, Poland, Finland, Hungary, Romania, Bulgaria, and Turkey. A hexagonal grid has been superimposed on the map to regulate movement and the placement of game pieces. Each hex has a unique four-digit identification number for ease of reference. The map scale is approximately 74 kilometers (46 miles) per hex. Several charts and holding boxes used during the game are printed directly on the map.
(2.3)
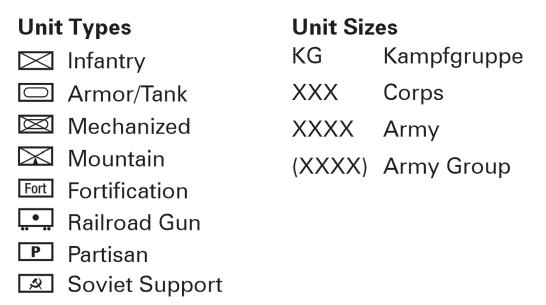
The Playing Pieces
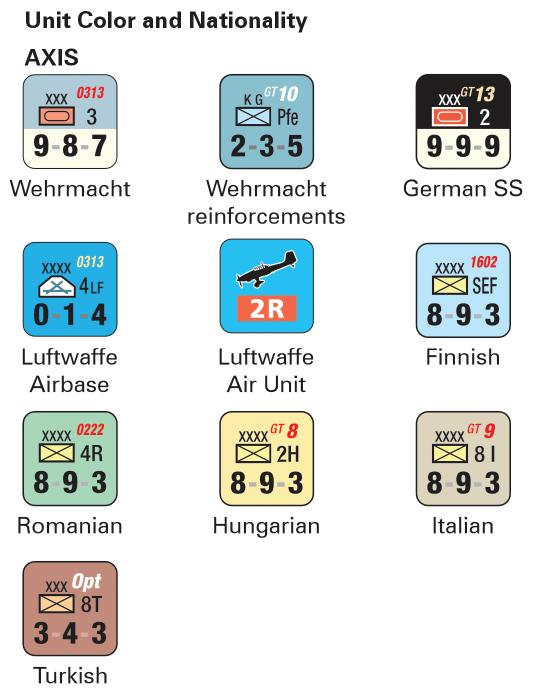
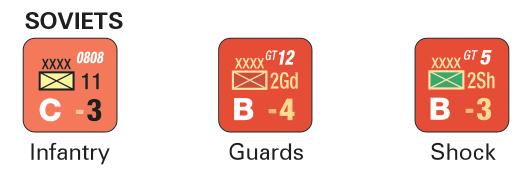
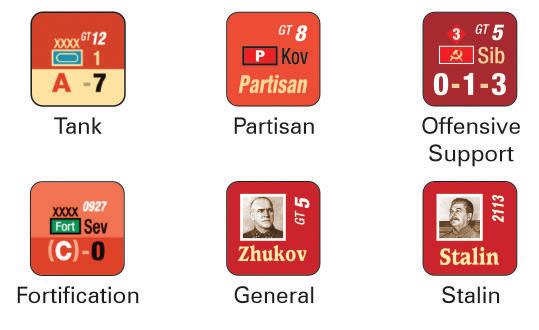
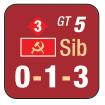
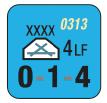
The cardboard counters included in the game represent the historical military forces of both sides that took part or could have taken part in the war on the Eastern Front. Units are primarily Corps and Army size. Axis units have Attack, Defense, and Movement Factors printed on the counter. Soviet combat units use variable Strength Chits which provide Attack and Defense factors, and these are obtained through chit-pull. Markers are provided to track unit status and other functions during the game.
Note: The use of “German” in this rulebook refers to Germany only. The use of “Axis” refers to Germany and its allies – Finland, Romania, Italy, Hungary, and Turkey.
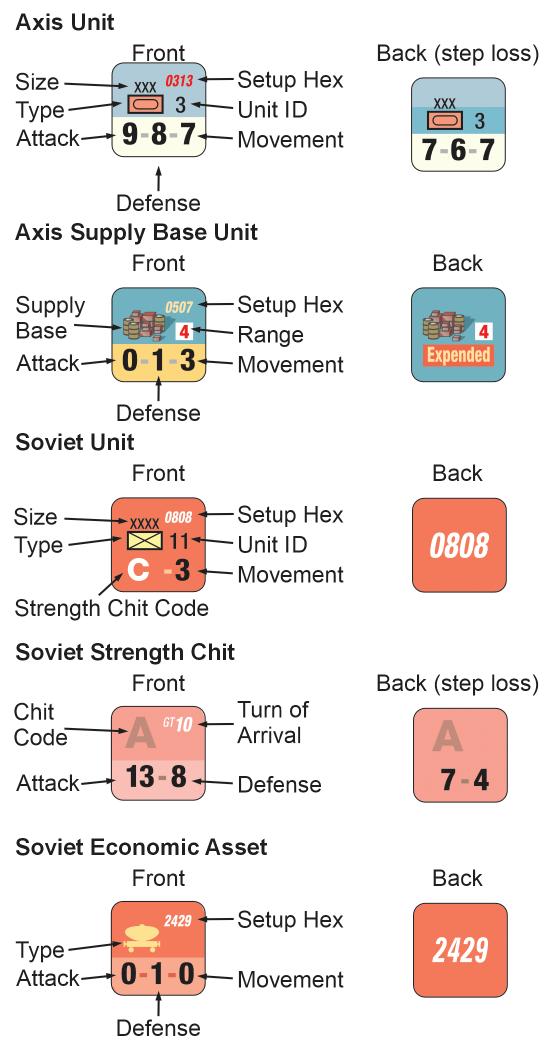
Note: The setup hexes listed on the Axis Supply Base counters are used for Scenarios 1, 2, and 6. Other game scenarios will specify different setup hexes, and any Supply Base counter can be placed in those hexes.
Combined Arms
Abbreviations
AXIS
Ape Apel 22nd Panzer Division
Arn Arnim 39th Panzer Corps
Ede Edelsheim 24th Panzer Division
Gro Grossman 6th Infantry Division
Har Harpe 41st Panzer Corps
Hol Hollidt 17th Corps
Kar Karelia
Lan Lanz 22nd Corps
Lau Lauhert 39th Panzer Regiment
Lgm Langermann 24th Panzer
Mac Mac 23rd Panzer Division
Mkn Mackensen 3rd Panzer Corps
Pfe Pfeiffer 297th Infantry Division
Pue Puechler 257th Infantry Division
Ram Ramke 2nd Fallschrimjaeger Divsion
Rau Raus 6th Panzer Division
copyright ©2025, Compass Games, LLC
Rei Reinhardt 421st Infantry Regiment
San Sanne 100th Jaeger Division
Sch Schell 25th Panzer Division
SE South East
Sie Siebert 44th Infantry Division
Str Strecker 11th Corps
SOVIET
Gd Guards
KEV Kiev
KOV Kovpak
LNG Leningrad
Pro Prokopyuk
MOS Moscow
Sh Shock
SLN Stalino
Sib Siberian
STG Stalingrad
TBL Tblisi
TUL Tula
VOR Voronezh
(3.0) SEQUENCE OF PLAY
The game is played in a series of turns, and within each turn are several Phases. Each turn represents one month during the summer and two months during the winter and thaw seasons. In each phase, the player performing the actions is referred to as the phasing player and the other player as the non-phasing player. There is a Turn Record Track printed on the map and a Game Turn marker to place on the track to show the current Game Turn and a Phase Record Track and Phase marker to place on the track to show the current Phase of each Turn.
Sequence of Play (Turns 1 - 11)
1. Mutual Supply Phase
2. Axis Movement Phase
3. Axis Combat Phase
4. Axis Exploitation Movement Phase
5. Soviet Movement Phase
6. Soviet Combat Phase
7. Administrative Phase
Sequence of Play (Turns 12 - 22)
1. Mutual Supply Phase
2. Soviet Movement Phase
3. Soviet Combat Phase
4. Soviet Exploitation Movement Phase
5. Axis Movement Phase
6. Axis Combat Phase
7. Administrative Phase
(3.1) Detailed Sequence of Play TURNS 1 – 11
1. Mutual Supply Phase (9.0)
• Both players determine the supply status for all friendly units on the map.
• The Axis player must withdraw one German unit in Turn 6. (14.0)
• German Air units can conduct Air Supply missions, but not on a Mud Turn (18.1).
• The Soviet player adds any Strength Chits that arrive as reinforcements this turn.
• The Soviet Player applies the effect of Partisan markers currently on the map. (10.1)
• The Soviet Player then can place new Partisans and relocate existing Partisans. (10.2)
• The Axis player removes any expended supply bases. (9.3.4)
2. Axis Movement Phase (5.0)
1) Reinforcements (17.0)
2) Strategic Movement and Sea Transport
3) Movement and Overrun
4) Move Air Base and Supply Base
3. Axis Combat Phase (8.0)
Axis units can attack adjacent Soviet units.
4. Axis Exploitation Movement Phase (5.4)
German Panzer units can use their full Movement Factor for movement and overrun even if starting the Phase in a Soviet ZOC.
German Infantry, Mountain, Supply Base, and Axis Infantry units can move one hex if they are not in a Soviet ZOC at the start of the Phase.
Air Base and Railroad Gun units cannot move.
5. Soviet Movement Phase (5.0)
1) Reinforcements (17.0)
2) Strategic Movement and Sea Transport
3) Movement and Overrun
4) Move Offensive Support units
6. Soviet Combat Phase (8.0)
Soviet units can attack adjacent Axis units.
7. Administrative Phase
a. Soviet Guards and Shock Units (17.2) The Soviet player may convert eligible Combined Arms units on the map to the Guards and Shock units.
b. German Corps (15.2) The Axis player may combine two German Kampfgruppen units in the same hex into one German Corps of the same type.
On Mud Turns, the KG units can be in an enemy ZOC.
c. German Replacements (15.1) On Mud Turns, the Axis player receives a number of replacement points (printed on the Turn Track) to recover steps for German units on the map.
d. Soviet Production (12.1) On a Production Turn, the Soviet player rolls a die for production. If the result is equal to or less than the current production value, one Offensive Support unit is placed on the map as a reinforcement.
e. Soviet Strength Chits (11.0) The Soviet player removes Strength Chits from all Soviet units that are not adjacent to an Axis unit and places them back into their appropriate cup.
Soviet units that are adjacent to an Axis unit and do not have a Strength Chit must be assigned a randomly drawn Strength Chit from the cup.
f. Recovery The Axis player flips all used Air Units to their front side. (14.0)
The Soviet player flips all used Generals to their front side. (16.5)
At the end of Turn 4, the Soviet player must replace all Mechanized Group units on the map with a Combined Arms unit that was eliminated. All Mechanized Group units are removed permanently. (16.4)
End Game Turn
One game turn is complete when all of the above Phases are finished. Advance the game turn marker one space on the Turn Record Track and reset the Phase marker on the Phase Record Track.
TURNS 12 – 22
1. Mutual Supply Phase (9.0)
• Both players determine the supply status for all friendly units on the map.
• The Axis player must withdraw one German unit in Turns 13, 16, and 20. (14.0)
• German Air units can conduct Air Supply missions (but not on Mud Turn).
• The Soviet player adds any Strength Chits that arrive as reinforcements this turn.
• The Soviet Player applies the effect of Partisan markers currently on the map. (10.1)
• The Soviet Player then can place new Partisans and relocate existing Partisans. (10.2)
• The Axis player removes any expended supply bases. (9.3.4)
2. Soviet Movement Phase (5.0)
1) Reinforcements (17.0)
2) Strategic Movement and Sea Transport
3) Movement and Overrun
4) Move Offensive Support units
3. Soviet Combat Phase (8.0)
Soviet units can attack adjacent Axis units.
4. Soviet Exploitation Movement Phase (5.4)
Soviet tank units can use their full Movement Factor for movement and overrun even if starting the Phase in an Axis ZOC.
Combined Arms, Guards, and Shock units can move one hex if they are not in an Axis ZOC at the start of the Phase.
Offensive Support units cannot move.
5. Axis Movement Phase (5.0)
1) Reinforcements (17.0)
2) Strategic Movement and Sea Transport
3) Movement and Overrun
4) Move Air Base and Supply Base
6. Axis Combat Phase (8.0) Axis units can attack adjacent Soviet units.
7. Administrative Phase
a. Soviet Guards and Shock Units (17.2) The Soviet player may convert eligible Combined Arms units on the map to the Guards and Shock units.
b. German Corps (15.2) The Axis player may combine two German Kampfgruppen units in the same hex into one German Corps of the same type.
On Mud Turns, the KG units can be in an enemy ZOC.
c. German Replacements (15.1) On Mud Turns, the Axis player receives a number of replacement points (printed on the Turn Track) to recover steps for German units on the map.
d. Soviet Production (12.1) On a Production Turn, the Soviet player rolls a die for production. If the result is equal to or less than the current production value, one Offensive Support unit is placed on the map as a reinforcement.
e. Soviet Strength Chits (11.0) The Soviet player removes Strength Chits from all Soviet units that are not adjacent to an Axis unit and places them back into their appropriate cup.
Soviet units that are adjacent to an Axis unit and do not have a Strength Chit must be assigned a randomly drawn Strength Chit from the cup.
f. Recovery The Axis player flips all used Air Units to their front side. (14.0)
The Soviet player flips all used Generals to their front side. (16.5)
End Game Turn
One game turn is complete when all of the above Phases are finished. Advance the game turn marker one space on the Turn Record Track and reset the Phase marker on the Phase Record Track.
Note: The turn sequence changes after Turn 11 and the phase orders for the Axis and Soviets are flipped for Turns 12-22, with the Soviets going first. Actions and restrictions within each phase remain the same. Note that there is only one exploitation phase during a game turn – in Turns 1 -11 for the Axis and in Turns 12-22 for the Soviets.
(4.0) ZONE OF CONTROL
(4.1) ZOC Definition
Combat units exert a measure of control into the six adjacent hexes surrounding the unit. This area of effect is called a Zone of Control (ZOC). Supply Base, Air Base, Railroad Gun, Offensive Support, and Economic Asset units do not exert a ZOC. Partisans and Stalin are not combat units and do not exert a ZOC. ZOCs do not extend across Sea or Lake hexsides or into brown out of play areas.
(4.2) ZOC Effects and Movement Cost
Units must pay two additional Movement Points (MP) to exit an enemy ZOC hex.
Units that start the Movement Phase in an enemy ZOC or enter an enemy ZOC hex during movement, can exit the hex by paying +2 MP, provided the next hex entered does not contain an enemy ZOC.
There is no MP cost to enter an enemy ZOC.
Note: German Panzer units can move directly from one enemy ZOC hex into another enemy ZOC hex (paying +2 MP) during the Movement Phase. No other units may move directly from one enemy ZOC hex into another enemy ZOC hex (5.1.3).
(4.2.1) A unit or stack that retreats into an enemy ZOC without a friendly unit in the hex, loses one step for each enemy ZOC hex the unit or stack retreats into (8.6).
A stack of units retreating together would lose one step for each enemy ZOC hex entered.
(4.2.2) The presence of a friendly unit negates the effects of an enemy ZOC in the hex for retreat and for tracing supply. Units with an Out of Supply marker may never retreat into an enemy ZOC hex unless a friendly unit is in the hex. Enemy ZOCs do not affect Advance after Combat.
(4.2.3) German Supply Base, Air Base, Railroad Gun, and Soviet Offensive Support units cannot enter a hex containing an enemy ZOC (friendly units do not negate the ZOC).
The units can exit an enemy ZOC hex by paying +2 MP. In addition to this cost, Railroad Gun units can exit an enemy ZOC along a Railroad provided the next hex entered does not contain an enemy ZOC.
(4.2.4) National borders do not block a ZOC.
(5.0) MOVEMENT
During the Movement Phase of each turn, the phasing player may move as many or as few units as desired. Units move from hex to hex and expend Movement Points (MP) to pay the cost of each hex entered. The number of MP expended can never exceed the Movement Factor of the unit. Unused MP may not be accumulated from turn to turn or transferred between units.
Overrun is a form of combat that is resolved during movement (7.0).
Additional movement can occur in the Exploitation Movement Phase (5.4).
(5.1) Movement Procedure
Units may be moved individually or as a stack, provided the units were in the same hex at the beginning of the Movement Phase. The cost to enter a hex varies according to the terrain in the hex and the type of unit that is moving. Consult the Terrain Effects Chart (TEC) printed on the map to find the correct number of MP required to enter each hex. The hexside terrain cost for a Minor or Major River is added to the MP cost of the hex to be entered. Ground units may not enter prohibited (P) terrain.
(5.1.1) Any unit that is marked Lack of Supply or Out of Supply has its Movement Factor halved, rounded up (9.5).
(5.1.2) The MP cost of terrain depends on the type of unit being moved. For example, when moving into a woods hex, the cost for a leg unit is 1 MP, while a mechanized unit must pay 2 MP.
Mechanized (Mech) refers to Panzer, Tank, Mechanized Group, and Supply Base units.
Leg refers to Infantry, Mountain, Air Base, Soviet Combined Arms, Shock, Guards, and Offensive Support units.
(5.1.3) Any unit with a Movement Factor of 1 or more may always move ONE hex in the Movement Phase even if it
does not have enough MP to enter an adjacent hex. Units may never move into a prohibited hex.
(5.1.4) German Panzer-only units are allowed to move directly from one enemy ZOC hex to another enemy ZOC hex during the Movement Phase. Note that this capability does not apply during the Exploitation Movement Phase (5.4).
(5.1.5) German Mountain units pay one less MP to move into a mountain hex. Only German Mountain units can move, retreat, or advance after combat, into a High Mountain hex.
(5.1.6) The German Railroad Gun can move along any number of connected Railroad hexes, regardless of terrain, but can never enter an enemy ZOC (even if a friendly unit is in the hex).
(5.1.7) Some Sea and Lake hexes are printed with red arrows indicating Frozen Access. During Snow turns, Soviet infantry units (only) may treat these hexsides as a Minor River for movement.
(5.1.8) All Swamp hexes on the map are treated as Woods during Snow turns.
(5.1.9) Brown-shaded hexes or portions of hexes are considered out of play, essentially functioning as sea hexes/ hexsides, thus are inaccessible for all purposes (movement, combat, and ZOC). As such, hexsides such as 1526/1625, 1625/1626, and 1625/1726, for example, are considered as all-sea hexsides.
(5.2)
Movement Restrictions
(5.2.1) Movement restrictions by country:
• German units cannot enter hexes in Finland.
• Soviet units can enter hexes in any country, except Turkey, unless Turkey enters the war (optional rule 21.2).
• Romanian units can only enter hexes in the Soviet Union and Romania.
• Hungarian units can only enter hexes in the Soviet Union and Hungary.
• Italian units can only enter hexes in the Soviet Union and Germany.
• Finnish units can only enter hexes in the Soviet Union and Finland.
• Turkish units can only enter hexes in the Soviet Union and Turkey (optional rule 21.2).
copyright ©2025, Compass Games, LLC
(5.2.2) Units may not enter a hex with enemy units, except for Overruns (7.0). Soviet Partisans and Stalin are markers rather than units and do not prevent Axis units from entering the hex.
(5.2.3) German Air Base and the Soviet Offensive Support Group units must be moved only after all the other units.
(5.2.4) Units cannot move off the map, except as noted in (12.2) for Evacuation of Factories and (Optional Rule 21.1.1) concerning the Baku off-map box. The national borders drawn on the map do not affect movement, except as noted in 5.2.1.
(5.3) Strategic Movement
Strategic movement refers to long-distance movement in rear areas away from enemy units. Units performing Strategic Movement may move up to 15 hexes in the Movement Phase regardless of Movement Factor, unit type (Leg or Mechanized) or terrain (except as noted below). Units that use Strategic Movement cannot use regular movement or Sea Transport (5.5) in the same turn. There is no limit to the number of units that can perform Strategic Movement during a friendly Movement Phase, as long as the conditions for Strategic Movement (5.3.1) are not violated.
(5.3.1) Units using Strategic Movement may not be within two hexes of an enemy unit at any time and must start and end the movement in hexes where the unit is in Supply. In addition to combat units, Soviet Soviet Partisans are considered enemy units, rather than markers, regarding strategic movement.
Units using Strategic Movement may not enter a city hex containing an enemy Control marker and may not enter Prohibited terrain.
(5.3.2) Air Base, Supply Base, Fortress, Economic Asset, Out of Supply, and Lack of Supply units cannot use Strategic Movement.
Exception: German Supply Base units may perform Strategic Movement during Mud Turns only.
(5.3.3) The Railroad Bridge connecting the Chongar Peninsula to the Crimean Peninsula (1125-1025) may be used for Strategic Movement (but not regular movement).
(5.4) Exploitation Movement Phase
(5.4.1) In the Axis Exploitation Movement Phase, German Panzer units can move and conduct Overruns using their
full Movement Factor, even if starting the phase in a Soviet ZOC. Overrunning units do not have to spend additional MPs to leave and enemy ZOC.
German Infantry, Mountain, and Supply Base, and Axis Infantry units that are not in a Soviet ZOC at the start of the phase can move one hex. German Air Base and Railroad Gun units cannot move.
(5.4.2) In the Soviet Exploitation Movement Phase, Soviet Tank units can move and conduct Overruns using their full Movement Factor, even if starting the phase in an Axis ZOC. Overrunning units do not have to spend additional MPs to leave and enemy ZOC.
Soviet Combined Arms, Guards, and Shock units that are not in an Axis ZOC at the start of the phase can move one hex. Offensive Support units cannot move.
(5.4.3) Strategic Movement and Sea Transport are not allowed in the Exploitation Movement Phase.
(5.5) Sea Transport
In each friendly Movement Phase, one friendly unit may be moved by sea. The unit must start the Movement Phase in a friendly port hex and move to a friendly controlled port on the same body of water. Units transported by sea may not perform normal movement or Strategic Movement in the same Movement Phase.
Note: The Baltic Sea, Gulf of Riga, and Gulf of Finland are all considered part of the same body of water for this rule.
At the start of the game, the Axis player controls the ports of Danzig (0307), Königsberg (0507), and Constanta (0325). All other ports begin under Soviet control.
(5.5.1) Only German Infantry units, Supply Base units, Romanian units, and Soviet Combined Arms, Guards, and Shock units may be transported by sea. German Supply Base units can only be transported by sea to Königsberg or to Leningrad, not to other ports.
(5.5.2) German Infantry Kampfgruppe count as one-half of a unit for Sea Transport, so two of these units can be transported in a single Movement Phase. However, both units must move to the same port.
(5.5.3) A port hex in an enemy ZOC may be used for Sea Transport. Units that are marked Lack of Supply or Out of Supply may be shipped by sea.
(5.5.4) Sea transport on the Black Sea can only be used by the side that currently controls Sevastopol. Sea Transport is not allowed from a port on the Baltic Sea, Gulf of Riga, or Gulf of Finland, to a port on the Black Sea or Sea of Azov.
(5.5.5) The Soviet Player may use Sea Transport on the Baltic Sea, Gulf of Riga, and Gulf of Finland, only when Leningrad is under Soviet control.
(5.5.6) The Axis player may use Sea Transport on the Baltic Sea, Gulf of Riga, and Gulf of Finland, only when Königsberg is under German control.
(6.0) STACKING
The placement of more than one unit in a hex is called Stacking. There is a limit on the number of units that may stack in the hex. The Stacking limit applies only at the end of each phase. Players may temporarily exceed the stacking limit while moving, retreating, or advancing after combat. At the end of any phase, if a hex is found to exceed the stacking limit for any reason, excess units must immediately be eliminated, and the opposing player gets to choose the units to remove.
(6.1) Axis Stacking
The Axis player can stack up to three German Corps units, one Air Base, one Supply Base, and one Railroad Gun unit. Each corps unit counts as one regardless of the current strength of the unit.
(6.2) Axis Allies Stacking
Each Romanian, Italian, Hungarian, and Finnish army unit counts as 3 Corps for stacking regardless of the current strength of the unit. These units can never stack with German Corps or other combat units.
(6.3) Soviet Stacking, Turns 1-11
On Turns 1 to 11, the Soviet player can stack a maximum of one Combined Arms Army, Mech Group, Shock, or Guards with one Fortress unit, one Offensive Support unit, and one Economic Asset unit.
(6.4) Soviet Stacking, Turns 12-22
On Turns 12 to 22, the Soviet player can stack one Combined Arms Army, one Shock or Guards or Tank Army, one Fortress unit, one Offensive Support unit, and one Economic Asset unit.
(6.5) Free Stacking
Air units, Strength Chits, Stalin, and Partisans do not count for stacking.
(6.6) Checking
Stacks
At any time during the game, players may check the contents of their own stacks and enemy stacks, including Strength Chits assigned to units.
(7.0) OVERRUN
In the Movement Phase and the Exploitation Movement Phase, moving units or stacks may conduct Overruns. Overrun is a form of combat that is resolved during movement. If an Overrun succeeds and the enemy units retreat or are eliminated, the units conducting the Overrun can continue moving and may perform additional Overruns.
(7.1)
Overrun Procedure
Move a unit or stack adjacent to a target hex and declare an Overrun. Overruns are made from the adjacent hex and the attacking units do not enter the hex unless the defender retreats or is eliminated. The attacking units must have 3 MP available to pay for the Overrun. Units with less than 3 MP remaining cannot conduct (or take part in) an Overrun. Overrunning units do not have to spend additional MP to leave an enemy ZOC hex.
Total the Attack Factors of the Overrunning unit or stack and total the Defense Factors of enemy units in the target hex. At this point, if the odds are less than 1:3, the attacker gets an automatic A2 result, and the Overrun is over. If the odds are 1:3 or better, resolve the Overrun in the same way as a regular Combat. The Attacker may add one available Air Unit to support the Overrun.
If the Overrun succeeds and the enemy units are eliminated or retreat, the units conducting the Overrun must enter the vacated hex. The units that conducted the Overrun may continue moving if they have MP remaining and may conduct another Overrun if they can pay the 3 MP cost. If an overrun fails to dislodge the defending enemy units, the attacking units must remain in the hex adjacent to the target and end movement for the phase.
Note: Snow Turns have differing effects on overruns for both the Axis (18.2.3) and the Soviets (18.2.4)
(7.2) Overrun Restrictions
Overruns are not allowed across a Major River, across a Sea or Lake hexside, across a Frozen Access hexside, into a Mountain hex, a City hex, a hex containing a Fortress unit, or into a Swamp hex (except on Snow Turns). Overrun is allowed across a Minor River hexside.
(7.2.1) Overrun is not allowed from a hex that exceeds the stacking limit. Units that are Lack of Supply or Out of Supply cannot perform an Overrun.
(7.2.2) When an Overrun is successful, the units conducting the Overrun do not pay any additional MP to enter the vacated hex and can ignore any enemy ZOCs in the vacated hex.
(7.2.3) One German Air unit can be used to support German units conducting an Overrun (not defending). A Soviet Offensive Support unit may be used to support Soviet units conducting an Overrun (not defending).
(7.2.4) In the Exploitation Movement Phase, only German Panzer and Soviet Tank units may conduct Overruns.
(7.2.5) During Snow Turns, Soviet units pay 2 MP to conduct an Overrun, instead of 3 MP.
(7.2.6) Units of the same type (Leg or Mechanized) can conduct an Overrun together even if they have different Movement Factors. Units of different types (Leg vs. Mechanized) cannot conduct an Overrun together.
(8.0) COMBAT
Combat can occur between opposing units in adjacent hexes when initiated by the phasing player. The phasing player is the Attacker and the non-phasing player is the Defender. Combat is always voluntary. The attacker is not required to declare all combats at the beginning of the Combat phase and is free to initiate and resolve combats in any order they choose.
(8.1) Procedure
Perform the following steps for each combat:
STEP 1: Total the Attack Factors of all attacking units and total the Defense Factors of all units in the target hex. Soviet combat units that do not have a Strength Chit must draw one for the combat.
Note: The Defense Factor of the defending unit(s) may be modified due to attacks across River hexsides (8.4.1).
STEP 2: Compare the totals and express the numbers as an odds ratio (attacker to defender). Round the odds in favor of the defender to match one of the odds columns on the Combat Results Table.
Example: Odds of 15 to 4 become 3:1 odds and odds of 11 to 12 become 1:2 odds (rounded in favor of the defender).
STEP 3: The attacker must declare the use of Air Support (German), Railroad Gun support (German), or Offensive Support (Soviet) and indicate the units providing the support.
STEP 4: Determine all column shifts that apply to the current combat including combat modifiers for Terrain and German Air Support and adjust the final odds column to the right or left.
Note: The odds ratio may be modified due to terrain located in the hex of the defending units (8.4 and Terrain Effects Chart).
STEP 5: The attacker rolls one die, applies any relevant die roll modifications, and finds the result on the Combat Results Table. The attacker applies combat results first by taking Step Losses and conducting Retreats, followed by the defender performing any Advance After Combat. Then the defender applies combat results by taking Step Losses and conducting Retreats, followed by the attacker performing any advance after combat.
STEP 6: The phasing player may initiate another combat and repeat the Combat procedure until all combats are resolved.
Note: Snow Turns have differing effects on combat for both the Axis (18.2.3) and the Soviets (18.2.4)
(8.2) Column Shifts
Column shifts always start on the end columns (7:1+ or 1:3) of the Combat Results Table (CRT) if the actual odds ratio is higher than 7:1 or lower than 1:3. For example, if an odds ratio is calculated as 9:1, a column shift of 2 Left starts on the 7:1+ column and shifts left to the 5:1 column. Odds of 1:5 with a column shift of 2 Right starts on the 1:3 column and shifts up to the 1:1 column. Otherwise, column shifts are made from the odds ratio calculated in Step 2. (8.2.1) Die roll modifiers are cumulative. If a modified die roll is greater than 9, it is treated as 9.
(8.3) Combat Restrictions
(8.3.1) No hex may be attacked more than once in the same combat phase and no unit may attack or be attacked more than once in the same phase.
(8.3.2) The phasing player may only attack one hex at a time and cannot target more than one hex in a single combat. A defending hex can be attacked from up to six adjacent hexes.
(8.3.3) Units stacked in the same hex may attack different hexes as long as each attack is conducted as a separate combat. All defending units in a hex must be attacked as one combined defense strength.
(8.3.4) There is no limit to the number of attacks the phasing player can make in a friendly Combat Phase. Each unit can attack or be attacked only once in each Combat Phase.
(8.3.5) The Attack Factor of a unit cannot be divided and used in separate combats. For example, a unit with an Attack factor of 7 cannot use 3 factors for one combat and 4 factors for another combat.
(8.3.6) Fortress Units cannot attack. Ignore the Attack Factor on the assigned Strength Chit and only use the Defense Factor. The Fortress unit counter has the letter code in parentheses (C) as a reminder.
(8.3.7) Finnish, Hungarian, Romanian, and Italian units may participate in combat with German units but may never participate in combat with units of a different nationality, other than German.
(8.3.8) Units with an Attack factor of zero can never participate in an attack.
(8.3.9) Combat cannot take place across a Sea or Lake hexside except Frozen Access hexsides.
(8.4) Terrain Effects on Combat
Except for Minor River and Major River hexsides (described below), the terrain of a hex or hexside does not affect Attack Factors or Defense Factors. Terrain can affect combat in the form of column shifts based on the terrain in the defending hex. Combat modifiers are listed on the Terrain Effects Chart.
(8.4.1) Combat modifiers for Minor and Major Rivers only apply if all units are attacking across the river.
• Minor River If all units are attacking across a Minor River hexside, add 2 to the total Defense Factor of the targeted defending unit(s).
• Major River If all units are attacking across a Major River hexside, the total Defense Factor of the targeted defending unit(s) is doubled.
If all units are attacking across a combination of Minor and Major River hexsides, use the modifier for Major River.
(8.4.2) The Kerch Strait (1227-1327) is treated as a Major River hexside for combat modifier purposes. Tank and Mechanized units cannot attack across the Kerch Strait.
(8.4.3) On Snow Turns, Soviet infantry units (only) can attack across a Frozen Access hexside (red arrows) and treat the hexside as a Minor River. Retreat and advance after combat are not allowed across a Frozen Access hexside (18.2.2).
(8.5) Combat Results
Results that start with A apply to the Attacker and results that start with D apply to the Defender. Mandatory step losses are indicated by white numbers on a red-orange background. All numeric combat results, except mandatory step loss results, may be taken as a step loss or a retreat in any combination. However, units with no Movement Factor may not retreat, thus are required to take all numeric results as step losses.
An AE result indicates that all attacking units are eliminated and a DE result indicates that all defending units are eliminated.
For mandatory step losses, the value on the left is Attacker step losses and the value on the right is Defender step losses. Excess step losses are ignored if all units are eliminated.
Example: Soviet attack on a stack of two German Corps units gets a D2 result. The German player can satisfy the result in one of three ways:
a) Lose one step on each Corps unit.
b) Retreat both units two hexes.
c) Take one step loss on one unit and retreat both units one hex.
(8.5.1) Step Loss When allocating step losses, a unit cannot take a second step loss until all other participating units have taken one step loss. Units that are unable to retreat must take the entire combat result as step losses.
(8.5.2)
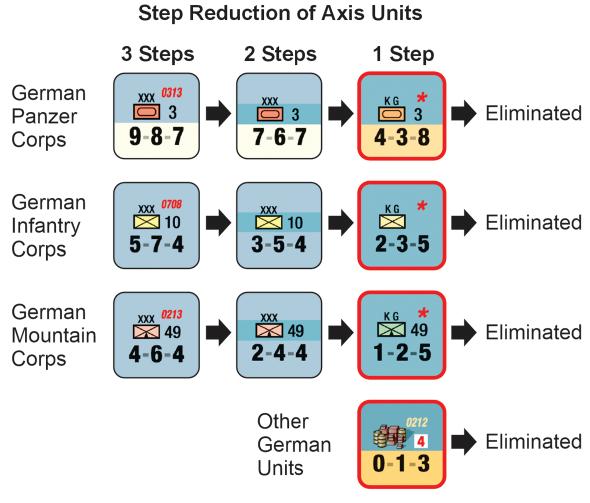
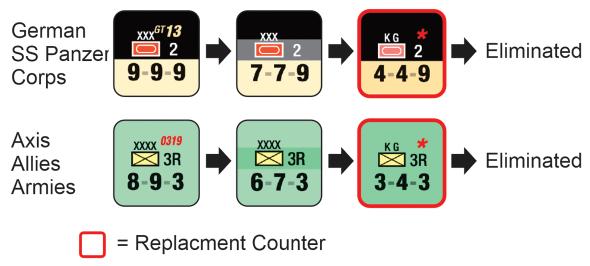
Axis Units
• German Corps, including Panzer and Panzer SS Corps units have three steps. The first and second steps are
represented by the front and back of the unit counter. The third step is represented by a Kampfgruppe (KG) unit of the same type.
• Axis allied army units also have three steps, and the third step is represented by an “*” army unit with the same unit name.
• All other Axis units have one step.
(8.5.3)
Soviet Units
• Soviet Combined Arms, Guards, Shock, Tank, Mechanized Group, and Fortress units have two steps represented by the front and back of the Strength Chit assigned to the unit.
• All other Soviet units have one step.
(8.6) Retreat
Units that choose to apply combat results as a retreat may retreat to different hexes, but each hex of a retreat must be
farther away from the original combat hex. Each retreat of one hex reduces the combat result number by 1. Players always retreat their own units.
(8.6.1) If there are multiple hexes a unit can retreat to, the actual hex is decided according to the following priorities:
1. empty hex not in an enemy ZOC
2. hex with a friendly unit and no enemy ZOC
3. hex with a friendly unit in an enemy ZOC (negated)
4. empty hex in an enemy ZOC
(8.6.2) Units in a stack that retreat into an enemy ZOC hex that does not already contain a friendly unit, must take one step loss (not one per unit). Units with an Out of Supply marker cannot retreat into an enemy ZOC hex unless it is negated by a friendly unit present in that hex.
(8.6.3) German Panzer, Soviet Tank, and Soviet Mechanized Group units that retreat across a Major or Minor River hexside lose one step.
(8.6.4) Units cannot Retreat into a hex occupied by enemy units, across a Sea or Lake hexside, or across a Frozen Access hexside. German Railroad Guns may only retreat along a Railroad.
(8.6.5) If units retreat to a hex containing other friendly units and the hex is attacked later in the same Combat Phase, the retreated units cannot participate in the combat and are eliminated if any friendly unit in the hex suffers a combat result requiring a step loss or retreat.
(8.7) Advance After Combat
After applying all combat results, if all units of one side have retreated or have been eliminated, surviving units of the opposing side that participated in the combat may advance. Advance after combat is not mandatory, but the decision to advance must be made before resolving any other combat. All advance after combat is done by hexes, not by movement points.
The number of hexes which the winning side’s units may advance after combat is equal to the combat result applied to the losing side minus the result applied for step losses (see 8.7.1 for additional restrictions).
(8.7.1) Advance after combat is a maximum of two hexes. Advancing into a second hex is not allowed unless the enemy units have retreated two or three hexes or have been eliminated.
copyright ©2025, Compass Games, LLC
German Panzer, Soviet Tank, and Soviet Mechanized Group units can advance a maximum of two hexes. All other units can only advance one hex.
(8.7.2) The first hex of an advance must be into the hex that was just vacated. The second hex can be any hex chosen by the player. The first hex of an advance may cross a Major or Minor River hexside, but the second hex cannot. Advance can never cross a Sea or Lake hexside or Frozen Access hexside. Advancing units ignore enemy ZOCs.
(8.7.3) Offensive Support units, Railroad Gun units, units with a Movement Factor of zero, and units that did not participate in the combat cannot advance after combat.
Example 1: Defender has a D3 result, takes one step loss, and retreats two hexes. Attacker can advance up to two hexes.
Example 2: Attacker has one step, Defender has two steps, and the result is mandatory 1/1. Attacker is eliminated, Defender takes one step loss and cannot advance.
Example 3: Defender has two steps and the result is D2. Defender takes one step loss and retreats one hex. Attacker can advance one hex (only).
(9.0) SUPPLY
Provision of supply overshadows all actions taken by an army. If the necessary ammunition or fuel is not supplied, the chance of a unit surviving combat is significantly reduced. Therefore, players must make every effort to provide supply to their units.
(9.1)
Supply Status
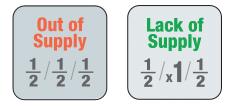
In the Mutual Supply Phase of each turn, both players must determine the supply status for all of their units. Units that are judged to be in supply are considered to be in supply for the rest of the turn. Units that are not in supply are given a Lack of Supply marker. If already marked Lack of Supply, the Lack of Supply marker is flipped to indicate the unit is Out of Supply. The supply status marker remains with the unit for the rest of the turn.
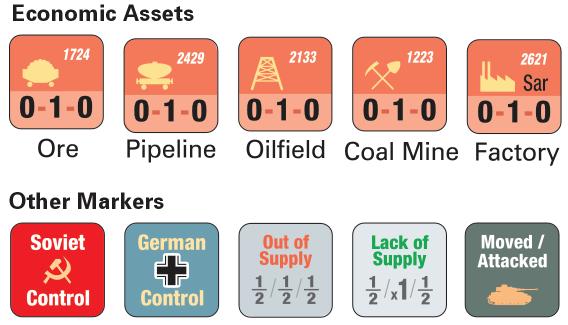
Note: German Supply Base units and Soviet Economic Asset units are always in supply and can never be marked Lack of Supply or Out of Supply.
(9.1.1) If a German Air Base or a Soviet Offensive Support unit cannot trace a Supply Line, the unit is removed and may return to the game as a reinforcement three turns later. Place it on the turn record track three turns ahead of the current turn to indicate this.
(9.1.2) Soviet units (not Offensive Support units) that are in or adjacent to a hex containing a Factory may be marked Lack of Supply but can never be marked Out of Supply.
(9.1.3) Isolated Units. Units marked Out of Supply (not Lack of Supply) that cannot trace a Supply Line of any length to a valid Supply Source are Isolated and subject to attrition. Roll a die for each hex containing an Isolated Unit and refer to the table below to determine Step Losses. The owning player can choose the units that take the Step Losses from the Isolated units in the hex.
German Air Base and Soviet Offensive Support, Combined Arms, Guards, and Shock units can return as reinforcements three turns later (17.1). Soviet Tank Army units can return as reinforcements five turns later (17.1). Other units are permanently eliminated.
(9.2) Supply Line
A Supply Line is a contiguous path of hexes from a unit to a valid Supply Source. Supply Lines cannot pass through a hex that contains an enemy unit, enemy control marker, or enemy ZOC (unless negated by a friendly unit in the hex). Supply Lines cannot cross Sea or Lake hexsides.
Supply Sources can supply an unlimited number of units.
(9.2.1) On Snow turns, Soviet infantry units may trace a Supply Line across a Sea or Lake hexside marked with a red arrow (Frozen Access). Tank, Offensive Support, and Mechanized Group units cannot.
(9.2.2) The Railroad Bridge connecting the Chongar Peninsula to the Crimean Peninsula (1125-1025) may be used to trace a Supply Line either directly by units or as a Railroad connection.
(9.3)
Axis Supply
Axis units are in supply if a Supply Line with a maximum length of 4 hexes can be traced directly to a valid Supply Source or to a Supply Base located on a Railroad with a Supply Line of connected Railroad hexes back to a valid Supply Source.
(9.3.1) The Supply Source for Axis units is any hex adjacent to the map edge area marked W, H, and R. The Supply Source for Finnish units is any hex adjacent to the map edge area marked F.
(9.3.2) If a Soviet control marker is in Helsinki, all Finnish units are automatically Out of Supply and cannot trace to a Supply Source (F).
(9.3.3) Special Axis Supply. Axis units that are at least 6 hexes away from a Soviet unit (ignore Out of Supply Soviet units) may trace a Supply Line of any length to an Axis Supply Base or Supply Source.
(9.3.4) Axis Supply Base. Supply Base units that cannot trace a Supply Line along a Railroad can be expended in order to provide supply to Axis units. Flip the Supply Base counter to the Expended side and treat the Supply Base the same as a Supply Base with a valid Supply Line. The expended Supply Base must be removed at the end of the Mutual Supply Phase.
Note: Supply Base units that are expended (or eliminated in combat) can return as a reinforcement three turns after removal.
(9.3.5) German Air Supply. In the Mutual Supply Phase of each turn, the Axis player may use available Air Units to change the status of German units from Out of Supply to Lack of Supply (14.2).
(9.4) Soviet Supply
Soviet units are in supply if a Supply Line with a maximum length of 4 hexes can be traced directly to a valid Supply Source or to a Railroad hex with a Supply Line of connected Railroad hexes back to a valid Supply Source.
(9.4.1) The Supply Source for Soviet units is any hex adjacent to the map edge area marked E or S.
(9.5) Supply Effects
Units that are marked Lack of Supply have their Attack Factor and Movement Factor halved (round up). Units that are Out of Supply have their Attack Factor, Defense Factor,
and Movement Factor halved (round up). Out of Supply units can never retreat into an enemy ZOC unless the hex is occupied by a friendly unit. Units that are Out of Supply or Lack of Supply cannot conduct Overruns or use Strategic Movement.
(9.5.1) German units that are Out of Supply cannot receive replacement steps (15.0) or combine KG (15.1). Soviet Combined Arms units that are Out of Supply cannot be converted (17.2). Lack of Supply units are not affected.
(9.6) Sea
Supply
Soviet Offensive Support units, German Supply Base and Air Base units, and Axis Ally units cannot use Sea Supply.
(9.6.1) If the Axis player controls Odessa and Sevastopol and both ports have a Supply Line connected by Railroad to a valid Supply Source, German units can trace a Supply Line of two hexes to any port on the Black Sea (not the Sea of Azov).
Note: If Sevastopol is occupied by an Axis unit at the beginning of the Mutual Supply Phase, the Soviet player may not use Sea Supply from Odessa. If the Soviets subsequently recapture Sevastopol, the Soviet player may use Sea Supply from Odessa.
(9.6.2) If the Axis player controls Danzig and Königsberg, and both ports have a Supply Line connected by Railroad to a valid Supply Source, German units can trace a Supply Line of two hexes to any port on the Baltic Sea, Gulf of Riga, and Gulf of Finland.
(9.6.3) If the Soviet player controls Tuapse or Novorossiysk and that port has a Supply Line connected by Railroad to a valid Supply Source, Soviet units can trace a Supply Line of two hexes to any port on the Black Sea (not Sea of Azov).
(10.0) PARTISANS
Partisan markers represent the effect of Soviet partisans on German supply. The Soviet player receives three Partisan markers as reinforcements during the game. These markers are placed on German Supply Bases.
(10.1)
Partisan Interdiction on Supply
In the Mutual Supply Phase, the Axis player rolls a die for each German Supply Base with a Partisan marker. The Soviet player places the indicated number of Out of Supply markers on German combat units within four hexes of the Supply Base, starting with units that are nearest the Base. The size of the combat unit (Corps, Kampfgruppe) does
copyright ©2025, Compass Games, LLC
not matter. German Supply Base, Air Base, Railroad Gun, and Axis units other than German cannot be marked Out of Supply.
Die RollOut of Supply Units
This represents the affected German Combat unit being engaged in anti-partisan operations in the rear area with a reduced capacity to carry out combat operations in the current turn.
(10.2) Placement and Movement
In the Mutual Supply Phase of each turn, after the effects of Partisans are applied, both new (reinforcement) and existing Partisan markers (those not currently on a German Supply Base) are placed on a German Supply Base. Each Partisan marker must be at least five hexes from another Partisan marker. Partisan markers already on the map and located on a German Supply Base can be relocated from one Supply Base to another in this step, the location must be within five hexes of the current hex.
(10.3) Partisan Effects on Supply
If a German Supply Base unit with a Partisan marker is expended to provide supply, friendly units must be within 3 hexes of the Base to be in supply.
(10.4) Axis Reinforcement Restrictions
Axis reinforcements cannot be placed on a Supply Base with a Partisan marker.
(10.5) Other Partisan Effects
(10.5.1) Partisan markers cannot be eliminated.
(10.5.2) Axis units using regular movement (not strategic movement) may enter and move through hexes with Partisan markers.
(10.5.3) Partisan markers remain in the hex when a Supply Base unit moves, retreats, or is removed.
(11.0) SOVIET STRENGTH CHITS
Soviet Army, Mechanized Group, and Fortress units do not have an Attack Factor or Defense Factor printed on the counter, only a letter code and Movement Factor are displayed. The attack and defense factors of these units are determined by a random pull of a Strength Chit, which is
then placed with the unit to determine these values. Strength Chits placed with these units must match the letter code on the counter (A, B, C).
During setup, the Soviet player must put all the Strength Chits (A*, B*, C*) into three separate opaque containers (cups or mugs). Strength Chits without the * will be added later as they become available as reinforcements.
(11.1) Placement
(11.1.1) Before Combat During the game, if a Soviet Army, Mechanized Group, or Fortress unit participates in a combat or Overrun (attacking or defending) and the unit does not already have a Strength Chit, the Soviet player must draw a Strength Chit with the same letter code as the unit and place it under the unit.
(11.1.2) Next to Enemy Unit In the Administrative Phase, if any Soviet Army, Mechanized Group, or Fortress unit adjacent to an Axis unit does not have a Strength Chit, the Soviet player must draw a Strength Chit with the same letter code as the unit and place it under the unit.
(11.2)
Removal
(11.2.1) Not Adjacent to Enemy Unit In the Administrative Phase, any Soviet unit with a Strength Chit that is not adjacent to an Axis unit has the Strength Chit removed and returned to the container with the same letter code.
(11.2.2) Strength Chits remain with the unit they have been assigned to until the unit is eliminated, or until the Administrative Phase and the unit is not adjacent to an enemy unit.
Note: Strength Chits with a * are not returned to the container and are not reused. Strength Chits without the * are always returned to the container and can be reused multiple times.
(11.3)
Steps
Players should note that each Strength Chit has a fullstrength side on the front and a reduced-strength side on the back. When a unit takes a loss in combat, the Strength Chit with the unit is flipped over just like a combat unit with two steps. Any time a new chit is drawn for a unit, the chit is always placed on the full-strength side.
(11.3.1) Fortress units cannot attack and only use the Defense Factor printed on their Strength Chit when defending. The Fortress unit counter has the letter code in parentheses (C) as a reminder.
copyright ©2025, Compass Games, LLC
(12.0) ECONOMIC ASSETS

There are five types of Soviet Economic Asset units: factory, oil field, oil pipeline, coal mine, and ore. Ore represents mineral resources such as iron, nickel, and manganese. The Defense Factor of Economic Asset units represents workers and citizens organized as militia for local defense. Economic Asset units affect the production of Soviet Offensive Support units.
Economic Asset units have only one step which can be taken as a step loss to satisfy combat results. When an Economic Asset unit is eliminated, the unit is placed in the first available box on the Eliminated Economic Assets track on the map (one unit per box). The number of units placed on the track affects the production of Soviet Offensive Support units (13.0).
Economic Asset units cannot move and are always considered to be in supply.
(12.1) Production
Production Turns are indicated by a Factory symbol on the Turn Record Track. In the Administrative Phase of each Production Turn, the Soviet player rolls a die, and if the result is equal to or less than the Production Number in the last box containing an Economic Asset unit, the Soviet player receives one Offensive Support unit. An Offensive Support unit is taken from the on-map OSM Waiting Box and placed on the map in any hex that is currently in supply and not in an enemy ZOC (even if a friendly unit is in the hex). The Soviet player can never have more than 10 Offensive Support units on the map at any given time.
(12.2) Factories
Factory Economic Asset units (only) may be removed (evacuated) from the map to prevent a reduction in the Production number caused by eliminated Asset units. In the Administrative Phase of a Production turn, one Factory unit may be removed and placed in the Evacuated Factories Box (not on the Eliminated Economic Assets track). Factories are the only Economic Asset units that can be removed voluntarily.
(12.2.1) Only Factories located on a Railroad connected to a Soviet Supply Source hex on the map edge can be evacuated
(removed). The railroad path cannot pass through hexes containing an enemy unit or an enemy ZOC unless negated by a friendly unit in the hex.
(12.2.2) Factory units in an enemy ZOC at the start of the Administrative Phase cannot be evacuated (a friendly unit in the hex does not negate the enemy ZOC).
(13.0) SOVIET OFFENSIVE SUPPORT
Offensive Support markers represent independent assets such as artillery, rocket launchers, armor, cavalry, engineers, ski troops, and aircraft. Offensive Support units can only be used to support Soviet units conducting an attack in regular combat or as an Overrun. When supporting an attack or overrun, the Offensive Support unit must be within three hexes of the target hex and adds +3 to the combat resolution die roll. Terrain and enemy ZOC do not affect the ability of Offensive Support units to provide support.
Note: The Offensive Support die roll modification MUST be applied to ALL attacks occurring within 3 hexes of the Offensive Support unit.
Offensive Support markers that do not start setup on the map or appear as a reinforcement are placed in the OSM Waiting Box.
(14.0) GERMAN AIR UNITS
In scenarios starting with Turn 1, the Axis player has three Air Base units and five Air units. Air Units are placed in the German Air Unit box, while Air Base units are placed on the map. Each German Air unit can be used for one mission each turn, as either Air Support or Air Supply. Air missions must be carried out within four hexes of an Airbase. Only one mission can be performed by each Air Unit each turn.
In the Recovery Phase of each turn, all Air Units in the German Air Unit box are flipped face up and are available for missions in the next turn.
The Axis player must withdraw one German Air Unit at the beginning of the Mutual Supply Phase on Turns 6, 13, 16, and 20. Withdrawn Air units are removed from the German Air Units Box and are out of play for the rest of the game.
copyright ©2025, Compass Games, LLC

(14.1) Air Support
During an Axis Combat Phase, the Axis player may use available Air units to provide support to attacks made by German units only. During an Axis Movement or Exploitation Movement Phase, the Axis player may use available Air units to provide support to an Overrun made by German Units. Air units can only support combats and Overruns on target hexes (hexes occupied by Soviet units) within four hexes of an Air Base. When a combat or overrun is supported by an Air unit, the Combat Strength Ratio is shifted two columns to the right. There is no limit to the number of Attack Support missions that can be performed per turn other than the number of available, unused, Air units. After each support mission, the Air unit is returned to the German Air Units Box and flipped face down to show the Used side. Only one Air unit may be used in each combat and overrun.
In the Recovery portion of the Administrative Phase, the Axis player flips all used Air Units to their front side.
(14.2) Air Supply
In the Mutual Supply Phase of each turn, the Axis player may use available Air Units to change the status of German units from Out of Supply to Lack of Supply. Each Air unit can affect one German unit within four hexes of an Air Base. Air Units used for Air Supply missions are returned to the German Air Units Box and flipped face down to show the Used side.
(14.3) Weather Effects
During Mud Turns, the number of Air units available in the German Air Units Box is halved (round down). During Snow Turns, the Axis Player may use Air units for Air Supply missions, but not for Attack Support missions.
(15.0) GERMAN
(15.1) Replacement Steps