

1.0 Introduction
1.1 General
1.2 Game Compnents
1.3 Complexity
2.0 Sequence of Play
2.1 General
2.2 British Player Turn
2.3 Turkish Player Turn
3.0 Air Missions
3.1 Bases
3.2 Range of Movement
3.3 Transfers
3.4 Air Mission Procedure
3.5 Air Strike Procedure
3.6 Turkish Air Missions
3.7 British Air Missions
4.0 Infantry Movement
4.1 Supply
4.2 Terrain Costs
4.3 Unit Stacking
4.4 Arab Movement
4.5 Jordan River Area
4.6 Sea Movement
4.7 Turkish Panic Movement
4.8 Rail Movement
4.9 Disrupted Movement
5.0 Cavalry Movement
5.1 Supply
5.2 Terrain Costs
5.3 Unit Stacking
5.4 Movement Options
6.0 Zones of Control
6.1 Zones of Control of ZOC
6.2 ZOC and Movement
6.3 ZOC and Supply
6.4 ZOC and Command Control
6.5 ZOC and Retreat
7.0 Infantry Combat
7.1 General
7.2 Turkish Command Control
7.3 Supply Requirements
7.4 Combat Procedure
7.5 Combat Results
8.0 Cavalry Combat
8.1 General 8.2 Supply
8.3 Choice of Combat Tables
8.4 Combat Results
9.0 Recovery
9.1 British Recovery 9.2 Turkish Recovery
10.0 Card Play
10.1 Card Types
10.2 Card Nationalities
10.3 Card Counts
10.4 Card Draws
10.5 Three Player Cards
11.1 British Reinforcements
11.2 Turkish Reinforcements
11.3 Reinforcement and Setup Chart
12.0 Scenarios
12.1 Scenario 1 (Historical) Dash to Samakh
12.2 Scenario 2 (What If) Dash to Samakh: Without Lawrence
12.3 Scenario 3 (What If) Dash to Samakh: Lwarence Goes It Alone
12.4 Scenario 4 (Historical) Race for Damascus
13.0 Victory Conditions
13.1 Tactical Victory 13.2 Strategic Victory
13.3 Overall Victory
14.0 El Aurens
15.0 Designer Notes
Game Credits
Game Design: Roger Nord
Game Graphics: Bruce Yearian
Production Manager: Billy Thomas
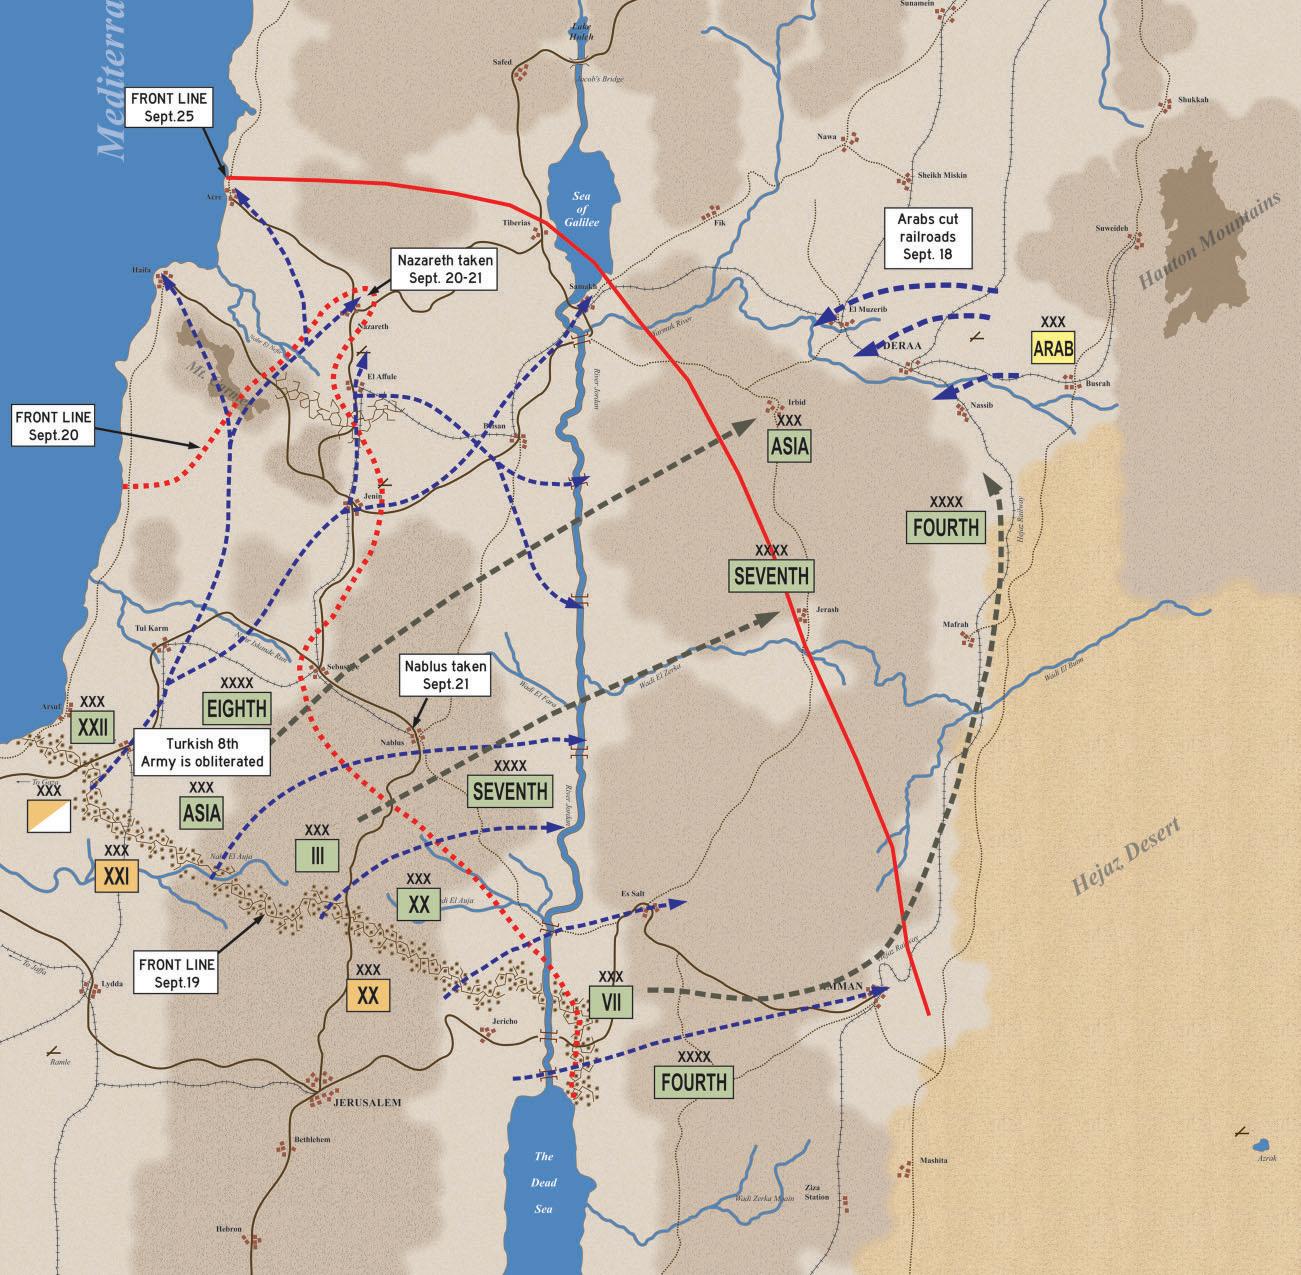
Falling Crescent is an operational level game of the British offensive of September-October 1918 against the Turks in Palestine. One player controls the Turkish, German and Bedouin forces, the other the British, French and Arab forces. After lasting for centuries, the Ottoman Turks’ hold on Palestine is at risk. British forces and Arabs in revolt threaten to bring down the Ottomans and their Crescent flag
The playing map is an accurate portrayal of the area at the time. The counters (hereafter known as “units”) represent the forces historically available to each side.
The game places the players in the historical position of the respective commanders, reproducing the problems and possibilities open to each. It is, however, a game of skill, in which the outcome will depend upon the decisions taken by the players; it is entirely possible to change the course of history.
1.2.1
• Two 22" x 34" maps
• Two counter sheets of 5/8" counters and markers
•One British Fate Deck
•One Turkish Fate Deck
• Eight PlayerAid Cards
•One Rule Book
• Two six -sided dice
If any parts are damaged or missing please contact: Compass Games, LLC PO Box 278 Cromwell, CT 06416
Phone: (860) 301-0477
E-mail: support@compassgames.com
Online game support is available. Visit us on the web: https://www.compassgames.com. You can also use the URL or QR code to reach Compass Games online: https://linktr.ee/compassgames

The Map: The two 22” x 34” maps depicts the area of Palestine and Transjordan as they appeared in 1918. A hexagonal grid is overlaid on the map to regulate movement, supply and combat. Each hex covers 2.3 miles.
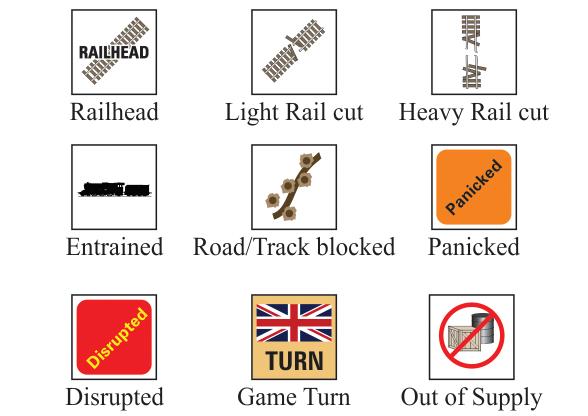
The Counters: The playing pieces, also called units or markers, represent the military units and informational markers needed for Falling Crescent.
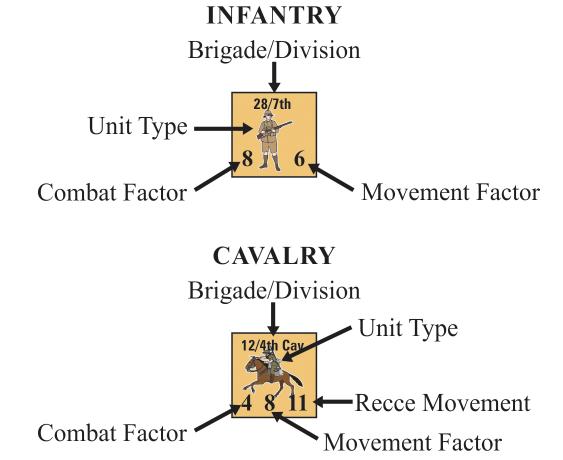
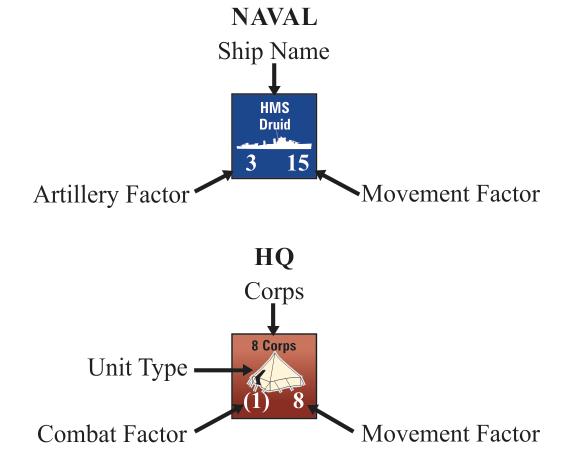
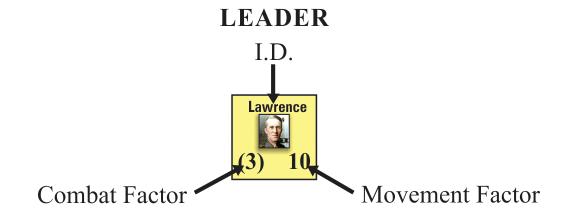
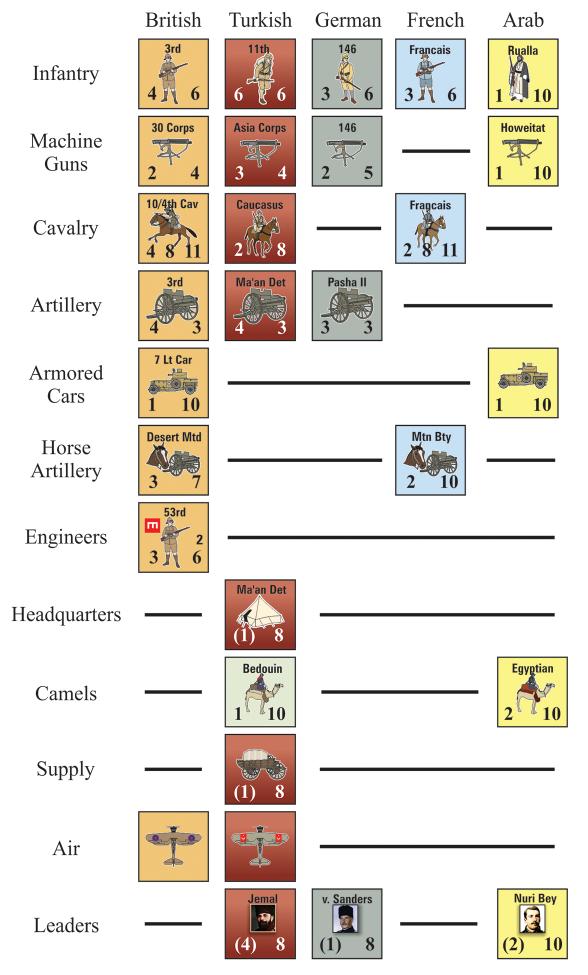
The unit sizes and abbreviations printed on the military units do not bear directly on. For players who take interest in the historical background, they are presented on the following list:
1.Unit designations
II - battalion III - regiment
X - brigade XXX - corps
2.British Abbreviations
AC = Armored Car
Aus Mtd = Australian Mounted Division
ANZ Mtd = Australian and New Zealand Mounted Division
Yeo Cav= Yeomanry of the Corps Cavalry Regiment
Francais = Detachment Francais de Palestine et Syrie
Desert Mtd = Desert Mounted Corps
Egyptian = Egyptian Camel Corps
Hauraum = Hauraun Fellahin
Lt Car = Light Car Patrol
Mtn Bty = Mountain Battery-French
Palestine = Palestine Brigade
Rualla = Rualla Tribe
Sherifian = Sherifian Camel Corps
3.Turkish Abbreviations
Amman = Amman Division
Army Res = General Army Reserve
Composite = Composite Division
Depot AR = Depot Regiment
Ma'an Det = Ma’an Detachment
Ma'an/Ziza = Ma’an Detachment Ziza Station
Pasha II = Pasha II Contingent-German
Railway = Railway Artillery-German Markers
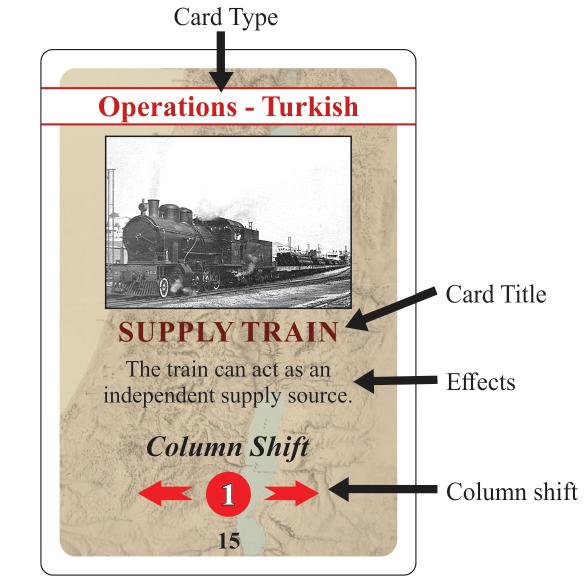
Cards are new to Falling Crescent. They enhance the game by giving both players more options in the decisions they make. Twenty-six cards make up the deck for each side.
Falling Crescent is not a particularly complex game. Players should read the rules through once carefully to get the gist of them, then set up the counters and play one of the short scenarios provided in section 11, referring back to
the rules when necessary. Much of the information required is provided in the form of easy-to-consult cards, charts and tables. These apart, players will find after 2 or 3 playing’s that they have familiarized themselves with the rules and what may at first have seemed complex will have become second nature.
Falling Crescent is played in game-turns, each one consisting of a British player-turn and a Turkish playerturn. The British player always goes first and during his turn and is called the phasing player. The Turkish player goes last and during his turn and is the phasing player. Whenever play is going on outside the player’s turn, in his opponent’s turn, and is then called the non-phasing player. The term “Turkish” is sometimes used, where the context makes its meaning clear, to include German and Bedouin units; similarly, “British” in¬cludes French and Arab units.
After setting up their units and shuffling his initial card deck, the British player executes his first turn in the following order of phases:
1.Draw Cards. The British player draws two cards from his face-down card deck, looks at them and keeps them in his hand.
2. Air Missions. The British player chooses his air missions, exposes them to Turkish interception, and carries them out
3.Infantry Movement. The British player checks the supply status of his infantry units and moves them according to the terrain costs on the Terrain Chart. He may move cavalry units in this phase, subject to movement effects on the Water/Forage Chart. After all movement, the Turkish player can attempt breakouts.
4.Infantry Combat. The British player again checks for infantry supply, before attacking with the infantry, or cavalry, at his option. The type of attacker will determine which combat table may be used. Whenever infantry attacks, or a combined force of infantry and cavalry, the Infantry Combat Results Table must be used. Whenever just cavalry-type units attack, the owning player has the choice of using either the Infantry or Cavalry Combat Table.
5.Cavalry Exploitation Movement. The British player may now move cavalry units not moved so far, subject to movement effects on the Water/Forage Chart. Cavalry units (also referred to as “cavalry-type units”) include
cavalry, horse artillery, and armored cars; all other units are considered “infantry” for purposes of determining which phase they can move in. French and Arab cavalrytype units (including the 2 camel corps) may move in either phase, as may Arab dummies, Lawrence, and Nuri Bey.
6.Cavalry Combat. The British player may now attack with cavalry units not yet having attacked in the turn, using either combat table.
7.Recovery. The British player rallies disrupted units and draws new cards from the British card deck as needed to refill the owning player’s hand up to a maximum of two cards.
When the British player has finished his turn, the Turkish player follows this sequence of play:
1.Draw Cards. The Turkish player draws two cards from his face-down card deck, looks at them and keeps them in his hand.
2.Air Missions. The Turkish player conducts limited air missions, which the British may try to intercept.
3.Movement. The Turkish player checks supply for all his units and moves them according to the terrain costs.
4.Combat. The Turkish player rechecks supply and establishes command control for all units desired to attack with. His attacks are optional; they are restricted at all times to the Infantry Combat Table.
5.Recovery. The Turkish player rallies or tries to rally panicked and disrupted units. He also may repair rail cuts. Lastly, the Turkish player draws new cards from the Turkish card deck as needed to refill the owning player’s hand up to a maximum of two cards. When finished, the Turkish player advances the game turn marker one turn along the turn record track on the map.
Each side has an air force in the game, represented by air units based at friendly air fields. Turkish planes may take off or land at the airfields at Jenin, El Affule, Reyak, and Deraa. British air units may use Ramle and Azrak. In addition, either side may use the other’s bases if they are captured during the course of play. A base is captured when an enemy ground unit, other than a leader, enters the airfield hex; it remains controlled by that player unless it is recaptured in similar manner. Air units present when a base is captured are considered destroyed and are permanently removed from the game. All the bases listed have unlimited
capacity to handle planes, except desert Azrak, where only two air units may be present at any time.
Air units may leave their bases to go on bombing and strafing missions, designated simply as air missions. They may also fly out to intercept such missions in the enemy’s turn. In both cases, their movement range is a 30-hex radius extending outward from the base used. This radius is counted from the base hex exclusive to the destination hex inclusive. To rebase his planes afterwards the owning player may land them at any friendly field within the same distance limit of 30 hexes. The Azrak capacity limit is still in effect.
Instead of committing an air unit to an air mission, the phasing player may transfer it to any other friendly base. The transfer is possible even if the new base is more than 30 hexes away. Planes engaging in transfers consume all their movement allowance for that turn. The Azrak capacity limit remains in effect.
The phasing player chooses his hex targets within range and then places his available air units on those hexes. He may place any number of air on a given hex, provided he uses them each only once in the phase. After all placements are made, the nonphasing player may try to defend the target hexes within range of his interceptors. He deploys his available interceptors on the target hexes, using each unit only once in the phase. He then rolls a single die for each hex containing one or more interceptors, and consults the Air Interception Table for the result.
The British Handley Page bomber flies on missions only with a -1 strike modifier. It has a HP marker on the counter.
Whenever interception is not tried, or if it fails, the phasing player carries out an air strike against a target hex. He rolls one die on the RAF Attack Table, applies the die-roll modifiers, if any, and finds the result under the column of his total attacking strength. The results key on the table explains the effects in detail. The British Handley Page bomber flies on missions only with a -1 strike modifier. It has a HP marker on the counter.
For the first two turns only. Turkish planes may fly missions against Arab ground units east of the Jordan. British interception is limited to the single air unit stationed at Azrak. If any Turkish air mission evades interception, the
Turkish player rolls on the RAF Attack Table, treating all successful strike results as disrupts. After game turn two, Turkish air units may or may not continue to fly missions, depending on the setup players have chosen (see section 10).
In the first two game turns, no British air missions are permitted; only interceptions from Azrak are possible. Starting with turn three, the British player can conduct air missions or transfer air units between bases.
Requirements. In order for it to move without penalty, an infantry unit must be in supply. It is in supply if it can trace a supply line back to a friendly supply source (see “a” below). At the precise moment he moves it, the phasing player checks supply for that friendly unit. If the unit is in supply it moves normally. If it is unsupplied, it incurs a movement penalty, losing one-half its printed movement allowance with fractions rounded down.
4.1.1 Exempted Units. Certain units are exempt from infantry supply. They are: Turkish supply units, leaders and headquarters; Bedouin, Arabs, naval units, and British cavalry-type units. None of these units is ever considered out of supply for infantry movement. The British cavalry units do of course need cavalry supply under the rules of cavalry movement (see section 5).
4.1.2 Turkish Supply Lines. To be supplied, a Turkish unit must be able to trace a path of no more than SIX hexes from the unit exclusive to a friendly supply source inclusive. The hex path must traverse passable terrain (i.e., must not include all water hexes), and must be free of British units and their zones of control (see section 6). If the unit cannot trace such a path it is out of supply. Friendly ground units, however, negate British zones of control (ZOC) in hexes they occupy (i.e., a supply path can be traced through an enemy ZOC, provided the hex in question is occupied by a friendly unit).
4.1.3 Turkish Supply Sources. These sources can be a friendly town, supply unit, or rail line. Any town north or east of the original trench line is friendly to the Turks, unless British units occupy it or exert a zone of control into one or more of its hexes. At least one British unit must be positioned. Turkish supply units function even when they are panicked or disrupted. Turkish rail lines are functional supply sources when they lead back to a supply unit or friendly town, without any rail cuts, air interdiction, British units or British zones of control obstructing the railroad
path. As long as it is unobstructed, the path may contain any number of rail hexes. Friendly ground units on the rail line do negate British zones of control into their occupied hexes, but they do not negate air interdiction markers.
4.1.4 British Supply. To be supplied, British infantry must trace a path of any length over passable terrain (no all water hexes) to a road, track or British rail line running off the south or west edge of the map. The supply line has to be free of Turkish units and their zones of control. If it is not, the unit in question is unsupplied. Friendly units lying along the path do negate Turkish zones of control into their hexes, allowing the supply path to function.
4.1.5 First-Turn Supply. In the first game turn, no supply checks are necessary for infantry since they all start the game in supply. Thereafter, normal supply rules will apply.
Once an infantry unit’s movement allowance is determined and adjusted for supply, the phasing player moves the unit from hex to hex, expending movement points according to the hex terrain entered. The cost in movement points varies with the terrain, as shown on the Terrain Chart. The phasing player can expend movement points up to the unit’s available allowance, and no more, unless he plays a favorable card enhancing unit movement. However, if he chooses to move the unit just one hex in the phase, he may always do so, regardless of the terrain cost involved. Movement points may not be “loaned” from one unit to another, nor may they be saved from one phase to another.
During infantry movement, the phasing player may pass his units through friendly-occupied hexes without any extra cost or restriction, though the normal rules on enemy zones of control and terrain cost do apply. At the end of the infantry movement phase, general stacking limits are three for British units in any one hex and two for the Turks/Germans. If at the end of the phase, a particular hex is stacked beyond these limits, the phasing player must eliminate the excess units in order to come within the required limit. He places units of his choice in the surrendered pile, to be counted as victory points for his opponent. These stacking limits are general and do not apply to certain kinds of units; exempt units are leaders, headquarters, supply units, prisoners and information markers. Except for the case of prisoner units, a player may stack any number of such units in a hex. Up to 12 prisoner units may stack together with their 2 or 3 British guard units (see rule 7.5d). British units may only occupy the same hex as Turkish/ German units if the latter are prisoners; Arab units may never occupy the same hex as Turkish or German units. Exception: British naval units may occupy a partial sea hex at the same time as Turkish or German units (see Rule 4.6).
4.4.1 Inverted Movement. Arab units move inverted with their “unknown” side up. The British player may freely examine their true strength at any time. They actually continue inverted throughout most of a game turn; only at the moment that they attack or defend in combat does he reveal their actual strength. Even when Turkish planes disrupt them, or they attempt rail cuts, Arab units remain inverted.
4.4.2 Zone of Operations. Arab units operate only in the eastern sector of the map. The dividing line is the Jordan River north to Lake Huleh, and up the same hexrow as the Lake to the northern map edge. Arab units may enter, but may not voluntarily move west of, the line. If they are forced to do so by retreat after combat, the Turkish player gains victory points (see rule 12.1). In any Jordan River hex, Arab units always are considered to occupy the east bank.
The river meanders north to south, creating both a west bank and an east bank in its hexes. As units stop along the River from Lake Huleh southwards they exclude enemy units from their occupied hexes, and the owning player declares which bank they occupy, with Arab units always occupying the east bank. Crossing of the River from Lake Huleh southwards is prohibited except at the crossing hexes (fords or bridges) shown. Crossings in this sector are the only place where zones of control extend from units on one bank of the river into adjacent hexes on the opposite bank, permitting combat across the river. In the upper Jordan area, north of Lake Huleh, players treat the river as any other on the map.
All sea hexes are the exclusive domain of British naval units. Ground units may never enter these hexes, suffering elimination if forced to do so because of combat. On the other hand, partial sea hexes containing coastline are passable terrain for both naval and ground units. They may simultaneously occupy the same coastal hex without regard to each other. The British naval units move in the Infantry Movement Phase.
Before the Turkish player executes any movement in his Infantry Movement Phase, he scans the map locations of Turkish units to see whether they may panic. If he finds that British units occupy hexes in their immediate rear areas, all affected units (except leaders and headquarters units) must undergo a panic test. If a panic result is obtained on the Panic Chart, the panicked units execute a restricted movement.
4.7.1 Turkish Rear Area. Each Turkish-occupied hex has an immediate rear area running along a 180° arc on its northerly looking like this:
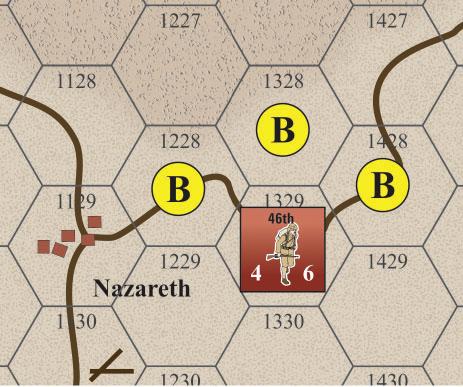
In the above diagram, hex 1329 is occupied by the Turkish 46th unit and, one or more of the hexes marked 'B' are British-occupied. A panic test is therefore required. If no British units occupy any 'B' hexes. Turkish unit may move normally and do not test for panic.
4.7.2 Panic Test. Every Turkish unit in every T hex as shown above, exclusive of leaders and headquarters units, must undergo a panic test. The Turkish player rolls a die for each unit and consults the Panic Chart for the result. Where the unit is already panicked from some previous cause it automatically remains panicked: there is no need to roll a die. Whenever a Turkish unit escapes panic because of a favorable die-roll, it moves normally. A “panic” result on the chart however, will cause panic movement, which restricts the direction in which the unit may move in the Infantry Movement Phase. To indicate panic, the Turkish player inverts the unit to its blank side. A panicked artillery unit permanently loses its guns and becomes a smaller, detached infantry unit: invert the artillery counter and place a “P” marker on it to indicate its panicked status (see 7.5e).
4.7.3 Panic Movement. The Turkish player has to move each panicked unit as far northward as possible, towards the general rear area of all Turkish forces in play. The unit must expend all its available movement allowance in this fashion until it can recover at some later point. If it exits the northern mapedge before recovering, it is added to the “surrendered” pile and adds to the British player’s victory points total. A number of specific cases define how panic movement is executed:
1. Where British zones of control are exerted into all 3 hexes immediately to the north, the unit moves into one of them and stops.
2. Where British units completely occupy the three northern hexes, the unit must still flee. It moves in any other available direction chosen by the Turkish player, and swings back to the north as soon as possible, subject to zones of control stopping it along the way.
3. Where British units totally surround the unit, it remains stationary.
4. Where British units do not occupy or control all three northern hexes, the panicked unit must escape through the free hex or hexes.
5. Impassable water terrain will block panic movement.
4.7.4 Leaders and Headquarters. Although these units do not panic because of British bypass as shown above, they can panic from other causes. British air strikes or combat could panic them, which will require them to execute panic movement until or unless they are able to recover.
4.7.5 Artillery. There is a second way that artillery units may panic, besides bypass. The Turkish player may voluntarily panic any artillery unit whenever a British regular unit, excluding Arabs, comes within two hexes of it from any direction. A voluntarily panicked artillery unit becomes infantry and inverts, with permanent loss of guns, and must move northward as all panicked units do. It cannot, however, recover good order status on the same turn it panics: starting on the next turn, the unit may be eligible for recovery under the recovery rules. If the Turkish player finds an artillery unit bypassed, he should first test for panic, rolling on the Panic Chart. A “no panic” result would still allow him the option to panic the artillery unit voluntarily.
A player may move certain of his units by rail on a friendly rail network; no cavalry (of any nationality), horse artillery, armored cars, Bedouins or Arabs can use rail movement. To discourage rail movement, an opposing player may try to place obstacles along the rail lines. For victory points, the British player may extend his rail network.
4.8.1 Friendly Rail Network. Rail hexes west of the Jordan and south of hex 0445 (inclusive) belong initially to the British, all others to the Turks. The Turkish rail network is fixed and can never be expanded. The British rail network can be, with the aid of British engineers.
4.8.2 British Rail Expansion. Engineer units (see 1.1b) expand British rails by moving north along the rail line from Lydda and crossing the Turkish trench line. They begin at hex 0444 and proceed to convert the Turkish rails at the maximum rate of two rail hexes per turn. Both engineer units must be used and stacked together. Otherwise, if only one engineer unit converts rails, the rate is one rail hex per turn.
Should the engineers pull off the track, conversion stops at the farthest point of their advance. The British player places a railhead marker on the hex of last conversion.
4.8.3 Moving by Rail. In order to move by rail, a unit must begin the movement phase on a friendly rail hex. It expends one movement point to entrain and then proceeds by rail. For every new rail hex entered beyond the hex of entrainment, the unit expends one fifth movement point. Rail movement continues until it has exhausted its available movement allowance, runs into an obstacle on the rail line, or has detrained. Any time the unit remains entrained, it carries over rail movement into the next turn and the phasing player places an entrained marker on top of the unit to mark its status (he will not have to expend a movement point to entrain at the start of the next movement phase). Whenever it detrains, the unit spends one movement point to do so, and then moves away on foot if it still has unused movement points. In rail movement, the German rail artillery unit is unique; it always moves by rail and suffers elimination if it has to leave the track. Its movement allowance is 10 rail hexes.
4.8.4 Obstacles to Movement. An opposing player can stop rail movement in a number of ways. His units can exert a zone of control into a rail hex, stopping all movement through the hex. They can occupy a rail hex with the same effect. In addition, the British player can send an air mission to strike and interdict a rail line, or can cut the rail line with his ground units. Any of these obstacles will require the phasing player to detrain his units in the hex immediately before them. The phasing player can, however, entrain units in hexes adjacent to any such obstacles, and move away from them.
4.8.5 Rail Capacity. During a player’s turn, up to six friendly units may use rail movement, not counting leaders or headquarters units. Any friendly entrained units carried over from the previous turn do count toward this limit, other than leaders or headquarters units. When entrained, units may freely pass each other on the rail lines, although the normal stacking limit will be in effect at the end of the Infantry Movement Phase.
4.8.6 Rail Cuts. The British player may use any of his units to cut Turkish rail lines. After he finishes all movement in a phase, he determines which units occupying Turkish rail hexes will try to cut the rails. He takes each rail hex in turn and rolls a die on the Rail Cut Chart. When the result is favorable, he puts the appropriate railcut marker on the hex. Each rail line hex may undergo just one railcut attempt per movement phase.
A disrupted unit loses one-half its printed movement
allowance (round fractions down) for one friendly turn. However, there is no such penalty if the unit is also unsupplied; the loss of one-half movement for the unsupplied status remains as it is.
In order to move without penalty, a British cavalry unit must be in supply at the moment it begins movement. If it is on or adjacent to a friendly wadi, river or town, the cavalry unit is supplied and moves normally. If not, the unit checks for supply on the Water/Forage Chart, and may incur some movement penalty.
5.1.1 Friendly Supply Sources. The wadi, river or town hex must be friendly in order to act as a cavalry supply source. When the source is friendly-occupied, it is a functional source. However, when British cavalry is merely adjacent to one of these hexes, there can be no Turkish units or zones of control in the hex, or it becomes a hostile hex cut off from supply. Where the wadi, river or town hex lays two or more hexes away from a cavalry unit, it is outside the unit’s supply range and does not function as a supply source for that unit.
5.1.2 Supply Check. The British player checks supply for cavalry units unable to draw from any friendly supply source. For each stack of affected units that he desires to move, he totals their strength and rolls a die on the Water/ Forage Chart. As explained on the chart, the units’ movement may be penalized. Once he checks for supply and units are penalized, the British player must move them during that phase.
5.1.3 First-Turn Supply. Since all British cavalry start in supply, no supply checks are necessary on game-turn one. Thereafter, the above supply requirements are in effect.
5.1.4 Card Assisted Supply. Two cards – Water for All and Rest is Good help supply British cavalry as directed.
The Terrain Chart sets forth the terrain cost for cavalry to enter various hexes. Cavalry units move and expend movement points as infantry units do (see rule 4.2). Note that cavalry-type units moving into a trench hex (even if from an adjacent trench hex) pay the cost of the other terrain in the hex, plus one extra movement point. Like infantry, they may always move one hex regardless of the terrain cost.
The same British stacking limit of three units per hex at the end of movement applies to cavalry as well as to infantry.
Within this limit, cavalry and infantry may freely mix together.
A British cavalry unit may move in either movement phase of the British player turn. Irrespective of which phase it moves in, a cavalry unit (not armored cars) may conduct reconnaissance movement if eligible to do so (see b. below).
5.4.1 One Movement. At his choice, the British player may move an armored car, horse artillery or cavalry unit either in the Infantry Movement Phase or in the Cavalry Exploitation Movement Phase of a game-turn. He cannot move the same cavalry unit in both phases.
5.4.2 Reconnaissance Movement. Whenever a cavalry unit moves, the British player may choose to recon with the unit. As long as it is supplied and in good order, he may extend the unit’s movement allowance to 11 points, the second movement number printed on its face. Armored cars and disrupted cavalry units cannot execute reconnaissance movement. Unsupplied cavalry units may not be able to carry out reconnaissance (see Water/Forage Chart). Anytime a cavalry unit recons, it may not attack in combat during the same turn. The unit may defend normally. Arab and French cavalry ¬type units cannot carry out reconnaissance movement.
5.4.3 Disrupted Movement. Besides losing ability to recon, a disrupted cavalry unit drops one-half its movement allowance for one friendly turn. The British player can ignore any further loss of movement on the Water /Forage Chart, but he must observe the directional movement if the unit is required to pass through a wadi, river or town.
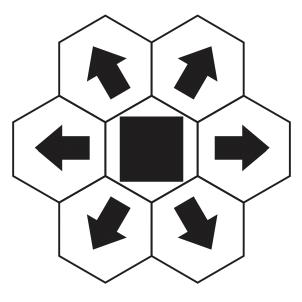
Any unit in good order may exert a zone of control into its surrounding six hexes, depending on the kind of opposing units involved. Units which are disrupted or panicked are considered as disordered and they exert no zones of control at all.
6.1.1 Infantry vs. Infantry. Infantry units, that is all ground units exclusive of British cavalry and armored cars, do exert zones of control over opposing infantry.
6.1.2 Infantry vs. Cavalry. Turkish infantry opposing British cavalry or armored cars do not exert zones of control
unless they are of a certain type. Turkish units with zones of control are: machine guns, cavalry units and infantry units when stacked with leaders or headquarters. A leader or headquarters by itself does not stop British cavalry or armored cars. When they face Turkish infantry, British cavalry and armored cars do impose zones of control.
6.1.3 Naval/Air vs. Land. Naval and air units for all purposes ignore ground units in movement. They may move freely by or over ground units of any type.
A unit moving into an enemy zone of control has to stop immediately. Whenever a unit starts its movement in an enemy-controlled hex, it may move directly from that hex to a second enemy-controlled hex and then it must stop. Once a unit enters an enemy zone of control, its movement ceases for that movement phase, whether the hex is vacant or friendly-occupied. Note that enemy units may never occupy the same hex as one another, nor may units pass through a hex occupied by an enemy unit. Exceptions: British land units and Turkish/German prisoners; naval/air units and land units.
Supply can be traced through enemy zones of control if the hexes are occupied by friendly units; it cannot be traced through vacant hexes that are in enemy zones of control nor through enemy occupied hexes.
The Turkish player can trace a path for command control or recovery through friendly-occupied hexes in enemy zones of control. He may not trace such a path through vacant hexes in enemy zones of control, nor through hexes occupied by enemy units.
Retreating units may enter hexes in enemy zones of control only if those hexes are occupied by friendly units. If no legal line of retreat is open to a unit, it is eliminated instead. Turkish units may surrender to British or French units: (see rule 7.5d). To some extent, the owning player has choice in the direction in which units retreat (see 7.5b for retreat priorities).
Combat is voluntary at the phasing player’s choice: it is never mandatory. The phasing player may commit none, some or all of his units to attack adjacent enemy units, but no unit may attack more than once per player-turn. No unit
may be attacked more than once in a single combat phase, though the Turkish player’s units may be attacked in both the British infantry and British cavalry combat phases of the same turn. The phasing player may execute his attacks (also referred to as battles) in any order he desires in the combat phase; each attack must be resolved before the next is executed (i.e., all combat results including any advance or retreat after combat must be implemented before the next attack is resolved). When the phasing player makes an attack, he must attack all the defending units in a hex as one battle. He may conduct a multi-hex attack against more than one defending hex at a time, as long as all the attacking units are adjacent to all the defenders and all the defending units participate. For Turkish units to attack at all they also have to establish command control.
For every attack he wants to wage, the Turkish player must establish command control. He may use leaders stacked with attacking units, or trace a command control path back to headquarters.
7.2.1 Headquarters Units. A headquarters unit may support an attack so long as a line of communications, called the command control path, is traceable back to it. The path goes from at least one of the attacking units, exclusive, back to a headquarters unit, inclusive. This command control path has to extend six or fewer hexes, traverse passable terrain (no all water hexes), and avoid British zones of control. If it does not, there is no command control and the units cannot attack, unless they benefit from leader command control (see below). The headquarters unit itself must be in good order, since disrupted or panicked headquarters units do not function for command control. Note that command control can be traced through enemy ZOC if the hex or hexes in question are occupied by friendly units.
7.2.2 Leaders. Whenever combat units stack with a leader, he can give them command control. No other units, apart from those in the same hex as the leader, can receive his command control, because his communication range is much more limited than that of a headquarters. For the effect of panic or disruption on the command control of leaders, see rule 7.4.
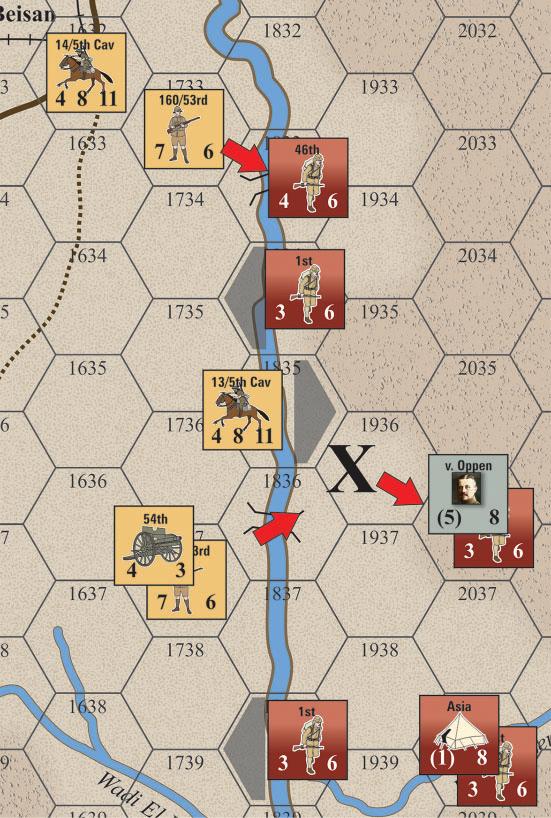
Here is movement along and across the Jordan. British attacks follow. No units may cross the Jordan without a bridge; the grayed banks illustrate. British infantry with artillery cross the lower bridge to attack Von Oppen’s force, which is in command control. At the upper crossing bridge, combined infantry and cavalry attack the Turk 4-6 infantry. In combat there is -1 across the crossing, +1 for combined arms and +1 for Turkish defender outside command control, leaving a net +1. Note the headquarters good path was cut off earlier when the lower attackers ended moving at hex “X”.
To participate in combat at full strength, infantry units need supply. When they can trace a supply path as defined under the movement rules, units fight at full strength. When they cannot, they are unsupplied and fight at one-half strength, with fractions rounded up.
7.3.1 Judging Supply. At the moment a battle is declared, players judge supply for their participating units. The supply status of a unit may alter during the course of a
single combat phase, as the result of the resolution of previous attacks.
7.3.2 Unit Status and Supply. There is a cumulative strength loss when an unsupplied unit is not in good order. Thus disruption or panic will cut its strength further by another 50%, with fractions again rounded up. For example, a panicked, unsupplied unit with a face strength of five ends up at a reduced strength of two.
7.3.3 Leader Benefit. Leaders are not affected by lack of supply, but they will add their strength value only up to the effective strength of units accompanying them. Example: a (4)-8 leader is stacked with an unsupplied 4 unit; their total strength is 4 (2 from each unit).
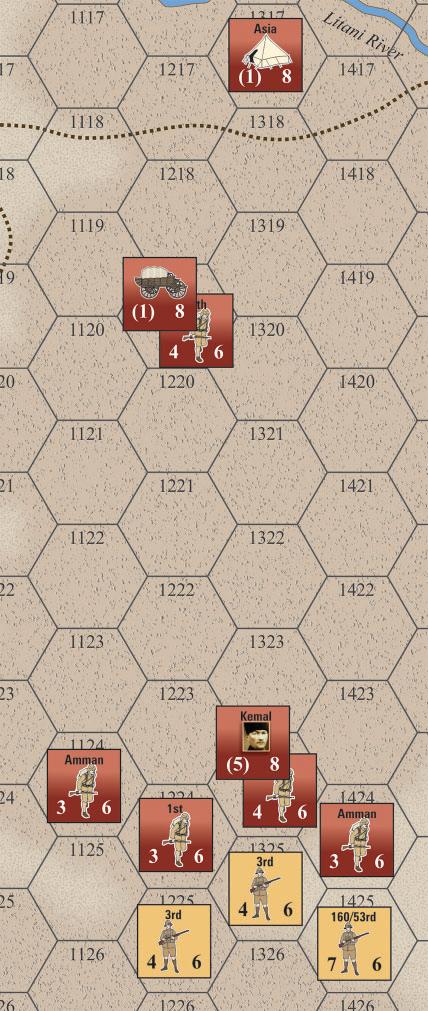
The previous image highlights Turkish supply, command control and the power of Ataturk. It is the Turks’ turn. For supply, there is no town or rail within six hexes of any of the Turks, so they bring up the wagon supply unit. The wagon stops within 6 hexes of the line. Without the wagon, the line units are unsupplied; they would move and fight at ½ effectiveness.
The headquarters is outside the 6-hex range needed to provide command control to attack. This leaves Ataturk on his own as a leader to give command control (cc).
Ordinarily, a leader provides cc leadership bonus only to units in his hex, which in that case yields a 2:1 attack vs. the British 4 (8 to 4).
However, if the Turks had been to lucky to draw the Ataturk Combat card, playing it here would enable two more bonus attacks, a 1.5:1 on his right, a 1:1 on his left or even a mass attack of 5:1 on the British center unit (6+8+6 vs. 4).
Note that whatever infantry the Turks can use with Ataturk, he just adds the bonus once per attacking hex.
The phasing player may commit his units to attack adjacent units. He is termed the attacker and the non-phasing player is termed the defender, regardless of the overall strategic situation in the game at that particular time.
A.Prepare for Combat. Before actual fighting takes place, players check for two situations.
1.Turkish Breakouts. Prior to British combat, the Turkish player may try to break out his surrounded units (see below).
2.Machine Gun Suppression. Also before any combat, either or both players may commit machine gun suppression fire into an adjacent hex to weaken opposing force strength. They will need a suppression card matched to the nationality of the unit/s firing:
•For defending Turks, use Hot Fire
•For attacking British, use Cover Fire
•For attacking Arabs, use Roof Overhead
The owning player identifies the target hex and rolls a die on the Machine Suppression Table. When successful, fire disrupts a unit in the targeted hex.
In the event a target hex contains a stack of units, the targeted player chooses which one to disrupt.
Note that British or Arab machine guns that fired in suppression may also join in figuring attacker’s odds. Turkish machine guns only fire on defense and do not join in defender’s odds.
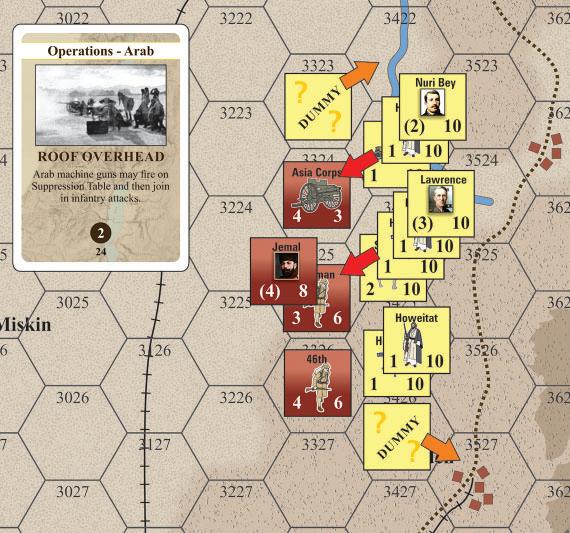
Here’s a case of Arab combat, machine gun fire, rail supply, artillery support,and dummy units.
Arab forces advance, aiming to cut the rail line behind the Turks and possibly put them out of supply.
Lawrence reveals his force at 9-strength (3,1,1,2) plus 2 from units to his left to attack Jemal’s hex, which defends at 6-strength (3,3). Jemal is a good prize to eliminate.
Right before the attack, the British play their Arab Roof Overhead card to fire both machine guns at Jemal’s hex and hopefully disrupt a target unit of their choice. Then they join Lawrence’s attack.
Nuri Bey reveals his force at 4-strength (2,1,1) to attack the Turk artillery and thereby prevent supporting fire for Jemal’s defense.
The Arab dummies are revealed and discarded for now.
7.4.1 Combat Odds. The attacker, in adding up his units’ strength, adjusts their total for supply, unit status, leaders and artillery support. The defender does the same for his units, and the result is expressed as a ratio between the two strengths, attacker vs. defender. Since the Infantry Combat Table has columns of precise ratios, such as 2-1, or 3-1, the attacker rounds down any in between odds in favor of the defender. An example of rounding down is 27 attack points vs. 10 defense points, for a 2-1 ratio on the table.
7.4.2 Leader Bonus. A leader stacked with attacking units will add his parenthesized strength to the composite strength of the units. If, for example, a supplied 1-6 unit and 2-6 unit are stacked with a (4)-8 leader, the total leader
bonus is three, for a total of six strength points available to attack out of the hex. Other, specific restrictions apply to the use of leaders:
1. Only one leader per friendly stack of units is allowed to add in its bonus.
2. More than one leader can participate in a battle, provided they are in different hexes.
3. Defending leaders are available to assist defending units, in the same way attacker leaders help their units.
4. Solitary leaders, without any other units accompanying them, have no intrinsic strength. They may not attack; if they are attacked by themselves, they are automatically eliminated.
5. Turkish leaders and German leaders may freely assist each other’s national forces.
6. Arab leaders only help Arab units. They may stack with British army units, but will not give them any bonus.
7. Panicked Turk leaders do nothing at all for an attack; their presence is ignored in figuring combat odds, and they cannot establish command control. Adverse combat results will affect them, depending on what happens to the units attacking out of their hexes. If the units they are stacked with attack in more than one direction, the owning player must specify in advance which attack the panicked leader is considered to accompany for purposes of suffering any adverse combat results.
8. Panicked German leaders add one-half their strength, fractions rounded up, to an attack. They can give command control to accompanying units; however they do not modify the attacker’s die-roll.
9. In defense, panicked Turk and German leaders add one-half their strength, fractions rounded up, to their accompanying units. They do not modify the combat die-roll or shift the odds column.
7.4.3 Panicked Units. In combat, panic affects non-leader units differently, depending on whether they are Turkish or German. In all cases, however, they are subject to command control and supply requirements, and they impose no zones of control. Turkish and German units differ as follows:
1. Panicked Turkish units cannot attack. If they are stacked with other friendly units which are attacking, they suffer the same combat result as the attackers. On defense, they defend at one-half strength with a rounding up of fractions, and do not benefit from die-roll modifiers or shifts in the odds column.
2. Panicked German units can attack and defend at one-half strength, with fractions rounded up. When defending or attacking, they do not benefit from die-roll modifiers or
shifts in the odds column.
3. Combat die-roll modifiers and shifts in the odds column will occur as long as other, non-panicked units participate to qualify for the benefits.
7.4.4 Disrupted Units. All disrupted units in supply may attack and defend at one-half strength, with fractions rounded up. Disrupted leaders can also provide command control to their accompanying units. When unsupplied, all disrupted units fight at lower strength, according to rule 7.3. For combat purposes, disrupted units never exert a zone of control, and, except on defense, they do not modify dierolls or shift the odds column.
7.4.5 Entrained Units. Units entrained on rail lines cannot attack; they first have to detrain in a friendly movement phase. On defense, they immediately detrain at the moment of attack and defend at full strength, adjusting for supply under rule 7.3. For combat purposes, entrained units have zones of control, they can shift the odds column and they can modify die-rolls. However, if a unit detrains to defend itself and suffers any adverse combat result, it also disrupts automatically, unless the result is panic, in which case the unit panics.
7.4.6 Parenthesized Units. Parenthesized units Turkish units, other than Leaders, cannot attack. They may defend normally. British forces have no parenthesized units besides Leaders.
7.4.7 Artillery Support. The phasing player may commit his artillery units to support declared attacks. He adds the combat strength on any artillery unit within two hexes of at least one of the defending hexes. After the phasing player finishes his artillery commitment to a battle, the defending player may commit any of his artillery units within the same range. The result of artillery commitments could change the combat odds. The following specific rules govern the use of artillery:
1. An artillery unit fires support only per combat phase, and up to three times in a game-turn, involving three combat phases.
2. An unsupplied artillery unit is halved, with fractions rounded up. Attacking an artillery unit prevents it from firing in support of defending forces. The phasing player should declare his intended attack to stop its possible support, and then attack the unit at some point in the combat phase.
3. A panicked or disrupted artillery cannot give fire support.
4. Artillery units cannot attack opposing units directly. If opposing units attack them directly, they defend at face value and do not modify the combat die-roll.
5. British naval units function as artillery.
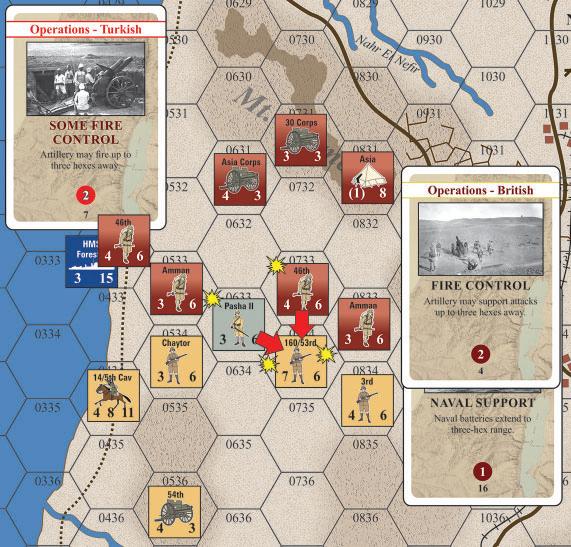
The example here shows a duel of the big guns.
It is the Turks’ turn, who set up to destroy the British 7-6 infantry that anchors the coastal line. The Turks bring in German infantry, Headquarters control and more artillery. They play their Some Fire Control card and extend artillery range from 2 to 3 hexes, reaching the defending hex.
Altogether the Turks have 14 factors (7-strength infantry and 7-strength supporting artillery). So far, attacker has a 2:1 advantage.
Fortunately the defender can also call in artillery support, playing their own Fire Control and Naval Support cards to extend range. A 4-strength land artillery and 3-strength HMS Forester raise the defense to 14 (7, 4, 3) and lower odds to 1:1.
Without the cards played, there would be no artillery here within range. Note how HMS Forester and Turkish infantry can occupy the same coastal hex. They ignore each other.
7.4.8 Turkish Break Outs. As soon as the British player has finished moving and before he declares any combat in the Infantry Combat Phase, the Turkish player may try to break out surrounded units. He rolls a die on the Break Out Chart for each unit attempting to escape. Specific procedures control break out attempts:
1. British zones of control must totally surround a defending hex in order to permit a break out attempt. In addition, the zones must extend into vacant hexes, completely cutting off a retreat for units in the defending
hex. If there any Turkish units adjacent to the defending hex, no break out is possible, even in multi-hex defense.
2. Break outs are optional according to the Turkish player’s choice. However, once he tries to break out a unit in a defending hex, he must roll for each of the units in that hex, taking them one at a time on the chart. Leaders and headquarters go last in the sequence.
3. A “B” result on the chart means the break out attempt succeeds. The Turkish player must move the unit one or two hexes in any direction, ignoring attacking units and/ or British zones of control.
4. Once a Turkish unit has broken out, it must accept any declared combat against the new hex. If alone in the new hex, the unit defends at one-half strength, with fractions rounded up. If it shares the hex with other units originally there, the break out unit contributes zero strength to their defense, while it suffers the same combat result they do from a British attack.
5. An “S” result on the chart means the unit fails to break out and it surrenders. After all the Turkish units have either broken out or surrendered, the British player advances one or more of his adjacent units into the hex and takes the surrendered units prisoner, unless all of his units are Arabs.
6. The British player delays combat until the Turkish player finishes with all break out attempts.
7. If a unit is surrounded by the zones of control of British cavalry and/or armored cars, no break out attempted is permitted, Horse artillery do not prevent a break out.
8. Panicked or disrupted units cannot try to break out, but must accept combat if declared.
9. Arab units take no prisoners. If a Turkish unit obtains an “S” result and all the adjacent enemy units are Arabs, the unit is instead eliminated and the British player puts the unit in the Turkish eliminated pile. Notwithstanding the Arab units, if at least one British army unit is adjacent it advances into the hex occupied by the Turks and they become prisoners.
10. No break out is possible where British units occupy all six hexes surrounding the defending hex, or where they occupy all passable terrain around the unit and it is backed up against impassable water.
11. Turkish artillery breaking out will be stripped of its guns. The Turkish inverts the unit to its infantry side; the loss of its guns is permanent.
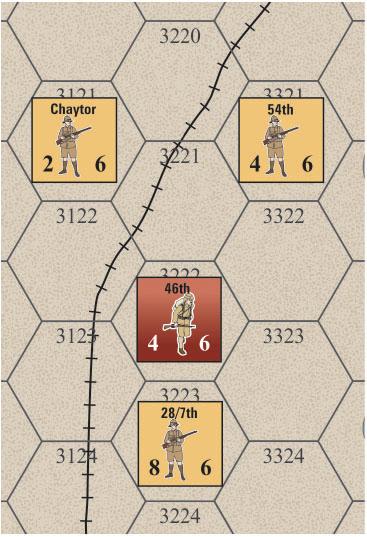
British infantry units are in 3121, 3321 and 3223. The 7th Infanty unit is eligible to attack the Turkish 46th Infnaty unit in the upcoming British Infantry Combat Phase. Before it can do so, however, the Turkish player may announce a break out attempt. He may do so because (1) the unit is entirely surrounded by British ZOCs and (2) all adjacent hexes are in British ZOC, so no retreat after combat would be possible. Note that a Turkish unit may be surrounded as here by British ZOCs at a distance, and still have room to retreat; in such circumstances a break out attempt is permitted.
For each attack, the phasing player rolls a die on the Infantry Combat Table, modifies the roll as directed, and applies the final result given. The result is also subject to special rules on retreat priorities, advance after combat, Turkish surrenders, artillery losses and Arab dummies.
7.5.1 Die-roll Modifiers. The table has several die-roll modifiers that either raise or lower the die-roll in an attack. These modifiers are cumulative and offsetting, as in the case of a defending leader (-1) and defending artillery (-2), matched against an attacking leader (+1). The final die-roll modifier would be a (-2), A modified die-roll of less than zero is treated as zero, and more than seven is treated as seven.
7.5.2 Retreat after Combat. A player retreats his own units when they receive an “R” result on the Infantry Combat Table. He always chooses their retreat to allow survival wherever possible. There are a number of specific restrictions in retreating units:
1. Retreating artillery units must stay on roads or tracks if possible.
2. If the retreating unit is forced to end its retreat overstacked with other friendly units, this is permitted. The owning player must then reduce the overstacking in his next Infantry Movement Phase by moving them apart. If he cannot, he removes any excess units and places them in the surrendered pile (Turkish player’s units) or eliminated pile (British player’s units). They count for victory points in the normal way.
3. Retreating units may not enter the same hex twice in their retreat path.
4. Retreats longer than one hex cannot stop anywhere short of the required distance. The owning player eliminates any unit able to go some, but not all, of the specified number of hexes.
5. Unless the Combat Results Table calls for a longer retreat, Arab units may always retreat one hex after they are involved in combat (even when not required to retreat at all). Whenever they retreat, they may ignore enemy zones of control. Such optional Arab retreats must be conducted immediately after the particular combat, before any other attack is conducted.
6. Retreating after combat involves no expenditure of movement points.
7. Retreating units may enter hexes in enemy ZOC only if those hexes are occupied by friendly units.
7.5.3 Advance after Combat. Whenever a hex is left vacant as a result of elimination or retreat, enemy units which took part in the particular combat may advance up to two hexes.
1. The first hex of this advance must be the vacated hex. Units advancing after combat ignore enemy zones of control. Advance after combat does not involve the expenditure of movement points. The option to advance after combat must be exercised immediately, before any further combat is resolved, or not at all. Victorious units may advance as above irrespective of whether they were the defenders or the attackers. In the case of multi-hex combat, where more than one hex has been vacated, the victorious unit(s) may choose which vacated hex to enter as the first hex of advance; if several victorious units are advancing and have a choice of hexes vacated as a result of combat, they may advance together (observing stacking limits) or split their advance. Similarly, several victorious units advancing through a single vacated hex may remain together in any subsequent second hex advance, or move into different hexes from one another; the owning may also may also choose to advance some
victorious units and not others, or some one hex, some two hexes, etc.
2. Whenever a Turkish unit surrenders as a result of combat (not of a failed break out) and a British or French unit advances to take the unit(s) prisoner, other victorious units involved in the that combat may advance up to two hexes, the first hex of advance being that in which the Turkish unit(s) are now prisoners. Arab units that participated in the combat may also take part in the advance. All other options and restrictions given in the preceding paragraph apply.
7.5.4 Turkish Surrenders. As a result of a combat, or of failed attempts to break out, Turkish units may surrender to British or French forces, but not to Arabs. Surrender is a combat result requiring further action from the British player. To win victory points, his units must escort Turkish prisoners to safe areas. There are several steps in the surrender process:
1. Surrender can result from failed break out attempts (see rule 7.4.8).
2. Surrender in combat occurs when British-controlled units totally surround the Turkish defenders with British zones of control and cut off all retreat. The defenders surrender on any adverse combat result, except when both sides retreat or there are surviving defenders after an exchange. When defending units surrounded by British ZOC suffer an exchange result, the defending unit is not eliminated; instead it moves to an adjacent hex occupied by an attacking British (not Arab) unit and becomes a prisoner (the attacker’s loss in an exchange is taken in the normal way). If all the attacking units are eliminated in such an exchange, there is obviously no one for the defenders to surrender to. In this case the number of defenders required to be lost are instead eliminated.
3. A single British unit may stack with up to six surrendered Turkish units (also referred to as prisoner units). When escorting prisoner units, the British unit becomes a guard unit. Up to 12 prisoner units may stack with two (or three) guard units in a given hex.
4. To escort prisoners, a guard unit must stay in good order at all times. If the unit is disrupted, it may stay with prisoners, but it cannot move them.
5. The British player transfer prisoners to a new guard unit having the new guard unit and the old guard unit in the same hex at the same time during a movement phase.
6. Regardless of unit types involved, guards may move prisoners at the maximum movement allowance of six. Rail transport of prisoners is possible starting with the 1st October turn, along friendly or converted track south
of converted railhead markers. Guards must entrain and detrain with their prisoners; prisoners count toward the limit of six units which may move by rail (see rule 4.8.5).
7. Captured Turkish artillery automatically converts to its infantry side, representing personnel without field equipment. The artillery unit is inverted permanently to its infantry side.
8. To collect victory points for prisoners, the British player must escort them off the south or west edge of the map. As they exit, he takes the units and places them in the surrendered pile. The escorting guard units may then reenter the map at the exit hex at the start of their next movement phase.
9. Turkish forces still at liberty can attack guard units. Any adverse result to the guard units will liberate the prisoners. The guards, if they survive, always retreat out of the defending hex, and the Turkish attackers advance to stack with the ex-prisoners. Freeing the prisoners gives the Turkish player victory points. If his units are overstacked in the hex, he must reduce the stack down to the stacking limits by the end of his next movement phase; failure to do so results in the removal of excess units (owning player chooses which, if there is a choice).
10. British artillery (including horse artillery) may never escort enemy prisoners. If Turkish units surrender to British artillery, both must remain in the hex in which the surrender occurred until some other type of British unit joins them to take over as prisoner escort. The artillery unit is then free to move. British artillery may only accept a surrender if no other type of British unit is available.
7.5.5 Artillery Losses. Turkish artillery in combat can be stripped of its guns by panic or surrender. Once it becomes an infantry unit, the loss of its guns is permanent and in all later combat the unit fights at its reduced strength. Artillery units that are panicked or surrendered are inverted to their “infantry” side; the loss of guns is permanent. Indicate the unit’s panicked status by placing a “P” marker on the unit.
7.5.6 Arab Dummies. Since Arab units remain inverted except at the moment of combat, the identity of dummy units is unknown until combat forces the British player to reveal them. When he turns a dummy counter face up, the British player must remove it from play. In the next British Infantry Movement Phase, he may redeploy it, face down with any Arab unit(s) on the map, taking care to observe stacking limits.
7.5.7 British Step Losses. Some British infantry and most cavalry have step reduction in strength. In an exchange or elimination result, the British player may invert such a unit and take the loss in that manner. If the unit should incur a
similar result later, it is eliminated.
7.5.8 Leaders, HQs, Supply Units. All of these may be taken as combat losses, just like any other unit. Whenever the Turkish player loses a leader, and the Yilderim Officers card is in effect, a Generic Leader counter appears as a substitute in Damascus. Generic German and Turk leaders are inter-changeable.
Like other units, horse artillery, cavalry and armored cars (referred to generally as ‘cavalry-type units’) may attack only once in the British player’s turn. This attack may be made in the Infantry Combat Phase or in the Cavalry Combat Phase, but not in both. Cavalry which have attacked during a turn (in either phase) may not conduct reconnaissance movement that turn. Note that while cavalry, horse artillery, and armored cars may all move in either the Infantry or Cavalry movement phase, and all may attack in either the Infantry or Cavalry Combat Phases, only cavalry can carry out reconnaissance movement. Note also that it is perfectly permissible for any of these units to attack in the Infantry Combat Phase and move in the Cavalry Movement Phase, or vice versa.
Requirements for British cavalry-type units’ combat supply differs from movement supply. At the moment of cavalry combat, whether the units attack or defend, they must trace a supply line in the way British infantry would under rule 7.3; if they are unable to trace such a line, they are unsupplied. Their penalty for being out of supply is halved strength, with fractions rounded up.
8.3
When British cavalry-type units combine with British infantry or Arab units in an attack, the British player resolves the battle on the Infantry Combat Table. When he commits only cavalry type-units to the attack, he may use either combat table. Where only cavalry-type units are attacking, the British player declares which combat table he has chosen and rolls one die for the Infantry Combat Table or two dice for the Cavalry Combat Table. In this context all units other than horse artillery, armored cars, and cavalry count as “infantry”. Any attack which includes naval gunfire must be made on the Infantry Combat Table.
8.4
Infantry combat procedures and results under rules 7.4
and 7.5 also control cavalry combat, except for certain situations. The specific changes for cavalry combat are:
A.Shifts to Odds Column. Certain cavalry attacks can cause a shift to the odds column on the Cavalry Combat Table. Before rolling the dice, the British player checks the table to see whether his attack will shift the odds column up or down. Example: he conducts a 2-1 attack with a charge bonus (1 column shift to the right), aimed at a Turkish rear area (1 column shift to the right) on defenders positioned in the rough (1 column shift to the left). The net column shift produces a 2.5-1 attack. Like die-roll modifiers, these shifts are cumulative and offsetting.
B.Retreats. Cavalry units may freely retreat with an “R” or “1A” result, unless certain Turkish units, as explained in rule 6.1, impose zones of control. When Turkish zones do cut off their retreat, the British player may still avoid total elimination by taking cavalry step losses or eliminations at the rate of one step loss or elimination per retreat hex required.
C.Break Outs. Turkish units may never attempt to break out when adjacent to British cavalry units. For purposes of break out, horse artillery and armored cars are not cavalry; the Turkish units may treat them as infantry.
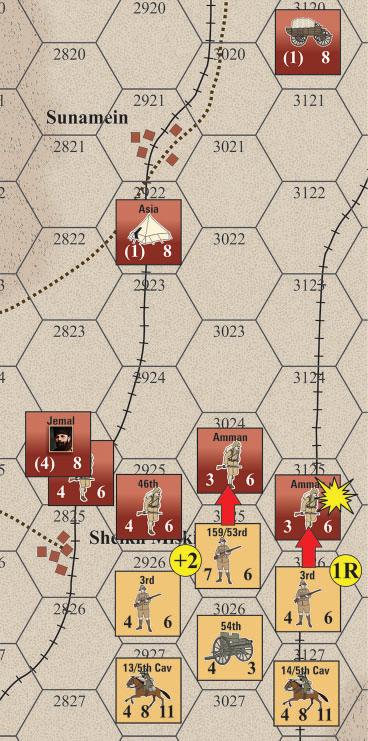
It is the British infantry combat phase. They plan two attacks, both at 2:1.
The center 7-6 attacks the center Turk 3-6, while the right 4-6, with 4-3 artillery support, attacks the other Turk 3-6.
Since the defenders are in command control and in supply, they suffer no adverse die-roll modifiers or strength loss.
British strategy is to either push these defenders out of the way or eliminate them, opening a path for the cavalry to move later and attack leader Jemal, the headquarters or the supply wagon.
Unsure whether his one-column shift card or two dieroll modifier card is best against the Turkish center, the British player goes ahead and rolls first, which he may do.
He gets a 3 on the 2:1 column and then decides what to do with his cards.
On clear terrain the 3 roll either raises +2 to 5 and a 1DE, or it shifts up one column to 3:1 and gets a DR2. Since a 1DE is better, the British play the modifier card.
For the second attack, the British player rolls a 2 for a BR both retreat, which is not good; the attackers want to move forward not backward.
Fortunately the British one-column shift card saves the day, since a 2 on the 3:1 yields a DR, much better.
The cavalry path now opens toward Turkish supply, leader or headquarters. to fight them in the upcoming cavalry combat phase.
After they are played, both cards go to the discard pile.
Note that the two cards may have been useful for their specific events; however, the British player twice wanted die-roll options.
The British player automatically rallies his disrupted units at the end of his turn. He removes the “D” marker from each disrupted unit, and it regains good order status.
At the end of his turn, the Turkish player rallies disrupted units, attempts to rally panicked units, and repairs railcuts, in Turkish rail lines.
9.2.1 Rallying Units. Disrupted Turkish units automatically regain good order status, just as British units do. There are no recovery die rolls for Panicked units, however, they require help from a leader or headquarters, which must not itself be panicked or disrupted. To recover with the aid of a headquarters, a unit must be no more than three hexes away from the headquarters, exclusive, and all the hexes in the recovery path must contain passable terrain free of British zones of control (the presence of a friendly unit in a hex, however, negates such British ZOC). In order to rally with the aid of a leader, a unit must be stacked with the leader; there is no way a leader can help from a distance unless it rallies a companion headquarters in the same hex. Since leaders and headquarters units in good order can rally other leaders and headquarters units, the Turkish player can set up a chain reaction of recovery. When they rally, the Turkish player flips panicked units back over to their front side, or in the case of two-sided units, removes the panicked marker. Should a panicked unit exit the northern map edge before recovering, its transfered to the “surrendered” pile, and adds three victory points towards the British total.
9.2.2 Repairing Rail Cuts. To repair his cut rail lines, the Turkish player first moves a unit onto the rail cut. In order to effect repairs, the unit must remain in the railcut hex for a whole Turkish turn, and must also remain undisrupted and unpanicked for the whole of that time. A single unit observing the above conditions can reduce a heavy cut to a
light cut, or remove a light cut altogether. Two units meeting the above conditions can remove a heavy cut altogether.
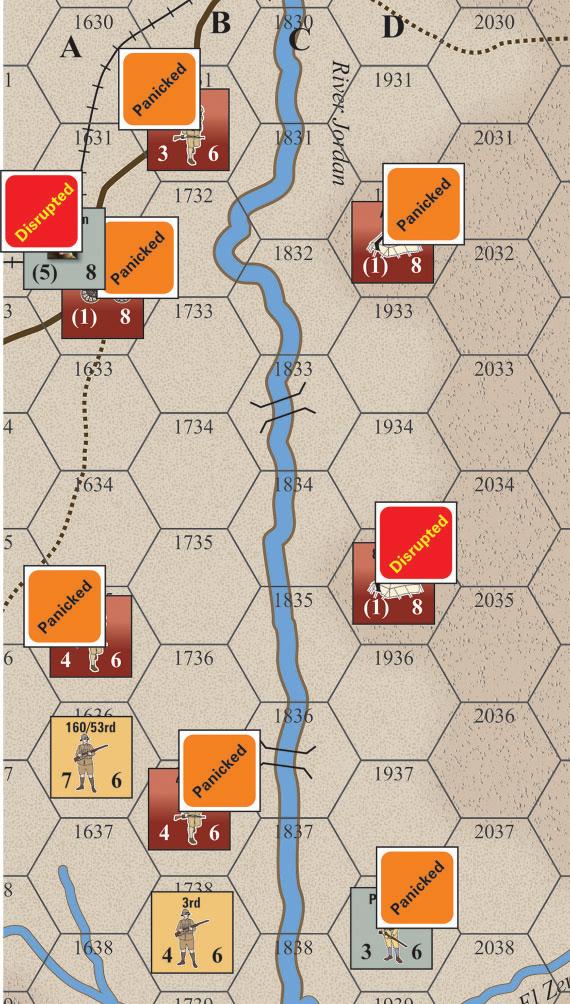
This scene displays the before-and-after of Turkish recovery. Note that no die rolls are made. The Jordan River runs between the units and is impassable except at the bridge.
First thing, clear disrupts automatically. On the east bank, the disrupted lower headquarters revives and recovers the other 2 units on hexrow D
On west bank, disrupted leader Von Oppen revives and recovers the supply wagon with him. The panicked unit next to him on hexrow B remains as is because leaders
Leader and headquarters units cannot effect rail repairs; all other Turkish-controlled land units can discard both cards and draw two new ones from the draw pile.
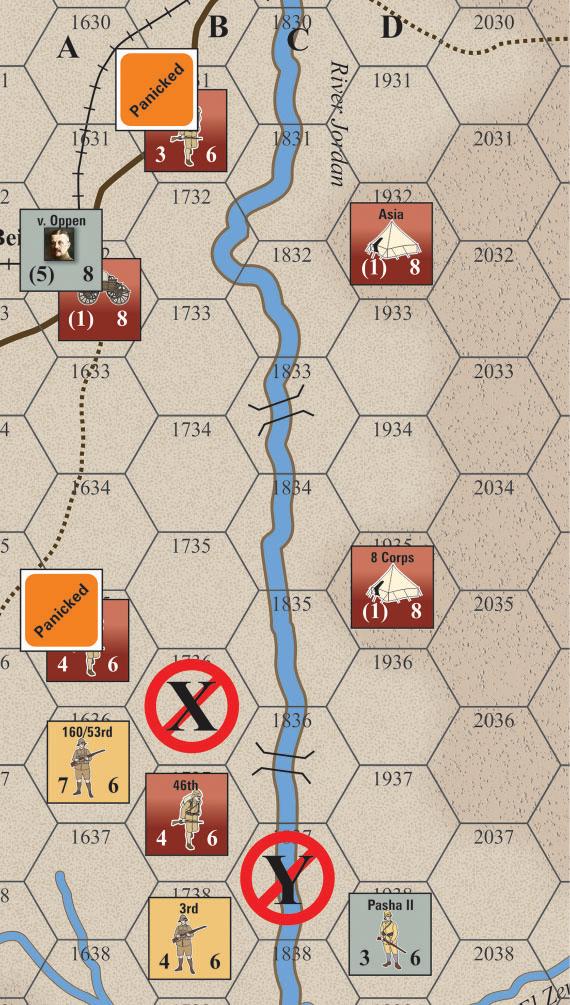
won’t recover units outside their hex. Both panicked infantry units left on hexrows A and B also remain as they are because neither headquarters can trace 3 passable hexes to them. Jordan River, and the 7-6 British infantry’s zone of control into “X”, cut off a recovery path.
The lowest unit on hexrow B can recover since the nearest headquarters traces a free path across the bridge directly to the hex. Note that the path would be cut if the lower 4-6 British infantry occupied the west bank “Y” hex.
10.1
Falling Crescent is a card-assisted game. Two kinds of cards are available from each player’s deck. Operations cards cover immediate tactical situations and discard upon use. Strategy cards apply to longer-term situations and may not have to discard upon use, but can remain in effect and stay on the table.
Cards are color-coded on their face to show their separate national forces. The color on a card face indicates that its Title, Die Modifier, and Column Shift apply only to that force and no other.
10.2.1 Turkish Cards. All Turkish cards are red. German cards are black.
10.2.2 British Cards. All British cards are a variation of dark red. French cards are blue.
10.2.3 Arab Cards. All Arab cards are dark brown.
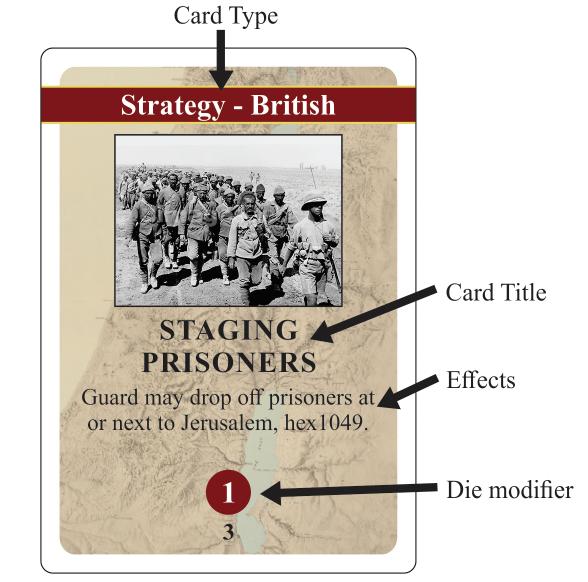
10.3.1 Title. This refers to a specific event, advantage, or disadvantage that can occur during play. The Title text appears on the card beneath a descriptive picture. When used, the phasing player lays the card down and declares the Title to be in effect.
10.3.2 Die Modifier. This appears as a circled number on the bottom of the card. When used, the number applies a plus or minus modifier to a die roll the phasing player makes during his turn. Before or after rolling, he plays the card, declaring the modifier to be in effect. Only one card die modifier applies per roll and cannot be used with a card column shift.
10.3.3 Column Shift. This appears as a number with arrows on the bottom of the card. When used, the number applies a left/down or right/up column shift to a die roll the phasing player makes during his turn. Before or after rolling, he plays the card, declaring the column shift to be in effect. Only one card column shift applies per roll and cannot be used with a card die modifier.
10.3.4 Only One Choice per Card. Title, die modifier, and column shift are all exclusive from one another.
1. The phasing player may only use one of them from an Operations card and then puts the card in the discard pile.
2. The phasing player may only use the die modifier or the column shift once from a Strategy card and then puts the card in the discard pile.
3. The phasing player may use the title from a Strategy card and then places the card on the table for future use of the title. A Strategy Card played for its Title sits face up on the table indefinitely and continues to apply for the duration. It is not part of any deck reshuffle. There is a limit of two Strategy cards that remain on the table. A player may freely exchange a newly drawn Strategy Card for one already on the table.
The maximum hand size for the phasing player is two cards drawn from the face down friendly deck draw pile. Any Strategy card placed on the table does not count toward the hand size.
10.4.1 Refill Hand. The phasing player may choose to play one or both of his cards during his turn. At the start of his next turn, he draws new card/s to refill the hand.
10.4.2 Exchange Card(s). If the phasing chose not to play any card from his hand in the preceding turn, he may now discard both cards and draw two new ones from the draw pile.
10.4.3 Stand Pat. If the phasing chose not to play any card from his hand in the preceding turn, he may simply pass on the card draw and wait for a better moment to play the cards later.
10.4.4 Deck Reshuffle. In the event no cards remain in the friendly draw deck, the phasing player reshuffles the discard pile and continues with a fresh deck.
When three players participate, separate the decks into three parts---one British, one Arab, and one Central Powers. The British player and Arab player only draw a maximum of one card per game turn from their respective decks. Their hand size limit is also one card at a time.
The British regular army receives no reinforcements in the game. It may in fact have to reduce strength because of sickness (see below). The Arabs get reinforcements on turn two at Azrak (see Reinforcement Chart) and possibly later if uprisings occur.
11.1.1 Arab Uprisings. As soon as Arab units (not dummies) enter the towns of El Muzerib or Nassib, they will cause irregular units to appear. This sequence controls the Arab uprising:
1. To trigger an uprising, Arab regulars can enter either town at any point in the game-turn.
2. Immediately after the first town falls, the British player rolls a die twice for each unit appearing: one dummy and three irregulars.
3. The first number rolled is the directional hexrow around the town, starting with north as one, northeast as two, and continuing clockwise to northwest as six.
4. The second number rolled is the number of hexes away from the town, exclusive, going along the hexrow rolled by the first number.
5. The following example: Arab regulars take Nassib and trigger an irregular’s entry with a four-five die-roll. The units appears, face down, in the south direction, five hexes from Nassib.
6. If the irregular or dummy appears in a friendly occupied hex, overstacking is possible but must be ended as soon as possible.
7. If the irregular or dummy enters on top of enemy units, then the British player displaces it to the nearest available hex in the same hexrow (his choice if 2 available hexes are equidistant).
8. Once the dummy and irregulars enter, the British player may immediately move them in the normal fashion.
9. Arab irregulars and the dummy cannot delay entry; if the British player does not take them when available, they are lost.
11.1.2 British Reduced Strength. British regular army units anywhere north of Lake Huleh, exclusive, have to check for malaria and influenza on game turns 10/3 and 10/5. At the beginning of his Infantry Movement Phase in each of these turns, the British player rolls a die for each regular army unit in the affected area. A roll of one to four means the unit is healthy. A five or six indicates that the unit has become infected. The British player places a “D” marker on the infected unit, and it remains disrupted until the following Recovery Phase. The disrupted unit does not have to withdraw from action, but its strength is reduced to one-half, with fractions rounded up.
The Turkish player receives a reinforcement on the 9/27 game turn known as the Ma’an Detachment. The Reinforcement Chart lists the units, which enter the south edge on the Hejaz Railway line, either on foot or entrained. If British units block this entry hex, they instead enter at the nearest-unblocked south-edge hex to the Railway (if unblocked hexes are equidistant, the Turkish player chooses which his units enter at). The British block hexes either by occupying them or putting them within their zone of control. The Turkish player can voluntarily delay the entry of the Ma’an Detachment.
Four different setups are available. Players can choose from among these alternatives:
•Alternate Historical Setup (pro-British)
•Modified Historical Setup (neutral)
•Free Setup (pro-Turkish)
•Historical Setup (shown only on the Player Setup Cards) Whatever one they select, the British player always sets up last.
Turkish Forces
(a)they place one or two infantry units in every start trench hex.
(b)all other beginning units, and any remaining infantry, start anywhere behind trench line.
(c)eight units, Ma’an Detachment (MD), enter on 9/27, south end Hejaz Railway.
British Forces
(a)all regular army units start two or more hexes south of Turkish trench line.
(b)all Arab units except 3 x 1-10 and 1 x dummy enter on 9/17 turn, on or adjacent to desert airfield hex 3850.
(c)when Nassib or El Muzerib falls, remaining Arab units enter on or adjacent to the airfield.
SPECIAL DIRECTIONS
Historical Setup Scenario:
British: Regular army units may not move first two turns, on turn three they are freed. Arabs may move and fight first two turns. Air units at Azrak may fly intercepts only first two turns, other RAF grounded; turn three all are freed.
Turkish: Turkish forces east of Jordan may always move and fight, restricted to east bank first two turns. Turkish forces west of Jordan frozen first two turns, on turn three are freed.
Turkish air may fly missions only first two turns vs. Arabs on east bank. Afterwards they fly intercepts only.
Both: May not examine other’s stacks first two turns, afterwards they may.
B.MODIFIED HISTORICAL SETUP
Turkish Forces: All troops behind trench line stay in Historical Setup. The forces on trenchline, including adjacent artillery, may freely interchange position as long as (a) they remain on trenchline if infantry and adjacent to trenchline if artillery, and
British Forces: All troops stay in sectors of Historical Setup, except any cavalry and armored cars may freely locate along line.
SPECIAL DIRECTIONS
Modified Historical Setup Scenario:
All Directions from Historical Setup are in effect.
C.FREE SET UP
Turkish Forces: All units are free to set up wherever Turkish player wants them, provided (a) no more than three units can go north of Deraa, inclusive, (b) at least two units are on every trench hex, and (c) the Ma’an Detachment appears as stated on turn 9/27.
British Forces: Arabs appear as stated in Historical Setup. British regulars set up freely on west bank 2 or more hexes south of the trenchline.
SPECIAL DIRECTIONS
Free Setup Scenario:
The Directions from the Historical Set Up remain in effect,
except for Turkish air units having ability to fly missions at all times, to try for disrupts against any British units. Players may also examine each other’s stacks at all times.
To highlight various stages of the Palestinian Campaign, several scenarios are presented, ranging from shorter historical actions to “what-if” situations. In all of them, the Turkish player sets up first and moves second. Each scenario also offers special rules which supplement the standard rules.
12.1.1
Setup is the same as the Historical Setup of the Campaign Game.
12.1.2
Turns are 16 September to 25th September, for a total of nine.
12.1.3
All rules of the Campaign Game will apply. There are supplemental rules as follows:
1.Von Sanders. German General Liman Von Sanders commands the Central Powers forces in Palestine, and is headquartered in Nazareth. The Allies see him as a target for capture.
a.Capture. Until British ground units come within two hexes of Von Sanders, he may not move. As soon as they enter this zone, he may move in the next Turkish movement phase and attempt escape. British regulars can try to capture him through surrender or elimination in combat; Arab forces may not attack or capture Von Sanders.
b.Leadership. Von Sanders has a combat strength of 1, but does not modify die-rolls or shift odds for attack or defense. If units stacked with him engage in combat, he will suffer the same results that they do, except for panic or disruption.
2.German Rear Guards. Because they are better disciplined than the Turks (and to protect Von Sanders). German units must resist or slow down British forces wherever possible.
a.Proximity to Fighting. No German units may withdraw more than three hexes away from the nearest British unit of any type. Exception: The Turkish player may retreat German units further than 3 hexes from the nearest British unit if required to do so as a result of combat.
b.Good Morale. Only when the Turkish player rolls a six
on the Panic Chart or the Break Out Chart, will a German unit panic or surrender. This rule supercedes all die-roll modifiers given on the charts. German units will not panic as a result of RAF attacks.
3.British Victory Conditions. British victory towns are: Amman, Deraa, Samakh and Haifa. Von Sanders is a swing objective and serves as a bonus. To win, the British have to:
•Neutralize Von Sanders by ringing him through 360 degrees by their zones of control however far the radius extends.
•Occupy three of the victory towns with supplied units in good order.
•Prevent a Turkish victory.
Alternatively, they may win by:
•Capturing Von Sanders through combat.
•Occupying two of the towns as above.
•Preventing a Turkish victory.
In the case of both sets of victory conditions, all 3 conditions must be met in order for the British player to win.
4.Turkish Victory Conditions. The Turkish player wins if he saves Von Sanders and avoids losing more than 20 units as prisoners. Von Sanders is not saved if he is ringed by British zones of control as in (3) above.
5.Draw. If neither side achieves their victory conditions the result is a draw.
After careful preparation, British General Allenby releases Lawrence and his Arab forces to start the Allied offensive. In mid-September 1918 they attack on the Jordan east bank. Regular army units on the west bank launch their own offensive on 18 September, making such good progress that Allenby expands on his original goals of Sebustiye, El Affule and Amman. He now orders Samakh and Deraa to be taken, both important junctions for Turkish supply and retreat. Gradually he even begins to eye Damascus. In the early going, enterprising British cavalry break through and take a stab at capturing Von Sanders, who has lingered around Nazareth in the hope that Turkish forces would stop the Allied offensive. On 20 September, in the middle of the night, British cavalry sweep into the town and he barely escapes them. Nazareth falls to British forces on the next day.
12.2 SCENARIO 2 (WHAT IF)
Dash to Samakh: Without Lawrence
12.2.1 DEPLOYMENT
Setup is the same as Historical Setup of the Campaign
Game, but all RAF aircraft are stationed at Ramie, and the Arabs are absent from the game.
12.2.2 SCENARIO LENGTH
There are nine turns, from 16 September to 25 September. 12.2.3 SPECIAL RULES
All rules of the Campaign Game and Scenario 1 are in effect, plus these rules:
1.Turkish Withdrawals. On each turn the Turkish player must withdraw two units of any type from west of the Jordan and move them to the east bank, where they operate for the rest of the scenario. Although there are no Arab regulars present. Turkish commanders are worried enough about local unrest to cover the vulnerable east bank area.
2.British Preparedness. Without the need to wait for their Arab allies, all British regular units, including air units, are ready to fight earlier. They may move and attack from turn one onward.
Despite concerted efforts by Allenby and Lawrence, the Allies cannot launch an Arab offensive. The various Arab tribes are too divided, their men are untrained, and the Turks have managed to intimidate the populace. In the overall war, however, Turkey suffers strategically, so the British go ahead and attack in Palestine, hoping to catch the Turks off guard. The Allied drive gets underway from the west bank on 16 September.
12.3 SCENARIO 3 (WHAT IF)
Dash to Samakh: Lawrence Goes It Alone
12.3.1 DEPLOYMENT
Setup is the same as Historical Setup of the Campaign Game for Arabs and Turks. British regulars are absent; players may consider that they remain south of the frontline and distract Turkish forces.
12.3.2 SCENARIO LENGTH
Turns are 16 September to 25 September, for a total of nine.
12.3.3 SPECIAL RULES
The rules of the Campaign Game are in effect, but not the rules of Scenario 1. In addition, the following special rules apply:
1.Solid Trenchline. During the whole scenario. Turkish forces must have at least one unit on each frontline trench hex. The rear trench line, near El Affule, does not have to be occupied.
2.West Bank Movement. For the first five turns no more than 2 Turkish units located on the west bank of the Jordan can move each turn: they do not have to be the same 2
units each turn. After turn five, the Turkish player may move four units per turn. West bank units can cross over to the east bank, but they immediately count towards the east bank movement quota. Arab units may freely move about both east and west bank areas.
3.East Bank Movement. Throughout the scenario, the Turkish player can move up to four of his units located on the east bank. If they move onto the west bank, they immediately count towards the west bank quota.
4.Arab Replacements. On the turn following their loss, Arab units, excepting leaders, return to play at any location free of Turkish zones of control and within five hexes of Amman or Deraa. The British player may return dummy units in the same manner to disguise their presence. When eliminated, Arab leaders are permanently lost.
5.Royal Air Force. All planes can fly throughout the scenario.
6.British Victory Conditions. To win, the British player must inflict a minimum of six rail cuts still in existence at game’s end, with two or more of them to the north of Deraa. Secondly, he must occupy the following points: Deraa, and any location lying within two hexes of Haifa, Samakh and Damascus.
These points need not be occupied simultaneously, but they do each have to be occupied at the end of a game turn. If they are forced to retreat on the same turn they arrive at the objective, the Arab units must attempt to occupy it afresh.
An occupation of at least one hex of Damascus proper at the end of a game-turn allows the British player to eliminate any one of the other three objectives as a victory requirement. Players should note that Deraa itself is an objective, unlike the other towns, which offer victory zones.
7.Turkish Victory Conditions. The Turkish player wins if he prevents a British victory and eliminates Lawrence.
8.Draw. If neither side achieves their victory conditions, the result is a draw.
Even though Turkish forces in Palestine are ripe for an Allied offensive. Allenby bides his time. He intends to make the safest possible attacks, with the Arabs bearing the brunt of the load. He orders Lawrence to disrupt the Turks for a ten-day period, threaten their key points, and cut their rails. Allenby allows full range to their movement on both banks of the Jordan. Buoyed by this freedom of action, Lawrence envisions an end to the war and leads his forces on a broad sweep of the area in hope of an Arab victory, and not a British one. The Turks try in vain to keep up with Lawrence and to capture him, but they fail. Unwilling to chase him in force, they release a few units for the task and hold most
of their troops committed to the frontline trenches. By 25 September, Lawrence achieves a tactical victory and waits for Allenby to deliver the knock out blow.
12.4.1 DEPLOYMENT
Setup is as follows:
On Jordan west bank Turkish forces start anywhere up to five hexes north of Sea of Galilee. On Jordan east bank they start anywhere three hexes north of Deraa, hex 2830.
On Jordan west bank British regular forces start anywhere south of Nazareth, hex 1129. On Jordan east bank they start five or more hexes south of Deraa. Arabs start anywhere east and south of Deraa.
Note: One brigade each of the Aus Mtd., 4th Cavalry, 7th, and 10th divisions should begin the game flipped over to its reduced strength side.
12.4.2 SCENARIO LENGTH
There are five turns, 27 September to 5 October.
12.4.3 SPECIAL RULES
Rules of the Campaign Game only are in effect, together with the following:
1.Deployment Restrictions. All Turkish units, excluding those stacked with headquarters or leaders, must roll for panic on the Panic Chart when they are initially deployed. Panicked units in this Scenario do have to move north; however, the Turkish player may hold them from exiting the map if he chooses to keep them in play. British units of the 10th and 53rd Divisions may not move until turn two.
2.Automatic Rail Cuts. The British player starts by placing three rail cuts between Amman-Deraa and three between Deraa-Kesweh. Two of them (his choice which) must be light cuts.
3.British Victory Conditions. In order to win, the British have to impose zones of control on north map edge hexes 2301-2901, inclusive. They also must simultaneously occupy Amman, Deraa, Beirut, Damascus and Baalbek. The occupying troops must be in supply.
4.Turkish Victory Conditions. The Turkish player wins if he prevents a British victory and he exits at least ten units of any type off the north map edge between hexes 23012901, inclusive. Once exited, the units may not return to play.
5.Draw. If neither player achieves his victory conditions, the result is a draw.
After cutting rail lines north and south of Deraa to block Turkish retreats, Lawrence and Arab forces take Deraa on 27 September. They soon move on to harass and slaughter the pitiful Turkish columns melting away on foot to the north. Not to be outdone, Allenby orders his Desert Mounted Corps to go full speed for Damascus and establish allied control of Arabia. The Australian Mounted Division at Tiberias and the 4th Cavalry west of Deraa become the vanguard. They pause briefly for sharp encounters at Kesweh and Sasa, where Turkish remnants, Germans among them, give a good accounting. As the net closes in on Damascus, the city falls into chaos and the ranking Turk at the scene, Jemal Pasha, flees on 30 September. That night the Damascus garrison commander goes over to the British and gives them details of the city defenses. The city is virtually abandoned by the Turks on the following morning, when Arabs and British regulars charge into the city, both claiming first entry.
Occupying Damascus, Lawrence tries to restore order, with Arab factions bickering over their newfound power. While he labors to create an Arab self-government, Allenby pushes his regulars, already suffering from malaria, northward towards Baalbek, where they cut off part of the final Turkish flight. To round out the campaign in Palestine, the 7th Infantry Division enters Beirut a few days later.
13.1 TACTICAL VICTORY
To win tactically, a player must control certain towns and outpoint his opponent, a. Control of Towns. A player controls a town at the end of the game if at least one of his units occupies it in good order, or his forces were the last to pass through the town and it is now vacant. He must control three or more of these towns: Haifa, Amman, Deraa, Beirut, and Reyak. The Turkish player starts the game controlling all five towns.
13.1.1 Points Schedule. A player collects tactical victory points depending on the results achieved. The following schedule sets the points he can earn:
15 VPs for eliminating Lawrence
10 VPs for each cavalry step loss (two- step units totally lost will count 20 points). Armored cars count as cavalry for this purpose, but horse artillery count as infantry.
10 VPs for any unit removed because of overstacking, except dummies.
5 VPs for each infantry unit eliminated.
5 VPs for each Turkish prisoner unit liberated.
3 VPs for each Arab unit eliminated, excluding dummies.
3 VPs for each Arab unit west of the Jordan, per turn.
3 VPs for each good order Turkish unit exited off the north map edge. Such exiting is allowed only on game turns 10/13 and 10/15. An exited unit may not return to play.
To the British Player
5 VPs for capturing or eliminating the leader Kemal.
3 VPs for each Turkish unit in the surrendered pile. 2VPs for each converted Turkish rail hex.
-25 VPs if Arab units enter Damascus ahead of British regular army units.
Note that the British player receives no victory points for eliminated Turkish units.
To win strategically, a player must occupy both hexes of Damascus at the end of the game. His occupying units have to be in good order and in supply, or they will not count. The British player can use Arab units for capturing Damascus, but must pay the tactical price listed above if they do so.
To gain overall victory the British player must achieve both a strategic and a tactical victory. The Turkish player gains an overall victory if he wins a strategic victory. Tactical victory can end in a draw when players earn an equal number of points, or when one player has a points victory, but does not control all the specified towns; strategic victory can end in a draw when they each occupy a hex in Damascus In assessing victory, players can agree to end the game before the final turn.
Lawrence, known to the Arabs as El Aurens, was the inspiration behind the Arab revolt, and only his charismatic leadership bound together the mutually suspicious desert tribes. To reflect his critical importance, the British player suffers the following penalties if Lawrence is killed:
1. Arabs of the Howeitat (Ho) and Rualla (R) tribes, Arab irregulars (I), and those of the Hauraun Fellahin (H) may no longer stack with one and another, nor may they make combined attacks.
2. At the start of each movement phase the British player rolls a die. If the result is a 5 or 6, no Arab units may attack in the immediately following (infantry or cavalry) combat phase.
The design of Falling Crescent proved to be an interesting challenge. Initial stages involved research on orders of battle and the basics of the campaign. Cyril Falls’ book Armageddon—1918 was an excellent source, showing that in this theater at least, British sources on Turkish operations were reasonably complete and accurate. I went on to consult the other texts listed in the Bibliography, to fill in the essential details.
Although the Palestinian Campaign presents one of the last major cavalry actions in history, it at first glance appears dull because the Campaign is so one-sided. The Turks are depleted, low in supply and morale, without much leadership. Their resistance in general was brief and lukewarm; the British eventually rolled over them. As an afterthought, the British commander, General Sir Edmund Allenby, cast his eye on Damascus as the prize. The Arabs, with Lawrence pushing them on, harassed and cut their way to the City. A small Turkish force under Kemal (Ataturk) managed to escape to the north. It ended for Turkey a few weeks later in October, when her losses in Bulgaria and Palestine brought her to the peace table and she left the Great War.
Compared to history, the British in Falling Crescent don’t have it so easy. In order to win, they must take territory, capture the bulk of the Turkish army and avoid sickness. Their Arab forces cannot charge into Damascus without paying a price in victory points. Lawrence and the Arabs move quickly, but their offensive strength is limited. Theirs is a diversion, much like the plan Allenby had cast for them. To speed up play for the British, and to reflect the “bog factor” for days without significant British gains, I have put the British player on a tight, 14-day schedule.
The Turks in the game are weak, but, especially among the Germans, they can strike back if allowed to organize. They can easily stand up to the Arabs, if the Turkish player wants them to, at the cost of draining his front. The Turkish rails offer a real advantage: an escape to Damascus and the north, or a fast interior line. Turkish strength, while less than the British, can throw “bodies” in the way, If players want to strengthen Turks to their maximum, the Free Setup should give the British all they can handle.
Movement and particularly combat lend a variety of detail to both sides. There is enough interaction between armies to make the campaign unpredictable. Very often in the actual battle, British troops would approach fleeing Turkish forces, only to discover they would give up (surrender), run helterskelter (panic, rout), or withdraw in good order (breakout). At times the Turks would fight; the results usually favored the British, with an occasional rebuff (exchange, step loss or retreat). In the meantime British air, in the form of the new RAF, did its best to tie up retreats.
When the dust cleared, the British, by Allenby’s directive, wanted to take the Turkish army out of the war in Palestine (surrender), and escort it to the British rear for internment (prisoners). Allenby never intended to annihilate the Turks; his Western Front experience taught him a good lesson on attrition. His best and most memorable deed in this campaign was his brilliant use of cavalry for breakthroughs (limited zones of control, exploitation movement). All his preparations were complete and his training superb (set-up last, no command control burden).
Along with Allenby, Colonel Lawrence deserves great credit in this decisive victory of British arms. Lawrence carries on a vital guerilla role in the game. His race to Damascus and the rail-cuts in his wake can be remarkable in their scope. The Turks probably cannot recover from his swathe. The desert and the hills give Lawrence and his forces their needed sanctuary, leaving the slower Turks powerless to pursue. Their rail lifelines are soon cut for good.
In designing Falling Crescent I tried to bring out the flavor of encirclement and surrender, of charging cavalry and elusive Arabs guerillas. The Palestine campaign is one of history’s last great cavalry actions. In this fluid scene, local plans can often go astray unforeseen developments may hinder or even alter command plans. The players’ cards, new to this edition, add their part to the fortunes of war with reactive tactics and shifting events.
The game’s pace is swift, and I believe that players will enjoy it as a World War I game devoid of attrition and stalemate. Especially in the use of cavalry and air, they will see a hint of things to come in 1939-1940, when a later war will no longer be fought with horses and canvas biplanes, but with treaded armor and screaming dive bombers.
Map of Operations at the start of the campaign through September. On October 1st, the Arab forces entered Damascus and on October 8th, Entente forces entered Beirut.