BUILD GREEN: FIJI HOME BUILDING MANUAL


DRAFT 2 2023 June 15
2023
Solar panels

Steep roof slope for drainage so roof lasts longer
Ridge cap with vent to let hot air out
Tinted light tunnel
Light coloured roof with reflective coating
Tree shades north wall
Shaded window/vent at top allows hot air to escape
Window to wall ratio provides cooling and light
Tall room height allows hot air to rise
Tinted windows reflect sunlight
Light coloured walls reflect heat
Tinted windows in door panel
Concrete foundation for termite protection

Shorter wall faces north
Shaded outdoor area at north cools home interior
DRAFT 2 2023 June 15
ACKNOWLEDGMENTS
This Manual was prepared as part of the update to the Fini National Building Code (FNBC) project.
It provides guidance on how to construct a new home that will comply with the sustainability requirements of the FNBC.
Team Leaders
MPWTMS Ministry of Public Works, Transport and Meteorological Services
Taitusi Vakadravuyaca, Permanent Secretary
Andrew Pene, Director of Buildings and Government Architect
Marica Ratuki, Principal Electrical Engineer, Zahidul Islam, Chief Structural Engineer
Mikaele Belena, Director of Energy, Mohammed Nistar Khan, Director of Water and Sewerage
Asian Development Bank
Kristina Katich, Senior Urban Development Specialist
Consulting Team
Wavefront Planning and Design

AGM Architects Organization

Global Green Growth Institute

New Zealand Foreign Affairs and Trade

DRAFT 2 2023 June 15
CONTENT 01 08 15 21
OVERVIEW
SITING
SHAPE AND LAYOUT
COOLING
Objectives
How to Use the Manual
Building Terminology
Legislative Requirements
Location
Orientation
Landscape
Maximum Coverage
Building Composition
Window and Vent Placement
Room Layout
Room Size
Window Shading 4.2 Glazing 4.3 Insulation and Air Gap 4.4 Ceiling Fan 4.5 Air-Conditioning 4.6 Appliances 32 5. BUILDING MATERIALS
Building MaterialsDRAFT 2 2023 June 15
1.
2.
3.
4.
1.1
1.2
1.3
1.4
2.1
2.2
2.3
2.4
3.1
3.2
3.3
3.4
4.1
5.1

52 57 7. WATER 8. ELECTRICAL 7.1 Rainwater Harvesting 7.2 Low Flow Water Fixtures 7.3 Solar Hot Water Heater 8.1 Power Source 8.2 Layout 8.3 Wiring 71 9. BUILDING PERMIT 9.1 Development Consent 9.2 Building Permit 9.3 Site Inspections 9.4 Occupancy Permit BUILD GREEN 42 6. ENERGY 6.1 Lighting 6.2 Solar Power 6.3 Bio Energy 8.4 Devices 8.5 Grounding
A SAMPLE ENERGY EFFICIENT LAYOUT PLANS DRAFT 2 2023 June 15
APPENDIX
Build Green provides a step-bystep outline of important design elements to be considered when planning to construct a sustainable home. Sustainable homes are designed to maximize energy savings which reduces the carbon footprint and leads toward a sustainable future.
Overview
in this chapter
1. Objectives
2. How to Use the Manual
3. Building Terminology

4. Legislative Requirements
Not only do sustainable homes contribute toward Fiji’s commitment to reduce energy consumption, but they benefit the homeowner.
After the initial installation costs, sustainable homes reduce energy bills, allowing homeowners to use the savings for other important endeavours ... so
1
! DRAFT 2 2023 June 15
Build Green
Objectives 1.1

This Manual is intended for everyone.
New homeowners, to make decisions on how to build green, save energy, reduce costs and help Fiji achieve carbon neutral. Designers, to ensure building plans incorporate sufficient green building techniques to receive a building permit Builders, to understand expected standards, incorporate them into building plans, and construct homes to achieve the objectives Plan Examiners, to reference when evaluating if a proposed building permit application complies with the Fiji National Building Code Agencies, to evaluate if guidelines for green building, resilience, fire safety, access, health and amenity are effectively executed Building Inspectors, to evaluate if a building complies with the intent of the Fiji National Building Code Educators, as a reference to instruct new architects, builders, engineers, technicians, trades workers
to Build Green
| 2 Overview F IJI HOME BUILDING MANUAL BUILD GREEN
DRAFT 2 2023 June 15
How to Use the Manual
The guidelines in this manual are best practices that can be applied to all homes in Fiji, from single family homes, to duplexes, rowhouses and stacked multi-unit blocks. It is appropriate for homes in urban areas, peri-urban areas and rural areas.
The FHBM is laid out to provide guidance and direction on how to construct a sustainable, home in Fiji from the ground up ... how to Build Green. Sections are presented in a logical order, from initial concept and site planning to submitting a building plan for approval:
• Section 2 Siting – locating your home to optimize energy savings
• Section 3 Shape and Layout – energy efficient orientation, room size, room layout
• Section 4 Cooling – natural and mechanical means of reducing solar heat gain
• Section 5 Building Materials – reflective and protected walls, floor and roof
• Section 6 Energy – solar and bio energy options
• Section 7 Water – re-use of rainwater and solar heating
• Section 8 Electrical – energy efficient options and general layout
• Section 9 Building Permit - requirements and next steps
After reading and applying the guidelines to the design of a home, the end result will be a home that is optimized for energy efficiency.
There is unlimited possibility for variation in the design and execution of houses. Site conditions, choice of materials, size, layout, location and a host of other factors can all vary. No manual can provide detailed information to cover all such variations. This manual is no exception. But it does provide guidance, direction and intent for homes in Fiji to be built sustainably and achieve Fiji’s energy reduction goals to be carbon neutral by 2030.
| 3 Overview F IJI HOME BUILDING MANUAL BUILD GREEN
1.2
DRAFT 2 2023 June 15
Building Terminology 1.3
Bearer a beam supported on foundation walls, piles, or piers and carrying floor joists.
Brace
(a) Diagonal Brace – a member of a framed house fixed diagonally and used to resist tension or compression or both.
(b) Subfloor Brace – a bracing element below the ground floor level.
(c) Wall Bracing – a section of wall above the ground level which performs a bracing function.
Cladding the outside or exterior weathering surface of a house.
Footing construction through which the weight of a house is transferred to the ground.
Foundation those parts of a house in direct contact with, transmitting and distributing loads to the ground, through a footing.
Framing Timber timber members to which lining, cladding, or decking is attached, which are depended upon for supporting the structure and for resisting forces applied to it.
Masonry any construction using concrete blocks, laid to a bond and joined together with mortar.
Pile a column-like member used to transmit loads from the house and its contents to the ground.
(a) Anchor pile – a pile directly supporting a bearer, loadbearing walls and roof structures, which is embedded into the ground with concrete so as also to resist vertical uplift and horizontal forces.
(b) Braced Anchor pile- an anchor pile directly supporting a bearer and having a brace attached to it.
(c) Floor pile- a pile that does not have any brace attached to it and that is required to support one floor only but not load bearing wall
Plate a timber member supported by a wall or bearers or joists to support and distribute the load from floors, walls roofs or ceiling.
(a) Bottom plate- a plate under the ends of studs.
(b) Top plate- a plate placed over the ends of studs.
Purlin a horizontal member laid to span across rafters and to which the roof cladding is attached.
Rafter a roof framing timber providing a support for purlins, roof covering or sarking.
Roof that surface of a house intended to shelter any other part, or any other space below it, against the elements, and in particular to discharge rainwater outside the confines of the house or space below.
| 4 Overview F IJI HOME BUILDING MANUAL BUILD GREEN
1.3 DRAFT 2 2023 June 15
Spacing the distance at which members are spaced measured centre to centre. Span the clear distance between supports measured along the member.
Stud
(a) Loadbearing stud- a stud in a loadbearing wall.
(b) Trimming stud- a stud located on the side of an opening.
(c) Jack stud- a stud of shorter height than the height from the top plate to bottom plate of the wall
Wall
(a) External wall- an outer wall of a house.
(b) Foundation wall – that part of the foundation comprising a masonry or concrete wall supporting a house or part of a house, and not extending more than 2.0 m above the underside of the footing.
(c) Internal wall-a wall other than an external wall, a partition.
(d) Load-bearing wall - a wall supporting vertical loads from floors, ceiling joists, roof, or any combination of these.
(e) Non load-bearing wall -a wall other than a load-bearing wall.
(f) Structural wall - any wall which because of its position and shape is designed to contribute to rigidity and strength of the house.
| 5 Overview F IJI HOME BUILDING MANUAL BUILD GREEN
1.3 1.3 DRAFT 2 2023 June 15
1.4
Legislative Requirements
The approval of the Climate Change Act, 2021, demonstrates the Government of Fiji’s commitment to ensuring a sustainable future. It requires all buildings in Fiji to achieve a 30% energy reduction by 2030. The Fiji National Building Code (FNBC) also requires a 30% energy reduction.
Build Green: Fiji Home Building Manual likewise provides guidelines that, if followed, will achieve at least a 30% energy reduction, and more. If all energy saving techniques in this document were implemented, the resulting energy savings would be close to 100% and homeowners are encouraged to do that.
The more energy reduction techniques used, the lower the monthly utility bill as the need for cooling is greatly reduced and alternative sources of energy reduce the need to pay for energy from the grid. However, implementing all energy saving techniques may not be possible due to topography, allotment size and shape, site conditions and financial resources.
Each homeowner / builder is encouraged to contact the Local Authority to determine the number and type of green building techniques needed to achieve the 30% and comply with the FNBC Section G Energy Efficiency.
30% Energy Reduction for Homes
To comply with the FNBC, the following energy saving techniques must be included in a home building design:
Required
• window shading and placement
• natural ventilation
• daylighting
• low carbon building material
• cool roof, walls and floors
• efficient water use
• renewable energy (hot water, swimming pool, 80% of exterior lighting)
Guidelines on how to apply the above requirements to home design are distributed throughout the document as shown in the table below:
FNBC Required Energy Saving Techniques
Performance requirements in the FNBC are shown on the left and related sections in the FHBM are shown on the right
Fiji National Building Code Required performance
Passive Solar Cooling
Natural Ventilation
Heat Gain Avoidance and Deflection
Efficiency in Lighting
1.4
Efficiency in Heating and Cooling
Efficiency in Windows
Building Materials with Low Embodied Carbon
Renewable Energy Generation and Use
Fiji Home Building Manual
Section 2 Siting
Section 3 Shape and Layout
Section 3.2 Window and Vent Placement
Section 4.3 Insulation and Air Gap
Section 6 Building Materials
Section 6.1 Lighting
Section 4.4 Ceiling Fan
Section 4.5 Air Conditioning
Section 4.6 Appliances
Section 4.2 Glazing
Section 6 Building Materials
Section 6.2 Solar Energy
Section 6.3 Bio Energy
| 6 Overview F IJI HOME BUILDING MANUAL BUILD GREEN
DRAFT 2 2023 June 15
Relationship to Other Home Building Guidelines
The purpose of this document is to provide guidance on how to implement the energy efficiency requirements of the FNBC and Build Green. Guidelines on water, electricity and applying for a building permit are also included. There are a number of other important guideline documents that should also be considered when building a home. These guidelines, listed below, provide important information on how to build a strong and resilient home that is designed to withstand wind loads and for the exterior of the building - walls, roof, floor and foundation:
Intent of Build Green FHBM Guidelines
Guidelines are important documents because they provide greater description and explanation of a standard and often diagrams and examples of how to comply.
Build Green
Related Documents with Guidelines for Home Structure and Exterior
MCTTT Guidelines for Improving Building Safety iTaukei, 2019
Fiji Shelter Handbook, 2019, by Shelter Cluster Fiji

Help for Homes: Tips to Build Back Safer, 2016, by Shelter Cluster Fiji
MHCD 2-bedroom House Plan, 2021
Unlike a law (Building Act) or regulation (Building Regulations), guidelines provide best practices and examples of how to comply with a law or regulation. Only the Required green building techniques (see list on previous page) need to be included in home building designs. Other Build Green guidelines (Section 2 to 6) do not have to be followed, but if they are, the home will achieve higher energy savings resulting in significantly reduced energy bills for homeowners.
Water and Electricity Guidelines
The water and electricity guidelines in this document represent best practices for installation. Unlike energy efficiency, following the guidelines is not related to complying with FNBC or Energy Fiji Limited standards, but instead provides guidance for safe installation.
Building Permit Procedures
Unlike Sections 2 to 9, the Building Permit Procedures section provides a step-by-step explanation of the process of applying for a building permit, inspections and permission to occupy the home. It is not a guideline or best practices as it instead is a description of procedures.
| 7 Overview F IJI HOME BUILDING MANUAL BUILD GREEN
1.4 DRAFT 2 2023 June 15
The first step in constructing a green building is to investigate site characteristics such as natural terrain, vegetation, slope and neighbouring developments, and use these elements to optimize the reduction of energy consumption and to benefit the environment.
Siting
1. Location
2. Orientation
3. Landscape
4. Maximum Coverage
This section describes how the placement of the building and landscaping on the allotment increases natural cooling and can protect the building from disaster.
2
DRAFT 2 2023 June 15
Proper siting of a building can reduce energy needs significantly and will not increase construction cost. Taking advantage of the natural terrain, sun and wind patterns will ensure energy savings are optimized.
Avoid Hazards
As the climate warms, sea levels are expected to rise in the coming decades. Increasingly intense storms also lead to threats such as landslides, inland flooding and high winds. New buildings should be sited so they are protected as much as possible from potential hazards to reduce the need to double up on stronger foundations, roofs, walls.
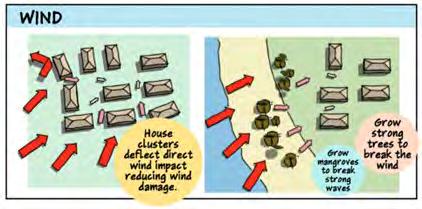
High Winds
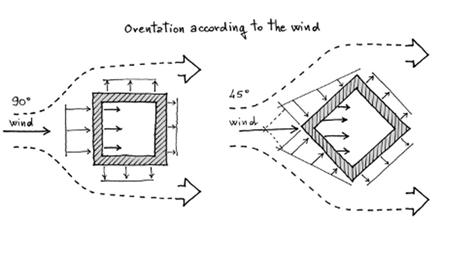
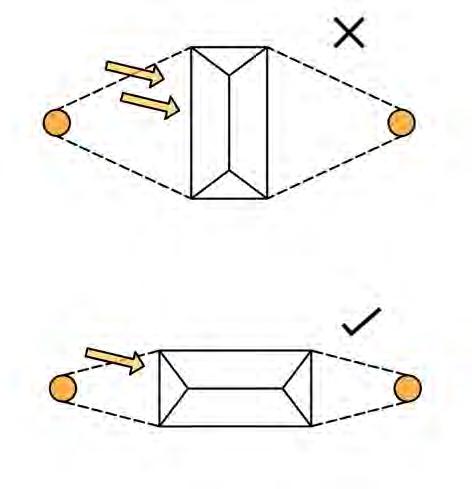
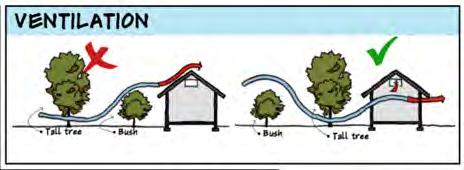
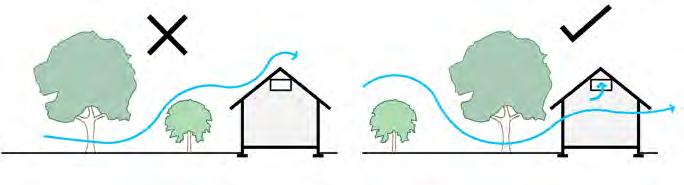
If winds are strong, the building and its occupied surroundings should be protected. The impact of wind on a facade can be reduced by plantations (trees, hedges) or embankments, or adapting the shape of the building.
When locating your building on the allotment, ensure you are not siting your home in a wind channel or where fully exposed to
• Trees or other buildings can serve as wind breaks
• Close to mangroves to slow incoming swells and reduce the impact of high speed seawater during storms
• Setback from the top or bottom of a steep slope to avoid strong winds.
Grow mangroves to break strong waves
House clusters deflect direct wind impact reducing wind damage
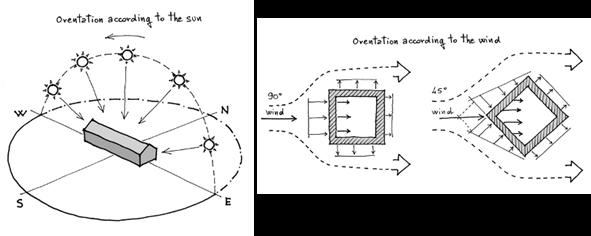
Orientation according to the wind
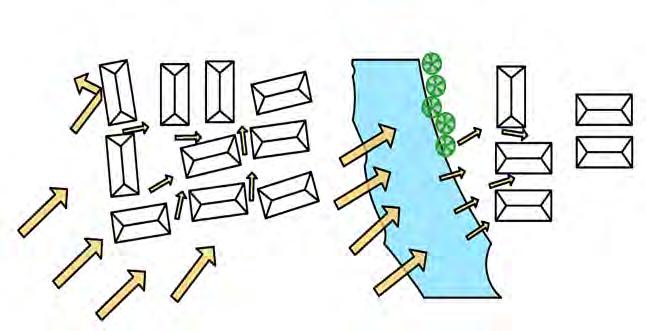
Grow strong trees to break the wind
| 9 Siting F IJI HOME BUILDING MANUAL BUILD GREEN
Location
The layout of building clusters in a traditional village setting are known to combat high winds during cyclones.
2.1
90°
45° wind wind
WIND
DRAFT 2 2023 June 15
Flood
Building a house close to the shoreline or on riverbanks is risky as the building may collapse if exposed to storm surge or flood waters. If there is no other option, all homes should be:
• Located on the highest possible elevation on the allotment
• Be constructed so that the top of the main floor is elevated 1.0m above the known flood level –this will allow flood waters to pass underneath and protect the interior
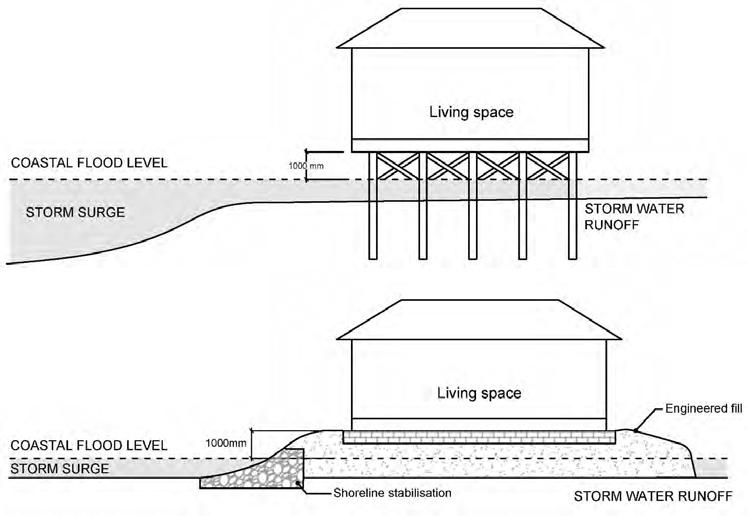
• Have a strong foundation of concrete piles set deeply into the soil
• Have cross-bracing between posts above the known high water mark to provide support for the foundation but not trap any debris carried by storm surge or flood waters
Known Flood Level
The known flood level is important for siting the building to protect it from flooding. Refer to your local authority for the known flood level in your area.
For a river, it would be where the river-bed ends and the grass or non marine plant-life start. You are likely to find debris high on tree branches along the river-bank, or look for the stain of flood water level mark on a tree trunk or building wall that indicates the highest level reached by the flood or seawater. Similarly in coastal areas the edge of the plant growth and sand typically is the known flood level. Building your house higher than high water mark is critical for your protection.

New buildings must not be sited in areas designated by the Government of Fiji as environmentally significant or hazardous flood prone sites and existing buildings should seek to mitigate flood risks and associated damages if situated in flood prone areas.

| 10 Siting F IJI HOME BUILDING MANUAL BUILD GREEN
2.1 No houses in the flood zone FLOOD R I V E R Flood zone X X Living space 1000 mm Coastal Flood Level Coastal Flood Level Storm Surge Storm water runoff Storm Surge 1000 mm Living space Engineered fill Shoreline stablisation Known flood level Bottom of floor should be 1.0 m above the known flood level Known flood level DRAFT 2 2023 June 15
Landslips
Landslips are a hazard in the parts of Fiji with mountainous terrain. Soil saturated with water from storms and cyclones will slip and can cause damage to buildings and public infrastructure, can trap and harm building occupants, and can delay the delivery of aid such as water, food, medical supplies and shelter. To protect your family, ensure you construct your home and other buildings away from high-risk landslip areas.
If your allotment includes a steep slope or cliff, the building should be sited to:
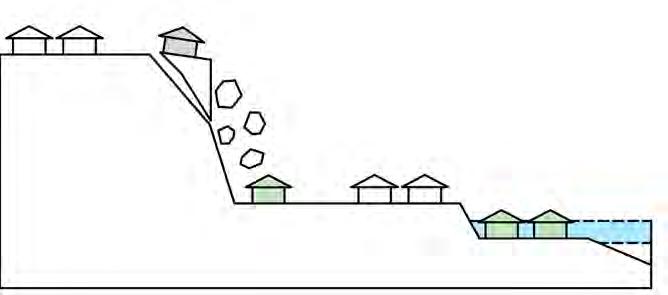
• Avoid building your house on the edge of a steep hill, at the base of a hill, or on the hill
• Choose a building site that is at least 20 m from the top of the cliff or base of the hill
• If landslips larger than 20 m wide from the edge of the cliff have fallen away in your area, best to avoid building altogether
LANDSLIPS Avoid building on the edge or the base of a hill
Find out what the flood or tsunami levels were in the past and build your house above that
Tsunami
Landslips can be fatal. Better not to build than risk the life of your family.
| 11 Siting F IJI HOME BUILDING MANUAL BUILD GREEN
2.1
DRAFT 2 2023 June 15
Flood/
Orientation
Buildings that are sited directly along the sun path are cooler and more energy efficient.
The need for air conditioning can be greatly reduced in your home if the building is properly oriented on the allotment. In Fiji, north and south building walls are minimally exposed to the sun except at sunrise and sunset. However, east and west building walls are fully exposed and sun penetration through the roof, windows and walls are the main cause of overheating.
To significantly reduce energy consumption and the need for air conditioning, the building should be sited so that:
• The longest building walls face north and south, and the shortest building walls face east and west
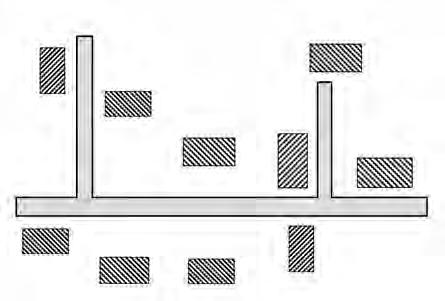
ORIENTATION
Siting the home at an angle to the wind direction increases the amount of exposure to wind
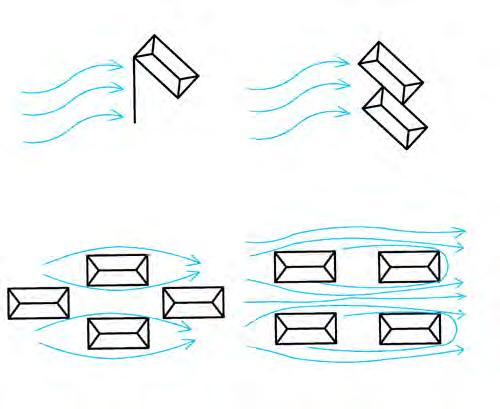
Stagger buildings to avoid creating a wind tunnel
Orient the shorter sides of your home to face the east and west sun path, except where this compromises natural ventilation
Sun path for a home with longest walls away from the sun to keep the home as cool as possible
| 12 Siting IJI HOME BUILDING MANUAL BUILD GREEN
2.2
W W E E N S N S
DRAFT 2 2023 June 15
Landscape
Existing trees, terrain and new landscaping will decrease the amount of solar heat gain and reduce flooding.
Natural features in urban and rural areas are important parts of green building. Landscape features that can provide protection from sun and wind should be included in the building design as follows:
• Plant trees on east and west sides of building to shade it from the sun (but far enough back that trees won’t damage the building because of a storm or cyclone

• Plant shrubs close to the building for shading
• Use indigenous plants that require minimal irrigation.
• Limit paved areas around the building to reduce heat island effects.
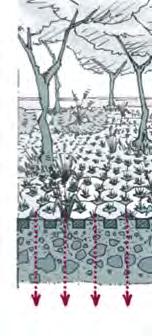
• Provide appropriate drainage technique to mitigate storm water run-off and facilitate replenishment of water table through rainwater infiltration.

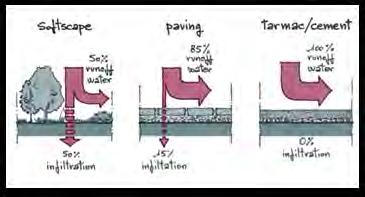
• Construct driveways and patios to allow rainwater to filter through it, such as concrete pavers with holes in the centre, patio with loose gravel between pavers, driveways built with aggregate (not asphalt) on flatter terrain
Permeable paving (concrete pavers with holes for grass in the centre) allows rainwater to seep into the ground
| 13 Siting F IJI HOME BUILDING MANUAL BUILD GREEN
2.3
Softscape Tall tree 50% runoff water 85% runoff water 100% runoff water 0% infiltration 15% infiltration 50% infiltration
LANDSCAPE
Paving Tarmac/cement RAIN WATER Known flood level Tree shades house natural ventilation DRAFT 2 2023 June 15
Tall tree Bush Bush
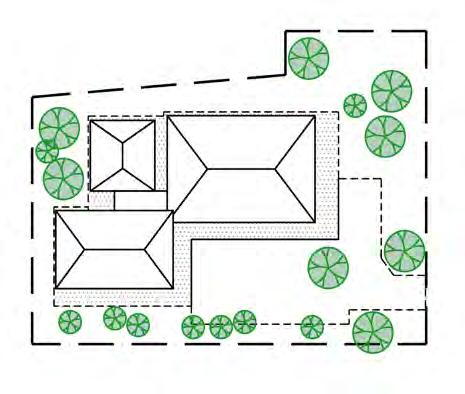
Maximum Coverage
Landscape is a primary source of cooling in urban and rural areas.
Reducing the amount of hardscape (concrete, asphalt, structures) is a key component to ensuring your home is kept cool. In addition to planting trees to cool your home, it is equally important that your home does not occupy a majority of the allotment or there will be insufficient green area to reduce the heat island effect (overheating of buildings).
The building layout, including number and size of rooms, should ensure:
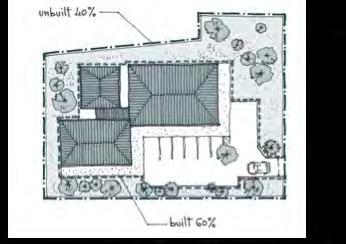
• The building footprint does not cover more than 40% of the allotment
• Appropriate setbacks from the allotment boundary are adhered to
Site Boundary Setbacks:
Setbacks from the allotment boundary are important to allow for cross flow ventilation between houses, to provide space for hedges for privacy, to avoid shadows cast by a neighboring house, to allow space for plumbing installation, and provide space for a backyard garden and a play area for the family.
At this point, you should be able to:
• Identify potential hazards and have a strategy to reduce risks
• Identify appropriate positioning of the home relative to the sun path
• Identify landscape features that will assist in cooling the building, provide a wind buffer and increase rainwater infiltration
• Identify the maximum ground floor area based on achieving a maximum 40% coverage
Setback distances often increase with an increase in the number of levels in the building as set out in the planning documents of the Local Authority. Refer to your local authority for the front, rear and side setback allowances for your
| 14 Siting F IJI HOME BUILDING MANUAL BUILD GREEN
2.4 unbuilt
built
DRAFT 2 2023 June 15
40%
60% setback between houses setback from road
Shape & Layout
The second step in constructing a green building is to ensure the size, shape and room layout take advantage of natural shading, sun and wind patterns.
1. Building Composition
2. Window and Vent Placement
3. Room Layout
4. Room Size (for natural ventilation, daylighting, accessibility)
This section describes best practices to locate and size the building and rooms to maximize cooling and promote natural ventilation.
3
DRAFT 2 2023 June 15
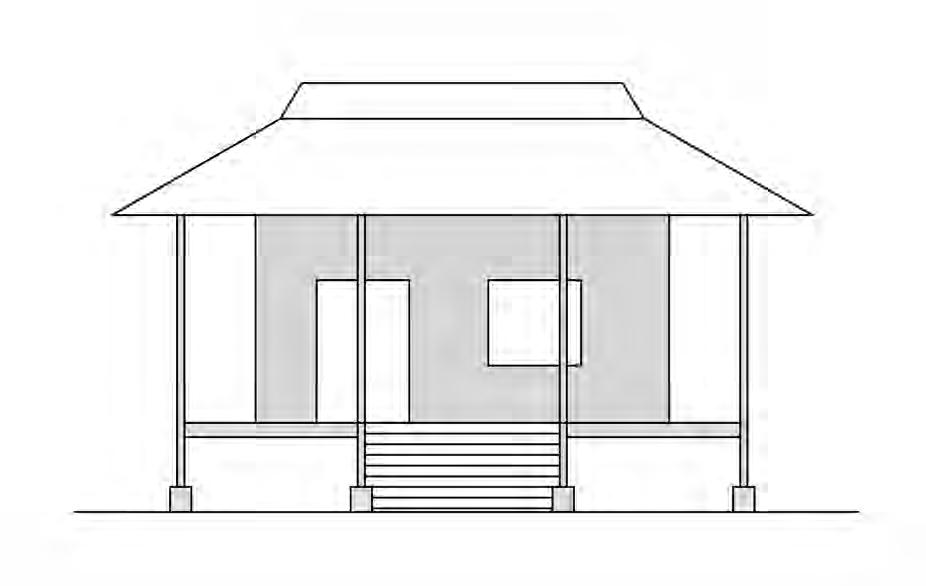
Building Composition
The size, shape and layout of rooms directly affects how much the home is cooled and can significantly decrease the need for air-conditioning.
The capability of a building to store or release heat is connected to its volume, shape and mass. Thermal comfort of building occupants is affected by the amount of heat permitted to penetrate through roofs, walls and floors. Thus, the ratio of surface to volume contributes to the heating rate during the day and the cooling rate during the night.
Due to the hot, tropical climate in Fiji, homes should be constructed to:
• Have as many doors and windows as possible to promote natural ventilation
• Protect doors and windows by constructing verandahs, awnings, balconies, terraces for shade
• Minimize width of the home

• Have rooms with high ceilings (minimum 3.0 m) to promote natural ventilation
small ratio of windows and doors to the wall area assists with cooling the interior
porch helps to cool building interior
secondary roof with vents allow hot air to escape
roof overhang provides shading for door and windows
air space under floor will reduce potential for rot and increase natural ventilation
| 16 Shape & Layout BUILD GREEN
3.1
DRAFT 2 2023 June 15
Window and Venting
Good natural ventilation provides a sustainable means of maintaining thermal comfort, cooling the home, and promoting indoor air quality if windows are well shaded and oriented to prevailing breezes.
When air enters the home, it is either trapped inside with hot air rising to the top, or it is released outside the building. Good natural ventilation relies on the ability of air to easily move through the home, and avoiding the accumulation of heated air.
The effectiveness of natural ventilation to cool a home depends on a combination of optimal location of rooms, advantageous room size, and size and placement of openings (doors, windows and vents). Homes designed to promote natural ventilation should have:
• Narrow open plan to minimize air resistance
• Openable windows in all habitable spaces
• Rooms with inlet and socket openings located across or above the other
• Roof vents to expel hot air
• Orientation according to prevailing wind direction (with provision for solar protection if necessary)
• Room height of 3.0 m minimum with layered openings
Cross and Stacked Ventilation
Flow-through air movement is promoted by the careful placement of doors, openable windows and permanent vents. Design for natural ventilation should promote cross and stack ventilation and avoid single-sided ventilation by:
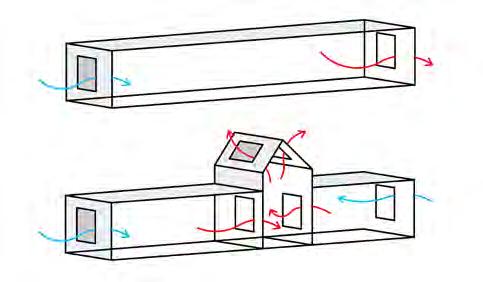
• Locating door and window openings on opposite sides of building with larger openings facing up-wind if possible, but not directly across to improve air circulation
• Deflecting wind toward large openings with wingwalls and planting
• Providing vents at the top of walls under the eaves to release heated air
• Providing vents in ceilings and solar chimneys to release heated air
Cross ventilation
Stack ventilation
Rotating turbine
Chimney terminates above roof level
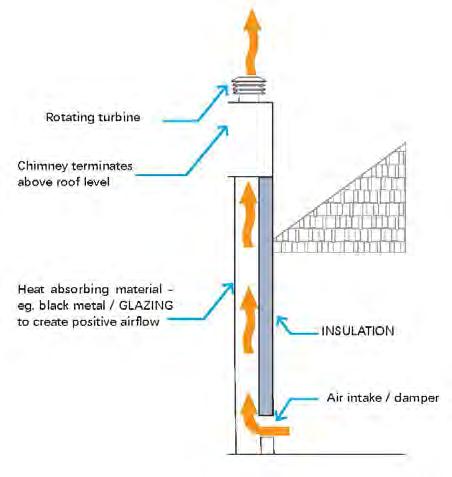
Heat absorbing material - eg. black metal/ Glazing to create positive airflow
Insulation
Air intake/ Damper
| 17 Shape & Layout F IJI HOME BUILDING MANUAL BUILD GREEN 3.2
3.2
DRAFT 2 2023 June 15
Window to Floor Ratio
The window-to-floor area ratio (WFR) is a measurement of the amount of openable window area allowing light and air into a building compared to the floor area. It’s important to ensure a minimum percentage of exterior walls consists of doors and windows to establish good natural ventilation and lighting.
To maximize natural ventilation, buildings should have:
• WFR not less than 16%
WINDOW PLACEMENT
NOT RECOMMENDED
WFR can be calculated by:
• Add up total area of all windows on exterior walls
• Calculate the area of the interior floor (length x width)
• Divide total area of windows by floor area, and multiply by 100

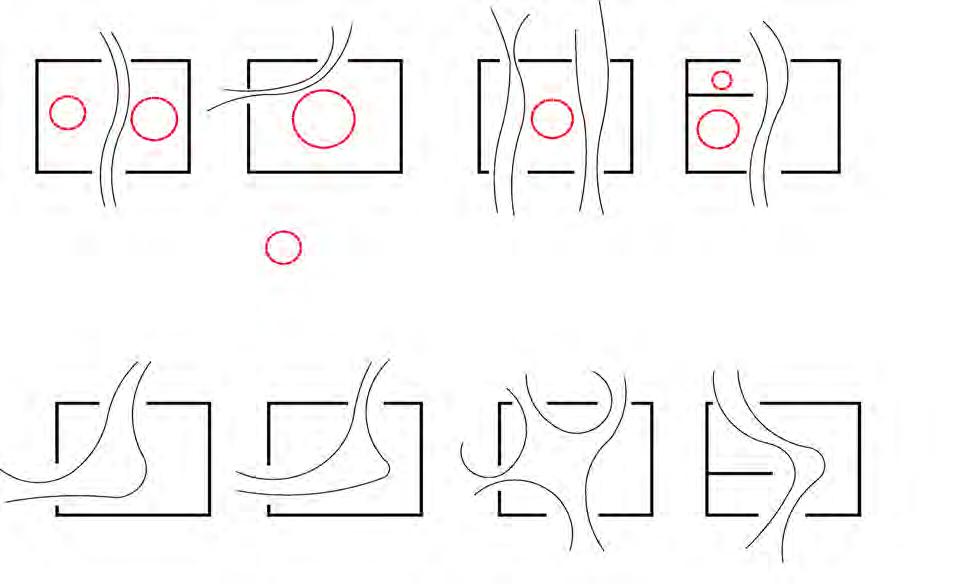
WFR
WFR = 10%
windows directly across from one another leave pockets of dead air space
Non ventilated air flow circulation
RECOMMENDED
windows too close windows in good positions to promote air flow
WFR = 16% (maximum recommended)
WFR = 40%
| 18 Shape & Layout F IJI HOME BUILDING MANUAL BUILD GREEN
3.2
3.2
DRAFT 2 2023 June 15
Vents
Vents are important so that hot air does not get trapped inside the home. They are also important so that wood rafters, purlins, insulation do not rot and need replacing.
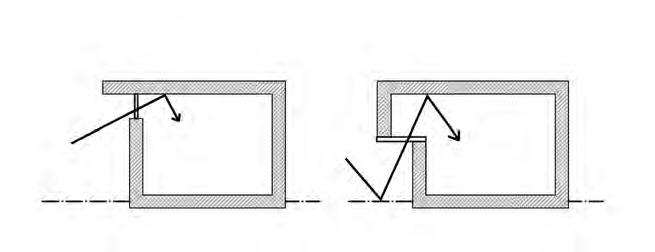
Since hot air rises, vents need to be placed at the top of the structure:
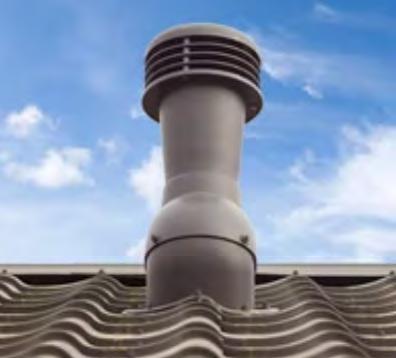
• for a sloping roof, vents need to be placed at the top
• for a roof with an attic, the roof eaves need venting as well as a vent at the top
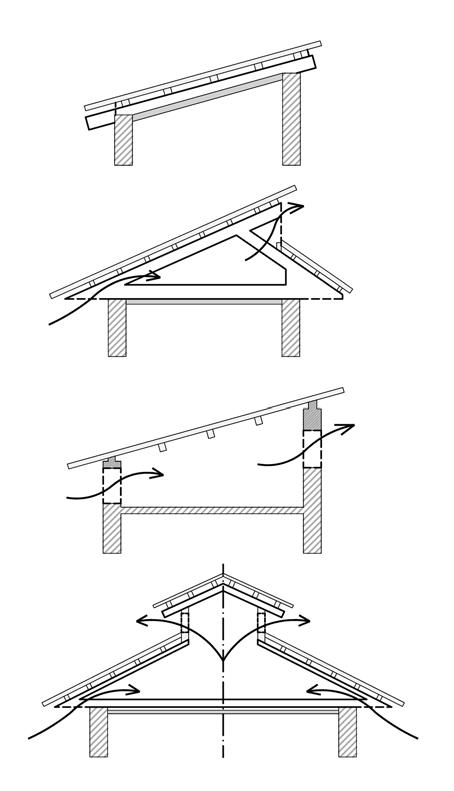
• vents can be covered with a grate
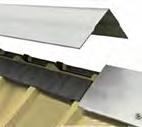
• a vented ridge cap can be constructed with
galvanaized metal or aluminum must be attached so there is a minimum 50 mm gap above roofing sheets
Prevailing wind
Roof Joist ceiling
Protection grating
minimum 50 mm gap between roofing sheets allows air to flow through
metal grate support
Prevailing wind
Attic
Vent outlet with grate
Attic
Vent inlet with grate

Vent outlet with grate
Vent in the eaves
Attic
Vent outlet with grate
| 19 Shape & Layout F IJI HOME BUILDING MANUAL BUILD GREEN
DRAFT 2 2023 June 15
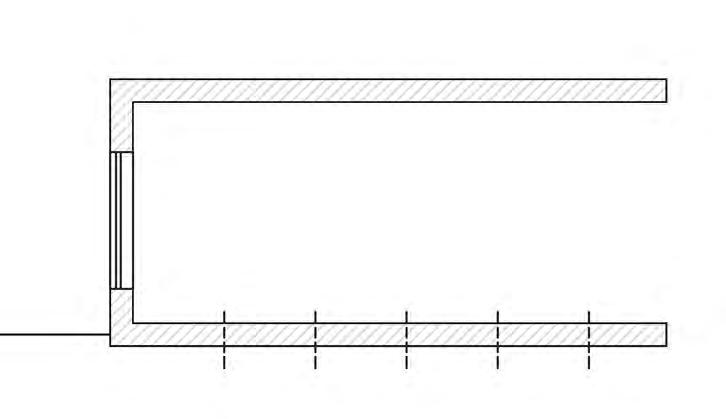
Overhang above window and tinted louvre windows
Room Layout 3.3
Location of rooms relative to the sun path is important to minimize reliance on fans and air-conditioning.
Room placement on the north, south, east or west façade should consider the sun path and associated potential for overheating compared to the type of room and when it is likely to be used the most.
Homes with rooms placed to maximize potential or cooling will:
• Place water closets, staircases, closets, utility rooms and rooms less likely to be used during the day such as bedrooms and kitchens on the east and west facing walls to act as buffers against heat gain
Potentially add more bedrooms to east side of house
EXAMPLES OF OPTIMAL ROOM LAYOUT TO REDUCE HEAT AND PROMOTE NATURAL VENTILATION
| 20 Shape & Layout F IJI HOME BUILDING MANUAL BUILD GREEN
3.3 Water closet Bedroom U Door Door kitchen Bedroom Living room N E W Water closet U Door kitchen Bedroom Living room S Porch Trees for shading Trees for shading E S W Bedroom Prevailing winds Door N Porch Trees for shading Trees for shading Bedroom Bedroom
DRAFT 2 2023 June 15
3.4
Room Size
Choosing appropriate room sizes, along with window sizing and placement, impacts important cooling techniques such as air circulation, ventilation and daylighting.
The amount of light entering a room depends on the angle of the sun, the orientation of the window to the sun, the size and position of the window on the wall, and reflected light from the ground, other buildings and the ceiling, walls and floor.
To conserve energy, rooms should be appropriately sized so that artificial light is not needed during the day. Narrow room sizes ensure that daylighting is optimized.
For sufficient natural light to enter a room, the building design should have:
• A maximum depth from the window of 7.0 m, and include additional natural lighting such as clerestory windows, skylights, atria, light shelves, light pipes, anabolic ceilings, venetian blinds
• Light coloured wall finishes to maximize internal reflectance
ROOM SIZE FACTORS
Clerestory windows at the top of walls allow light penetration and reduce glare without increasing heat gain from direct sunlight. Room size can be increased if clerestory windows are used in addition to regular windows.
Window height (higher, larger windows increase light penetration
At this point, you should be able to:
• Position the building on the site to maximize energy efficiency
• Layout the building configuration (external walls, shading structures)
• Locate doors, windows and vents to maximize natural ventilation and daylighting
• Locate and size rooms and corridors to reduce heat gain
2.5 hour (daylight penetration depth without shading)
2 hour (daylight penetration depth with shading)
0.5 hours
1 hour
1.5 hours
2 hours
2.5 hours
| 21 Shape & Layout F IJI HOME BUILDING MANUAL BUILD GREEN
3.4
DRAFT 2 2023 June 15
The third step in constructing a green building is to include construction techniques that cool building temperatures in the building design.
Cooling
1. Window Shading
2. Glazing
3. Insulation and Air Gap
4. Ceiling Fans
5. Air-Conditioning
6. Appliances
This section describes methods to reduce solar heat gain through the use of shading, insulation and reflective building materials.
4
DRAFT 2 2023 June 15
Window Shading
Windows are the largest source of solar heat gain in a building, but are a necessary part of daylighting and ventilation. Shading windows while still allowing light penetration and air infiltration is a triple objective for green building design..
In all rooms of the house, the goal is to optimize human comfort and conserve energy. In a warm and humid climate of Fiji, achieving thermal comfort while minimizing air-conditioning is a challenge. However, this challenge can be overcome by applying the following cooling techniques:
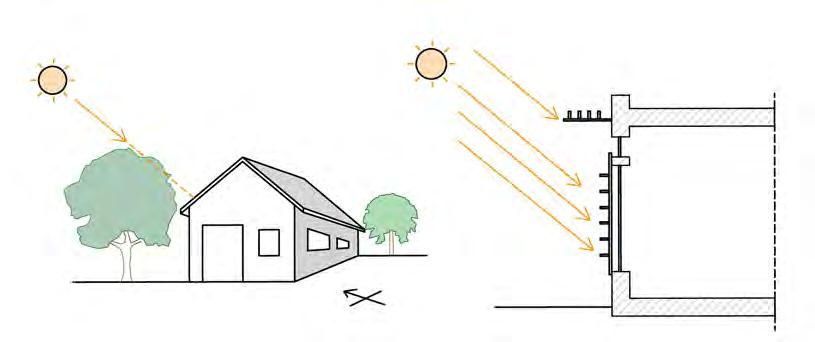
• Leverage shading from trees and shrubs to deflect direct sunlight from buildings, especially in the East and West-facing facades.
• Position lattice screens, fencing, awnings and shutters to shade windows
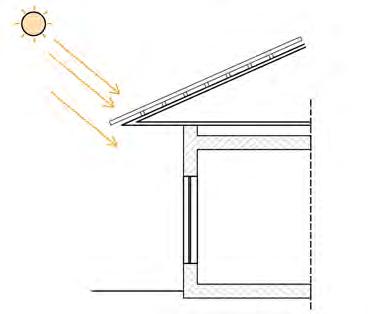
• Extend roof eaves up to 450 mm to shade windows and doorways (eaves should not extend beyond 450 mm to protect the roof from uplift due to cyclones)
• Incorporate horizontal and vertical overhangs into the building design
Cooling | 23 F IJI HOME BUILDING MANUAL BUILD GREEN
4.1
4.1 N
Natural shading from nearby trees
overhangs should be maximum 45 cm in length to reduce potential for uplift in strong winds 45 cm max. DRAFT 2 2023 June 15
Overhang above window and tinted louvre windows Roof
Overhangs
Permanently attached to the building, overhangs are one of the most effective techniques to cool building interiors. Overhangs must be designed, fitted and attached to the building for wind resistance so they will not dislodge during high winds.
Overhangs should be placed and configured according to the sun path to provide maximum protection and be secured as follows:
a) Vertical shading should be used for East and West facades
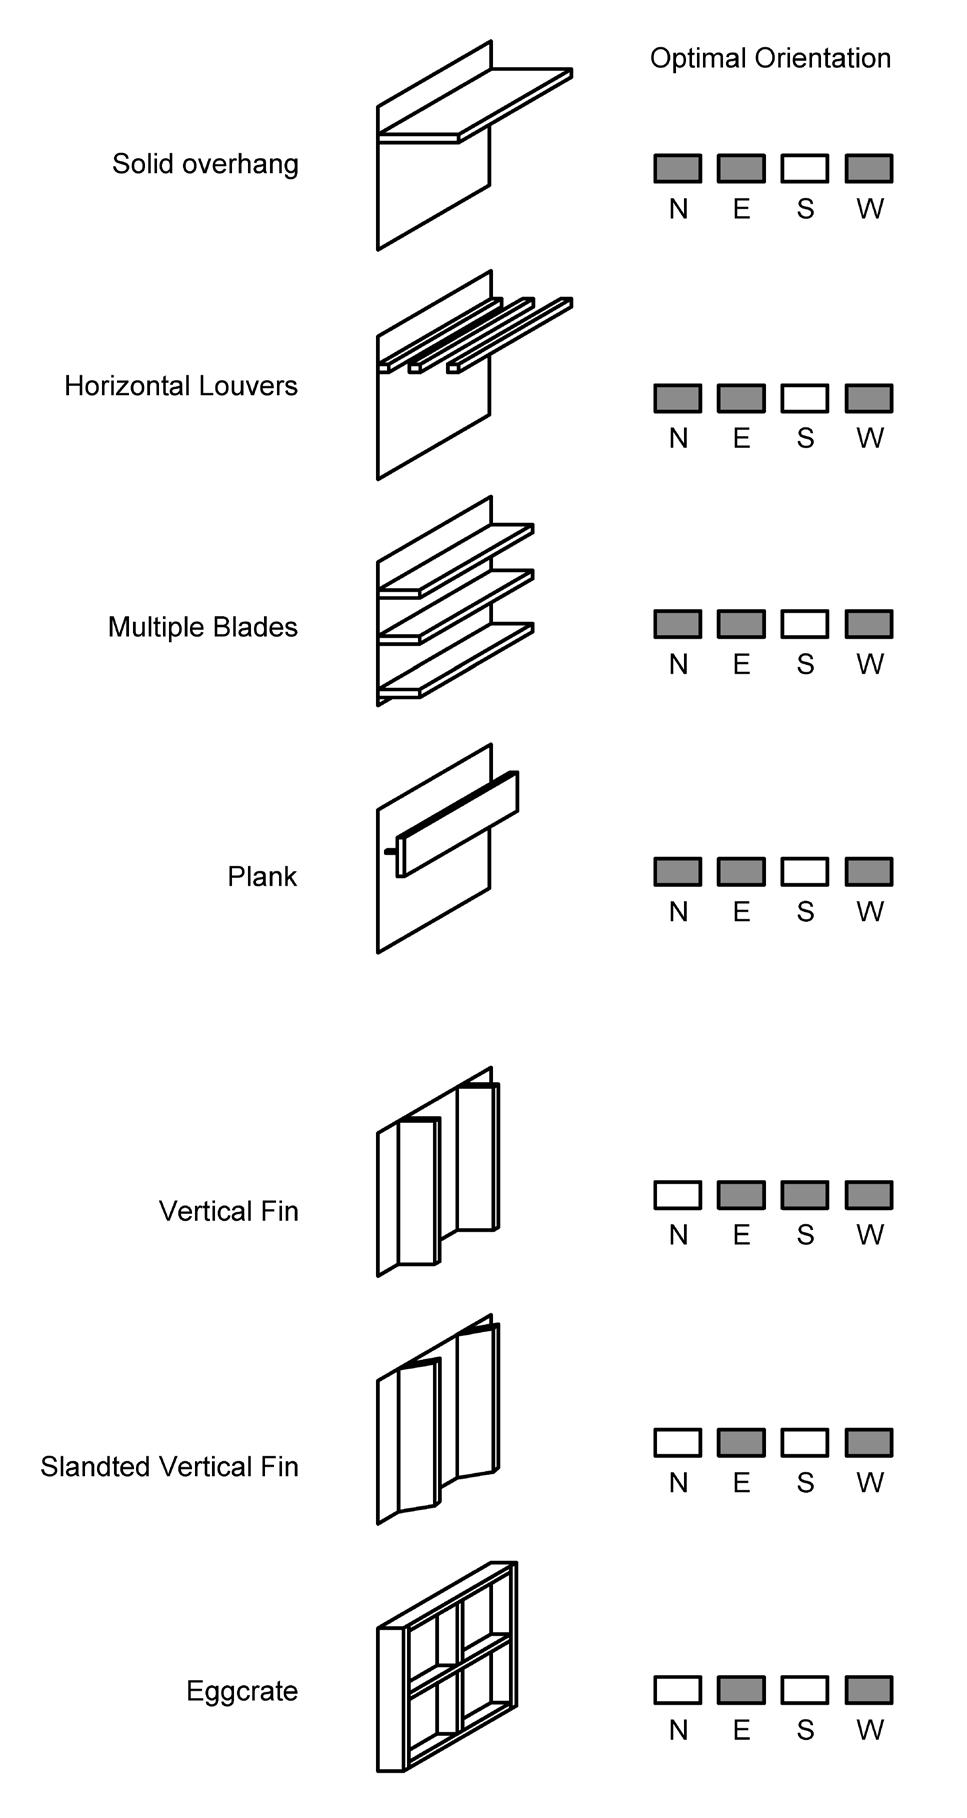
b) Horizontal shading should be used for North and South facades.
c) Overhangs should be fastened using:
• Cyclone-grade fasteners, or
• Be part of the building walls or roof
d) Recommended material for overhangs are:
• Stretched canvas or other durable material
• Timber
• Steel with reflective coating
• Concrete reinforced with metal mesh
Cooling | 24 F IJI HOME BUILDING MANUAL BUILD GREEN 4.1
4.1 DRAFT 2 2023 June 15
Glazing
Use of windows with high quality protective glazing (window glass) manufactured to offer protection from the sun is a highly effective way to reduce solar heat gain..
Glazing manufactured for sun protection or with a protective coating is as effective as shading windows described in the previous section. It is often not necessary to do both. Due to the sun angle, windows on the east and west facades can be protected by appropriately sized vertical shades, however, windows on the north and south facades likely need to have high quality protective glazing unless the sun is blocked by trees, shrubs and other shading techniques. As long as direct penetration by the sun is blocked by a shading technique(s), high quality glazing may not be required.
Where 100% shading cannot be achieved, windows should have high quality glazing with the following characteristics:
• Rated as having a u-value of 3.9 maximum
• Rated as having an R-value of 1.8 minimum
• Constructed with low-E glass with metal oxide coating
• Tinted glass Glazing
Tinted glass (single pane or louvre) is acceptable if energy rated glazing is not available.
Tinted, louvre window panes are an acceptable energy efficient glazing option

Cooling | 25 F IJI HOME BUILDING MANUAL BUILD GREEN
4.2
Options
Glazing Options Single pane glazing with e-coating 3.9 W/m2K Louvre windows with e-coating 3.8 W/m2K Double glazing with air gap 2.6 W/m2K Secondary Glazing 2.7 W/m2K Triple Glazing 0.7 – 0.8 W/m2K
Acceptable
4.2
DRAFT 2 2023 June 15
Insulation and Air Gap
Adding insulation to walls and the roof provides a strong barrier to heat penetration. When combined with an air gap and reflective material, a cool roof and a cool wall will protect the building interior.
safety tip
Thermal insulation reduces the transfer of heat across it thereby reducing the heat gain inside buildings on a hot day. The use of insulation for walls and roofs reduces the U-value (lower U-value means less heat transferred from building exterior to interior) and conversely increases the R-value. A number of insulation types are available at building supply stores:
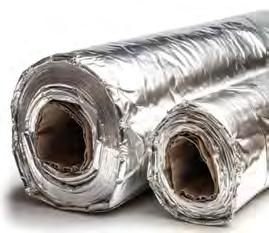
• Board insulation thin boards typically installed under a metal roof

• Reflective material insulation – reflective material typically attached to purlins, rafters or studs
Caution: do not use spray foam insulation around sockets and recessed lighting as it will be a fire hazard. Wait a minimum of 72 hours before using the building for sleeping after applying the insulation
• Batt insulation – 30 – 80 mm material made from glass, wool or other fibre, lightweight, typically attached between rafters or studs
• Spray foam insulation – plastic foam sprayed directly onto metal roof or wall, plywood or particle board.
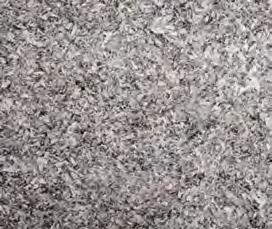
• Cellulose – loose fibres of organic material spread into a cavity, attic or between the exterior wall and gyp board
The following shows the effectiveness of the insulation types from most to least:
Spray foam insulation
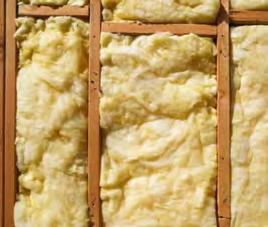
Batt insulation
Cellulose
Sheet Insulation
Reflective
For a roof, reflective material insulation alone is insufficient to reduce heat gain and must have both an air gap and be supplemented with other types of insulation. However, it can be used on walls which are not subject to direct sun.
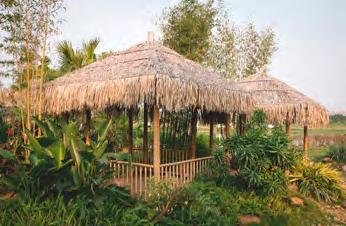
Thatch is a traditional building material which has effective cooling properties and is considered to be adequate for thermal comfort in individual dwellings. However, the installation of thatch roof must pass the fire safety requirements in the Fiji National Building Code.
Cooling | 26 F IJI HOME BUILDING MANUAL BUILD GREEN
4.3
4.3
DRAFT 2 2023 June 15
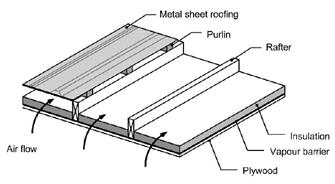
Installation
Roof insulation is necessary to prevent heat gain and is best combined with roof ventilation to prevent heat build up. In ventilated roofs, heat from the roof, ceiling or interior space below is removed through openings facing the prevailing winds. The socket opening should be larger than the opening for the inlet; they should be placed at different heights in order to obtain air movement by the stack effect when the wind is not blowing.
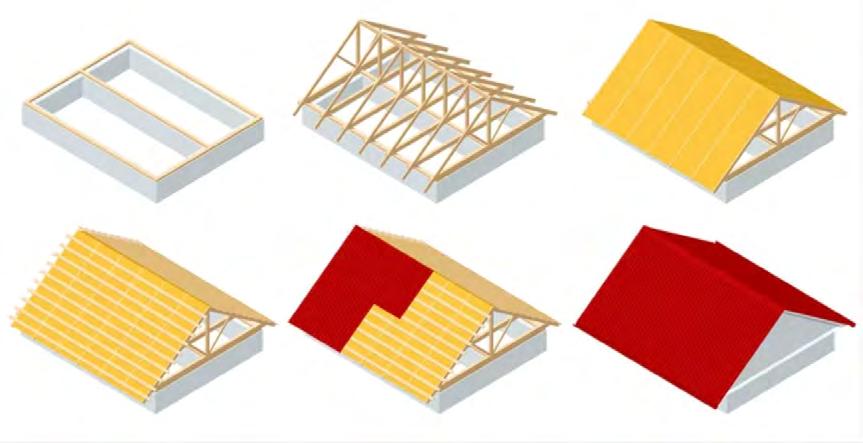
General rules of thumb for installing insulation include:
• Sheet insulation should overlap to form a continuous layer across the wall or roof
• Bulk insulation is more effective at reducing cooling loads in mechanically cooled buildings. The R-value of bulk insulation is reduced when compressed, installation guidance from suppliers should be followed.
• The selection of thermal insulation must also take into account end-of-life disposal issues. Materials that cannot be reused and recycled and can cause significant environmental harm must be avoided.
Attach purlins. leave 50 mm gap at ridge line to allow upward air flow
Attach underlay (eg. gyp board) and install insulation between framing with 50 air mm gap
Cooling | 27 F IJI HOME BUILDING MANUAL BUILD GREEN 4.3
4.3
Base for framing
Roof truss or other framing
Attach roofing to purlins, install venting in eaves if there will be an attic
Attach ridge cap to allow venting
Metal sheet roofing
Purlin
Rafter Insulation
Vapour barrier
Plywood DRAFT 2 2023 June 15
Airflow
4.4
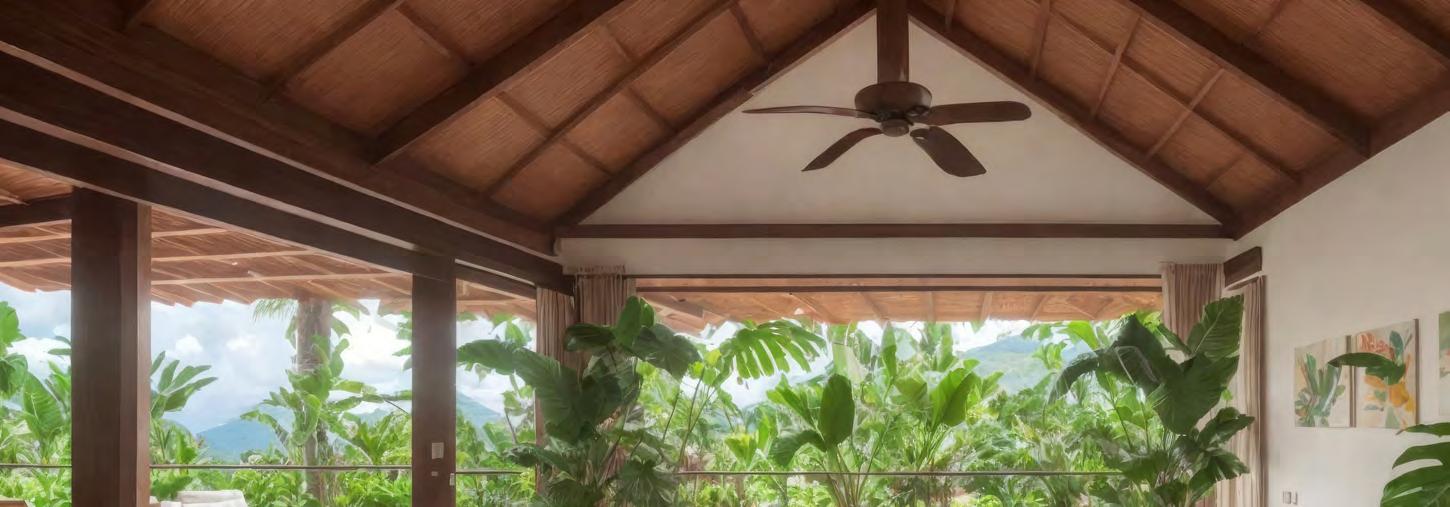
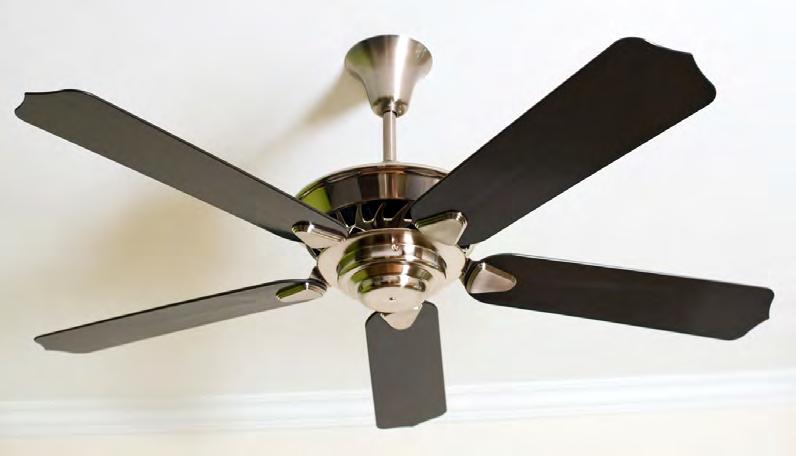
Ceiling Fans
Ceiling fans are considered a permanent part of a home and can be quite effective in cooling rooms. A combination of openable windows and ceiling fans are mostly effective at night time, but have limited impact at midday. However, if walls and the roof are insulated properly, ceiling fans can offer some thermal comfort in the heat of the day.
For optimal cooling, ceiling fans should be the appropriate size based on room dimensions as shown below.
Cooling | 28 F IJI HOME BUILDING MANUAL BUILD GREEN
Size of room (m²) Minimum number and diameter (mm) of ceiling fans required in a bedroom Minimum number and diameter (mm) of ceiling fans required in a habitable room other than a bedroom <15 1 x 900 1 x 900
1 x 1200 1 x 1200 ≥20<25 1 x 1200 1 x 1400
1 x 1400 2 x 1200
1 x 1400 2 x 1400
2 x 1400 3 x 1200 ≥50 2 x 1400 3 x 1400 4.4 DRAFT 2 2023 June 15
≥15<20
≥25<30
≥30<45
≥45<50
4.5
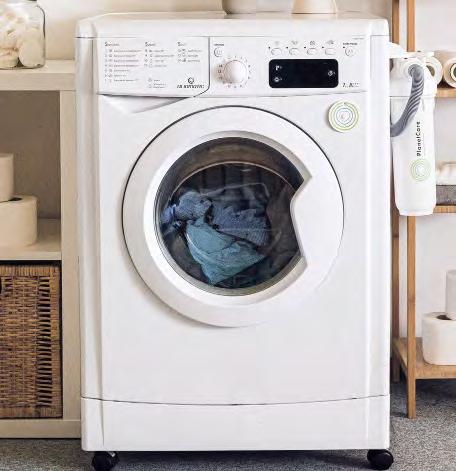
Air-Conditioners and Appliances
Energy efficient air conditioners that are appropriately sized for the room will save on energy needed. If powered by alternative energy (solar, bio energy), the environmental impact is
Heating and cooling appliances, such as Air Conditioning Units and Hot Water Heaters, can account for about 40% of energy use in an average home. Improving the efficiency of these operations can reduce cooling energy use by over 30%.
Currently, Fiji does not have a requirements for air-conditioners to have an energy rating or performance level, and the units commercially available do not provide this information. However, in the near future Fiji is likely to have this kind of rating system and it will be necessary for air-conditioners to have a minimum energy consumption rating or they will not be permitted to be sold.
Check with the Ministry of Trade and the FNBC website to look for updates on when a rating system is available and will be enforced.
Types of Air conditioners

Australia has an energy rating system applicable to air conditioners, laundry machines, dishwashers, monitors, televisions and pool pumps. In this example, the air-conditioning unit has a 4.5 star rating for cooling out of a maximum of 10 stars. With a daily energy consumption of 933 kWh per year, the cooling capacity for an outdoor temperature of 35° is rated at 4.00 kW. This unit would be on the low end of being considered energy efficient. If you want to increase savings on electricity cost and have a more efficient unit, you could choose a unit with a higher number of stars and a lower daily and annual consumption.
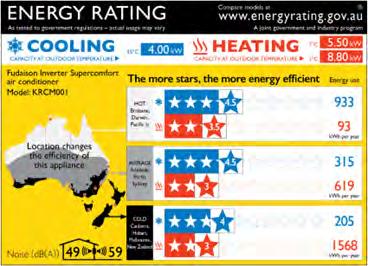
It is recommended to choose at least a 3 star or above when purchasing an air conditioner.
Cooling | 29 F IJI HOME BUILDING MANUAL BUILD GREEN
Typical Energy rating of ACs under Australian Standards
4.5 DRAFT 2 2023 June 15
4.5
AC selection and sizing considerations
It is advisable to consult with the store personnel and do some online research to ensure units are sized correctly according to the cooling needs of the room/building. Under or over-sized units can lead to many problems, such as hot/cold spots, ice buildup, water leakage, reduced lifespan, eventually leading to energy waste, just to name a few. The selection of the appropriate unit should consider:
• Energy star and performance ratings, recommended 3 star or above, if information is available
• Choosing the right type of AC units depending on your usability needs, such as deciding between window, split, or multi-split. Variable Refrigerant Flow (VRF) units provide the ability for individual zone controls from the same unit as well.
• Conventional versus inverter type units are also a choice to make, with inverter type units being more efficient, but coming at a slightly higher cost.
• Optimal location of the indoor and outdoor for split type units need to be considered during the building design phase, as this will lead to ease of installation, most efficient cooling of the spaces while reducing the distance between the indoor and outdoor units.
• Air-con will work best if the rooms/building are well insulated to keep the cold in and the heat out. Doors and windows should be sealed well to improve the efficiency of the air conditioning units.
• Where outdoor units are present, these should ideally be installed under a well-ventilated shade for increased efficiency and on an elevated platform to protect the unit from potential floods
• Unit should ideally be installed with sensors that can detect and deactivate or set the AC units to higher temperature when nobody is in the room.
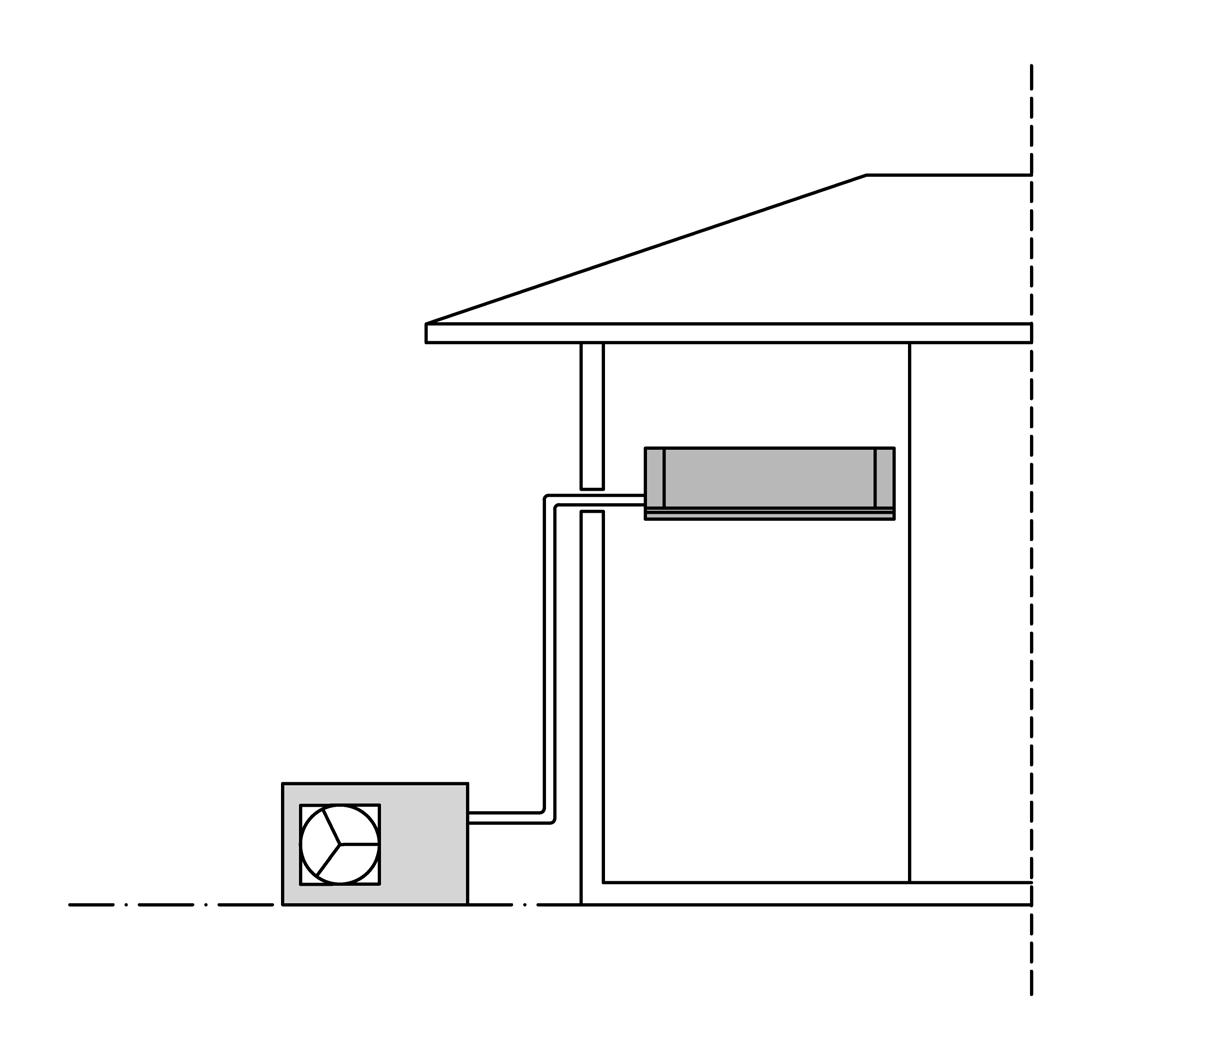
Installation
Installing an air-conditioner can be a complicated task depending on the type. Most wall-mounted units are best installed by a professional contractor or trades person, while portable units can be easily installed by homeowners.
In all cases, it’s best to follow the manufacturer’s instructions which is typically provided with the unit and is also available online.
Cooling | 30 F IJI HOME BUILDING MANUAL BUILD GREEN
4.5
Wall-mounted air-conditioner in building interior
Piping from interior of home to exterior
DRAFT 2 2023 June 15
Converter on building exterior
4.5
Comparison
Windows and ceiling fans have definite advantages over air conditioners with regard to reducing energy consumption and cost savings for both purchasing and operating the unit.
4.6
Advantages
Disadvantages
Windows Ceiling Fans Air-Conditioning
Medium cost to purchase and install if additional windows are needed
Low cost to purchase and install, one or several needed per room
High cost to purchase and install, one needed per room
No operating costs Low operating cost High operating cost
Fresh air Fresh air Re-circulated air
No noise Low noise while operating Medium noise while operating
Disadvantages
Ineffective in extreme heat
Moderate cooling in extreme heat
Maximum cooling in extreme heat
No impact on humidity Limited impact on humidity De humidified air
Energy Efficiency
No energy consumption Low energy consumption High energy consumption
At this point, you should be able to:
• Select appropriate window shading for north, east, south and west facades
• Identify and Select energy-efficient glazing
• Identify and select energy efficient building material and insulation for roof, external walls and floor
• Select venting style for the roof
• Know the advantages and disadvantages of windows, ceiling fans and air-conditioning
• Select an energy-efficient air-conditioner and appliances
Cooling | 31 F IJI HOME BUILDING MANUAL BUILD GREEN
DRAFT 2 2023 June 15
Building Material
The fourth step in constructing a green building is to select building materials that deflect the sun rays, do not transfer heat, and do not store heat.
Some building materials for walls, roof and floor need additional support such as insulation, air gaps and other means to optimize energy savings.
5
1. Sustainable Building
2. Wall, Roof, Floor
3. Termite Protection
DRAFT 2 2023 June 15
5.1
Building Materials
Building materials have different heat absorption properties and some are better than others at keeping a home cool. Green building also involves use of locally available material and recycled material to reduce the carbon footprint.
Avoid Hazardous Materials
Building materials and components containing substances that are harmful to human health must be avoided in buildings. Adverse impacts from materials should be considered at all phases of the building life – construction, operation and demolition/ deconstruction phases.
• asbestos,
• lead and other heavy metals,
• mercury,
• polychlorinated biphenyls (PCB)
• chlorofluorocarbons
• arsenic.
Check with the local authority for an update to this list.
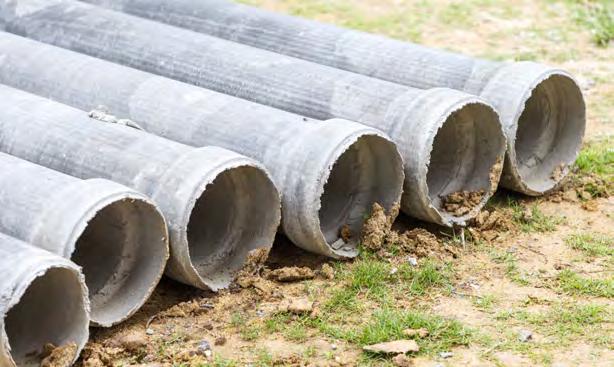
Asbestos in piping and roofing material.

If you suspect you have asbestos in building materials in your home, contact your local authority to have it removed.
| 33 Building Material F IJI HOME BUILDING MANUAL BUILD GREEN
5.1
DRAFT 2 2023 June 15
Recycled and Reused Materials
Building materials and components such as engineered timber, steel and concrete are often recycled or reused. They are typically made with either salvaged materials from other projects or materials with recycled content. Other materials that are sometimes recycled are floor tiles, glazing, gyp board for walls and ceilings, stone cladding and countertops, insulation and permeable paving. Building elements that are typically reused include: metal sinks for kitchens, bathrooms and laundry, stair railings, lumber, metal sheets for roofing or walls, insulation, metal eaves, gutters and downspouts, metal vents, and appliances such as fridge, stove, dishwasher, laundry and air-conditioners.
Homes should aim to achieve the following target:
• At least 20% of building materials to be recycled and/or re-used.
New recycled building projects are being developed all the time. A good practice is to check labelling at building supply stores and ask for specification sheets, and research the product labels online to learn if the product contains recycled content or is re-used.
Local Materials
Locally available and locally fabricated building materials are preferred green building products as less energy is expended in the transportation of materials over long distances from where they are made (often overseas) to the building site.
Locally available building materials in Fiji include:
• Timber
• Bamboo
• Concrete
• Window frames
• Cellulose insulation
Homes should aim to achieve the following target:
• At least 15% of building material to be locally available or locally manufactured Check with the local authority for updated lists of acceptable local building materials.
| 34 Building Material F IJI HOME BUILDING MANUAL BUILD GREEN 5.1
5.1 DRAFT 2 2023 June 15
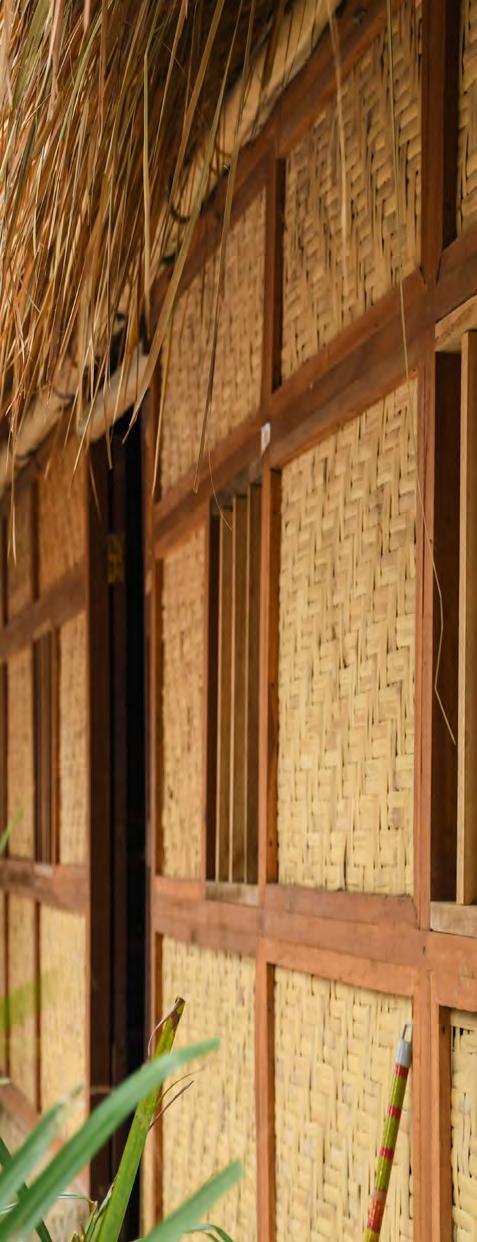
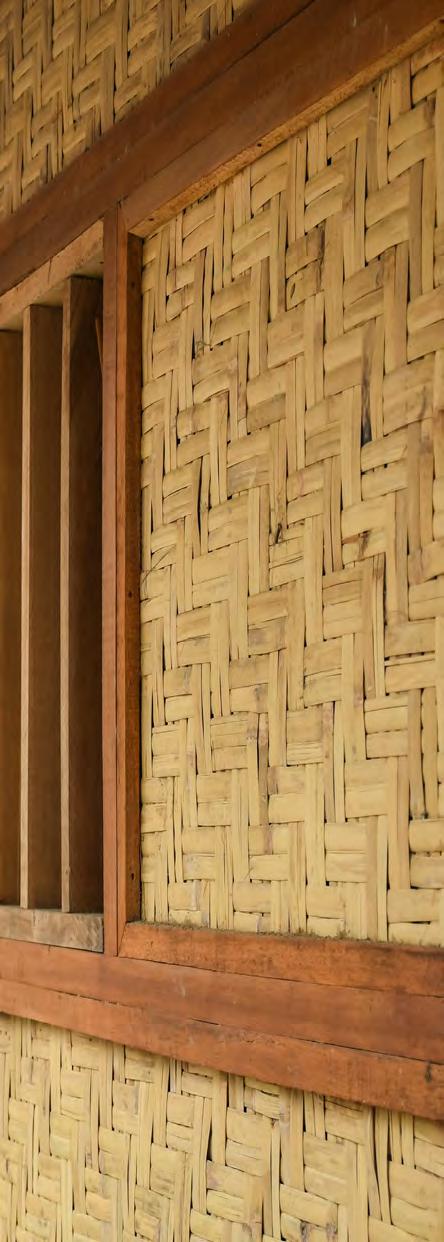
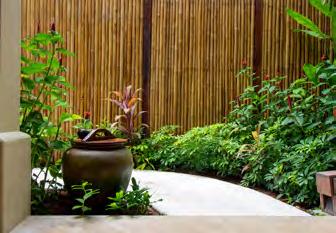
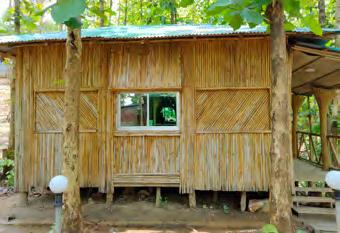
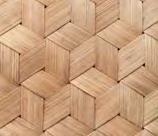
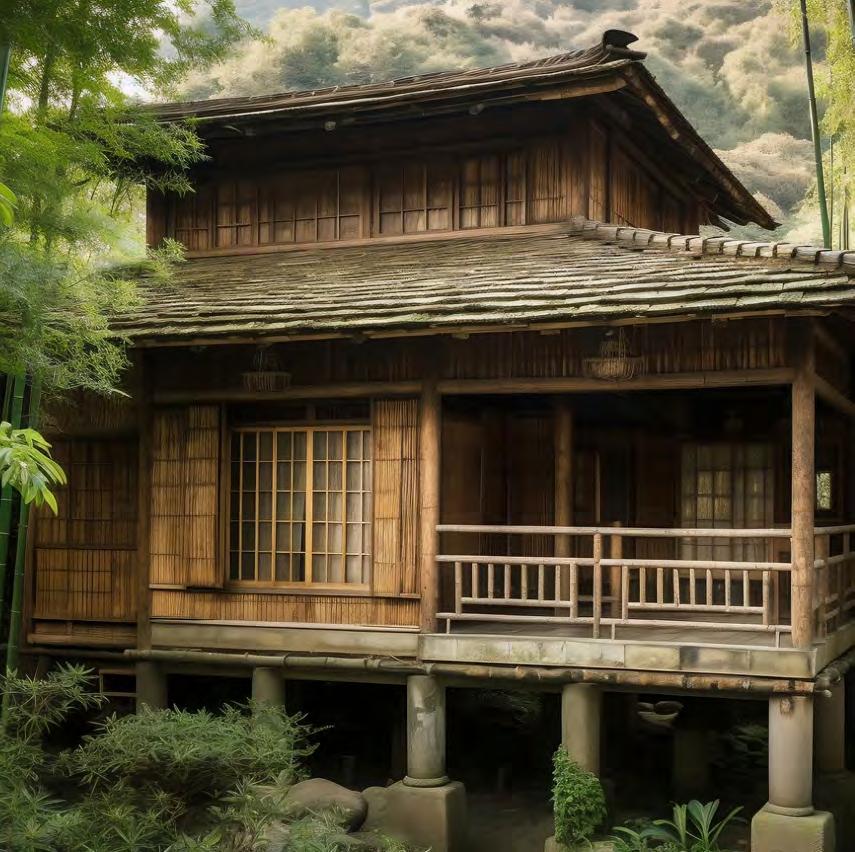
Bamboo
Bamboo is rapidly becoming the sustainable building product of choice for many homeowners due to its low cost, durability, sustainability, being locally available and attractive appearance.
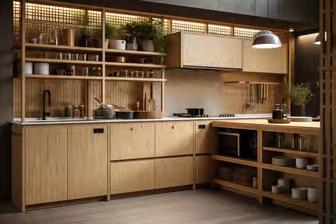

Bamboo building products include the following:

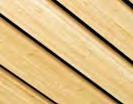
Engineered bamboo Planks, floor board, wall board, decking

Canes
Fencing, wall cladding, insulation
Weaved
Fencing, interior wall cladding, decorative Boards
Floors, interior walls, ceilings, shutters, blinds, cupboards, trim
| 35 Building Material F IJI HOME BUILDING MANUAL BUILD GREEN 5.1
5.1 DRAFT 2 2023 June 15
5.1
Wall, Roof, Floor
Exterior Wall
To reduce solar heat gain, exterior walls should be made of materials that can either deflect heat or have low conductive properties. Material should also be local, recycled or re-used. A selection of appropriate material and associated heat reduction techniques are listed here:
Exterior Walls
Wall Material Additional Heat Reduction Technique Needed
Bamboo Insulation on north and south walls
Steel panels Reflective e-coating and insulation on north and south walls
Concrete block or poured Insulation (but not reflective sheets) on all walls
Timber Insulation on north and south walls
Straw bale / Thatch / Earth None
5.1
Note that treatment is not required on east and west walls provided there is a roof overhang of 45 mm and the lower part of walls are blocked from the sun by planting, fences, other buildings, trees and the like.
| 36 Building Material F IJI HOME BUILDING MANUAL BUILD GREEN
DRAFT 2 2023 June 15
Roof
An important function of the roof is to protect the walls, openings and interior from direct sunlight, particularly on east and west walls. Whatever type of roof is used; it should have generous overhangs of not less than 0.6 m but preferably of 1.0 m. The roof should be made of lightweight materials with low thermal capacity and high reflectivity. It should be ventilated or well insulated to reduce heat gain due to solar radiation.
Similar to walls, roof materials should be local, recycled or re-used. A selection of appropriate material and associated heat reduction techniques are listed here:
Roof Material Required Heat Reduction Technique
Asphalt shingle Insulation and air gap
Bamboo Insulation and air gap
Steel panels Reflective e-coating and insulation
Concrete panels Insulation (but not reflective sheets) and air gap
Timber Insulation and air gap
Straw bale / Thatch / Earth
None
| 37 Building Material F IJI HOME BUILDING MANUAL BUILD GREEN
5.1
5.1 DRAFT 2 2023 June 15
Green Roof
A green roof is an excellent way to cool the building interior and reduce cooling costs associated with fans or air conditioning. Plants and soil on the rooftop deflect the heat from the sun and create comfortable living spaces below. Green roofs have been tested and hold up to cyclonic wind forces after plants are firmly established. A green roof should :
• Contain all layers shown in the diagram below
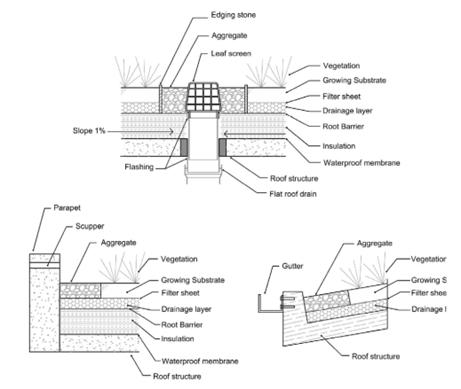
• Be constructed at a slope of 5% to 30%
• Protect the building interior with a continuous waterproof membrane
• Have a parapet at the roof edges to hold soil in place

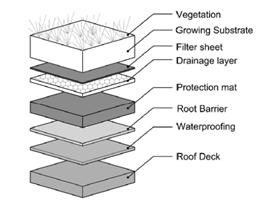
• Be supported by roof beams and posts that can support its weight when saturated with water
• Have a mesh drainage layer and roof drains that quickly directs excess water to a drainage pipe leading to the ground
• Have high quality soil
• Be planted with low-growing, sun-loving plants
Flashing
Edging stone
Aggregate
Leaf screen
Vegetation
Growing substrate
Filter sheet
Drainage layer
Protection mat
Root barrier
Waterproofing
Roof deck
Vegetation
Growing substrate
Filter sheet
Drainage layer
Root barrier
Insulation
Waterproof membrane
Roof structure
Flat roof drain
Aggregate
Aggregate
Vegetation
Growing substrate
Filter sheet
Drainage layer
Root barrier
Insulation
Gutter
Vegetation
Growing substrate
Filter sheet
Drainage layer
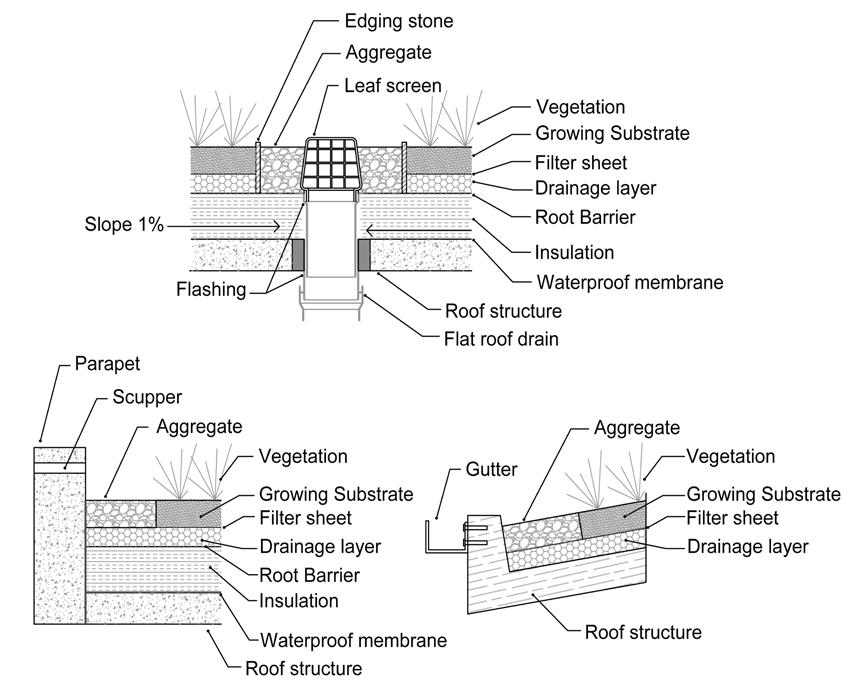
Roof structure
Waterproof membrane
Roof structure
| 38 Building Material F IJI HOME BUILDING MANUAL BUILD GREEN
5.1
5.1
1%
Slope
Parapet Scupper
DRAFT 2 2023 June 15
Floors
Three floor types mostly used for homes in Fiji are:
• Timber framing with a timber, concrete, or tiled floor
• Concrete slab on posts or on grade
• Raised earthen platform or Yavu with dry grass and thatched mats
All three flooring types require good ventilation and ample drainage to achieve good comfort levels for occupants, and for peak performance and to extend the lifespan of the materials.
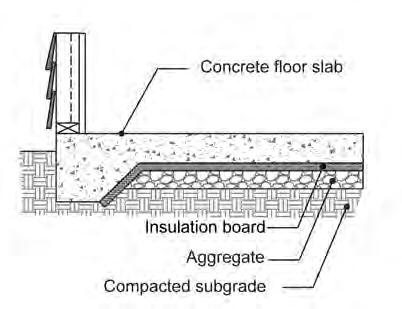
The thermal performance of earth floors and concrete slabs is similar. When kept from direct sunlight in a well-ventilated space these two floor types do not retain heat. But in an unventilated space these floor types will retain heat and slowly release it during the night when they are no longer absorbing heat. To eliminate heat being transmitted from the floor, insulation must be used.
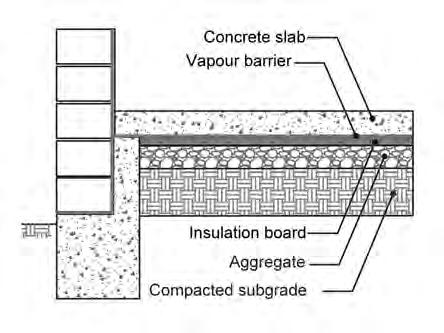
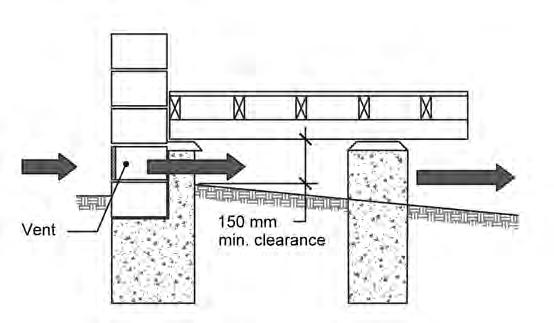
Timber floors are low thermal conductors. However, they need ventilation to reduce moisture accumulation, heat transfer and rotting the wood. The lowest surface of a timber beam must be at minimum 400mm clear of the earth/organic matter to prevent timber rot. This air gap allows cross ventilation that removes heat and moisture rising from the earth. For earth floors and concrete slabs, pay extra attention to the air above the surface of the floors, allow for avenues to allow the hot air to escape the rooms, while for timber flooring it is the air beneath the floor that is key!
| 39 Building Material F IJI HOME BUILDING MANUAL BUILD GREEN
5.1 5.1 Aggregate Vent 150 mm min. clearance
Concrete slab
Insulation
Compacted
Concrete floor slab Compacted
Vapour barrier
Insulation board
board
subgrade
subgrade
Post to foundation
Bearer to post
Bottom plate to floor joist
Stud to bottom plate
Aggregate DRAFT 2 2023 June 15
Floor joist to bearer
5.1
Foundation.
Foundations are the primary supports for the building, and they must have adequate depth, width and appropriate spacing appropriate to soil type, slope and exposure to wind, flooding and sea surge. Consult the documents mentioned in Section A for standards and guidelines on how to construct them.
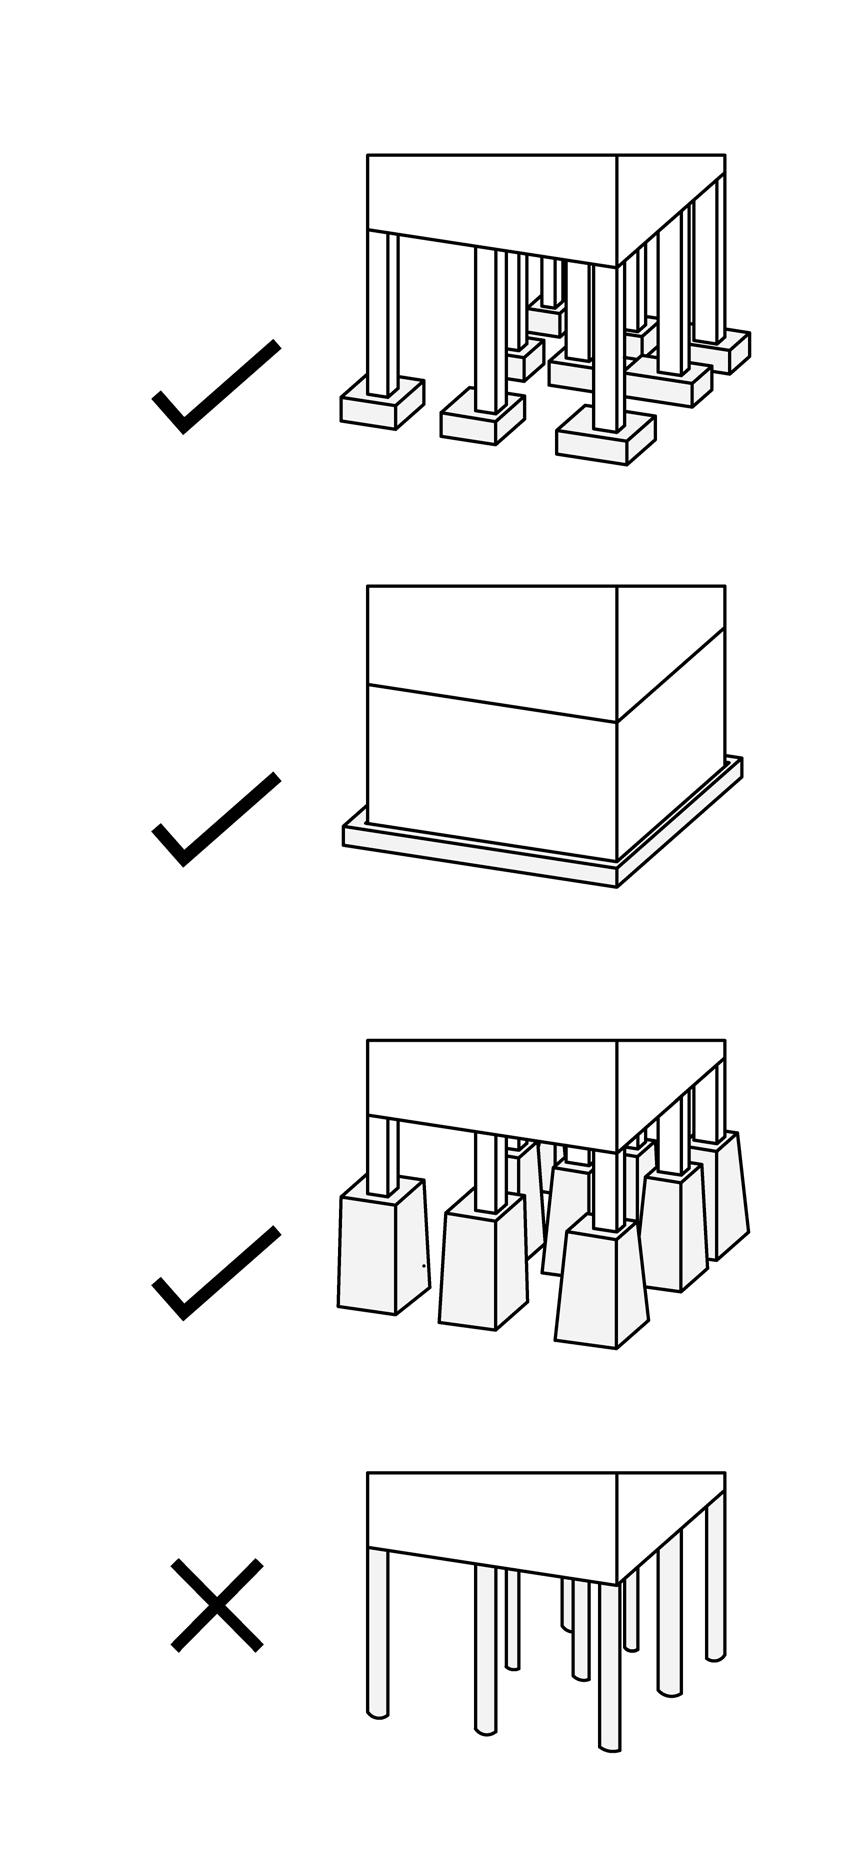
Foundations with sufficient strength for homes are:
• Pad concrete footing with concrete posts
• Strip footing of concrete block (must have venting)
• Mass Footing with timber or concrete posts
Distance between footings / posts varies depending on soil conditions, the structure and size of the house. Consult a local builder of the local authority to verify appropriate distances.
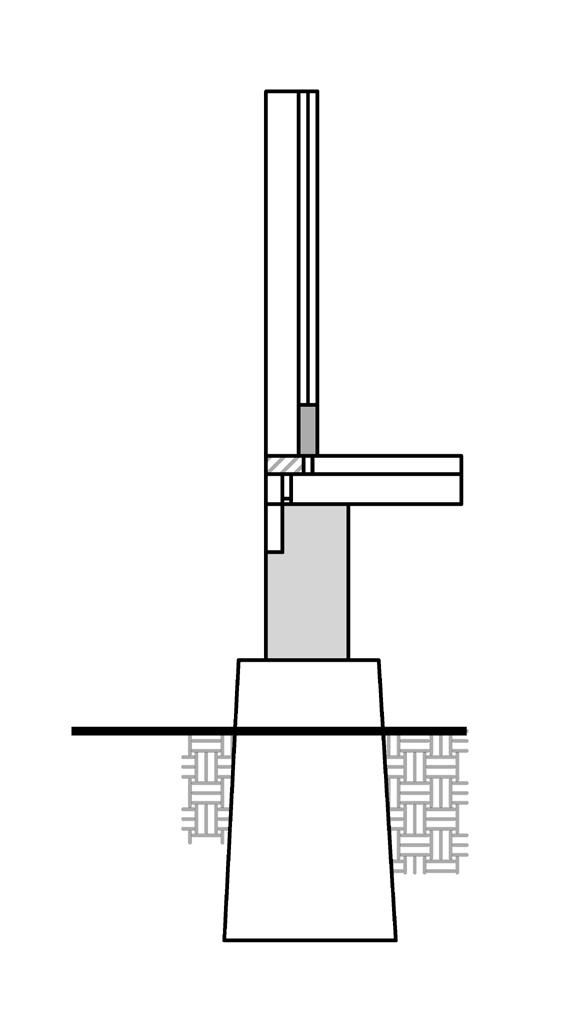
Moisture Protection
Concrete footings and piles are prone to moisture creep where moisture flows upward from the ground to the underside of the floor where it continues to rise. It can ruin tile flooring, carpet and timber floors or may result in a constant puddle on the floor.
To prevent moisture creep, a moisture barrier sheet like Visqueen should be applied over a sand layer to prevent moisture from rising though a concrete slab. Consult your local engineer or local authority Visqueen specifications and how to apply them. For a slab on grade on a slope, a drain should be installed between the house and the higher end of the slope to catch and divert all surface water runoff preventing it from reaching your building.
For timber posts attached to concrete footings, it is essential to allow the concrete footing cover to rise past the earth so that the timber does not have direct contact with soil or organic material. Any prolonged contact will trigger a reaction that would cause the timber to rot. For fence poles set directly into the earth, a good coat of tar applied to the timber on every surface in contact with the earth can seal the timber and protect it.
iTaukei Traditional Homes
5.1
Pad footing
Strip footing
Mass footing
Timber post in soil
With our iTaukei and traditional building types, the mud floor is first protected with the “Yavu” treatment, that is a raised earthen platform is battered along the perimeter or edges this to aid the quick discharge of runoff off of the thatch roofs preventing pooling and the degradation of the earth mound and bamboo walls. The surface of the Yavu is treated with smooth river stones and old shells set deep in the earth
| 40 Building Material F IJI HOME BUILDING MANUAL BUILD GREEN
DRAFT 2 2023 June 15
Termite Protection
Termites are located in all parts of Fiji, particularly in the urban areas of Lautoka, Suva, Nadi and Labasa. Every home should be protected against termites.
Termites live in the soil and thrive in wet areas. Having good drainage around your home to prevent water from ponding will help. However, termites swarm in September to November, meaning that they fly and spread, so it is best to have termite protection built into your home as termites can travel virtually anywhere.
Termite prevention consists of any of the following measures:
• Using termite-resistant building material:
o Pressure-treated timber
o Timber with termite-resistant coating
o Steel, aluminum and other metal posts, beams, rafters
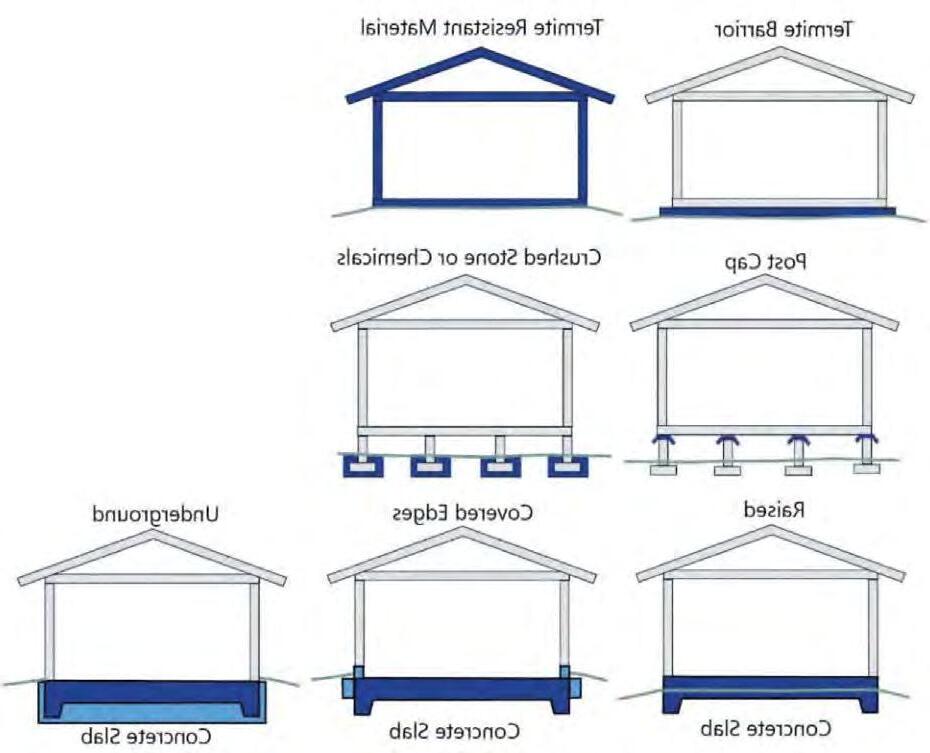
o Concrete or masonry footings and foundations
o Plastics and polycarbonites (such as engineered wood)
• Install a termite barrier to prevent upward movement into the floor
• Chemical treatment to kill and repel – this is typically done AFTER termites have been identified on the property
| 41 Building Material F IJI HOME BUILDING MANUAL BUILD GREEN 5.1
5.1
Termite barrior
Covered edges Underground
Post cap
Raised
Concrete slab
Concrete slab
Concrete slab
Crushed stone or chemicals
DRAFT 2 2023 June 15
Termite resistant material
To prevent termites, termite-resistant building material should be used for the lower 1.5 m of all construction, including steps, porches, verandahs, patios, utility shelves. This is the best method as it only needs to be done once, unlike chemical treatment which needs to be applied annually.
If chemical treatment must be used, it should be applied:
• Prior to pouring and installing footings
• Again after levelling of footing and slab areas
• Again after the final finished grade is set
• Every year afterward
Any chemical treatment must be approved by the Ministry of Agriculture to ensure there is no harm to soil.
At this point, you should be able to:
• Identify and select energy efficient building material and insulation for roof, external walls and floor
• Select venting style for the roof
• Know the difference between hazardous building materials and preferred energy efficient materials
• Estimate if the new home will meet the targets of using 20% recycled/reused building material and 15% local material
• Determine if bamboo or a green roof will be used
• Develop a strategy to safeguard your home from termites
| 42 Building Material F IJI HOME BUILDING MANUAL BUILD GREEN
5.1
5.1 DRAFT 2 2023 June 15
The fifth step in constructing a green building is to design a sustainable and renewable energy system as the energy source for the home.
Energy
6
1. Efficient Lighting
2. Solar
3. Bio Energy
DRAFT 2 2023 June 15
Lighting
Using energy-efficient lighting is a low cost green building technique that affects every room in the house, and outdoors too.
Lighting is very important for comfortable and safe indoor and outdoor spaces. There are many variables to consider, such as the lighting technology, types of fixtures, desired illumination levels for individual rooms and spaces, and lighting controls. Taking these considerations earlier on in the design stages can help avoid unnecessary issues and surprises in the future
Natural Lighting
Homes that allow a generous amount of natural lighting promote energy efficiency by eliminating the need for artificial lighting during the daytime. Positioning and sizing of windows for natural lighting should be considered along with objectives for natural ventilation (see Section 3.2) and energy efficiency (see Section 4.1 and 4.2). Too many windows, particularly on the east and west facades, will promote natural lighting at the cost of being able to cool the building naturally and efficiently. So it is a good practice to calculate the amount and number of windows necessary to illuminate interior spaces, and not go above the minimum number and size requirement.
WWR (Window to Wall Ratio) is a calculation used to determine the optimum area of windows. It is calculated for each wall, and measures the percentage of window area to wall area:
WWR (%) =
Area of window Area of X 100
The maximum WWR for energy efficiency and natural lighting in a home in the FNBC is 40%, while the optimum energy efficient range is 15% - 25%. The WWR should be calculated for each facade, then take the total sum of percentages and divide by 4 to get the WWR for the entire building.
Not all facades on the home should have the maximum WWR permitted. As indicated in Section 2.2 and 2.3, windows are discouraged from being placed on east and west facades. Instead, window placement is encouraged along
north and south facades. The maximum area for windows on all four facades should not exceed 40% and should ultimately be in the range of 15% to 20%.
WWR = 25%
WWR = 40%
| 44 Energy BUILD GREEN
6.1
DRAFT 2 2023 June 15
Artificial Lighting
While natural lighting in building design is important, artificial lighting is often necessary for night time use. Since artificial lighting is one of the largest sources of energy consumption in a home, it is essential to use the energy saving measures listed below:
Wattage
The majority of lighting fixtures available for purchase in Fiji are considered to be energy efficient, ranging from low watt 5W (watt) fixtures to 40 W fixtures. However there is a small quantity of lesser efficient lighting fixtures and bulbs still available for purchase, such as incandescent bulbs and CFL (Compact Fluorescent Lamps). Both of these options should be avoided.
LEDs on the other hand, offer the highest efficiency and light output with longer lifespans, and are highly recommended for a greener lighting design. For example, for the same amount of power consumption (10W), an LED produces 800 lumens of brightness, whereas CFL only produces 450 lumens and incandescent as the lowest at 81 lumens. There are various types of LED lighting and fixtures available including LED bulbs, tubes, downlights, and hanging details.
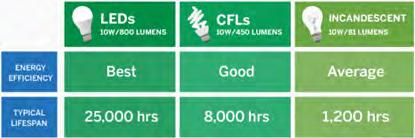
LEDs are also available as retrofits to upgrade older/existing lighting fixtures with this newer technology. For example, typical “tube lights” that were based on Fluorescent technology can now be replaced with LED based tubes. This does require some basic knowledge, such as bypassing the internal ballast and/or replacing/removing the “starter” that were used in the older technologies. Retrofitting this way generally brings energy saving benefits at very little upfront cost. For example, a 2 feet Fluorescent tube light, which general consumes 18W
when replaced with a 2 feet LED based tube can consume around 9W of power instead, causing a 50% reduction in energy consumption.
It is recommended to go with reputable brands, in order to ensure the lighting meets the specified energy efficiency, brightness and lifespan ratings while offering longer warranties. It also provides higher confidence that the same type/model of lighting will be available in the future, when it comes time to replace the existing lights. Often a times, it would be harder to find exact replacements for cheaper or unbranded lighting, causing consumers to replace with another brand that not only looks different, but also gives different brightness and color temperature when compared to existing lights in the room.
| 45 Energy F IJI HOME BUILDING MANUAL BUILD GREEN 6.1
Comparison of lighting lifespan
2.3 DRAFT 2 2023 June 15
Illumination considerations
Choosing the right levels of brightness is very important in a building design, as individual applications/rooms/spaces require their own brightness levels for a comfortable experience. A higher wattage of lighting using means higher levels of brightness (lumens) when considering the same lighting technology.
It is recommended to do a proper lighting design of the house prior to construction, in order to ensure that the required level of Lux is achieved in all spaces. The design usually needs to consider various factors such as the lighting technology used, the distance between the lights to achieve uniform lighting without dark spots, the height of the installed lights compared to the workspace, the influence of the light reflection from walls and ceilings, and so forth, while trying to maximize the use of natural lighting as well.
Requirements
All homes in Fiji can contribute to the country’s goal of reducing energy production by 30% by using energy efficient lighting, a low cost solution with a large energy savings impact.
Requirements for all homes are:
• At least 80% of general lighting in homes must have LED fixtures and lighting or other low-energy technique
• At least 75% of exterior lighting must be powered by solar or other alternative energy technique.
• All lighting in homes must have timer (occupancy) and/ or dimmer switches
| 46 Energy F IJI HOME BUILDING MANUAL BUILD GREEN 6.1 2.4
DRAFT 2 2023 June 15
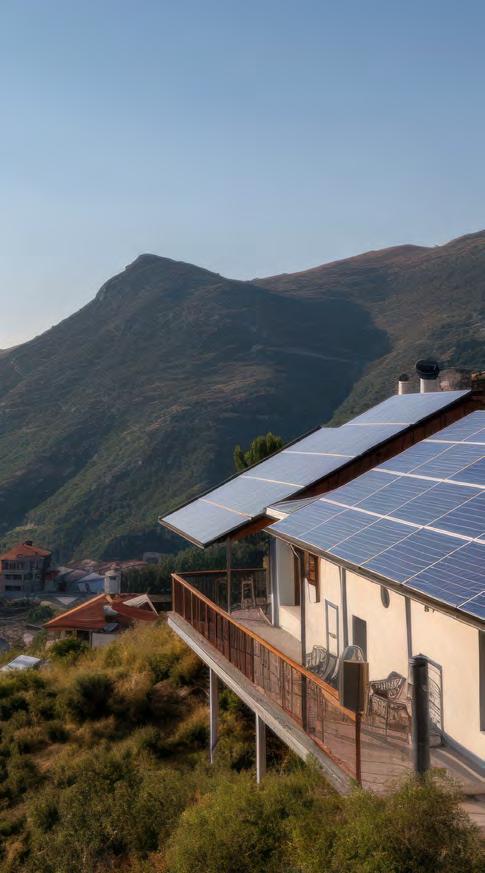
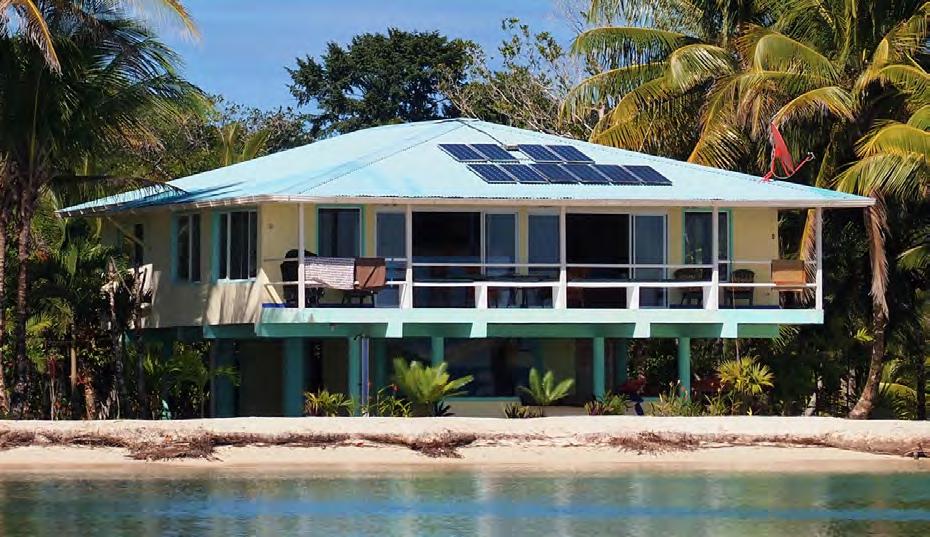
6.2 Solar Energy
Research shows that using solar energy instead of electricity supplied by the grid can amount to as much as an 80% reduction in consumption of energy for a home. This translates to huge savings on
As a tropical Island Country, Fiji is blessed with abundance of solar energy all year around. It makes sense to take advantage of this free resource using solar photovoltaic (PV) systems to:
• help offset electrical utility bills with free renewable energy
• contribute toward GHG emissions reduction by reducing reliance on the national grid which is partly powered by fossil fuels
• increase resilience and energy security by producing partial/full energy needs on-site, while mitigating the worsening impacts of natural disasters due to climate change
• decrease maintenance costs, as there are no mechanical moving parts that can wear out over time, added with
Solar energy does have the disadvantage of higher initial costs to install, but the cost of solar panels and complete systems have come down significantly over the decade, making it a very competitive option. Most solar PV systems for homes have a payback time of 5-7 years ... meaning it’s free energy after that!
| 47 Energy F IJI HOME BUILDING MANUAL BUILD GREEN
6.2 DRAFT 2 2023 June 15
SECTION 1 6.2
Types of Solar Energy Systems in Fiji
1. Supplied from the Grid 100%
Energy Fiji Limited and other energy supply companies are working toward achieving supplying S100% renewable energy by 2030. Some locations in Fiji will be connected to a renewable energy source automatically, just by being in a specific location and already connected to the grid. If this is your situation, you are automatically contributing toward Fiji’s zero carbon objective!
2. Free Solar PV System Supplied by an Energy Provider with Connection Back to the Grid
Some energy suppliers offer to supply and install a free solar PV system on your rooftop or in your yard if the owner agrees to buy back the energy from the energy supplier at a much lower rate than energy from the grid. Again, if you choose this option, you will be automatically contributing toward Fiji’s zero carbon objective and will save on your energy bills.
3. Solar PV System with Grid Backup
Installing your own solar PV system on a rooftop or in a yard will result in significant cost and energy savings, and if you are connected to the grid you can pay for power during times when weather is not favourable for solar energy collection.
4. Solar PV System with Grid Backup and Battery
Installing your own solar PV system along with a backup grid connection can be further enhanced by having a battery for storage. Batteries collect energy during peak periods and store it for use later in the afternoon and evening. A backup connection to the grid would only be necessary in extreme weather conditions or emergencies.
5. On-site Solar PV System with Battery 100%
If you are in a location where a grid connection is not possible and there are no energy supply companies nearby, this is your best option. Purchasing a battery that is oversized for your expected needs will give the assurance that your energy needs will be met except in emergency situations. This is a also a great option for long-term cost and energy savings no matter where you live.
energy savings
utility bill savings
energy savings
utility bill savings
energy savings
utility bill savings
energy savings
utility bill savings
energy savings
utility bill savings
| 48 Energy F IJI HOME BUILDING MANUAL BUILD GREEN
6,2 DRAFT 2 2023 June 15
Installation of Solar PV System
A full solar PV system consists of the following components:
• solar PV panels, mounting hardware and cables
• battery, mounting hardware and cables
• inverter (to convert the low voltage of the solar panels (12, 24, or 48 volt) into 240 Volt for the grid
An electrician is not needed to install a solar PV system due to the low voltage. But if the solar PV system will be connected to the grid, an electrician is highly recommended. Either way, a building permit is needed from the local authority.

Following manufacturer’s instructions is essential for doit-yourself installations.
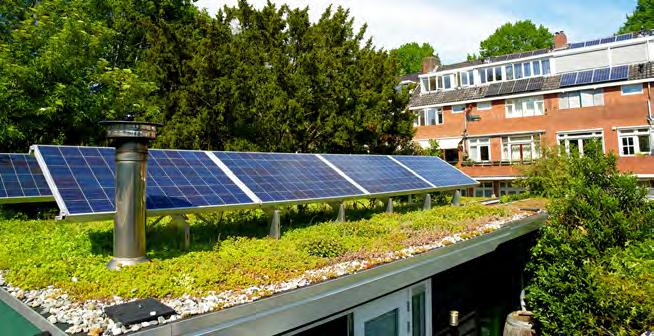
Rooftop Mount
Fiji is located in the southern hemisphere at a latitude of ~18 degrees. To extract maximum solar energy the solar panels must be ideally tilted between 15-20° and face the North direction. This generally calls for the following considerations:
• If a solar PV system will be installed, the roof design should ultimately ensure that a sufficient amount of roof area is in a north facing direction. For new or existing roofs that do not face north, tiltable mounting brackets should be used. This system has a slightly higher costs compared to flat mounted systems, and reduced structural and wind resistance. Maximizing roof area tilted to the north at 15-20% is ideal.
• Shading of solar panels should be avoided for all times of the day year round. Consideration should be made for young trees that might cast shade in future.
• Racking systems to support the solar panels should be mounted according to manufacturer’s instructions and to achieve an acceptable wind resistance. The strength of the racking system is only as good as the roofing structure it is fixed to, meaning that a solid roof with wind resistance that conforms with standards in the Fiji National Building Code is essential.
• The roof should be designed to take on the additional load and mounting system of the solar system. For example, the roof purlin spacing must fall within the permitted allowances of the solar racking system being used.
• If roof spacing, orientation or structure is not ideal for mounting of solar system, ground mounted systems are also available. These come in various types including, but not limited to, ballast systems, pile-driven, screw, pole mounted, etc. Ground mounted systems are generally more expensive than roof mounted.
| 49 Energy F IJI HOME BUILDING MANUAL BUILD GREEN 6.2
Bracket for attaching solar panels
6.2 DRAFT 2 2023 June 15
Inverters and Batteries
An inverter converts DC (direct current) electricity generated by solar panels into AC (alternative current) electricity that can be used to supply power to the house. Batteries can be used in a solar system to store excess energy generated by solar panels during the day to be used at night or nonpeak periods. Important considerations for inverters and batteries include:
• Most PV inverters are designed to be mounted outdoors with the solar panels or can be mounted on the walls as well (blue inverters in the picture).
• For systems that include batteries, the battery inverters and especially batteries are more suited for indoor installation. Due to the heat generated under normal operation and the environmental requirements, the power room must have adequate ventilation in place, while still being protected from any water ingress or flooding.
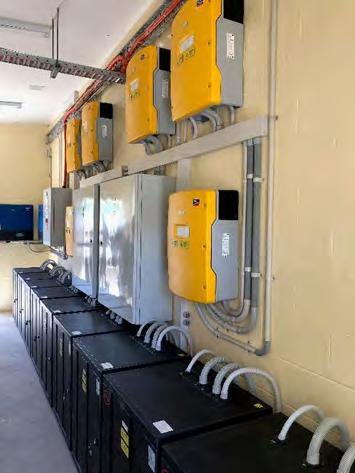
• To reduce electrical losses, these components are preferably located close to the buildings main electrical panels for shorter distances and easier connection to the buildings electrical systems. Provisions need to be made for additional mounting space required by the solar system components
Solar Energy – How to make the most of it
As demonstrated by the graph on the right, solar energy is best generated between 9am to 3pm daily in good weather due to the sun being overhead (yellow graph). To take advantage of the free solar energy and cut costs on utility bills, households should try to shift daily energy usage activities away from the peak period because less use equals more savings.
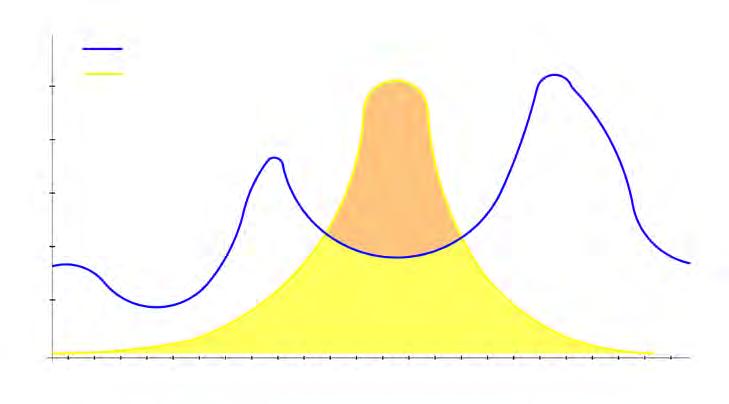
Using energy outside the peak period such as between 6 am and 8 am, and from 3 pm onward (blue graph), will mean that this energy cannot be supplied by solar and hence will come from the utility grid at a cost.
Any excess solar energy that is not used by the household (orange region) will simply be wasted and exported back to the grid. This is how a “Grid Connected Solar System” works and is the most commonly used system in many buildings.
While it is understood that not all energy usage by a household can be shifted to daytime, all consideration has to be taken to make the most of the freely available solar energy to ensure maximum benefit.
| 50 Energy F IJI HOME BUILDING MANUAL BUILD GREEN 6.2
6.2
Time of Day 1 2 3 4 5 6 7 8 9 10 11 12 13 14 15 16 17 18 19 20 21 22 23 24 250w 500w 1.25kw 1kw 1.5kw Power demand Solar energy used in home DRAFT 2 2023 June 15
Your home’s electricity demand Your solar output Solar energy exported
Bio Energy
Bio Energy is a long-standing renewable energy option in Fiji, mainly used in rural areas, that can create energy for lighting and other household energy needs.
Biogas Digestors operate similarly to a single-chamber anaerobic septic tank, but provision is made to trap the gas, which is largely methane, given off during digestion. The methane gas can be used as fuel for cooking and lighting buildings. For efficient gas production, the content of the digestor tank should have a carbon:nitrogen ratio of approximately 30:1.
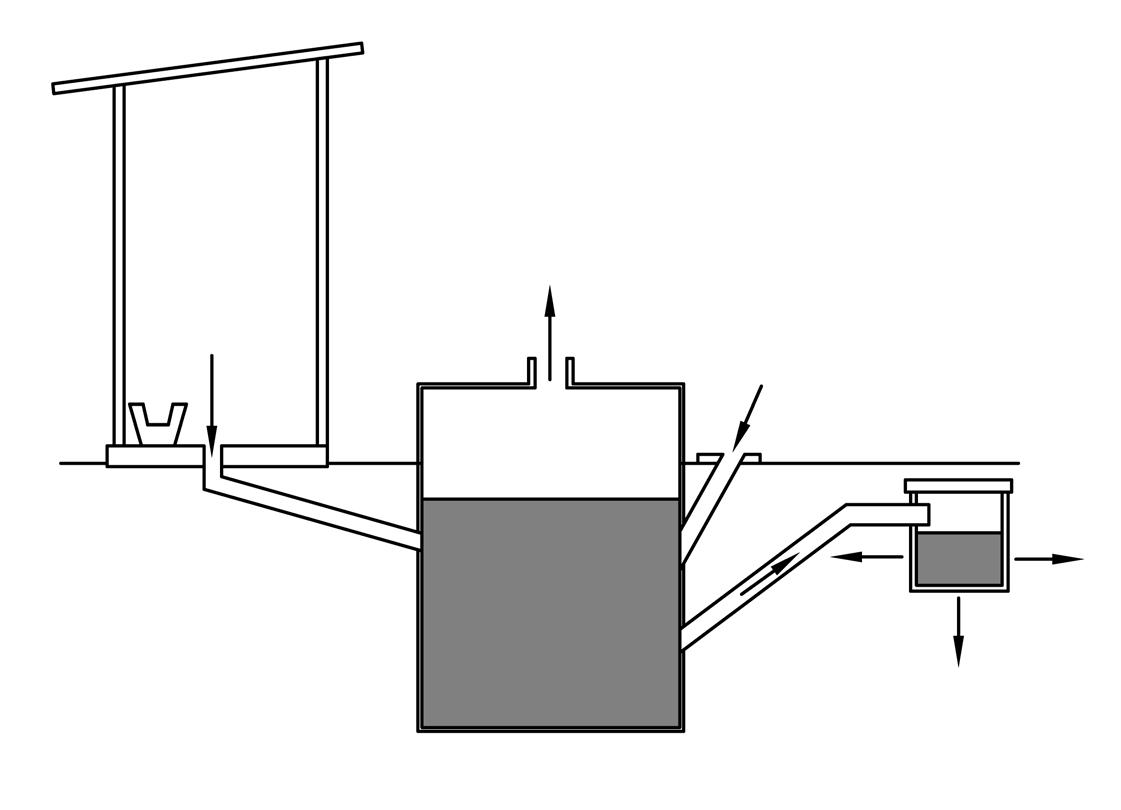
Vegetable wastes are usually added to excrement to raise the carbon content in the tank. Excess effluent from the tank is often drained into ponds, where algae are grown as feed for domestic animals such as ducks. The digestor tank requires desludging periodically.
The type of biogas digester is determined by local ground conditions, rainfall, water table, water supply, ground temperature range, and social, cultural, and religious influences within the community.
At this point, you should be able to:
• Calculate the WWR (window to wall ratio) to find out if your house design has window size and placement that is energy efficient
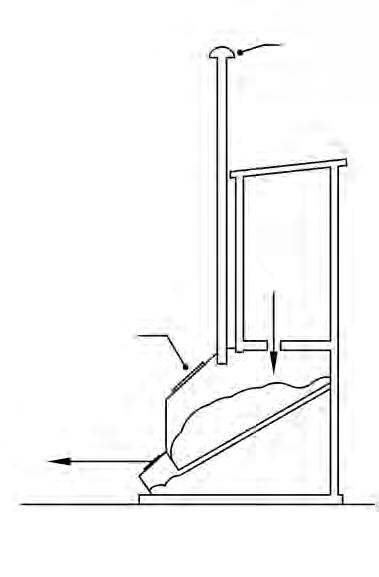
• Understand the advantages of using LED fixtures and bulbs
• Understand the cost-benefits of using solar energy
• Understand the solar energy options available
• Understand some of the rooftop mounting requirements
• Understand how to optimize the production and demand of power in a solar system
• Be aware of bio energy systems available
| 51 Energy F IJI HOME BUILDING MANUAL BUILD GREEN 6.3
biogas vegetable
absorption trench vent bung seal vegetable waste compost Single-chamber type digester
excreta
sludge DRAFT 2 2023 June 15
waste
tank
bucket flush
Water
The sixth step in constructing a green building is to maximize the potential of rainwater and groundwater to reduce energy and conserve water.
1. Rainwater Tank and Efficient Fixtures
2. Solar Hot Water Heater
Water is a precious resource and an important part of everyday living. Rain water is abundant in during the rainy season and abundant year round in the Suva / Nausori region.
7
DRAFT 2 2023 June 15
Rainwater Harvesting
Rainwater harvesting is a system which collects and stores rainwater for household use, replacing the need for water
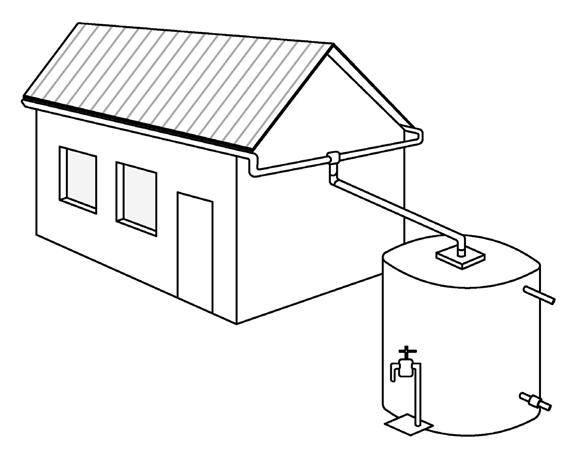
Rainwater is a sustainable, free source of nearly pure water that is abundantly available in the Suva area year around, and in other areas in the wet season. Rainwater harvesting is an important part of green building design as it:
a) reduces demand for freshwater supplies
b) reduces amount of runoff, soil erosion and the risk of flooding
c) reduces cost of water supply
Harvested rainwater should be used for non-drinking water uses only, such as toilets, laundry, irrigation, outdoor cleaning. It can only be used for drinking water if it complies with the Public Health Act and is properly treated with chemicals and filtered.
Rainwater harvesting consists of collection, distribution and storage equipment, as shown below, including but not limited to:
• Gutters and downpipes to collect rainwater from a sloped rooftop and convey it to a water storage tank
• Water storage tank which may include sockets and taps to access the water
• Return piping that conveys water into the house to provide water for toilets and laundries.
• Piping to exterior irrigation systems, hoses and other cleaning mechanisms.
Installation
Storage Tank
A strong and level base should be constructed to support the storage tank. Soil beneath the storage tank should be compacted, then a 100 mm layer of loose aggregate should be installed on top of the compacted earth, extending 300 mm past the edge of the storage tank.
Gutters and Downpipes
Gutters should be attached to the roof edge with metal brackets and metal screws according to manufacturer’s instructions Downpipes must be securely fastened and the joints secured with a waterproof sealant.
Return Pipes
Pipes that supply water from the storage tank to the building interior should be durable PVC or copper pipes (or other durable material) and should have a continual, gradual slope for positive drainage. A pump may be required.
| 53 Water F IJI HOME BUILDING MANUAL BUILD GREEN
7.1
7.1
Gutter connects to storage tank
Roof collects rain water and feeds it to the gutters
Tap for water supply
DRAFT 2 2023 June 15
Galvanized drain pipe Filter Overflow Connect to irrigation
Low Flow Fixtures
Low flow water fixtures are a simple and cost-effective way to conserve water, save money and reduce environmental impact.
Low flow water fixtures can help reduce the strain on water resources and thereby reducing carbon emissions and providing a more sustainable future.
Low flow water fixtures are designed to use less water per minute without sacrificing performance, resulting in significant reduction in cost of purchasing water
To reduce water use, low flow fixtures should be installed for all water supply taps, showerheads, toilets and hoses:
• Landscaping – Plant only native/adaptive species that require minimal watering, use recycled water for watering gardens and lawns.
• B. Bathrooms – Showerheads to run at flow rate of 6L/min (base case 8L/min), when operating at pressure of 3bars (43.5psi).
• Bathrooms – Faucets in public and private bathrooms of all building classes to run at 2L/ min (base case 6L/min) while operating at full pressure of 3bars (43.5psi).
• Toilets – Water closets installed with option for half flush; 6L for full flush and 3L for half flush (base case 8L and 4L.)
• Kitchen – Faucets in kitchen sinks with maximum flow of 8L/min (base case 10L/ min) while operating at full pressure of 3bars (43.5psi).
| 54 Water F IJI HOME BUILDING MANUAL BUILD GREEN
7.2
7.2 DRAFT 2 2023 June 15
7.3 Solar Hot Water Heater

Solar hot water heaters can be easily installed on a roof and provide a large energy savings for a reasonable cost.
Other than air-conditioning, heated water is one of the largest energy consumers in a household. If every home in Fiji were to convert to or install a new solar hot water heating system, Fiji would achieve approximately 25% energy savings.
All homes in Fiji should:
• Have a solar hot water system for 100% of hot water demand
Installation
Solar hot water heaters are typically installed on the roof, either directly attached or on a mounting bracket. Similar to solar panels, solar hot water heaters in Fiji should be installed on a north facing roof and so they achieve an angle of 15 to 20 % slope.
How it Works
Solar energy is captured and converted into thermal energy through solar collectors: the market offers three types of products: flat plate, evacuated and unglazed solar collectors.
The flat solar collectors in the figure above are a very simple concept: an absorbing plate, integrated with the pipes for the heat transfer fluid, is placed into a box insulated at the back and along the sides. The absorber plate surface exposed to solar radiation is normally black, painted or “selective” (a treatment that allows the performance to be improved thanks to the low emissivity in the far infrared). A transparent cover, located in front of the plate, reduces the convective losses and, mainly, the radiative ones in the far infrared (greenhouse effect).
| 55 Water F IJI HOME BUILDING MANUAL BUILD GREEN
7.3 DRAFT 2 2023 June 15
At this point, you should be able to:
• Identify the components of a rainwater harvesting systems and understand how they are installed
• Understand how to safely prepare the base for a water storage tank
• Be aware of the low flow rates for water dispensers
• Understand the benefits of solar hot water heating and how it works
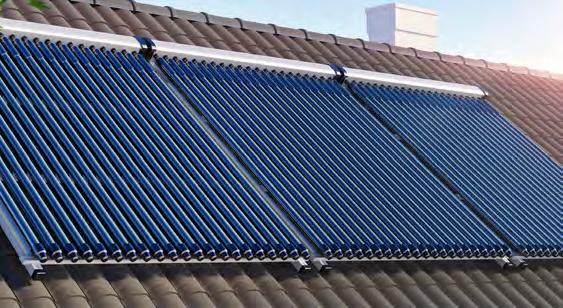
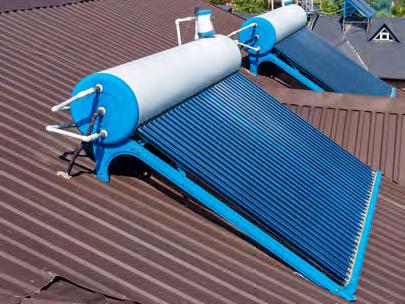
The evacuated collectors consist of a series of evacuated glass tubes, each of which contains an absorber and pipes through which a heat transfer fluid flows. The vacuum reduces convection heat loss between the absorber and the glass, increasing efficiency and allowing temperatures in excess of 100 °C to be achieved. To increase the amount of solar radiation on the absorbing plate, some models of evacuated collectors are provided with a reflector foil, often appropriately shaped.
Another type is the unglazed collector, or plastic absorber, which is simple and quite inexpensive. These collectors are specially designed for low-temperature applications and are made from ultraviolet (UV) resistant plastic. The heat losses are higher than in the two types mentioned above, but the good cost-benefit ratio makes them a remarkable product, especially in Fiji’s warm climate.
| 56 Water F IJI HOME BUILDING MANUAL BUILD GREEN
7.3 DRAFT 2 2023 June 15
Electrical
Safety Tip
Live electrical parts are dangerous and can be fatal.
Only licensed electricians should install, connect or remove live electrical parts.
8
1. Power Source
2. Layout
3. Wiring
4. Devices
5. Grounding
DRAFT 2 2023 June 15
Power Source
Solar - ON Grid
Energy suppliers in Fiji, such as Energy Fiji Limited, are working toward providing at least 90% of energy needs through renewable resources by 2025.
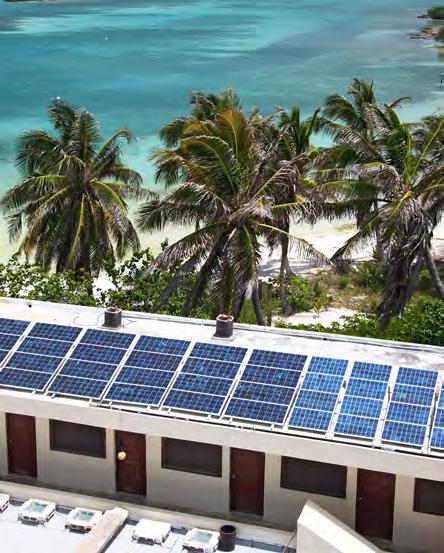
Contact EFL or other energy provider companies to see if you are in a location to connect to a grid system that supplies renewable energy. If so, you will achieve the energy reduction goal
Solar - OFF Grid
If energy from the grid is not available in the immediate future, solar power is available through:
a) Energy Provider Companies
Some companies supply rooftop solar panels and a battery free of charge in exchange for a commitment for the homeowner to purchase power from the company
a) Do-it-yourself
Rooftop or ground level solar panels can be installed by the homeowner or contractor, with the electrical connections done by a licensed electrician, see section 7.
Solar Hot Water Heater
Available at hardware stores, a solar hot water heater can be installed by homeowners after the roof is completed. Plumbing to connect the battery to the power supply system must be installed at the same time as plumbing for the rest of the building , see Section 5.8.
Bio Energy
Energy from human waste and compost can provide a portion or all of energy needs, and is particularly helpful where the grid system is unavailable, see Section 5.9.
Grid Power Supply
If connection to the grid is the only viable option, energy savings can be attained from other techniques in this manual. See Sections 5.2 to 5.6 for safe installation guidelines.
safety tip
A fault or will happen if the amount of power in the electrical system is unbalanced. Reduce opportunity for a fault by:
• limiting the number of devices on a circuit breaker to three devices
• use a separate circuit breaker for devices with a high energy demand
| 58 Electrical BUILD GREEN
8.1
8.1 DRAFT 2 2023 June 15
An electrical system for a residence consists of two components: power supply, device locations, circuits and power distribution.
Power Supply
Power supply system will be installed by EFL or other energy provider company if connected to a grid system, or by the landowner or a contractor if it is an alternative energy system.
Most important to consider is the location of the external electrical equipment that will be attached to the building. External equipment should be:
a) Installed in a sheltered location such as under roof eaves
b) Installed in a high and dry location on the external wall
c) Located away from nearby metallic or conductive material that is not grounded
safety tip
Siting a building too close to the electrical supply grid system can be dangerous due to the potential for arcing if there is a power surge.
Reduce potential for a building to catch fire by:
• locating the building a minimum of 3.5m from electrical grid system
safety tip
Siting external electrical equipment too low on an external wall or close to areas prone to flooding, spills, or hazardous material is dangerous. It’s best to install exterior electrical equipment:
• away from hazardous areas and at an elevation to reduce impacts of flooding
Solar shingles
PV panels have a 50-year lifespan
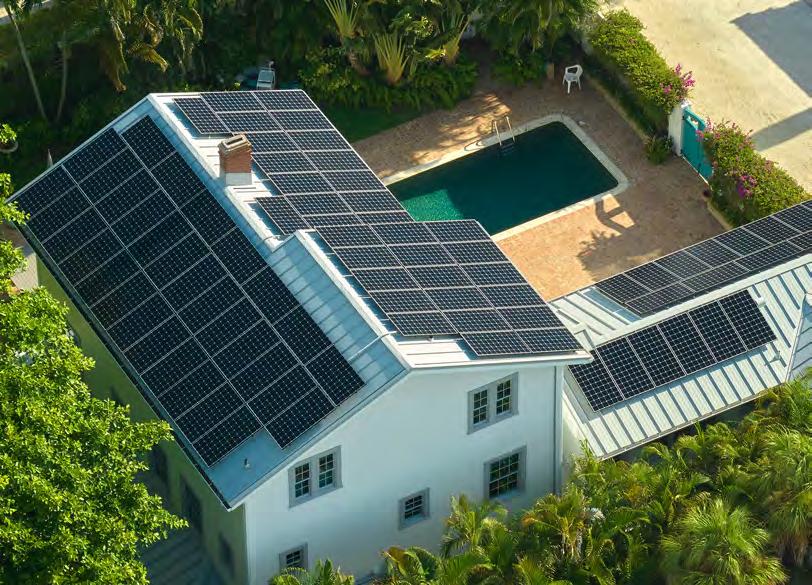
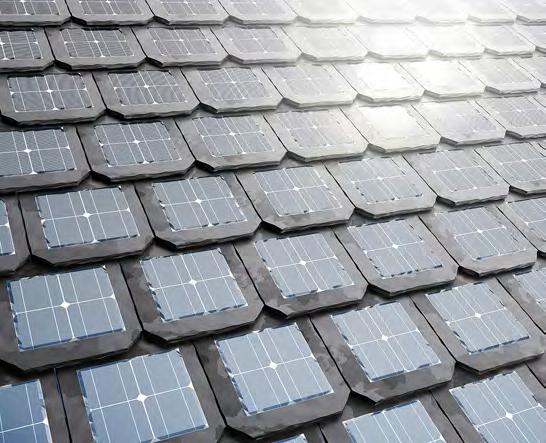
| 59 Electrical F IJI HOME BUILDING MANUAL BUILD GREEN 8.2
8.1 DRAFT 2 2023 June 15
Device Location
A plan of electrical devices should be made for the entire building including all sockets, switches, lights and appliances.
1
Start by identifying a location for the meter that is close to (but not too close) to the electric grid supply. Confirm location with EFL.
2 Locate the meter or source of power entry into the house and choose a location for the switchboard that will be close to the external power supply.
3 Determine location of major appliances (tv, oven, laundry).
4 Next, draw in light fixtures attached to the wall or ceiling.
5 Locate the light switch close to the doorway.
6
Show location of all sockets in each room.
Electrical Devices
Switches
Lights
Sockets
• locate 300 - 450 mm above floor
• install maximum of 6 m apart
• use RCD for major appliances and energy users
• see Section 4 for standards for placing sockets in wet areas
• install 1.2 m above floor
• be located near doorways
• be located so that a clear lighted path from the living area to bedrooms and water closets is visible at night
• locate a switch at both top and bottom of stairs
• can be located on a wall or ceiling
• energy-efficient lighting required
• must be firmly supported onto ceiling or wall so that it is not loose-fitting
Appliances
• connected to an RCD, only one per RCD
• ceiling fans must have a minimum clear height from the ground of 2.1m
• low energy demand rating required
| 60 Electrical F IJI HOME BUILDING MANUAL BUILD GREEN 8.2
Meter Switch board Dining Living Room Kitchen Bedroom 2 S S S S S S S S S W.C Bedroom 2 8.2
DRAFT 2 2023 June 15
Layout
8.2 Circuits
After laying out the location of sockets, switches, lights and appliances, deciding the number and type of devices and switches will refine the layout into a workable plan. Each diagram below represents one circuit that extends from the circuit breaker in the switchboard, to the socket, switch, light or appliance, and with the neutral and earthing cables in the same conductor connects back to the circuit breaker again.
As shown in the diagrams, it is favourable to group a number of sockets, sockets and lights together on the same circuit to reduce the overall number of circuits in the system. It may be advantageous to have double, triple or quadruple switches to limit the number of individual switches in a room.
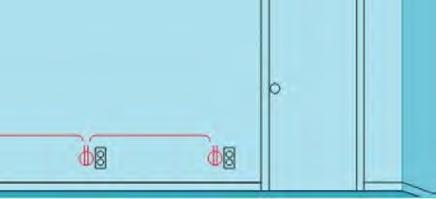
It’s important to remember that sockets in wet areas such as water closets and kitchens need to have the following IPX ratings: kitchens - IPX4, water closets - IPX4 and IPX7 (see pg. 66).
Switch-controlled split receptacle, duplex receptacle (switch at start of cable run)
Single-pole switch and two light fixtures (switch between light fixtures, light at start of cable run)
| 61 Electrical F IJI HOME BUILDING MANUAL BUILD GREEN
S S BB S TH S
Double receptacle small-appliance circuit with IPX4 and neutral wire
Single-location protection, connected on the circuit
Switch-controlled split receptacle (switch at end of cable run)
240V Baseboard heaters, thermostat
8.2 DRAFT 2 2023 June 15
120V duplex receptacles wired in sequence
Switchboard
After the power supply enters the building, it connects to the switchboard which acts as the main distribution centre.
The switchboard typically contains:
Main Switch - manually operated, the Main Switch turns power on and off to the electrical system in the house
RCD (Residual Current Device) - automatically cuts power to all circuit breakers it is connected to if a fault is detected ... typically two RCDs are used for most homes
Busbar - used to connect circuit breakers to the RCD
Circuit Breakers - controls power to each circuit
Neutral Bars - receive current from the connected devices via neutral cables, and returns the current back to the Main Switch
Earthing Bar - receives current from the connected devices in case of a fault and connects to the Main Earthing Terminal located near the switchboard
Items REQUIRED to have an RCD in the switchboard or in a nearby separate enclosure:
• Power points in wet areas such as kitchens, bathrooms, laundries, swimming pools
• Outdoor power points and lighting
• Electric stoves and ovens
• Air conditioning units
• Portable appliances such as hairdryers, electric kettles, and toasters
• Power tools, including electric drills and saws
• Pool and spa pumps
• Electric hot water systems
safety tip
When power is cut to the building by activating the Main Switch, the switch itself is still “live” and connected to the incoming conductor carrying power from the meter.
From the switchboard, power is connected to sockets, switches, lights and appliances via an active cable, and it returns back to the switchboard via a neutral cable. More information on switchboards and circuit breakers is provided in Section 5.
• Take precautions when operating the main switch as it contains active current

| 62 Electrical F IJI HOME BUILDING MANUAL BUILD GREEN
8.2
8.2 DRAFT 2 2023 June 15
Electrical Layout Diagram
safety tip
A fault or will happen if the amount of power in the electrical system is unbalanced.
Reduce opportunity for a fault by:
• limiting the number of devices on a circuit breaker to three devices
• use a separate circuit breaker for devices with a high energy demand
pipes, ducts, air-con, parts of showers, sinks, swimming pools, spas
B Main Switch - manually operated to turn power off and on to the entire system
C Neutral Bar (main) - returns power from the switchboard to the main switch
Active cable provides power to sockets, switches, lights, appliances
Neutral cable returns power to the main switch
Earth cable sends power to the earth electrode in case of a fault
D RCD (Residual Current Device) - will automatically turn off power to all connected circuits if it detects a fault (change in current)
E MCB (circuit breakers) - will automatically turn off power to a connected device
F Sockets, switches, lights, appliances - user power supplied to them
G Neutral Bar (devices) - receives current flow from sockets, switches, lights, appliances
H Earthing Bar - receives current from sockets, switches, lights, appliances if a fault occurs
I Main Earthing Terminal - receives current from earthing bar and metal devices (J)
J Metal pipes, ducts, air-con, parts of showers, sinks, swimming pools, spas - send current to main earthing terminal if received
K Earth Electrode - metal stake discharging current into the ground
| 63 Electrical F IJI HOME BUILDING MANUAL BUILD GREEN
8.2
and
EFL On-site
RCD MCB circuit breakers Meter Service head Sockets, switches, lights,
Main Switch Neutral bar Neutral bar Earthing bar Main earthing terminal Metal
A B C D E F G H I J K A Earth electrode
Power
Service cableelectricity from Grid Supplied
installed by
solar system Energy from solar panels / battery
appliances
A
Source
Energy
A
On-site bio-energy system
from organic waste
Distribution 8.2 DRAFT 2 2023 June 15
Switchboard Power Supply Power
Type
Wiring conductors contain 3 cables
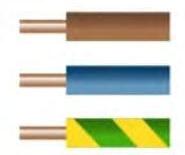
Active
Provides power from the main switch to all devices (sockets, switches, lighting, appliances)
Neutral
Connects devices back to the switchboard and main switch
Earthing
Connects devices, switchboard and main switch to an
safety tip
Standards that must be followed for wiring, circuits, devices, switchboards and all other connections and equipment can be found in Section E Electricity of the Fiji National Building Code.
• Additional standards are found in the Australian Wiring Rules AS/NZS 3000
safety tip
Voltage
Voltage in Fiji is the same as Australia and New Zealand:
• 240 volts AC
• 50 Hz frequency
Rough-in
Homeowners and contractors can install wiring conductors and connections to junction boxes, sockets, switches and lights.
But a certified electrician must install connections to main switches, the switchboard, metre, and in the case of a solar or bio energy system the inverter and meter box. In all cases, any connection to the grid must be inspected by:
• certified electrician and/or
• Energy Fiji Limited and/or
• energy supply company.
Metal nail plate attached to stud at all hole locations to protect the wiring from nails or screws after the interior wall board is attached.
Wiring can be roughed-in by installing conductors, junction boxes, and devices, but ALL connections MUST be verified by a certified electrician.
• Homeowners are required to submit a report from a certified electrician that guarantees that all connections are properly executed before electrical power will be provided by EFL
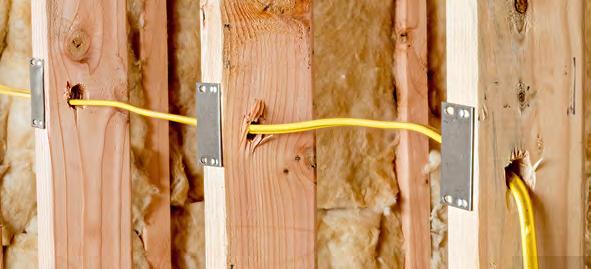
| 64 Electrical F IJI HOME BUILDING MANUAL BUILD GREEN
Wiring 8.3 Active Neutral Earthing
8.3 DRAFT 2 2023 June 15
Wiring Installation
Where possible, wiring should be installed parallel to wall and ceiling studs and joists. If this is not possible, wiring can be inserted through studs and joists according to the following installation critieria:
• holes for wiring conductors in 100 mm x 100 mm studs should be no greater than 30 mm
• holes in studs for wiring conductors should be located a minimum of 50 mm from the edge of the stud
• minimum 50 mm distance between holes in studs for wiring or other service cables
• positioning of wiring conductors must maintain a minimum setback from metal objects of:
a) 50 mm for cables with a cross-sectional area of up to 16 mm2
b) 75 mm for cables with a cross-sectional area of up to 35 mm2
c) 100 mm for cables with a cross-sectional area of up to 120 mm2
d) 150 mm for cables with a cross-sectional are of over 120 mm2
• a metal nail plate (see photo on previous page) must be attached to all studs and joists where there is a hole for an electrical or other service cable to protect the service after wall board is attached
• loose conductors should be secured to a stud, joist or rafter with a non-conductive tie to prevent sagging
For higher voltage installations, the setback distances will be greater and will depend on the specific requirements of the installation.
Junction Box

Where possible, wiring should be installed parallel to wall and ceiling studs and joists. If this is not possible, wiring can be inserted through studs and joists according to the following installation critieria::
• holes for wiring conductors in 100 mm x 100 mm studs should be no greater than 30 mm
• holes in studs for wiring conductors should be located a minimum of 50 mm from the edge of the stud
• minimum 50 mm distance between holes in studs for wiring or other service cables
• positioning of wiring conductors must maintain a minimum setback from metal objects of:

| 65 Electrical F IJI HOME BUILDING MANUAL BUILD GREEN
8.3 8.3 DRAFT 2 2023 June 15
Devices 8.4
Sockets and Switches
Sockets must be installed at safe distances from wet areas, appliances, and countertops to reduce risk of electric shock and prevent a fire.
Safe Installation
• ensure a minim distance of 25mm is maintained between sockets and switches and any metallic or conductive object
• if the voltage is greater than 240 volts, a minimum separation distance of 50 mm is required
• CONTACT A CERTIFIED ELECTRICIAN TO SEE IF ADDITIONAL INSULATION IS REQUIRED FOR SOCKETS, SWITCHES, CONDUCTORS AND CABLES

Sockets
Minimum setbacks for sockets:
• from the ground - 300 mm
• between sockets - 600 mm
• on the floor - not permitted
• on outside of cupboards - not permitted
In a kitchen:
• sink - 300 mm
• countertop - 150 mm
Switches
Minimum height:
• from the ground - 0.9 to 1.2 m
• switch to switch - 150 mm vertical, 200 mm horizontal
• edge of door frame - 100 mm
cooker switch within 2m of cooker but at least 300mm horizontally from hob
150 mm
switches/sockets at least 300mm horizontally from edges of hob and sink
300 mm 300 mm
centre of sockets at least 150 mm above worktop
appliances- fused switches above supplying unswitched sockets below worktops, careful of proximity to water pipes
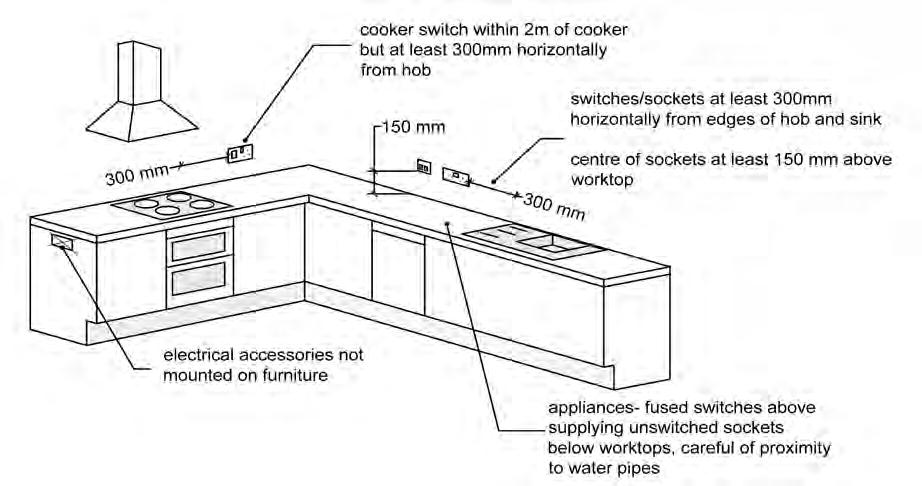
| 66 Electrical F IJI HOME BUILDING MANUAL BUILD GREEN
8.4
DRAFT 2 2023 June 15
electrical accessories not mounted on furniture
Wet Areas
Additional protection from electric shock is mandatory in wet areas such as water closets, kitchens, laundry, swimming pools and spas. Protection is ensured by two techniques:
a) RCD switch
b) IPX Rating for water resistant sockets, switches, lighting and appliances
All sockets, switches, lighting and appliances that could be exposed to water are required to have an IPX rating for water resistance.
As shown in the table, a scale from 0 to 9 indicates that the device is designed to protect against exposure to water as indicated by the rating.
Swimming Pools and Spas
To protect against electric shock, outlets, switches, lighting and appliances should have separation distances and IPX ratings as follows:
• all electrical equipment installed within 2.25 m horizontally of the edge of the pool or spa must have an IPX7 rating or higher
• sockets and power outlets must be at least 3.9 m away from the inside wall of the swimming pool or spa
• specific distances and IPX requirements may vary depending on the layout of the pool/spa and surrounding area, type of equipment and devices
• A certified electrician should be consulted for all electrical work within 4.0 m from the pool/spa
Sockets and Switches
In a water closet:
• shower or bathtub - 300 mm horizontally from edge of the shower or tub with an IPX7 rating or higher
• shower or tub - greater than 300 mm - must have an IPX4 rating or higher
• sinks - minimum 300 mm from edge of sink
• toilet - minimum 1.5 m setback from the toilet
Rating IPX Water Resistance Protection
IPX0 No protection
IPX1 Protects against falling drops of water
IPX2 Protects against falling drops of water at a 15o angle
IPX3 Protects against spraying water at a 600 angle
IPX4 Protects against splashing from all directions
IPX5 Protects against water jets sprayed at the socket from any direction
IPX6 Protects against powerful water jets from any direction
IPX7 Protects against immersion in water up to 1.0m depth for up to 30 minutes
IPX8 Protects against continuous immersion in water, see manufacturer’s conditions
IPX9 Protects against high-pressure, hot water jets from any direction
| 67 Electrical F IJI HOME BUILDING MANUAL BUILD GREEN 8.4
8.4 DRAFT 2 2023 June 15
Lighting and Appliances
Secure installation is essential to protect against electrical shock and fires.. Sufficient structural support must be provided to ensure they won’t wobble while operating and separated electrical circuits and RCDs must be provided.

Ceiling Fans and Lighting
• must only be installed on the ceiling where there is a minimum clearance height of 2.1 m from the floor to the fan blades or light fixture
• if installed in a water closet containing a sink, shower or bathtub, it must have an IPX rating of:
IPX7 if located within the shower or bathtub
IPX4 if located in the ceiling or wall directly over the shower or bathtub
IPX4 if the lighting is located within 2.4 m of the edge of the sink, shower or bathtub
Appliances
• the following high-risk appliances must have a separate RCD (residual current device) in the switchboard with a maximum rating of 30 mA:
electric oven refrigerator
any wall or ceiling mounted air conditioner laundry machines
Installation
• lighting and appliances should be installed according to manufacturer’s specifications
• wiring connections must be verified as safe by a certified electrician
safety tip
Lighting, including pot lights, wall sconces, ceiling fans, hanging lights, flush mount lights, must have the electrical box secured to a wall stud or ceiling rafter
• additional support, such as blocking or mounting brackets must be provided if lighting is to be installed mid span
safety tip
All large appliances, ceiling fans and air conditioners must have their own circuit connected with an RCD in the switchboard to isolate the current and so it can be easily switched on and off
• A certified electrician must review and approve connections and wiring layout

| 68 Electrical F IJI HOME BUILDING MANUAL BUILD GREEN 8.4
8.4 DRAFT 2 2023 June 15
Grounding 8.5
In addition to grounding cable that is attached to all electrical devices, all exposed metal objects in the home need to be grounded to reduce the opportunity for electric shock.
Exposed metal in a bathroom is bonded in the wall cavity, and then connected to the Earthing system
Grounding of exposed metallic objects is called equipotential bonding, and is an important safety feature to protect the health and safety of occupants.
earthing conductor
fault current flows to earth
switchboard/ panel
earthing terminal
equipotential bonding conductor
metallic water pipe
Exposed metal in a kitchen is bonded in the wall cavity and then connected to the Earthing system
main equipotential bonding conductor
Equipotential bonding begins with developing a layout plan showing the location of all exposed metallic objects in the home that are required to be grounded and the wiring layout (green cable) that will extend back to the main switch, see diagram on page 63.
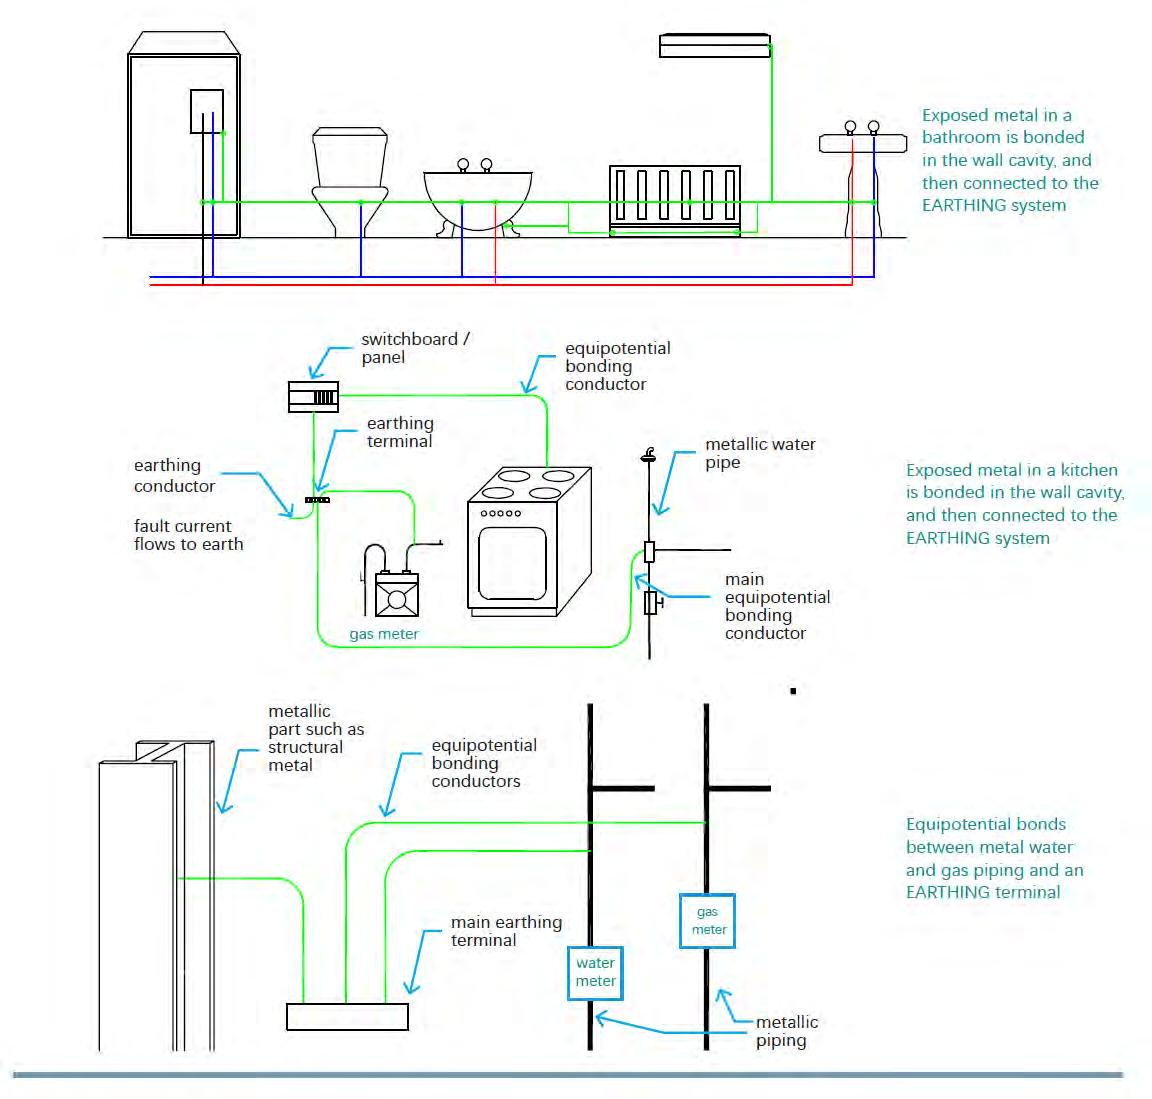
Grounding wire will be attached both to the main switch and to an electrode which will carry the current down into the earth where it will dissipate.
Safe Installation
metallic part such as structural metal
equipotential bonding conductors
Equipotential bonds between metal water and gas piping and an Earthing terminal
Grounding wire for the equipotential bonding system must be separated from live electrical conductors and wiring by a minimum of 50mm
In all cases, equipotential bonding cable should be insulated with PVC or rubberised material where it could come into contact with humans or live parts of the electrical system.
main earthing terminal
metallic piping
| 69 Electrical F IJI HOME BUILDING MANUAL BUILD GREEN
8.5
DRAFT 2 2023 June 15
Electrode
An electrode is the end-point of the electrical and grounding systems. It conveys electricity safely to the ground in case of an electrical fault.

An alternative to using an electrode is to connect the grounding system back to the meter supplied by EFL. Homeonwers must
Installation
contact EFL and follow their requirements on whether to connect grounding wire back to the grid or to an electrode. All solar or bio energy systems that are not connected to the grid must have the grounding system connected to an electrode.
a) The electrode should be made of a corrosion-resistant material, such as copper, copper-bonded steel, or stainless steel.
b) The electrode should be installed in a location that is easily accessible for maintenance and testing.
c) The electrode should be installed at a depth of at least 600mm below ground level or below the water level if it is submerged.
d) The electrode should be surrounded by a suitable backfill material, such as bentonite or graphite, to ensure good contact with the surrounding soil or water.
e) The electrode should be connected to the main earthing system using a suitable bonding conductor.
f) The bonding conductor should be protected from mechanical damage and installed in a location where it will not be subjected to excessive heat or corrosive materials.
g) The installation should comply with the relevant standards and regulations, including the Fiji National Building Code and AS/NZS 3000:2018, and be tested and inspected to ensure it is safe and reliable.
At this point, you should be able to:
• Identify the power sources that you will use
• Identify best location for the switchboard
• Do a rough sketch of the location of devices, active wiring, grounding
• Potentially layout circuits (professional help may be needed)
• Understand what is in a switchboard
• Know the setbacks and requirements for outlets, switches, lights and appliances
• Potentially do the rough-in for laying out conductors and grounding cable, with connections done by a certified
safety tip
Installation of a meter, switchboard, main switch and electrode should ONLY be done by a certified electrician
| 70 Electrical F IJI HOME BUILDING MANUAL BUILD GREEN
8.5
8.5
DRAFT 2 2023 June 15
The seventh and final step in designing a green building is to apply for development consent and a building permit.
Building Permit
1. Development Consent
2. Building Permit
3. Site Inspections
4. Occupancy Permit
9
DRAFT 2 2023 June 15
Development (Building) Consent Development or Building Consent
Permission granted by an approval authority allowing development to occur on a site subject to the approval of a Building Permit
The first step in applying for permission to construct a home is to contact the Local Authority and arrange for a meeting to discuss the proposed new home.
The Local Authority will review the location of the allotment, size, shape, adjacent land uses and landscape (topography, vegetation, natural features) and if it would be subject to natural disasters like flooding and landslips.
If the Local Authority believes the proposed home would not conform to the Scheme Plan, Zoning or other development policy, regulations or guidelines, the Local Authority will require that the homeowner/builder apply for Development (Building) Consent.
Most often an application for a single home on an allotment will not require Development Consent and will go straight to the Building Permit stage. However, if there are issues like the potential for danger or harm to others from building the home in the proposed location, the issue of whether the home should be built at all will be determined during Development Consent.
| 72 Building Permit F IJI HOME BUILDING MANUAL BUILD GREEN
9.1 DRAFT 2 2023 June 15
Building Permit Building Permit
Permission granted by an approval authority that allows construction of a building or site to commence and proceed according to requirements in the building consent and building permit approval conditions.
To apply for a building permit, a homeowner or builder should contact the Local Authority and arrange for a meeting to discuss the proposed new home. Alternatively, applications for Building Permits are available online.
All applications for a home subject to a Building Permit must comply with the Fiji National Building Code (FNBC). The FNBC applies to all buildings in Fiji. The Sections in the FNBC that have standards for homes are:
Section A Overview - definitions and description of procedures
Procedure
• Apply to the Local Authority for a Building Permit
• Fill in application (available online) and submit required plans, drawings, and other information
• Once approval is granted, siteworks such as marking out trees and landscapes to be protected, clearing, and grading can begin
• Building Permit remains active until either an Occupancy Permit is granted or the homeowner/builder
Section B Structure - strength of footings, foundations, floor, roof and walls, fastenings, and siteworks
Section CR Fire Protection - appropriate building materials, means of escape, window and door protection, smoke and fire alarms, fire prevention
Section D Access - window and door placement, size, stairways, ramps, balconies
Section E Electrical - grid-supplied energy, solar energy, bio energy
Section F Health and Amenity - weather protection, airtightness, kitchens, sanitary compartments, room sizes, water supply, waste, stormwater
Section G Energy Efficiency - energy reduction target, cooling, ventilation, lighting, windows, water efficiency, solar energy, bio energy
Secton H Hazardous Material - applies mainly to non-residential buildings, but does restrict the use of hazardous materials in all buildings
Section 1 Auxillary Buildings - standards non-habitable buildings like a shed
Building Classification in FNBC
Home (single family) - Class 1
Home with more than 1 unit/apartment - Class 2
Minor Buildings, farm buildings, latrines - Class 10
Timeline
• A Building Permit remains in effect until either an Occupancy Permit is granted or the homeowner/builder asks for the Permit Application to be withdrawn
• Once granted, construction must start within 2 years or the Building Permit will be null and void, and a new Building Permit would have to be issued.
| 73 Building Permit F IJI HOME BUILDING MANUAL BUILD GREEN
9.2 DRAFT 2 2023 June 15
Site Inspections
Importance
Site inspections are an important part of the building process as it provides a quality control mechanism. They ensure that the building is safe, functional, and meets the required standards. They provide a valuable opportunity to identify potential issues early on, which can save time and money in the long run.
Building Inspectors can identify any code violations and provide guidance to homeowners and builders on how to correct them. Inspections can also help to identify potential safety hazards, such as faulty wiring or structural weaknesses, before they cause harm to workers or future occupants of the building.
Inspections can help to ensure that the construction is of good quality and meets the specified standards. This includes checking that materials are being used correctly and that construction methods are appropriate.
Inspectors can help to identify any issues that may cause maintenance problems in the future. This can include things like inadequate drainage, faulty plumbing, or improperly installed electrical systems. By identifying issues early on, inspections can help to keep the project on track and within budget. This can help to avoid costly delays or additional expenses.
Building Inspection
• conducted by Local Authority
• inspect site preparation, foundation, walls, roof, plumbing
Electrical Inspection
• conducted by EFL (Energy Fiji Limited) or by other energy provider (eg. for solar energy)
• inspect safe connection to grid system,
Water Inspection
• conducted by WAF (Water Authority of Fiji)
• inspect safe connection to grid system, rainwater tank connection
| 74 Building Permit F IJI HOME BUILDING MANUAL BUILD GREEN
9.3 DRAFT 2 2023 June 15
Occupancy Permit
Procedure
Permission granted by an approval authority to permit the use of the building postconstruction
A home cannot be lived in until an Occupancy Permit has been granted. An Occupancy Permit will only be granted upon the successful completion of all site inspections.

| 75 Building Permit F IJI HOME BUILDING MANUAL BUILD GREEN
9.4 DRAFT 2 2023 June 15
