This guide is presented in good faith to assist in the
本安裝 冊僅供參考, 並不代表所述內容可應 installation of EchoPanel® Array. It is not intended as an 在所有安裝現場狀況, 完美的安裝只有專業 all-encompassing guide, and a professional qualified 班 installer is recommended 才能承擔, 謹此聲明. for optimum results. Woven Image accepts no responsibility for installation 本公司或代理商不負有關安裝品質的責任. actions taken or not taken. Please refer to Woven Image Pty Ltd. Terms of Trade.
本安裝 冊僅是本公司建議的安裝 法, 客 如 This installation guide contains only recommendations; 有任何疑問, if you have any尚請與本公司或代理商連絡. questions about installation techniques
Please note: • Please check that all ceiling baffles are the correct colour, shape, are undamaged and have the same batch • 請收到貨品後注意所有障板的顏 , 造型, 皆如訂 number (if requested).
注意事項:
且產品沒有損傷, 批號 • 單內容, No claims will be accepted after 並確定係同 EchoPanel® Array has • 產品安裝後, been installed.不得再有任何索賠要求
•• 艾銳天花障板吸 EchoPanel® Array’s acoustic performance will alter 功能因不同的產品規格及安裝 based on a variety of factors including the thickness of 間距 有不同 the baffles and the spacing between them.
please contact your distributor or Woven Image sales representative.
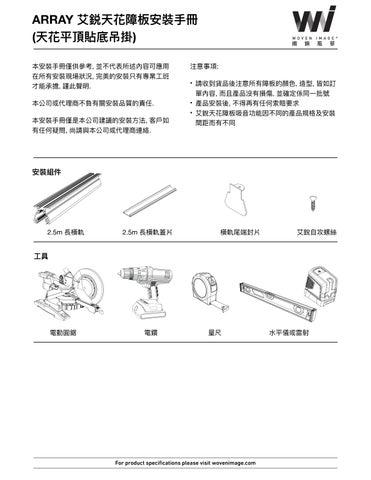
HARDWARE 安裝組件
Array 2.5m rail 2.5m 長橫軌
Array 2.5m snap cover 2.5m 長橫軌蓋片
Array end cap 橫軌尾端封片
Array tek screw 艾銳 攻螺絲
TOOLS 具 REQUIRED
Drop saw
Drill
電動圓鋸
電鑽
Measuring tape
量尺
手
用
工
戶
一
方
色
音
而
手
手
自
For product specifications please visit wovenimage.com 而
水
工
ARRAY 艾鋭天花障板安裝 EC HOP AN E L® A R R AY冊(d irect fix ) INSTALLATION GUIDE (天花平頂貼底吊掛)
Spirit & Laser levels
平儀或雷射
ARRAY 艾鋭天花障板安裝 ECHOPANEL® AR R AY冊( dire ct fix ) I N S T A L L A T I O N G U I D(天花平頂貼底吊掛) E 直 天花平頂安裝 PERPENDICULAR INSTALLATION
第 1步 Step
檢查天花平頂, 確定結構沒有問題, 表 沒 •• Inspect ceiling surfaces and structure to ensure it有損傷, is free from damage and is structurally fit for 如果是已安裝 膏板或矽酸钙板 installation. Level 3 plasterboard finish for a ceiling 的平頂, 要確定找到後 的骨架 is recommended. • 把平頂表
清潔乾淨, 並
雷射確定鎖螺
• Prepare area and use a laser line to mark off fixing 絲的定位 points.
第 2步 Step
先將橫軌 端鎖入封片 •• Using the supplied screw, attach one of the end caps to the rail.
第三步 • 預先在已做記號的橫軌定 螺絲將橫軌鎖 • After pre-drilling clearance holes in the rail, attach 入平頂 to a structural member, aligning with marked fixing on the ceiling. • points 循序安裝橫軌, 確定橫軌的平 間距相同 Step 3
• Continue to install the remaining rails following the same method, ensuring spacing between the rails is parallel.
手
面
行
用
用
面
石
面
一
一
角
二
For product specifications please visit wovenimage.com
I(天花平頂貼底吊掛) NSTALLATION GUIDE Step 4 第四步 •• Trim the snap covers to the required length using 圓鋸將長軌蓋片鋸成施 圖標 的長度 a drop saw as outlined in the installation guide or project drawings.
Step 5 第五步 •• Slide first baffle flush the edge of the 將第the片板片切 對 to 長軌推入. aluminium rail. SLIDE
Step 6 第六步 •• Insert the snap圖推入定位之後安裝切好的長 cover near the first installed baffle 板片依施 and slide across.
軌蓋片
第七步 Step 7
繼續安裝其他板片, 重複第六步的動作 •• Continue to install the remaining baffles and snap • covers following 片板片, the same 將尾端封片封上 method. 安裝好最後 • Finish and secure the end of the rail with the remaining end cap.
手
示
工
齊
口
一
工
For product specifications please visit wovenimage.com 一
用
ARRAY 艾鋭天花障板安裝 ECHOPANEL® AR R AY冊( dire ct fix )
推 SLID E入
I(天花平頂貼底吊掛) NSTALLATION GUIDE 單片排列平INSTALLATION 安裝 PARALLEL
Step 1
第 步 重複上述 1-4 的動作
•• Follow steps 1-4 of Perpendicular Installation.
Step 第 2步 •• Insert baffles flush to the rail. 將板片往上塞入依施 圖裁切好的長軌
Step 3
第三步
• Using self-tapping tek screws, lock the baffle into • 電鑽將螺絲鎖入板 the profile from the side.
手
工
身
行
二
For product specifications please visit wovenimage.com 一
用
ARRAY 艾鋭天花障板安裝 ECHOPANEL® ARRAY冊(direct fix)