Quick Reference Guide
Publication Date: June 2025

*Refer to the full document for further information*
Daily Rinse (To be completed to the end of each day)
1. Product Reclaim / Air Purge: This step removes most of the solution from the system, improving rinsing effectiveness.
2. Configure Sprayer: Disable Section Control and open the boom orifice valve and high flow valve (if equipped). Ensure the rinse tank is full.
3. ExactApply Setup: Select A+B spray method, set valve pulsing to fixed mode and nozzle flow to 75%
4. Boom-Only Rinse: Start the Boom-Only Rinse, 1 section at a time, including fence row nozzles, with a target pressure between 600-700 kPa for at least 10 seconds per section.
5. Clean Filters: Next, with all sections disabled, rinse the 4 filters by opening the tap at the bottom of each filter for 10 seconds. Depending on the chemicals used, it may be necessary to remove the filters for thorough cleaning. Open the solution tank sump valve and flush the fill line
6. Reset Spray Settings: Once each section has been rinsed and the full rinse tank volume has been used, adjust settings back to original (Pulsing-Auto, spray mode, target rate selected, section control enabled, boom orifice valve orientation).
Full System Rinse (Changing crops/chemicals, repair/servicing, storage)
1. Air purge: Complete an Air Purge This will remove most of the solution from the boom and increase rinsing effectiveness.
2. Configure Sprayer: Ensure solution tank is empty and rinse tank is full. Open the boom orifice valve and high flow valve (if equipped).
a) It is recommended to use a PWM approved boom cleaner when completing a full system rinse.
b) It may be necessary to let the cleaner soak in the system overnight. Follow label recommendations.
3. Solution System rinse: Select Solution System Rinse and set the desired rinse volume in the screen. Exit the cab to begin the rinse cycle from the ground using the side fill display.
4. Eductor: Open the eductor rinse valves and drain valves and press the solution System Rinse Button on the side fill display to begin. Close the eductor rinse valves and drain valves after the eductor step has finished and return to the cab.
5. Boom Rinse: Once the rinse cycle has finished, spray out the rinsate. It is recommended to follow steps 3-5 from the Daily Rinse procedure when spraying out the rinsate, as this will still assist in removing the majority of chemical from the ExactApply nozzle bodies.
6. If needed, a Boom-Only rinse procedure can be carried out after the solution system rinse to flush the boom again using clean water from the rinse tank, once it has been refilled.
Publication Date: June 2025
Rinse System Options
•
Boom-Only – Rinse Water (Clean Water)

o Boom-Only allows you to remove spray solution from the solution pump, flowmeter, and boom plumbing, by spraying water from the rinse tank out of the boom nozzles
o Used to rinse plumbing and nozzle bodies to prevent tip plugging.
• Solution Tank Only
o Solution Tank Only allows you to rinse the solution tank using rinse water, without rinsing any other systems
o Used when the tank requires extra rinsing
• Solution System Rinse
o Solution System Rinse allows you to remove spray solution from the entire system.
o Used when changing crop type, chemical types and before the machine is stored.
Product Reclaim/Air Purge
Before beginning any rinse process, the majority of solution should be cleared from the components that the operator intends to rinse. This will increase rinsing effectiveness and rinse water efficiency.
Air Purge
Air purge uses pressurized air from the onboard air tank to push the solution from the boom plumbing out of the nozzles and onto the ground.
Product Reclaim
Product reclaim uses pressurized air from the onboard air tank to push the solution from the boom plumbing back into the solution tank. For greatest effectiveness, raise the centre frame and tilt the booms to the highest position.
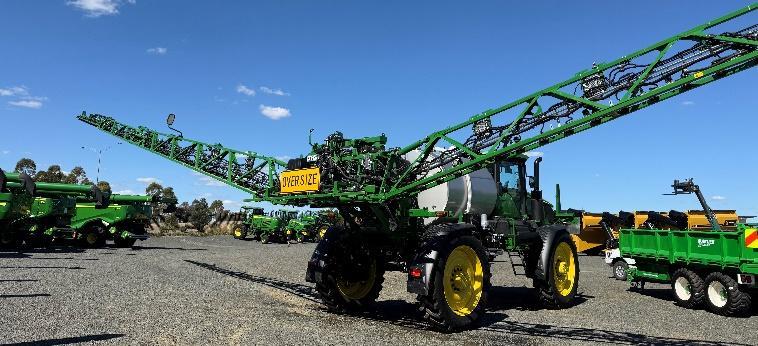
Figure 1. Center frame fully raised and booms tilted to highest position
Boom-Only Rinse
ExactApply nozzle bodies should be rinsed daily to prevent nozzle plugging and premature solenoid wear. A Boom-Only rinse will rinse the solution pump, flow meter and all boom plumbing using clean water from the rinse tank. This includes the recirculation lines, which are nozzle feed lines when in spray mode/boom rinse mode, as each boom section is pressurized from both ends. A small amount of water will enter the solution tank from the solution pump bleed line The return line from the boom to the solution tank (not shown) is considered part of the solution tank and is cleaned during a solution system rinse.
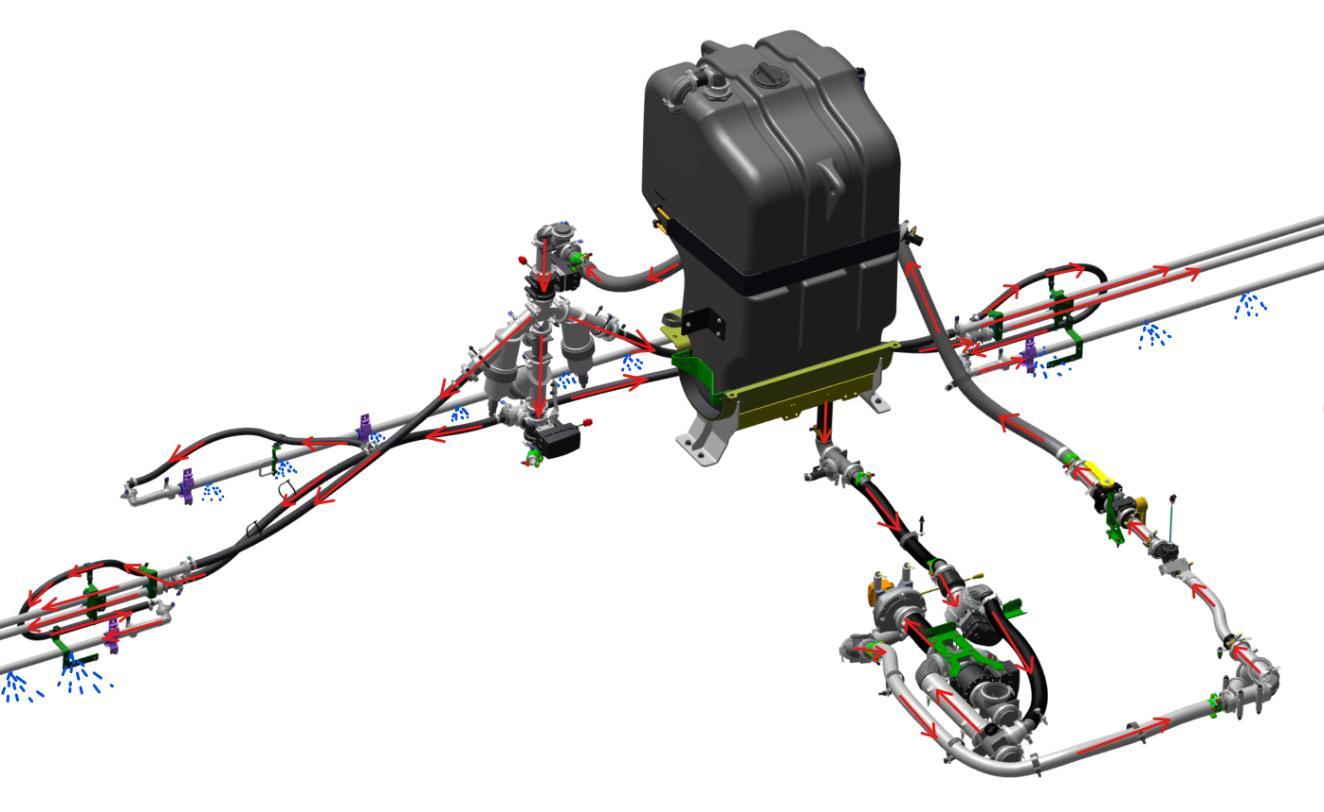

Figure 2. Rinse water path when doing a boom rinse.
Figure 3. Section being pressurised from both ends whilst in spray/boom rinse mode.
When carrying out a Boom-Only rinse, there are steps that need to be taken first for full effectiveness.
1. Disable Section Control and open the boom orifice valve and high flow valve (if equipped).
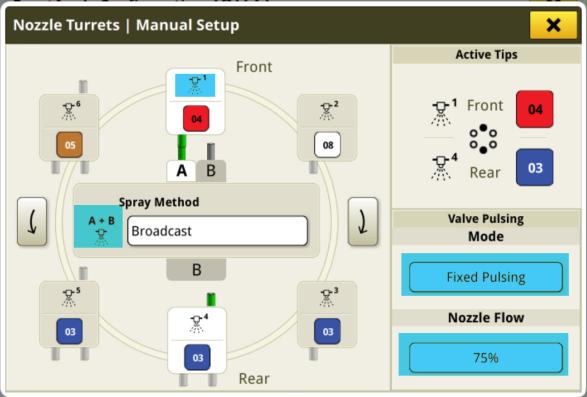
2. (For ExactApply machines) Select A + B spray method, set valve pulsing to fixed mode and nozzle flow to 75%
a. Both solenoids need to be rinsed to avoid chemical buildup in the unused side.
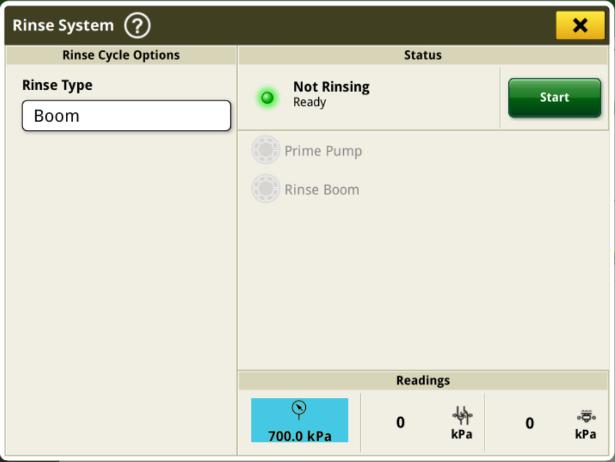
3. Starting with a full rinse tank, start the Boom-Only Rinse, 1 section at a time, including fence row nozzles, with a target pressure between 600-700 kPa for at least 10 seconds per section.
a) The volume of water needed to fully rinse each section will vary depending on boom cleanliness and products used. (Granulars will require a longer time to dissolve the solids from the system).
4. With all sections disabled, rinse the 4 filters by opening the tap at the bottom of each filter for 10 seconds. Open the solution tank sump valve and flush the fill line.
a) Depending on chemicals used, it may be necessary to remove the filters for thorough cleaning. It is recommended to use the full rinse tank volume, at a minimum, when completing a boom rinse
5. Once each section has been rinsed and the full rinse tank volume has been used, adjust settings back to original (Pulsing-Auto, spray mode, target rate selected, section control enabled, boom orifice valve orientation).
Figure 5. Fixed pulsing at 75%, A+B mode
Figure 4 Orifice Valve in open position
Figure 7 Target pressure set to 700kPa.
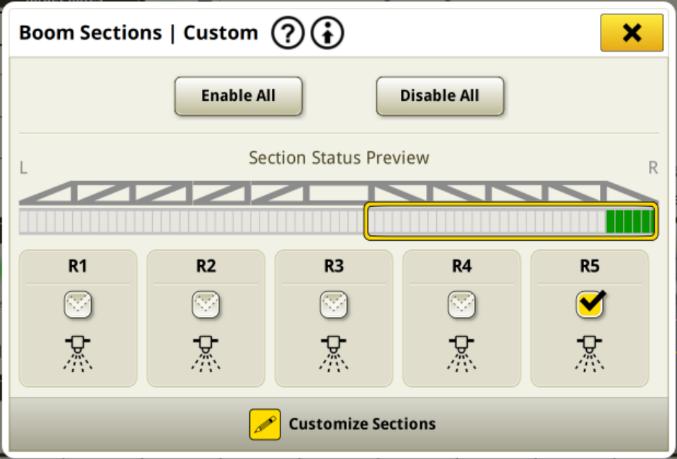
Figure 6. R5 boom section enabled with the other 10 sections disabled.
Solution Tank Only Rinse
Solution tank only rinse allows the residue inside the tank to rinsed separately using rinse water, in situations where the tank requires additional cleaning A tank only rinse can also be used in situations where spraying off the rinsate is not possible, such as when transporting the machine.
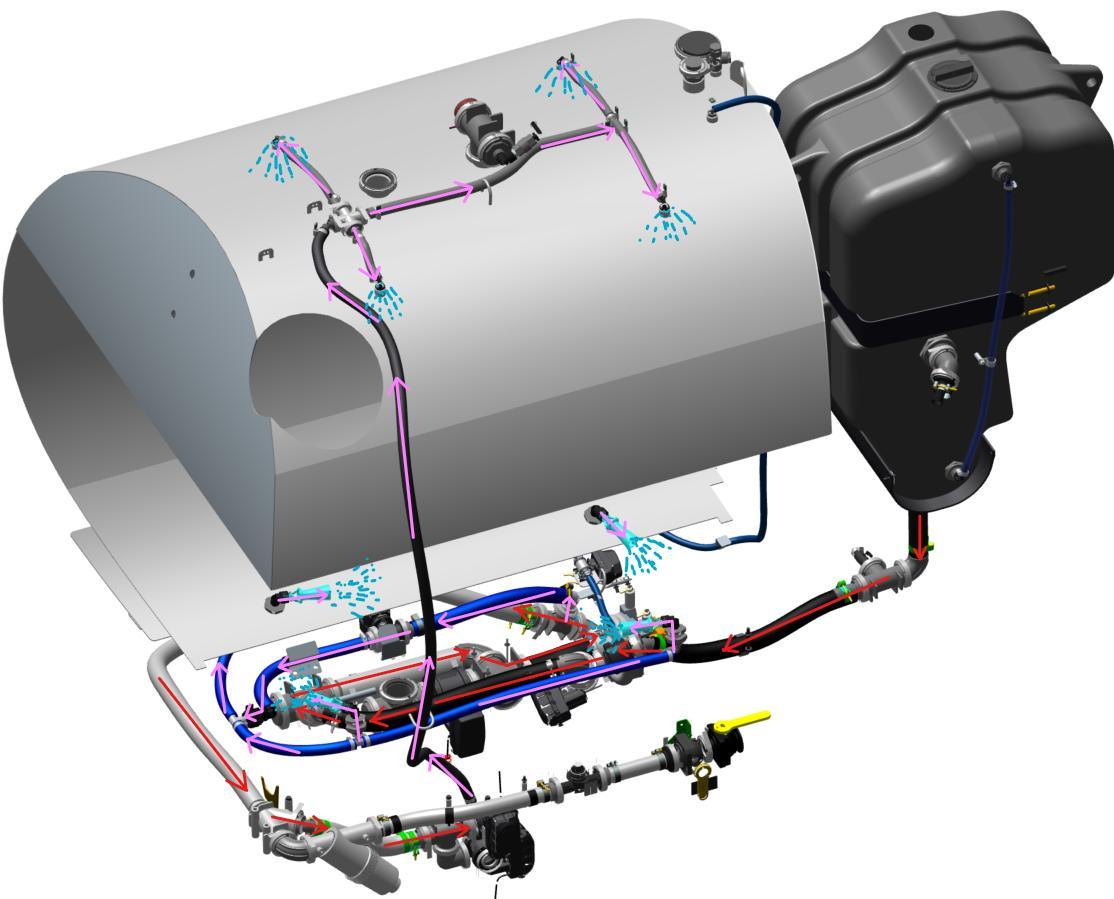
Figure 8. Rinse water path when doing a tank only rinse.
Solution tank rinse cycle:
1. Clean water from the rinse tank is pulled into the solution pump.
2. The solution pump pushes the rinse water through the agitation circuit and into the agitation nozzles in the bottom of the tank. Rinse water is also pushed through to the rinse nozzles in the top of the tank.
3. Rinse water will continue to be pumped through the rinse and agitation nozzles for approximately 6 minutes. Rinsate is not recirculated when doing a tank rinse.
4. After the tank rinse is complete, the rinsate will need to be drained out of the tank through the sump valve or sprayed out of the boom.
Solution System Rinse
To effectively clean the machine when changing crop types, changing chemicals or storing the machine, a solution system rinse needs to be done to ensure there is no chemical residue remaining in the machine
Adjust the rinse volume before starting the cycle to control the amount of clean water used to rinse the eductor, agitation nozzles and bypass. Once these systems are rinsed with clean water from the rinse tank, the water circulates to the solution tank and this same water (rinsate) is then used for the remainder of the cycle to rinse the solution tank and recirc plumbing.
Table 1. Volume of rinse water used during each solution system rinse cycle.
The number of rinse cycles can be adjusted between 1-3 for machines without load command Three rinse cycles are possible on the high volume setting for 412R, 612R and 616R models without needing to refill the rinse tank (for machines without load command).
The time to complete one cycle of a solution system rinse is listed in the table below This does not include the time to spray out the solution, as that is dependent on the target pressure that is set in the display. The Solution System Rinse can be carried out whilst transporting the machine.
Table 2. Solution system rinse cycle time, depending on rinse volume setting
1. Ensure the solution tank is empty and rinse tank is full. Open the boom orifice valve and high flow valve (if equipped). To begin a Solution System Rinse Cycle, set the desired rinse volume in the screen and exit the cab to begin the rinse cycle from the ground using the side fill display
a) It is recommended to use a PWM approved boom cleaner when completing a full Solution System Rinse.
b) It may be necessary to let the cleaner soak in the system overnight. Follow label recommendations.

2. Open the eductor rinse valves and drain valves and press the solution system rinse button on the side fill display to begin.
3. Clean water is automatically pulled from the rinse tank into the solution pump
4. The solution pump pushes the rinse water through the eductor circuit and into the solution tank (green arrows) Close the eductor rinse valves and drain valves after this step is complete.
5. Next, rinse water is pushed from the rinse tank into the solution system agitation circuit (red arrows)
6. Next, rinse water is pushed from the rinse tank through the bypass circuit into the solution tank (pink arrows).
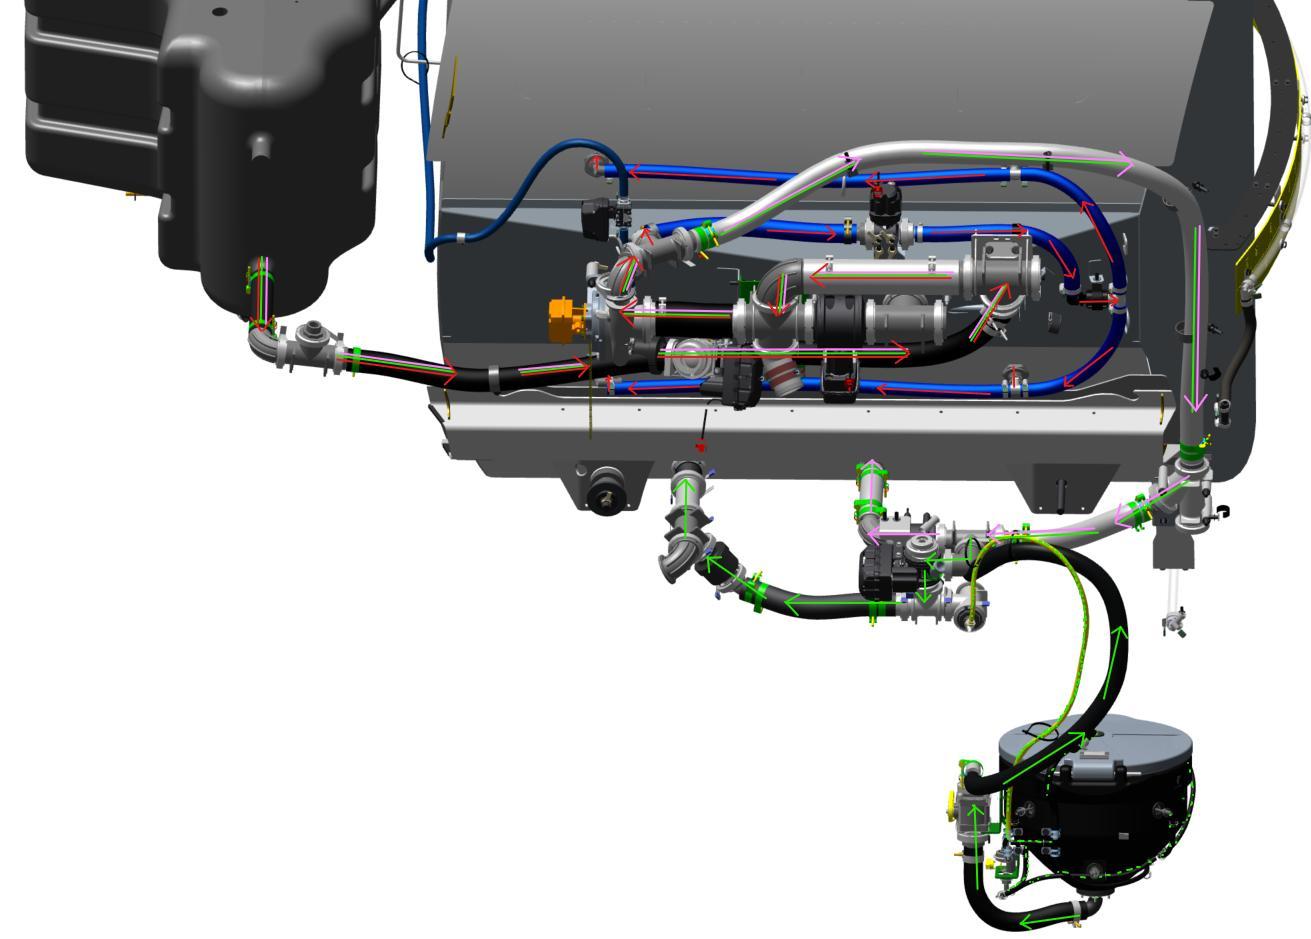
Figure 9. Solution System Rinse Cycle button
Figure 10. Eductor (green), agitation (red) and bypass (pink) rinse cycle, looking from underneath.
7. Rinsate from the solution tank is circulated through the tank rinse nozzles
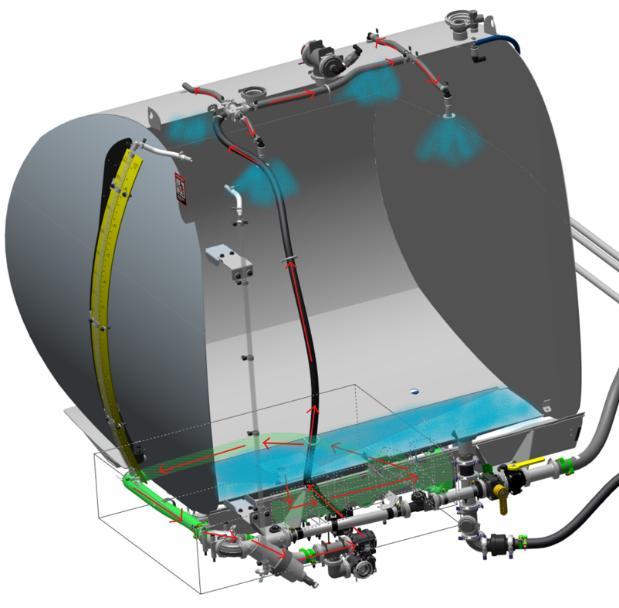
Figure 11. Rinsate circulated through tank rinse nozzles.
8. Rinsate from the solution tank is circulated through the boom recirculation circuit.
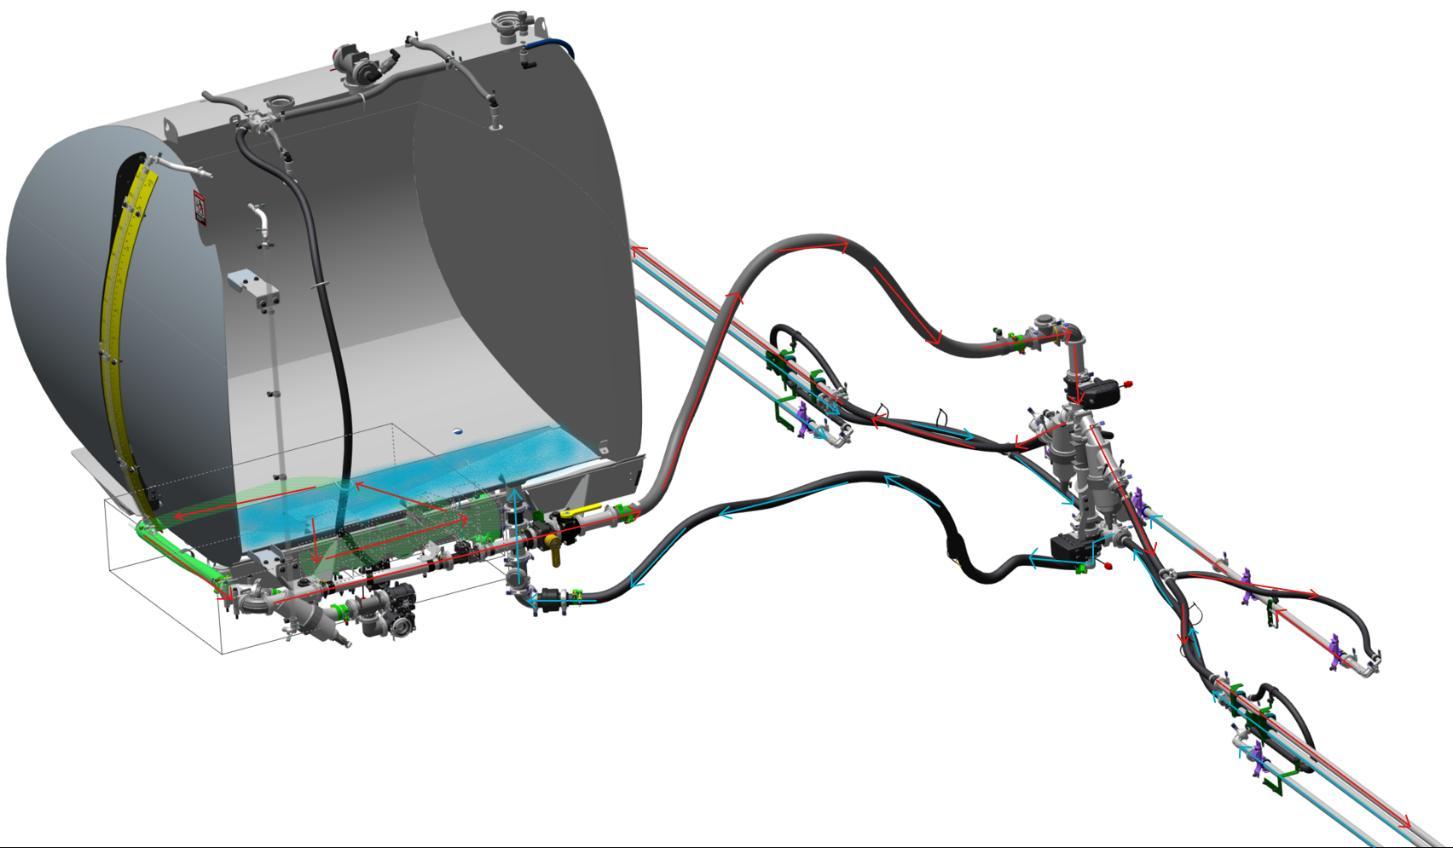
Figure 12. Rinsate circulated through boom recirculation circuit.
9. Rinsate from the solution tank is circulated through the tank rinse nozzles again, with steps 7-9 taking approximately 6 minutes.
10. Operator will need to return to the cab to spray out the rinsate. It is recommended to follow the same steps from the boom only rinse procedure when spraying out the rinsate, as this will still assist in removing the majority of chemical from the ExactApply nozzle bodies.
11. If needed, a boom only rinse procedure can be carried out after the solution system rinse, once the rinse tank has been refilled.
ExactApply Dripping
If the ExactApply nozzle bodies continue dripping after completing a boom only rinse, the nozzle body needs to be inspected to see what is causing the leak. Bore water can significantly reduce the wear life of ExactApply components.
Perform a pressure relief before inspecting components.
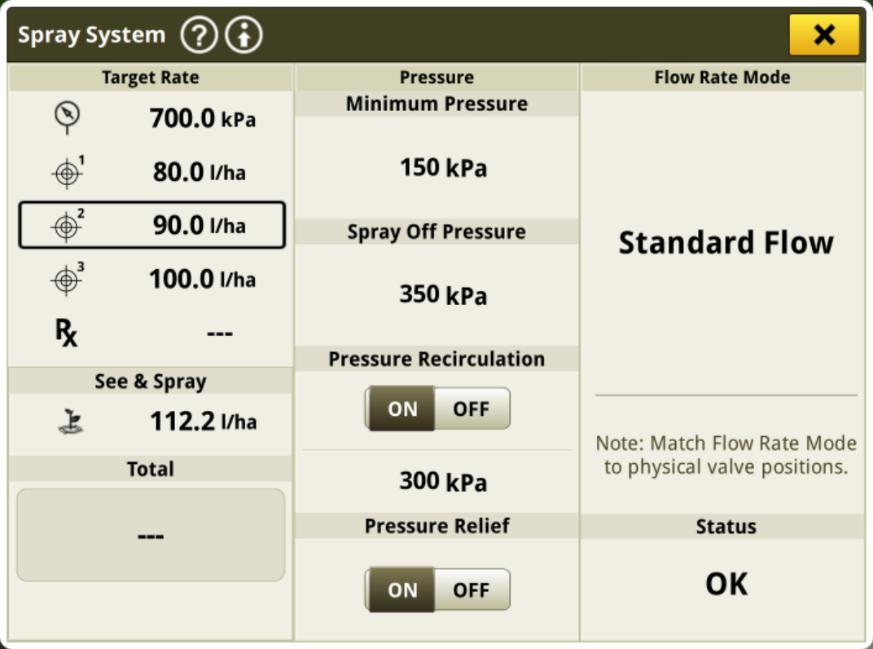
To conduct a pressure relief:
1. Open the Spray System page and toggle on Pressure Relief.
2. With the pump off, press the master on.
Potential causes for leaking:
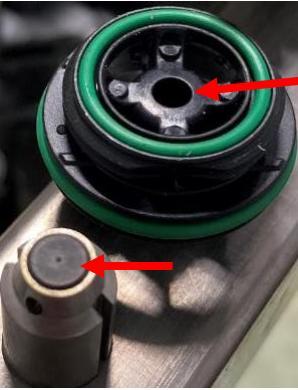
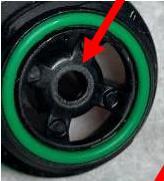
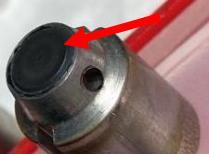
• Residue inside of the valve, stopping the plunger (D) from sealing against the valve seat (E). If this is found, another boom-only rinse needs to be done using clean water
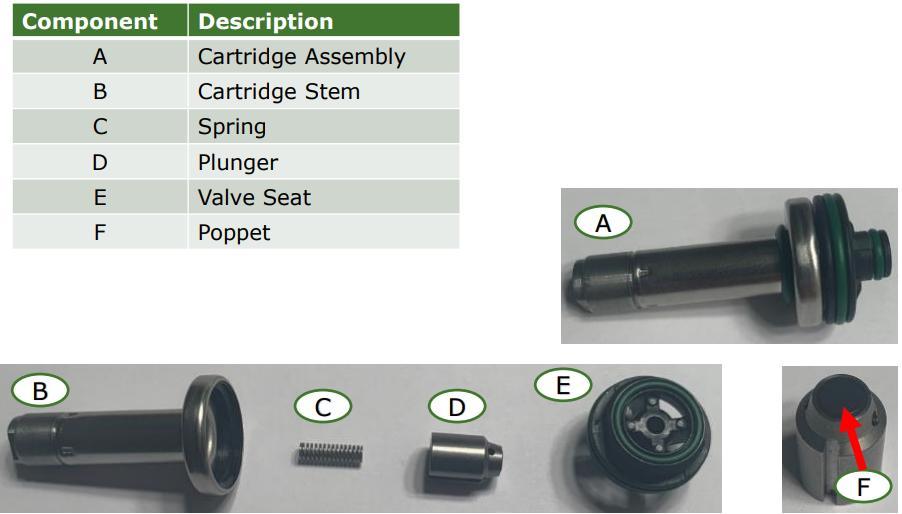
Figure 13. Spray System page showing pressure relief toggled on
Figure 14. ExactApply Cartridge Components
• Seal damage.
o Not seated correctly or missing
o Flat or damaged O-rings
o Damaged figure 8 seals in turret
Replace damaged seals.
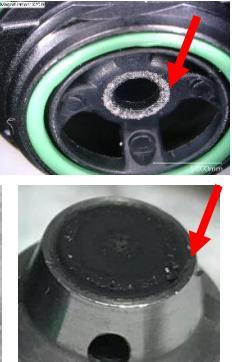
• Valve seat and plunger wear.
o Replace worn components.

o Torque valve seats using the supplied torque tool.
o Dry cartridge before reassembling to avoid cartridge seizing inside the coil
• Broken springs and corroded plunger
o Spring should be 13mm in length. Replace broken springs with KK114043 ▪ KK114043 is a stronger spring that is more resistant to failure.
o If the plunger is corroded and not able to move freely, it needs replacing.


• Bent Valves. Caused by incorrect removal from the nozzle body.
o Bent valves do not seal and need to be replaced.

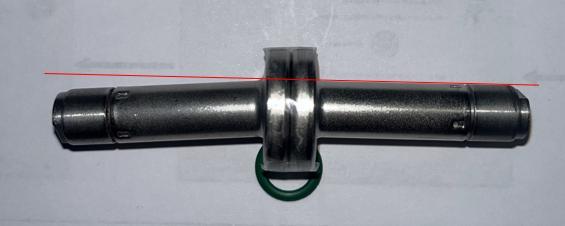
Figure 15. No wear (left), moderate wear (centre), heavy wear (right)
Figure 16. Broken spring (left) and corroded plunger (right).