

Your Guide to a Successful Recovery
Preparation, education and a pre-planned discharge are very important for a joint replacement surgery. This booklet was made to help you understand:
● What to expect through every step of your surgery process.
● What you will need to do before and after surgery.
● How to care for your new joint.
Remember, this is just a guide. Your nurse navigator, physician, physician’s assistant, nurses or therapists may add to or make changes to any of the suggested care plans. Always use their recommendations first, and ask questions if you are unsure of any information. Keep your guide as a handy reference for at least the first year after your surgery.
Patient Name
Surgery Date
Please bring this book with you to:
● Your hospital pre-operative class
● The hospital upon admission
● All outpatient rehab appointments

The Joint Center
Goal #1
Goal #2

AdventHealth Hendersonville
AdventHealth Hendersonville is a 103-bed community hospital that is a member of AdventHealth, the largest not-for-profit Protestant health care system in the world. We provide high quality, personalized and compassionate care to our patients and community.
Through our dedication to safety, rigorous self-assessment, performance improvement, corporate integrity and service management, we are repeatedly recognized as a leader in patient safety and quality through CMS and The Leapfrog Group. Our commitment to provide whole-person care - body, mind and spirit is a leading reason more people are choosing AdventHealth Surgery Services for their care.
Amenities
To create a positive experience, our facility is designed with patients, healing and physicians in mind. Here are just a few of the hospital amenities we provide at AdventHealth Hendersonville:
● Pastoral care
● Physician referral services
● AdventHealth Café
● The Gift Shop
The Nurse Navigator
● Tours and consults
● Free Wi-Fi
● AdventHealth Home Care NC
● Security
The nurse navigator is here to help you navigate the surgical process. From preparing for surgery to post-operative care, your nurse navigator will help guide you and address your questions and concerns about your surgical procedure.
Your nurse navigator will:
● Provide education throughout your surgical process.
● Assess your needs at home.
● Act as your guide throughout the course of treatment from pre-operative to post-operative discharge.
● Answer questions and coordinate your hospital care with the joint care team.
● Coordinate scheduling your joint replacement education class.
● Act as a liaison between the physician’s office, the hospital, testing facilities and home care if needed.
● Answer questions and direct you to the correct resources within the hospital.
You may call your nurse navigator at any time to ask questions about your surgery.
Address:
100 Hospital Drive
Hendersonville, NC 28792
Main Phone: 828-684-8501
Concierge:
Located in Main Hospital Entrance
Provides directions throughout hospital AdventHealth Café:
WEEKDAYS:
Breakfast: 6 to 10 am
Lunch: 11 am to 2 pm
Dinner: 4 to 6 pm
WEEKENDS IN CAFÉ DINING ROOM:
Continental Breakfast: 7 to 9 am
Light Snacks: 11 am to 1 pm and 4 to 5 pm
Pastoral Care:
Available 24-hours/day, 7-days/week
Chapel:
Available 24-hours/day, 7-days/week
AdventHealth Hendersonville Main Campus

Pre-Operative Care
Included in this section:
Pre-Operative Care Checklist
● A checklist to help guide you through the pre-operative process
Scheduling Your Surgery
● What you will need before scheduling your surgery
One to two weeks after scheduling surgery
● Pre-operative exercises, goals, guidelines
● Schedule education class
Pre-Operative Education Class
Three to Six Weeks Before Surgery
● Stop smoking
● Make healthy choices
Pre-Registration
Pre-Admission Testing
One to Two Weeks Before Surgery
● Pre-operative visit to surgeon
● Stopping medications
● Blood thinner warning
Prepare for Your Return Home
● How to prepare
● Arrangements to make
● Obstacles
● Environments to consider
Night Before Surgery
Morning/Day of Surgery
● Instructions to follow before surgery
Pre-Operative Shower Instructions

Pre-Operative Care Checklist
Before Your Surgery Will Be Scheduled:
● Obtain medical clearance from your primary care physician and any specialist as required. Please provide all clearance information to the orthopedic surgeon’s office. Also please keep a copy for your own records.
One to Two Weeks After Scheduling Surgery:
● Begin pre-operative exercises located in Appendix A . These should be done twice a day on both legs and arms.
● Schedule your pre-operative education class with the nurse navigator.
Three to Six Weeks Before Surgery:
● Stop smoking.
● Attend the pre-operative testing/pre-registration appointment with the hospital. (Please bring your insurance cards and your prescription card if it is different from your insurance card.)
Before Attending the Education Class:
● Confirm the date and time for the class with your nurse navigator before coming to the hospital.
● Bring this book.
● Bring your coach.
One to Two Weeks Prior to Surgery:
● Stop all medications that can increase bleeding unless otherwise instructed by your physician.
● Attend your pre-operative appointment with the surgeon’s office if applicable.
● Prepare your home for your return from the hospital.
Night Before and Day of Surgery:
● Wash with the chlorhexidine prep using the instructions in this guide.
● Do NOT eat or drink anything after midnight.
● Have personal belongings packed and in your car.
● Arrive to the hospital on time and report to surgical check-in.

Scheduling Your Surgery
Obtain Medical Clearance
You must obtain your medical clearance before your surgery is scheduled . Also, if recommended by the surgeon or primary care physician, you may be required to obtain clearance from a specialist such as your cardiologist, pulmonologist, etc. These clearances must be obtained prior to scheduling your surgery as well.
Your primary care physician will order any labs or exams that need to be completed to medically clear you for surgery. We do prefer that your medical clearance includes basic laboratory work, a chest X-ray and an EKG.
Please bring these exam results with you on your pre-operative testing day. If these tests are not included in your medical clearance, we will complete them on your pre-operative testing day.
One to Two Weeks After Scheduling Surgery
Pre-Operative Exercises, Goals and Activity Guidelines – See Appendix A
It is very important that you begin to strengthen and stretch your muscles prior to your surgery.
Your physician may even prescribe physical therapy for you prior to surgery as an exercise plan. If not, complete the exercises shown here that your physician wants you to start doing now and continue until your surgery. This can make a huge difference in the amount of pain you have during your recovery period. You should be able to do them in about 15 to 20 minutes, and it is typically recommended that you do all of them twice a day.
Consider this a minimum amount of exercise before your surgery. There is a picture guide of the exercises in Appendix A . Please let the care team know during the pre-operative class if you need further guidance on completing these exercises.
Also, remember that you need to strengthen your entire body, not just your leg. It is very important that you strengthen your arms because you will be relying on your arms to help you get in and out of bed, in and out of a chair, walk and to do your exercises post-operatively.
STOP doing any exercise that is too painful!
Please see Appendix A for exercises.
Pre-Operative Care Education Class
A special class is held for all joint replacement surgery patients. You should plan to attend this class two to four weeks before your surgery. You will only need to attend one class. Members of the team will be there to answer your questions. It is strongly suggested that you bring a family member or friend to act as your “coach.” The coach’s role will be explained in class. The outline of the class is as follows:
● What to expect before, during and after surgery
● The roles of coach/caregiver and nurse navigator
● Exercises
● Infection prevention
● Preparing your home
Items to Bring to Class:
● Pain control
● Preventing complications
● Going home
● Protocols
● Presentation by a physical therapist
1. Friend or family member who will be helping in your recovery
2. This book (passport)
Parking
There is handicap parking available near each entrance.
Three to Six Weeks Before Surgery
Stop Smoking
It is very important to stop smoking before your surgery. Smoking makes it harder to get oxygen to your healing joint, which is vital in the healing process. If you need help on how to quit smoking, please contact your nurse navigator. They will be able to guide you to the best resources.
Eat Right
See Appendix F for guides on eating healthy and preparing for surgery.
Pre-Admission Testing
You will have a pre-operative testing appointment with the hospital before your surgery.
The pre-operative testing department will complete lab work or tests ordered by your surgeon and review your medication information with a clinical pharmacist.
If you have had an EKG and/or chest X-ray done within six months, please bring these results with you to this appointment.
One to Two Weeks Before Surgery
Pre-Operative Visit to Surgeon
You may be scheduled for an appointment in your surgeon’s office before your surgery. This will serve as a final check-up and a time to ask any questions that you may have.
Stop Medications That Increase Bleeding
Stop all anti-inflammatory medications such as aspirin, Motrin, Naproxen, vitamin E, fish oil, etc. per your physician’s instructions. These medications may cause increased bleeding.
If you are taking a blood thinner, you will need special instructions for stopping the medication by the prescribing physician.
Prepare for Your Return Home
1. Preparing Your Home Prior to Surgery
a. Clean, do laundry and put it away.
b. Put clean linens on the bed.
c. Prepare meals and freeze them in single-serving containers.
d. Cut the grass, tend to the garden and finish any other yard work.
e. Install night lights in bathrooms, bedrooms and hallways.
2. Arrangements
a. Arrange for someone to collect your mail, empty the trash and take the trash to and from the curb.
b. Arrange for someone to care for pets (i.e. walk the dog, empty litter boxes, give food/water).
c. Arrange for someone to help complete heavy housework (vacuuming, mopping, etc.) and general housework.
d. Arrange for someone to do your grocery shopping.
e. Arrange to get any adaptive equipment or devices (reacher, sock aid, shower chair, etc.)
3. Check Your Home for Obstacles
a. Remove throw rugs and tack down loose carpet.
b. Remove electrical cords and other obstructions from walkways/hallways.
c. Check bathroom for the need of grab bars.
d. Assess stairs. If there is more than one step with no railing, consider having one installed.*
e. Look at the layout of your bathroom. Will the space around your toilet accommodate a 3-1 commode approximately 19” x 28”? (Measure interior of tub if there is no other shower available, and also take into account the curvature of the tub. The chair needs to sit flat in the tub for safety.) Check the shower stall (opening, amount of space, door swing/slide). Measure heights of built-in benches/seats in shower stall (more often than not they are too low).**
f. Check the height of your bed. Is it too high? Too low? Is there enough space around the bed to maneuver a walker?
g. Find appropriate chairs in which you can sit. The chairs you choose should be firm. The seat should be higher than the back of your knee. It should also have arms to help getting up and down and should not have wheels.
h. Be cautious of small pets who could trip you.
*Bi-lateral total knee patients MUST have a railing.
**These suggestions vary from surgeon to surgeon, so please be sure to follow your surgeon’s specific instructions.
4. Check Before Surgery
a. Look at the layout of your home office (i.e. is your computer hard drive easily accessible? Filing drawers?) What type of chair do you have (i.e. casters/wheels)?
b. Do “dry-runs” of any routine(s) you have or any community environments you may encounter. Keep in mind the physical demands of each activity and your body positioning/body mechanics. What are some of the physical/ environmental barriers you will encounter?
Some Suggested Environments to Consider:
● Work: What does your job require your body to do (standing for too long, lifting, bending, etc.)? What body positions does it put you in? What type of chair do you have (casters/wheels)?
● Places of worship: Pews or theater-style seats may be too low. Older churches may not have handicap accessible bathroom stalls. Are there other chair options?
● Favorite restaurants: Seats, chairs with casters, chairs vs. booths, accessibility of toilets
● Homes of friends or family members’ home you frequently visit: Do they have stairs/steps, even if you don’t? Are there appropriate chairs to sit in? What about a secondary residence to which you might be returning or vacationing?
● Fitness centers (or home gyms): What type of work-out routines do you do? What machines/equipment are used?
● Movie theaters, concert halls, hair dresser/barber shop, etc.
Night Before Surgery
Special Instructions
You will be instructed by your physician about medications, skincare, showering, etc.
● Pack a suitcase with clothes for your hospital stay. Loose-fitting shorts or capris are preferred; no long pants.
● Please leave jewelry, valuables and large amounts of money at home.
Do Not Eat or Drink
● Do not eat or drink anything after midnight.
● No chewing gum.
Showering
● At your pre-op appointment at AdventHealth, you will receive Chlorhexidine wipes and an instruction sheet to guide you through using them the night before and the morning of your surgery. See page 15 for instructions.
Morning and Day of Surgery
Special Instructions
You will be instructed by your physician about medications, skin care, showering, etc.
● DO NOT take medication for diabetes on the day of surgery.
● Please take medications for your heart, thyroid or blood pressure the morning of surgery. Taking the medication with a sip of water is okay.
● Arrive on time. If you are late, it could result in having to move your surgery to a much later time.
Do Not Eat or Drink
● Do not eat or drink anything after midnight. No chewing gum.
Showering
● Do not bathe with soap or shampoo. Use the Chlorhexidine Prep again. See the following page for instructions.
● Do not wear any makeup or apply lotion.
What
to Bring to the Hospital
● Personal hygiene items are available at the hospital. Please make sure you pack shorts, tops, well- fitted slippers and flat shoes or tennis shoes.
● For safety reasons, DO NOT bring electrical items. You may bring battery-operated items.
● Bring any assistive devices (rolling walker/cane/etc.) to the hospital so we may inspect it for safety and adjust it to fit your height.
● You must also bring the following to the hospital:
A copy of your advance directives (See Appendix D for information)
Your insurance card, prescription card, driver’s license or photo I.D. and any co-payment required by your insurance company
CPAP or Bi-PAP machine if needed
This book
Pre-Operative Shower Instructions
Instructions for Pre-Operative Showers with a Chlorhexidine Prep Wipes (Hibiclens)
Evidence shows that pre-operative showers with an antiseptic solution can reduce the risk of infection at the surgical site. These showers decrease the number of normal bacteria on your skin, thus reducing the risk of infection.
You will perform these showers the night before and the morning of surgery.
Take a shower and wash your entire body in the following manner:
● Shower and shampoo your hair and dry off completely before using the cloths.
● Use ONE cloth per body area (body areas will be listed in the instructions with the wipes), then throw the cloth away. DO NOT FLUSH THE CLOTHS.
● DO NOT rinse your skin after using the cloths. Your skin may feel sticky for 1-2 minutes after using. This will go away after the solution dries on the skin.
● Follow these steps the evening before your surgery and again the morning of your surgery.
● DO NOT use deodorant or lotion the morning of your surgery.
● If you develop a rash, redness or itching, rinse your skin completely and stop using the cloths. Notify your nurse and/or physician when you are in pre-op on the morning of your surgery.
Chlorhexidine wipes and instructions should be provided to you at your pre-testing appointment.

Hospital Care | Discharge Planning
Included in this section:
Day of Surgery
● An overview of what to expect before surgery
● Recovering immediately after surgery
● Care after recovery
Day After Surgery
Handwashing
Criteria for Discharge
Coach’s Checklist
● A checklist to help your coach prepare for leaving the hospital
Discharge Instructions
● Information about physical therapy and follow-up care
● A list of items you should have in your possession before discharge
● What to watch for after discharge
Going Home
● Easing your transition home
● Medical equipment

Day of Surgery
Before Surgery in the Pre-Operative Unit
You will be prepped for surgery; an IV will be started; your skin will be cleansed with Chlorhexidine Prep; you will meet with your operating room nurse, anesthesiologist* and surgeon.
*Your anesthesiologist will make the final decision on the type of anesthesia that is best suited for you. For information about the different types of anesthesia and what to expect before, during and after your surgery, please refer to Appendix E .
Immediately After Surgery
You will be taken to a recovery area (PACU – Post-Anesthesia Care Unit) where you may remain for one to three hours. During this time, pain control is typically established, and your vital signs are monitored. You may have the following equipment:
● Sequential compression devices (SCD) - Used to prevent blood clots
● TED hose - Used to prevent blood clots and minimize swelling
● Incentive spirometer - Used to prevent pneumonia
● Drains - Drains may be placed to reduce swelling at the physician’s discretion
● Foley catheter - May be placed in your bladder to drain your urine and will be removed the day after surgery
● Cryotherapy Machine - pad that circulates cold fluid will be placed over your knee or hip to reduce swelling and pain
The recovery team will keep your family updated on your progress.
After Recovery
You will be taken to post-op/phase II area or to an inpatient room on the third floor of the hospital.
● You should also begin using your incentive spirometer and doing the deep breathing exercises that you learned in class.
● You can expect to be assisted out of bed.
● You will be receiving pain medication as tolerated.
● It is very important that you begin ankle pumps on this first day. This will help prevent blood clots from forming in your legs.
● Your physician may start you on a blood thinner after surgery to prevent blood clots.
● Your surgeon expects you to be out of bed on the first day of surgery.
Same Day Discharge:
Most of our patients having total joint replacement surgery go home the same day of their surgery. If your surgeon determines it is safe for you to go home, you will be taken to the phase II post-op area to get ready to go home.
Advantages:
● You will get better rest at home in your own bed.
● You will have a more comfortable car ride home due to the spinal block still working.
● You will be in a much quieter and less disturbing environment.
● The risk for coming in contact with harmful germs/ bacteria is much less at home than in the hospital.
● Your family can bring your walker into the post-op area so that you may work on safe ambulation with our team prior to going home.
● Our nursing team will make sure your pain is managed well and you are able to tolerate food and drink before going home.
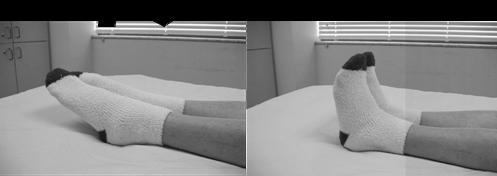
Ankle
Pumps:
Flex foot. Point toes. Repeat.

For patients who stay the night in the hospital:
Day After Surgery
Post-Operative Day One
Your morning will start early.
● Labs may be drawn
● Vital signs taken
● Bathing/dressing with help
● Help out of bed and into a chair
● Visit from surgeon or nurse practitioner
● Physical therapy assessment
● Walking with physical therapist
Most patients will discharge after their morning Physical Therapy and Occupational Therapy sessions.
Make sure your coach is available to provide transportation home. You should plan for that transportation to be in the late morning or early afternoon.
Handwashing
When should you clean your hands?
● Before preparing or eating food
● Before touching your eyes, nose or mouth
● Before and after changing wound dressings or bandages
● After using the restroom
● After blowing your nose, coughing or sneezing
● After touching hospital surfaces such as bed rails, bedside tables, doorknobs, remote controls or the phone
How should you clean your hands?
● With an alcohol-based hand sanitizer:
1. Put the product on your hands and rub them together.
2. Cover all surfaces until hands feel dry.
3. This should take around 20 seconds.
● With soap and water:
1. Wet your hands with warm water. Use liquid soap, if possible. Apply a nickel- or quarter-sized amount of soap to your hands.
2. Rub your hands together until the soap forms a lather and then rub all over the top of your hands, in between your fingers and the area around and under the fingernails.
3. Continue rubbing your hands for at least 15 seconds. Need a timer? Imagine singing “Happy Birthday” twice.
4. Rinse your hands well under running water.
5. Dry your hands using a paper towel, if possible. Then use your paper towel to turn off the faucet and open the door if needed.
Criteria for Discharge
You will be able to go home when you have met the following criteria:
Cleared by physical therapy for safety
Cleared by the orthopedic team
Pain is managed
Coach’s Discharge Checklist
Coaches, are you ready for discharge day? Before patient discharge, we want to make sure you are comfortable and know the following:
What blood thinner is your loved one going home on? (See Appendix E )
Is there a surgical dressing? If so, when does it need to be changed?
The signs and symptoms of infection?
How to assist the patient in and out of bed?
The exercise program to follow at home?
How to assist the patient up and down stairs?

If you have any questions or concerns, please do not hesitate to ask a member of the joint care team prior to discharge.
Discharge Instructions
Congratulations, you have just received a new joint!
Here is a list of things that should be in place or your possession prior to your discharge:
1. You will need physical therapy after your discharge. This should be scheduled two to three times a week. (Your care manager may help set this up or you might receive a prescription from the physician.)
2. You will get prescriptions for pain medication and blood thinner. You may be discharged on aspirin 81 mg twice a day for four weeks or Xarelto daily for 21 days.
3. You will need prescriptions for any new medications since your surgery.
4. You should continue taking a stool softener until you are no longer on pain medication (ex. Colace, Senokot S). It is important to maintain a good bowel program since constipation can occur because of the pain medications.
5. You will need a follow-up appointment in the surgeon’s office. If you are unsure of your follow-up appointment, please contact the surgeon’s office after discharge.
If you are leaving the hospital and going to a rehab facility, please have them bring you to your follow-up appointment unless you have been seen by your surgeon in the rehab center.
Physical Therapy
● You may be referred to Physical Therapy to continue the rehab started while in the hospital.
● Your therapy program is one of the most critical components of your recovery from total joint replacement surgery and is key to helping you achieve your best long-term outcome!
● Therapists are specially trained to assist you in recovery with specific activities, exercises and instructions.
● You may be referred to outpatient physical therapy vs home health physical therapy.
Candler | 828-670-7726
Biltmore Village | 828-209-5300
Laurel Park | 828-694-6722
East Asheville | 828-298-4720
South Asheville | 828-687-4545
Fletcher | 828-681-2162

Things to Watch for After Discharge
1. If you suddenly begin to run a fever greater than 100.4˚ F, call your surgeon.
2. If you have significant drainage from your wound after discharge or an increase in redness and swelling, call your surgeon.
3. If you experience a sudden onset of calf pain, especially if the calf pain is in the non-operative leg, call your surgeon.
4. If you experience sudden chest pains or shortness of breath, call 911.
Going Home
It is our goal to transition you from hospital care to an environment that is safe and will ensure you have a rapid recovery.
● Speak with your surgeon’s team regarding getting walkers and any other equipment you may need at home.
You will need:
● Two-wheeled walker
Must walk with a rolling walker for two weeks post-op
● Elevated toilet seat
● Shower chair
● Bedside commode
Your Surgeon’s office will help set up your Home Health and Physical Therapy services for you after discharge. Speak with the EmergeOrtho staff when you see your doctor for your pre-op visit.
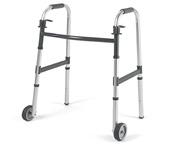
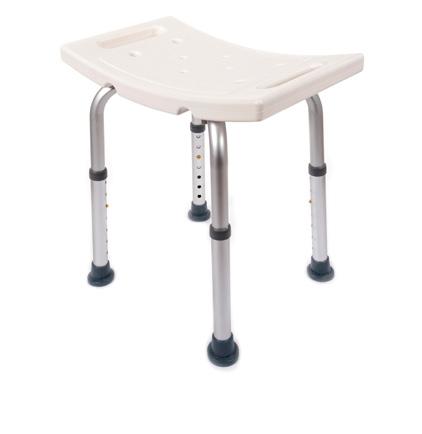
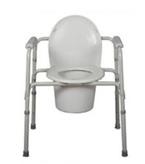
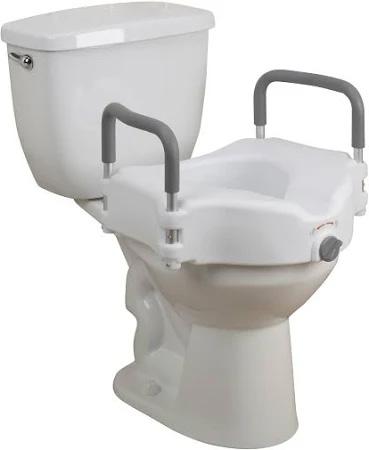

Two-Wheeled Walker 3-in-1 Commode
Shower Chair Elevated Toilet Seat
Post-Operative/Home Care
Included in this section:
Caring for Yourself at Home
● Basic patient activity
● Dressings and incision care
● Managing discomfort
● Body changes
● Stockings
● Total knee arthroplasty (TKA) protocol
Recognizing and Preventing Potential Complications
● Infections
● Blood clots
● Pulmonary embolus
Activity Guidelines and Goals
● Easy view chart to help track where you should be during:
• Weeks One to Two
• Weeks Two to Three
• Weeks Four to Six
Frequently Asked Questions
● Commonly asked questions after surgery

When you go home, there are a variety of things you need to know for your safety, your recovery and your comfort.
Caring for Yourself at Home
What you can do at home:
● Ankle pumps (See Appendix A )
● Deep breathing (incentive spirometry – you will take this home)
● Do three to four deep breaths every 30 to 60 minutes while awake.
● Patients who have had a total knee replacement (TKA) will need to have below knee TED hose on their non-operative leg. Please remove TED hose/ACE wrap for two hours per day. If walking on your own, you do not need to wear the TED hose.
● You may shower per the instructions in the “Caring for Your Incision” section below. If you do get the incision wet, pat it dry with a clean towel.
● You should continue taking a stool softener (i.e. Senokot S, Colace) until you are no longer on prescription pain medication. It is important to maintain a good bowel program since constipation can occur.
● See Appendix B for information and examples on proper body positioning when sitting down, standing up and lying down.
● You should plan on getting up every two hours and moving around.
Dressings
Refer to your Surgeon’s specific instructions if they differ from the information below.
● Your incision will be covered with a waterproof dressing. It is OK to shower with dressing in place. Note: the dressing is “water resistant” and not truly “waterproof.” Pat dry after showering.
● Change dressing as instructed by your surgeon. If you have any questions about dressing changes, please call your surgeon doctor at 828-258-8800.
● DO NOT submerge the incision for at least 6 weeks. (no bathtubs, hot tubs, swimming pools, etc.)
● Do not apply lotion, soaps, creams, or ointments on the incision.
● If there are Steri-Strips in place, do not pull them off. Leave them alone until they fall off on their own.
● Do not trim incision sutures. Usually there are no sutures to remove.
Caring for Your Incision
● Keep your incision dry.
● Notify your surgeon if there is increased drainage, redness, pain, odor or heat around the incision.
● Take your temperature if you feel warm or sick. Call your surgeon if it exceeds 101.4° F.
Control Your Discomfort
● Take pain medicine at least 30 minutes before physical therapy.
● Gradually wean yourself from prescription medication to a non-prescription pain reliever. You may take two extra-strength Tylenol tablets in place of your prescription medication, or Ibuprofen, if approved by your physician, up to four times per day.
● Change your position every 45 minutes throughout the day.
● Use ice for pain control.
Body Changes
● Your appetite may be poor. Drink plenty of fluids to keep from getting dehydrated. Your desire for solid food will return.
● You may have difficulty sleeping, which is normal. Do not sleep or nap too much during the day.
● Your energy level will be lower than normal for at least the first month.
● Narcotic pain medication can cause constipation. Use stool softeners or laxatives if necessary.
Stockings/TED Hose/Ace Wraps
You may be asked to wear special stockings or Ace wraps. These are used to help compress the veins in your legs to keep swelling down and reduce the chance for blood clots.
● If swelling in the operative leg is bothersome, elevate the leg for short periods throughout the day. It is best to lie down and raise the leg above the heart level.
● Wear the stockings continuously, removing per your surgeon’s instructions, or you are walking on your own.
● Notify your surgeon if you notice increased swelling or pain in either leg.
● Ask your surgeon when you can discontinue stockings.
Total Knee Arthroplasty (TKA) Protocol – Single and Bilateral
● Full-weight bearing. You may go from walker to cane to nothing as tolerated if you are not limping.
● Extension (stretching) exercises (See Appendix A )
● Continue exercises from therapy twice daily.
● You should see a physical therapist equal to or greater than two times a week. Ice should be used after activity, exercise or physical therapy. In addition, it may be used at any other time to assist in reducing pain and swelling.
• Remember, most of your success depends upon the effort you put into physical therapy after your discharge. Your goal for flexion (bending) your knee is at least 90 degrees. Your goal for extension (straightening) is 0 degrees by your first follow-up appointment.
Recognizing and Preventing Potential Complications
Infection
Signs of Infection
● Increased swelling and redness at the incision site
● Change in color, amount or odor of drainage
● Increased pain in incision
● Fever greater than 101.4° F
Preventing Infection
● Take proper care of your incision as directed.
● IT IS IMPORTANT TO NOTIFY your primary care physician and dentist that you have had a joint replacement before you have any dental work done. They will likely prescribe antibiotics to take before the procedure as a precaution.
● Refer to Appendix E for other procedures which you may need antibiotic protection.

Blood Clots in Legs (DVT)
Surgery may cause the blood to slow and thicken in the veins of your legs, creating a blood clot, a condition called Deep Vein Thrombosis or DVT. Therefore, blood thinners are taken after surgery. If a clot occurs despite these measures, you may need to be admitted back to the hospital.
(See Appendix E for more information about blood thinners.)
Signs of Blood Clots in Legs
● Swelling in thigh, calf or ankle that does not go down when raised above heart level.
● Pain, heat and tenderness in calf, back of the knee or groin area. Blood clots can form in either leg.
Prevention of Blood Clots
● Ankle pumps (right and left sides)
● Walking
● Compression stockings
● Blood thinners
Pulmonary Embolus (PE)
An unrecognized blood clot could break away from the vein and travel to the lungs. This is an emergency, and you should CALL 911 if suspected.
Signs of Pulmonary Embolus
● Sudden chest pain
● Sweating
● Difficult and/or rapid breathing
● Confusion
● Shortness of breath
Preventing Pulmonary Embolus
● Prevent blood clot in legs
● Recognize a blood clot in the leg and call physician promptly
Post-Operative Guidelines and Goals
Day of surgery : walk 30 feet with assistance using walker
Discharge home afternoon after surgery : walking 100 to 300 feet using walker
Week 1 Week 2
ROM (Range of Motion) 0 to 100 degrees 0 to 120 degrees
Rest, Ice and Elevation
Activity
Doctor Appointments
Periods of rest with leg raised (at heart level) and ice applied for 30 minutes, six to eight times a day (to decrease swelling that is expected)
Take short walks often around the house with a walker
Chair exercises five times daily for flexion and extension
Periods of rest with leg raised (at heart level) and ice applied for 30 minutes, four to five times a day (to decrease swelling that is expected)
Take short walks often inside and outside the house with or without a walker
Chair exercises five times daily for flexion and extension
Perform lymph massage (see reverse side) twice per day before exercising in the morning and before going to bed at night
Two-week follow-up with orthopedic surgeon
Other
Take showers with Mepilex bandage in place until after post-operative day 5
You may begin driving when no longer taking narcotic pain medications
Remove TED hose at night before bed and replace in the morning
Week 3 to 4
0 to 120 degrees
Week 4 to 8
0 to 130 degrees
Start stationary bike riding, golfing or dancing; NO high impact activities Walk long distances without tiring
Chair exercises 5 times daily for flexion and extension
Return to work; this will vary from patient to patient
Self-directed exercises, strengthening and stretching become normal exercises for the rest of your life
Six-week follow-up with orthopedic surgeon
You no longer need narcotic pain medication; over-the-counter medications only 6 months: Follow up with your orthopedic surgeon
Not all patients progress the same. Limits due to medical conditions, elasticity of tendons and muscles and extent of surgery will impact individual progress.
Frequently Asked Questions
Will I need help at home?
Yes, the first several days or weeks, depending on your progress, you will need someone to assist you with meal preparation, etc. Preparing ahead of time, before your surgery, can minimize the amount of help needed. Having the laundry done, house cleaned, yard work completed, clean linens put on the bed and single portion frozen meals can reduce the need for extra help.
How long until I can drive and get back to normal?
If surgery was on your right leg, driving could be restricted up to six weeks. If surgery was on your left leg, and you have an automatic transmission, you could be driving in two weeks. Getting back to “normal” will depend on your progress. You must be off pain medications before you start driving again.
When will I be able to get back to work?
Most people take at least one month off from work, unless their jobs require a lot of sitting (desk job/ receptionist), and they can return to work with an assistive device. An occupational therapist or physical therapist can help make suggestions for joint protection and help you save your energy while on the job.
How often will I need to be seen by my physician following the surgery?
You will be seen for your first post-operative office visit two weeks after discharge. The number of follow-up visits will depend on your progress. Many patients are seen at six weeks, twelve weeks, one year and then every couple of years. (See Appendix C for more information about long term follow-up care.)
Are there any permanent restrictions following this surgery?
Yes, high-impact activities such as running, singles tennis and basketball are not recommended. Injury-prone sports such as downhill skiing are also restricted.

What physical/recreational activities may I participate in after my surgery?
You are encouraged to participate in low-impact activities such as walking, dancing, golfing, hiking, swimming, bowling and gardening at your surgeon’s discretion. Make sure that you check with your surgeon before beginning any of these activities.
I have noticed swelling in my knee and/or ankle. Is that normal?
It can be normal to have swelling in your knee and ankle after joint replacement surgery. Apply ice to the affected area and elevate your leg. If swelling does not improve or you are concerned about it, please call your physician.
When will my staples be removed?
Your staples are usually removed at your first office visit around the two week mark.
I have noticed a large amount of bruising/blisters on my leg. Is that normal?
It is very common for patients to have bruising and/or blisters after joint replacement surgery. It is important to not pop the blisters and keep them covered. If you experience bruising, keep an eye on them, and notify the surgeon if they become warm or hard.
I am having trouble sleeping. What can I take?
It is a very common occurrence to have difficulty sleeping for a few weeks after your surgery.Apply ice to your knee before bed. Try to leave it on for about 30 minutes. Try adjusting your routines at night. Your sleeping patterns will improve as time goes on.


Appendices
Appendix A
● Exercises Before Surgery
● Exercises After Surgery
● Additional Exercises
Appendix B
● Proper Positioning After Surgery
● Daily Living Activities
Appendix C
● Follow-Up Care
Appendix D
● Advance Directives
Appendix E
● Anesthesia
● Blood Thinners
● Antibiotic Protection
Appendix F
● Nutrition and Surgery
● Nutrient Requirements Pre/Post-Surgery
● Nutritional Sources
Exercises Before Surgery
Should be done a minimum of twice per day
1. Ankle Pumps
● Flex foot. ● Point toes. ● Repeat 20 times.


2. Armchair Push-Ups
This exercise will help strengthen your arms for walking with crutches or a walker.
● Sit in an armchair.
● Place hands on armrests.
● Straighten arms, raising your bottom up off chair seat if possible. (Feet should be flat on floor.)
● Repeat 20 times.
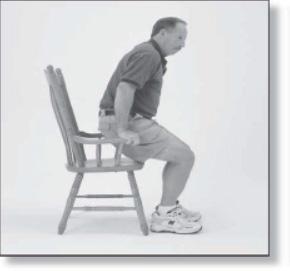
Exercises Before Surgery
Should be done a minimum of twice per day
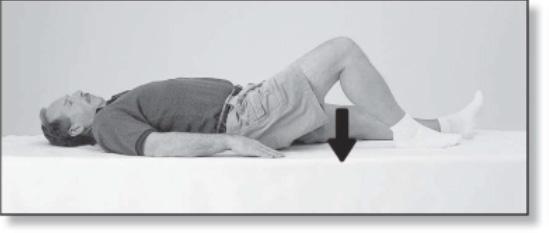
3. Quad Sets — Knee Push-Downs
● Lie back.
● Press knee into mat, tightening the muscles on the front of thigh.
● Do NOT hold breath.
● Repeat 20 times.
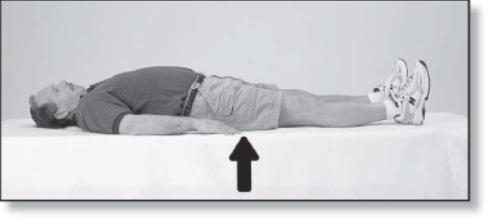
4. Gluteal Sets — Bottom Squeezes
● Squeeze bottom together.
● Relax.
● Do NOT hold breath.
● Repeat 20 times.
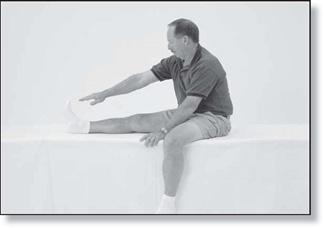
5. Seated Hamstring Stretch
● Sit on couch or bed with leg extended.
● Lean forward and pull ankle up.
● Stretch until pull is felt.
● Hold for 20 to 30 seconds.
● Keep back straight.
● Relax.
● Repeat five times.
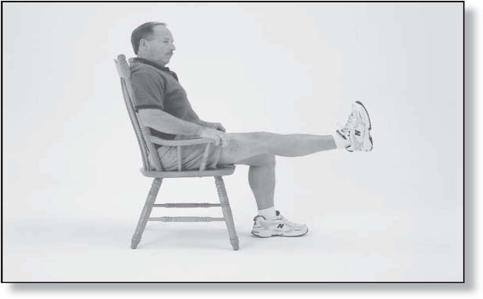
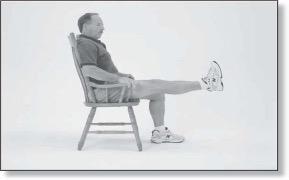
6. Knee Extension – Long Arc
● Sit with back against chair.
● Straighten knee.
● Repeat 20 times.
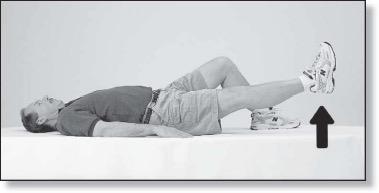
7. Straight Leg Raises
● Lie on back.
● Keep the good knee bent and foot flat.
● Lift surgical leg up approximately 12 inches.
● Keep knee straight and toes pointed up.
● Repeat 20 times.

Exercises After Surgery (In Hospital and One to Two Weeks After Surgery)
Should be done every day, twice per day
1. Extension Stretch
● Prop foot of operated leg up on chair.
● Slide your bottom forward slightly in the chair.
● Place a towel roll under your ankle as needed.
● Place ice pack and 5 to 10 lbs of weight on top of knee (a 5 to 10 lb bag of rice works well).
● Do for a maximum of 20 minutes, 5 times per day.
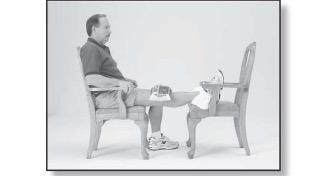
2. Seated Knee Flexion – Knee Bending
● Sitting in a straight back chair, cross leg with operated leg on the bottom.
● Slide feet underneath chair, gently stretch, and bend knee as far as possible.
● Then plant your foot and slide your bottom forward on chair.
● Hold stretch for 30 seconds, and repeat 20 times.
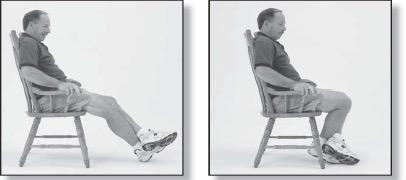


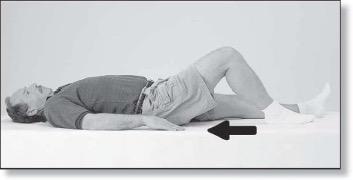
3. Heel Slides – Slide Heels Up and Down
● Lie on couch or bed.
● Slide heel toward your bottom.
● Repeat 50 times.
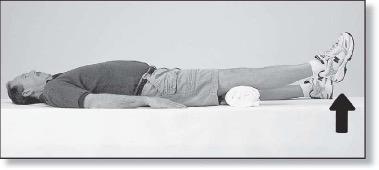
4. Short Arc Quads
(Post-Operative ONLY)
● Lie on back and a place towel roll under thigh of operated leg.
● Lift foot, straightening knee. Do not raise thigh off roll.
● Repeat 20 times.
Additional Exercises
As you progress at home, your therapist may have you complete additional exercises to further enhance your recovery. After your therapy session, ask your therapist to mark the appropriate exercises in your book.
1. Straight Leg Raises
● Lie on back with unaffected knee bent and foot flat.
● Lift the surgical leg up 12 inches. Keep knee straight and toes pointed up.
● Relax.
● Repeat 20 times.
2. Knee Extension — Long Arc
● Sit straight with back against chair.
● Straighten knee.
● Repeat 20 times.
3. Prone Knee Flexion Stretch
● Lie on stomach. (Put a pillow under your stomach if this bothers your back.)
● Bring heel towards buttocks as far as possible.
● Bring heel back down to the floor.
● Repeat 20 times.

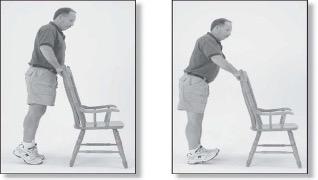
4. Ankle Dorsiflexion
— Plantar Flexion
● While standing, hold on to a firm surface.
● Raise up on toes.
● Go back on heels.
● Repeat 20 times.

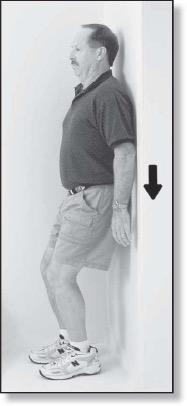
5. Quarter Squat
Note: Please do these with your therapist first.
● With feet shoulder-width apart and back to wall, slide down wall until knees are at 30 to 45° of bend.
● Return to upright position.
Caution: You should not bend knees enough to cause pain.
6. Marching
● While standing, march in place.
● Hold on to a firm surface for balance.
● Have therapist write in length of time:


Additional Exercises
As you progress at home, your therapist may have you complete additional exercises to further enhance your recovery. After your therapy session, ask your therapist to mark the appropriate exercises in your book.
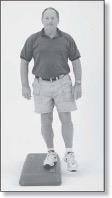
7. Single Leg Step-Up
Note: Please do these with your therapist first.
● Use a step or book. (Height of step will depend on your strength.)
● Start slow.
● You may exercise your good leg as well.
● With foot of surgical leg on step, straighten that leg.
● Return.
● Repeat times.
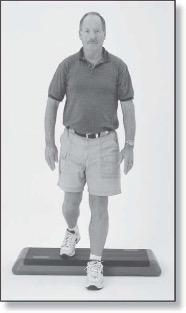
8. Retro Leg Step-Up
Note: Please do these with your therapist first.
● Use a step or book. (Ask therapist how high it should be.)
● Step up/backwards with one foot, then the other.
● Step off/forward in the same way.
● Repeat times.
Appendix B
Proper Positioning After Surgery
Lying in Bed
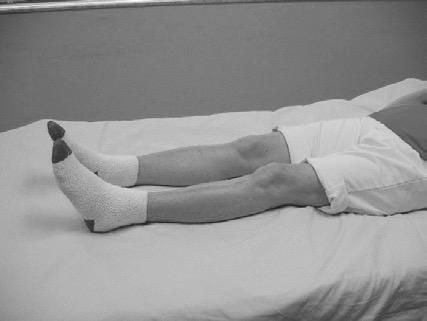
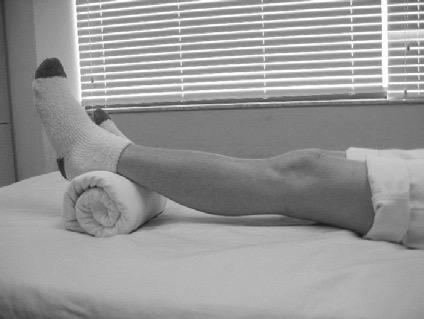
When lying in bed, keep knee straight. Avoid putting a pillow underneath your knee. The knee should be kept as straight as possible. You can place a small pillow under your ankle to assist in straightening.
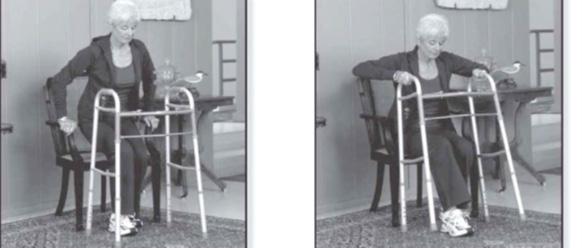
Standing Up from Chair
Do NOT pull up on the walker to stand!
Sit in a chair with arm rests when possible.
1. Scoot to the front edge of the chair.
2. Push up with both hands on the armrests. If sitting in a chair without armrest, place one hand on the walker while pushing off the side of the chair with the other.
3. Balance yourself before grabbing for the walker.

Daily Living Activities
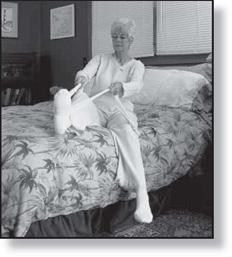
Transfer - Bed
Getting into bed:
1. Back up to the bed until you feel it on the back of your legs (you need to be midway between the foot and the head of the bed). Slide operated leg out in front of you when sitting down.

2. Reaching back with both hands, sit down on the edge of the bed and then scoot back toward the center of the mattress. (Silk pajama bottoms, satin sheets or sitting on a plastic bag may make it easier.)
3. Move your walker out of the way, but keep it within reach.
4. Scoot your hips around so that you are facing the foot of the bed.
5. Lift your leg into the bed while scooting around (if this is your operated leg, you may use a cane, a rolled bed sheet, a belt or your theraband to assist with lifting that leg into bed).
6. Keep scooting and lift your other leg into the bed.
7. Scoot your hips towards the center of the bed.
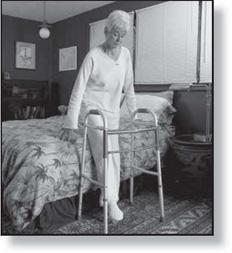
NOTE: DO NOT CROSS YOUR LEGS to help the operated leg into bed.
Getting out of bed:
1. Scoot your hips to the edge of the bed.
2. Sit up while lowering your non-surgical leg to the floor.
3. If necessary, use a leg-lifter to lower your surgical leg to the floor.
4. Scoot to the edge of the bed.
5. Use both hands to push off bed. If the bed is too low, place one hand in the center of the walker while pushing up off the bed with the other.
6. Balance yourself before grabbing for the walker.
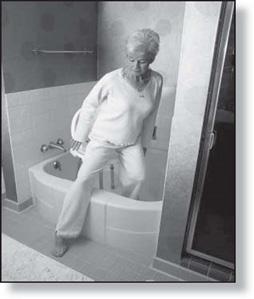
Transfer - Tub
Getting into the tub using a bath seat:
1. Place the bath seat in the tub facing faucets.
2. Back up to the tub until you can feel it on the back of your knees. Be sure you are in front of the tub bench.
3. Reach back with one hand for the bath seat. Keep the other hand in the center of the walker.
4. Slowly lower yourself onto the bath seat, keeping the surgical leg out straight.
5. Move the walker out of the way, but keep it in reach.
6. Lift your legs over the edge of the tub, using a leg lifter for the surgical leg, if necessary.
Getting out of the tub using a bath seat:
1. Lift your legs over the outside of the tub.
2. Scoot to the edge of the bath seat.
3. Push up with one hand on the back of the bath seat while holding on to the center of the walker with the other hand.
4. Balance yourself before grabbing the walker.
Transfer - Automobile
1. Push the car seat all the way back; recline it if possible, but return it to the upright position for traveling.
2. Place a plastic trash bag on the seat of the car to help you slide and turn frontward.
3. Back up to the car until you feel it touch the back of your legs.
4. Reach back for the car seat and lower yourself down. Keep your operated leg straight out in front of you, and duck your head so that you don’t hit is on the door frame.
5. Turn frontward, leaning back as you lift the surgical leg into the car.
Appendix C
Follow-Up Care
The Importance of Lifetime Follow-Up Visits
Over the past several years, orthopedic surgeons have discovered that many people are not following up with their surgeons regularly. The reason for this may be that they do not realize they are supposed to or they do not understand why it is important.
So, when should you follow up with your surgeon? These are some general rules:
● As instructed by your physician (every one to two years)
● Anytime you have mild pain for more than a week
● Anytime you have moderate or severe pain
There are two good reasons for routine follow-up visits with your orthopedic surgeon:
1. Why? Two things could happen. Your hardware could become loose, and this might lead to pain. Or, the changes in the cement could cause a reaction in the bone called osteolysis, which may cause the bone to thin out and cause loosening. In both cases, you might not know this is happening for years. Orthopedists are continually learning more about how to deal with both problems. The sooner we know about potential problems, the better chance we have of avoiding more serious problems.
2. The second reason for follow-ups is that the plastic liner in your knee may wear. Little wear particles combine with white blood cells and may get in the bone and cause osteolysis, similar to what can happen with cement. Treatments and procedures are available to keep this from worsening, but your surgeon must know about the problems.
X-rays taken at your follow-up visits can detect these problems. Your new X-rays can be compared with previous films to make these determinations. This should be done in your physician’s office.
We are happy that most patients do so well they do not often think of us. However, we enjoy seeing you and want to continue to provide you with the best care and advice. If you are unsure how long it has been or when your next visit should be scheduled, call your physician. We will be delighted to hear from you.

Advance Directives
Exercise your right. Put your health care decisions in writing.
It is our policy to place patients’ wishes and individual considerations at the forefront of their care and to respect and uphold those wishes.
What are advance medical directives?
Advance directives are a means of communicating to all caregivers the patient’s wishes regarding health care. If a patient has a living will or has appointed a health care agent and is no longer able to express his or her wishes to the physician, family or hospital staff, the medical center is committed to honoring the wishes of the patient as they are documented at the time the patient was able to make that determination.
There are different types of advance directives, and you may wish to consult your attorney concerning the legal implications of each.
Living wills are written instructions that explain your wishes for health care if you have a terminal condition or irreversible coma and are unable to communicate.
Appointment of a health care agent (sometimes called a medical power of attorney) is a document that lets you name a person (your agent) to make medical decisions for you, if you become unable to do so.
Health care instructions are your specific choices regarding use of life sustaining equipment, hydration and nutrition, and use of pain medications.
Upon admission to the hospital, you will be asked if you have an advance directive. If you do, please bring copies of the documents to the hospital with you so they can become a part of your medical record. Advance directives are not a requirement for hospital admission.
Appendix E
Anesthesia
What types of anesthesia are available?
Decisions regarding your anesthesia are tailored to your personal needs. The types available for you are:
● General anesthesia provides loss of consciousness.
● Regional anesthesia involves the injection of a local anesthetic to provide numbness, loss of pain, or loss of sensation to a large region of the body. Regional anesthetic techniques include spinal blocks, epidural blocks and saphenous nerve blocks. In some cases, general anesthesia and regional anesthesia are done in conjunction with each other.
Will I have any side effects?
Your anesthesiologist will discuss the risks and benefits associated with the different anesthetic options as well as any complications or side effects that can occur with each type of anesthetic. Nausea or vomiting may be related to anesthesia or the type of surgical procedure. Medications to treat nausea and vomiting will be given if needed.
The amount of discomfort you experience will depend on several factors, especially the type of surgery. Your pain discomfort should be minimal, but do not expect to be totally pain-free. The staff will teach you the pain scale (0-10) to assess your pain level.
What will happen before my surgery?
You will meet your anesthesiologist immediately before your surgery. Your anesthesiologist will review all information needed to evaluate your general health. This will include your medical history, laboratory test results, allergies and current medications. With this information, the anesthesiologist will determine the type of anesthesia best suited for you. If a regional anesthetic is to be used, it will be done in the pre-operative area. He or she will also answer any further questions you may have.
What happens during surgery/anesthesia?
Your anesthesia will be provided by an anesthesia care team. An anesthesiologist with a certified registered nurse anesthetist (CRNA) will provide your care while in the operating room. They will monitor your vital signs (blood pressure, heart rate and oxygen level) during surgery and administer any medications necessary to provide you a safe surgical procedure.
What can I expect after the operation?
After surgery, you will be taken to the Post-Anesthesia Care Unit (PACU) where specially-trained nurses will watch you closely.
Blood Thinners
The surgeon will place you on an anticoagulant, also called a blood thinner, to assist in preventing patients from forming blood clots. Most patients will go home on a blood thinner. The specific medication will be decided by your surgeon based on your medical history and physician preference.
Medication Purpose
Blood Thinners
Medication Names: Generic (Brand) Most Common Side Effects
Oral Blood Thinners
● Aspirin
● Rivaroxaban (Xarelto®)
● Apixaban (Eliquis®)
● Risk of bleeding
● Upset stomach
● Bruising
● Burning at injection site
● Decrease in platelets
Tell your nurse or physician if you notice any bleeding or black-colored stools.
Antibiotic Protection
Antibiotic Protection for Implanted Joint Prosthetics
Reduce the chance of infection by following our infectious precautions. These instructions are written for your dentist and treating physician to follow. An untreated infection elsewhere in your body may spread to your joint replacement.
Teeth cleaning, fillings:
Amoxicillin, 2 grams one hour prior to the procedure
Dental extractions, root canal:
Same as above.
Urinary tract procedures (cystoscopy, transurethral resection of prostate (TURP)):
Ampicillin, 2 grams plus gentamicin 80 mg IV or by injection one half hour prior to procedure
Ampicillin, Vancomycin, Gentamicin given by IV or injection MUST be administered and prescribed by your treating physician.
Nutrition and Surgery
It is important to eat properly prior to and after surgery so that your body has the optimal nutrition to heal. You will have more strength to move, sit up and walk, as well as have an increased ability to resist any potential infection.
Follow these guidelines to prepare yourself nutritionally for surgery:
● Eat balanced meals, using the Food Guide Pyramid as a reference for choosing a healthy diet. The Food Guide Pyramid recommends six to 11 servings from the bread, cereal, rice and pasta group, three to five servings from the vegetable group, two to four servings from the fruit group and two to three servings from the meat, poultry, fish, dry beans, eggs and nuts group. It is recommended that fats, oils and sweets be used sparingly.
● Be sure you get enough calories and protein. If necessary, use a supplement such as milkshakes, Ensure, Boost, Carnation Instant Breakfast, etc. to add to your caloric and protein intake.
● If you are on a special diet, such as low fat for heart disease, or a calculated calorie/carbohydrate diet for diabetes, continue to follow your diet. Please be sure to inform your nurse of any dietary requirements you might have.
● Do not try to lose weight in the weeks before surgery. If you have been instructed by your surgeon to lose weight, please make an appointment with the dietitian to get information about the best way to lose weight without putting yourself at risk. In the days prior to your surgery, eat a well-balanced diet. The day prior to your surgery, eat light, low-fat meals during the day, but be sure to get enough calories. Avoid foods that can cause constipation or those that can produce gas.
To help minimize discomfort or constipation after surgery, try to have a bowel movement on the day before your surgery.
Below is a list of common gas forming foods. Try to minimize your intake of:
● Apples
● Avocados
● Beans (kidney, lima and navy)
● Broccoli
● Brussel sprouts
● Cabbage
● Cantaloupe
● Cauliflower
● Corn
● Cucumbers
● Honeydew melon
● Leeks
● Lentils
● Onions
● Peas (split or black-eyed)
● Peppers (green)
● Pimentos
● Radishes
● Rutabagas
● Sauerkraut
● Shallots
● Soybeans
● Turnips
Pre/Post–Surgery
Nutrient Requirements
How Much/ Day
65 –100 grams
25 –40 grams
Found in these Common Foods:
Meat, poultry, fish, eggs, milk, cheese, legumes, (dried beans, ie: kidney beans, lentils, chickpeas), soy products, nuts, seeds
Fruits, vegetables, legumes (bean)s, bread, cereal, rice, pasta, grains
Bran, vegetables, (cauli fl ower, broccoli, cabbage) fruits (prunes, berries, bananas), beans
Oils (olive, canola, sun fl ower), nuts, seeds, avocado, salad dressings, margarine, butter
18 mg
1500 mg
15 mg
5000 IU
Helps Your Body With:
Healing, tissue repair and re-growth
Nutrients
Protein
Energy for healing and preventing protein/muscle breakdown
Carbohydrates
Fiber Helps prevent constipation
Absorption of fat-soluble vitamins, immune response, energy
Lipids (fats)
400 –800 IU
Liver, lean red meat, poultry, fish, iron-fortified cereals, legumes, dark leafy greens, dried fruits
Iron Forming hemoglobin and carrying oxygen **best when eaten w/vitamin C rich foods
Milk, cheese, yogurt, soy products, turnip and mustard greens, collards, kale, broccoli, almonds
Meat, liver, eggs, oysters and other seafood
Carrots, sweet potatoes, dark yellow or green leafy vegetables (spinach and broccoli), milk, cheese, liver, egg yolk
Fortified milk, butter, margarine, fortified cereals, liver fatty fish (salmon), egg yolk
30 IU
80 µg men 65 µg women
60 mg
Vegetable oils (corn or sun fl ower), beef liver, milk, eggs, butter green leafy vegetables, fortified cereals
Green leafy vegetables, fatty fish, liver, vegetable oil
Citrus fruits, strawberries, tomatoes, peppers, greens, raw cabbage, melon
Calcium Building/maintaining bones and muscle contraction
Zinc Helps in wound healing, component of enzymes
Vitamin A Helps in wound healing and growth, maintenance of skin
Vitamin D Helps in bone healing and calcium absorption
Antioxidant/disease-fighting properties (do NOT take supplements BEFORE surgery)
Vitamin E
Vitamin K Helps wound healing response and blood clotting
Vitamin C Building connective tissues, essential nutrient for healing
Tips:
● If your appetite decreases after surgery, try eating smaller meals more frequently and add a protein drink between meals.
● Eat protein with every meal.
● Drink 8 cups of water daily to help prevent constipation.
Nutritional Sources
Protein Sources
1 large egg: 6 g
¼ cup egg beaters: 4.5 g
3 ounces can white tuna: 23 g
4 inch onion, sesame or poppy seed bagel: 5.4 mg
1 Boca burger patty: 13 g
3 ounces cooked lean steak: 23 g
3 ounces cooked lean roast beef: 24 g
3 ounces cooked lean pork: 24 g
4 ounces roasted chicken breast: 36 g
3 ounces roasted white meat turkey: 28 g
4 ounces cooked cod/ flounder/pollock: 28 g
Fiber Sources
1 medium artichoke: 10.3 g
½ cup navy beans: 9.5 g
½ cup black beans: 7.5 g
Apple with skin: 3.3 g
1 medium banana: 3.1 g
1 ounce almonds: 3.5 g
½ papaya: 2.8 g
½ cup green peas: 3.5 g
5 prunes: 3.5 g
½ cup canned pumpkin: 3.6 g
½ cup spinach: 3.5 g
Iron Sources
¾ cup 100% iron fortified ready to eat cereal: 18 mg
½ cup grits 7.1 mg
½ cup cream of wheat 5.2 mg
3 ounces chicken liver 10.8 mg
3 ounces canned clams 23.8 mg
3 ounces oysters 13.2 mg
1 ounce pumpkin seed 4.2 mg

Calcium Sources
½ cup fortified cereal: 200-670 mg
1 cup skim milk: 305 mg
1 cup calcium-fortified soy or rice milk: 300-370 mg
8 ounce plain or fruit yogurt: 275-450 mg
1 ounce cheese: 200-220 mg
Zinc Sources
3 ounces steamed oysters:30mg
3 ounces steamed Alaskan king crab: 6.5 mg
3 ounces roasted dark turkey meat: 3.9 mg
3 ounces roasted pork loin: 2.1 mg
1 ounce cashews: 1.6 mg
1 cup cooked brown rice: 1.1 mg
Nutritional Sources
Vitamin A Sources
¼ cup fortified egg substitute, 407 mcg
1 cup fortified skim milk: 150 mcg
1 medium egg: 84 mcg
1 ounce cheddar cheese: 90 mcg
1 ounce Swiss cheese: 84 mcg
½ cup cooked sweet potato: 11.5 mcg
1 cup fresh kale: 14.7 mcg
½ cup cooked carrots: 10.7 mcg
1 cup fresh red pepper 10.1 mcg
Vitamin D Sources
3 ounces halibut: 200 IU
3 ounces salmon: 370 IU
½ cup fortified cereal: 100 IU
1 cup milk: 125 IU
3 ounces trout: 650 IU
1 medium/large egg: 40 IU
3 ounces of canned tuna: 80 IU
1 cup cranberry juice: 90 mg
1 cup strawberries: 85 mg
1 medium navel orange: 80 mg
Vitamin E Sources
1 tablespoon corn or soybean oil: 12 mg
1 tablespoon canola or sunflower oil: 8 mg
1 cup cooked kale: 7 mg
5 ounces sweet potato: 5 mg
1 cup cooked spinach: 4 mg
1 cup blueberries: 3 mg
1 cup cooked broccoli: 2 mg
Vitamin K Sources
½ cup broccoli: 110 mcg
½ cup green beets: 350 mcg
½ cup turnip greens: 425 mcg
½ cup kale: 531 mcg
½ cup spinach: 444 mcg
½ cup Swiss chard: 287 mcg
Vitamin C Sources
3 ounces red pepper: 163 mg
3 ounces green pepper: 110 mg
½ cup black currants: 101 mg
1 cup cooked broccoli: 98 mg
1 cup orange juice: 98 mg
1 medium kiwi: 75 mg
½ medium papaya: 95 mg

